Intenza 550 Ti User manual


Thank you for purchasing Intenza product. Before installing or using the equipment, please read all
instructions carefully to ensure that you have the knowledge to safely and properly operate all of this
product’s features. The following will provide guidelines for quick set up and the correct way to use the
equipment. We hope you can achieve the product experience that you expect.
Intenza 550 series treadmill has been tested and designed to comply with the regulations for Class A
digital device and for class S, studio use. This product is in compliance with European Directives, i.e.
Machinery Directive 2006/42/EC, Low Voltage Directive 2006/95/EC. Intenza 550 series treadmill is
designed to provide you with safe, intuitive, comfortable, reliable experience, guiding you to a healthy
lifestyle.
CAUTION
Any changes or modifications to this equipment will affect the product warranty.
TRADEMARK NOTE
iPhone and iPod are trademarks of Apple Inc., registered in the U.S. and other countries.
“Made for iPod”, “Made for iPhone” mean that an electronic accessory has been designed to connect
specifically to iPod, iPhone, respectively, and has been certified by the developer to meet Apple
performance standards. Apple is not responsible for the operation of this device or its compliance with
safety and regulatory standards. Please note that the use of this accessory with iPod, iPhone may
affect wireless performance.
Made for iPhone® (iPhone 4S, iPhone 4, iPhone 3GS), iPod® (4th generation), and iPod nano® (6th
generation).

TABLE OF CONTENTS
SECTION DESCRIPTION.......................................................................... PAGES
1. IMPORTANT SAFETY PRECAUTIONS ..............................................1
2. TREADMILL OVERVIEW AND ASSEMBLY .......................................2
2.1 ASSEMBLY INSTRUCTION-550TI......................................................................................3
2.2 ASSEMBLY INSTRUCTION-550TE....................................................................................7
3. SETUP ...............................................................................................11
3.1 ELECTRICAL POWER REQUIREMENT ..............................................................................11
3.2 HOW TO STABILIZE THE INTENZA 550TI AND 550TE.......................................................11
3.3 CHECKING THE BELT.....................................................................................................12
3.4 POWER SWITCH ...........................................................................................................12
4. HOW TO USE INTENZA 550TI AND 550TE .....................................13
4.1 INTENZA 550TI INTERACTIVE CONSOLE OVERVIEW ........................................................13
4.2 INTENZA 550TE ENTERTAINMENT CONSOLE OVERVIEW..................................................15
4.3 HOW TO OPERATE MULTIMEDIA ....................................................................................16
4.4 CENTRAL CONTROL CENTER OVERVIEW........................................................................17
4.5 HOW TO EFFECTIVELY WORKOUT AT YOUR OWN LEVEL ................................................18
4.6 HOW TO PERSONALIZE YOUR WORKOUT .......................................................................19
4.7 SAVE THE WORKOUT PROFILE ......................................................................................19
4.8 HOW TO TRACK YOUR WORKOUT RECORD ...................................................................20
4.9 SETTING OF 550TI........................................................................................................22
4.10 SETTING OF 550TE......................................................................................................22
5. WORKOUT OPTIONS .......................................................................23
5.1 QUICK START ...............................................................................................................23
5.2 PRESET PROGRAM .......................................................................................................24
5.3 TARGET PROGRAM .......................................................................................................25
5.4 HRC PROGRAM ...........................................................................................................26
5.5 CUSTOM PROGRAM ......................................................................................................28
5.6 RACE PROGRAM...........................................................................................................29
5.7 FITNESS TEST ..............................................................................................................30
6. MAINTENANCE.................................................................................32
6.1 PREVENTATIVE MAINTENANCE TIPS...............................................................................32
6.2 HOW TO ALIGN THE RUNNING BELT ...............................................................................32
6.3 HOW TO TENSION THE RUNNING BELT ...........................................................................32
6.4 SELF DIAGNOSIS ..........................................................................................................33
7. TROUBLE SHOOTING......................................................................34
7.1 WHEN TO CALL FOR HELP ............................................................................................34
7.2 ERROR MESSAGE .........................................................................................................34
7.3 HOW TO USE THE SAFETY STOP PULL CORD ................................................................34
8550TI EXPLODED DRAWING & PART LIST ....................................35
9550TE EXPLODED DRAWING & PART LIST...................................36

1
1. IMPORTANT SAFETY PRECAUTIONS
Warning
zIntenza 550 series treadmill is designed for cardio vascular exercise in a commercial environment.
zHealth-related injuries may result from incorrect or excessive use of exercise equipment. Please check with
your physician prior to beginning any exercise program.
zHeart rate monitoring systems may be inaccurate. Over exercise may result in serious injury or death. If you
feel faint, stop exercising immediately.
Safety Precautions
zUnsupervised children must be kept away from this equipment.
zAssemble and operate the equipment on a stable base and properly leveled.
zKeep an open area of 6.5 feet by 3 feet (2000 mm x 1000 mm) behind the treadmill for clear of any obstructions,
including walls, furniture, and other equipment.
zAway from sources of heat, such as radiators, heat registers, and stoves. Avoid extreme temperature
changes.
zDo not use outdoors or in an enclosed swimming pool environment.
zKeep equipment away from water and moisture. Avoid dropping anything on or spilling anything inside the
equipment to prevent electric shock or damage the electronics.
zNever leave the equipment unattended when it is plugged in. Unplug the equipment from its power source
when it is not in use for a long time.
zDo not drop or insert any object, hands, or feet into any opening, or underneath the equipment.
zDo not attempt to remove the cover or modify the equipment. Service should only be done by an authorized
service technician.
zDo not use the equipment with bare feet. Wear shoes with rubber or high-traction soles. Do not use shoes
with heels, leather soles, cleats, or spikes. Make sure no stones are embedded in the soles.
zDo not operate the equipment until the defective components are repaired.
zUse the handrails whenever additional stability is required. In case of emergency, such as tripping, the user
should grab the handrails and place his/her feet on the side platforms. The handrails may be held to enhance
stability as needed, but are not for continuous use.

2
2. TREADMILL OVERVIEW AND ASSEMBLY
550Ti Overview
550Ti Part List
Open the shipping carton. Remove all parts from the carton and card boards inserts. Before you begin the
assembly, verify that the following hardware items are packed with the equipment. Please prepare and use a 6 mm
hex wrench to assemble the treadmill.
No. Part description Image QTY
1 Interactive console assembly 1
2 Console bridge assembly 1
3 Right upright post 1
4 Left upright post 1
5 Flat washer, white 14
6 Washer, star 16
7 Flat washer, black 2
8 Dome screw(White),M8*15L 14
9 M8*95L(Black) 2
Maintenance Trouble Shooting
Workout Option
Setup Introduction
Safety precaution Assembly
3
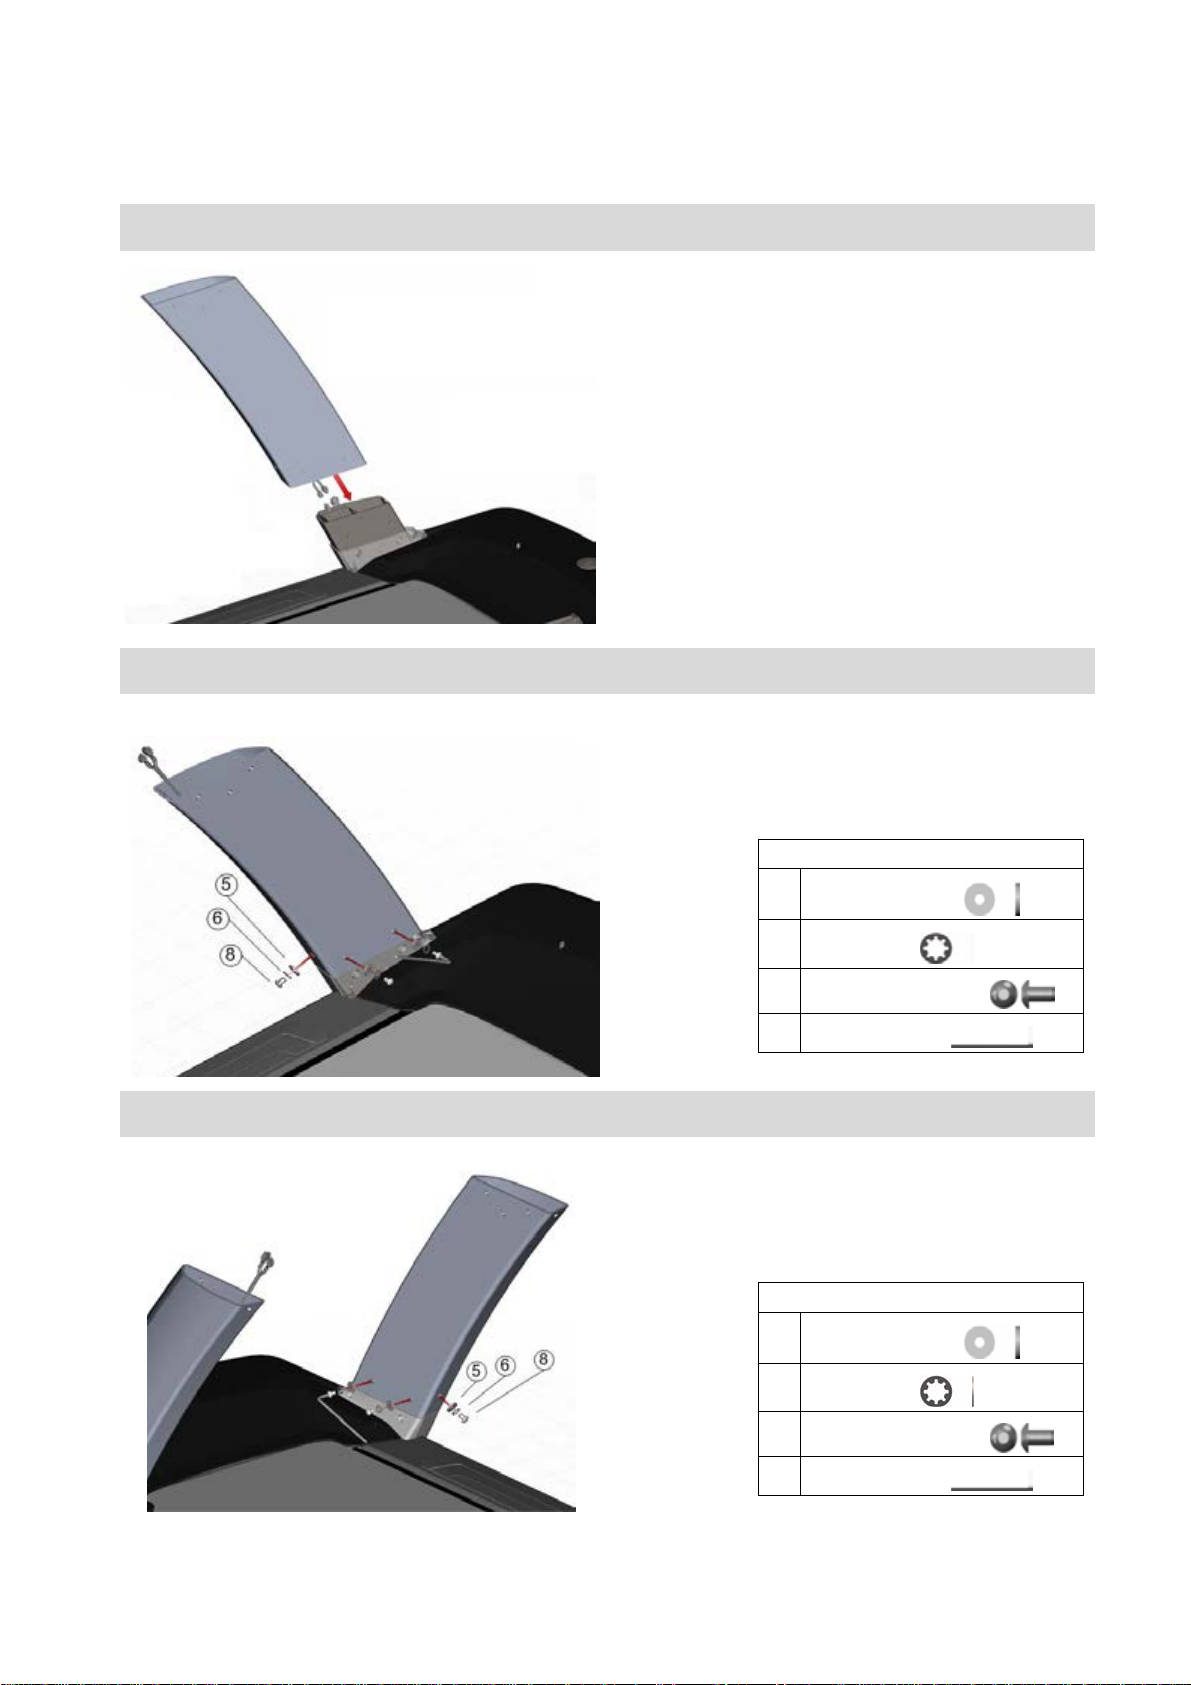
2.1 Assembly Instruction- 550Ti
STEP 1 Installing the left upright post- connect the two electrical connectors
STEP 2 Installing the left upright post- secure the left upright post
TOOL
5 Flat washer, white
6 Washer, star
8 Dome screw, M8*15L
Hex wrench-6mm
STEP 3 Installing the right upright post- secure the right upright post
TOOL
5 Flat washer, white
6 Washer, star
8 Dome screw, M8*15L
Hex wrench-6mm
4
19
NOTE
Ensure the two electrical connectors at the
bottom of the left upright post are well-connected
before movin
g
to the next ste
p
.

4
STEP 4 Installing the console bridge- connect the two electrical connectors
STEP 5 Installing the console bridge- position the bridge on the top of the upright post
STEP 6 Installing the console bridge- secure the left side of the console bridge
TOOL
5Flat washer, white
6Washer, star
8 Dome screw, M8*15L
Hex wrench-6mm
NOTE
Ensure the two electrical connectors at the top of
the left upright post are well-connected before
movin
g
to the next ste
p
.
NOTE
Ensure you push any excess wires inside the left
upright post.
Maintenance Trouble Shooting
Workout Option
Setup Introduction
Safety precaution Assembly
5
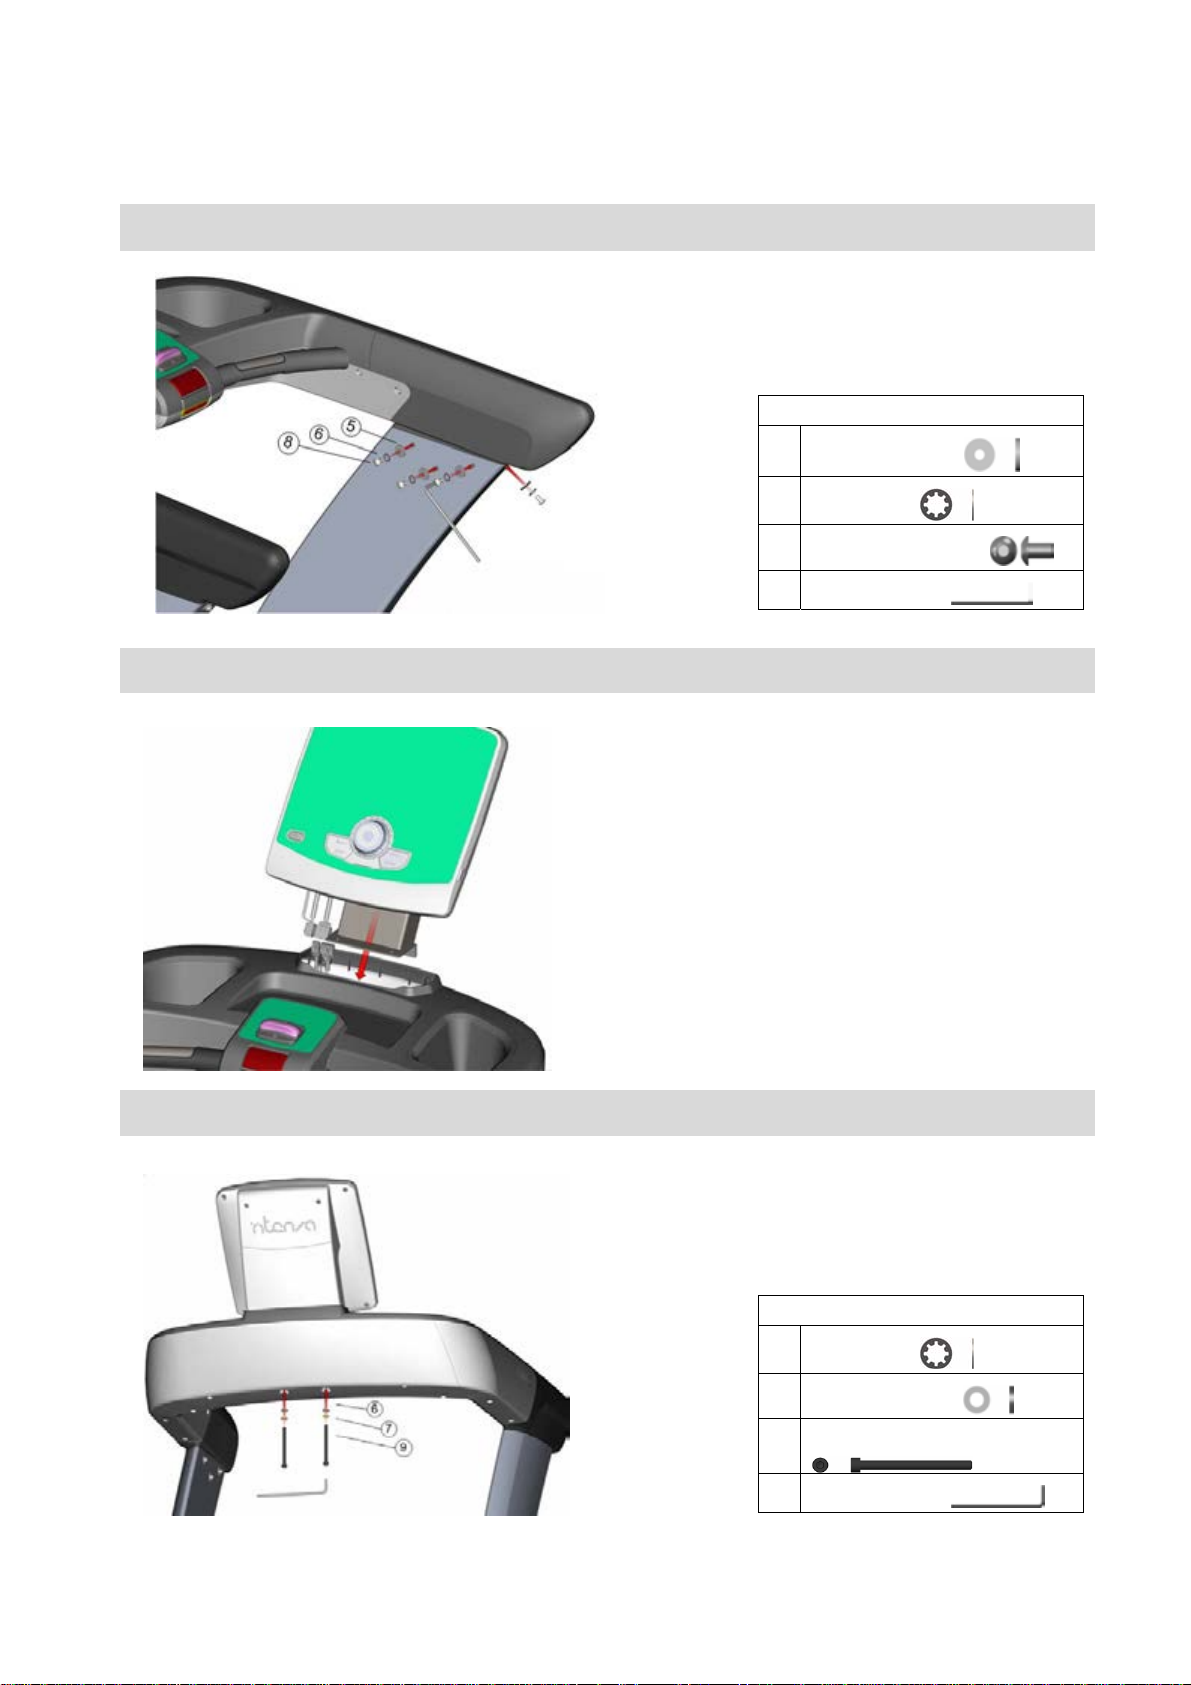
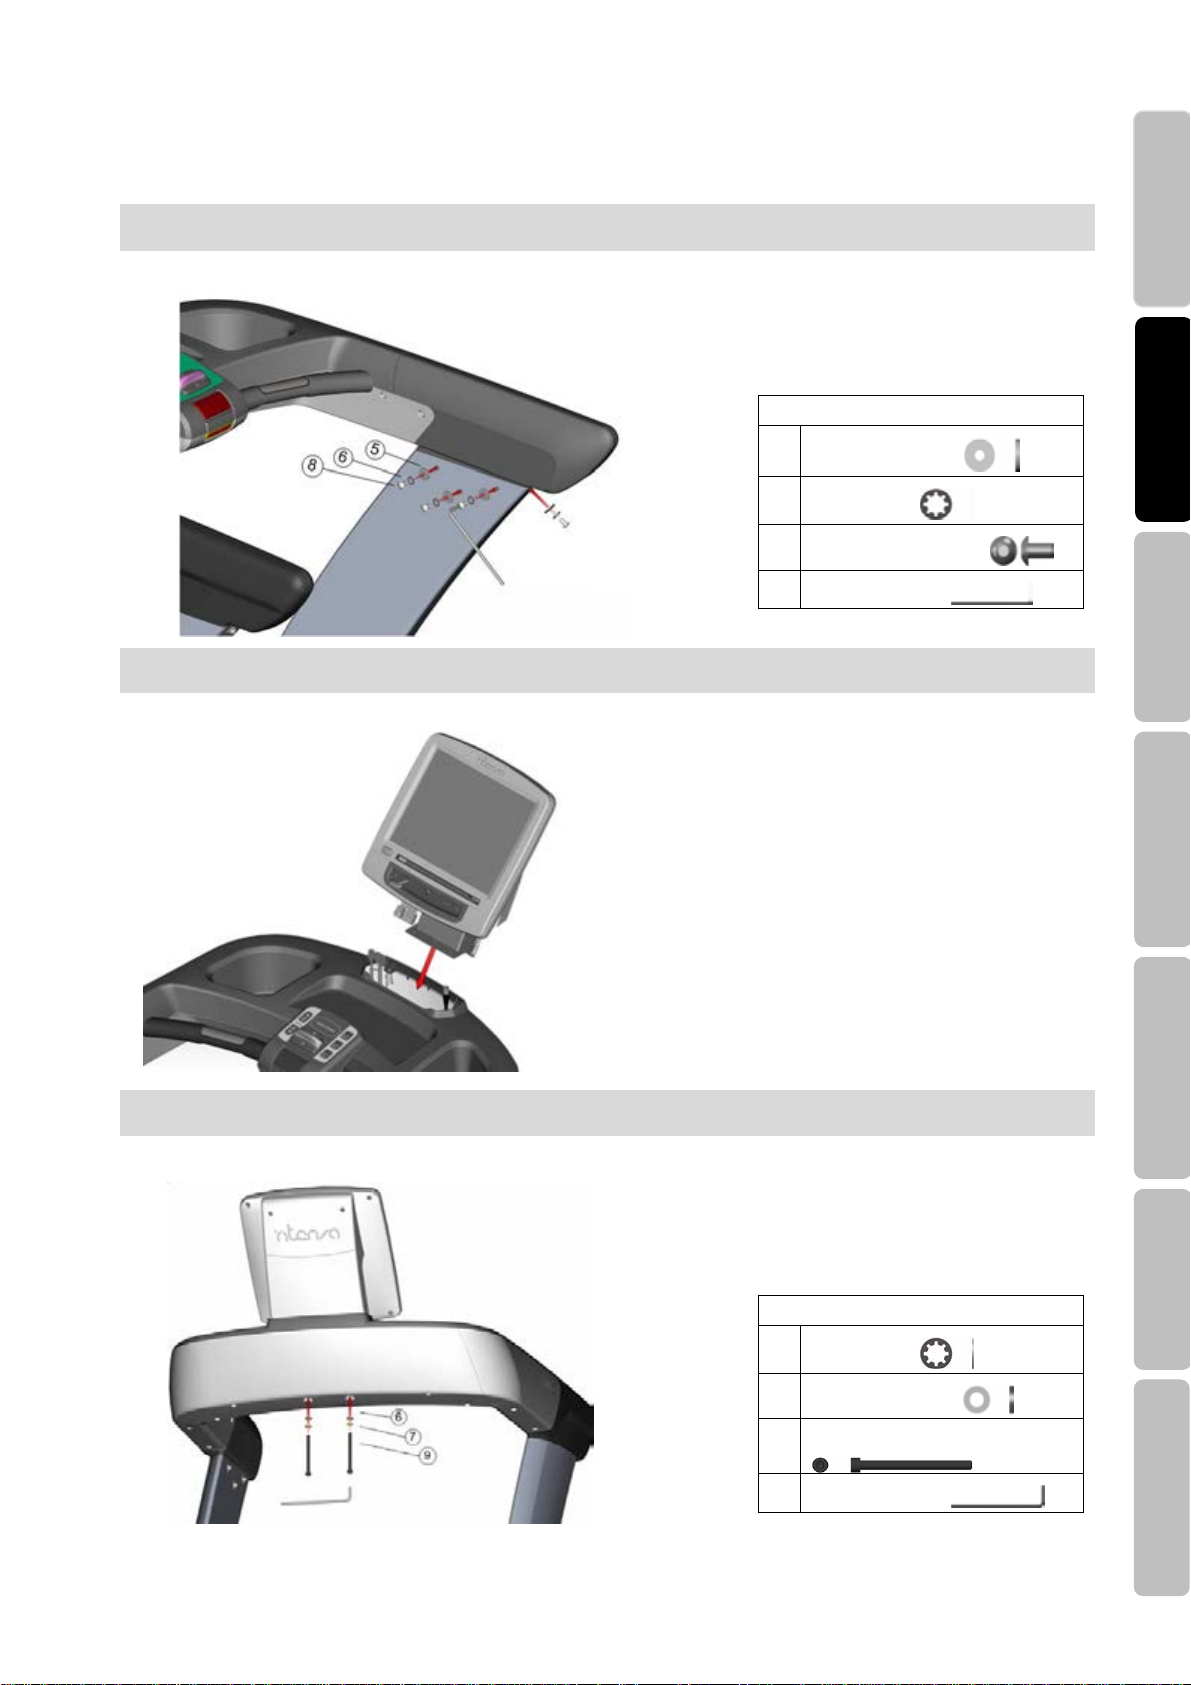
STEP 7 Installing the console bridge- secure the right side of the console bridge
TOOL
5Flat washer, white
6Washer, star
8 Dome screw, M8*15L
Hex wrench-6mm
STEP 8 Installing the 550Ti interactive console- connect the two electrical connectors
STEP 9 Installing the 550Ti interactive console- secure the console
TOOL
6 Washer, star
7 Flat washer, black
9
M8*95L(Black)
Hex wrench-6mm
Assembly finished
NOTE
Ensure the two electrical connectors at the
buttom of the console are well-connected before
moving to the next step.

6
550Te Overview
550Te Part List
Open the shipping carton. Remove all parts from the carton and card bpards inserts. Before you begin the
assembly, verify that the following hardware items are packed with the equipment. Please prepare and use a 6 mm
hex wrench to assemble the treadmill.
No. Part description Image QTY
1 Entertainment console assembly 1
2 Console bridge assembly 1
3 Right upright post 1
4 Left upright post 1
5 Flat washer, white 14
6 Washer, star 16
7 Flat washer, black 2
8 Dome screw(White),M8*15L 14
9 M8*95L(Black) 2
Maintenance Trouble Shooting
Workout Option
Setup Introduction
Safety precaution Assembly
7
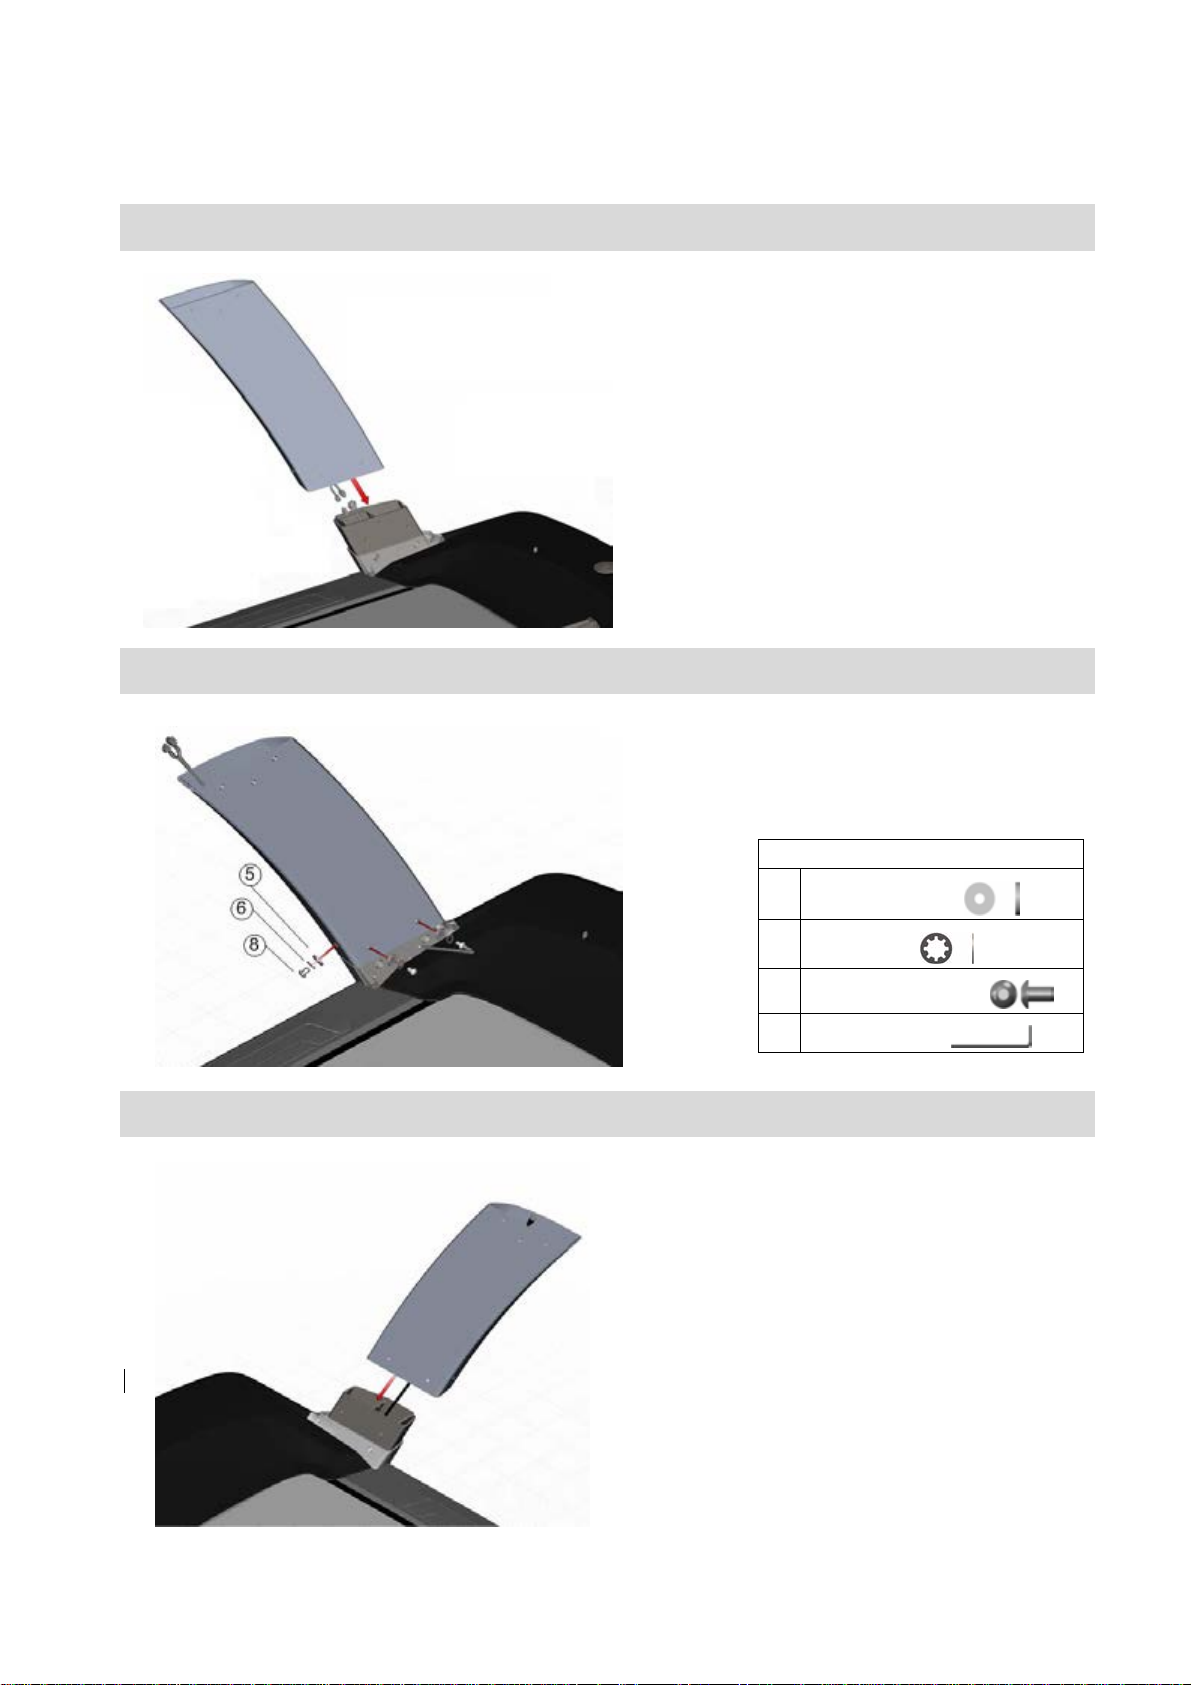
2.2 Assembly Instruction- 550Te
STEP 1 Installing the left upright post- connect the two electrical connectors
STEP 2 Installing the left upright post- secure the left upright post
TOOL
5Flat washer, white
6Washer, star
8 Dome screw, M8*15L
Hex wrench-6mm
STEP 3 Installing the right upright post- Insert TV wire into right upright post tube
NOTE
Ensure the two electrical connectors at the
bottom of the left upright post are well-connected
before movin
g
to the next ste
p
.
NOTE
Insert the TV wire through the upright post and
ensure the TV wire do not fall inside the post.

8
STEP 4 Installing the right upright post- secure the right upright post
TOOL
5Flat washer, white
6Washer, star
8 Dome screw, M8*15L
Hex wrench-6mm
STEP 5 Installing the console bridge- connect the two electrical connectors
STEP 6 Installing the console bridge- connect the TV wire connector
NOTE
Ensure the two electrical connectors at the top of
the left upright post are well-connected before
movin
g
to the next ste
p
.
Maintenance Trouble Shooting
Workout Option
Setup Introduction
Safety precaution Assembly
NOTE
Ensure the electrical connector of TV wire at the
top of the right upright post is well-connected
before movin
g
to the next ste
p
.

9
STEP 7 Installing the console bridge- fix the TV wire connector
STEP 8 Installing the console bridge- position the bridge on the top of the upright post
STEP 9 Installing the console bridge- secure the left side of the console bridge
TOOL
5 Flat washer, white
6 Washer, star
8 Dome screw, M8*15L
Hex wrench-6mm
NOTE
Ensure to push any excess wires inside the right
and left upright post.
NOTE
When connecting the TV wire, ensure to twist
lock the connector, then push the jacket to cover
the connector.
10
STEP 10 Installing the console bridge- secure the right side of the console bridge
TOOL
5 Flat washer, white
6 Washer, star
8 Dome screw, M8*15L
Hex wrench-6mm
STEP 11 Installing the 550Te Entertainment console- connect the electrical connectors
STEP 12 Installing the 550Te Entertainment console- secure the console
TOOL
6 Washer, star
7 Flat washer, black
9
M8*95L(Black)
Hex wrench-6mm
Assembly finished
NOTE
1. Ensure the two electrical connectors and the
connector of TV wire at the buttom of the
console are well-connected before moving to
the next step.
2. When connecting the TV wire, ensure to twist
lock the connector, then push the jacket to
cover the connector. Please refer to STEP 7.
Maintenance Trouble Shooting
Workout Option
Setup Introduction
Safety precaution Assembly
11
AB
3. SETUP
3.1 Electrical Power Requirement
Below is showing the current rating for Intenza 550 series treadmill based on supply voltage. Make sure that the
Intenza 550 series treadmill is supported by the proper line voltage for the installation location before plugging into
the outlet.
Supply Voltage (VAC) Frequency (Hz) Current (Amps) Power consumption (kW)
220 - 240 50/60 15 2.0
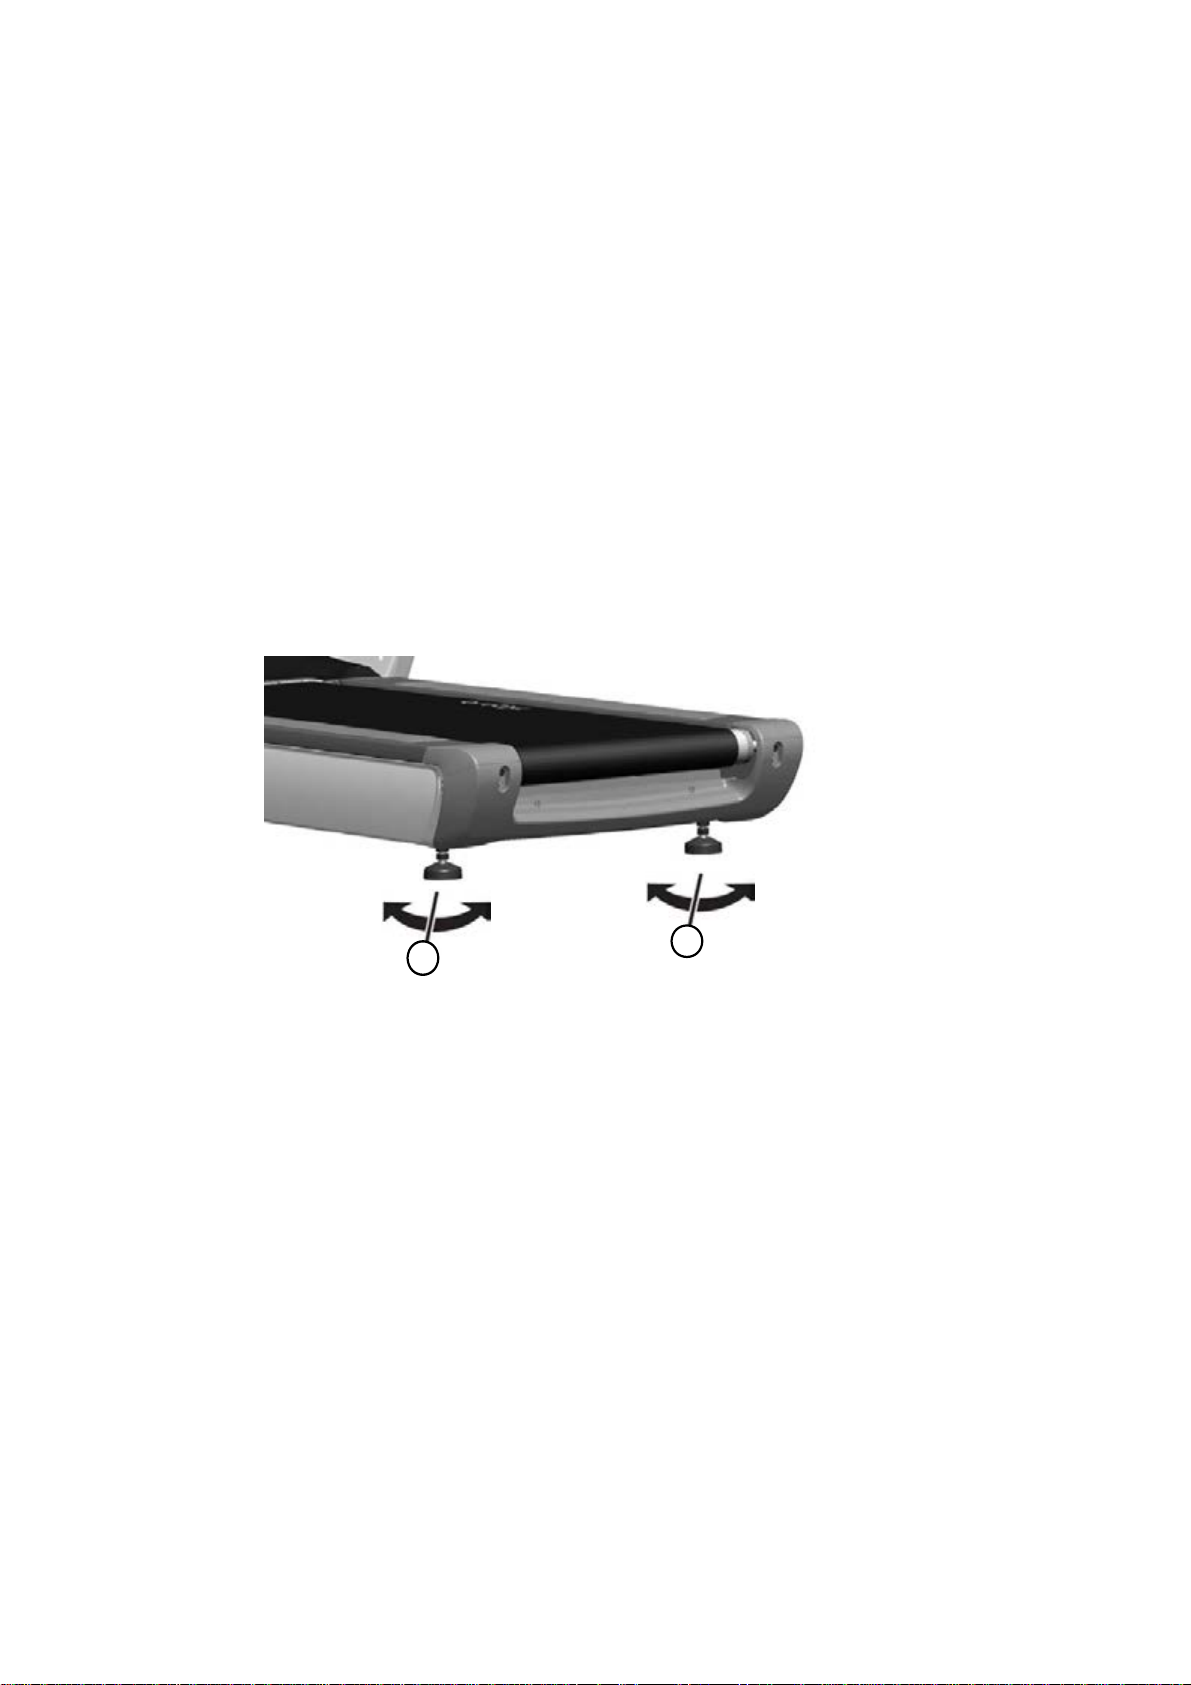
3.2 How To Stabilize The Intenza 550Ti and 550Te
After placing the unit where it will be used, check its stability. If there is even a slight rocking motion or the unit is not
stable, determine which stabilizing leg is not resting on the floor. To adjust, turn the stabilizing leg A or B until the
rocking motion ceased and both stabilizing legs rest firmly on the floor. It is extremely important that the stabilizing
leg be correctly adjusted for proper operation.

12
3.3 Checking the Belt
After Intenza 550 series treadmill has been installed and stabilized, the belt must be checked to confirm proper
tracking. First, ensure the power cord is plugged into a suitable outlet. Second, turn on the treadmill. Stand on the
side landing of the treadmill and straddle the belt. To start the belt, press the 4 mph button, If the striding belt
appears off-center, please refer to Section 6.2 How to Align the Running Belt.
3.4 Power Switch
Located on the front panel at the base of Intenza 550 series treadmill. The On/OFF switch has two position – “I” for
ON and “O” for
Maintenance Trouble Shooting
Workout Option
Setup Introduction
Safety precaution Assembly
13
4. HOW TO USE Intenza 550Ti AND 550Te
Operating Intenza 550 series treadmill is very easy. Learning the features and incorporating Intenza 550 series
treadmill into your member’s fitness program is just as easy. In this chapter, you will learn the display function and
how to get the most workouts from Intenza 550 series treadmill.
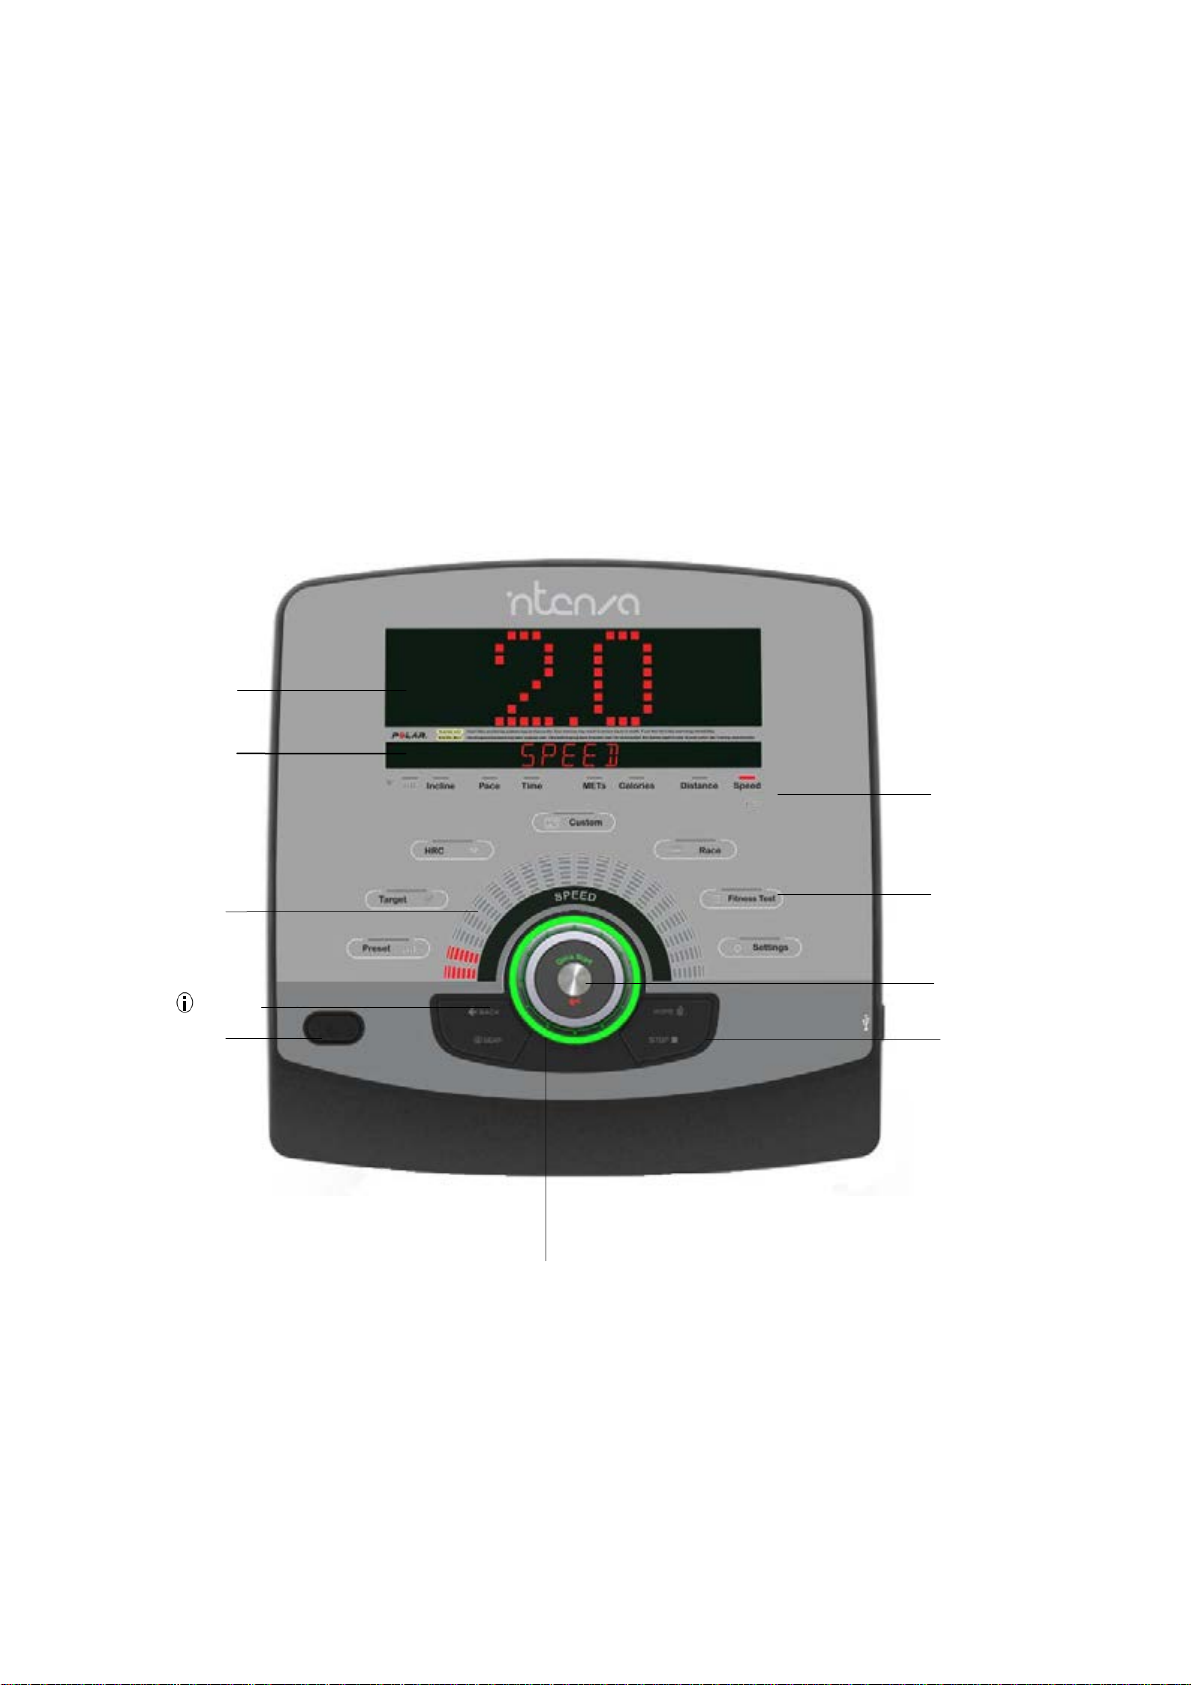
4.1 Intenza 550Ti Interactive Console Overview
Your Intenza 550Ti is equipped to provide you and your users unlimited exercise opportunities. Experiment with
each feature to find the right combination for your fitness regimen. The console provides the operating controls and
display elements described in the following paragraphs.
1. Profile window
3. Speed scale
4. Back / SCAN
5. USB icon
7. Quick start/ Enter
8. Home / Stop
9. Smart workrate
2. Message bar
6. Programs
10. Energy saver
14
1. Profile Window: This window displays are made of column of lights, which shows the information for setting
up a workout.
2. Message Bar:
During the program set-up, operating instructions will be displayed in the message bar.
During the workout, below exercise data will be displayed for your reference.
zHR: heart rate can be detected if the user is wearing the Polar heart rate chest strap or hold onto the contact
heart rate grips consistently.
zIncline: the incline percentage of the workout you are using.
zPace: how fast you cover a specific distance.
zTime: the number of time elapsed since beginning the workout.
zMETs: the ratio of the work metabolic rate to the resting metabolic rate.
zCalories: the number of calories burned since proceeding the workout.
zDistance: the total number of miles or kilometers you have run so far.
zSpeed: the speed at which you are currently running, in miles-per-hour or kilometers-per-hour.
3. Speed Scale: This scale displays the speed. Increase and decrease the speed from 0.8 km/h to 20 km/h for
550Ti, and 0.8 km/h to 25 km/h for 550Te. Increment is at 0.1 km/h which can be adjusted by using the stick
shift during the workout.
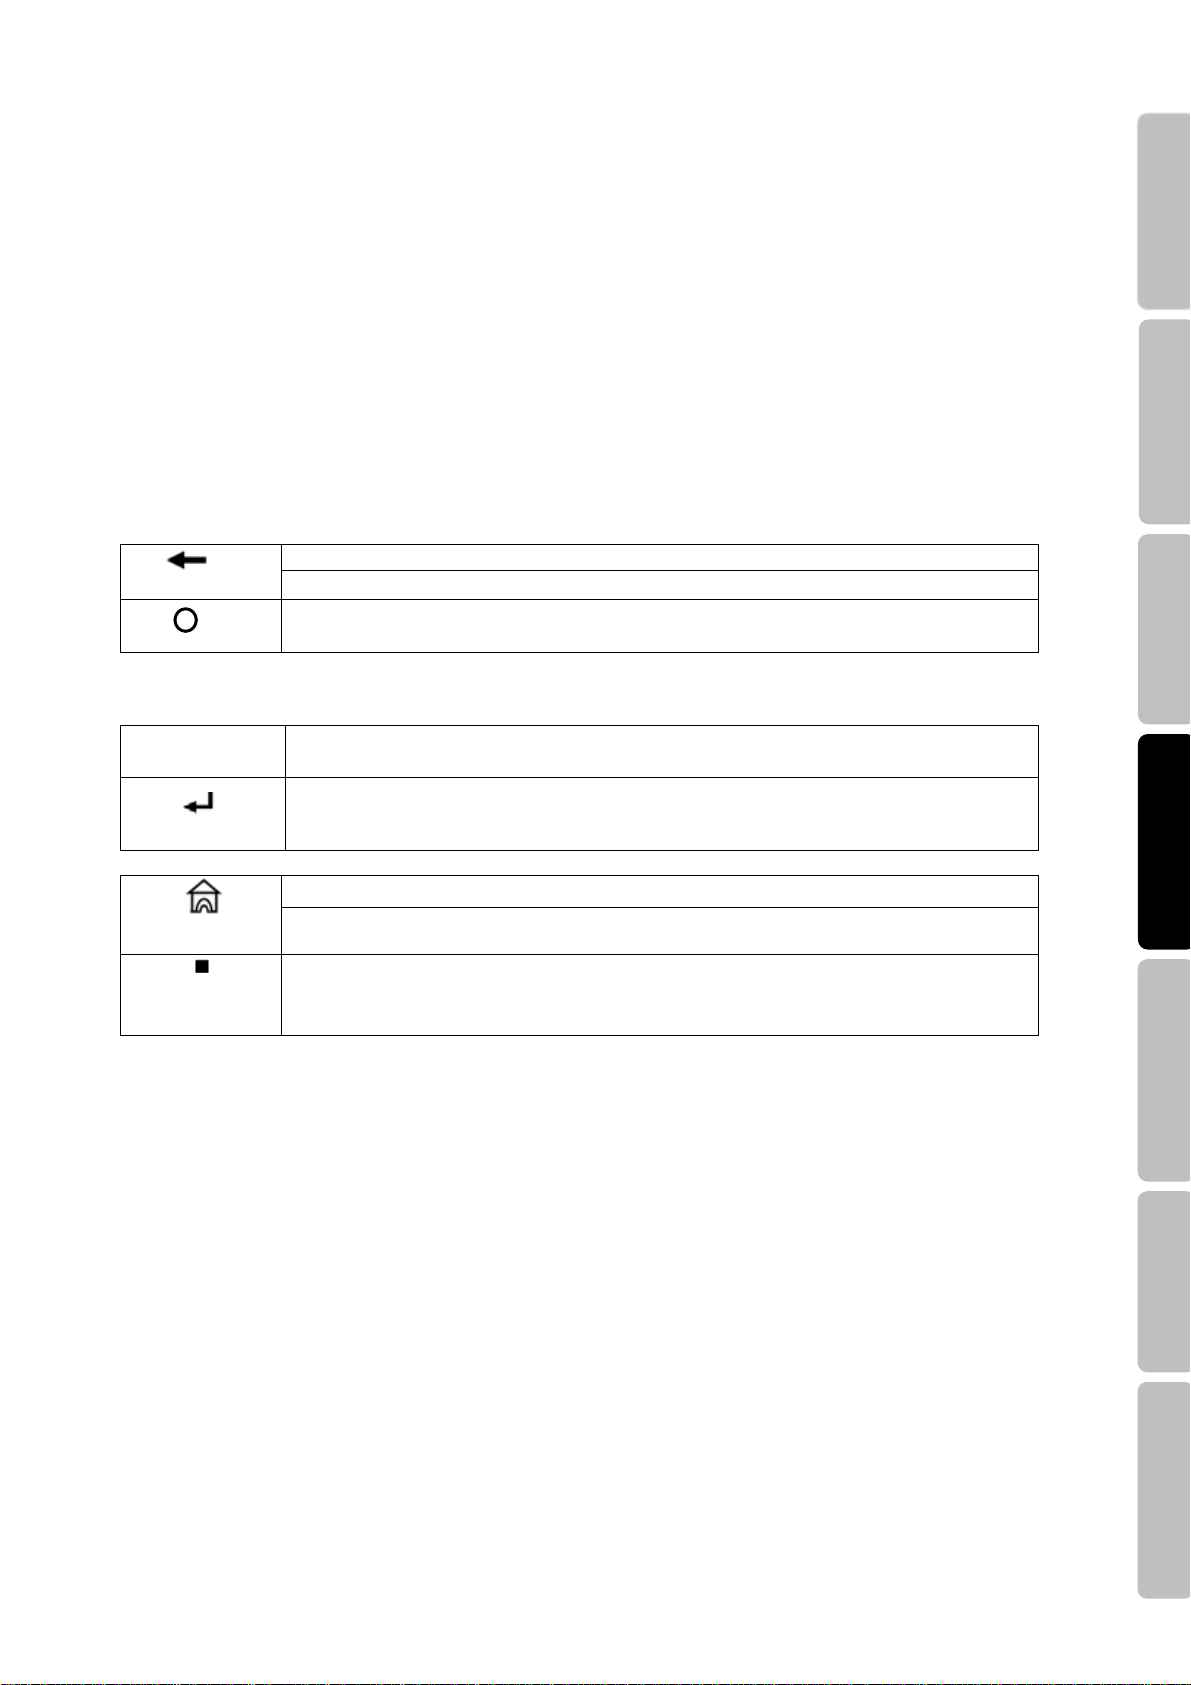
4. Back key and Scan:
During program set up, press this key to go back to previous selection for correction.
During the name setting, press this key to correct the wrong input.
During the workout, the display information toggles between both exercises parameter in
each message bar. Press SCAN to display that statistic continuously throughout the workout.
5. USB icon: This icon lights up when Intenza console detects the USB device.
6. Programs: Please refer to Section 5 Exercise Workout Option.
7. Quick start and Enter key:
QUICK START Press this key to enter the workout mode promptly, without having to select a workout
program. The default speed is at 0.8 km/h with no incline.
During program set up, press this key to confirm selection or value.
8. Home and Stop key:
Press this key to go back to the first layer when necessary.
During the setting of saving confirmation, press this key to double confirm. (Please refer to
Section 5 Exercise Workout Option.)
This key is only effective when a selected program is operating. Press STOP once will end
the workout program and the message bar will show the workout summary. Press STOP
again will exit the workout program promptly.
9. Smart Workrate: The skirting light of Uni jog indicates the workout intensity. (Please refer to Section 4.5 How
To Effectively Workout At Your Own Level.)
10. Energy saver: The energy saver mode is used to minimize the power being used from the wall when Intenza
550Ti is not in use. Press this button to put Intenza 550Ti into energy saver mode after ending a workout.
Press this button to either “wake up” Intenza 550Ti.
i
SCAN
BACK
HOME
STOP
ENTER
Maintenance Trouble Shooting
Workout Option
Setup Introduction
Safety precaution Assembly
15
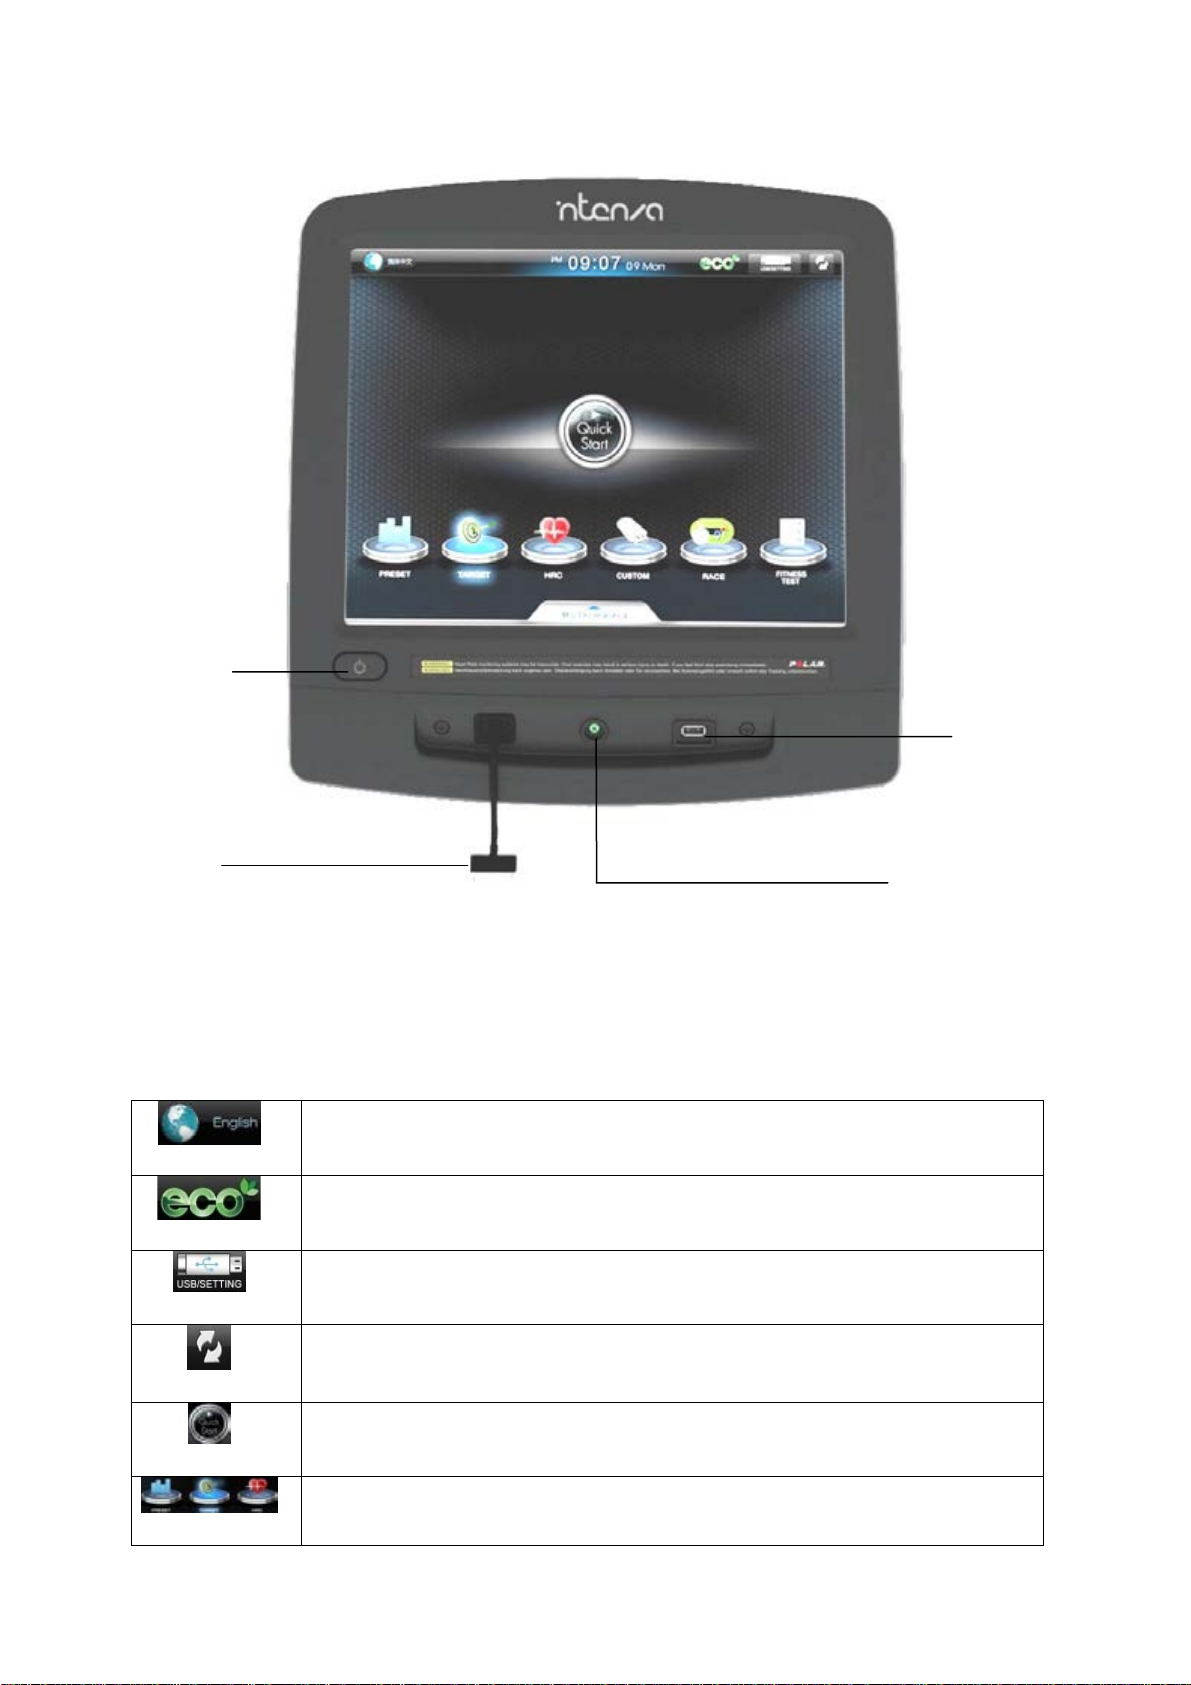
4.2 Intenza 550Te Entertainment Console Overview
1. Energy saver : The energy saver mode is used to minimize the power being used from the wall when
Intenza 550Te are not in use. Press this button to put Intenza 550Te into energy saver mode after ending a
workout. Press this button to either “wake up” Intenza 550Te.
2. iPod dock: Allows an iPod to be docked and controlled by the display while charging battery. .
3. Headphone jack: Allows you to plug in headphone.
4. USB port: Allows for data download, read and play MP3 files.
5. Home screen:
Language
Simplified Chinese, English, Spain, Germany, Japanese, Korean. Six kinds of language
offered for your choice.
Eco
To minimize the power being used from the wall when the treadmill is not in use.
USB setting
Allows you to customize your personal information, name, age, weight. (Please refer to
Section 4.10 Setting Of 550Te)
Scene change
Allows you to change the scene between multimedia and workout scenes.
Quick start
Allows the user to start a workout immediately, by passing any setup or goal setting.
Programs
Preset / Target / HRC / Custom / Race / Fitness Test
Allows the user to select programs to setup the goal or customize programs. (Please
refer to Section 5 Workout Option.)
1. Energy saver
2. iPod dock
4. USB port
3. Headphone jack

16
6. Multimedia Bar
Previous In the now playing screen, press Previous skips to the previous song/ video in the list.
Play
Press this button can play the selected song/video; while playing, press this button to
pause the song/video being played.
Next In the now playing screen, press Next to skip to the next song in the list.
Audio/Video- iPod
Allows you to control your iPod playlist from the display, listen to iPod music and watch
iPod video.
Audio/Video-USB
Allows you to enjoy the entertainment songs or videos from your personal USB device.
Play list
Sort the contents of iPod, USB and TV by play list.
Scene change
Allows you to change the scene between multimedia and workout scenes.
Volume
Tap on the Volume in the display and slide the volume bar up/down decrease/increase
volume intensity. Press the Mute to turn off the volume.
Zoom Press this button to zoom in/out the scene of video or movie.
4.3 How To Operate Multimedia
USB device
1. Insert the USB device to USB port.
2. Press the USB setting icon in the Multimedia bar of the current screen.
3. Follow the onscreen prompts.
iPod
1. Connect your iPod to the built-in iPod connector.
2. Press the iPod icon in the Multimedia bar shown on the screen.
3. Follow the onscreen instructions.
Maintenance Trouble Shooting
Workout Option
Setup Introduction
Safety precaution Assembly
This manual suits for next models
1
Table of contents
Other Intenza Treadmill manuals


Popular Treadmill manuals by other brands


Livestrong
Livestrong LS8.0T owner's manual

NordicTrack
NordicTrack Elite 5700 Treadmill manual

Orbit Fitness
Orbit Fitness StarTrak st3355 owner's manual

SportsArt Fitness
SportsArt Fitness T675 user manual

CAPITAL SPORTS
CAPITAL SPORTS PACEMAKER F80 manual
ICON Health & Fitness
ICON Health & Fitness NETL28717.0 user manual


