Inter-m VDC-273 User manual

MADE IN KOREA
9007908610
VDC-273/413
Digital Color Camera
- Line Lock
To set the camera in LL mode for synchronization with the power supply frequency, take the following steps.
1. Turn switch to “L”;
2. Turn switch to “PHASE”;
3. Press the + or – button and to make the phase variable.
Adjust with the button and so that the vertical phase of the camera matches with the vertical
phase of another camera (or system) with a multi-channel oscilloscope.
For initial setting, press RESET button .
- White Balance
White Balance can be adjusted within the scope of 2900-8000K color temperature.
When switch is at “AUTO” the white balance is adjusted automatically.
For manual adjustment, take the following steps.
1. Turn switch to “MANUAL”;
2. Turn switch to “W,B”;
3. Pressing “R” button increases redness while pressing “B” increases blueness. For initial setting,
press RESET button .
- BLC (Back Light Compensation)
The switch 7 improves an image that is darkened because of backlighting. Set this switch to ON for
backlight subjects.
- AES
Turning this switch 8 “ON” when a lens with a manual iris diaphragm is used enables the automatic
adjustment of image brightness. In this case the shutter speed changes according to the brightness of
the subject.
AES functions only when AGC switch 9 is turned on.
- AGC
The switch 9 automatically increases the camera’s sensitivity when the level of amdient light drops.
ON: AGC is activated.
OFF: AGC is not activated.
Specifications
Specifications
Image Pickup Device 1/3 inch interline-transfer CCD
Number of Effective Pixels VDC273 NTSC 510(H) 492(V)
PAL 500(H) 582(V)
VDC413 NTSC 768(H) 494(V)
PAL 752(H) 582(V)
Synchronization Method INTERNAL / LINE LOCK
Scanning Frequency NTSC HORIZONTAL 15.734Hz
VERTICAL 59.94Hz
PAL HORIZONTAL 15.625Hz
VERTICAL 50Hz
Video S/N Ratio 48dB (50% AGC OFF)
Minimum Required Illumination 0.9 Lux (F1.2 AGC-ON)
Lens Mount C / CS
Power Supply AC 24V 50/60Hz
Power Consumption 5W
Dimensions (mm) 70(W) x 56(H) x 134(D) mm
DIGITAL COLOR CAMERA
Home Page : http://www.inter-m.com
E-mail : [email protected]
* Specifications and design subject to change without notice for improvements.
a. LEVEL Adjustment
b. ALC Adjustment
Mounting a Camera
Mounting a Camera
(1) Mounting a Lens (2) Connection (3) Lens Adjustment Back focus adjust
(4) Setting Switch
Lens Adjustment
Lens Adjustment
1. Video Adjustment
Connect the camera according to the connection method, turn it on, display a image on the
monitor, and check the image. The camera has been factory-adjusted best position, but it may need
to be adjusted according to the object conditions of lens.
Connection
Connection
1. When the camera is powered, the POWER LED lights up.
2. Connect to the video monitor, etc. (75Ω)
3. This camera is originally designed to be mounted from the bottom, as shown.
Mounting a Lens
Mounting a Lens
1. Before mounting a lens, check whether it is a C-mount or CS-mount lens.
* The F mark indicates a focal point.
2. Mount the lens on the camera by turning the lens clockwise.
Adjust its position.
3. When using an auto-iris lens with an EE amplifier, turn the switch to the “VIDEO” side.
When no EE amplifier is equipped, turn the switch to the “DC” side.
* Video Iris Lens [3-pin terminal] * DC Iris Lens [4-pin plug]
4. If the cable is too long, house it in the camera mounting bracket.
LENS Flange back (B) Dimension (A)
C-mount Lens 17.526mm 10mm or less
CS-mount Lens 12.5mm 5.5mm or less
A
B
F
*F: Focal point
Pin No Lens Video Iris Lens
19.5V [max 50mA]
2 GND
3VIDEO
Pin No Lens DC Iris Lens
1Brake
2Brake
3Drive
4Drive
Monitor Screen LEVEL Turning Direction
Too bright Counterclockwise (Toward L)
Too dark Clockwise (Toward H)
Monitor Screen ALC Turning Direction
Part (high-intensity part) of the screen halates. Clockwise (Toward PK)
Other part of screen (except high-intensity part) darkens. Counterclockwise (Toward H)
Back Focus Adjustment
Back Focus Adjustment
The back focus has been factory-adjusted to the best point for CS-mount lens, but it may need to be re-
adjusted if the mount is changed to the C-mount or when a different lens is used.
If required, adjust it as follows.
- With a fixed-focus lens
If the focus can not be adjusted correctly by rotating the lens focus ring, adjust the back focus as
follows.
1. Loosen the back focus locking screw by turning it counterclockwise with a screwdriver.
2. Turn the back focus adjustment ring to focus at the best point.
3. Tighten the back focus locking screw by turning its clockwise.
- With a zoom lens
If the image is out of focus when zooming (with-angle telephoto), adjust the camera as follows.
1. Shoot a comparatively dark scene with thin lines about three meters away from the came.
2. Set the lens to the maximum telephoto position, and adjust the lens focus.
3. Set the lens to the maximum wide-angle position, and adjust the focus.
4. Repeat step 2 and 3 two or three times.
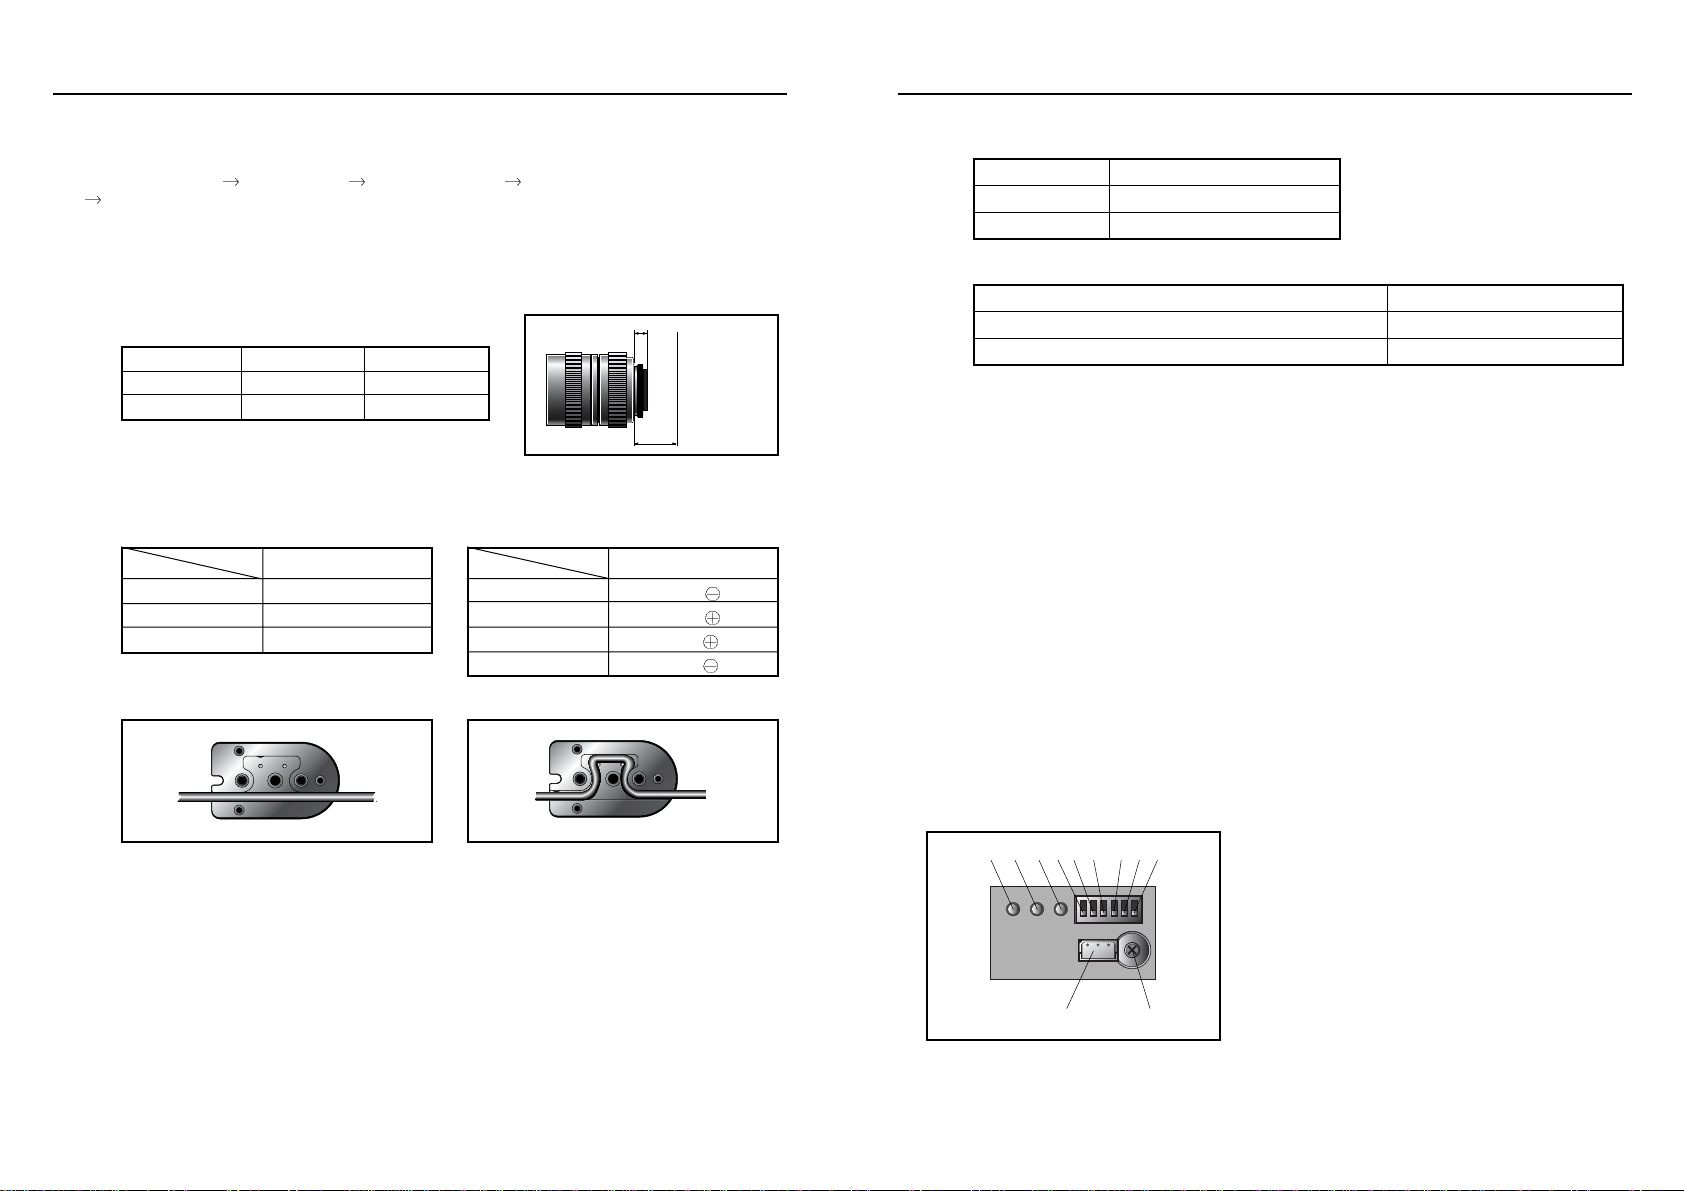
Setting SwitchSetting Switch
1. [RESET] RESET button.
2. [R] White Balance red control, [–] Line Lock vertical
phase control.
3. [B] White Balance blue control, [+] Line Lock vertical
phase control.
4. [WHT BAL] White balance control mode, [PHASE]
Line lock phase control mode.
5. [INT] Internal mode, [LL] To set the LL mode.
6. [MANU] [AUTO] White balance select control
mode.
7. [BLC ON/OFF] Back Light Compensation Switch
8. [AES ON/OFF] Automatic Electronic Shutter
9. [AGC ON/OFF] Auto Gain Control Switch
10. [DC LEVEL] DC Iris Lens Level Control
11. [FOR SERVICE] Interface connector. This connector is used for service.
123456 789
11 10
DIGITAL COLOR CAMERA DIGITAL COLOR CAMERA
This manual suits for next models
1


