Interacoustics Micromedical Orion Rotary Chair User manual

Installation Instructions
Orion Rotary
Chair
Micromedical by Interacoustics
Science made smarter
D-0120794-C – 2019/11


Copyright © November 1, 2019 by Interacoustics. All rights reserved. Information in this document is subject
to change without notice. Companies, names, and data used in example herein are fictitious unless otherwise
noted. No part of this document may be reproduced or transmitted in any form or by any means, electronic or
mechanical, for any purpose, without express written permission of Interacoustics A/S, Micromedical
Technologies or its licensees.
Windows® is a registered trademark of the Microsoft Corporation, registered in the United States and other
countries. FireWire®is a registered trademark of the Apple Inc., registered in the United States and other
countries. Other trademarks are the property of their respective owners.


Table of Contents
1INTRODUCTION........................................................................................................................... 1
1.1 About this manual ................................................................................................................1
1.2 Intended use ........................................................................................................................1
1.3 Contraindications .................................................................................................................1
1.4 Environmental Conditions....................................................................................................1
1.5 Required tools......................................................................................................................1
1.6 Marking ................................................................................................................................2
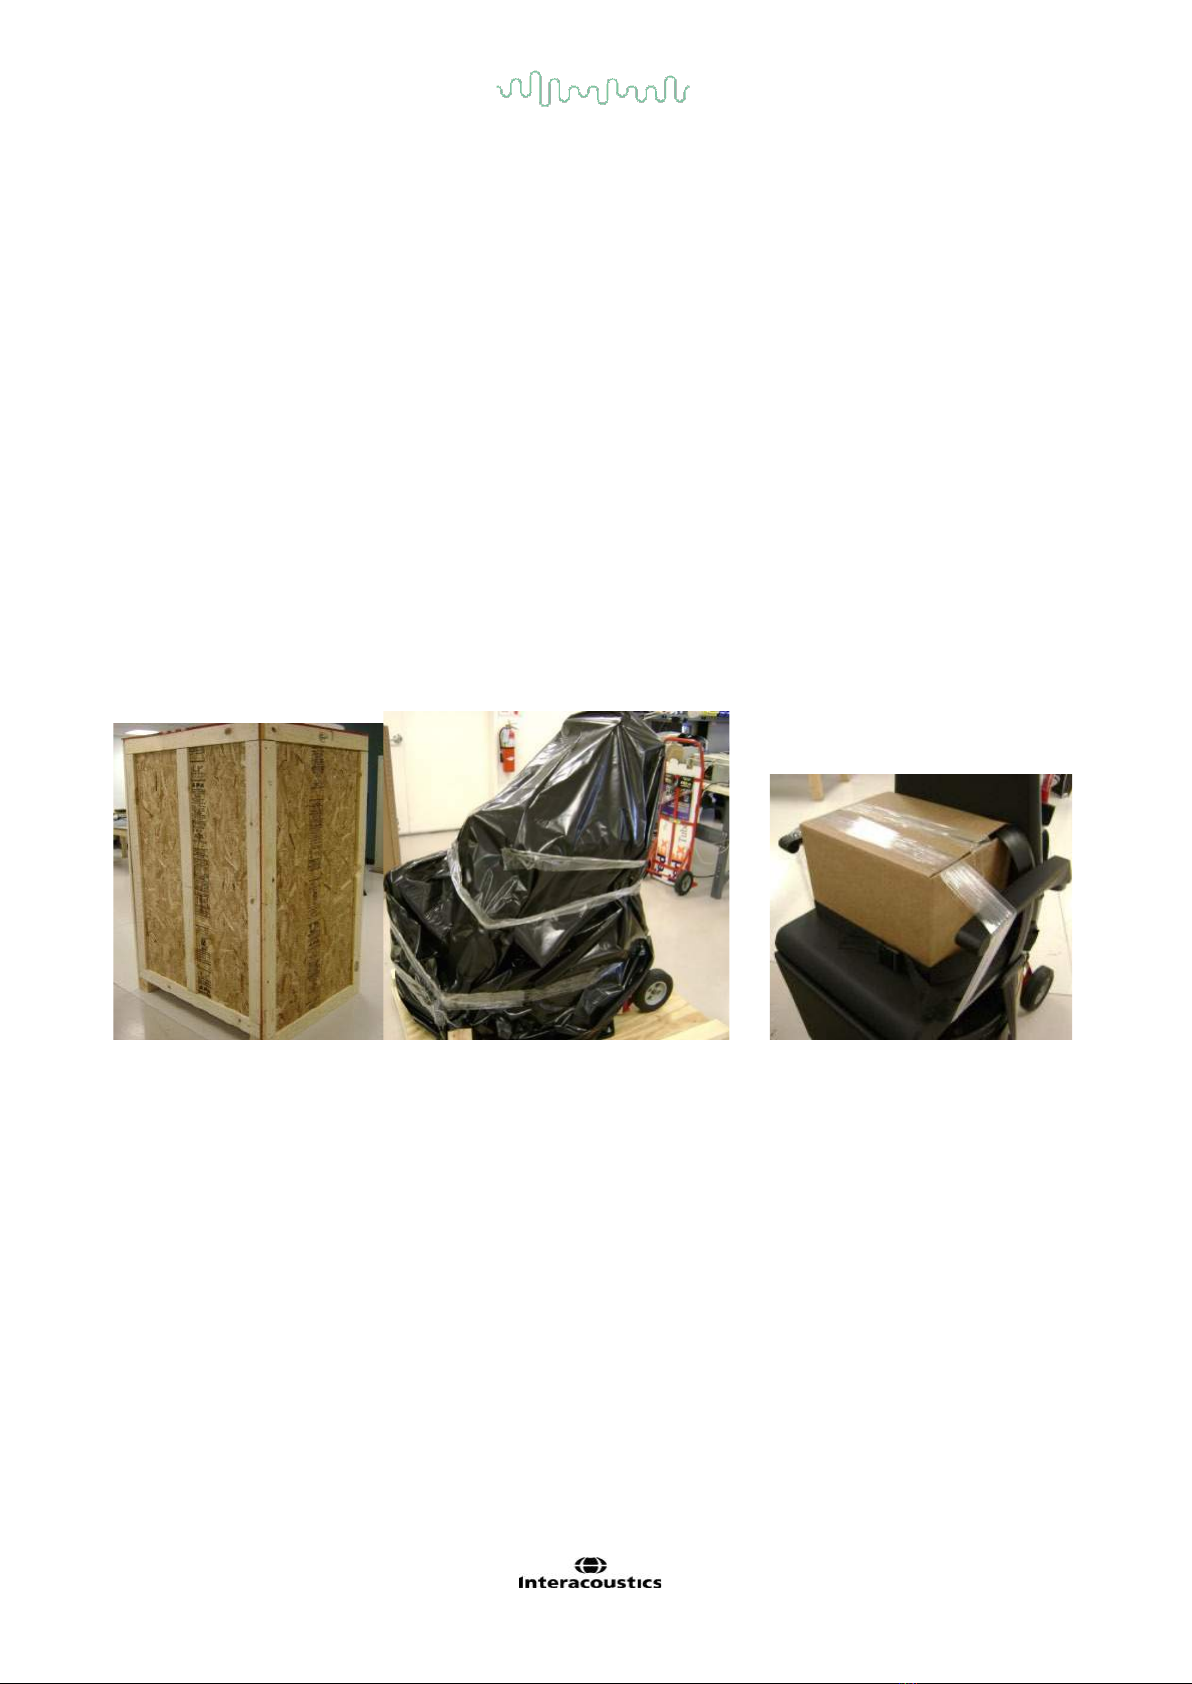
2UNPACKING AND INSPECTION................................................................................................. 3
2.1 Inspection of equipment ......................................................................................................3
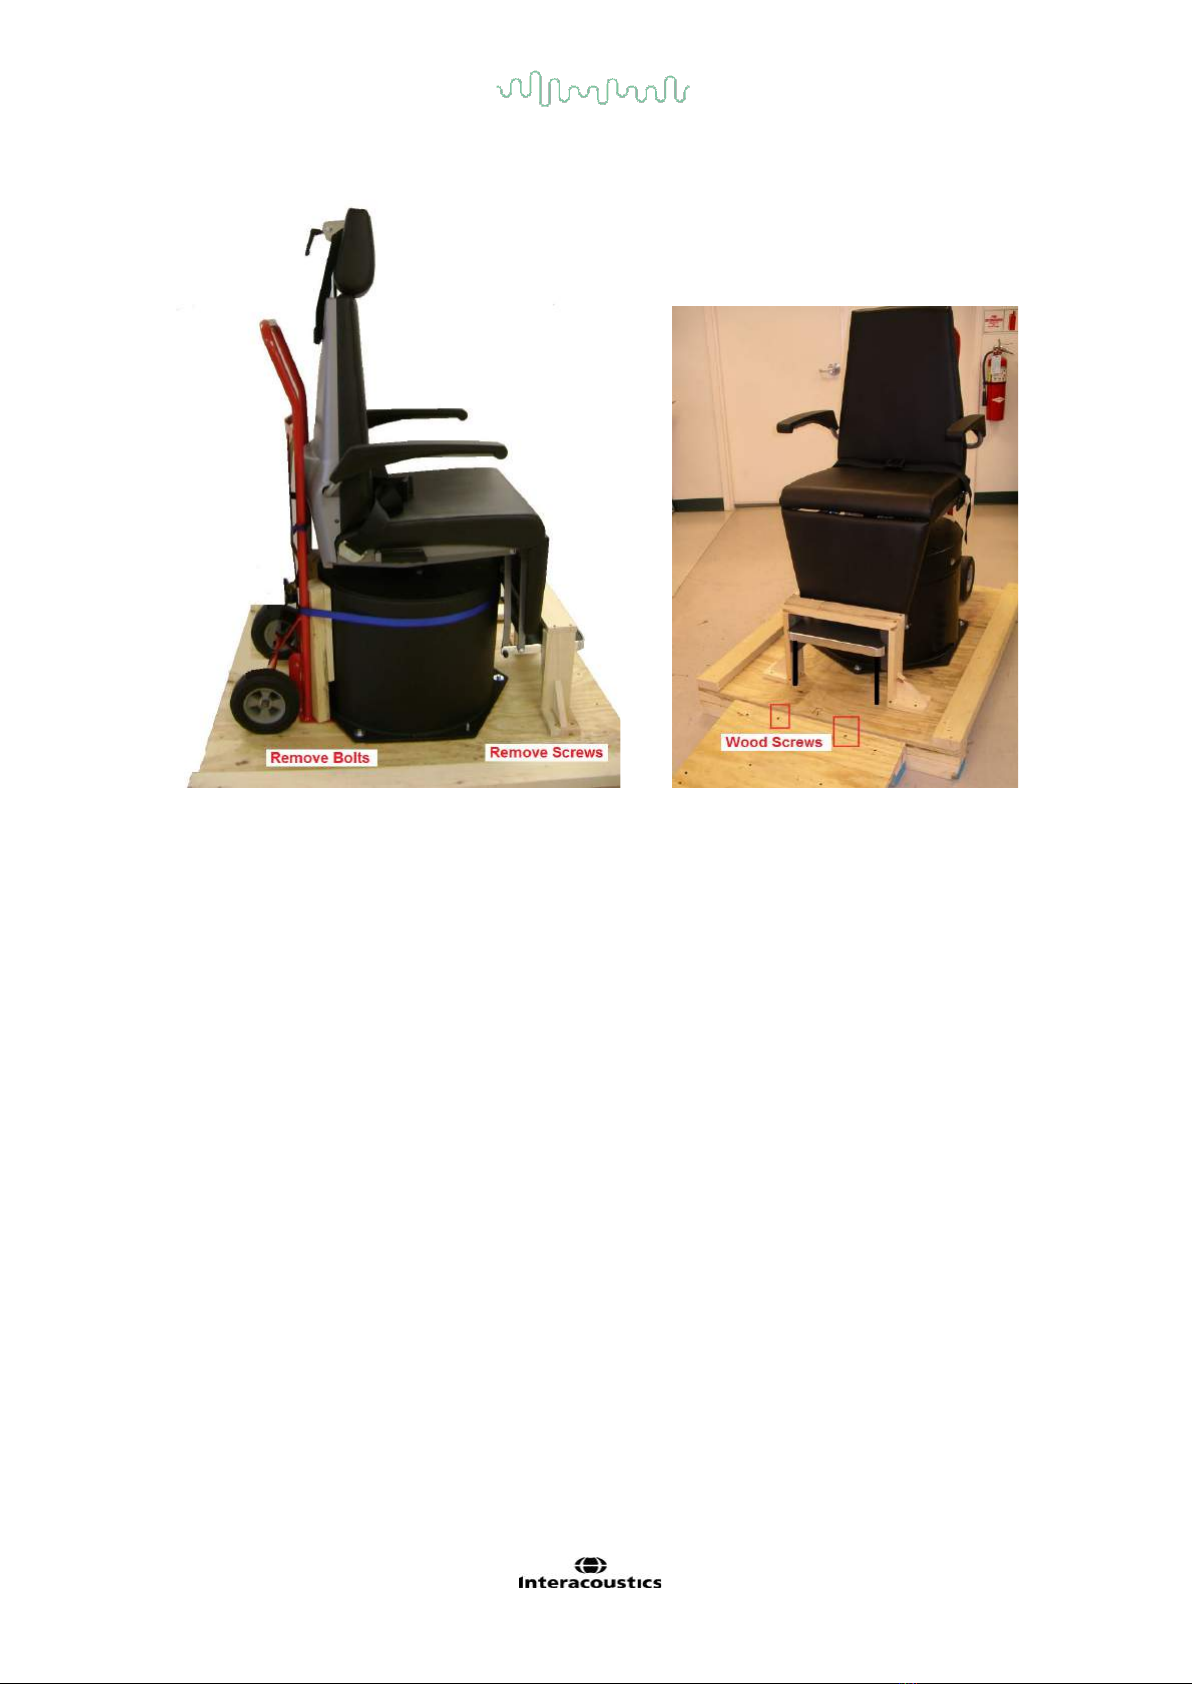
2.2 Removing chair from the crate ............................................................................................3
3COMPUTER CONFIGURATION .................................................................................................. 5
3.1 Tower configuration .............................................................................................................5
3.2 Laptop configuration ............................................................................................................5
3.3 Orion Rotary Chair configuration .........................................................................................5
3.4 Isolation Transformer configuration .....................................................................................6
3.5 Cart configuration ................................................................................................................6
4ANCHORING CHAIR TO THE FLOOR........................................................................................ 7
4.1Computer setup ...................................................................................................................7
4.2 Included parts ......................................................................................................................7
4.3 Determine chair installation location....................................................................................7
4.4 Drilling anchor holes ............................................................................................................8
4.5 Variations in flooring ............................................................................................................8
4.6 Placing anchors ...................................................................................................................9


D-0120794-C – 2019/11
Orion Rotary Chair Installation Instructions Page 1
1Introduction
1.1 About this manual
This manual details the installation procedure for the Orion Reclining Chair accessory used with the
VisualEyes™ 515 and VisualEyes™ 525 Software version 2.1 and later.
Manufactured By
Distribution and Service
Tel.:
Fax:
E-mail:
Web:
Interacoustics A/S
Audiometer Allé 1
5500 Middelfart
Denmark
+45 6371 3555
+45 6371 3522
info@interacoustics.com
www.interacoustics.com
Micromedical Technologies Inc.
10 Kemp Drive
Chatham, IL 62629
USA
+1 (217) 483-2122
+1 (217) 483-4533
info@micromedical.com
www.micromedical.com
1.2 Intended use
The Orion Reclining Chair accessory is the chair the patient will be seated or lying on to perform the
examination. The Orion Reclining Chair accessory replaces a standard office chair for ocular motor tests
and nystagmus tests, examination table for Dix-Hallpike, positional, and caloric tests, and rotational chair for
Sinusoidal Harmonic Acceleration, Step, VOR Suppression, and Visual VOR tests.
1.3 Contraindications
More intensive rotational chair tests may be contraindicated in patients less than 5 years of age or greater
than 110 years of age.
1.4 Environmental Conditions
•Recommended for indoor use only
•Relative Humidity: 30 to 80% (non-condensing)
•Temperature Storage: 32°to 125°F (0°to 52°C)
•Operating Temperature: 60°to 90°F (16°to 32°C)
•Power Supply: 110VAC, 220VAC step down to 110VAC through isolation
transformer
1.5 Required tools
The following tools are required to assemble the Orion Reclining Chair. Assembly time will take 2 or more
hours to complete. The dealer will need to provide these items.
Hammer drill
16 oz hammer
½” socket on 3/8” drive
Stubby Phillips screwdriver
Standard and Phillips
screwdrivers
Battery powered drill with Phillips
bit
Ear plugs
Disposable dust mask
Safety glasses
10 mm wood drill bit for dry wall
10 mm wood drill bit for wall
studs
Pencil with eraser
Bubble level or smartphone level
Stud finder

D-0120794-C – 2019/11
Orion Rotary Chair Installation Instructions Page 2
1.6 Marking
The following marking can be found on the instrument:
Symbol
Explanation
An applied part that includes a patient connection that is intended to deliver
electrical energy or an electrophysiological signal to or from the patient shall
be a Type BF part. An EOG amplifier is considered a Type BF part.
An applied part that includes a patient connection which can be
disconnected from the patient immediately is a Type B part. The Aqua
Stim™ caloric irrigator is a Type B part.
Follow instructions for use
WEEE (EU-directive).
This symbol indicates that when the end-user wishes to discard this product,
it must be sent to separate collection facilities for recovery and recycling.
Failing to do so may endanger the environment.
0123
The CE-mark indicates that the manufacturer meets the requirements of
Annex II of the Medical Device Directive 93/42/EEC for the quality system.
Manufacturer.
Year of Manufacture.
Do not re-use.
Parts like foam cushions and irrigator tips are for single use only.
Reference number used to denote the model of the equipment.
Do not push symbol used with components that could easily tip over, such
as the Digital Light Bar
Chinese RoHS compliance standard where the product contains less than
the maximum concentration value of lead, mercury, cadmium, hexavalent
chromium, polybrominated biphenyls, and polybrominated diphenyl ethers.

D-0120794-C – 2019/11
Orion Rotary Chair Installation Instructions Page 3
2Unpacking and inspection
2.1 Inspection of equipment
Check shipping containers and contents for damage
When the system is received, please check the shipping crate and pallet for rough handling and damage. If
damage has occurred, shipping containers should be kept until the contents of the shipment have been
checked mechanically and electrically.
If the instrument is found to be faulty, please contact your local distributor. Keep the shipping material for the
carrier’s inspection and insurance claim.
Disposition of packaging materials
Rotational chair crates, equipment pallets, and other shipping materials should be recycled where available.
Contact the local distributor for on-site service of the Orion Reclining Chair, as the Orion Reclining Chair will
not normally be returned to the factory or distributor.
2.2 Removing chair from the crate
Use a power screwdriver to remove screws from top of the crate then all four sides. Unwrap chair by
carefully cutting tape and removing plastic sheeting.
Chair in crate Chair wrapped on pallet chair with head support & cables in box

D-0120794-C – 2019/11
Orion Rotary Chair Installation Instructions Page 4
Chair pallet with shipping cover removed Ramp secured to base
Chair is strapped to a 2-wheel dolly inside crate. A wooden ramp, that is part of the equipment on the pallet,
should be fastened with screws to the chair pallet to form a ramp. Tilt the chair and roll it off the pallet and
down the ramp. Position the chair in the exam room such that the cable opening in the chair base is directed
toward the equipment cart.

D-0120794-C – 2019/11
Orion Rotary Chair Installation Instructions Page 5
3 Computer configuration
3.1 Tower configuration
The small form factor tower computer will come with an all-in-one
monitor and computer stand. The computer slides into the back of the
stand.
•The goggle cameras plug into the front USB ports of the
computer.
•The speaker bar sits under the touch screen monitor and the
room camera sits above the monitor. Both the speaker bar and
room camera connect to the two USB ports on the back of the
monitor.
•The monitor’s USB hub cable and DisplayPort cable connect to
the back of the computer.
•The TV connects to the computer either by HDMI (if available)
or by a DisplayPort to HDMI adapter.
•The RF Remote plugs into the USB port on the keyboard.
•The Orion rotary chair’s USB cable will connect to the back of the computer.
•Printer USB cable connects to the back of the computer.
•Power cables for the monitor and tower are provided by the stand, and the stand is powered by an
external power cable connected to the isolation transformer.
3.2 Laptop configuration
The laptop configuration will use a USB hub
to connect the peripherals of the room
camera, RF remote, camera goggles,
printer, and Orion rotary chair cable to the
computer. Power supply for the USB hub
and chair will be provided by the isolation
transformer. The power to the laptop is
provided by a power strip or power mains.
3.3 Orion Rotary Chair configuration
•The Emergency Stop box connects to the base of the chair
and placed on the desk or equipment cart for easy access to
the operator.
•USB camera goggles (front mount, top mount, side mount)
connect to the USB ports on the left side of the chair frame.
•USB cable from the base of the chair will connect to the computer.
•Power to the Orion rotary chair is provided by the isolation transformer.
Left to Right: Power to Isolation Transformer, Power Switch, USB to PC, E-stop

D-0120794-C – 2019/11
Orion Rotary Chair Installation Instructions Page 6
3.4 Isolation Transformer configuration
•Orion Reclining Chair uses 110V for operation. The Isolation
Transformer is set from the factory for the intended source voltage.
•Specialized power cables connect the isolation transformer to the
computer and peripherals.
•Laptop computer and printer may connect to the external power
strip or to power mains.
3.5 Cart configuration
If a cart is configured with the system, use the manufacturer’s assembly instructions to assemble the cart.
Cart styles will vary. When placing the system components on the cart, it is required that the external water
tank for the Aqua Stim water caloric irrigator is placed on the same shelf as the Aqua Stim.
Example of a chair equipment cart with Aqua Stim and water tank on the same shelf

D-0120794-C – 2019/11
Orion Rotary Chair Installation Instructions Page 7
4 Anchoring chair to the floor
4.1 Computer setup
The chair base must be anchored to maintain proper position of the chair at the correct distance from the
wall mounted TV. The TV should be mounted on the wall before anchoring the chair to the floor.
4.2 Included parts
The Orion Reclining Chair is shipped with the following items:
1. SDS 5/8 inch masonry drill bit (hex-shank or round-shank bits can be used but are not supplied)
2. Anchor bolt kit
a. (3) 3/8 in. anchor
b. (3) 3/8 in. x 2 ¼ in. screw
c. (3) 3/8 in. ID x 2 in. OD flat black washer
d. (3) 3/8 in. ID x 1 in. OD flat steel washer
For this procedure the installer will need to use the following additional items:
1. Hammer drill
2. Hammer
3. Adjustable wrench or socket wrench
4. Ear plugs
5. Disposable dust mask
6. Safety glasses
4.3 Determine chair installation location
When locating the Orion Reclining Chair in the exam room, ensure the following items are met:
1. There will be easy access of the chair service panel.
2. The cables connect to the front of the Orion Reclining Chair. The center of this access area is the
chair zero location or Home location. This location should be aligned to the center of the television. If
the chair cannot be centered in front of the TV, then the center position will have to be set in the
software accommodate the location. Before the chair is bolted to the floor, confirm the chair will be
able to be centered in front of the television.

D-0120794-C – 2019/11
Orion Rotary Chair Installation Instructions Page 8
3. The Orion Reclining Chair should be situated away from the TV so the patient seated in the chair
(center of chair base) is between 30” and 39” (0.75 and 1.00 m) from the front panel of the TV (not
the wall). Adjacent walls should have the same clearance to the base of the Orion Reclining Chair.
4. After Chair has been carefully placed in the proper position, mark the area where the three holes are
to be drilled.
5. Move the chair to the side, or keep the chair in place and drill the holes using the base as the
template.
4.4 Drilling anchor holes
Mark drill bit with electrical tape for hole depth of 1.75 to 2 inches (4.5 to 5 cm).
Secure the drill bit in the chuck of the hammer drill. Place the drill in the middle of the target hole. Keep the
drill bit vertical. Be careful not to drill at an angle, because this may cause difficulty in keeping the anchor
screw head flush on the washer.
When drilling in concrete cement dust will be produced. The cement dust must be carefully removed from the
area after drilling. Sweep the dust and pick up remaining particles with a water dampened cloth. Do not
breath the dust, use a mouth cover as appropriate. Wear ear plugs and safety glasses while drilling into the
concrete floor and cleaning up the dust.
4.5 Variations in flooring
Carpet
If the floor is carpeted, then remove a small square of carpet that will not be visible when the chair is placed
over the hole, otherwise damage to the carpet may occur.
Ceramic Tile
If the floor is ceramic tile, then obtain a different drill bit appropriate for drilling through ceramic tile.
Vinyl Flooring
If the floor is vinyl tile over concrete, the anchor holes can be drilled with the supplied bit.
Wood Floor

D-0120794-C – 2019/11
Orion Rotary Chair Installation Instructions Page 9
If the floor is hard wood, then consult with the building owner about how they want to mount the chair.
Consider lag screws, toggle bolts or molly anchors.
4.6 Placing anchors
Place the anchor into the drilled hole with the expanded end first.
Insert the split anchor end into the drilled hole. Make sure the anchor is below the concrete surface.
Complete this process for all three anchors. Move the chair back over the anchors.
Stack the lag screw with the washers, first the small steel washer then the large black
washer. Place the screw with washers into the anchor and tighten firmly with a wrench.
The lag screw will expand the anchor in the concrete hole.
If the anchor spins in the hole, remove the anchor, clean out the concrete dust and try
again. If the anchor does not hold, contact Interacoustics or Micromedical Technologies for
further instructions.
Table of contents
Other Interacoustics Indoor Furnishing manuals
Popular Indoor Furnishing manuals by other brands

ZINUS
ZINUS FSSSBH-14-1 Assembly instruction

Forte
Forte LACE LCXS71 Assembling Instruction

Furniture of America
Furniture of America Lucie CM3788 Assembly instructions

zomo
zomo Deck Stand Vegas installation instructions

Lightolier
Lightolier Lytecaster 1001F_3d specification

Bestar
Bestar 49240-1152 Assembly instructions