Interline SYLVA 2 User manual
S Y L V A 2 •1MONTAGE-INSTRUCTIE/MONTAGEANLEITUNG/ASSEMBLY INSTRUCTIONS/INSTRUCTIONS DE MONTAGE
SYLVA 2 BINNENSAUNA UIT MASSIEF HOUTEN WANDPANELEN
SYLVA 2 MASSIVSAUNA
LOG BOARD SAUNA SYLVA 2
SAUNA EN MADRIERS SYLVA 2
MONTAGE-INSTRUCTIE
MONTAGEANLEITUNG
ASSEMBLY INSTRUCTIONS
INSTRUCTIONS DE MONTAGE
Montageanleitung
Assembly instructions
Instructions de montage
GER
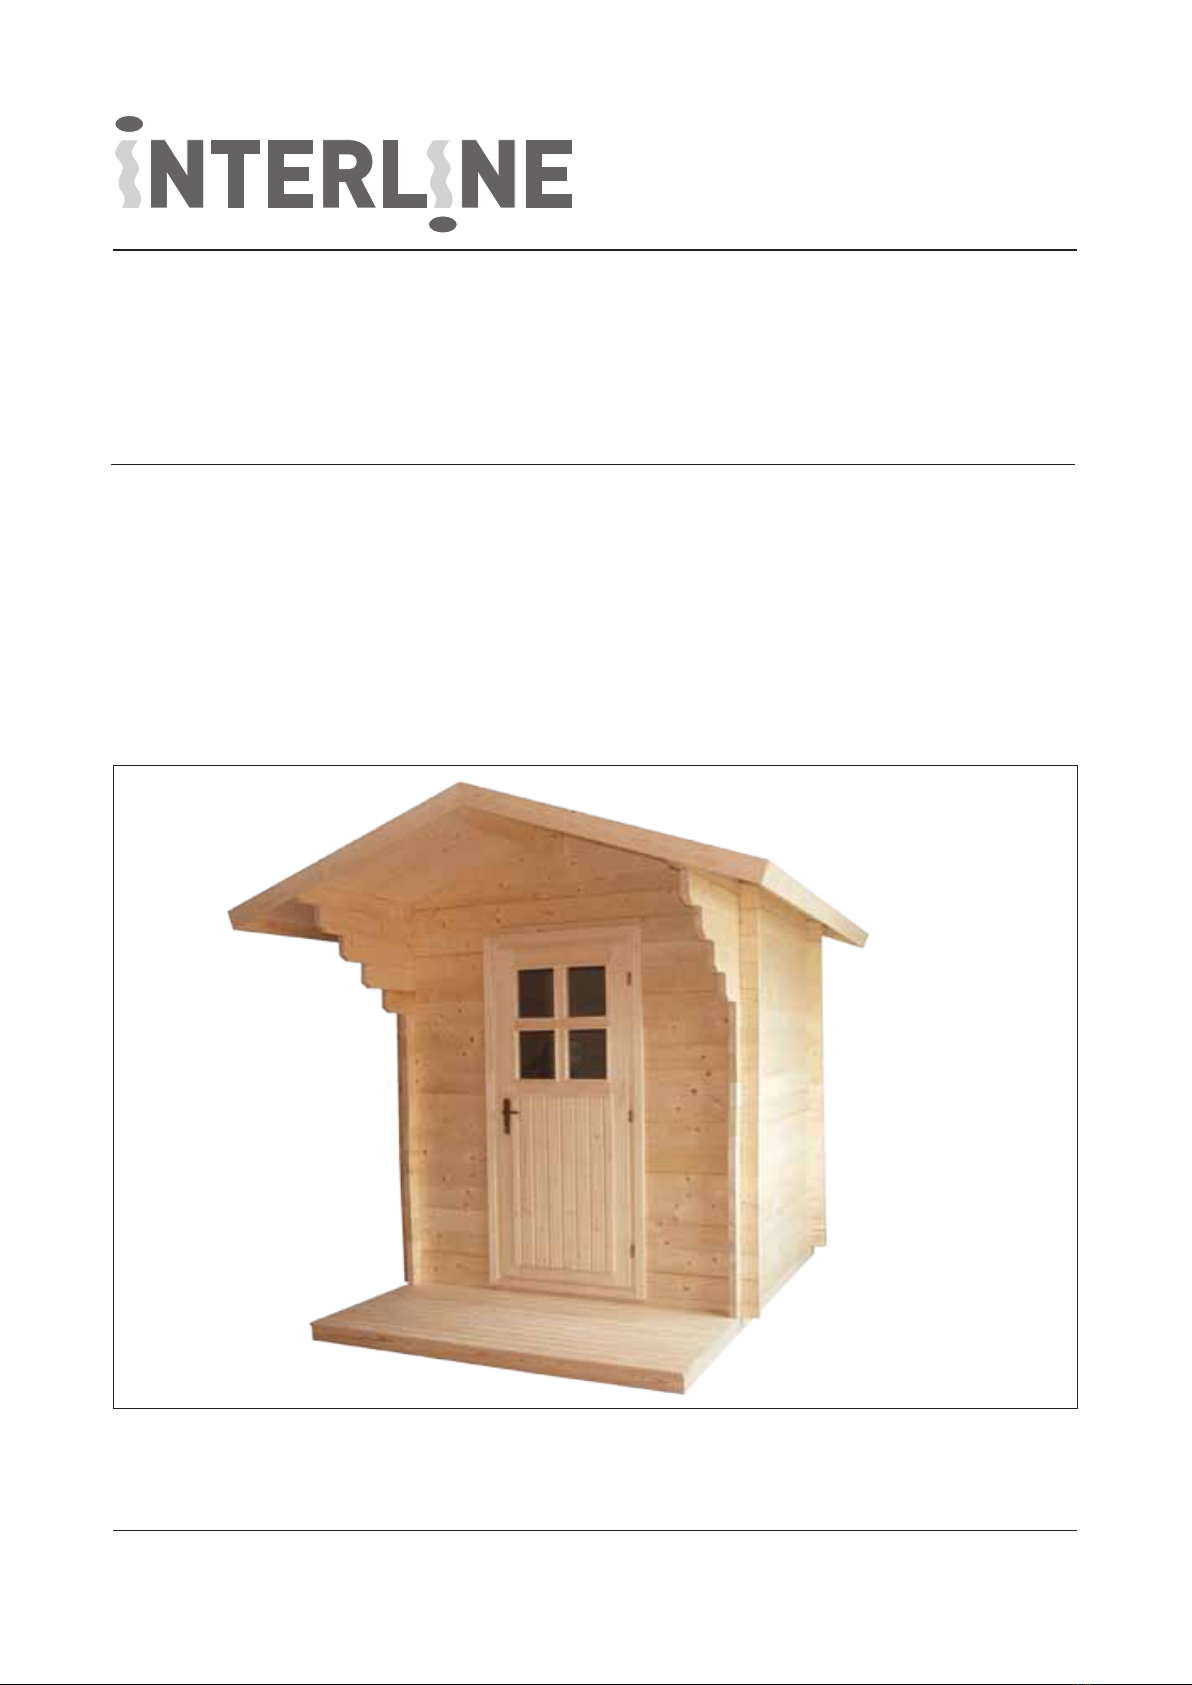
Massivsauna SYLVA 2
330 x 272 x 264 cm
Log board sauna SYLVA 2
Sauna en madriers SYLVA 2
domo01
SYLVA 2
330 X 272 X 264 CM

S Y L V A 2 •2MONTAGE-INSTRUCTIE/MONTAGEANLEITUNG/ASSEMBLY INSTRUCTIONS/INSTRUCTIONS DE MONTAGE
Beste koper,
Uit vele verschillende houten cabines heeft u gekozen
voor een Interline Sylva sauna. Gefeliciteerd met uw
nieuwe eigendom en hartelijk bedankt voor uw aanschaf!
Maakt u zich allereerst vertrouwd met deze instructies
en de begeleidende paklijst en sauna-specieke
tekeningen, om onnodige problemen en tijdverspilling
te voorkomen.
Om veiliger en makkelijker te werken, behoort u de
sauna met behulp van tenminste één assistent op te
bouwen. Wees extra zorgvuldig tijdens het hanteren
van grote en zware onderdelen zoals de wand-/deur-/
raampanelen en plafondcomponenten en ook tijdens
hun montage – let bijvoorbeeld op dat zij niet kunnen
omvallen voordat zij volledig in positie zijn bevestigd.
Lees, omwille van het gemak en het behalen van een
succesvol resultaat, voordat u aan het werk gaat,
deze montage-instructies door! Neem bij twijfel of
vragen contact op met uw leverancier voor advies.
De Interline Sylva sauna’s worden geleverd in transport-
verpakkingen. Nadat u de goederen heeft ontvangen,
behoort u grondig te controleren dat de verpakkingen
op geen enkele manier beschadigd zijn. In het geval dat
er een verpakking is beschadigd, s.v.p. onmiddellijk
controleren of er zich in de verpakking beschadigde
onderdelen bevinden. Als de beschadigingen zijn
veroorzaakt gedurende transport, moet aan de chauffeur
worden verzocht hiervan een aantekening te maken in
zijn vervoerbiljet.
Voordat u begint met bouwen is het verstandig te
controleren of u beschikt over een volledige set
componenten zoals deze staan aangegeven op de
paklijst. De leverancier dient zonder uitstel op de hoogte
te worden gesteld van onvolkomenheden of ontbrekende
onderdelen, dit ten hoogste binnen vijf (5) werkdagen.
Klachten
In het onwaarschijnlijke geval dat het geleverde
productiefouten bevat, is Interline verantwoordelijk voor
de productiefouten. Interline zal niet verantwoordelijk
worden gehouden voor gebreken die zijn veroorzaakt
tijdens transport of door onachtzame behandeling of
onjuiste opslag. Ook zijn claims welke te wijten zijn aan
de natuurlijke eigenschappen van hout, dat een levend
materiaal is, niet legitiem. In het geval dat deze montage-
instructies zijn veronachtzaamd, doet dit de verantwoor-
delijkheid van Interline teniet.
Deze garantie geeft u specieke juridische rechten die
van land tot land kunnen variëren. Specicaties kunnen
wijzigen zonder u daarvan op de hoogte te stellen.
Deze garantie heeft geen betrekking op de saunaoven
of verlichting die mogelijk tegelijkertijd met de sauna zijn
aangekocht.
Belangrijk
Om deze garantie geldig te maken, dient u uw aankoop
te registreren op onze Interline Products website.
Ga hiervoor naar www.interline-products.com naar de
pagina Productregistratie.
De eigenschappen van hout
Hout is een natuurproduct en ieder stuk hout heeft zijn
eigen kleurenstructuur en verschillende manieren van
werking. De wijze waarop hout eruitziet is geen twee
maal hetzelfde en dit is ook één van de meest geliefde
kenmerken van hout. Het zetten van hout en de barsten
in het hout zijn twee normale eigenschappen van hout.
Gedurende het proces van zetten /krimpen, neemt de
spanning in het hout toe. Als de spanning de elasticiteit
van het hout te boven gaat ontstaan er barsten. De
omvang van de barsten is afhankelijk van de vochtigheid
en de dikte van de houtblokken. In grotere balken kunnen
de barsten vrij breed zijn ten gevolge van het normale
proces van opdrogen. Er is echter geen reden hierover
ongerust te zijn. De barsten brengen over het algemeen
geen schade toe aan de thermische of dichtheidswaarden
van de balken. Veranderingen in luchtvochtigheid
beïnvloeden voortdurend de omvang van de barsten.
Opslag tot aan de montage
De balkensauna’s van Interline worden gemaakt van
kwalitatief hoogwaardig Scandinavisch vurenhout dat
onbehandeld wordt geleverd. De verpakkingen van het
bouwpakket zijn niet waterbestendig. De verpakkingen
dienen voornamelijk om de houten onderdelen te
beschermen tegen vuil. Het is daarom van belang het
bouwpakket tot aan de montage op te slaan in een droge
en geventileerde ruimte, niet direct op de grond geplaatst
en beschermd tegen invloeden van het weer zoals regen,
zonneschijn enzovoort.
NL

S Y L V A 2 •3MONTAGE-INSTRUCTIE/MONTAGEANLEITUNG/ASSEMBLY INSTRUCTIONS/INSTRUCTIONS DE MONTAGEM O N T A G E - I N S T R U C T I E I n t e r l i n e - B I N N E N S A U N A - P A G I N A 3
Lieber Sauna Besitzer!
Herzlichen Glückwunsch zum Erwerb einer Interline
Sylva Massivsauna und vielen Dank für Ihr Vertrauen.
Machen Sie sich zunächst mit dieser Montageanleitung
vertraut und überprüfen Sie anhand der beigefügten
Packliste die Vollständigkeit der Einzelteile.
Aus Sicherheitsgründen sollte der Aufbau mit mindes-
tens einem Helfer durchgeführt werden. Behandeln Sie
große und schwere Teile wie die Wand-, Tür-, Fenster
und Dachelemente mit besonderer Vorsicht. Achten Sie
bei der Montage auf feste Verschraubung.
Um ein müheloses Gelingen zu garantieren lesen
Sie bitte diese Montageanleitung vor Beginn der
Arbeiten aufmerksam durch! Bei Fragen kontaktieren
Sie Ihren Händler.
Ihre Interline Sylva Sauna wird in einer für den Transport
geeigneten Verpackung geliefert. Überprüfen Sie die
Verpackung sofort nach Erhalt auf evtl. Beschädigungen.
Im Falle einer Beschädigung der Verpackung prüfen
Sie bitte sofort, ob Schäden an den Bauteilen der Sauna
entstanden sind. Veranlassen Sie den Fahrer die
Beschädigung im Lieferschein zu bestätigen.
Überprüfen Sie die Vollständigkeit der Komponenten
Ihrer Sauna anhand der Packliste. Informieren Sie Ihren
Händler über fehlende Teile, er wird die Teile innerhalb
von fünf (5) Tagen liefern.
Reklamation
Für den unwahrscheinlichen Fall eines produktions-
bedingen Fehlers haftet Interline. Interline kann nicht
haftbar gemacht werden für Transportschäden, Schäden
aufgrund grober Fahrlässigkeit oder unsachgemäßer
Behandlung. Beschwerden, die sich auf die natürliche
Charakteristik des Holzes beziehen sind nicht legitim.
Im Falle der Nichteinhaltung dieser Montageanleitung
erlischt die Verantwortung von Interline. Diese Garantie
gewährt Ihnen Rechte die sich in einigen Ländern
unterscheiden. Änderungen bleiben vorbehalten. Diese
Garantie umfasst nicht den Ofen oder die Beleuchtung.
Wichtig
Um Gewährleistungsansprüche bestätigen zu lassen,
sollen Sie Ihren Ankauf registrieren auf unserer Interline
Products Website. Sie nden diese Registration auf www.
interline-products.com, Seite Produktregistrierung.
Natürliche Charakteristik von Holz
Holz ist ein Naturprodukt und jedes Stück hat seine
eigene Färbung und Beschaffenheit. Das Aussehen von
Holz ist niemals gleich und gerade dies ist ein beliebtes
Merkmal von Holz. Das Setzen von Holz und Risse im
Holz sind normale Eigenschaften von Holz. Während des
Prozesses des Setzens erhöht sich die Spannung im
Holz. Wenn die Spannung die Spannungstoleranzen des
Holzes überschreitet kann es zu Rissen kommen. Die
Größe der Risse hängen von der Feuchtigkeit und Dicke
des Holzes ab. Aufgrund des Trocknungsprozesses
können Risse in größeren Balken breiter sein. Diese
Risse sind kein Anlass zur Beunruhigung. Die Risse
beeinträchtigen die thermischen und statischen
Eigenschaften des Holzes nicht. Veränderungen der
Luftfeuchtigkeit beeinussen stetig die Größe der Risse.
Lagerung
Ihre Interline Sauna ist aus hochwertiger, unbehandelter
nordeuropäischer Fichtenholz gefertigt. Die Umverpa-
ckung ist nicht wasserdicht. Die Umverpackung soll Ihre
Interline Sauna vor Verschmutzungen schützen. Lagern
Sie den Bausatz bis zur Montage an einem trockenen,
belüfteten Ort, nicht direkt am Boden. Vermeiden
Sie direkte Witterungseinüsse wie Sonne, Regen,
Schnee, u.s.w.
Dear Log Sauna Owner!
From many different log cabins you have chosen a
Interline Sylva log sauna. Congratulations and thank you!
The rst thing to do is to familiarise yourself with these
instructions and the accompanying packing list and
sauna individual drawings in order to avoid unnecessary
problems and time waste.
For ease and safety, this job should be undertaken with
at least one helper. Take special care when handling
large and heavy parts such as wall/door/window panels
and ceiling sections, and during their assembly – e.g.
to ensure they do not fall over before being fully xed
in position.
DE
GB
S Y L V A 2 •4MONTAGE-INSTRUCTIE/MONTAGEANLEITUNG/ASSEMBLY INSTRUCTIONS/INSTRUCTIONS DE MONTAGE
For ease & success, please read all through these
Assembly Instructions before starting the job!
In case of any doubt or query, please contact your
supplier for advice.
The Interline log saunas are delivered in transport
packages. After you have received the goods you should
check thoroughly that the packages are not damaged in
any way. In case a package have been damaged, pls.
check immediately if there are damaged parts inside
the package. If the damages are caused during the
transportations, the driver has to be requested to mark
this in his waybill.
Before you begin to build you should check that you have
a complete set of components according to the packing
list. The supplier should be informed of faults or missing
parts without delay, within ve (5) working days at the
latest.
Complaints
In the unlikely event that there are production faults in
the delivery, Interline answers for the production faults.
Interline is not to be held responsible for faults that have
been caused during the transportation or by negligent
treatment or false storage. Also claims that are to be
referred to the natural characteristics of wood, which is a
living material, are not legitimate. In case these assembly
instructions have been neglected, the responsibility of
Interline becomes void.
In case these mounting instructions have been
omitted, this nullies the supplier’s liability. This
warrantee gives you specic legal rights, which may
vary from one country to another. Specications can
change without informing you thereof. This warrantee
does not concern the sauna oven or lighting which
possibly was bought at the same time as the sauna.
Important
In order to validate this warrantee you should ll in the
registration form on our Interline Products website.
You can nd this form on www.interline-products.com,
page Product Registration.
Characteristics of wood
Wood is a product of nature and every piece of wood
has its’ own colour structure and is working in different
manners. The appearance of wood is never the same
and this is also one of the so beloved features of wood.
The settling of the wood and the cracks in the wood
are two normal features of wood. During the process of
settling /shrinking, tension increases in the wood. If the
tension exceeds the tensile stress in the wood, cracks
will occur. The size of the cracks depends on the humidity
and thickness of the logs. In bigger logs the cracks can
be quite wide due to the normal drying process. There
is, however, no need to feel alarmed. The cracks do not
generally harm the thermal or density values of the logs.
Changes in the air humidity constantly affect the size of
the cracks.
Storage until assembly
The Interline log saunas are made of quality Scandinavian
pine wood that is delivered un-treated. The packages of
the building kit are not waterproof. The packages mainly
protect the wooden parts from getting dirty. Therefore,
it is important that the building kit is stored up till the
assembly in a dry and ventilated place, not directly on the
ground, and protected from weather conditions like rain,
sunshine and so on.
Cher(e) Propriétaire du Sauna
en madriers!
Parmi de nombreuses cabines de bois, vous avez choisi
le sauna Sylva en madriers Interline. Nous vous en
félicitons et remercions!
La première chose à faire est de vous familiariser avec
les présentes instructions, la liste de colisage jointe ainsi
que les différents schémas du sauna an d’éviter des
problèmes inutiles et une perte de temps.
Pour des raisons de commodité et de sécurité, nous
vous recommandons d’entreprendre ce montage en vous
faisant aider par au moins une personne. Prenez des
précautions supplémentaires lors de la manipulation de
pièces volumineuses et lourdes telles que panneaux de
parois/porte/fenêtre et sections de plafond, ainsi que
lors de l’assemblage de ces pièces – en veillant par
exemple à ce qu’elles ne tombent pas avant de les avoir
positionnées et solidement xées.
Pour parvenir aisément au meilleur résultat, il
convient de lire la totalité des présentes Instructions
d’Assemblage avant de commencer! En cas de doute
ou de questions, consultez votre revendeur qui vous
conseillera.
FR

S Y L V A 2 •5MONTAGE-INSTRUCTIE/MONTAGEANLEITUNG/ASSEMBLY INSTRUCTIONS/INSTRUCTIONS DE MONTAGE
Les saunas Sylva en madriers Interline sont livrés dans
des emballages de transport. Après avoir réceptionné les
biens, nous vous conseillons de vérier soigneusement
que les colis n’ont pas été endommagés. Dans le cas
où un colis a été endommagé, veuillez immédiatement
vérier si des pièces à l’intérieur du colis ont été endom-
magées. Si les dommages ont eu lieu durant le transport,
demandez au conducteur de le marquer sur sa feuille
de route.
Avant de commencer à assembler le sauna, nous vous
conseillons de vérier que vous avez bien l’ensemble
des pièces détachées gurant sur la liste de colisage.
Le fournisseur doit être informé des défauts ou des
pièces manquantes sans tarder, à savoir au plus tard
dans les cinq (5) jours ouvrables.
Réclamations
Dans le cas peu probable où il existerait des défauts
de fabrication lors de la livraison, Interline en est tenu
responsable. Interline n’est pas responsable des
dommages qui ont été causés durant le transport des
marchandises ou des dommages causés par un traite-
ment inadéquat ou un stockage inapproprié des
marchandises. Les réclamations portant sur les
caractéristiques naturelles du bois, qui est un matériau
vivant, sont en outre considérées comme non justiées.
Dans le cas où les présentes instructions d’assemblage
ont été négligées, la responsabilité d’Interline est nulle.
Cette garantie vous confère des droits juridiques
spéciques, pouvant varier d’un pays à l’autre. Les
spécications peuvent être modiées sans que vous ne
soyez prévenu.
Cette garantie ne s’applique pas au poêle de sauna ni
au dispositif d’éclairage qui aurait été acheté en même
temps que le sauna.
Important
An de valider cette garantie, vous devez
remplir l’enregistrement de produit sur notre site
Interline Products. Pour faire cela, allez au site
www.interline-products.com, page Enregistrement
de Produit.
Les caractéristiques du bois
Le bois est un produit naturel et chaque morceau de bois
possède sa propre structure de couleurs et travaille de
façon différente. Le bois n’a jamais la même apparence
et c’est bien pour cette caractéristique que le bois est tant
aimé. Le tassement du bois et les ssures dans le bois
sont deux caractéristiques habituelles du bois. Durant le
processus de tassement /rétrécissement, la tension
augmente dans le bois. Si cette tension excède l’élasticité
du bois, des ssures apparaîtront. La taille des ssures
dépend de l’humidité et de l’épaisseur des poutres en
bois. Les ssures des poutres en bois plus grandes peu-
vent être relativement larges. Ceci est dû au processus
de séchage habituel. Il n’y a cependant aucune raison de
s’alarmer. Les ssures ne nuisent généralement pas aux
valeurs thermiques ni à la densité des poutres en bois.
Les changements d’humidité atmosphérique inuent
sans cesse sur la taille des ssures.
Entreposage jusqu’à l’assemblage
Les saunas Sylva en madriers d'Interline sont fabriqués
à partir de sapin scandinave de qualité qui est livré non
traité. Les emballages du kit de construction ne sont
pas imperméables. Les emballages protègent surtout
les pièces en bois des salissures. C’est pourquoi il est
important que le kit de construction soit stocké dans un
endroit sec et ventilé, pas directement au contact du sol
et à l’abri des intempéries telles que la pluie, le soleil et
autres jusqu’à son assemblage.

S Y L V A 2 •6MONTAGE-INSTRUCTIE/MONTAGEANLEITUNG/ASSEMBLY INSTRUCTIONS/INSTRUCTIONS DE MONTAGE
SYLVA 2 BINNENSAUNA UIT MASSIEF HOUTEN WANDPANELEN
SYLVA 2 MASSIVSAUNA
LOG BOARD SAUNA SYLVA 2
SAUNA EN MADRIERS SYLVA 2
• Buitenmaat (incl. dakrand) : 330 x 272 x 264 cm
• Binnenmaat: 191 x 191 x 205 cm
• Wanddikte: 45 mm
Bewaar het aeveringsbewijs, de rekening en de
montage-instructie zorgvuldig voor eventuele vragen.
U heeft de volgende hulpmiddelen nodig voor de
montage;
• 1 hamer met houten garnituur of een rubberhamer
• 1 accuschroevendraaier met bits voor kruisschroeven
en torxschroeven
• 1 rolmaat
• 1 boor Ø 10 mm, 1 boor Ø 3 mm
• 1 waterpas
• 1 potlood
Voor het opbouwen heeft u hulp nodig van een assistent!
We raden u aan de gaten voor de schroeven voor te
boren.
Kleine afwijkingen in de maat kunnen voorkomen.
Technische wijzigingen en drukfouten voorbehouden.
• Kabinenmaß (inkl. Kranz) : 330 x 272 x 264 cm
• Innenmaß: 191 x 191 x 205 cm
• Wandstärke: 45 mm
Heben Sie den Lieferschein, die Rechnung und die
Montageanleitung für eventuelle Rückfragen gut auf.
Sie benötigen folgendes Werkzeug für die Montage:
• 1 Hammer mit Beilageholz oder einen Gummihammer
• 1 Akkuschrauber mit Bits für Kreuzschrauben und Torx
• 1 Rollmaßband
• 1 Bohrer Ø 10 mm, 1 Bohrer Ø 3 mm
• 1 Wasserwaage
• 1 Bleistift
Für die Montage brauchen Sie einen Helfer! Weiter
empfehlen wir die Löcher für die Schrauben vorzubohren.
Geringfügige Maßabweichungen können möglich sein.
Technische Änderungen und Druckfehler vorbehalten.
DENL

S Y L V A 2 •7MONTAGE-INSTRUCTIE/MONTAGEANLEITUNG/ASSEMBLY INSTRUCTIONS/INSTRUCTIONS DE MONTAGE
GB FR
• Outside dimensions (incl. eaves) : 330 x 272 x 264 cm
• Inside dimensions: 191 x 191 x 205 cm
• Wall thickness: 45 mm
Keep the delivery note, the invoice and the assembly
instructions for future reference.
You need the following tools for the assembly:
• 1 hammer with wooden enclosure or a rubber hammer
• 1 cordless screwdriver with bits for cross and torx
screws
• 1 tapeline
• 1 drill Ø 10 mm, 1 drill Ø 3 mm
• 1 level
• 1 pencil
You need someone to help you with the assembly. We
advise you to rough-drill the screw holes.
Small variations in size can be possible. Technical
changes and printing errors reserved.
• Dimensions extérieures (bord du toit inclus) :
330 x 272 x 264 cm
• Dimensions intérieures : 191 x 191 x 205 cm
• Épaisseur de la paroi: 45 mm
Gardez le bon de livraison, la facture et les instructions
de montage soigneusement pour des questions
éventuelles.
Vous avez besoin des outils suivants pour la montage :
• 1 marteau avec des garnitures en bois ou un maillet
en caoutchouc
• 1 visseuse sans l avec des morceaux pour vis Torx et
transversales
• 1 mètre à ruban
• 1 perceuse Ø 10 mm, 1 perceuse Ø 3 mm
• 1 niveau
• 1 crayon
Vous avez besoin d’un aide pour la montage. Nous vous
recommandons d’amorcer les trous de vis.
Des petites variations en dimension sont possible.
Sous réserve de modications techniques et fautes
d’impression.

S Y L V A 2 •8MONTAGE-INSTRUCTIE/MONTAGEANLEITUNG/ASSEMBLY INSTRUCTIONS/INSTRUCTIONS DE MONTAGE
NL
Onderdelenlijst
Voorkant met deur
• 1 balk 216 x 7 x 4,5 cm met uitsparing voor ventilatie
en 4 uitsparingen voor draadstangen
• 14 balken 62,4 x 14,6 x 4,5 cm met uitsparingen voor
de elektrische installatie
• 14 balken 62,4 x 14,6 x 4,5 cm
• 1 balk 216 x 7 x 4,5 cm boven het deurkozijn met
4 uitsparingen voor draadstangen
• 1 dakdeel 316 x 15 x 4,5 cm
• 1 dakdeel 216 x 49,5 x 4,5 cm
Rechter- en linkerkant
• 24 balken 216 x 14,6 x 4,5 cm
• 2 balken 236 x 14,6 x 4,5 cm
• 2 balken 256 x 14,6 x 4,5 cm
• 2 balken 276 x 14,6 x 4,5 cm
• 2 balken 296 x 14,6 x 4,5 cm
• 2 balken 316 x 14,6 x 4,5 cm
Achterkant
• 1 balk 216 x 7 x 4,5 cm
• 1 balk 216 x 14,6 x 4,5 cm met uitsparing voor
ventilatie
• 14 balken 216 x 14,6 x 4,5 cm met 2 boorgaten
• 1 dakdeel 216 x 49 x 4,5 cm
• 4 daklatten 191 x 4 x 4 cm
• 2 dakdelen 190 x 95 x 6 cm
• 5 basisdelen 316 x 8 x 4 cm
• 17 grondbalken 191 x 11 x 3,5 cm
• 4 plinten 191 x 2 x 2 cm
• 68 dakplanken 143,5 x 9,5 x 2 cm
• 2 windveren 316 x 10 x 2 cm
• 4 windveren 146,5 x 10 x 2 cm
• 1 terrasplank 199,5 x 8 x 2 cm
• 1 terrasplank 190,5 x 8 x 2 cm
• 1 afdekplank 199,5 x 8 x 2 cm
• 4 banksteunen 4 x 4 cm (2 stuks 53 cm,
2 stuks 120 cm)
• 1 bank 133 x 48 cm
• 2 banken 190 x 58 cm
• 2 rugsteunen
• 2 hoofdsteunen
• 1 deurkozijn 200 x 95 cm
• 1 binnenverlichting
• 1 lampenscherm 52 x 24,5 x 3 cm
• 1 vloerrooster 70 x 50 cm
• 1 ovenbeschermingsrooster 3-delig
• 1 ventilatieschuif
• 1 set montagematerialen
• 1 montage-instructie
• 6 draadstangen 8 mm incl. moeren
• 6 m siliconenkabel 5 x 2,5 mm2
• 1 m siliconenkabel 2 x 1,0 mm2
• 20 m2 dakvilt
De onderdelenlijst dient ook als klachtenformulier!

S Y L V A 2 •9MONTAGE-INSTRUCTIE/MONTAGEANLEITUNG/ASSEMBLY INSTRUCTIONS/INSTRUCTIONS DE MONTAGE
Stückliste
Vorderseite mit Türe
• 1 Blockbohle 216 x 7 x 4,5 cm mit Ausnehmung für
Zuluft und 4 Ausfräsungen für Gewindestangen
• 14 Blockbohlen 62,4 x 14,6 x 4,5 cm mit
Elektroinstallationsbohrungen
• 14 Blockbohlen 62,4 x 14,6 x 4,5 cm
• 1 Blockbohle 216 x 7 x 4,5 cm über Türstock mit
4 Ausfräsungen für Gewindestangen
• 1 Dachbrett 316 x 15 x 4,5 cm
• 1 Dach 216 x 49,5 x 4,5 cm
Rechte und linke Seite
• 24 Blockbohlen 216 x 14,6 x 4,5 cm
• 2 Blockbohlen 236 x 14,6 x 4,5 cm
• 2 Blockbohlen 256 x 14,6 x 4,5 cm
• 2 Blockbohlen 276 x 14,6 x 4,5 cm
• 2 Blockbohlen 296 x 14,6 x 4,5 cm
• 2 Blockbohlen 316 x 14,6 x 4,5 cm
Rückseite
• 1 Blockbohle 216 x 7 x 4,5 cm
• 1 Blockbohle 216 x 14,6 x 4,5 cm mit
Lüftungsausschnitt
• 14 Blockbohlen 216 x 14,6 x 4,5 cm mit 2 Bohrungen
• 1 Dach 216 x 49 x 4,5 cm
• 4 Dachauageleisten 191 x 4 x 4 cm
• 2 Dachelemente 190 x 95 x 6 cm
• 5 Fundamente 316 x 8 x 4 cm
• 17 Bodenbretter 191 x 11 x 3,5 cm
• 4 Sockelleisten 191 x 2 x 2 cm
• 68 Dachbretter 143,5 x 9,5 x 2 cm
• 2 Windfedern 316 x 10 x 2 cm
• 4 Windfedern 146,5 x 10 x 2 cm
• 1 Terrassenbrett 199,5 x 8 x 2 cm
• 1 Terrassenbrett 190,5 x 8 x 2 cm
• 1 Abdeckbrett 199,5 x 8 x 2 cm
• 4 Bankauageleisten 4 x 4 cm (2 Stück 53 cm,
2 Stück 120 cm)
• 1 Bank 133 x 48 cm
• 2 Bänke 190 x 58 cm
• 2 Rückenlehne
• 2 Kopfstützen
• 1 Türstock 200 x 95 cm
• 1 Innenbeleuchtung
• 1 Lampensichtblende 52 x 24,5 x 3 cm
• 1 Bodenrost 70 x 50 cm
• 1 Ofenschutzgitter 3-teilig
• 1 Lüftungsschieber
• 1 Montagematerialset
• 1 Montageanleitung
• 6 Gewindestangen 8 mm inkl. Muttern
• 6 m Silikonkabel 5 x 2,5 mm2
• 1 m Silikonkabel 2 x 1,0 mm2
• 20 m2 Dachpappe
Die Stückliste dient auch als Reklamationsbogen!
DE

S Y L V A 2 •1 0MONTAGE-INSTRUCTIE/MONTAGEANLEITUNG/ASSEMBLY INSTRUCTIONS/INSTRUCTIONS DE MONTAGE
Parts list
Front with door
• 1 beam 216 x 7 x 4,5 cm with cut-out for ventilation
and 4 cut-outs for threaded rods
• 14 beams 62,4 x 14,6 x 4,5 cm with cut-outs for the
electrical installation
• 14 beams 62,4 x 14,6 x 4,5 cm
• 1 beam 216 x 7 x 4,5 cm above the door frame with
4 cut-outs for threaded rods
• 1 roof panel 316 x 15 x 4,5 cm
• 1 roof panel 216 x 49,5 x 4,5 cm
Right and left side
• 24 beams 216 x 14,6 x 4,5 cm
• 2 beams 236 x 14,6 x 4,5 cm
• 2 beams 256 x 14,6 x 4,5 cm
• 2 beams 276 x 14,6 x 4,5 cm
• 2 beams 296 x 14,6 x 4,5 cm
• 2 beams 316 x 14,6 x 4,5 cm
Back side
• 1 beam 216 x 7 x 4,5 cm
• 1 beam 216 x 14,6 x 4,5 cm with cut-out for ventilation
• 14 beams 216 x 14,6 x 4,5 cm with 2 drill holes
• 1 roof panel 216 x 49 x 4,5 cm
• 4 roof supports 191 x 4 x 4 cm
• 2 roof panels 190 x 95 x 6 cm
• 5 base parts 316 x 8 x 4 cm
• 17 oor beams 191 x 11 x 3,5 cm
• 4 skirting-boards 191 x 2 x 2 cm
• 68 roof boards 143,5 x 9,5 x 2 cm
• 2 bargeboards 316 x 10 x 2 cm
• 4 bargeboards 146,5 x 10 x 2 cm
• 1 deck board 199,5 x 8 x 2 cm
• 1 deck board 190,5 x 8 x 2 cm
• 1 covering board 199,5 x 8 x 2 cm
• 4 bench supports 4 x 4 cm (2 pcs 53 cm,
2 pcs 120 cm)
• 1 bench 133 x 48 cm
• 2 benches 190 x 58 cm
• 2 back rests
• 2 head rests
• 1 door frame 200 x 95 cm
• 1 interior light
• 1 lamp shade 52 x 24,5 x 3 cm
• 1 oor grate 70 x 50 cm
• 1 three-piece oven protector grate
• 1 ventilation slide
• 1 set of mounting materials
• 1 assembly instruction
• 6 threaded rods 8 mm incl. bolts
• 6 m silicon cable 5 x 2,5 mm2
• 1 m silicon cable 2 x 1,0 mm2
• 20 m2 roong felt
The parts list also serves as complaint form!
GB

S Y L V A 2 •1 1MONTAGE-INSTRUCTIE/MONTAGEANLEITUNG/ASSEMBLY INSTRUCTIONS/INSTRUCTIONS DE MONTAGE
Liste des pièces
Avant avec porte
• 1 madrier 216 x 7 x 4,5 cm avec découpe pour
ventilation et 4 découpes pour tiges letées
• 14 madriers 62,4 x 14,6 x 4,5 cm avec découpes
pour l’installation électrique
• 14 madriers 62,4 x 14,6 x 4,5 cm
• 1 madrier 216 x 7 x 4,5 cm au-dessus du châssis
de porte avec 4 découpes pour tiges letées
• 1 panneau de toit 316 x 15 x 4,5 cm
• 1 panneau de toit 216 x 49,5 x 4,5 cm
Cotés droit et gauche
• 24 madriers 216 x 14,6 x 4,5 cm
• 2 madriers 236 x 14,6 x 4,5 cm
• 2 madriers 256 x 14,6 x 4,5 cm
• 2 madriers 276 x 14,6 x 4,5 cm
• 2 madriers 296 x 14,6 x 4,5 cm
• 2 madriers 316 x 14,6 x 4,5 cm
Coté arrière
• 1 madrier 216 x 7 x 4,5 cm
• 1 madrier 216 x 14,6 x 4,5 cm avec découpe pour
ventilation
• 14 madriers 216 x 14,6 x 4,5 cm avec 2 forures
• 1 panneau de toit 216 x 49 x 4,5 cm
• 4 barres de support de toit 191 x 4 x 4 cm
• 2 panneaux de toit 190 x 95 x 6 cm
• 5 panneaux de base 316 x 8 x 4 cm
• 17 madriers de base 191 x 11 x 3,5 cm
• 4 plinthes 191 x 2 x 2 cm
• 68 planches de toit 143,5 x 9,5 x 2 cm
• 2 planches de rive 316 x 10 x 2 cm
• 4 planches de rive 146,5 x 10 x 2 cm
• 1 planche de terrasse 199,5 x 8 x 2 cm
• 1 planche de terrasse 190,5 x 8 x 2 cm
• 1 planche couvrant 199,5 x 8 x 2 cm
• 4 supports de banc 4 x 4 cm (2 pcs 53 cm,
2 pcs 120 cm)
• 1 banc 133 x 48 cm
• 2 bancs 190 x 58 cm
• 2 appuis pour le dos
• 2 appuie-têtes
• 1 châssis de porte 200 x 95 cm
• 1 éclairage intérieur
• 1 abat-jour 52 x 24,5 x 3 cm
FR
• 1 caillebotis 70 x 50 cm
• 1 grill protection four à 3 pièces
• 1 coulisse de ventilation
• 1 kit de montage
• 1 instruction de montage
• 6 tiges letées 8 mm incl. écrous
• 6 m câble en silicones 5 x 1,5 mm2
• 1 m câble en silicones 2 x 1,0 mm2
• 20 m2 carton bitumé
La liste des pièces aussi sert de formulaire de plainte!
S Y L V A 2 •1 2MONTAGE-INSTRUCTIE/MONTAGEANLEITUNG/ASSEMBLY INSTRUCTIONS/INSTRUCTIONS DE MONTAGE
Montageanleitung
GER
Schrauben 4 x 60 mm
domo04
Abb 1.1
Abb 1.2
Schroeven/Schrauben/Screws/Vis 4 x 60 mm

S Y L V A 2 •1 3MONTAGE-INSTRUCTIE/MONTAGEANLEITUNG/ASSEMBLY INSTRUCTIONS/INSTRUCTIONS DE MONTAGE
Schrauben 4 x 60 mm
domo05
Abb 1.3
Abb 1.4
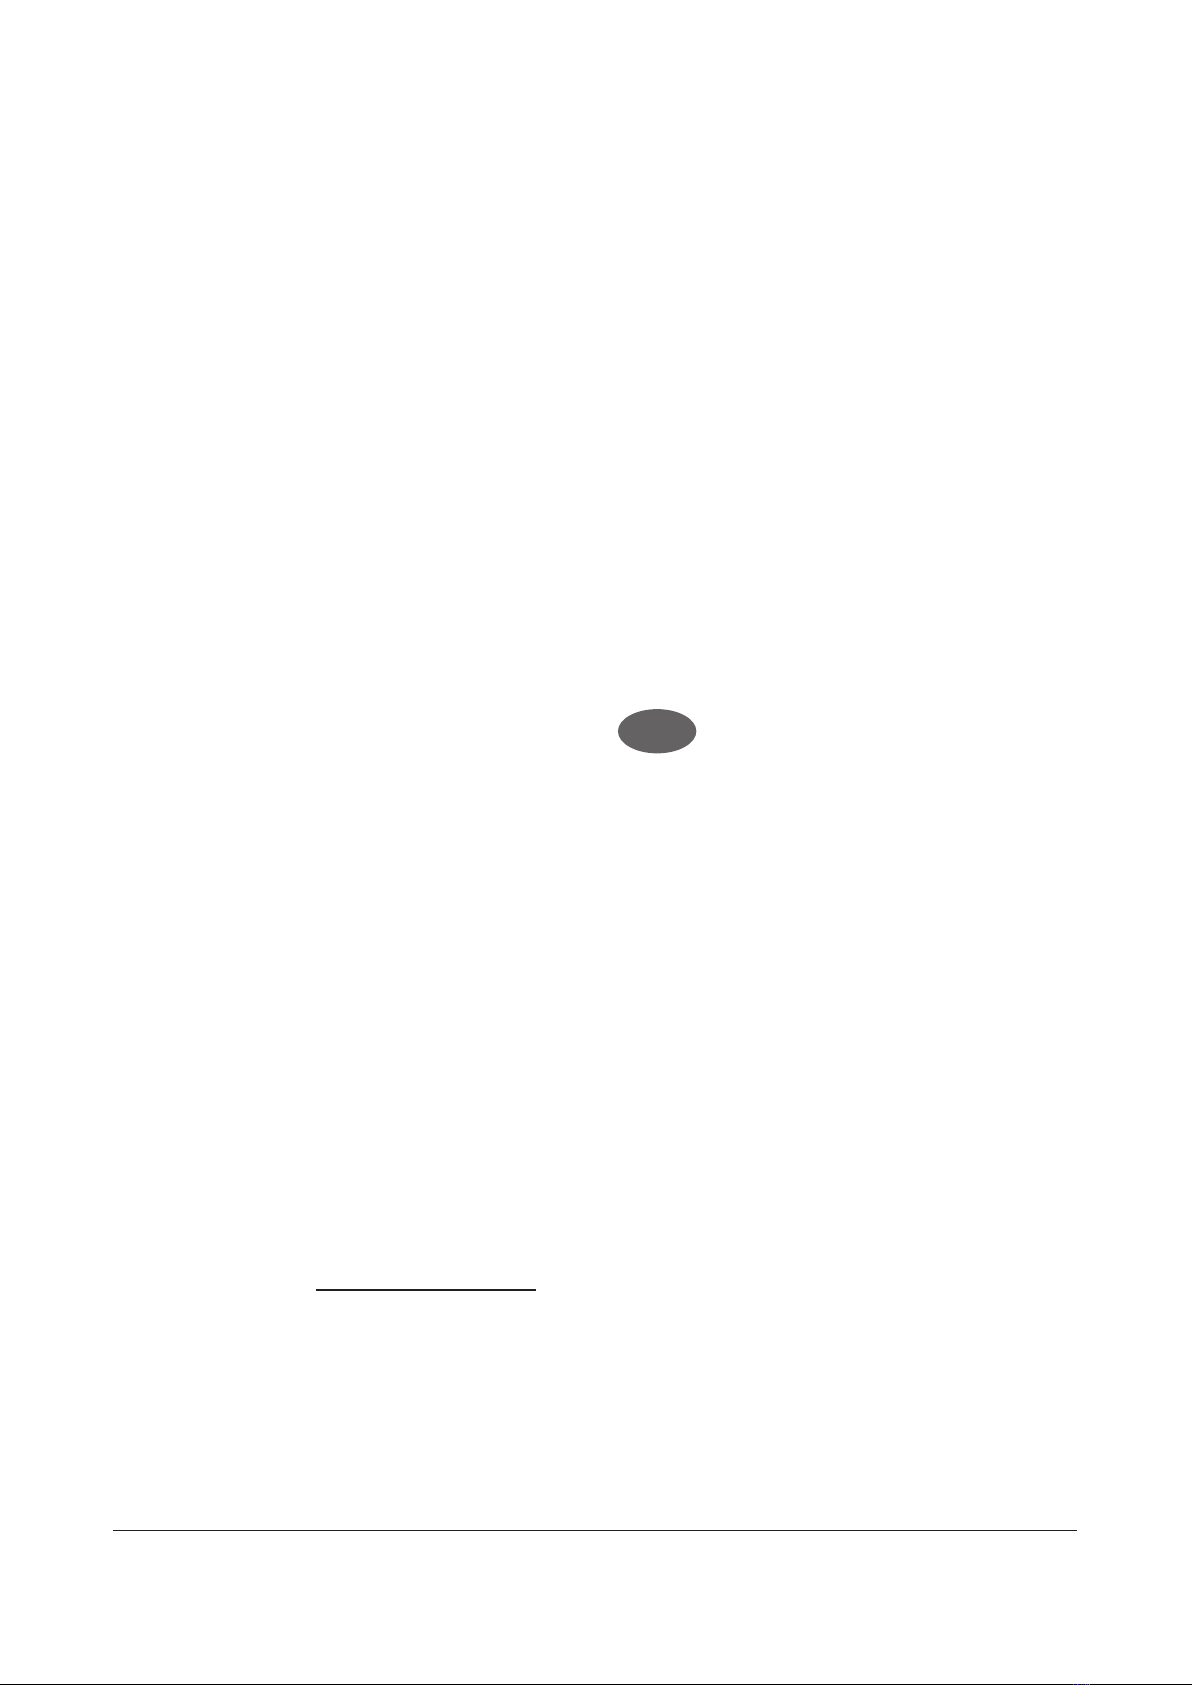
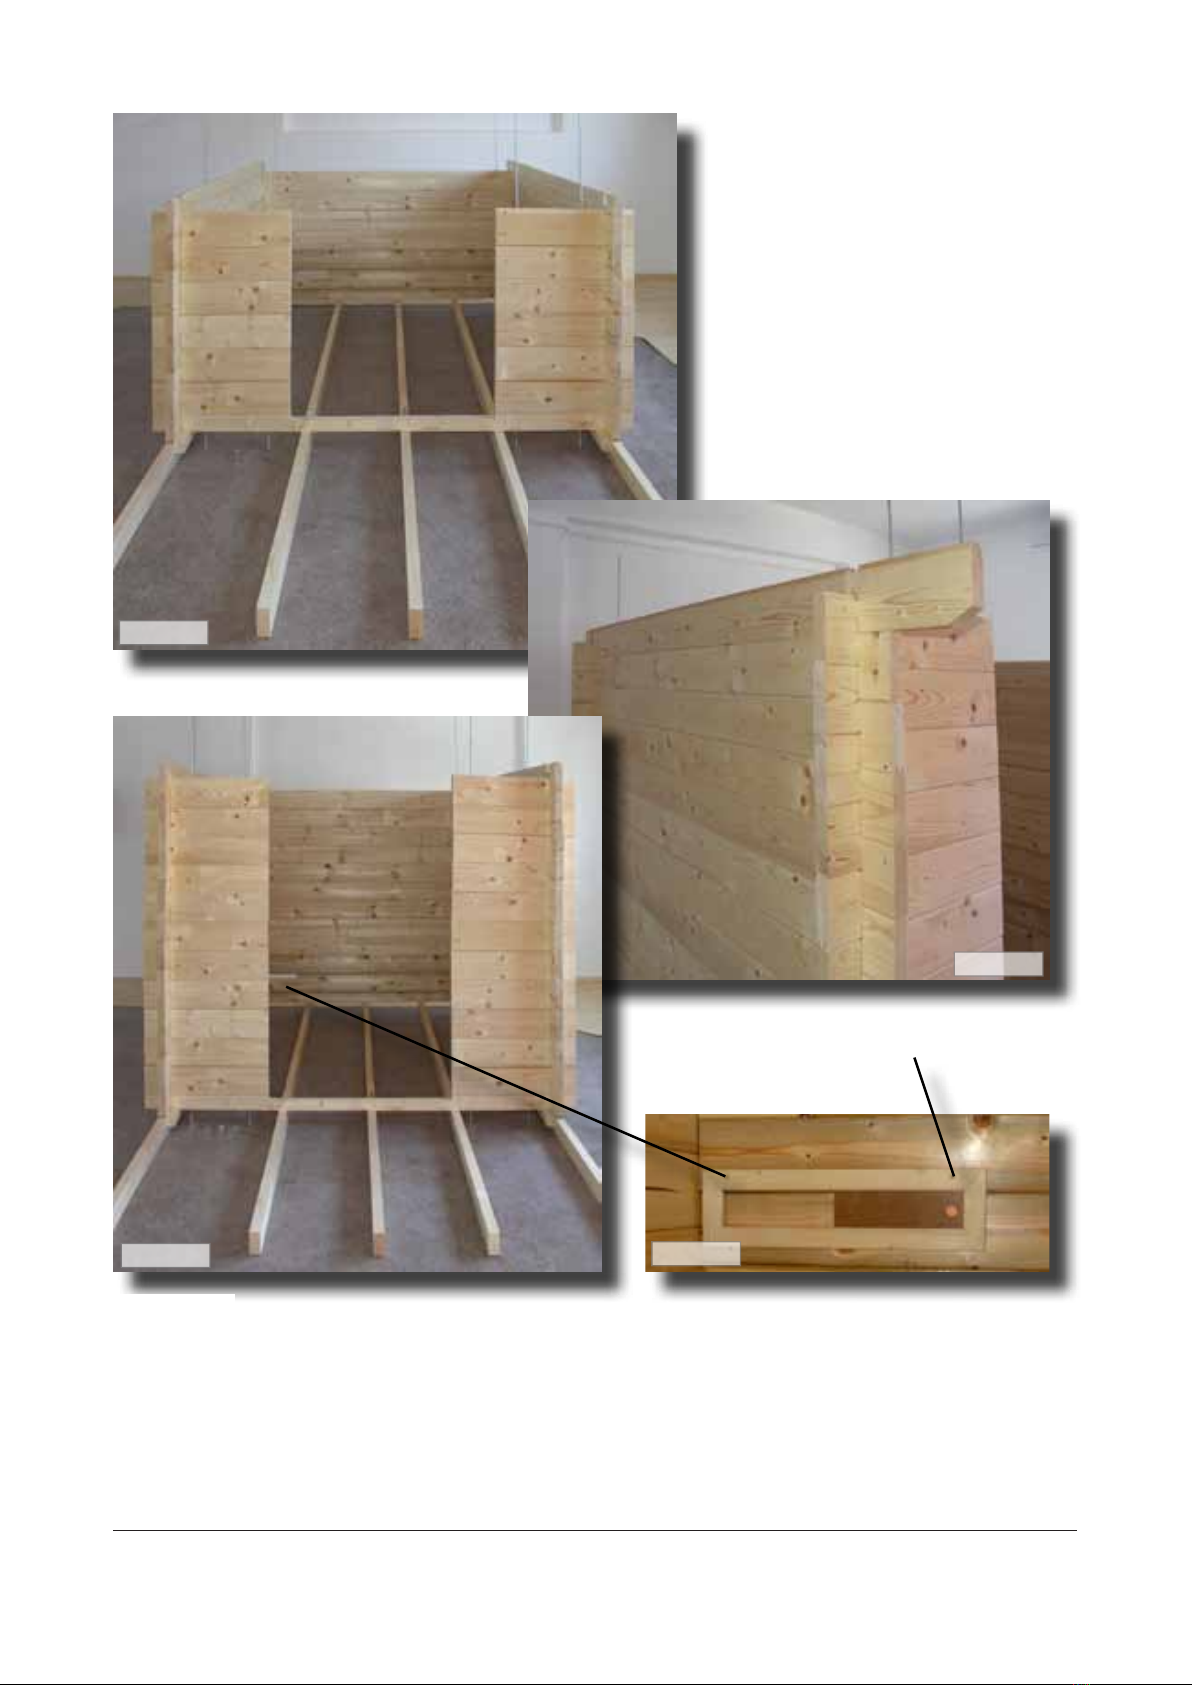
BODENRAHMEN
HINTEN
Schroeven/Schrauben/Screws/Vis 4 x 60 mm
Achterkant vloerframe/
Bodenrahmen hinten/
Back of bottom frame/
Coté arrière du châssis
de base
S Y L V A 2 •1 4MONTAGE-INSTRUCTIE/MONTAGEANLEITUNG/ASSEMBLY INSTRUCTIONS/INSTRUCTIONS DE MONTAGE
Montageanleitung
GER
domo06
Schrauben 4 x 60 mm
Abb 1.5
Abb 1.6
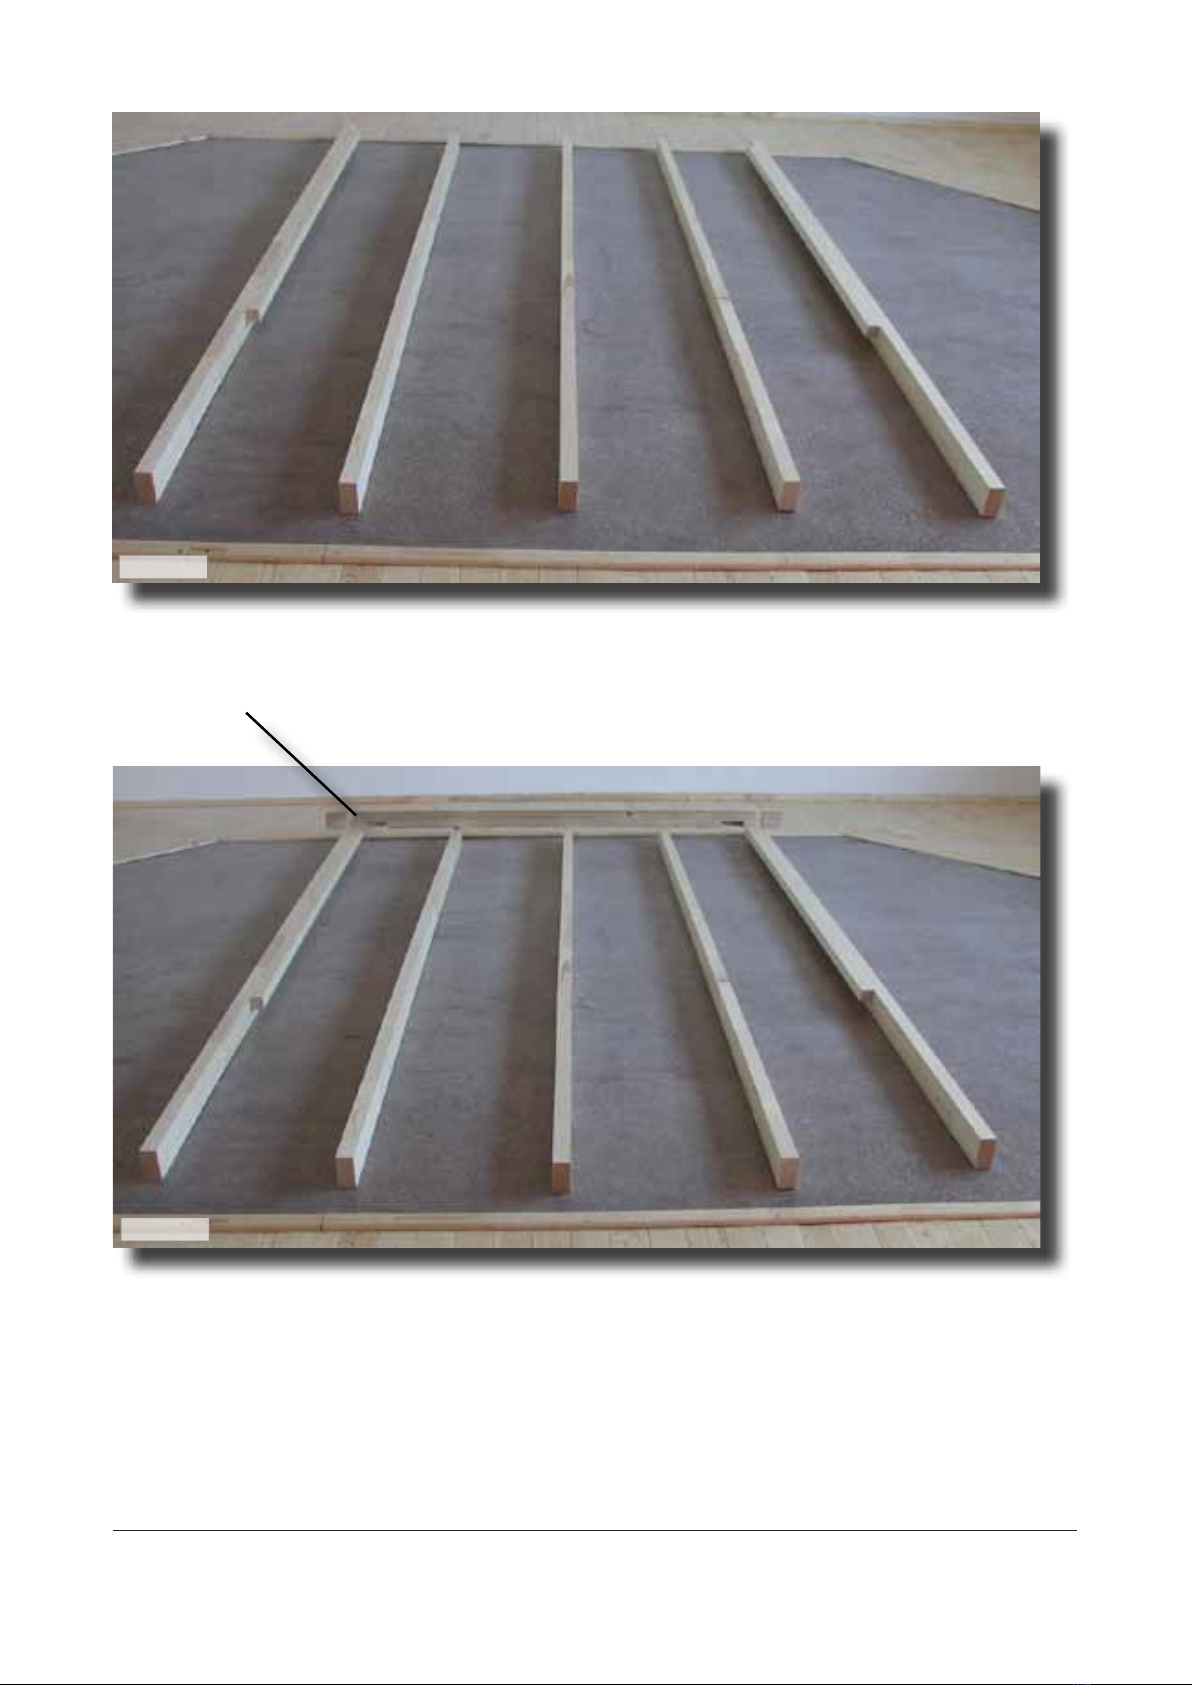
BODENRAHMEN
VORNE
Schroeven/Schrauben/Screws/
Vis 4 x 60 mm
Voorkant vloerframe/
Bodenrahmen vorne/
Front of bottom frame/
Avant du châssis de base

S Y L V A 2 •1 5MONTAGE-INSTRUCTIE/MONTAGEANLEITUNG/ASSEMBLY INSTRUCTIONS/INSTRUCTIONS DE MONTAGE
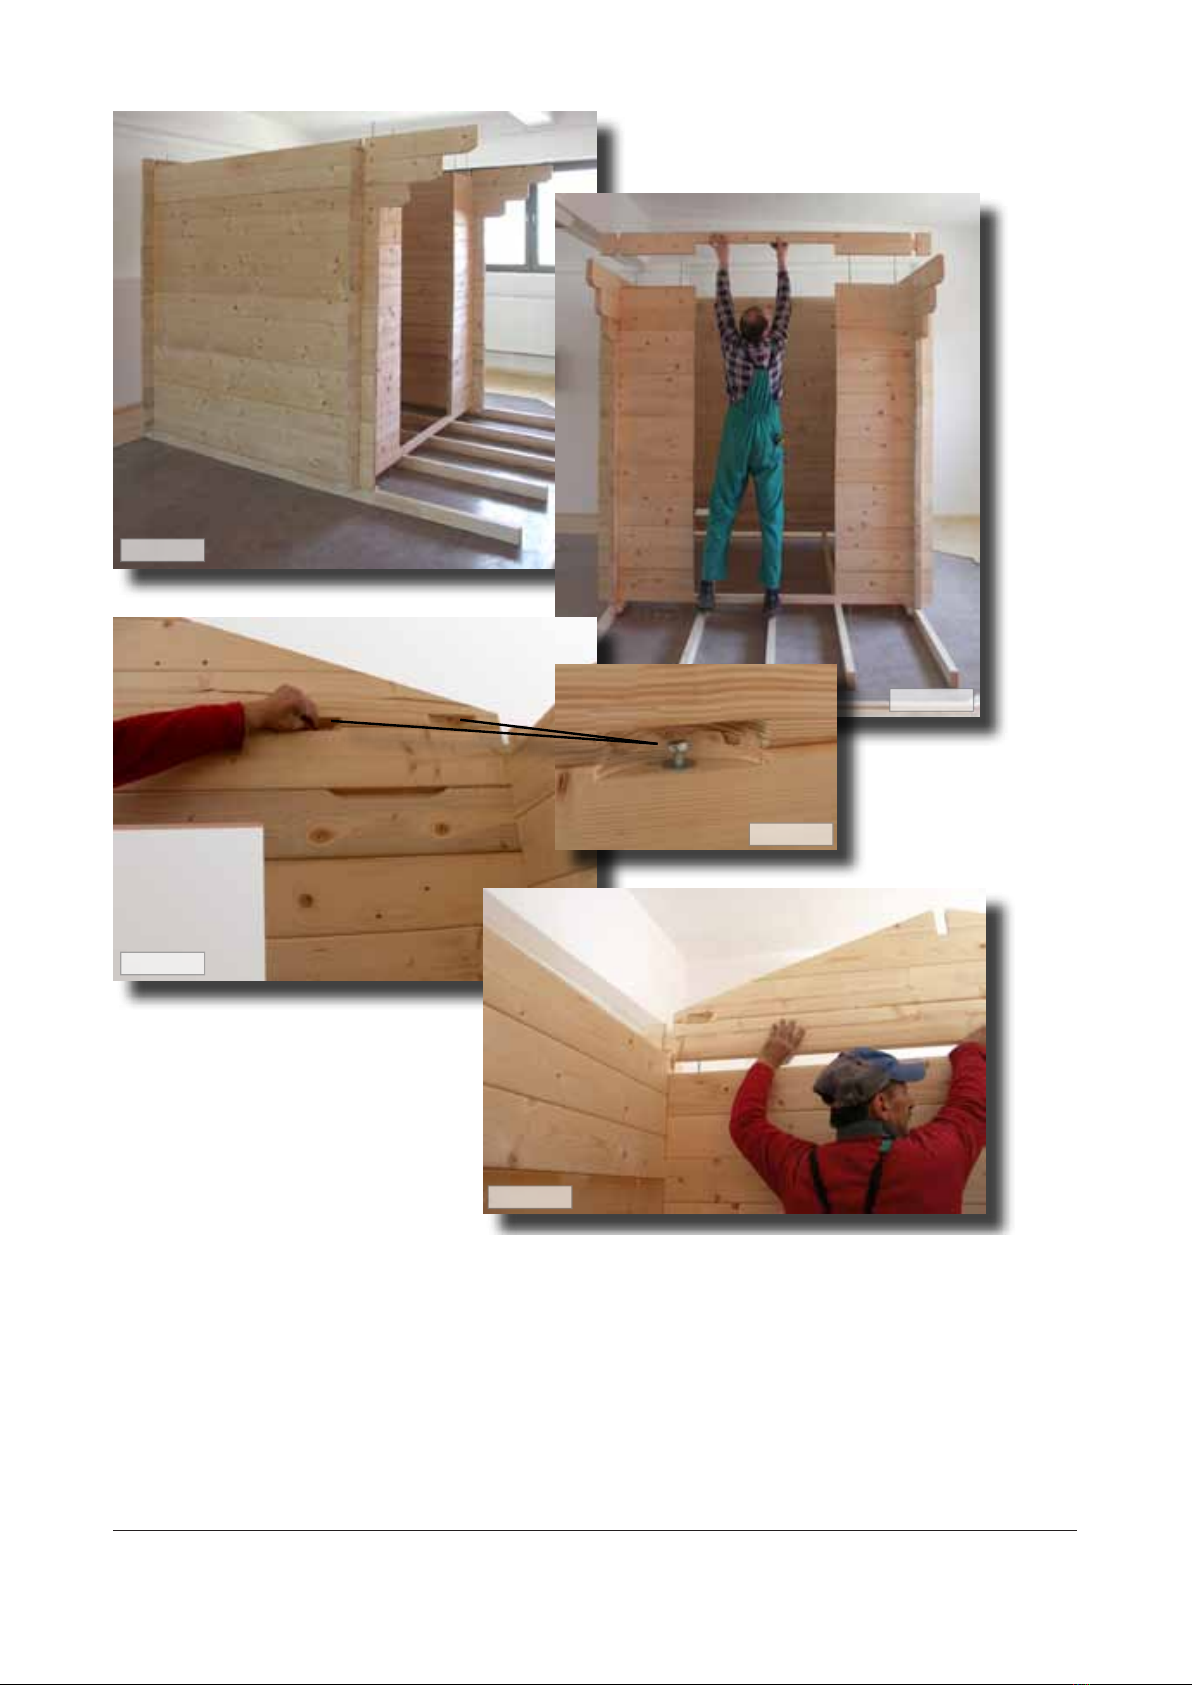
domo07
Abb 1.7
Abb 1.8

S Y L V A 2 •1 6MONTAGE-INSTRUCTIE/MONTAGEANLEITUNG/ASSEMBLY INSTRUCTIONS/INSTRUCTIONS DE MONTAGE
Montageanleitung
GER
domo08
Abb 1.10
Abb 1.9
Abb.1.11
Gewindestangen 8 mm
Draadstangen/Gewindestangen/
Threaded rods/Tiges letées 8 mm
S Y L V A 2 •1 7MONTAGE-INSTRUCTIE/MONTAGEANLEITUNG/ASSEMBLY INSTRUCTIONS/INSTRUCTIONS DE MONTAGE
domo09
Abb 1.12
Abb.1.19
Abb 1.13
Abb 1.14
Schrauben 3 x 35 mm
Abb 1.15
Schroeven/Schrauben/Screws/Vis 3 x 35 mm
S Y L V A 2 •1 8MONTAGE-INSTRUCTIE/MONTAGEANLEITUNG/ASSEMBLY INSTRUCTIONS/INSTRUCTIONS DE MONTAGE
Montageanleitung
GER
domo10
Abb 1.17
Abb 1.18
Abb.1.16
Abb.1.20
Abb 1.19

S Y L V A 2 •1 9MONTAGE-INSTRUCTIE/MONTAGEANLEITUNG/ASSEMBLY INSTRUCTIONS/INSTRUCTIONS DE MONTAGE
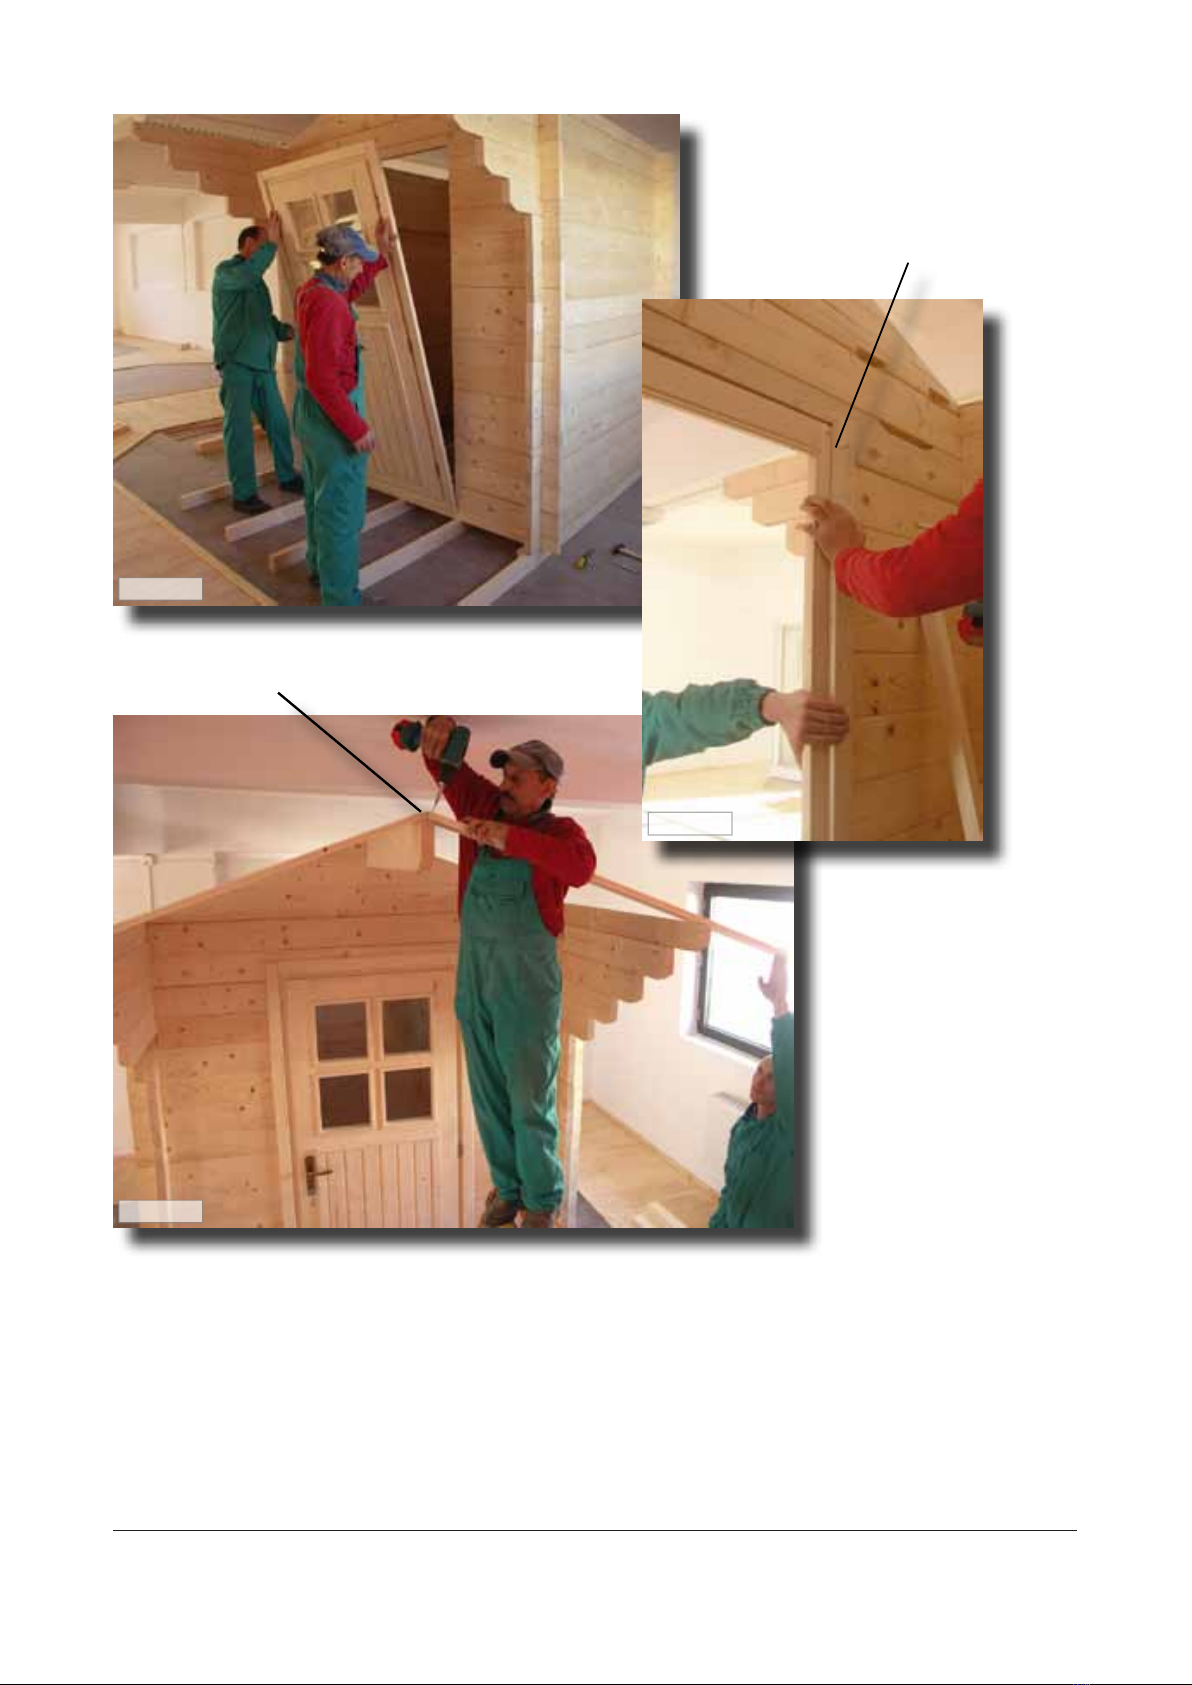
domo11
Abb.1.21
Abb 1.22
Abb 1.23
Abb 1.24
S Y L V A 2 •2 0MONTAGE-INSTRUCTIE/MONTAGEANLEITUNG/ASSEMBLY INSTRUCTIONS/INSTRUCTIONS DE MONTAGE
Montageanleitung
GER
Montageanleitung
GER
domo12
Schrauben 3,5 x 50 mm
Abb 1.26
Abb 1.25
Abb 1.27
Schrauben 3 x 40 mm
Schroeven/Schrauben/
Screws/Vis 3 x 40 mm
Schroeven/Schrauben/Screws/Vis 3,5 x 50 mm
Other Interline Plumbing Product manuals


Popular Plumbing Product manuals by other brands


Glacier bay
Glacier bay HD67816W-5010H Installation and care guide

Laufen
Laufen LIS CW2 H894661 manual

Sensea
Sensea 3276007457476 Assembly, Use, Maintenance Manual

Kohler
Kohler Stillness 979T-4 installation instructions

Brizo
Brizo 62710LF Installation

Hans Grohe
Hans Grohe PuraVida Series Instructions for use/assembly instructions


