Internal Corp Zella V12 Multi-Charger User manual

USER MANUAL
Thank you for choosing V12 Multi-Charger.
Alwasy follow the basice safety precautions when
using electrical appliances.
Read all the instructions carefully and keep this
manual handy for easy reference.
Model: V12 Multi-Charger
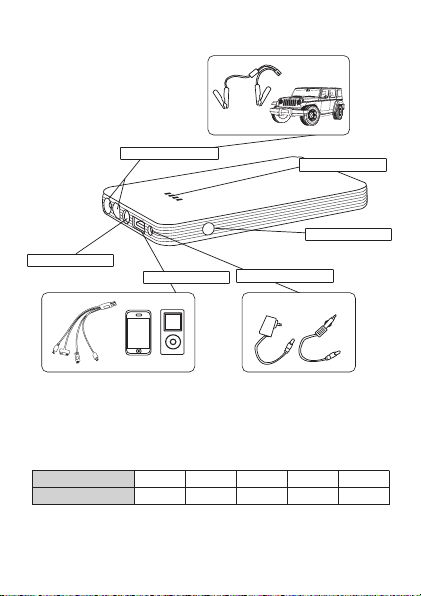
Booster Cable
Booster Cable Socket
LED Indicator
LED Switch/Power
Power Adapter Input
5V/2A USB Port
LED Light
AC Adapter Cigar Cable
The Indicator will ash one by one during the period of
charging. Different number of solid indicators show different
storage level of Jump Starter. All indicators light up when the
charging is paused or completed.
Press the power switch to check the storage level of Jump
Starter.
A. Product Layout
B. Indicator
Indicator 1 Solid 2 Solid 3 Solid 4 SolidUnlit
Storage Leve 25% 50% 75% 100%0%
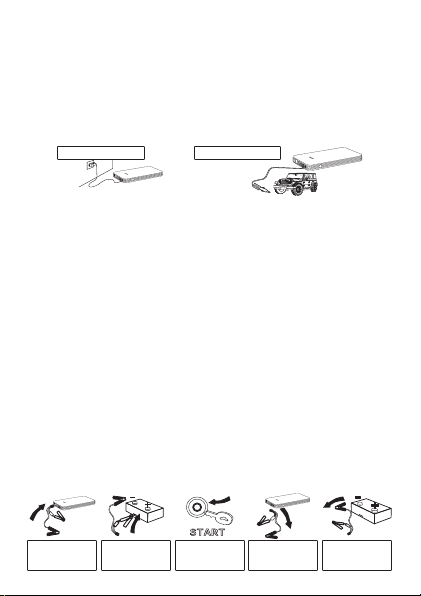
Red Clamp to +
Black Clamp to -
Connect Cable Start Engine
Remove unit
Remove Clamps
AC Adapter Cigar Cable
12345
Plug the power adapter in the wall socket.
Connect the other end of the power adapter to the power
adapter input of the unit,
or use the cigar socket cable to charge the unit from the car's
cigar socket.
1.
2.
1.
2.
3.
4.
5.
6.
7.
Plug the blue EC5 connector of smart cable into jump start
socket rst.
Correctly connect the smart cable to vehicle's battery
terminals; positive (+) to positive (+), negative (-) to negative
(-).
If all the operation is correct, the “Start”indicator turns
green.
Start the vehicle.
The time relay of smart cable is 30 seconds. Without any
operation in 30 seconds, it shuts down automatically.
Remove the smart cable from Jump Starter to reset the smart
cable.
Wrong connection of battery terminals, short-circuit and low
voltage of Jump Starter will trigger the alarm and turn the
indicators to red.
When the vehicle is started, remove the smart cable off the
battery terminal within 30 seconds.
C. Charging Instructions
D. Jump Starting 12V Vehicle
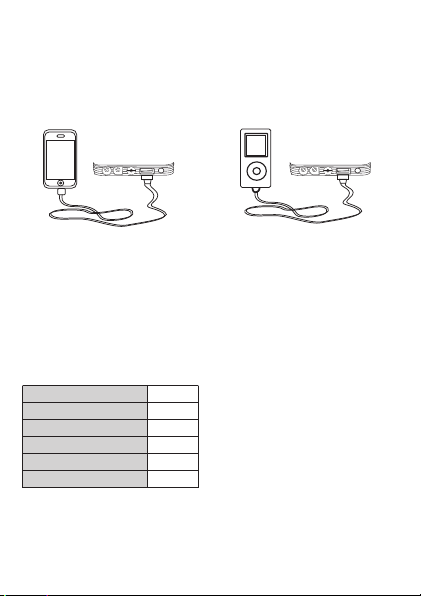
Connect the USB cable to the 5V/2A USB output port and
connect the other end of the cable to the device to charge. Press
the power button if necessary. The LED indicators will light and
start charging.
E. Charging Cell Phone or Tablet Instruction:
Hold LED Switch/Power button for 3 seconds and the LED
ashlight will turn on.
Press the button again to switch modes.
F. LED Flash Light
G. Package Content
Unit 1
1
1
1
1
Safety Cable
Multi USB Cable
AC Power Adapter
Cigar Socket Cable
1User Manual

H. Product Specications
V12 Multi-ChargerModel Number
135 x 76 x 14mm / 210gSize/Weight
12V/1A
Input
About 2-3 HoursCharging Time
200AStart Current
400A
-20°
C~ 6 0 °
C
Operation Temp.
Peak Current
>1000 cyclesLife Cycle
5V2A, 12V JumpstartOuput
7500mAhBattey Capacity
Short circuit, Over Charge,
Over Discharge
Protection

Q:
A:
Q:
A:
Q:
A:
Q:
A:
Q:
A:
How do you turn off this appliance?
This appliance will turn off automatically when there is no load.
How many times can this appliance charge my cell phone?
This depends on the device, but roughly 4 times for a standard iPhone.
How long will this appliance take to charge my cell phone fully?
This depends on the device, but approximately 1 hour.
How many times can this appliance on a full charge, start my vehicle?
This depends on the vehicle, but approximately 20 times.
How long can this appliance hold its charge?
Approximately 6 months, but this greatly depends on the temperature
and environment. We suggest recharging it every 3 months.
When Jumpstarting the car, make sure to connect the cables to the unit
and battery terminals rmly. Loose connection can result in damage and
over heating and cause burns.
Check that the LED indicators light, and any cables are properly
connected. Rust and dirt on the battery terminals can cause weak
connections. If you nd rust or dirt on the terminals, clean them rst and
reattempt the Jumpstart. If after three tries the car wont start, other
reasons can be considered. Do not try to force a jumpstart after 3 times or
it may break the unit. Re-check the connections and the terminals.
After the car has been jumpstarted, remove the cables within 30 seconds.
The safety cable's alarm will go off to remind you. Leaving the cables on
will cause damage to the unit.
Always connect the clamps to the battery terminals one at a time to avoid
electrical shortage.
Do not take apart or customize this product.
1.
2.
3.
4.
5.
I. FAQ
J. Caution

The warranty has expired from the date of purchase.
There is no label, record or evidence of the date of purchase.
Defects resulting from natural disasters such as but not limited to res, earthquakes,
storms.
Defects resulting during shipment which is beyond our control.
Damage or product failure resulting from normal wear and tear, physical abuse,
improper installation, misuse, modication or repairs by unauthorized third parties.
Damage or product failure resulting from use/misuse against what is written and stated
in this manual, product page, or any notications we present.
Damage or product failure resulting in connection with an outside product against our
recommendations or warranty.
Damage or product failure of the internal circuit board, cables or batteries resulting
from outside force.
Any other damage or product failure that we distinguish as outside the warranty.
1.
2.
3.
4.
5.
6.
7.
8.
9.
We oer a 1 year warranty on any defects in material and workmanship from
date of purchase by the end user/consumer.
The warranty will be invalid with the following conditions:
K. Warranty Information
For any problems or questions regarding operation of the unit,
contact technical support from the mail form below.
Technical Support
PC
https://www.internal.co.jp/form/mail/products/v12-english
SmartPhone
Read the QR code on the right
using an appropriate app to access the form.

© Internal Corp., 1998-2016. All rights reserved.
Internal Corp.,
2-1 Landmark tower 27F, Minatomirai 2 Cho-Me
Nishi-Ku Yokohama-Shi, Kanagawa- Ken 220-8127 Japan
Tel: +81-45-228-8927
Web: www.internal.co.jp
Submit Questions to: hardware@internal.co.jp
Table of contents
Popular Batteries Charger manuals by other brands

Elmec
Elmec EVduty EVC30 Series user manual

Mori Raddrizzatori
Mori Raddrizzatori MICRO-TECH-A series instructions

Tronsmart
Tronsmart W02 user manual

GreenWorks
GreenWorks BT 80 Li 4.0 Operator's manual

National Railway Supply
National Railway Supply ERB-C 12/201 Installation, operation and service instructions

VOLTCRAFT
VOLTCRAFT CT-8000Pb operating instructions

Technosmart
Technosmart TS-PS-CHWL01-B user manual

Delta-q
Delta-q QuiQ 912-24 series product manual

Gude
Gude START 230 Translation of original operating instructions

AA Portable Power Corp
AA Portable Power Corp CH-L18515 user manual

EcoFlow
EcoFlow RIVER Pro user manual

Ansmann Racing
Ansmann Racing xMove 2.0 Ultimate instruction manual


