Interphase Star Pilot 6 User manual

't .",'d.:
.%*
Qffz *y++
t_
:rysffi;t'
; 6:q
Operation
Marunl

Thblcof Contents
General
Information
UnitInstallation .....................6
DisplayUnit........ .............6
PowerConnection
............. ......6
Antenna
Installation............. .................1
Star
Pilot
6
GPSAntenna ...............1
BasicOperation .....................8
Star
Pilot
6
Keyboard
............. ........8
Alpha-Numeric
Keys .......8
Common
Softkey
Functions ............8
PowerlBacklight
Control .................9
GettingStarted ....
l0
Turning
the
Star
Pilot6
On....... ....
l0
The
MenuScreen ...........
l0
Choosing
The
PositionScreen .......l0
WhatIsA Waypoint'?
Entering
Waypoints
(1)Position
Mode .................
12
Saving
PresentPosition
AsA Waypoint ........l2
(2)
PlotMode ........14
Featuresof TrackPlot t4
t1
ll
ll
Creating
Routes
(5)
Status
Mode ....
19
(6)
SetUp Mode ...................20
TheBasicsofGPS ................21
Advanced
Navigation
Guide ...............22
GPS
Modes............ .........22
Navigational
Terms ........22
NMEA
0183DataOutput
............ ..................23
Error Messages& Troubleshooting
Tips..........................24
GPS
HealthMessages............ ........24
ErrorCodes ....24
Specifications........ ...............25
How To ObtainService .......26

@
1992Interphase
Technologies,
Inc.
Pub.
#STP6-
l-,192
Interphasc
Star
Pilot6r\1isatradcrrark
of'Interphase
Tcchnologies.
Inc
To
OurCustomer
Thank
you
forchoosing
the
Interphase
StarPilot
6r\1
GPS
recetver.
Throughout
thedevelopment
of this
fine
product,wehave
primarilv
been
concemed
withcrcating
aunitthat
of-lersthe
best
possiblevalue
foryour
money.
Selection
of features.
easeof use,superior
perfor-
manceandoutstanding
reliability
wercthebenchmarks
upon
which
all
importantdesign
decisions
were
made.
Wef'eel
proud
oftheStar
Pilot 6 and
yoursatisf-action
isveryimpo-rtanttous.
To thisend.
we
welcome
any
comments
or
rugg.riion,rh\u might
have
inregard
tothisequipment.
Forthefastest
repair
sel'viG.it isimportant
that
you
cornplete
the
WARRANTY REGISTRATION CARD and
returnitas
soonas
possible.
Importantl{otice
Navigationbased
solely'
onone
methodorone
instrument
should
neverbe
practiced.The
StarPilot
6GPS
shouldbeconsidered
asan
aidto
navigation.
notils
theonly
meansofnavigation.
Whilcthe
Global
PositioningSystem
is
usually
reliableandaccurate.
certain
conditions
and
somelocations
maycause
adeterioration
in
perlbr-
manceofthis
oranyother
GPS.
Itistherefore
important
for
the
new
usertolearnabout
the
lirnitationsof this
systcm.
Warranty
Informntion
Interphase
Technologies,
Inc.
provides
alimitedone-year
warranty
ontheStar
Pilot6.
Please
notethatthereare
limitations
toour
warranty.We strongly
urge
youto readthis
warrantyreprlntedat
the
back
ofthis
manualand
closely
follow
its
terms
andconditions
should
your
receiver
require
repair.Please
notethatall
repair
work
performed
during
the
wananty
period
mustbe
pertormedby
Interphase
oranauthorized
InterphaseService
Center
fortheunit
to
remainunder
warranty.
Wehavefoundthat
many
problems
experiencedby
GPSusers
are
notcausedby adefect
intheunit.
but
insteaclareoften
theresultof
theuser
notcompletely
understanding
its
proper
methodof opcration.
Therefbre.
we
strongly
recommcnd
that
should
you
experience
a
problemwith
your
Star
Pilot6youfirst
call
Interphase
andask
to
speak
toour
TechnicalSupport
Department.
Wewill be
morethan
happytotryand
assist
1'ou
onthe
phone
and,
if required,
will give
you
instructionson
howto
quicklygetyour
set
repaired.
Interphase
maintainsa
staffoftrainedtechnicians
inSantaCruz,
CA
who
can
quicklyrepairand
return
your
scttortsoriginal
specifica-
tions.
Westrongly
recommend
that
for
the
fastestservice.
if your
set
does
require
repair.
you
senditdirect
toInterphaseand
notreturn
it
tothe
dealer.For
fastest
responsc,
pleasemakeacopyoforfill out
and
usethe
repairrequest
fbrmattheend
of this
manual.Mark
the
outside
ofthebox
"FOR SERVICE REPAIR".
Interphase
Star
Pilot6GPS
VideoOperation
Guide
Interphase
hasa
videoinstructional
aid
forthe
Star
Pilot6GPS
available.
Itincludesabasic
dcscription
oftheGlobal
PositioningSystcm
and
terminology:
ahelpful
glossary:astep-by-
steplcssonon
howto
start
vour
unit.enter
rvavpoints.track
plotting.
routingand
use
of
rnanlother
specialleatures
of your
StarPilot6.
Whcthcrvouareabeginner
oranexperienced
GPS
user.
this
videoisa
very
helpfuladdition
ttl
)'our
operation
ntanual.
See
yourAuthorized
Interphase
Dealer
for
this
vrdeoorcall
Interphase
@08)
427-1444.
The
Interphase
part# is
3tt-0002-017.

General
Informntion
Con-sratulations
on your selectiono1'thr'
Interphase Star Pilot 6
GPS receiver.
Itsrugged
waterprool'desigrttttake
s it tdcall'or
installation
on nearlvanv tvpe of boat.
The Star Pil<lt6 f
.tur.. rr", aclr
ancetl l'unctions.
ancie
tnplors one
of today's most sophisticatcdGPS rccc'ircr:. Thc cot.tlil.tttotts
:tr
channel
parallel
receiverdesisn
tracks
up to cight
GPSsatcllrte\
and
rscapable
of-providing irccLrli.rte
ptrsitirrninlonnatiot.l
e
\ c-r\
scct'lttcl.
The Star Pilot 6 dcsign
is
compact
and
ot'\\ate
rproot'cottstruction.
It
has
a long-lit'e
waterprool'keypad
which allous \()Ltt()
sclcci
cvr-rv
navi-eational
f'eature
.v.'ou
need
with thetouch of'l buttott.
It hasa
beeper
fbr arrival alanl, anchor
uatch alartrtancl
it uill beep
to
acknowledge
whenevera button is pressed.
The Star Pilot 6 works in a fully automatic
mode which you need
only startup to initialize.
There isno needto eltter
atlapproxinlate
Latitucleand Longitude posrtion.You can sclectntanv ol'the Star
Pilot 6 f'eatures
with theSet-Up display.You can activatean Anchor
Alarm. Waypoint Arrival Alarm. setuniversal
or localtime.
The Star Pilot 6 graphrcnavigationmode showsyour distanccoff
thedesired
course
andhow to steer,
right or lefi. to gct back ort
course,course
over ground and speedover ground.The Data u'iltclow
in thenavigation
mode allows you to choose
a view ttl'estittratccltirnc
of arrival.
timc to go. velocity rnade
good.distance
ntade
good.
present
position latitude
andlon-eitude.
currentdatc
and time. or local
nragnetic
variation.
The Star Pilot 6 makesit easyto store
your current
or favorite
positions
in any of 100
wavpoints.Eachwaypoint isclate
stantpedfor
futurereference
and a Waypoint ManagementDisplal,'
lets
vott
quickll, scroll through and view your listin-eo1-wa1'points.
You car.t
alsopre-programup to l0 routesof l0 waypoints each
1'orfuture use.
The Star Pilot 6's very low power consumption(typically lessthan
600milliAmps at l2 Volts DC) makes
it ideally
suitedfbr many of
today's
smaller
boats,or cruising
boats,
with limited
power
avail-
ability.

Overhead
Shelf/Table
GPS antenna/receiv
Antenna cable
Star
Pilot
6GPSdisplay
unit
UniIInstallntion
Display
Unit
Thecompactsize
oftheStarPilot
6allowsfor
easy
installationin
most
anyboat.Toget
maximum
perfonnance
andlifcfrom
your
unit.
the
fbllowingguidelines
shouldbeconsiclered
when
selecting
a
mounting
location:
I ) Selectalocationwhere
theunit
isprotected
from
excessive
temperature.
Heatisoneof the
worst
enemiesof electroniccompo-
nents,
and
will acceleratecomponent
aging,therebyreducingthe
trouble-freelife of your
Star Pilot 6.
2) Mount
thedisplay
in
alocationwhere
itwill beconvenientto
route
the
power
andantenna
cables.
NOTE: An optional.in-dashmountins
bracketis
availablefbr
theStarPilot
6displayunit.Contact
)'our
nearby
Authorized
InterphaseDealer
ortheInterphaseAccessories
SalesDepart-
ment (408)
427-4444.
Power
Connection
The
StarPilot6 requiresa
p()\\'er
sourccr,^,ith
a
voltage
levelfrom l0
to l6 VDC.
Lowvoltagemav
causcaclintdrsplar.rcduccd
srgnal,
weak
beeperandaslowtumon.High
voltagc
nta\eventuallyresult
infailure
of some
internalpart.
Thcnominalvoltasc
lound
on
most
properly
operatingmarine
po\\er
\\\tL-llts
is 13.6
VDC.I1isrecom-
mended
that
you
checkthevoltagesupplrwhich
rou intend
to
operatefor the
proper
level.
Connect
thetwo-pin
plug
onthecndof'the
powe
r supply
cabletothe
power
supply
jacklocated
attherearof the
unit.Connecttheredwire
to
the
positive
terminalandthe
black
wire
tothenegative
terminalof
your
boat's12VDC battery,orthecorrespondin-u
connectionsof the
main
distribution
panel.
Avoid
connectingdirectly'
tothesamecircuit
with
anyelectronicswhich
tendtodrawalarse
anrountofpower,
such
asbilge
pumps,
refrigerators
andtransmittingradios.
The
power
cordincluded
with
the
Star
Pilot
6 includes
an
in-line
fuseholderwith
a 1.6Amptuseinstalled.
Becertainwhen
connect-
ingthe
power
cordto the
batterythatthecorrect
pcllarity
isobserved
orthefusemay
blowand
possible
circuitdamage
mayoccur.
WARNING: Never
replacethe
Star Pilot 6 in-linefusewith afuse
ofahigherrating.Always
replacewith
a
fuse
with
a
rating
between
I Amp.
and
1.6
Amp. Beforereplacrng
thefuse
checkallconnec-
tions.If thefuse
continuestoblow,return
theentire
systemto
Interphase
forservice.

Antewtn
Installation
StarPilot6 GPS
Antenna
The Star Pilot 6 GPS Antenna.with its receiverunit. is housed
in a
durable.
waterproof
casrngdesigned
for mounting in an open
location.
For optimum signalreception,mount theantenna
with a
360o
vieri of the sky so
thatit can have line-of-sighttracking o1'thc
satellites.Prcvcntoblects
such
as
poles.
rails.otherantennasand
largecables
from obstructing
theview betweentheGPS antennaand
thesatellites.
Caremust alsclbetakenin choosing
a mounting location
u'herc
radarbeams
or communicatior-rs
transrnitterbcants
WILL NOT be
directed
towardstheGPS antenna.
Mount the antennaon a level surface.
such
as
a cabin top. or on a
standardmarine antennaextension
pole.Use of a standardmarine
antennamount with l-inch threads
isrequired
to complete
the
installation.
TheStarPilot6GPSantenna
includes
30
f-eet
ofantennacable.
If
extensioncable
isneeded,
call
Interphase
CustomerService
at
(408\
427
-4444
foradvice.
WARNING: Never attempt to take off the connector on the end of
thecableor to shorten
or splicethe cable.
This could causedamageto
theunit and void anv warrantv.
StarPilot 6 antcnna/rece
iver
\
StarPilot 6 antenna/recelvcr
I
I
/':
,--j
*'-_ r '7
-- -1
to ll firot
fiberg
Iass
extencler
(l x l'11'l'{D)
U-shaped
bracket
Antenna
m0unt
,/ " x 14THD)

}|-_:-;-
\U/
Softkeys
Basic
Operation
TheStarPilot6 Keyboard
The
Star Pilot 6 has
beendesignedtobeaseasyto learnandoperate
as
possible.
Theraised
push-button
kcy's
provicle
atactile
feel
toeach
operation
and
the
Star
Pilot
6responciswith
anaudiblcbeepeach
timeakeyis
pressed.
All keysnecessar)'tbr
opcratic'rnoftheunitare
onthefront
panel.
Inadditiontothealpha-numerickeysontheright
side,
theStar
Pilot
6 usesauniqueapproachcalled
"sofikeys"
along
thebottomofthedisplay.Thesefivekeys
are
labeled
bythe
LCD
displayandarecontrolledbytheunrt'ssofiware,
thusthe
name
"sofikeys".
The
"sofikey"
approach
allows
forvery
easyoperation.italmost
guides
you
along.eventhoughthe
StarPilot
6possesses
anamazing
numberof advancedf-eatures.It wouldtake
aconsiderablenumber
of
additionalbuttonsand
greatly
addtotheoperational
complexity
if
eachfunctionhadadedicated
button
instead
ol'usingthe
"sofikey"
approach.
Alpha-NumericKeys
The
StarPilot6 is
equipped
withanalpha-numerickeypad.The
alpha-numeric
kel,pad
consistsof l2 pushbuttons.
Eachbuttttnis
labeledwith
anumber.letters
ors1'mbol.
All alphabetandnumber
entries
are
made
usingthe
Alpha-Numeric
Kevpad
as
shown
below.
Thedisplayscreen
shows
you
rvhere
theletteris
tobcentcredbythe
highlighted
curs()r
position.
Example-PressKey#l:
Itime -1 2times=A 3times=B .1
times=C
andetc.
forotherkeysandalpha-numeric
characters.A space
is
enteredbypressing
Key
#0
twotimes.
Press
the
Right
ArrowontheAlpha-Nurneric
Keypadtomoveto
the
nextletter
entry.
Youmay
editorcorrectanentry
byusingeitherthe
Lefi
orRight
Amow
Key
totheletter
position
andchangingtheentry.
CommonSoftkey
Functions
Onsomeof thedisplayscreensseen
duringoperation
oftheStar
Pilot
6.
youwill notearecurrence
ofthefollowrngsofkeylabels.
Theirfunctions
are
identicalinwhichever
MODE is
beingused.
When
the
MENU softkeyis
pressed.
theStarPilot
6will return
to
theMenu
Screen.
If you
have
beeninadisplayinwhichyou
were
entering
information,
andthen
press
thc
MENU softkey.
theStar
Pilot
6will returntotheMenu
Screen
with
no
changesbeingentered.
UseoftheMENU softkeyis
always
required
inorderto
move
the
Star Pilot 6 fromone
Mode
toanother.
Alpha-Numeric
kevpad
\\\
I
Power/Backlight

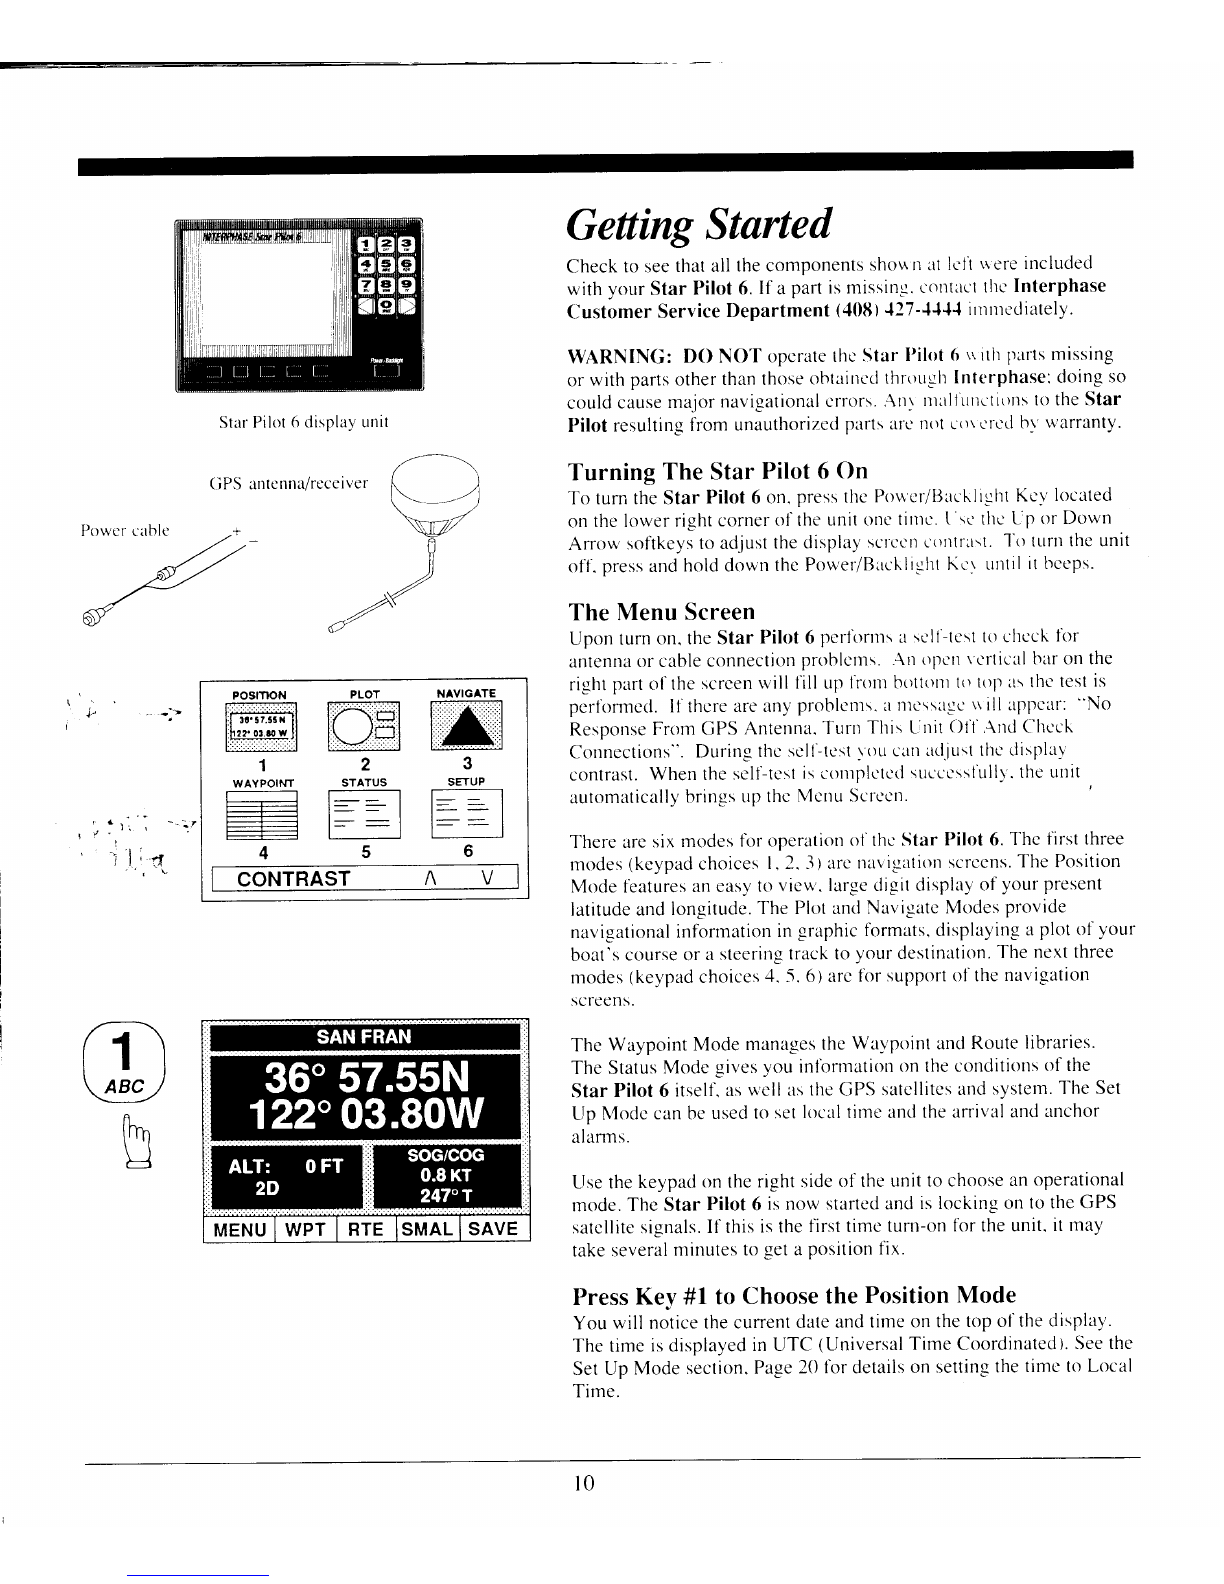
The ESC. or ESCAPE softker'.is sec-non \ontc ol-thc'
displavs
which
ask
you to enter information.sucl-t
as
\\
a\
n()ntt
ni,llttes
ot'
ctrordinates.
Pressingthc ESC solikel,r.lillreturntheStar Pilot 6 to the
previous
screen
uith nochangesbeingentered.
This i' ur,--fLtl.tor instance.if
you startedentering
a waypoint narnelnd thendccidr-cl
not to usethat
waypoint. Using theESC sofikey.thc Star Pilot 6 u ill rc-turnto the
previous
screen
anddisregardthe inforrnation
rt-ruhad \tarte(l
t()enter
tbr thesclectedwaypoint.
Up/Down arrowsoftkeys
(A V )allou'\ou to scroll
throughancl
sclectvariousfunctions. The ENTR (Enter)sofiker is uscrito
activatetcaturesandentcrdata
into vour reccl\cr.
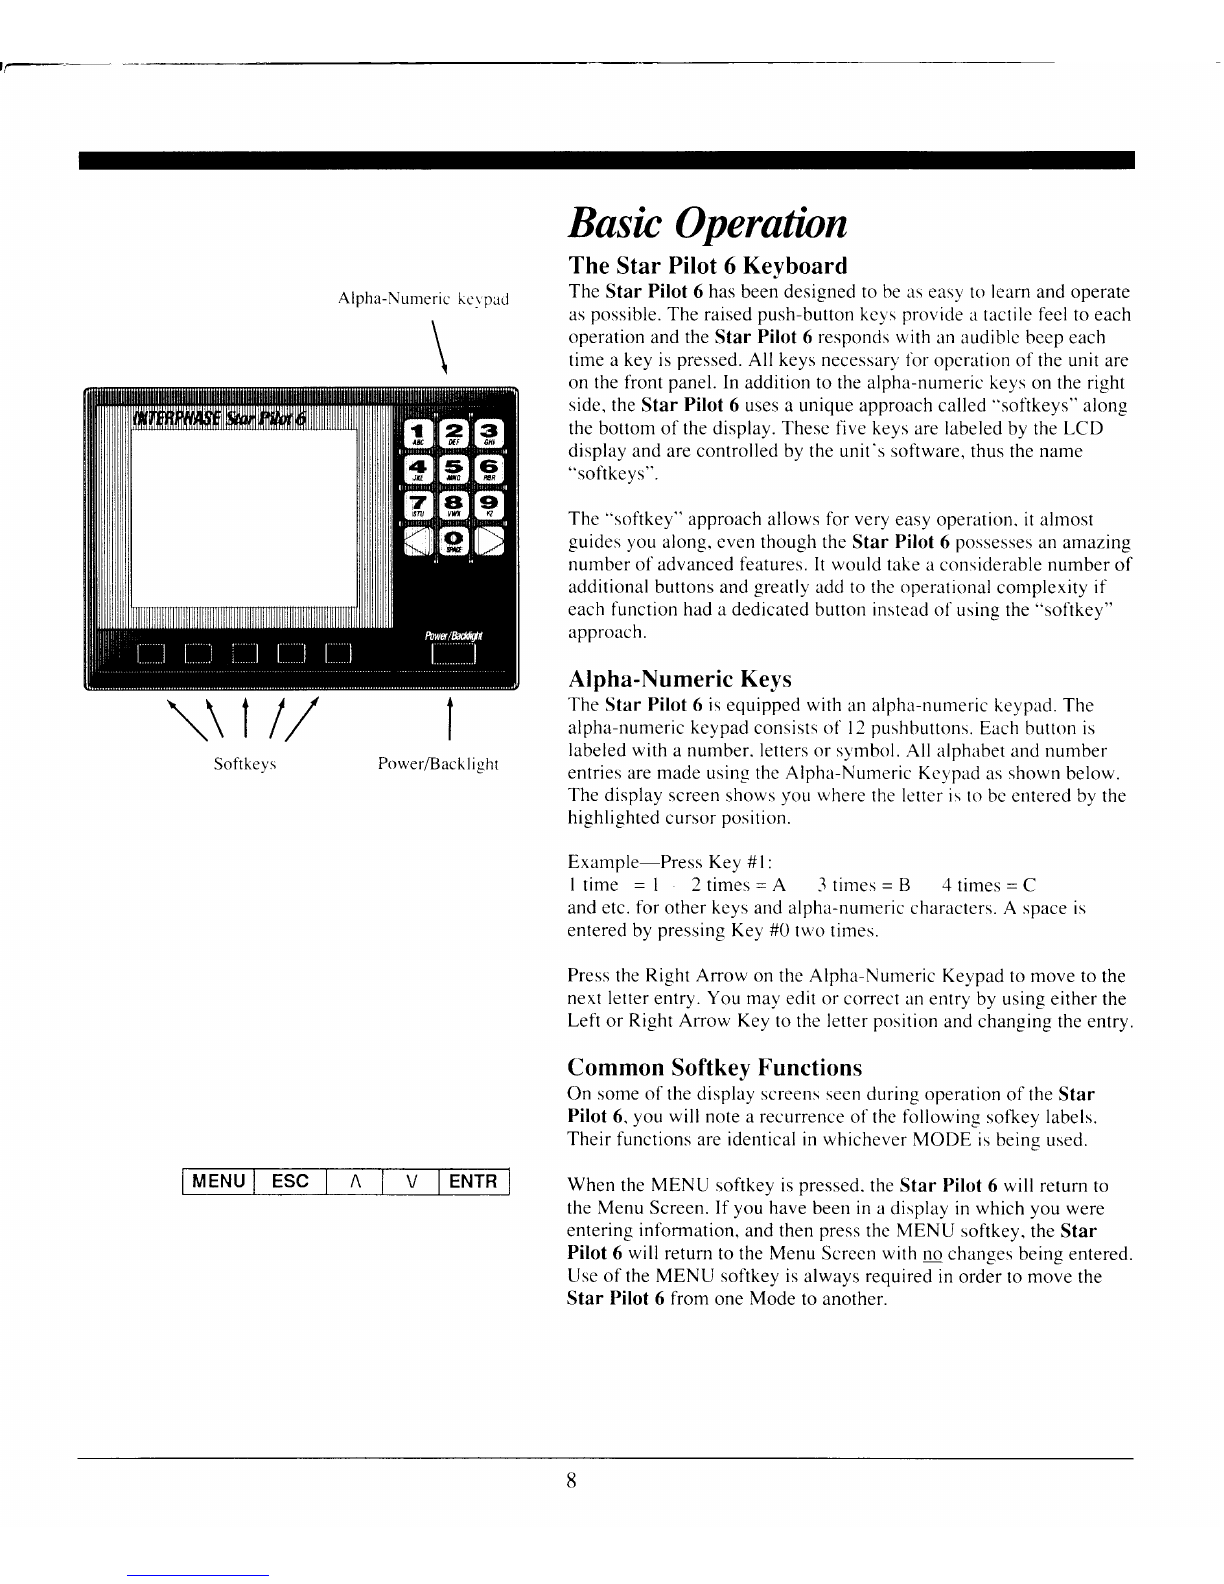
Power/BacklightControl
The Powcr/Backlight button is locatedon the lowcr rieht of thc Star
Pilot 6. To turn the unit On press
theker once. To turn the unit Off
press
andhold down the
key until theunit beeps.thenthetbllowing
messase
u'ill be displayed: "Exit Sequence
In Pnr-eressDo Not
Disconnect
Power
Until ProcessIsComplete. Countdown: 36".
l'he unit w'illthen
countdown from 36 to 0 and thenshut
off.
WARNIN(i: Do not turn off the Star Pilot 6 using a circuit breaker
or battery
switch.or allow enginestartingto cause
voltage
dropsto
the unit. Waypoints, routes.
setup values
andsatellitt'
almanac
information ma1,
be lost.
The Display Backlight goes
on automatically
when you turn the
Star Pilot 6 on. It will automaticallyturn off afier l0 seconds. A
momenlary push
on the Power Key turnsthe Backlight on, but it will
tum off automatically
two minutes afier thelast
key press
on an)'
sotikey. If vou want to keepthe Backlight on continuously.
press
the
Power Key twice (two beeps). A single
press
turnsthe Backlight ofl-.
The backlightdoeshavea limited lil-etirne.
For maxirnum lif-e.
use
the
Backliehtsparinslv.

Star
Pilot
6clisplav
unrt
(iPS antcnna/receiver
Getting
Started
Check
tosee
thatall
thecomponents
shgun
allt-fi
r"ereinclucled
with
your
Star
Pilot
6.
If a
partismissing.
colltrlcl
the-
Interphase
Customer
Service
Department
(40tt)'127-1'l-t"l
rrnrtrccliately.
WARNIN(i: DO NO'f ope
ratethcStarl)ikrt6 uith
parts
missing
orwith
parts
other
thanthose
obtatttccl
throuclt
Interphase:
cloing
so
could
cause
maior
navigational
crrors.
.\tlr Illltlltttle
tiotls
totheStar
Pilot
resulting
liom unattthorizecl
partsltt't
ll(\l
gt)\
e
I'ctl
hvrvarranty.
Turning TheStarPilot6 On
To tum the Star Pilot 6 on. press
thc Poucr/filrcklrght Kcv located
on the lower right corner
of the unit onc tirtlc.
I sc
thc Lrp
or Down
Arow sofikeys
to adjust
thedisplay scl'ccnc()rltri.l\l.
-l'o
tLtrllthe unit
off. press
andhold down the Power/Brtcklrgllt
Kcr Lrrltil
it trccps.
The Menu Screen
Upcln
turn on. the Star Pilot 6 pcrl'ortllsa scll-tcstto cltcck for
antenna
or cable
connection
prohlctns. .\tl opcrl
\ crtical baron the
right part
ol-thescrcen
lvill I'illup l'r'otttbottotlt
t()
t()pltsthe-
tt-'stis
performccl. If the
re areany problcrtrs.
lt
lllc\sagc riill appcar':
"No
Respc'rnse
FrornGPS Antenna.
Turll This L,rlit
Ol'l',\rld Chcck
Cortnections". During thc sclt-te
st\ ()Lr
callad.iLrstthctlisplal
contrast. When the self-te
sl iscotllplclctisuece-ssl'r.rllr.the unit
automatically
brings
upthc McttuScrcctl.
There are
six modesfbr operation
o1'thc
Star Pilot 6. Thc first three
modes(keypad
choices l' 2. -l)arc tlar,'igrltiotr
scrccns'
The Position
Mode t'eatures
ilneasy
to vicvn'.
largecligitdisplayof your present
latitude
and longitude.
The Plot ancl
Navigatc Modes provide
navigational
inforrnation
in graphic formats,displaying a plot of your
boat's courseor a steeringtrackto your destination.
The next three
modes(keypad
choices
4. 5. 6) arc fbr supporto1'the
navigation
screens.
The Waypoint Mode mana-qes
theWa1'pointancl
Route libraries'
The Status
Mode givesyou inlirnnation on theconditiotts
of the
Star Pilot 6 itself.
as
well astheGPS satcllite
sandsystem.
l-he Set
Up N,lodc
can be usedto set
l()caltime andthearrival andanchor
alanns.
Use the
keypad on thenght side
of the unit to choose
anoperational
mode.The Star Pilot 6 isnow started
and is locking on to theGPS
satcllitesignals.
If this is the first time turn-c'rn
for the unit. it rnay
takeseveral
minutesto geta position fix.
Press
Key#l to Choose
thePosition
Mode
You
will notice
thecunent
date
andtime
onthe
topol'the
displal'.
Thetime
is
displayed
inUTC(Universal
TimeCoordinated).
See
the
SetUpMode
section.
Page
20lbrdetails
onsetting
the
timcto
Local
Time.
Powct t ithlc
*r7
-F'
<<Y
ay'
PLOT
lKi.fi
l,\ lfil
l:\-1:n-:l
2
STATUS
r----l
t--l
l:: I
5
NAVIGATE
ffi
3
SETUP
t-l-_l I
t--l
l:: I
6
POSTnON
rffil
ll !!.3r.55x il
l'hrr.
or.,w
ll
[i:lllr:i-il
1
WAYPOINT
#
l_
l_
|..................'.'..._
4
CONTRAST A V
l0

At l'irstthe latitudeand longitudedigits may be all "0"s. Note the
lowcr lclt cornerof thcdisplay.
Below the
ALT: you will read
OLD.
2D or -lD. OLD nreans
thattheStar Pilot 6 does
not have
a new
position
iix. If 2D or 3D isshown.
thc
position
is
current.
Be aclviscd
thatit nravtakeseveralminutesfbr theStar Pilot 6 to obtain a ncw
position
fix. When theunit
completesitssatellitesearch.the
"0"s will
changeto vour presentposition
coordinatesandthcdisplavOLD will
chanseto 2D or 3D. You now havethe
Star Pilot 6 upancl
runnins.
NOTFI: Do not bealarrned
if the last
digits of the Latitucleur
Longitude sometimcsf-luctuate.This is normal w'hcn
thc Star Pikrt 6
isreceivin-u
position
infbmation.
WhatIsA Waypoint?
..\
\\'arpoint is usuallya startin-rl
point. clestination.buov or channeI
marker.or irnv
place
you wish the Star Pilot 6 to renrcrnber.
The Star Pilot 6 stores
up to l(X)
Wuvpointpositions.Waypoints
ean
hc storcrl
Lrsinccither
ol.two methods.You can
INSTANTLY store
Iour boat'\ prcsentpositionu'ith
theSAVE kev.
uhich vou will l'incl
u hcn r.rsins
any o1-thethrec Navigatiorral\{oclcs.You can store
Wa1'points
atanytimc h1 e
nteringtheLatituclc
& Longituclc
coorclin-
atesand
namingthe
Wavpointswhilc-
usingthcStar Pilot 6 in the
Waypoint Moclc.
EnteringWaypoints
After
turningthcStar
Pilot
6ONand
viewing
the
MENU
Screen.
prcss
Key#-{tobring
upthe
Wairpoint
Scrcen.
TheWavpointLogwill
be
shown
ontheleftsideofthc
displal'.
Thc
cursor
position
u'ill
be
noted
byrevcrsevideo.
Toenteranew
Wavpoint.
ortocdita
prcvic'rus
Waypoint,
usethe
Arrou L,por
Downsol'tkeystill the
cursor
islocated
atthc
position
inthe
Waypoint
Log
that
you
wish
touse.
Then
press
the
sotikev
under
ENTRfirrENTER.
Atier
pressin-e
theENTR.
or
ENTERsoltkey,
a
Windor,rwill openon
the
rightside
of thedisplay
promptin-c
you
to
givc
the
Wavpoint
u
NAME. UsetheKeypadLcftorRightArrows
to
movc
thccursortcr
theappropriate
letterspace.There
are
l0 spaces
fbrletters
ordigits.
Usin_ethe
method
described
in
thc
Basic
OperationoftheKeypacl.
enterthe
Wa1'pointNarne
.
Alter
you
havefinished
givingyourWaypoint
a
NAME.
and
have
enteredit.a
newWindowwill openontherightsidc
ofthcdispla;-.
You
will be
prompted
toenterin latitude
and
longitude
coordinates.
UsethcAlpha-NumericKeypadtomovethe
cursorandenterthe
latitude
coordinates.
Press
the
ENTRsofikey.
Enterthelongitude
coordinates.
Press
the
ENTRsofikey.TheWaypoint
entry'is
completeandthedisplay
returns
tothe
Waypoint
Screen.
NOTE: Rcmcmber
toentcr
N fbrNORTHLatitudes.W lbrWEST
Lonsitudes.etc.
[n
\JKT)
h
a-1
h
WAYPOINTS
FrffiTr*[tr
PTSUR
PTPIEDBLAN
PTCONCEPT
TOVIEW
OR
EDIT
DETAILS
OFA WAYPT,
USE
ARROW
KEYS
THEN
PRESSENTR,
MENUI RTE
I N I V IENTR
WAYPOINTS EDITNAME
SANTACRUZ Ehru
rnaru
EDIT
NAME
WITHKEYPAD
THENPRESS
ENTR,OR
PRESS
DEL
TODELETE
MENUI ESCIDELI IENTR
WAYPOINTS EDITLAT/LON
SANTACRUZ LATITUDE
fo"sz.sr
N
LONGITUDE
123"03.80W
USEKEYPAD
THEN
PRESS
ENTR
MENUI
ESC
I I IENTR
ll

(1) Position
Mode
Choosing
Key
#1
fiom the
Menu
Screen
will call
Lrp
thc
Position
Screen.
Theupper
part
ofthe
display
will rcad
"No Destination"
whenno
waypoints
are
stored
orselectecl.
ancl
uill showeither
a
waypoint
name
ora
routeand
waypoint
Ilame
u
he
none
has
been
preselected.
TheStar
Pilot6usesGPS
satellite
signalstocalcttlate
acurrent
position
inLatitudeand
Longitude.
This
positiorrisdisplaved
in
large,
easyto
readdigits
inthecenter
part
of the
clisplar
' \'ttucan
change
whatinformation
isdisplayed
in
this
larsebor br prcsstn-Q
theSMAL softkey
which
will immediately
changc-
ttt
rcitciL.\RG.
Nowyou
can
change
the
data
inthe
largebor br prersitru
the
< >
arrow
keysoneither
side
of Key
#0. Pressirtg
thc-
> arrou
advances
the
information
display
fromLatll-ontoSOG/(-OC;.
the
RNG/BRG.
VMG/DMG,
SOA/RBA.
ETAIfTG.DATE/TI\lE.
MAG VAR and
back
to
Latll-on
(see
Advanced
Navigatiorl
Ciuiclc
on
Page
22for
definitions
of abbreviations).
Pressin-ethe
< arrow'
key
reverses
the
orderof advance.
The
lowerlefi
part
ofthedisplay
hasir
smalldata
bor r"hich
always
showsaltitude
andthe
signal
rcccir.'ing
status.3Dor2Ddisplay
means
yourpresent
positionisctlrt'cltt.
OLD displa)-
means
no
position
fixes
arebeing
updated.
Scc
Page22o1'Advanced
Naviga-
tionGuide
formoredetails.
Notethat
thealtitude
will onlr bcclispllvccl
i1'theStar
Pilot6has
fixes
fiomfbur
satellites
and
isoperating
inthe3Dmode.
The
altitude
accuracy
will lluctuatc
plusorIttit.ttts50
rneters,
which
isthe
normal
tolerance
forGPS
altitudc
specit'icatitlrls.
Thelower
right
part
ofthcdisplal
is
anothcr
sntallclata
box
which
is
userconfi-eurable
inthe
satnc
wa\ asthe
largcdata
bor described
abovc.
When
the
sofikel'
rcaclsSMAL.r'ou
cnnchange
thecontents
of thebox
bypressingthe
< > arror.v
ket's.
Youcan
switchto
other
operating
modc-s
b1'
rcturning
tothe
Menu
Screen.
orinstantly
switch
backand
fbrth
betwccn
Position.
Plot,
Navigateand
Status
Modes
b1'pressin-t
the
#1.#1.#3or#-5
keys
wheninthose
modes.
Youcan
alsct
get
tothe
Waypoint
andSet
Up
Modesbypressing
#4
and
#6,
but
vou
can
only'
returnto
theother
modes
through
the
Menu
Screen
tiornthcse
twotnodes.
When
you
switch
between
operating
modes,
the
lastdisplays
set
will become
the
defaults
when
you
returnto
thedifferent
operating
modes.
Saving
Present
Position
AsA lVaypoint
If youwishtosave
thecurrent
positionvicwedonthe
Position
Screen
asawaypoint,
press
the
softkeyunder
the
labelSAVE onthe
display.
Upon
pressingthe
SAVEkey,theSave
PresentPosition
Window
opens
toreveal
yourWaypoint
Log.
The
WaypointLog scrolls
tothe
firstempty
locationand
date
stampsthe
position.Thedisplay
cursor
will identifythis
location.
t2

If you
havedecidedtosavethis
position.press
thesoftkeyunderthc
labelENTRonthedisplay.
Thecursortbrthis
waypointlocationwill
beshown
solidfbr I secondandthenretumtothe
orevious
Position
Screen.
After
pressing
ENTR,the
waypointlocationwill bedatestanrpecl.It'
asecondcntry
is
savedthatday.
thedatestamp
will be
fbllowecl
by"a
(WP2),
etc.See
Pagel7 of the
Waypoint
Mode
section
toeditand
ndmc
the
waypoint
locations.
NOTE: lf atanytime
yourvish
to
get
outoftheSave
Present
Position
Window.
press
the
sofikey
under
ESC
on
the
displa;".
This
will recallthePositionScreenandnochanges
will be
nracle
onthe
Wavnoint
Loq.
Pressing
thesoftkey labeledMENU. below the lowcr lcft sideof thc
displar.brings
the
Star Pilot 6 backto theMenu Screcn.
SAVE
IN
,,rlft WAYPOINTS
MENUI
ESC I A I V IENTR
h
l3

hr
Featuresof Track Plot
If your
track
movesoff thedisplay
area
(out
of the
selected
scale).
the
Star
Pilot
6will automatically
reset
yourpresent
position
tothe
centerof the
plot
square
and
movethetrack
plot
dots
accordingly.
Thescale
will remain
the
same.
(2) PIntMode
To enter
thePlotMode,choose
Key#2fromthe
MenuScreen.The
Star
Pilot6display
will startbyusingthe
lastPlotModedataand
destination.
ThePlotScreen
provides
agraphic
map
of 1'our
boat's
present
position
and
progress
towardsthe
destination
wa1'point.The
"N" at
thetopofthe
mapindicatestrue
north.At thetop
tl1'thedisplay
abovethe
mapisthe
present
longitudeof the
center
ofthetrack
plot
square.
Therightsideofthedisplay
showsthedestirtation
warpoint.
and
just
below
it inthe
middleofthe
right
sidcof'thcdisplar'.
the
present
latitudeofthecenter
ofthetrack
plot
square.
Thclou,erright
sideof thedisplayshows
you
therange
(RNG).
orclistance
to
your
destination,andbearing
tosteer
(BRG).
Dircctlrbclo',rthc
ntap
showsthescaleat
which
the
mapisset.
To set
the
Plotmaptothedesiredscalc.
push
thc
sol'tkev
under
SCLE
onthedisplay.
TheSETSCALE
windou* ill
open
revealingthe
milescales.Movethecursorusingthctlp orDoun Arrowsoftkeys.
Whenthecursorissetatthedesirecl
scalc.
press
thcENTR
sofikey.
The
StarPilot6 will returncenterecl
onthcPlot
Scrcen
with
thc
map
settotheselectedscale.
InthePlotModeanarrow
icon
uithadotinthecenter
showsyour
boat's
presentposition
andheacling.acliarnond
with
adot
inthe
centershows
yourstartine
point.
ancla
squar-crvith
adot
inthecenter
anda
f1a-eiconontopshowsthe
uarpoint
location.
Thecenter
dots
mark
theactual
positions
mostaccuratelr'.
Whcn
a
waypointis
selected.acourse
line
(Great
Circle.notRhunrbLine)
will bedrawn
between
thestarting
point
andthc
r.ra1'point.
Dotswill record
your
progress
overtimeasthc
boaticonlnoves.
ToReset
theStarPilot
6TrackPlot.thatis.tocraseall
plot
tracks
and
start
anewtrack
plotting.
movethecursortoCLEAR ALL atthe
top
ofthemilesscalesand
press
the
ENTR
soltkey.
To setthe
Star
Pilot6 TrackPlottoa
new
clestination
Waypoint.press
the
softkey
under
WPT.
The
Na"'igate
to
WPTWindow
w'ill
opcnto
vicw
the
WaypointLog.
Using
thesofikevUporDownArrowslnovethccursortothe
Waypoint
you
desireasthedestinatron.
Pressthesofikey
under
ENTRto
ENTER
the
Waypointdestination
yourvish
to
navigateto.
The
StarPilot6 will then
return
tothe
PIot
Screen.
Pressingthesoftkeyunder
RTE
operates
in
thesame
Inanner
as
TrackPlottingtoa
Waypoint.After
selectingtheROUTE.theStar
Pilot
6will begin
plotting
tothefirst
Waypoint
ofthe
Route.See
Pagel7 of the
WaypointMode
section
for
detailsonsettingup
Routes.
At anytime
while
you
areTrackPlotting,
you
may
SAVEyour
presentposition
in the
Waypoint
Log bypressing
thesofikeyunder
SAVE.
CLEARALL
lNM
2NM
5NM
25NM
1OONM
250NM
NAVIGATETO
K*T,rrtrirflEr
SANFRANCISCO
T4

(3) IYavigateMode
Press
Key#3fromthe
MenLr
DisplaytostarttheStar
Pilot6 inthe
Navigation
Mocle.The
NavigationScreen
-eraphicallv
shows
y'ou
the
RangeorDistance.
andCompass
Bearin-utothedestination
Wal"point
inthe
upper
letiofthedisplay.
TheDestination
Namcis
inthetop
center,
and
your
Cross
TrackError
(XTE)isshown
in
the
center
bottom
o1'thedisplay
abovethesoftkey
labels.
The3Dperspective
navigate
screcnteaturesadestination
flag
atthc
topof the
navigation
"highway".
Oneach
sidcofthecentercourse
line.atthebottom
o1'thedisplay.
isanautontaticalll
adjusteclCross
Trackscale.
Thc
direction
ot'theboat
icottinthecenter
ol'theclisplair
relates
tothe
present
coursc
being
steered.I1'-vour
boatisstopped.or
moving
veryslowly,theboat
icon
u'ill
change
dircctitttts
inarandom
way.Once
you
pick
up
speedand
arcunderway.thc
boatrcon
will
start
representing
your
current
heading.
TheStarPilot
6Navi-eationScreen
will be-sin
providine
datatothe
lastDestination
Waypoint
usecl.
Tostarlnaviglrtinglr)i.t
rtL-w
destina-
tion.
press
thesofikeyunder
WPT.
TheChoose
WPTWindow
will openttt
revealvour
WavpointLo-u.
Using
theUporDownArrowsofikeys.lnovethccursor
tttthe
Waypointlocation
you
wishtonavigateto.
Pressthe
softkcyunderENTR.
TheStarPilot6u'ill
cnter yourne\\
destination
Waypointand
return
to
theNavigation
Screen.
Youmaystart
navigatingaRoutebypressing
the
sofikeyunderRTE.
Aswhennavigatin-utoa
Waypoint.
youselcctaRouteandthcStar
Pilot6 will begin
nar,'i-uatingtothe
firstWaypointol'the
Route.
Intheupper
n-uhtcorner
ofthcdisplay
is
asmalldatabox
whichis
userconfigurablc
likc
those
inthePosition
Mode.Pressthe
< >
arrow
keystoadvance
throu-ch
Lat/Lon.SOG/COG.
VMG/DMG.
SOA/RBA.
ETA/TTG.
DATE/TIMEanclMAG VAR.
LAT - Latitude
LON - Longitude
SOG- Speed
OverGround
COG -CourseOverGround
VMG - VelocityMadeGood
(to
waypoint.t
DMG - Distancc
Made
Good
(to
waypoint)
SOA - Speed
of Advance
(to
waypoint)
RBA - RelativeBearing
Angle
(to
waypoint)
ETA -Estimated
Timeof Arrival
(to
waypoint)
TTG -Time
ToGo(to
waypoint)
h-.
\t
-J
ffil NAVIGATETO
WAYPOINTS
sANTA n-N117
::::::l
MENUIESC
I N I V IENTR
l5

DATE - Current
Date
TIME - Current
Time
MAG VAR - LocalMacnetic
Variation
For
more
details
onthesenavigationalterms.
please
refertothe
AdvancedNavigationGuidesection,
Page22.
Aswith
the
othernavigational
modes.
you
maystorc
your
presenl
position
in
a
Waypointatanytimebypressing
the
softkevundcr
SAVE.
If theStar Piklt 6 should
momentarily lose
contact
with thesatellites.
or if you choosethe NavigateMode beforethc unit haslocatedthe
minimal number of threesatellites
necclccl.navisationdata
wrll be
blanks andat the bottom of thedisplav replucinuX'l'E rvill be the
messagePOSITION UNKNOWN. When the unit finclsthc satellites.
it will resumenavigatin-eto your Destination
Wal'point.
NOTE: Youmusthavethe
ArrivalAlarmontorecciveaudtoor
visual
alertof arrivalto
your
destination.
In theAuto mode. theCross
Track scalcautonraticalll'adjuststo keep
theboat
iconin theactive
grid arca.This autorrutic
scttingisthe
default.
To set
fixed scales
press
theSCt-E
sof'tkcv
and
it uill allow
you to choosebetween
Auto. l. l. 5. 10.l0 and
.50
rnilc
(kilonteter
or
nauticalrnile) scales.If your Cross
Track Error is grcater
thanthe
fixed scalc,
theboat icon will stop
at thc lcl'tor richt cclge.
br.rtthe
correctdigital XTE reading
will still bc shorvn
and updated
below.
l6

(4) Waypoint
Mode
TheStar
Pilot6 is
capable
of storing
upto 100
Waypoints.whrch
canbe
usedtocreateup
to l0 Routes
of l0 Waypoints
each.
Waypoints
rnust
be
stored
intothe
Waypoint
Lo-ebelorethey
canbe
used
tocreate
Routes.Tovieworedit
yourWaypointLog.
prcss
Key
#4fromthe
MENU Screen.
The
WaypointLogwill be
seen
on
thelefiside
ol'thcclisplar'.The
cursorcan
be
scrolled
to
dif'f'erent
Waypoint
positions
bvusingthc
UporDown
Arrowsoftkeys
belowthedisplay.
Toview.enteroredil
a
Waypoint
press
thesoftkeyunder
ENTRaficrthecursor
islocatecl
atthe
Waypoint
position
clesired.
Afier
pressing
theENTR.orENTER
kcv.
a
Window
will open
requesting
you
toenteroredit
the
Way'pointName.Usethe
Ke1'pad
LeftorRightArrowsto
movcthecursortotheappropriatc
lcttcr
space.
Thcre
are
l0 spacesfor
lcttersordigits.Uscthc
Alpha-
NumericKeypad
toenterorcditthe
letterspace
s.The
cursor
will
shou
which
letter
sprcc\()u
iirc
usirts.
When
you
havecornplctedthe
NAME entr\'.
press
the
ENTER
sofikey.
When
vou
havecompletedthe
NAME entr)'.a
new
Winclou'will
open
onthe
rightof
thedisplay.
Youmav
enter
oreditthc
latituclc
and
longitudccoordinates
tbrthe
Waypoint
byusing
theAlpha-
NumericKeypaclto
movc
the
cursortothedesircddigit
space.
NOTE: Remcrnbertoenter
N lbrNORTHLatitudes.
W firr
WEST
Longitudcs.etc.
When
you
havecon-rpletedthe
latitucleandlongitudeentrv.
press
the
ENTRsofikey.
The
StarPilot
6will returntothe
WaypointScreen.
Your
Waypointwill beshownaddedtothe
Waypoint
Logonthc
lcft
sideofthedisplay.
Creating
Routes
Once
you
have
WaypointsstoredintheWaypoint
Log.
you
can
create
ROUTES.
The
StarPilotcanstoreupto 10Routes.Each
Route
can
sequenceupto l0 waypoints.
Tocreate
oreditaRoute.
press
thesofikeyundcr
RTE
onthe
WaypointScreen.
If youhave
any
Routes
prcviously
stored.
they
will
be
shownonthe
left
sideof thcdisplay.
Usethe
UporDown
Arrowsoftkeys
tom()vethecursortothe
Routc
youwish
tocdit.
Press
the
softkeyENTRtoENTERthe
Route
of
choice.
[0)
\JK!)
b
WAYPOINTS
SANTA
CRUZ TOVIEW
OR
EDITDETAILS
OFA WAYPT,
USE
ARROW
KEYS
THEN
PRESS
ENTR,
MENUI
RTE
I ^ I V IENTR
WAYPOINTS ED]T
NAME
SANTA
CRUZ Sru
rnnru
EDIT
NAME
WITHKEYPAD
THEN
PRESS
ENTR,
OR
PRESS
DEL
TO
DELETE
MENUI ESCIDELI IENTR
WAYPOINTS EDIT
LATiLON
SANTACRUZ LATITUDE
fo"sz.sr
N
LONGITUDE
123"03.80
W
USE
KEYPAD
THEN
PRESS
ENTR
MENUI ESC I I IENTR
h"t
\t
IJ
WAYPOINTS
ENNEM
PTSUR
PTPIED
BLAN
PTCONCEPT
TOVIEWOR
EDITDETAILS
OFA WAYPT,
USEARROW
KEYSTHEN
PRESSENTR,
MENUI
RTE
I n I v IENTR
t1

ROUTES
F{artf.X{-
SCTOPTARG
BJTO LPZ
MONTTO BJ
TOV|EWOR
EDITDETAILS
OFAROUTE,
USEARROW
KEYSTHEN
PRESSENTR,
MENUIWpTSI
n lv lerurn
Route
Screen
#l
RoutcScreen
#2
RouteScreen
#3
R',r,
\l
To entera ne\\'Route.
\'ou nrust
scrolldown to a blernkspaceartcl
press
ENTR. After vou prcss
thc sofikcy ENTR, thc Edit Narne
Route
Window will open.The Routeselected
will benotedon the
leli side
of thedisplay.If you wish. you ciln press
thesol-tkey
DEL to
deletetheentireROUTE. LJsing
theAlpha-Numeric Kcypad, yoLr
may NAME or eclitthe Routc Narnc.
When this iscompleted.
prcss
the sofikey ENTR anclthe Star Pilrtt 6
will displaytheROUTE on the top of the left sideancl
theWavpoints
currently storedin the ROLITE bclow. If you wish to adcla ner',
Waypoint to a Rollte.
or changea Waypoint's RoLlte
position.usethe
Up or Down Arrcw sofikeysto move thecursorto theclesirccl
positionandpress
the sottkey'unclerENTR.
The Star Pilot 6 display will show you theROLITE ancl
thc
Waypoint
positions
on thc lcfi sicle
of thcclisplar.
Your Warpoint
Lo_s
will be listedon theri-shtside
of thedisplav untlcrthe label
NEW WPT. Using the Up or Down Arrou sol'tkels.
rrove thecursor
to thc
Way'pointyou wish to place
in thc
scqucntial
orcier positiorr
inclicateclunc'lerthc ROUTE Waypoints on thc lc1'1.Prcss
the ENTR
sol'tker,.
andtheWavpoint selected
rvill bc entcrccl
in theROUTE. To
Dcletea Waypoirrt l'romthe Route.move thc cursorto thc 'i'DEL
WPTt' atthetop of theWaypoint Los. Prcssthc ENTR sofikel'.
and
theWaypoint selected
will be renroveclfl'ornthe Routc.
The Star Pilot 6 will then
return
to tlrc-
Eclit
RoLrte
screenwith thc
ROUTE andthe
Wavpoint
positions
e
urrcntlr stored
on thclcfi sidc
of thedisplav.
Thc riehtsiclco1'thc
clisplar'$illasainallow \,olr
to
add.changeor delete
Way'pointson this
Route. Il'you are
finished.
prcss
DONE.
Il'at anytimc cluringuse
of'the
Wavpoint
Screclrs.
or Route
Screens.
pressinu
the
sofikel'ESC lvhen
shownwill rcturn
theunittothe
previor.rs
scrccn.with no changes
heingenterccl.
Prcss
thc MENU
sotikel' rvhen
shown to e
xit thc WAYPOINT N{ODtr ancl
rcturn to
thc Mcnu Screen.
h
H
ROUTE EDIT
NAME
scTosF
SANTA
CRUZ
ANONUEVO
PIGEONPT
PILLARPT
STFRANCIS
Ep
rosF
EDITNAME
WITHKEYPAD
THENPRESS
ENTR,OR
PRESSDEL
TODELETE
MENUIesC
iOeUl IENrR
EDIT
ROUTE
SC TO SF
SANTACRUZ
ANONUEVO
PIGEON
PT
PILLARPT
STFRANCIS
TOADD.
CHANGE
OR
DELETEA WPT
ONTHIS
ROUTE
USEARROW
KEYSTHEN
PRESSENTR
MENUIDONEI
A I V IENTR
ROUTE NEW
WPT
scTosF
SANTA
CRUZ
ANONUEVO
PIGEON
PT
PILLAR
PT
ST
FRANCIS
.DEL
WPT'
SANTACRUZ
PTSUR
PTPIEDBLAN
PTCONCEPT
MENUIesC
I n I v Ierurn
RouteScreen
#4
l8

(5) Status
Mode
TheSTATUS
MODE isselectedbypressing
Ke1,#-5ol'fthe
Menu
Screen.
This
will
bringup
theStatusScreen
which
provides
the
fbllowing
data:
Thc top partof theStar Pilot 6 StatusScrcen
shows
1,ou
thc
SoftwareVersion of theControl Unit. thc AntennalReceiver
UItit ancl
theGPS Moclccurrently being uscd.
fbllowed by theGPS Hcalth
messa-qe.
The GPS Hc'althmessage
givcs infbnnation re-eardin.ethc Anterrna/
Receiver'scurrent
statusin its
effort
to set
sicnals
fiorn
thcsatcllitcs.
The center
partof theclisplal'provicles
thetirne
of the last
positiotr
fix.
Nextarcthe
valuest'or
PDOP.
HDOPand
VDOP.Thcsc
arc
mathematical
values
l'ronrcomputing
the
geotnetrvot'thcsatcllitcs
beirrg
usedtocalculatc
vour
current
position.
PDOP
standsforPositionDilutionOf Precision.Thclowertherating
the
bettcr
your
position
fix.Above
l2 isnot
usable.
A PDOPof l-3
isexccllcnt..l-6
good.7-9
acceptable.
l0-12
marginal.
and
12+
unacceptablc.
TheStar Pilot
6does
not
displal'
Lat/Lon
when
the
PDOPis ll or
-rrrcatcr.
HDOP stanclsl'orHorizontal
DilutionOf Precision.
Itindicates
thc
accuracy
of latituclcancl
longitudccoordinatc's.
VDOP standsttrr
Vertical
DilutionOf Precrsion.It indicatesthe
accurac),
ol'altitudeclata
(important
fbr
3Dfix onl.u").
The
bottom
o1'thcStar
Pilot
6 Status
ScreenshowsERRORCODE.
If theunit
isoperatingnormally.this
will be
00.SeePagc22ofthe
Advanced
Navi-eationGuideformoredetailsonerror
messages.
.5)
\.M!g/
h
CONTROL
S/w VER2.01
RCVRSn/t VER1.0
GPSMOOE 3-D
AUTO
GPSHEALTI.I GOOD
I-AST
FIX
AT 13:44.07
PDOP 2.1
HDOP 1.3
vDoP 1.5
ERRORCODE OO
t9

GPSSETUP
UNITS US
BEARINGS TRUE
SMOOTHING 1
ARRIVALALRM OFF
ANCHOR
ALRM OFF
NAVCALCULATOR
a6)
ver/
h
H
(6) Set
Up
Mode
Upon pressing
Key #6, theStar Pilot 6 GPS SetUp Screen
allows
you to change
andadjust
unitsof measure
(U.S..Metric or Nautical),
bearings
(Magnetic or True). smoothing (DataAvcraging). time
offset.
arrivaland anchor
alarms.
NOTE: If you change
unitswhile in the Plot Mode. the trackplot rs
cleared.
Usethe up/down arrow softkeysto choosethc feature
you wish to
ad1ust.the
press
ENTR. Each featurehasa window that
tells
y'ouhow
to adjustthesettings.
Afier vou havc thesetting
yt)uwant. press
ENTR. Pressing
ESC returns
you to the SetUp screcnwithout
entering
anv changes. You may press
the MENU key'to returnto the
Menu Screen.
The Srnoothing
functionallowsyou to use
dittbrent
DataAveraging
settings.
Thesesettings
go lrom 1
(no averaging)
to 99. The unit's
dclault is l. A DataAveraging settingof 3.
for cxitnrple
.averagesthe
lastthree
positionreadings
receivedfrornthc satcllitcsancl
"snroothes
out" position
ancl
navigation
readings.This f-eaturcisrnostLrseful
when your boat
ismoving verv slowly or lrotnroring atall. As a
gencral
rule.thefaster
your boat
spccd.thc lessi.treraginu
Yttu
need.
Interphase recommends
that
t'or
the
l'astcsl
po\\cr brtats
no ai'eraging
is
used
(l). lbr mostpower boittusr'
such
as
l'ishingor cruising
settitlgs
betw'een2 and,5.
ancltor sailboats:cttins:
bctucctt
-1
ancl
10.
Use
TirneOffsetto set
accuratc
clisplal
ol'local tirlc tl.1 hourclock).
Afier usingtheup/dorvn
arro\\'sot'tkcrs
to hrchlichtthe
TirneOffiet
press
ENTR. Then adiustthe tintc ol'f'sctitt hour increntettts
fiom UTC
(Universal
Time Coordinatccl.
or Circenuich \{cartTirne
)
wrth thc up/
down softkeysand
then
prcss
ENTR to cotnplctr-
thc time offsr-t
cntr\'.
The Amival Alann rnustbccnsasecl
lirrtheStar Pilot 6 to provide
audioor visualnoticco1'arrival
ata nltvigatiortaldcstlnatiott.
Ttt tum
theArrival Alann on. select
Arrir al Alann and
prcss
ENTR. Usethe
up/down arrow softkeysto highli-ehtENABLED (ot.t)
or DISABLED
(offl. Afier selecting
vour choice.
press
ENTR. Whe
n tuntingthe
Anival Alarm on.aliervou press
ENTR thedisplal'
u ill highli-uhtthe
nume
ric setting
in thelowerparlo1'thc
clisplay'.The ,Arrir
al Alann
ilctivc
settings
are
between0.0.5and
9.99
trnilcs.
lretersor tlaittical
nrilcs). I1'vc'rusetit belorv
0.05.the unitdctaultsbackto 0.05.
0.0-5miles
= 26.1
l'cct 0.0-5
NM = 304
f-eet 0.0-5KM = 50
meters
TheAnchorAlarmcan
besettosoundan
aucliblebeep
whenvourboat
drifis
past
the
setdistance
fiom your
anchora,ee.
Tuntingonand
settingthe
AnchorAlarm
isidenticaltothe
ArrivalAlann
above.
NOTE: Tosilencceitheraudible
ALARM.
press
an)'ke1'oncc.
TIMEOFFSET
BE
SMC
TIME
ARRIVI
ANCHC
N
HRSFROM
UTC
.8 HRS
PRESSARROW
KEYSTO
INCREASE
OR
DECREASETHE
OFFSET,THEN
PRESS
ENTR
MENU
IESC
I N I V IENTR
GPS
SETUP
UNITS US
BEARINGS TRUE
SMOOTHING 1
TIMEOFFSET .8
HRS
ANCHORALRM OFF
NAVCALCULATOR
ARRIVAL
ALARM
BE
sMc
TIME
ARRIVI
ANCHC
N
SET
OPTION
ENABLED
fiTFf'"*';l
DISTANCE
0.10Ml
MENUI
esc
I n I v lErurn
20

TltcBasics
of GPS
GPS.orGlobalPositioning
Systern.
is
asatellitenavigationsystem
designedto
provide
worldwidepositioning
andtirne
infbrmation
with
all
weather
capability.
quick
response
timeandaccuracytctwithin
several
yards.
GPS
is
maintainedbythe
UnitedStatesDepartment
of
Defense2rlhours
aday.
GPS
will
beasystemol-24satellitesorbiting
atanaltitudc
very
high
abovetheearth.Becauseofthe
great
altitude.thesatcllitcs'signals
are
notinterl-eredwith
bytheterrainor
geographv.
andthehigh
fiequencyof
thesignals
(l-57-5
MHz)resultsin
practicallv
no
interencefrom
shipboardcnginesorother
electrcnic
svstems.
GPSusesthe
principle
ofranging
to
givc
vr)u
vr)ur
position.
This
is
donebymeasuring
thedistancefrom
yourposition
tothe
position
of
atleastthreesatellites.The
distanceto
a
satelliteis
calculatedbv
measuringhowlongittakesradiosignals
toarrivcfrolnthekrrown
position
ofeachof therespectivesatellites
intheirorbits.
The
satellitesandthe
StarPilot
6must
be
precisely
tintedto
generate
the
exact
sameradiosignal
attheexact
sametimeinorder
to
mcasure
thetirneanddistancc
calculations
with
ahighdegreeofaccuracy.
Thisis
accomplishedbytheuseofatomic
clocksonallthesatellitcs.
andbycomparing
whatpart
ofthe
radio
signalcodeisrecervcd
at
the
exactsametimefiomallthesatellites.
Tocomplete
its
calculationsfilryourposition.
the
StarPilot
6 looks
upir-ritsdatabase
the
knownposition
o1'eachof thesatellites
atthat
exacttime.Becausethc
GPSsatellites
are
insuchahighorbit.
their
positions
atany
-eiven
tinreare
quitepredictable.
Now.
alltheStar
Pilot
6needs
todoiscalculate
allthisforthreeorfirursatcllitcs
everyf-ewseconds.
and
you
havecontinuousposition
updatingl
GPSsatellitesare
constantlymonitored
byDepartment
of Def'ense
ground
stations.Satellite
clocksandexact
pclsitionin_t
infbrmation
is
computedandany
variations
arenoted
or
correctedas
neccssary.
and
transmittedtotheappropriatesatellites.
WARNING: AsofApril 1992,
thereare16workin-esatellites
in
orbit.
Fullimplementation
of
2l satcllites
(and
three
sparesl
is
currently
pro.yccted
fbr 1993.
Usersare
cautionedthatthe
systcmis
stillinanexperimental
operationalstatus
andthesystem
maybe
turned
offor satellites
moved
atanytime.withoutwarning.
DO
NOTplace
yourself
oryourvcssel
ina
situation
where
GPS
isyour
sole
meansof navigation.
Checkwith
theCoastGuard
torcurrcnt
operational
slalu\
andmessages.
WARNIN(i: SelectiveAvailability
(S/A)
hasbeenimplemenred
by
the
U.S.
DODto
restrict
theaccuracyofGPS
positions.
Asof April
1992.
theaccuracyoftheGPSsystemis
suchthat95%
of thetime
a
fix will be
within100rneters
oftheactual
geographic
position.
2l
Table of contents
Other Interphase GPS manuals