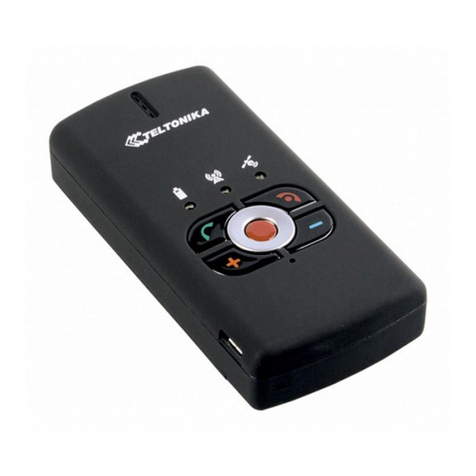
FUNCTION PARTS of DEVICE
1 – Microphone Microphone is used for voice conversations.
2 – USB port Connect mini USB cable to the device and the PC to configuration Handheld GPS and
charge the battery.
3 – Key lock To lock the keyboard, move the arrow to±, to unlock move the arrow to².
4 – Speaker Speaker is used for active voice conversation – to be able to hear the talker and for
incoming call signal.
5 – Keyboard You will enable or disable the set functions by pressing the buttons.
6 – LED indicators LED indicators will let you know in what mode the device is operating.
- Power indicator, - GSM indicator, - GPS indicator.
7 – ON button To turn the device on, press and hold the button until Power LED indicator turns green.
You can change voice volume by pressing buttons on device keyboard. That buttons are marked with color
circles. Button with orange circle voice volume will up and with blue circle voice volume will down.
GETTING STARTED
For more detail instruction please read User’s Manual.
Insert a SIM card.
Install the required drivers and software on your PC. (Chapter Software installation)
The internal battery of the device has to be fully charged. (Usually it can be charged by connecting the device to
the PC through the USB port, but you also can charge it using other accessories).
Switching ON the device: In order to do this connect device to USB port and it will switch ON automatically.
Another way is to push and hold the button located on top of the device until green LED turns on, release the
button when LED glows. (The first time before you turn ON the device is recommended to press restart button.
It is located in the hole behind alarm button.)
Set device parameters with the “GPS Assistant“ Software.
NOTE: (Recommended) SIM card is used with deactivated PIN code request. The PIN code request can be
disabled with the help of another mobile phone.
MINIMAL REQUIREMENT
Operation system MS Windows 2000 SP3 or MS Windows XP SP1
http://www.microsoft.com
Hard Disc Space: 20 MB
Screen Resolution 1024 x 768 (Full Screen)
Windows Installer v. 3.0
1
2 3
5 6
4
7


