148A
(148IO) SOLAR LED LANDSCAPE LIGHT ENGLISH 4.875” X 7.25” 09/15/2017
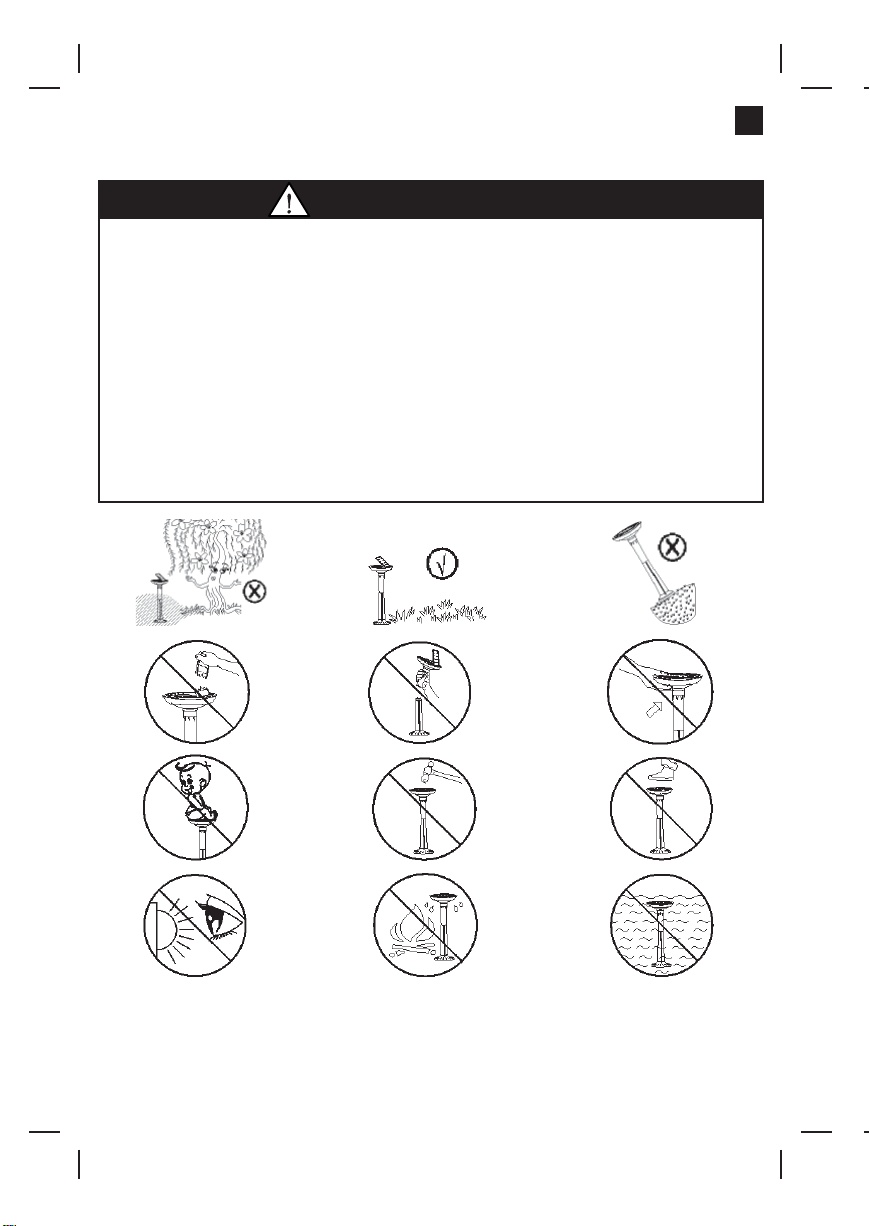
SAVE THESE INSTRUCTIONS
Page 5
Limited Warranty
Your Solar LED landscape light has been manufactured using the highest quality
materials and workmanship. All Intex products have been inspected and found free
of defects prior to leaving the factory. This Limited Warranty applies to the Solar LED
landscape light only.
This limited warranty is in addition to, and not a substitute for, your legal rights and
remedies. To the extent that this warranty is inconsistent with any of your legal rights,
they take priority. For example, consumer laws across the European Union provide
statutory warranty rights in addition to the coverage you receive from this limited
warranty: for information on EU-wide consumer laws, please visit the European
Consumer Center website at http://ec.europa.eu/consumers/ecc/contact_en/htm.
The provisions of this Limited Warranty apply only to the original purchaser and are not
transferable. This Limited Warranty is valid for a period of one (1) year from the date
of the initial retail purchase. Keep your original sales receipt with this document, as
proof of purchase will be required and must accompany warranty claims or the Limited
Warranty will be invalid.
If you find a manufacturing defect in the Solar LED landscape light during the warranty
period, please contact the appropriate Intex Service Center listed in the separate
“Authorized Service Centers” sheet. If the item is returned as directed by the Intex
Service Center, the Service Center will inspect the item and determine the validity of the
claim. If the item is covered by the provisions of the warranty, the item will be repaired
or replaced, with the same or comparable item (at Intex’s choice) at no charge to you.
Other than this warranty, and other legal rights in your country, no further warranties
are implied. To the extent possibly in your country, in no event shall Intex be liable to
you or any third party for direct or consequential damages arising out of the use of your
Solar LED landscape light or Intex or its agents’ and employees’ actions (including the
manufacture of the product). If your country does not allow the exclusion or limitation of
incidental or consequential damages, this limitation or exclusion does not apply to you.
You should note that this limited warranty does not apply in the following circumstances:
• If the Solar LED landscape light is subject to negligence, abnormal use or application,
accident, improper operation, improper voltage or current contrary to operating
instructions, improper maintenance or storage;
• If the Solar LED landscape light is subject to damage by circumstances beyond
Intex’s control, including but not limited to, ordinary wear and tear and damage
caused by exposure to fire, flood, freezing, rain, or other external environmental
forces;
• To parts and components not sold by Intex; and/or.
• To unauthorized alterations, repairs or disassembly to the Solar LED landscape light
by anyone other than Intex Service Center personnel.
Injury or damage to any property or person is not covered by this warranty.
Read the owner’s manual carefully and follow all instructions regarding proper operation
and maintenance of your Solar LED landscape light. Always inspect your product prior
to use. This limited warranty will be void if use instructions are not followed.