Intex BM4212 User manual

(173PO) 12 VOLT TROLLING MOTOR ENGLISH 7.5” X 10.3” 05/21/2012
173
PO
SAVE THESE INSTRUCTIONS
Page 1
173
PO
12 VOLT TROLLING MOTOR
Model BM4212
173-*PO--R0-1305
Voltage: 12V DC
Max. current: 35A
Max. power: 420W
Thrust:
40 Lbs (180N)
Maximum loaded boat weight: 2000Lbs (909kg)
Speeds: 5-forward / 3-reverse
Shaft length: 36” (91.4cm)
Suitable for: Freshwater and saltwater
Mounting type:
Transom mounting only
These product warnings, instructions and safety rules provided with the product represent some
common risks of water recreation devices and do not cover all instances of risk and danger.
Please use common sense and good judgement when enjoying any water activity.
Requirement: a deep cycle marine 12volt battery with at least 60 ampere
hours rating.
Note:
product. Not to scale. Boat, battery and motor mount board are not
included.
• Children should be supervised to ensure that they do not play with the appliance.
• This appliance is not intended for use by persons (including children) with reduced physical, sensory or mental capabilities, or lack of
experience and knowledge, unless they have been given supervision or instruction concerning use of the appliance by a person responsible
for their safety.
applicable to your area of operation.
operate equipment.
the motor is switched off and disconnected from the battery(s) before attempting any manual weed removal.
electrical short circuit and void the warranty.
precautions for servicing the motor, do not perform this service.
FAILURE TO FOLLOW THESE WARNINGS MAY RESULT IN PROPERTY DAMAGE, FIRE, ELECTRIC SHOCK, DROWNING, OR OTHER
SERIOUS INJURY OR DEATH.
WARNING

(173PO) 12 VOLT TROLLING MOTOR ENGLISH 7.5” X 10.3” 05/21/2012
173
PO
SAVE THESE INSTRUCTIONS
Page 2
173
PO
Tilt / twist / tiller
extension handle
Battery meter & Weed
escape control button
Control box
Clamp screws
Motor
Propeller
Tilt lock lever
Multi-position
mounting bracket
Quick release depth collar /
steering tension knob
SETUP INSTRUCTIONS
Mounting
CAUTION: Over-tightening the clamp screws can damage the motor mounting bracket.
Tilt Lock lever
teering tension knob
Clamp screws
Quick release depth collar / lever arm
appearance, which may result in updates to the instruction manual, without notice.
Overview:

(173PO) 12 VOLT TROLLING MOTOR ENGLISH 7.5” X 10.3” 05/21/2012
173
PO
SAVE THESE INSTRUCTIONS
Page 3
Shaft depth and steering tension adjustment
1. Open the lever arm of the quick release depth collar
and slowly slide the shaft up or down to the desired
depth. Close the lever arm back to secure the shaft
depth. The lever arm of the quick release depth collar
proper feel. Note: Do not over tighten the screw.
WARNING:
points and all moving parts when stowing, deploying,
release depth collar or the steering tension knob, as
2. The steering tension of the trolling motor can be
Stowing, deploying and tilt angle adjustment
Horizontal stow:
1. Loosen the steering tension knob, grab the back of
the control box or the motor shaft. Do not use the
handle to stow or tilt the motor.
2. While lifting up the motor 10” (25.4cm), tilt the trolling
motor into the boat. The mounting bracket will
ratchet into the locked position.
3. Re-tighten the steering tension knob and slide the
quick release depth collar down to the top of the
depth collar is retightened.
Horizontal deploy:
position, loosen the quick release depth collar,
reposition the depth collar and retighten to the
desired depth position.
2. Hold the back of the control box or the motor shaft
lock lever while holding the control box, and slowly
lower the motor into the water.
3. Make sure the quick release depth collar is securely tightened to the desired depth and the steering
tension knob is tightened to the desired steering tension.
Vertical stow:
vertical position.
2. Retighten the steering tension knob to retain and secure the vertical stow position of the motor.
3. Open the quick release depth collar lever arm and slide the quick release depth collar down to the top
of the steering tension knob. Close the lever arm.
Vertical deploy:
1. To deploy the motor from the vertical stowed position, loosen the quick release depth collar by opening
into the water to the desired depth.
2. Retighten the quick release depth collar, and retighten the steering tension knob to the desired steering
tension.
Quick Release Depth Collar / lever arm
Tilt Lock lever
teering tension knob
One hand:
lift here
Other hand:
press tilt lock lever
173
PO

(173PO) 12 VOLT TROLLING MOTOR ENGLISH 7.5” X 10.3” 05/21/2012
173
PO
SAVE THESE INSTRUCTIONS
Page 4
Tilt and extension handle adjustment and operation
IMPORTANT: To use the downward position, you
must press the release button located on the
underside of the pivot handle, and then push the
desired position.
the desired length position. The handle extends a 6
inches (15.2cm).
meets the face of the control box head.
Switch ON/OFF and speed adjustment
There are 5 forward speeds (1, 2, 3, 4 and 5) and 3
reverse speeds (-1, -2 and -3)
speed accordingly.
accordingly.
IMPORTANT:
Battery requirement and connection
IMPORTANT: For best result use a deep cycle marine 12 volt battery
(not included) with at least 60 ampere hours rating.
2. Connect the positive (+) red wire to the positive (+) battery terminal.
3. Connect the negative (-) black wire to the negative (-) battery
terminal.
The battery meter on the control box panel provides an indication of the
indicates that the battery must be recharged.
NOTICE: Maintain battery at full charge. Failure to recharge the battery within 12-24 hours is the leading
cause of premature battery failure. Proper care will ensure having battery power when you need it and
improve the battery life. Check with your local marine battery supplier for further details.
WARNING
Weed escape control button
propeller will rotate back and forth to disentangle itself from
the weeds.
NOTICE:
then press the weed escape button.
Battery meter
Tilt / twist / tiller
extension handle
Release
button
75o
173
PO
Weed escape button

(173PO) 12 VOLT TROLLING MOTOR ENGLISH 7.5” X 10.3” 05/21/2012
173
PO
Boat rigging and motor installation
An over-current protection device (circuit breaker or fuse) must be used with this motor. The Coast
Guard requires that each ungrounded current-carrying conductor must be protected by a manually
reset, trip-free circuit breaker or fuse. The type (voltage and current rating) of the fuse or circuit breaker
guidelines:
Maximum thrust voltage recommended circuit breaker rating
30# to 45# 12V 50A @ 12VDC
50# to 55# 12V 60A @ 12VDC
depending on the length of the cable needed and voltage of the motor. For further information and
Propeller replacement
1. Disconnect the motor cables from the
battery before changing the propeller
and servicing.
2. Hold the propeller and loosen the
propeller nut with pliers or a wrench.
3. Remove the propeller nut and washer.
screwdriver pressed into the slot on the
end of the propeller shaft.
5. Before installing the new propeller, make sure the drive pin is aligned 90 degrees with the small guiding
studs.
6. Align the new propeller with the drive pin and press into place.
7. Re-install propeller washer and nut.
8. Tighten the nut 1/4 turn past snug. Do not over-tighten the nut.
Maintenance
silicone spray.
Fishing line and other
check the propeller/motor seal for wear and tear.
the battery whenever the motor is out of the water. For long term storage, lightly coat all metal parts with
OF / 0OC.
Troubleshooting:
1. Motor fails to run or lacks power:
a. Check motor for obstructions. The motor may have gone into current limit. To reset: return
handle to off position, remove obstruction and resume operation.
b. Check battery connections for correct polarity.
the terminals.
d. Check battery water level. Add water if needed.
173
PO
Drive pin
prop nut & washer
propeller (11539)
SAVE THESE INSTRUCTIONS
Page 5
11540

(173PO) 12 VOLT TROLLING MOTOR ENGLISH 7.5” X 10.3” 05/21/2012
173
PO
SAVE THESE INSTRUCTIONS
Page 6
2. Motor loses power after a short running time:
3. Motor is hard to steer:
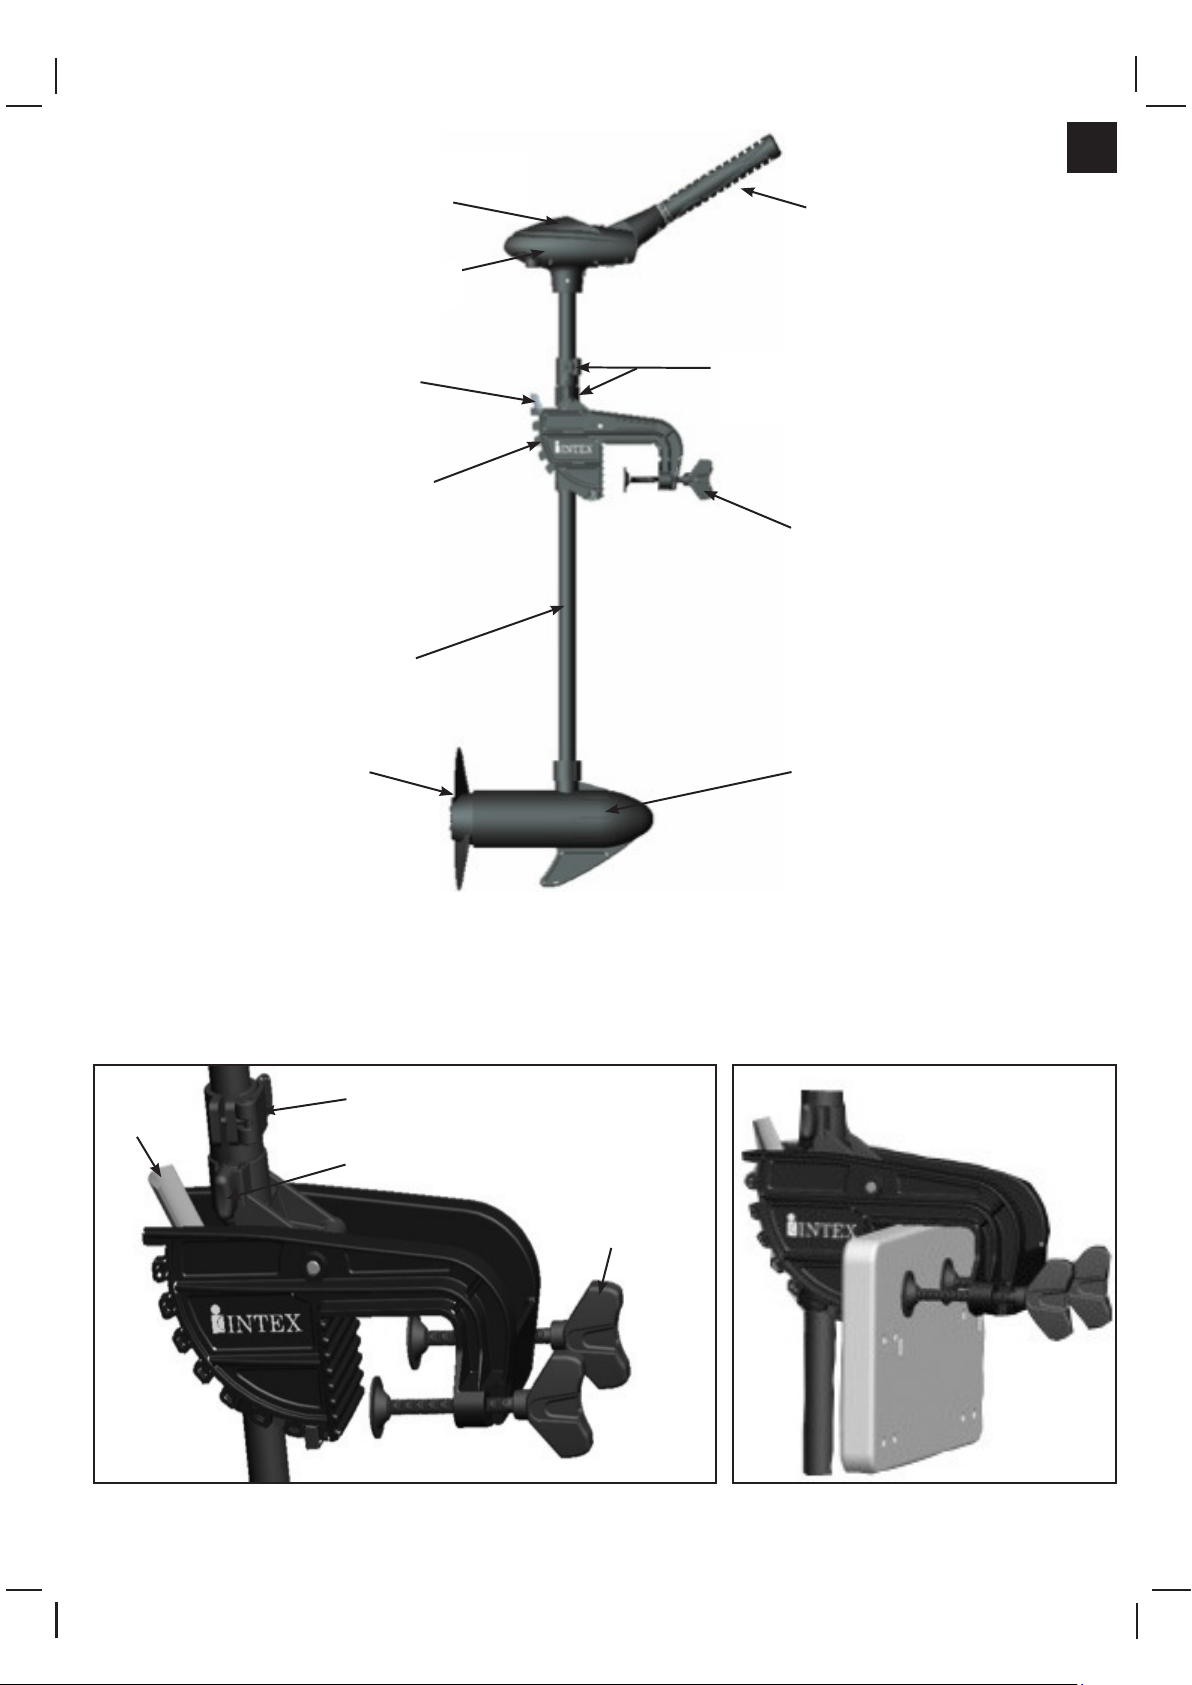
a. Loosen the steering tension knob on the top of the mounting bracket.
b. Lubricate the composite shaft.
a. With some boats, the transom bracket may loosen or shift during heavy use. Retighten the clamp screws.
5. You experience propeller vibration during normal operation:
173
PO
Motor does not
start, power
indicator does
not turn on
1) Power is not turned ON / battery cable
clamps are loose.
2) Battery cable clamps’ polarity reversed.
3) Low battery power.
1) Twist the handle to ON / ensure battery cable clamps are
secured and tighten.
2) Reverse and ensure correct polarity connection, then turn ON.
3) Recharge or replace the battery
Motor does not
work, power
1) Battery voltage is too high.
switch ON or under protection mode.
1) Replace with a 12V marine battery, then switch ON.
desired speed.
Motor suddenly
stop
1) Propeller, motor out of the water.
3) Low battery power.
elow the water surface.
3) Recharge or replace battery.
Battery only last
a short time
1) Battery not fully charged.
2) Deteriorated battery.
1) Fully charge the battery.
2) Replace with a new battery (use a 12V / 60Ah marine battery).
Control handle is
not responding
1) Under protection mode.
2) Water inside the control handle.
3) Others
speed to reset the protection mode.
then turn ON.
Battery cable
clamps are hot
1) Battery cable clamps are loose.
2) Battery terminals and cable clamps
are rusty.
2) Clean the battery terminals and the cable clamps, replace
them if necessary.
Motor is
vibrating heavily
1) Propeller is not positioned in the right depth.
3) Propeller is loose or broken.
4) Transom mounting bracket or clamp screws
is loose.
3) Tighten the propeller or replace a new propeller.
4) Tighten transom mounting bracket clamps and the steering
tension knob.
Weed escape
control button
not responding
under protection mode.
3) Others
1) Press and hold the button until the operation is over.
the weed escape button.
Move slowly
1) Low battery power.
3) Propeller is not positioned in the right depth.
4) Propeller is loose or broken.
1) Recharge or replace the battery.
4) Replace a new propeller.
Trolling motor
depth cannot
1) Lever arm of the quick release depth
collar is not open.
3) Obstruction in the mounting bracket.
1) Open the lever arm on the quick release depth collar.
2) Loosen the steering tension knob.
of the shaft.
Motor cannot be
stowed because
does not work
1) Motor is too deep.
position.
the motor to stow.

(173PO) 12 VOLT TROLLING MOTOR ENGLISH 7.5” X 10.3” 05/21/2012
173
PO
SAVE THESE INSTRUCTIONS
Page 7
173
PO
Limited Warranty
Your 12 Volt Trolling Motor has been manufactured using the highest quality materials and workmanship.
Warranty applies only to the 12 Volt Trolling Motor.
This Limited Warranty applies only to the original purchaser and is not transferable. This Limited Warranty is
with this manual, as proof of purchase will be required and must accompany warranty claims or the Limited
Warranty is invalid.
two (2) years period,
of this warranty cover the item, the item will be repaired or replaced at no charge.
Any and all disputes regarding the provisions of this Limited Warranty shall be brought before an informal
dispute settlement board and unless and until the provisions of these paragraphs are carried forth, no civil
limitation of incidental or consequential damages, so the above limitation or exclusion may not apply to you.
operation, accident, improper operation, improper voltage or current contrary to operating instructions, or to
DO NOT GO BACK TO THE PLACE OF PURCHASE FOR REPLACEMENT. IF YOU ARE MISSING PARTS
OR NEED ASSISTANCE, PLEASE CALL US TOLL-FREE (FOR U.S. AND CANADIAN
RESIDENTS): 1-800-234-6839.
Proof of Purchase must accompany all returns or the warranty claim will be invalid.
This manual suits for next models
1
Table of contents
Popular Outboard Motor manuals by other brands

Attwood
Attwood X3-40 Operation, maintenance & installation manual

Yamaha
Yamaha F115 owner's manual

Mercury
Mercury Sea Pro user guide

SLEIPNER MOTOR AS
SLEIPNER MOTOR AS Side-Power PPC 820 Installation and user manual

Yanmar
Yanmar D27 Service manual

SLEIPNER MOTOR AS
SLEIPNER MOTOR AS SE 40 Installation and user manual