Intova Sport HD User manual

0
Table of Contents:
Preface………………………………………………………1
Mainfeatures…………………………………………. .. . . ..1
Computer operating system requirements……. . . . . . . . . . . . . . . . . . . .1
Prestart Guide…………………………… . . . . . . . . . . . . . . . . .2
Basicinstallation…………………………………………… .3
Videomode…………………………………… . . . . . . . . . . ..5
Photo mode………………………………………………....10
Playbackmode……………………………………………...15
Settings………………………………………………. . . . . . . .16
Sport HD

1
Preface:
Thank you for purchasing an Intova Sport HD. SP1 utilizes the 1080p High Definition Video
format and is waterproof to 60 meters/200 feet. Visit www.intova.net to view the wide range of mount
optionsavailabletohelpyoufullyutilizethisgreatcamera.Enjoy!!
Mainfeatures:
*Videoresolution:
1080P (1920×1080 30fps)
720P (1280×720 30fps)
WVGA1(848×480 60fps)
WVGA (848×480 30fps)
VGA (640×480 30fps)
*Photoresolution:
12M 4000X3000Pixels(byinterpolation)
8M 3200X2400Pixels(byinterpolation)
5M 2592X1944Pixels
3M 2048X1536Pixels
* 1.5inchTFTLCD
* 4xDigitalZoom(no zoomin1080Pmode)
* 140°wideanglelens
*Builtinrechargeable1400mAhlithium-ionbattery
*SupportsmicroSDcardupto32GB(4GBSDHCCLASS4oraboveisrecommended)
Accessories:
CD-ROM/ user’smanual/USBcable/TVoutcable/handstrap
Computeroperatingsystemrequirements:
Windows2000/XP:
●128 MB RAM, minimum125MBfreediskspace.
●Available USB Interface.
●Recommended screen resolution 1024 × 768 pixels orhigher.
●16-bitcolororhigherdisplayadaptor.
WindowsVista:
●800MHz processor and 512 MB of system memory .
●20GB hard driver with minimum15GBofavailablespace.
●Support for Super VGA graphics.
●Available USB Interface.

2
Windows 7 :
1GHzorfaster32-bit(x86)or64-bit(x64)processor.
1GBRAM(32-bit)or2GBRAM(64-bit).
16GBavailablesystemRAM(32-bit)或20GB(64-bit).
WDDM1.0or higher versiondriver’s DirectX9graphics device.
Macintosh :
PowerMacintoshG3500MHzorhigher.
MacOSXversion10.2.6orlater.
128 MBminimumavailablesystemRAM(256MB recommended), 150 MBfree diskspace .
800 x600 or higher-resolutionmonitor displaying millions of colors.
Note: This hardware is plug and play compatible when used on a Mac. The included software is for
Windows operating systemsonly.
Handling notice before use:
•Donot attempt todisassemble the camera as there are high voltage parts and dangerouselectric shockcan
occur.
•Do not leave thecamera in direct sunlight or near heat sources.
•Ifcamerabecomes hotduringuse,turn offthe power immediately.
•For storage, remove the memory card and keep camera in a cool, dry place with housing door slightly
open
•SPI floats. Intova flotationstrap(optionalaccessory) is recommendedas extra precautionforwateruse.
Description:
•
•
•
•
•
•
•
•

3
Basicinstallation:
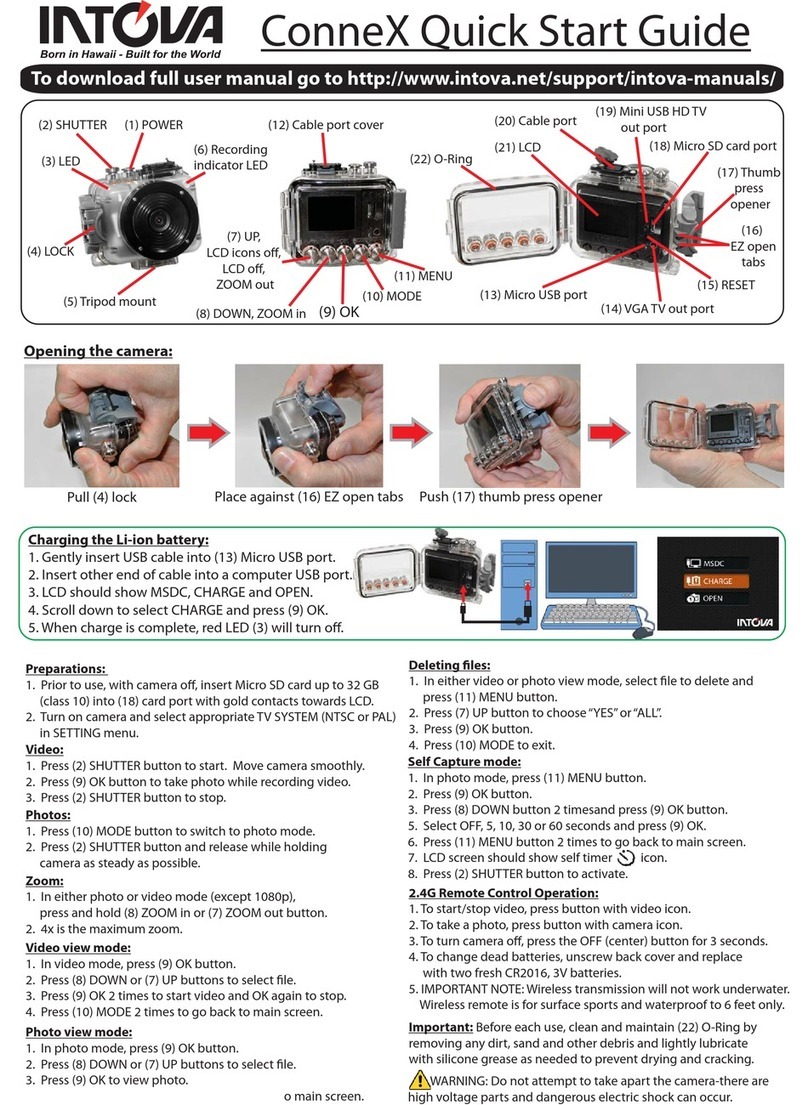
Openthehousing:
Followthedirectionsinthefigurebelowtoopenthehousing,.Sometimesavacuumsealmayoccur,use
acointoopenasindicatedinseconddiagram.
Insertmemorycard:
Follow the indicated direction inthe figure below to insert Micro SD memory card. After the card is
inserted,theicon willshowonLCDscreen.
* Turnoffpowerwheninsertingorremovingmemorycard.
。
Notes:
1.Formatthememorycardbeforeuse
2.IftheDVdoesnotworkwiththememorycard,pleasetryanewcard.
3.TheDVcan’trecordavideoortakeaphotowithoutaproperlyinsertedmemorycard.
USBchargingandtransferring:
ConnectyourcomputertoDV withUSBcable.Afterconnection,pressthepowerbutton,andthen
useUp/DownbuttonstoselectMDSC/CHARGE/OPEN.

4
MDSC:Entertodownloadvideoorimagefiles.
CHARGE:Chargeorrechargebattery. Fullchargingtimeisaround6hours.
OPEN: RechargethebatteryandoperatetheDV.
TVOUT:
ConnectDVandTVwithTVcabletodisplayDVfilesonTV.
Basicoperation:
FUNCTIONS:
Video
Photo
Playback
POWER:
Press”POWERbutton” to turn on / turn off。
MODESWITCH:
Press”MODEbutton” to switch betweenVIDEO/PHOTO/PLACKBACK.
VIDEO/CAMERA:
Press”Shutterbutton“totakeavideoorphoto
PLAYBACK:
Press”MODEbutton” to enterPlaybackmodeto viewvideoandimagefiles.
DISPLAY:
Wheninvideoorcameramode,pressUpbuttontoturnoffLCDandsavebatterypower.

5
RESET:
If DV shutsdownandthebuttonsdon’t respond, use a tooth pick or other sharp point to pressReset
buttonandrestartDV.
Videomode:
Defaultsettingof DVisvideomode. Press”Shutterbutton“tostartorstoprecording.
Digitalzoom:
Use “Downbutton”tozoominonscenewhileselectingtargets. Thezoomfactorwillbedisplayedon
theLCD,andcanbeincreasedtoamaximumof4X(resolutiondropsasanimageismagnified)
*Can’tzoomin1080Pmode.
Videomodedisplay:
ThefollowingiconsshowthevarioussettingsdisplayedontheLCDinVideomode.
Settings:
In Video mode, press “MENU Button”, and use UP / DOWN buttons to select desired adjustment
setting.Thefollowingiconsrepresentallofthe functionalsettings inVideomode.AUDIO/SIZE/EV/
WHITEB/METERING/CONTRAST/SHARPNESS/EFFECT/RECYCLE/VIDEOFLIP.

6
* Audio:Inthesettinglist,usetheUP /DOWNbuttonstoselect“AUDIO”,andpress“OKbutton”to
entersetting.ChooseONorOFF,andpress“OKbutton”toconfirmselection,thenpressMENUbuttonto
return.
“OK”
*Size:Inthesettinglist,usetheUP /DOWNbuttonstoselect“SIZE”,andpress“OKbutton”toenter
setting. There are 1080P / 720P / WVGA1 / WVGA / VGA. After selection, press “OK button”to
confirm,thenpressMENUbuttontoreturn.
“OK”
*EV:In the setting list, use the UP / DOWN buttons to select “EV”, and press “OK button” to enter
setting.Thereare+2/+1.7/+1.3/+1/+0.7/+0.3/0/-0.3/-0.7/-1/-1.3/-1.7/-2.Afterselection,press
“OK button” to confirm,thenpressMENUbuttontoreturn.
“OK”

7
* White Balance:In the setting list, use UP / DOWN buttons to select “WHITE B”, and press “OK
button” to enter setting. There areAUTO / SUNNY / CLOUDY / TUNGSTEN / FLUORESCENT.
Afterselection,press “OK button” to confirm,thenpressMENUbuttontoreturn.
“OK”
* Metering:In the setting list, use the UP / DOWN buttons to select “METERING.”, and press “OK
button” to enter setting.ThereareAVERAGE/SPOT/CENTER.Afterselection,press “OK button” to
confirm,thenpressMENUbuttontoreturn.
“OK”
* Contrast:In the setting list, use the UP / DOWN buttons to select “CONTRAST”, and press “OK
button” to enter setting. There are STANDARD / HARD / SOFT.Afterselection, press “OK button” to
confirm,thenpressMENUbuttontoreturn.
“OK”

8
*Sharpness:Inthesettinglist,usetheUP/DOWNbuttonstoselect“SHARPNESS”, and press “OK
button” to enter setting. There are STANDARD /HARD / SOFT.Afterselection, press “OK button” to
confirm,thenpressMENUbuttontoreturn.
“OK”
*Effect:Inthesettinglist,usetheUP /DOWNbuttonstoselect“EFFECT”, and press “OK button” to
entersetting.ThereareOFF/ART/SEPIA/NEGATIVE/MONOCHROME/VIVID. Afterselection,
press “OK button” to confirm, then press MENU button to return.
“OK”
* Recycle:In the setting list, use the UP / DOWN buttons to select “RECYCLE”, and press “OK
button” to enter setting. ThereareON/1MIN/2MINS /3MINS/4MINS/5MINS/10MINS/15
MINS.Afterselection,press “OK button” to confirm, then press MENU button toreturn.
Notice
:
This function directs the DV to save files in the SD card automatically at the specified time
interval. Once the SD card isfull, the earliest file will be deleted and covered with a newfile.. Select the
capacityofyourSDcardcarefully,andsavethefilesonacomputertoavoiddataloss.
“OK”

9
*VideoFlip:Inthesettinglist,usetheUP /DOWNbuttonstoselect“VIDEO FLIP”, and press “OK
button” to enter setting. Choose ON or OFF, and press “OK button” to confirm the selection, then press
MENUbuttontoreturn.
Notice: Thisfunctionallowsimagetobeflipped180degreesifcameraisusedupsidedown.
“OK”
Photomode:
Press theMODEbuttontoenterPhotomode.Adjustthe DVRtotakephotosoftheobjects (viewed
fromtheLCD),presstheShutterbuttontotakephotos.
Digitalzoom:
Usethe“Downbutton”tozoominonscenewhileselectingtargets. Thezoomfactorwillbedisplayed
ontheLCD,andcanbeincreasedtoamaximumof4X(resolutiondropsasanimageismagnified).
Thedisplayofphotomode:
ThefollowingiconsshowthevariousiconsettingsdisplayedontheLCDinPhotomode.

10
Settings:
In the Photo mode, press the “MENU Button”, and use the UP / DOWN buttons to select desired
adjustmentsetting.ThefollowingiconsrepresentallofthefunctionalsettingsinPhotomode.Theyinclude
SIZE / EV / QUALITY / WHITE B / METERING / CONTRAST / SHARPNESS / EFFECT /
SELFTIMER/BURST/PHOTOFLIP/TIMELAPSE.
*Size:Inthesettinglist,usetheUP /DOWNbuttonstoselect“SIZE”, and press “OK button” to enter
setting.Thereare12M/8M/5M/3M.Afterselection,press “OK button” to confirm,thenpressMENU
buttontoreturn.
“OK”
*EV:In the setting list, use the UP / DOWN buttons to select “EV”, and press “OK button” to enter
setting.Thereare+2/+1.7/+1.3/+1/+0.7/+0.3/0/-0.3/-0.7/-1/-1.3/-1.7/-2.Afterselection,press
“OK button” to confirm, then press MENU button to return.
“OK”

11
*Quality:Inthesettinglist,usetheUP/DOWNbuttonstoselect“QUALITY”, and press “OK button”
to enter setting. There are SUPER FINE / NORMAL / FINE. After selection, press “OK button” to
confirm,thenpressMENUbuttontoreturn.
“OK”
*WhiteBalance:Inthesettinglist,usetheUP/DOWNbuttonstoselect“WHITE B”, and press “OK
button” to enter setting. There areAUTO / SUNNY / CLOUDY / TUNGSTEN / FLUORESCENT.
Afterselection,press “OK button” to confirm, then press MENU button to return.
“OK”
*Metering:In the setting list, use the UP /DOWN buttons to select “METERING.”, and press “OK
button” to enter setting.ThereareAVERAGE/SPOT/CENTER.Afterselection,press “OK button” to
confirm,thenpressMENUbuttontoreturn.
“OK”

12
* Contrast:In the setting list, use the UP / DOWN buttons to select “CONTRAST”, and press “OK
button” to enter setting. There are STANDARD / HARD / SOFT.Afterselection, press “OK button” to
confirm,thenpressMENUbuttontoreturn.
“OK”
*Sharpness:Inthesettinglist,usetheUP/DOWNbuttonstoselect“SHARPNESS”, and press “OK
button” to enter setting. There are STANDARD / HARD / SOFT.Afterselection, press “OK button” to
confirm,thenpressMENUbuttontoreturn.
“OK”
*Effect:Inthesettinglist,usetheUP /DOWNbuttonstoselect“EFFECT”, and press “OK button” to
entersetting.ThereareOFF/ART/SEPIA/NEGATIVE/MONOCHROME/VIVID.Afterselection,
press “OK button” to confirm, then press MENU button to return.
“OK”

13
* Selftimer:Inthesettinglist,usetheUP/DOWNbuttonstoselect“SELF TIMER”, and press “OK
button” to entersetting.ThereareOFF/5SECONDS/10SECONDS/30SECONDS/60SECONDS.
Afterselection,press “OK button” to confirm, then press MENU button to return.
“OK”
*Burst:Inthesettinglist, usetheUP /DOWNbuttonstoselect“BURST”, and press “OK button” to
entersetting.ThereareNO/3PICS/5PICS/10PICS.Afterselection, press“OK button” to confirm, then
pressMENUbuttontoreturn.
Notice:Thisfunctionwillallow the camera to rapidly shoot the selected number of images in a “burst”.
“OK”
*Photoflip:Inthesettinglist,usetheUP /DOWN buttonstoselect“PHOTO FLIP”, and press “OK
button” to enter setting. Choose ON or OFF, and press “OK button” to confirm the selection, then press
MENUbuttontoreturn.
Notice: Thisfunctionallowsimagetobeflipped180degreesifcameraisusedupsidedown.
“OK”

14
*Timelapse:Inthesettinglist,usetheUP/DOWNbuttonstoselect“TIME LAPSE”, and press “OK
button” to enter setting.ThereareOFF/1SECOND/2SECONDS/ 5SECONDS/10SECONDS/30
SECONDS/60SECONDS/120SECONDS/180SECONDS.Afterselection,press “OK button” to
confirm,thenpressMENUbuttontoreturn.
Notice
:
Afterselection,presstheShutterbuttontoworkthisfunction.Photoswillbetakenautomatically
ateachspecifictimelapse.PresstheShutterbuttonagaintostop.
“OK”
Playbackmode:
Press Mode button to enter into Playback mode. The LCD will display as follows. Press UP/DOWN
buttonstosearchforthevideosorphotosyouwouldliketoview,thenpressOKbuttontoplay/view.
Videoplayback:
Use UP/DOWN buttons to select the video to be viewed, and press OK button to play. Press OK
buttonagaintostopthevideo,orpressUPbuttontofastforward.

15
Photoplayback:
UseUP/DOWNbuttonstoselectphototobeviewed.
PlaybackSettings:
AfterenteringPlaybackmode,pressMENUbuttontoenterfunctionsettings.UseUp/Downbuttonsto
selectDeleteorSlideShow.
* Delete:Use UP/DOWN buttons to select the video or photo to be deleted. Press MENU button,
choose “DELETE”and press OK button to enter setting list. Use UP/DOWN buttons to select YES
(Singleimage) orDELETEALL.
“OK”
*SlideShow:InPlaybackmode,pressMenubuttontoentersettinglistthenuseUP/DOWNbuttonsto
select “SLIDE SHOW”. There are NO / 1 SECOND / 3 SECONDS / 5 SECONDS.After selection,
pressOKbuttontoconfirm. Press Menu buttontoreturn andstartslideshowdisplay. PressMenubutton
onceagaintostop.
“OK”

16
Settings:
Press Menu button, then press UP button and OK button to enter settings in any mode. There are
LANGUAGE、VOLUME、DATE、CLOCK、FORMAT、SYS.RESET、AUTO
OFF、LIGHTFREO、TVOUT、STAMP、LCDOFF、VERSION.
*Language:UseUP/DOWNbuttonstoselect”LANGUAGE”, and pressOKbuttontoentersetting
list. There are
ENGLISH、PORTUGUESE、русский、KOREAN、SPANISH、ITALIANO、DEUTSCH、
FRANçAIS、日本、繁體中文、简体中文.Afterselection, press OKbutton toconfirm, andpress
Menubuttontoreturn.
“OK”
* Volume:Use UP/DOWN buttons to select”VOLUME”, and press OK button to enter setting list.
Therearesevenvolumelevels.Fullvolumeisnumber7.Afterselection,pressOKbuttontoconfirm,and
pressMenubuttontoreturn.
“OK”

17
* Date:Use UP/DOWN buttons to select”DATE”, Press OK button to enter setting list. Use
UP/DOWNbuttonsagaintoadjustthedate,andpressOKbuttontosetYear/Month/Day.Afterselection,
pressOKbuttonagaintoconfirm,thenpressMenubuttontoreturn.
“OK”
“OK”“OK”
*Clock:Use UP/DOWN buttons to select “CLOCK”, and press OK button to enter setting list. Use
UP/DOWNbuttons againtoadjusttime, and pressOKbutton tosetMinute /second.After adjustment,
pressOKbuttonagaintoconfirm,thenpressMenubuttontoreturn.
“OK”

18
* Format:Use UP/DOWN buttons to select “FORMAT”, and press OK button to enter setting list.
ChooseYESorNO,andpressOKbuttontoconfirmtheselection.PressMenubuttontoreturn.
“OK”
* Sys.reset:Use UP/DOWN buttons to select”SYS.RESET”, press OK button to enter setting list.
ChooseYESorNO,andpressOKbuttontoconfirmtheselection.PressMenubuttontoreturn.
“OK”
*Autooff:Use UP/DOWN buttons to select ”AUTO OFF”, and press OK button to enter setting list.
ThereareOFF/1MIN/3MINS/5MINS.Afterselection,pressOKbuttontoconfirm,thenpressMenu
buttontoreturn.
“OK”

19
*Lightfreq:Use UP/DOWN buttons to select ”LIGHTFREQ”, and pressOKbuttontoentersetting
list.Theyare50HZ/60HZ.Adjustaccordingtothefrequencystandardofcountry.Afterselection,press
OKbuttontoconfirm,thenpressMenubuttontoreturn.
“OK”
* TVOUT:Use UP/DOWN buttons to select ”TV OUT”, and press OK buttons to enter setting list.
Options are NTSC / PAL. Adjust according to country standard. After selection, press OK button to
confirm,thenpressMenubuttontoreturn.
“OK”
*Stamp:UseUP/DOWN buttonstoselect”STAMP”, and press OK button to enter setting list. There
are OFF、DATE、DATE / CLOCK. If selected, the time detail will be shown on video and photos.
Afterselection,pressOKbuttontoconfirm,thenpressMenubuttontoreturn.
“OK”
Other manuals for Sport HD
2
Table of contents
Other Intova Camera Accessories manuals