Intuitive PDPI Onscreen User manual

1
PDPI Onscreen Kit Manual
Intuitive
CORPORATION
©1998, 1999
Welcome to your manual for
The New Generation of the
Pulse Driven Printer Interface Board
Table of Contents
QUICK START:
Page 2 . . . Setting Printer DIP Switches
Page 3 . . . Installing PDPI Onscreen
Page 4 . . . Programming Receipt Ticket Information
Page 5 . . . Set-up Screens
The PDPI Board is designed to be used only for legal purposes as determined
by the authorities in the location where this piece will be used.
PDPI Onscreen

2
PDPI Onscreen Kit Manual
Intuitive
CORPORATION
©1998, 1999
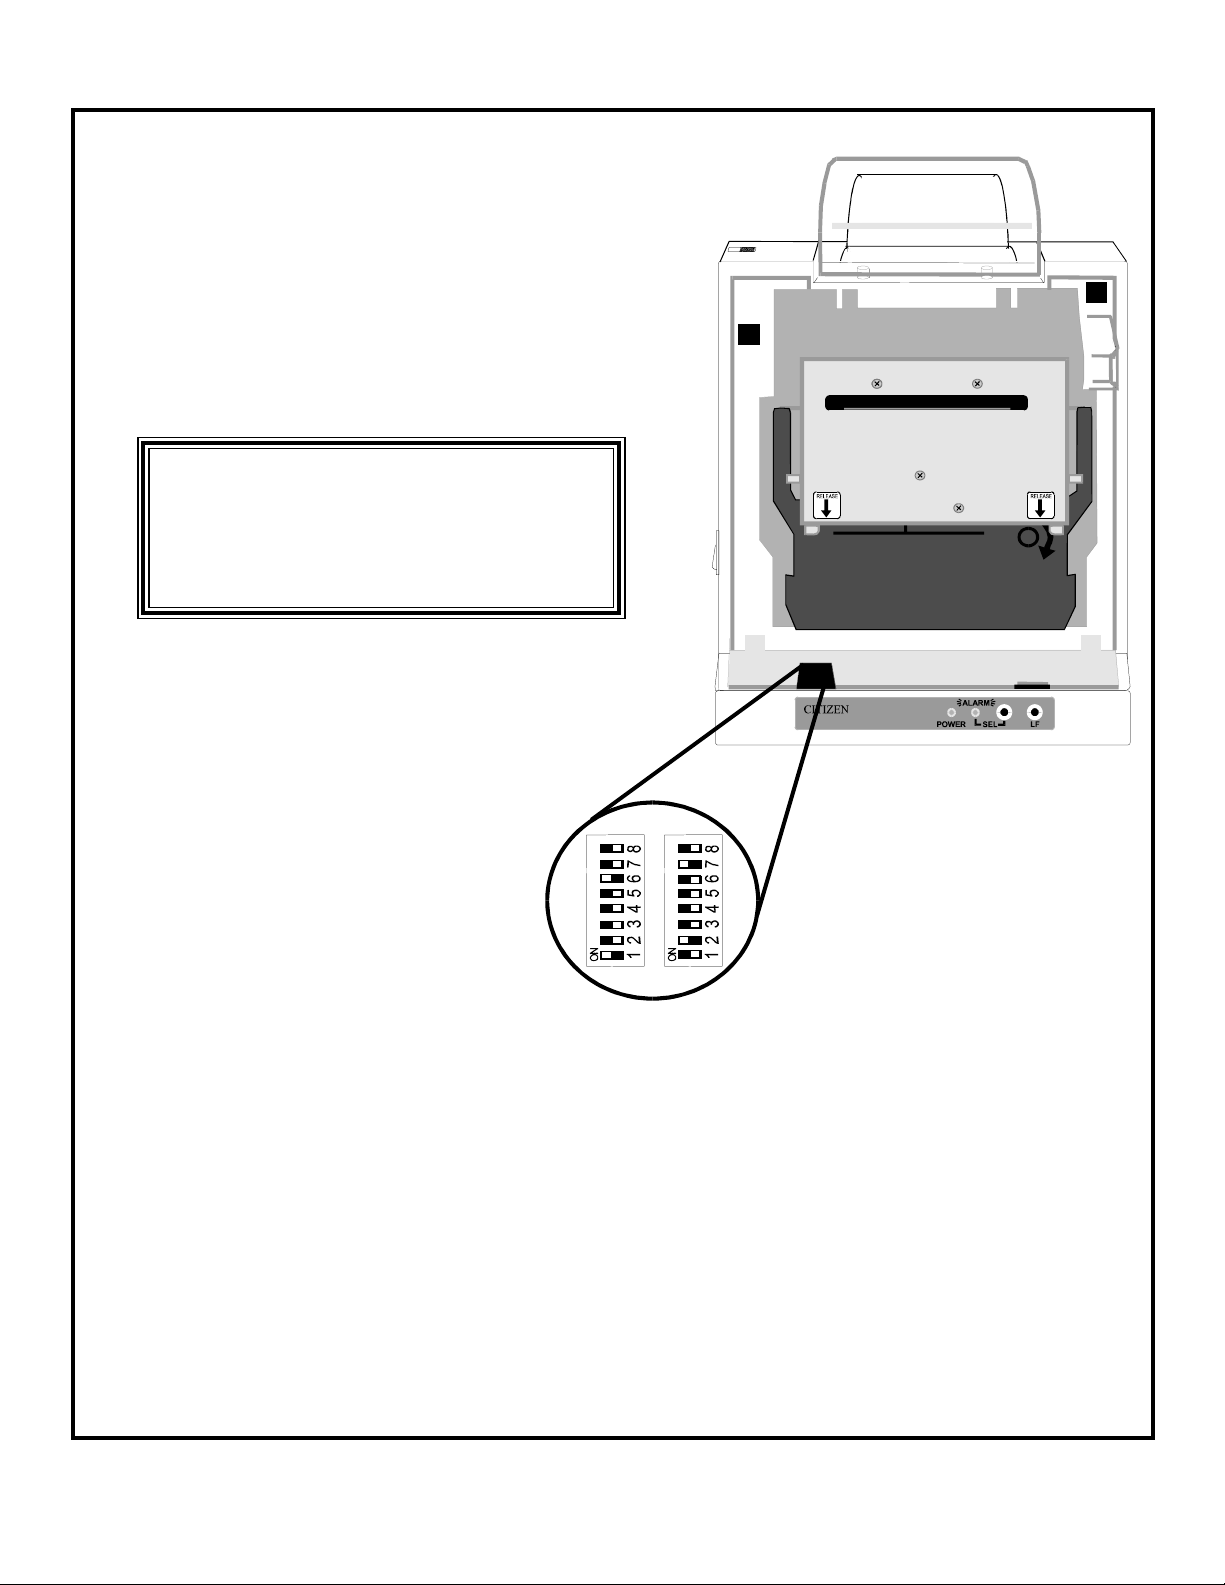
To Set the DIP Switch on the Citizen iDP3541 Printer
1) Make sure the printer is turned off.
2) Remove the front cover from the printer.
3) With a small object, like a screwdriver or ball point pen, gently move the DIP switch
either left or right. Make sure the switch is completely in the "on" or "off" position.
4) Replace the front cover
5) Turn the printer on.
NOTE: If at any time the DIP switch settings are changed and the printer has not been turned off,
and then on, the printer will NOT register the new settings.
The DIP switches for your Citizen printer
are located behind the front cover.
SETTING the DIP SWITCHES
on your PRINTER
The DIP switch settings on your printer
(Citizen, Epson or Ithaca) MUST be set to
1200 baud in order for your PDPI Onscreen
Board to function correctly.
Citizen iDP3541 Printer
Proper DIP Switch Settings
for 1200 Baud Rate
BANK 1 BANK 2
1, 6 on 2,7 on
2,3,4,5,7,8 off 1,3,4,5,6,8 off

3
PDPI Onscreen Kit Manual
Intuitive
CORPORATION
©1998, 1999
INSTALLING PDPI ONSCREEN
ToInstallyourPDPIOnscreenBoard
1) Turn the power off to the game cabinet.
2) Disconnect the cabinet harness from the game board.
3) Attach the card edge connector of the PDPI Onscreen board to the game board (so the parts side of each
board is facing in the same direction).
4) Attach the 10-position inline connector (or 15 position inline connector-varies based on board version)
from the supplied power cable to J4 on the PDPI-O Board. Attach the 10-dual position card edge
connector of the power cable to the game board.
5) Install the PDPI-O/game board combination back in the game cabinet.
6) Connect the 36-position card edge from the game harness to EC2 on the PDPI-O Board. Connect the10-
position card edge from the game harness to EC1 on the PDPI-O Board.
7) Install the Telco connector from the adapter cable to J1 on the PDPI-O Board and the DB25 connector to
the Citizen iDP3541 Printer.
8) To put remaining credits back onto the game without incrementing the Credit In Meter, insert one end of the
jumper wire to Pin 13, solder side of the game harness and the other end to the Service Credit In pin of the
game harness (CherryMaster, pin J).
9) Turn power back on the the game cabinet.
Connect to Citizen Printer Connect to PDPI-O Board, J1
Connect to game board Connect to PDPI-O Board, J4
Connect to game board
Jumper Wire

4
PDPI Onscreen Kit Manual
Intuitive
CORPORATION
©1998, 1999
PROGRAMMING RECEIPT TICKET INFORMATION
The PDPI Onscreen receipt tickets can be configured for a variety of outputs. There are 7 set-up/
information screens available with PDPI Onscreen that allow setup of location and disclaimer
information from within the existing game, without the use of a computer. Other setups, like Coin In
and Out values are all configured from the game monitor using the game’s control panel buttons.
1) Output Device Screen
a) Print $
b) Ticket Dispenser
c) Print Points
d) Print $ and Tickets
e) Print Tickets
2) Set Clock Information Screen
3) Game Number Screen
4) Editing Header Screen
5) Editing Footer Screen
6) Ticket Set-Up Screen
7) Last Five Scores Screen
To access the PDPI Onscreen set-up/information screens
1) Install PDPI Onscreen in your game cabinet.
2) Simultaneously press the DOUBLE, TAKE and Confirm buttons on your cabinet.
3) Follow the commands at the bottom of each set-up/information screen.
Print: $ Print: POINTS Print: $ and TICKETS Print: TICKETS

5
PDPI Onscreen Kit Manual
Intuitive
CORPORATION
©1998, 1999
OUTPUT DEVICE SCREENS
OUTPUT DEVICE: PRINT$
PRINTER TYPE: CITIZEN
MAX VOUCHER $: NO LIMIT
EXCESS CREDITS: PRINT WHOLE VALUE
DOUBLE/TAKE = UP/DOWN MENU ITEMS
BIG/SMALL = CHANGE VALUE
PLAY = EXIT SETUP
START = NEXT SETUP SCREEN
COPYRIGHT 1998
INTUITIVE CORPORATION
The first screen configures the style of the ticket, and the printer (Citizen, Ithaca, or Epson) or
dispenser to be used. Ticket values and amount won per game (hand count) are also configured
here.
DOUBLE/TAKE Moves the highlight box up and down to choose a menu item
BIG/SMALL Will scroll through the values of the menu item highlighted, as the following
descriptions explain.
PRINT
$
Print $ prints a receipt ticket from a receipt printer with a dollar value for credits.
PRINTER TYPE: Citizen iDP3541RF All printers must be set to
Epson 267 1200 baud transfer rate.
Epson 267II/300 8 data bits
Ithaca no parity
1 start bit
MAX VOUCHER$: (the maximum dollar value that is allowed to be printed for any receipt ticket)
$1 - $200: one value in this range, selections increment by $1
NO LIMIT: to print any ticket value, regardless of value

6
PDPI Onscreen Kit Manual
Intuitive
CORPORATION
©1998, 1999
EXCESS CREDITS: (indicates what to do with any credits that exceed the maximum voucher limit)
PRINT WHOLE VALUE: will print as many tickets as needed to
represent all the credits
*ONE MAX VOUCHER AND KEEP: prints one ticket for the Max Voucher
value specified. Any credits left over will be
put back on the screen
EVEN MULT OF MAX VOUCHER & TOSS: will print as many tickets as
possible in the Max Voucher value and
delete any remaining credits
*EVEN MULT OF MAX VOUCHER & KEEP: will print as many tickets as
possible in the Max Voucher value specified.
Any credits left over, less than the Max
Voucher value, will be put back on the
screen
ONE MAX VOUCHER & TOSS: will print one voucher up to the Max
Voucher value and the remainder will be
deleted
PRINT$
OUTPUT DEVICE SCREENS continued
*NOTE: The green jumper wire must be installed
for these selections to work properly.

7
PDPI Onscreen Kit Manual
Intuitive
CORPORATION
©1998, 1999
OUTPUT DEVICE: POINTS
PRINTER TYPE: CITIZEN
EXCESS CREDITS: PRINT WHOLE VALUE
PRINT
POINTS
Prints a receipt ticket with the word “POINTS”. The point value is equal to the total number of
credits that were on the game
PRINTER TYPE: Citizen iDP3541RF All printers must be set to
Epson 267 1200 baud transfer rate.
Epson 267II 8 data bits
Ithaca no parity
1 start bit
EXCESS CREDITS: PRINT WHOLE VALUE (only one choice available)
OUTPUT DEVICE SCREENS continued
OUTPUT DEVICE: TICKET DISPENSER
TICKET VALUE: $5
MAX WIN/GAME $: $5
EXCESS CREDITS: KEEP ON MACHINE
TICKET DISPENSER
TICKET VALUE: (the dollar value that equals one ticket. For example, if 1 credit = $1, and 1 ticket = $5, then
1 ticket will be dispensed if 5 credits are cleared; 2 tickets if 10 credits are cleared, etc.)
$1 - $99: one value in this range, selections increment by $1
MAX WIN/GAME $: (the maximum dollar value that can be won for each start. PDPI Onscreen automatically
knows the number of starts since it was last cleared and will only dispense the total
number of tickets allowable for that number of starts. Any credits left over, even if they
equal a whole ticket (s), are either put back on the machine or tossed.)
$1 - $99: one value in this range, selections increment by $1
NO LIMIT: dispense maximum number of tickets regarldess of number
of games played
EXCESS CREDITS: (indicates what to do with any credits that exceed the maximum ticket limit)
KEEP ON MACHINE
TOSS EXCESS

8
PDPI Onscreen Kit Manual
Intuitive
CORPORATION
©1998, 1999
OUTPUT DEVICE SCREENS continued
OUTPUT DEVICE: PRINT $ AND TICKETS
PRINTER TYPE: CITIZEN
TICKET VALUE: $5
MAX WIN/GAME $: $5
EXCESS CREDITS: KEEP ON MACHINE
PRINT
$AND TICKETS
Prints a receipt ticket showing both the dollar amount and the word “TICKETS” with a number.
PRINTER TYPE: Citizen iDP3541RF All printers must be set to
Epson 267 1200 baud transfer rate.
Epson 267II 8 data bits
Ithaca no parity
1 start bit
TICKET VALUE: (the dollar value that equals one ticket. For example, if 1 credit = $1, and 1 ticket = $5,
then, a receipt ticket will show ‘Tickets: 1’ if 5 credits are cleared; ‘Tickets:2’ if 10 credits
are cleared, etc.)
$1 - $99: one value in this range, selections increment by $1
MAX WIN/GAME $: (the maximum dollar value that can be won for each start. PDPI Onscreen automatically
knows the number of starts since it was last cleared and will only dispense the total
number of tickets allowable for that number of starts. Any credits left over, even if they
equal a whole ticket (s), are either put back on the machine or tossed.))
$1 - $99: one value in this range, selections increment by $1
NO LIMIT: to print any ticket value, regardless of value
EXCESS CREDITS: (indicates what to do with any credits that exceed the maximum ticket limit)
KEEP ON MACHINE
TOSS EXCESS

9
PDPI Onscreen Kit Manual
Intuitive
CORPORATION
©1998, 1999
OUTPUT DEVICE SCREENS continued
Prints a receipt ticket showing the word “TICKETS”. Ticket values are set up to correspond to a
dollar amount.
OUTPUT DEVICE: PRINT TICKETS
PRINTER TYPE: CITIZEN
TICKET VALUE: $5
MAX WIN/GAME $: $5
EXCESS CREDITS: KEEP ON MACHINE
PRINT
TICKETS
PRINTER TYPE:
TICKET VALUE: same as the section for Print $ and Tickets
MAX WIN/GAME $:
EXCESS CREDITS:

10
PDPI Onscreen Kit Manual
Intuitive
CORPORATION
©1998, 1999
SET CLOCK INFORMATION SCREEN
This screen is used to set the clock module on PDPI Onscreen. This time reference appears on
the printer receipt tickets and time stamps the last 5 scores. The clock module uses a 24-hour
military time reference.
SET CLOCK
08/28/98 12:34:56
DOUBLE/TAKE = LEFT/RIGHT
BIG/SMALL = CHANGE VALUES
PLAY = UPDATE AND EXIT
START = UPDATE AND NEXT SETUP SCREEN
COPYRIGHT 1998
INTUITIVE CORPORATION
DOUBLE/TAKE Moves the highlight box left or right to choose a segment from the date or
time.
BIG/SMALL Will scroll through the possible values.
PLAY Will accept the time and date displayed and exit, without going to any addi-
tional setup screens.
START Accepts time and date displayed and proceeds to the next setup screen.

11
PDPI Onscreen Kit Manual
Intuitive
CORPORATION
©1998, 1999
GAME NUMBER
0000
DOUBLE/TAKE = LEFT/RIGHT
BIG/SMALL = CHANGE VALUES
PLAY = UPDATE AND EXIT
START = UPDATE AND NEXT SETUP SCREEN
COPYRIGHT 1998
INTUITIVE CORPORATION
GAME NUMBER SCREEN
This screen is used to set the game number that prints on the receipt tickets. This ID is up to four
characters and can be either numeric or alpha characters.
DOUBLE/TAKE Moves the highlight box left or right to choose one of the four characters.
BIG/SMALL Will scroll through the numbers (0-9) and alphabet (A-Z).
PLAY Will accept the game number displayed and exit, without going to any addi-
tional setup screens.
START Accepts game number displayed and proceeds to the next setup screen.

12
PDPI Onscreen Kit Manual
Intuitive
CORPORATION
©1998, 1999
EDITING HEADER
DOUBLE/TAKE = LEFT/RIGHT
BIG/SMALL = UP/DOWN
PLAY = CHANGE CHARACTER
START = SAVE AND NEXT SCREEN
COPYRIGHT 1998
INTUITIVE CORPORATION
EDITING HEADER SCREEN
This screen is used to create or change the header information that will appear at the top of the
printer receipt ticket. Space is available for 15 lines of approximately 40 characters (subject to
printer).
It is important to note two things about Screen 1: The single box on the left is the end of text marker.
When a header is entered, this marker must be deleted and re-entered AT THE END of the header
text. The PDPI-O program stops looking for header information when it sees this character. If text is
entered after this character, the program will not read it and it will not appear on the ticket. If this
character is not inserted at the end of the header text, a lot of empty space may print on the ticket in
the header area. The column of boxes on the right indicates the length of each line. As text is in-
serted, any characters that get “pushed off the end” of the line will disappear and will not print on the
ticket. If this happens, the text must be re-entered.
All header text will print out in capital letters only. These boxes do not print on the receipt ticket.
DOUBLE/TAKE Moves the highlight box left or right on a line.
BIG/SMALL Moves the highlight box up or down a line.
PLAY Will change the ‘Editing Header’ screen (as shown on the next page) and
provide a means to change a highlighted character.
START Accepts the header displayed and proceeds to the next setup screen.
SCREEN 1

13
PDPI Onscreen Kit Manual
Intuitive
CORPORATION
©1998, 1999
EDITING HEADER SCREEN continued
EDITING HEADER
DOUBLE/TAKE = LEFT/RIGHT
BIG/SMALL = UP/DOWN
PLAY = SELECT CHARACTER
START+BIG/SMALL = INSERT/DELETE CHAR
INSERT A = END OF HEADER/FOOTER
COPYRIGHT 1998
INTUITIVE CORPORATION
0123456789
ABCDEFGHIJ
KLMNOPQRST
UVWXYZ .!?
,:;$#%&\=’
+-*/<>(){}
^_@`
To Enter or Change Header Text
1) From Screen 1, Use the DOUBLE, TAKE, BIG or SMALL buttons to move the cursor over the character/space
to change.
2) Press the PLAY button. (Screen 2 will be displayed).
3) To delete that character, press START and SMALL together, at the same time. (Screen 1 will appear with
changes).
To insert a space at that character, press START and BIG together, at the same time. (Screen 1 will appear
with changes).
To change that character, use DOUBLE, TAKE, BIG or SMALL to select a character in the symbol grid.
Press PLAY. This function overwrites the character highlighted by the cursor (Screen 1 will appear with
changes).
NOTE: adding a character in the middle of existing text must be done in 2 steps: insert a space, then change
the character (the space) to one selected from the symbol grid.
4) Repeat steps 1 through 3 until all header information is entered.
5) Repeat step 1 and 2, once more, to select the END OF TEXT marker box from the symbol grid making certain
it appears at the end of the header text.
SCREEN 2

14
PDPI Onscreen Kit Manual
Intuitive
CORPORATION
©1998, 1999
EDITING HEADER SCREEN continued
0123456789
ABCDEFGHIJ
KLMNOPQRST
UVWXYZ .!?
,:;$#%&\=’
+-*/<>(){}
^_@`
Numbers: 0 through 9
Letters: A through J
Letters K through T
Letters U through Z; space, period, exclamation point, question mark
comma, colon, semi-colon, dollar sign, number sign, percent sign, ampersand,
back slash, equal sign, apostrophe
plus sign, minus sign, asterisk, forward slash, less than, greater than, left
parenthesis, right parenthesis, left bracket, right bracket
carrot, underscore, at sign, accent mark, end of text marker (PDPI-O character)
Header Symbol Grid

15
PDPI Onscreen Kit Manual
Intuitive
CORPORATION
©1998, 1999
EDITING FOOTER
EDITING FOOTER SCREEN
This screen is used to create or change the footer information that will appear at the bottom of the
printer receipt ticket. This procedure is the same process as for the Header Information. Refer to
Page 12, Editing Header Information.
A default footer for Georgia can be enabled through a selection on the General Setup Screen
(see page 16). The footer reads:
THIS TICKET VALID FOR GOODS AND SERVICES AT THIS LOCATION ONLY. THE VALUE OF THE GOODS
AND SERVICES IS IN ACCORDANCE WITH THE O.C.G.A. 16-32-35 D.E.F. MERCHANDISE OR THIS
VOUCHER CAN NOT BE EXCHANGED FOR OR IN PART MONEY OF ANY KIND. ONLY MERCHANDISE CAN
BE RECEIVED.
I CERTIFY WITH MY SIGNATURE BELOW THAT NO CASH HAS BEEN RECEIVED FROM PLAYING THIS
MACHINE.
______________________________
CUSTOMER
______________________________
STORE PERSONNEL
This footer text is hard coded in the PDPI-O program. It can be edited, after it has been selected.
Any changes made in the Editing Footer screens, will not permanently affect the copy hard
coded in the program.
To Select the Default Footer
1) Press START to go to the next setup screen (General Setup).
2) Use TAKE to scroll down to the FOOTER: menu selection.
3) Use BIG/SMALL to change the selection to DEFAULT FOOTER 1.
4) Press START (several times) until the Editing Footer screen appears again.
5) Verify the default text is present.
6) Press START to save the default as the new footer.

16
PDPI Onscreen Kit Manual
Intuitive
CORPORATION
©1998, 1999
GENERAL SETUP SCREEN
This screen is used to define the output characteristics of the receipt tickets. Audit tickets are
printed from this screen.
HEADER:: ENABLE TEXT
FOOTER: DISABLE TEXT
METER IN VALUE: $0.05
METER OUT VALUE: $0.05
PRINTER CHAR/LINE 32
SCORES SCREEN: ENABLE
DOUBLE/TAKE = UP/DOWN MENU ITEMS
BIG/SMALL = CHANGE VALUE
CLEAR = PRINT AUDIT TICKET
CLEAR+TAKE = CLEAR AUDIT INFORMATION
CLEAR+PLAY = CLEAR SETUP INFORMATION
START = NEXT SETUP SCREEN
PLAY = EXIT SETUP
COPYRIGHT 1998
INTUITIVE CORPORATION
HEADER: (instructs PDPI-O how to handle the information present on the header screen)
ENABLE TEXT
DISABLE TEXT
CLEAR TEXT
FOOTER: (instructs PDPI-O how to handle the information present on the footer screen)
ENABLE TEXT
DISABLE TEXT
CLEAR TEXT
DEFAULT FOOTER 1: see page 15 for text

17
PDPI Onscreen Kit Manual
Intuitive
CORPORATION
©1998, 1999
GENERAL SETUP SCREEN continued
METER IN VALUE: (defines the value of one pulse on the In-Meter)
$0.00 - $99.99: one value in this range, selections increment by $0.01
METER OUT VALUE: (defines the value of one pulse on the Out-Meter)
$0.00 - $99.99: one value in this range, selections increment by $0.01
PRINTER CHAR/LINE: (defaults to 32. Maximum width of ticket is determined by selected printer)
1 - 99: one value in this range, selection increment by 1
SCORES SCREEN: (changes the accessibility of the Scores screen through the cabinet control panel)
ENABLE
DISABLE
To Select the Default Footer/Clear Header/Clear Footer
1) Use DOUBLE/TAKE to select either HEADER or FOOTER menu selection.
2) Use BIG/SMALL to change the selection to CLEAR TEXT or DEFAULT FOOTER 1.
3) Press START (several times) until the Editing Header or Editing Footer screen appears again.
4) Verify the text is cleared or the default text is present.
5) Press START to save the cleared or default text as the new header or footer.
6) PDPI-O will automatically change the selection on the General Setup screen to read ENABLE for either the
HEADER or FOOTER.or default text as the new header or footer.
6) PDPI-O will automatically change the selection on the General Setup screen to read ENABLE for either the
HEADER or FOOTER.
DOUBLE/TAKE Moves the highlight box up and down to choose a menu item.
BIG/SMALL Will scroll through values for the menu item highlighted.
CLEAR Prints an audit ticket (examples shown on page 21).
CLEAR + TAKE Resets audit ticket tallies to zero.
CLEAR + PLAY Resets setup information on ALL setup screen back to factory resets.
START Accepts information on setup screen and proceeds to the next setup screen.
PLAY Accepts information on setup screen and exits back to game.

18
PDPI Onscreen Kit Manual
Intuitive
CORPORATION
©1998, 1999
LAST FIVE SCORES
DATE TIME CRDTS GAMES
01/01/99 14:30:24 0026 0001
00/00/00 00:00:00 0000 0000
00/00/00 00:00:00 0000 0000
00/00/00 00:00:00 0000 0000
00/00/00 00:00:00 0000 0000
0000 GAMES PLAYED THIS ROUND
START = NEXT SETUP SCREEN
PLAY = EXIT SETUP
COPYRIGHT 1998
INTUITIVE CORPORATION
LAST FIVE SCORES SCREEN
The Last Five Scores are tracked and displayed in this screen.
This will be cleared if Clear Setup Information keys are pressed on the General Setup Screen.
This information can also be accessed from the control panel, as long as that feature is enabled in
the General Setup Screen.
.
To access the Last Five Scores screen from outside the cabinet, via the control panel, press TAKE,
DOUBLE and BIG at the same time.
NOTE: Do NOT try to access this screen via the control panel at ANY time when the TAKE,
DOUBLE, or BIG buttons are active and waiting for a response during game play.
The game board will register whichever button press occurs first , presuming it was
a player response. The Last Five Scores screen will then appear, however any
unintentional game responses cannot be reversed.
This screen is always accessible from inside the cabinet through the setup screens.
Table of contents
Popular Printer Accessories manuals by other brands

Universal
Universal WPNP-400NI-PIDS owner's manual

Intermec
Intermec EasyCoder 501 SA installation instructions

Seiko Epson
Seiko Epson SJIC11 instruction manual

Brother
Brother DR-250 Technical instructions

Xerox
Xerox Phaser 6180MFP supplementary guide

Canon
Canon BW PCL PRINTER KIT-J1 INSTALLATION PROCEDURE

Toshiba
Toshiba SmartLink e-STUDIO16 Operator's manual

Kyocera
Kyocera PF-430 Service manual

Acronova Technology
Acronova Technology Nimbie Sidekick NK50Y installation guide

Uninet
Uninet KONICA 4600 Sreies instructions

Intermec
Intermec EasyCoder 501XP install guide

Canon
Canon Color iR Security Kit-A1P installation manual