InVento 500006 User manual

1
Gebrauchsanleitung
Sicherheitshinweise – bitte aufbewahren
14+ Kein Spielzeug
Allgemeine Sicherheitshinweise
Ferngesteuerte Flugmodelle sind kein Spielzeug und dürfen nur von Personen ab 14 Jahren eingesetzt werden.
Achtung: Bitte die Gebrauchsanleitung aufmerksam lesen, bevor Sie das Modell in Betrieb nehmen. Gebrauchs-
anleitung gut aufbewahren. Folgen Sie stets den Empfehlungen in der Anleitung.
Wenn Sie ferngesteuerte Modelle erstmalig in Betrieb nehmen, so lassen Sie sich bitte von einem erfahrenen
Piloten beraten.
Fehler oder Nachlässigkeiten beim Betrieb Ihres Modells können erhebliche Sach- oder Personenschäden zur
Folge haben. Hersteller und Verkäufer haben keinen Einuss auf den ordnungsgemäßen Bau und Betrieb der
Modelle. Aus diesem Grunde wird mit Hinweis auf die Gefahren jegliche Haftung ausgeschlossen.
In einigen Ländern ist der Abschluss einer Modellhalterhaftpichtversicherung vorgeschrieben. Bitte informieren
Sie sich bei Ihrem Verkäufer oder einer Versicherung.
Modelle dürfen nicht in die Hände von Kleinkindern gelangen, da Kleinteile verschluckt werden können.
Erstickungsgefahr.
Sicherheitshinweise für den Betrieb
Hubschrauber-Rotoren und andere sich bewegende Teile stellen eine ständige Verletzungsgefahr dar.
Vermeiden Sie unter allen Umständen eine Berührung solcher Teile.
Bei Elektromotoren mit angeschlossenem Antriebsakku niemals im Gefährdungsbereich von rotierenden
Teilen aufhalten. Achten Sie ferner darauf, dass sonstigen Gegenstände niemals mit sich drehenden Teilen in
Berührung kommen.
Benutzen Sie nur empfohlene Ladegeräte und laden Sie Ihre Akkus nur bis zur angegebenen Ladezeit.
Die Modelle dürfen nicht durch Personen (einschließlich Kinder) bedient werden, deren physische, sensorische
oder geistigen Fähigkeiten eingeschränkt sind oder die über einen Mangel an Erfahrung verfügen, es sei denn, sie
werden über eine für die Sicherheit verantwortliche Person beaufsichtigt und zur richtigen Verwendung angeleitet.
Hände, Haare, lose Kleidung oder sonstige Gegenstände von Rotoren und beweglichen Teilen fernhalten.
Dieser Hubschrauber wurde für den Indoor- und Outdoor-Einsatz konzipiert. Outdoor nur an trockenen Tagen mit
Windstärken bis max. 3 Beaufort iegen. Räume müssen eine Mindestgröße erfüllen. Wir empfehlen eine Fläche
von mindestens 15 qm und eine Deckenhöhe von Mindestens 250 cm. Die Fläche muss frei von Hindernissen
sein (z.B. Lampen). Stärkeren Luftzug vermeiden.
Überiegen Sie niemals Zuschauer oder andere Piloten und halten Sie genügend Sicherheitsabstand zu Ihrem Modell.
Gefährden Sie niemals Menschen oder Tiere.
Vor Inbetriebnahme: Erst Sender einschalten, dann das Modell. Bei Beendigung: Erst das Modell ausschalten,
dann den Sender.

2
Sicherheitshinweise für Batterien/Akkus
Verwenden Sie keine unterschiedlichen Batteriearten und mischen Sie nicht neue und alte Batterien.
Nur empfohlenen Batterietyp verwenden.
Leere Batterien bitte aus dem Modell entfernen.
Batterien nicht in offenes Feuer werfen – Explosionsgefahr.
Keinen Kurzschluss verursachen.
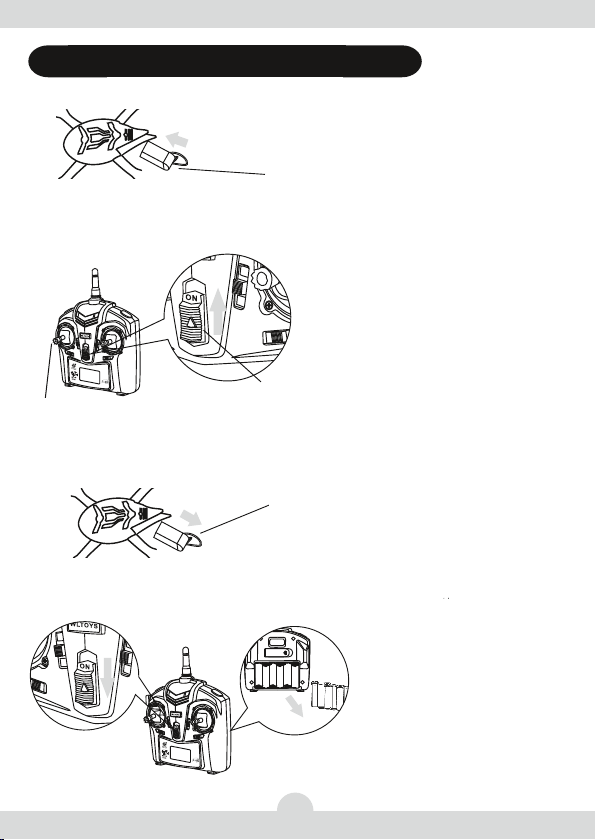
Beim Einlegen der Batterien auf die richtige Polarität achten.
Niemals Batterien auaden, die dafür nicht bestimmt sind.
Batterien aus dem Modell entfernen, wenn es über einen längeren Zeitraum nicht verwendet wird.
Wiederauadbare Akkus nur unter Aufsicht von Erwachsenen laden.
Wiederauadbare Akkus vor dem Laden aus dem Modell entfernen (wenn bauartbedingt möglich).
Sicherheitshinweise für Lipo-Akkus
Akkus nicht in Wasser oder andere Flüssigkeiten tauchen.
Akkus nicht erhitzen, ins Feuer werfen oder in Mikrowellengeräte legen.
Akkus nicht kurzschließen oder verpolt laden.
Akkus keinem Druck aussetzen, deformieren oder werfen.
Nicht am Akku löten oder diesen verändern oder öffnen.
Akkus nur mit dafür geeigneten Ladegeräten auaden, niemals direkt an ein Netzteil anschließen.
Akkus niemals in praller Sonne oder der Nähe von Heizungen oder Feuer laden bzw. entladen.
Akkus nicht an Orten mit hoher statischer Entladung benutzen.
All dies kann dazu führen, dass der Akku Schaden nimmt, explodiert oder gar Feuer fängt.
Akku von Kindern fernhalten.
Ausgelaufenes Elektrolyt von offenem Feuer fernhalten, dieses ist leicht brennbar und kann sich entzünden.
Bei Augenkontakt mit Elektrolytüssigkeit sofort mit viel klarem Wasser auswaschen und anschließend einen
Arzt aufsuchen.
Bei Kontakt mit Kleidung und anderen Gegenständen kann die Elektrolytüssigkeit mit viel Wasser aus- bzw.
abgewaschen werden.
Haftungsausschluss
Hersteller und Verkäufer haben keinen Einuss auf den ordnungsgemäßen Betrieb der Akkus. Aus diesem Grunde
wird mit Hinweis auf die Gefahren jegliche Haftung ausgeschlossen.
Entsorgungshinweise
Entsorgen Sie elektrische und elektronische Kleingeräte am Ende ihrer Nutzungsdauer getrennt vom
Hausmüll. Entsorgen Sie Geräte bei Ihrer kommunalen Sammelstelle. Dies gilt für alle Länder der
Europäischen Union sowie anderen europäischen Ländern mit separatem Sammelsystem.
Werfen Sie Akkus auf keinen Fall in den Hausmüll. Zum Umweltschutz geben Sie defekte oder
verbrauchte Akkus nur entladen zu den entsprechenden Sammelstellen (alle Verkaufsstellen für
Batterien und Akkus oder kommunale Sondermüllsammelstellen).

3
Produkteigenschaften
Bezeichnung der Quadcopter-Komponenten
Lieferumfang
4-Kanal Mini Quadcopter (2,4 GHz) mit Gyro-Funktion
4 Rotoren
Für Indoor- und Outdoorug geeignet
Fliegt außerordentlich stabil und agil
Sender mit LCD-Display für leichte und präzise Bedienung
Flexible Rotorblätter
4-Kanal-Steuerung: Hoch & Runter (Pitch) - Links &
Rechts (Gier) - Vorwärts & Rückwärts (Nick) - Seitwärts
links & rechts (Roll)
Rotordurchmesser: 55 mm
Gesamtlänge: 117 mm
Höhe: 32 mm
Gewicht: 24 g (ohne Flugakku)
Flugzeit: Ca. 7 Minuten
Ladezeit: Max. 50 Minuten
4-Kanal Mini-Quadcopter
4-Kanal-2,4 GHz-Fernsteuerung
Fluggakku LiPo 3,7 V 250 mAh (2 Stück)
Ersatzrotorbätter (4 Stück: 2 x rot, 2 x schwarz)
Dual-LiPo-Ladegerät + USB-Ladekabel
Gebrauchsanleitung
Empfohlenes Zubehör für den Sender
6 x AA-Batterien 1,5 V
Kanzel
Blaue LEDs
Empfangsplatine
Rahmen
Rote LEDs
Motor
Rotorblatt

4
Funktionsübersicht des Controllers
Antenne
Schalter für LED-Beleuchtung
(AN/AUS)
Steuerhebel: Vorwärts / rückwärts (Nick) –
seitwärts links & rechts (Roll)
Trimmung vorwärts /
rückwärts (Nick)
Trimmung links / rechts (Gier)
LCD-Display
ON/OFF-Schalter
Modus-Anzeige
Modus-Anzeige
Anzeige Senderbatteriespannung
Trimmung links / rechts (Gier)
Batteriedeckel
Trimmung Gas (Pitch)
Trimmung Seitwärtsug (Roll)
Trimmung vorwärts / rückwärts (Nick)
Trimmung Seitwärtsug (Roll)
Trimmung Gas (Pitch)
Gashebel: Steigug /
Sinkug (Pitch) –
links / rechts (Gier)
Schalter für Ruderumstellung
Power LED

5
Einsetzen der Sender-Batterien
Aufladen des Flugakkus
Spezifikationen des Ladegeräts
Sender
Ladekabel
LiPo-Akku
3,7 V 250 mAH
Ladegerät
LED
Batterie-
deckel
1. Batteriedeckel abnehmen
(in Pfeilrichtung nach unten
schieben).
Stecken Sie den USB-Stecker in einen
freien USB-Port an Ihrem Computer.
Stecken Sie nun den Ladestecker in
die Ladebuchse des LiPo-Ladegeräts.
Anschließend die LiPo-Akkus in das
Ladegerät stecken. Die rote Lade-LED
leuchtet auf und zeigt den Ladevorgang
an. Sobald die Lade-LED erlischt ist der
Ladevorgang abgeschlossen.
Zur Sicherheit den kompletten
Ladevorgang aufmerksam beobachten.
Input: DC 5 V
Ladestrom: 450 mAH x 2
Volle Spannung: 4,2 +/- 0,03 V
2. Legen Sie 6 x AA Batterien (nicht
im Lieferumfang enthalten) mit der
richtigen Polarität in das Batteriefach
ein. Anschließend den Deckel wieder
auf das Batteriefach schieben.

6
Verbindung der Fernsteuerung mit dem Empfänger
Schritt 1
Den LiPo-Akku in die Akku-Aufnahme
des Quadcopters schieben (siehe Illus-
tration). Die blauen LEDs am Quadcopter
beginnen zu blinken. Den Quadcopter
nun auf eine ebene Grundäche stellen.
Schritt 2
Schalten Sie die Fernbedienung mit
Gashebel in Nullstellung ein (ON/OFF-
Schalter in ON-Position bringen).
Nun den Gashebel schnell von
Nullstellung auf Vollgas und zurück in
Nullstellung bringen, um die Verbindung
zwischen Sender und Empfänger
herzustellen. Die blauen LEDs leuchten
nun konstant.
Achtung: Der Quadcopter darf sich nicht
bewegen bis die blauen LEDs konstant
leuchten (nicht blinken).
Schritt 3
LiPo-Akku nach dem Flug aus dem
Quadcopter entfernen.
Lassen Sie den Akku niemals für längere
Zeit im Modell stecken. Hierdurch kann
Tiefentladung oder sogar Feuer entstehen
und der Akku wird zerstört.
Schritt 4
Sender nach dem Flug ausschalten und
Batterien entnehmen, sofern der Sender
für längere Zeit nicht mehr in Gebrauch
genommen wird. So vermeiden Sie ein
Auslaufen der Batterien, Beschädigun-
gen des Senders oder sogar Feuer.
LiPo-Akku
3,7 V 250 mAH
LiPo-Akku
3,7 V 250 mAH
AN/AUS-
Schalter
AN/AUS
Gashebel der Fernbedienung in Nullstellung
bringen (komplett nach unten schieben).

7
Fliegen des Quadcopters
Steuerhebel
„Roll“ Seitwärts
nach links
Vorwärts
iegen
Rückwärts
iegen
Seitwärts
nach rechts
Steigen
Links
Steuerhebel
„Gas“
Steuerhebel
„Nick“ Steuerhebel
„Gier“
Modus ModusFlugverhalten Flugverhalten
1. Machen Sie sich mit der Bedienung Ihrer Fernsteuerung vertraut, bevor Sie Ihren ersten
Flug unternehmen.
2. Bitte führen Sie mit Ihrer Fernsteuerung entsprechende Flugsimulationen durch, bevor
Sie Ihren ersten realen Flug unternehmen.
Sinken
Rechts
Routineüberprüfungen vor dem Flug
Prüfen Sie alle Verschraubungen auf einen festen Sitz.
Prüfen Sie, ob Ihre Senderbatterien und Flugakkus über ausreichend
Ladung verfügen.
Halten Sie genügend Sicherheitsabstand zu Ihrem Modell.
Gefährden Sie niemals Menschen oder Tiere.
Flughöhe
Mit dem Steuerhebel „Gas“ kontrollieren Sie die Flughöhe.
Gashebel nach vorn: Die Drehzahl steigt und der Quadcopter
gewinnt an Höhe.
Gashebel nach hinten: Drehzahl nimmt ab, der Quadcopter sinkt.

8
Roll- und Nickverhalten
Mit dem Steuerhebel „Roll/Nick“ kontrollieren Sie die Flugrichtung
seitwärts sowie vorwärts und rückwärts.
Steuerhebel nach links: Der Quadcopter iegt seitwärts nach links.
Steuerhebel nach rechts: Der Quadcopter iegt seitwärts nach rechts.
Steuerhebel nach vorn: Der Quadcopter iegt vorwärts. Steuerhe-
bel nach hinten: Der Quadcopter iegt rückwärts.
Seitenruder
Mit dem Steuerhebel „Gier“ kontrollieren Sie die Flugrichtung (Links-
und Rechtskurve).
Steuerhebel nach links: Der Quadcopter iegt nach links gegen
den Uhrzeigersinn.
Steuerhebel nach rechts: Der Quadcopter iegt nach rechts im
Uhrzeigersinn.
Fliegen von Kreisbahn
Für einen korrekten Flug muss der Quadcopter ggf. nachgetrimmt werden.
Rudertrimmung
Kurz vor dem Abheben dreht die Quadcopter-Nase ohne Befehl nach
rechts/links:
Nase dreht nach rechts: Trimmung zur linken Seite anpassen.
Nase dreht nach links: Trimmung zur rechten Seite anpassen.
Vorwärts-Rückwärtstrimmung
Kurz vor dem Abheben neigt sich die Quadcopter-Nase ohne Befehl nach
vorne/hinten:
Nase neigt sich nach vorne: Trimmung nach unten anpassen.
Nase neigt sich nach hinten: Trimmung nach oben anpassen.
Rolltrimmung
Kurz vor dem Abheben dreht der gesamte Quadcopter-Korpus ohne
Befehl nach rechts/links:
Korpus dreht nach rechts: Trimmung zur linken Seite anpassen.
Korpus dreht nach links: Trimmung zur rechten Seite anpassen.
Trimmung der Fluglage
Links
Links
Vorwärts Rückwärts
Rechts
Rechts
Nachdem Sie sich mit den beschriebenen Funktionen vertraut gemacht haben,
beginnen Sie mit dem Fliegen von Kreisen, die mit etwas Übung immer kleiner werden.

9
Mit etwas Übung und einer entsprechenden Sicherheitshöhe sind auch Figuren
aus dem Kunstug (Loopings, Flips, Rollen) möglich.
ACHTUNG: Fliegen Sie den Quadcopter immer mit dem Rücken zur Sonne um einen
Kontrollverlust zu vermeiden.
Probleme und Problemlösungen
Problem Ursache Lösung
Blaue LEDs auf
dem Quadcopter
blinken, Quadcopter
reagiert nicht auf
Fernsteuerung.
Fernsteuerung war während des
Bindevorganges zu nah am Quadcopter.
Fernsteuerung ausschalten und weiter vom
Quadcopter entfernen. Akku trennen und erneut
an den Quadcopter anschließen. Folgen Sie den
Bindeanweisungen.
Fernsteuerung
funktioniert nicht.
Fernsteuerung ist nicht eingeschaltet.
Batterien falsch eingelegt.
Batterien sind leer.
Fernsteuerung einschalten.
Batterien überprüfen und ggf. richtig einlegen.
Batterien austauschen.
Quadcopter reagiert
nicht.
Kein Strom.
Kein Signal an Empfänger.
Flugakkus oder Senderbatterien
sind leer.
Akkuverbindung mit Quadcopter überprüfen.
Frequenz überprüfen (gleiche Frequenz zwischen
Sender und Empfänger herstellen).
Laden Sie den Flugakku oder tauschen Sie die
Senderbatterien.
Motor arbeitet nicht. Keine Verbindung zwischen Motor und
Quadcopter.
Motor defekt.
Verbindungen überprüfen und ggf. nachlöten.
Motor tauschen.
Der Quadcopter
lässt sich nicht
kontrollieren.
Zu starker Wind oder Luftzug. Nicht bei starken Wind oder Luftzug iegen, da
das Modell dafür nicht geeignet ist.
Quadcopter steigt
nicht.
Nicht genug Gas.
Akku ist leer.
Steuerhebel ganz nach vorne drücken.
Akku auaden.
Quadcopter landet
zu hart.
Steuerhebel zu fest heruntergedrückt. Steuerhebel langsam herunterdrücken, um eine
sanfte Landung zu ermöglichen.

10
Ersatzteile
1Kanzel
2Rotorblatt
3 Motor
4Rahmen
5Empfangsplatine
6 LiPo-Akku 3,7 V 250 mAH
Vertrieb:
INVENTO GmbH • Klein Feldhus 1 • D-26180 Rastede - Germany • service@invento-hq.com • www.invento-hq.com
US Distribution by: HQ KITES & DESIGNS U.S.A., INC. • sales@hq-kites-usa.com • www.hq-kites-usa.com
Konformitätserklärung
Hiermit erklärt die Weili Toys Industrial Co., Ltd., dass sich
dieses Modell (Invento Art. Nr. 500006 = WL Toys Art. Nr. V252)
einschließlich Controller in Übereinstimmung mit den grundlegenden
Anforderungen und den übrigen einschlägigen Bestimmungen der
Richtlinie 1999/5/EG befindet.
Die Konformitätserklärung kann unter folgender Adresse gefunden
werden: www.inventodownload.com/conformity.

11
Instruction manual
Safety instructions – keep after reading
14+ It´s not a toy!
General safety instructions
Radio-controlled models are not toys. Not suitable for persons under 14 years.
Warning: Read the manual carefully before using the model. Keep the manual after reading. Always follow
exactly the recommendations given in the instructions.
If you are operating a radio-controlled model for the rst time, you should seek the advice of an experienced
modeller.
Errors and negligences in operating your models can result in serious injuries and and damage to property.
As manufacturers and vendors have no inuence on the operation and maintenance of your models, we bring
these hazards expressly to your attention but deny all further liability.
In some countries it is legal requirement to carry a third party indemnity insurance. Please ask your local dealer
or insurance company for further details.
Keep away from children. Models contain small parts. Choking hazard.
Safety instructions during operation
Helicopter rotors and other moving parts are a constant source of injury. Never touch moving parts.
Never get to close to a propeller or moving parts when an electric motor is connected to its battery.
Only use the recommended charger and charge batteries for he recommended charging time.
Persons (including children) with reduced physical, sensory or mental capabilities or lack of experience are not
allowed to use these models, unless they are supervised by a person responsible for their safety and able to
give professional advice how the product should be used.
Keep hands, hair, loose clothing and further objects away from the rotor and moving parts.
This helicopter has been designed to y indoors and outdoors. Outdoor ights only on dry days and wind
conditions to maximum of 3 Beaufort. Rooms should have a minimum area. We recommend a minimum room
size of 15 sqm. The required minimum ceiling height is 250 cm. The area has to be free of obstacles. Avoid
strong airows.
Never y over or towards spectators or other pilots and maintain a safe distance at all times.
Never allow the model to endanger persons or animals.
Startup procedure: First switch on the transmitter, and then the model. Termination: First switch off the model,
and then the transmitter.

12
Safety instructions for the use of batteries/battery packs
Different types of batteries or new and used batteries are not to be mixed.
Only batteries of the same or equivalent type as recommended are to be used.
Exhausted batteries should be removed from the model.
Do not dispose batteries in fire – batteries will explode or leak.
The supply terminals are not to be short-circuited.
Batteries are to be inserted with the correct polarity.
Non-rechargeable batteries are not to be recharged.
Remove batteries if the model is not to be used for an extended period of time.
Rechargeable batteries are only to be charged under adult supervision.
Rechargeable batteries are to be removed from the model before being charged (if removable).
Safety notes for the use of LiPo batteries
Do not place the battery in water or any other liquid.
Do not heat or incinerate the battery. Do not place it in a microwave oven.
Avoid short-circuits, and never charge the battery with reversed polarity.
Avoid pressure or shock loads, and never distort or throw the pack.
Never solder directly to the battery or modify or open it.
Batteries must only be charged with a suitable charger. Never connect the battery directly to a mains PSU.
Never charge or discharge a battery in bright sunlight, or close to a heater or open re.
Do not use the battery in areas with high level s of static discharge.
Any of these errors can result in damage to the battery, explosion or even re.
Keep the battery out of the reach of children.
Do not allow escaped electrolyte to come into contact with re, as it is highly inammable, and may ignite.
If uid electrolyte gets in contact with eyes, ush with copious amounts of clean water and contact a doctor without delay.
The uid electrolyte can be removed from clothing and other objects by rinsing in plenty of water.
Liability exclusion
As manufacturers and vendors have no inuence on the operation and maintenance of batteries, we bring these
hazards expressly to your attention but deny all further liability.
Disposal restrictions
Electrical and electronic equipment should be disposed separately from the household waste.
Take your unwanted equipment to your local community collection point. This requirement applies to
member countries of the European Union as well as other non-European countries with a separate
waste collection system. Never throw batteries into normal household waste, but dispose of
discharged batteries at the collection points provided for that purpose (e.g. your local toxic waste
disposal centre).

13
Special product features
Quadcopter component description
Contents
4 channel mini quadcopter (2.4 GHz) with built-in Gyro
Quad rotor design
Suitable for both indoor and outdoor ying
Extremely steady and agile ight performance
Transmitter is designed with a LCD display for easier and
more precise operation
Flexible rotor blades
4 channel controller: up & down (Pitch) - left & right (Yaw) -
forward & backward (Nick) - sideways left & right (Roll)
Rotor diameter: 55 mm (2.17“)
Overall length: 117 mm (4.61”)
Height: 32 mm (1.26”)
Weight: 24g (without battery pack)
Flying time: approx. 7 minutes
Charging time: max. 50 minutes
4 channel mini quadcopter
4 channel 2.4 GHz remote controller
Flight battery pack LiPo 3,7V 250 mAh (2 pcs)
Spare rotor blades (4 pcs: 2 x red, 2 x black)
Dual LiPo charger + USB charging cable
Instruction manual
Recommended accessories for the transmitter
6 x AA 1.5 V batteries
Cockpit
Blue LEDs
Receiver board
Main
frame
Red LEDs
Motor
Rotor blade

14
Remote controller functions
Antenna
LED button (ON/OFF)
Control stick: forward / backward (Nick) –
sideways left & right (Roll)
Forward / backward trim (Nick)
Left / right trim (Yaw)
LCD display
ON/OFF switch
Mode indicator
Mode indicator
Transmitter battery level
Left / right trim (Yaw)
Battery lid
Throttle trim (Pitch)
Sideways trim (Roll)
Forward / backward trim (Nick)
Sideways trim (Roll)
Throttle trim (Pitch)
Throttle stick: ascent /
descent (Pitch) –
left / right (Yaw)
Rudder conversion button
Power LED

15
Inserting the transmitter batteries
Charging the flight battery
Charger specifications
Transmitter
Charging cable
LiPo battery
3.7 V 250 mAh
Charger
LED
Battery
lid
1. Slide the battery lid
downwards to open the
battery compartment.
Insert the USB plug into the USB port
on your computer. Insert the charging
plug into the charging socket on the LiPo
charger. Now insert the LiPo batteries
into the charger. The red charge LED on
the charger will light up to indicate the
charging is in process. As soon as the
red charge LED will extinguish the LiPO
batteries have been completely charged.
For safety reasons battery charging has
to be observed constantly.
Input: DC 5 V
Charging current: 450 mAH x 2
Full voltage: 4,2 +/- 0,03 V
2. Insert 6 x AA batteries (not included)
with the correct polarity and replace
the battery lid.

16
Connection between transmitter and receiver
Step 1
Push the LiPo battery into the battery
compartment of the quadcopter as
illustrated. The blue LEDs on the quad-
copter will start ashing. Now place the
quadcopter on a level surface.
Step 2
Move the ON/OFF switch on the remote
controller to ON (with throttle stick in
lowest position). Now move the throttle
stick quickly from the lowest position
to full throttle and back to the lowest
position to start the connection between
transmitter and receiver. The blue LEDs
now glow constantly.
Caution: Do not allow the Quadcopter to
move until the blue LEDs shine constantly
(not blinking).
Step 3
Remove the LiPo battery from the
quadcopter after ight.
Never leave LIPo battries in the model
for a longer period of time as this can
lead to deep discharges or even re.
Step 4
Switch of the controller after ight.
Remove the batteries for storage if the
controller is not to be used for a longer
period of time and prevent battery
leakage, controller damage or even re.
LiPo battery
3.7 V 250 mAh
LiPO battery
3.7 V 250 mAh
ON/OFF switch
ON/OFF
Push the throttle stick to the lowest position.

17
Flying the quadcopter
Control stick
“Roll“ Move left
Fly
forward
Fly
backward
Move right
Ascent
Turn left
Control stick
“Throttle”
Control stick
“Nick” Control stick
“Yaw”
Mode ModeFlight behaviour Flight behaviour
1. Make yourself familiar with the operation of your controller before ying the
quadcopter for the rst time.
2. Please practise and repeat ight simulations with your controller before you take off
for your rst real ight.
Descent
Turn right
Routine checks before flying the quadcopter
Check if all screws are rmly tightened.
Check if controller batteries and ight batteries are fully charged.
Maintain a safe distance to the quadcopter at all times.
Never allow the model to endanger persons or animals.
Flight altitude
The throttle stick controls the height of the model.
Push the stick forward: the model will gain height.
Pull the stick back: the model will sink down and land.

18
Nick and Roll functions
The control stick „Roll/Nick” controls the ight direction of the
quadcopter (sideways and forwards/backwards).
Push the stick to the left: the model will y sideways to the left.
Push the stick to the right: the model will y sideways to the right.
Push the stick forwards: the model will y forwards.
Pull the stick backwards: the model will y backwards.
Rudder
The control stick controls the ight direction of the model (left turn
and right turn).
Push the stick to the left: the model will y to the left.
Push the stick to the right: the model will y to the right.
Flying in circles
If you are familiar with the functions described, start ying in circles.
With a little practice you will draw smaller and smaller circles.
Trim the quadcopter to provide excellent ying properties.
Rudder trim
Just before the quadcopter lift off, the nose leans to the right/left:
Nose leans to the right: adjust the trim to the left.
Nose leans to the left: adjust the trim to the right.
Forward/backward trim
Just before the quadcopter lift off, the nose leans forward/backward:
Nose leans forward: adjust the trim downwards.
Nose leans backward: adjust the trim upwards.
Roll trim
Just before the quadcopter lift off, the body leans to the right/left:
Body leans to the right: adjust the rim to the left side.
Body leans to the left: adjust the trim to the right side.
Trim the quadcopter
Left
Left
Forward Backward
Right
Right

19
Once you have gained experience and condence in hovering the quadcopter,
you can attempt more advanced maneuvers (loopings, ips and rolls).
CAUTION: Always y the quadcopter with your back to the sun to prevent loss of control.
Troubleshooting
Problem Problem cause Problem solution
Blue LEDs on the
quadcopter ash
continuously and
quadcopter will
not respond to
transmitter.
Controller too near to quadcopter
during binding process.
Power off the controller. Move the controller
further away from the quadcopter.
Disconnect and reconnect the ight battery to
the quadcopter. Follow the binding instructions.
Controller does not
work.
Controller is not switched on.
Batteries are not properly installed.
Batteries are empty.
Switch on controller.
Remove and reinstall the batteries.
Change batteries.
Quadcopter does
not work.
No electric power.
Controller does not receive a signal.
Batteries in the helicopter and/or
controller are empty.
Check connection between quadcopter and
ight battery.
Check channel/frequency (quadcopter and
transmitter need to be on the same frequency).
Charge the ight batteries or change the
controller batteries.
Motor does not work. No connection between model and
motor.
Motor is defective.
Check cables and re-solder if necessary.
Change motor.
Quadcopter is
uncontrollable.
Strong winds or airows. Do not y in strong winds or airows.
Quadcopter does not
climb.
Unsufcient power.
Flight batteries are empty.
Push the throttle stick forwards.
Charge the ight batteries.
Landing of the
quadcopter is too
hard.
Trottle stick was pulled backwards
too fast.
Pull the throttle stick back gently for a soft
landing.

20
Spare parts
1Cockpit
2 Rotor blade
3 Motor
4Main frame
5Receiver board
6 LiPo battery 3.7 V 250 mAh
Distributed by:
INVENTO GmbH • Klein Feldhus 1 • D-26180 Rastede - Germany • service@invento-hq.com • www.invento-hq.com
US Distribution by: HQ KITES & DESIGNS U.S.A., INC. • sales@hq-kites-usa.com • www.hq-kites-usa.com
Declaration of Conformity
Herewith Weili Toys Industrial Co., Ltd. declares that this model
(Invento Art. No. 500006 = WL Toys Art. No. V252) including
remote control meets the basic requirements and any other
relevant requirements of guideline 1999/5/EC.
The original declaration of conformity can be requested on
www.inventodownload.com/conformity
Table of contents
Languages: