InvizBox Go User manual

InvizBox Go
User Manual
Author: Vincent Riou
Version: 4.0.11
Copyright: InvizBox Ltd 2019


Contents
1 Device Description 5
1.1 Start/Stop Button 5
1.2 Charging the InvizBox Go 5
1.3 Using the InvizBox Go as a charger 5
1.4 Wi-Fi LED display 6
2 First Connection to the InvizBox Go 6
2.1 Starting the InvizBox Go 6
2.2 Connecting to the InvizBox Go 6
2.3 Accessing the InvizBox Go interface 6
3 Installation Wizard 7
3.1 Welcome Page 7
3.2 Choose Network Page 8
3.3 Wizard Complete Page 10
4 Using the InvizBox Go (Basic Mode) 11
4.1 Authorization Required (Login Page) 11
4.2 Basic Mode Menu 12
4.3 Status Page 13
4.4 VPN Location Page 15
4.5 Privacy Mode Page 16
4.6 Hotspot Page 17
4.7 Account Details Page 19
4.8 Logout Link 20
4.9 Expert Mode Link 20
5 Expert Mode 21
5.1 Expert Mode Menu 21
5.2 Tor Configuration Page 22
5.2.1 Tor Status 22
5.2.2 Bridge Configuration 22
5.2.3 Proxy Configuration 22
5.2.4 Country Options 22
5.3 Tor Advanced Page 22
5.4 System Page 22
5.5 Administration Page 22
5.6 Backup / Flash Firmware Page 23
5.7 System Log Page 23
Section Page 3

5.8 Kernel Log Page 23
5.9 Update Log Page 23
5.10 Reboot Page 23
5.11 Adblock Page 23
5.12 Wireless Page 23
5.13 Diagnostics Page 23
5.14 Realtime Graphs Section 23
5.15 Basic Mode Link 23
6 Networking Management 24
6.1 Supported Networks and Encryptions 24
6.2 Storing and Reconnecting to Networks 24
7 Troubleshooting/Support 24
Page 4 Section

1 Device Description
This section will give you an overview of the InvizBox Go device.
1.1 Start/Stop Button
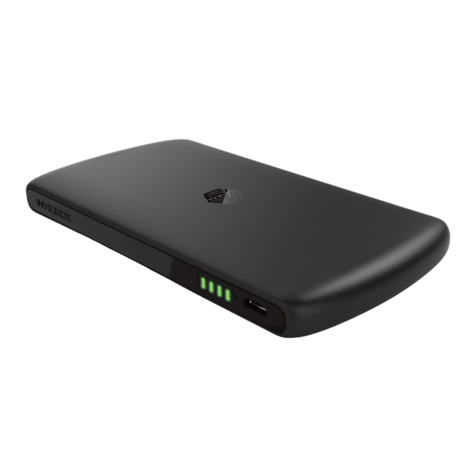
The start/stop button is in fact the logo on the top part of the casing. In order to press that button, just
press the logo on the casing until you feel the button being pressed underneath (this gets easier with a bit
of practice). In order to know if you've successfully pressed that button, keep an eye on the battery lights
which will come on (or off).
1.2 Charging the InvizBox Go
One side of the InvizBox Go is dedicated to the battery and charging. On that side of the casing, you can
find:
• a micro USB port which you can use to charge your InvizBox Go
• a battery shaped LED display to let you know the battery state
1.3 Using the InvizBox Go as a charger
On the other side of the InvizBox Go casing you can find a USB port. This port is used when you're using
your InvizBox Go as a charger.
Just plug your usual devices to this port to charge them.
Section 1 Device Description Page 5

1.4 Wi-Fi LED display
Also on the non charging side, you can find a Wi-Fi shaped LED display. The purpose of this display is to
keep you informed on the networking state of the InvizBox Go.
2 First Connection to the InvizBox Go
2.1 Starting the InvizBox Go
In order to start your InvizBox Go (or stop), you need to press the top part of the casing where the InvizBox
Logo is. Under the case, there is a button which once pressed will start your device.
Within a couple of seconds after having pressed that button (keep it pressed for about 2s), the Wi-Fi LED
will be green, indicating that the device is booting.
That light will then switch off until the device can determine in which state its networking is. For example,
until the setup is complete, that light will be red (indicating that the InvizBox Go is not connected to any
network).
2.2 Connecting to the InvizBox Go
In order to connect to the InvizBox Go, you will need to identify the Wi-Fi hotspot that it is running and
connect to it. Initially, that network will be called "InvizBoxGo".
Just connect your phone or computer to that network as you would normally connect to any Wi-Fi network.
2.3 Accessing the InvizBox Go interface
Now that you are connected to your InvizBox Go, you need to access the Administration Interface.
•Some operating systems automatically identify that the hotspot requires a setup and will give you a
link to the setup page automatically. If this is the case, don't hesitate to use that link.
• On most devices, you will need to open your favourite browser and go to http://inviz.box
•Some devices are unable to access that URL, if it is the case for you, you will then need to go to
http://10.153.146.1
At any stage, you can access the InvizBox Go administration interface using http://inviz.box
(http://10.153.146.1 for some of you). And therefore, I would recommend that you bookmark that page as
you will need to access it when you want to change network or VPN Location in the future.
Now that you have accessed your device Administration Interface, you are ready to go through the
Installation Wizard as described in the next section.
Page 6 Section 1.4 Wi-Fi LED display

3 Installation Wizard
This section will help you complete the Installation Wizard which is a once off process on your InvizBox
Go.
3.1 Welcome Page
In this page, you just have to click on the "Let's Go" button to proceed with the rest of the wizard.
Note that when clicking "Let's Go" on this page, you have accepted the Acceptable Use Policy (box cannot
be unticked since if you're not willing to accept that Agreement, you cannot go any further and should stop
using the device)
Section 3 Installation Wizard Page 7

3.2 Choose Network Page
In this page, you have to select a network to connect to.
The InvizBox Go will perform a scan of all networks available to you and list them in order of how strong
their signal is. It also adds information regarding the fact that these networks require a password or not.
There is a green refresh icon beside the networks which can be clicked to perform another scan for
networks if the network you're looking for is not in the list.
As the InvizBox Go scans for networks, your device may disconnect you. If this is the case, simply
reconnect to the InvizBox Go WiFi hotspot to continue.
After having selected your network of choice, you will be prompted to enter its password. No passwords
are required for "Open" networks.
You can also select "Connect to Hidden Network" and enter the name of the network to connect to a
hidden network.
Once you have chosen a network and (if necessary) entered the password for it, click Finish to go to the
final wizard page.
If you have entered in the wrong password on this page, then you will need to connect to the network
again once you have finished the wizard. This can be done by returning to the "Choose Network" page of
the Administration Interface in the InvizBox Go section of the menu.
Page 8 Section 3.2 Choose Network Page

Section 3.2 Choose Network Page Page 9

3.3 Wizard Complete Page
Congratulations, you have set up your device and are ready to access the Internet through a secure
router.
The next page you get to is the Status Page which if the main page of the Administration Interface and will
show you the main information related to your InvizBox.
Page 10 Section 3.3 Wizard Complete Page

4 Using the InvizBox Go (Basic Mode)
Once you have completed the Installation Wizard (see previous section if you haven't), it becomes simpler
to use the InvizBox Go.
4.1 Authorization Required (Login Page)
Now that you have set up your InvizBox Go (using the Installation Wizard), you will be required to login in
order to reach the administration interface.
The Administrator Password to use on this page is typically the same password as the one used to
connect to the Wi-Fi hotspot (you can change it in the Hotspot Page). If you haven't changed it, it is still the
one that was provided to you on a card inside the packaging - labelled InvizBox Go Wifi Password.)
Section 4 Using the InvizBox Go (Basic Mode) Page 11

4.2 Basic Mode Menu
When you first login to the InvizBox Go administration interface, you will find that you can navigate to
different pages using a menu (collapsible if you're using a small screen such as a phone, in which case
you will have to click the menu button first).
Some areas of the menu will expand/collapse as you click on them and this will allow you to reach the
pages you're looking for.
The Basic Mode Menu contains a link to the Choose Network Page which you have already used during
the initial wizard as well as some new ones which we will look into in more detail below.
The menu will look something like this (in this example, the user is currently on the VPN Location Page):
Page 12 Section 4.2 Basic Mode Menu

4.3 Status Page
The Status page is quickly going to become your "go to" page as it will provide you with a way to quickly
understand in which state your InvizBox Go is. It will also provide you with quick acccess links to the most
used configuration changes (such as connecting to a network, getting to a Captive Portal, changing VPN
Location or changing Privacy Mode).
In the image below, we can see what the most important sections are starting from the top of the page:
•Privacy Mode: This will indicate if you're running in VPN, Tor or Wifi Extender mode (a button to
change Mode is present)
•InvizBox Status: This will describe in which state your InvizBox Go is and if you're connected to
VPN, it will add to which city you are connected to. The different statuses include:
•No Internet Connection - device is not connected to a network
•Behind Captive Portal - device is connected but behind a captive portal (login/registration page)
•No VPN Connection - device is in VPN Mode and connected but the VPN connection is not
established yet
•Secure Connection - VPN Active - device is in VPN Mode and secure
•No Tor Connection - device is in Tor Mode and connected but the Tor connection is not
established yet
•Secure Connection - Tor Active - device is in Tor Mode and secure
•Wifi Extender Mode (no VPN or Tor) - device is in Wifi Extender Mode
•Error with Internet Connection - device is unable to determine the networking state (for example
during a DNS failure)
•Internet Status: This will indicate if you device is connected to a Wi-Fi network (a button to choose a
network is present)
•VPN Connection: This will indicate if your VPN connection is established (a button to change VPN
Location is present)
Following this important area, you will find more information that could be relevant to you as it describes
you InvizBox Go as a router.
The sections are as follow:
•System: This will show the following details:
•Current Firmware Version: the firmware version currently running
•Factory Reset Version: the firmware version the device would revert to when reset
•Hostname: the device hostname
•MAC Address: how long has the device been running
•Model: the device hardware model
•Kernel Version: the version of the kernel that the device is running
•Local Time: the date and time currently on the device
•Uptime: how long has the device been running
•Memory: an overview of the device memory usage
•Swap: an overview of the device swap space
•Network: an overview of the network configuration on the device
Section 4.3 Status Page Page 13

•DHCP Lease: a list of connected devices
•Support: a link to our InvizBox Go support page
Page 14 Section 4.3 Status Page

4.4 VPN Location Page
In this page, you have to choose the location which you want your VPN connection to use.
For example, the default is the closest physical location to you when you did the original setup. This
means you will appear as if you are located in that city when browsing the internet.
Once you have selected your location, click Save to update your VPN location.
Section 4.4 VPN Location Page Page 15

4.5 Privacy Mode Page
In this page, you will be able to switch between three Privacy Modes:
•VPN: this is the standard mode and therefore the one that you set up in the Installation Wizard. This
mode will allow you to use your VPN account and select your VPN Location.
•Tor: this is a mode where the InvizBox Go will connect to the internet through the Tor network. If you
want to configure it further, you will have to go into Expert Mode
•Wi-Fi Extender: this mode will act as a simple Wi-Fi extender without adding any security or privacy
element to the connection
Page 16 Section 4.5 Privacy Mode Page

4.6 Hotspot Page
In this page, you can modify the name of the Wi-Fi hotspot that your InvizBox Go creates (default value
being InvizBoxGo which you've experienced throughout the initial setup process). You can also deal with
some settings for the WiFi hotspot.
You can also modify the password used to connect to that Wi-Fi hotspot (default value was provided to
you on a card with your InvizBox Go device).
Once you have entered your a new value for one or both of those fields, click Save to update your
credentials (those modified values will be forgotten following a reset and would have to be entered
manually again - do not lose your original card).
Important Note: every time a new password is set in this page, the administrator password will also be set
to that value (That administrator password can subsequently be changed to a different value in the
Administration Page).
Checking 'Hidden SSID' will hide the WiFi hotspot. Devices will then only be able to connect by entering
the hotspot name and password on their device as it will not show up in WiFi scans.
Checking 'Wireless Isolation' will isolate devices connected to the hotspot so that they are not able to see
each other.
Section 4.6 Hotspot Page Page 17

Page 18 Section 4.6 Hotspot Page

4.7 Account Details Page
In this page, you can enter modified VPN credentials (username and password).
Your initial username and password have been stored on your device (possibly provided to you by email if
you purchased your device before August 2017). Therefore these fields have been pre-populated with
valid values.
If you get new credentials, you can enter them on this page. Once you have entered your modified VPN
credentials, click Save to update your credentials. These modified credentials will be forgotten following a
reset and would have to be entered manually again unless you flash them to your device, see our support
page for details on how to flash VPN credentials.
Section 4.7 Account Details Page Page 19
Other manuals for Go
2
Table of contents
Other InvizBox Network Router manuals
Popular Network Router manuals by other brands

LIGHTNING Instrumentation
LIGHTNING Instrumentation Pocket MultiCom user manual

D-Link
D-Link DES-1005D Quick installation guide

Philips
Philips CKA7740N/00 quick start guide

Infinite
Infinite Show Me WM8-4G-4GP+EC user manual

AMX
AMX NXA-ENET8POE installation guide

GRASS VALLEY
GRASS VALLEY Profile XP PVS1100 installation guide