manuals.online logo
Brands
  1. Home
  2. •
  3. Brands
  4. •
  5. Ipcamdata
  6. •
  7. IP Camera
  8. •
  9. Ipcamdata iSmartViewPro User manual

Ipcamdata iSmartViewPro User manual

Other manuals for iSmartViewPro

1

This manual suits for next models

1

Popular IP Camera manuals by other brands

Challenger Smart Force ASFCAM2 quick start guide

Challenger

Challenger Smart Force ASFCAM2 quick start guide

Foscam FI8903W user manual

Foscam

Foscam FI8903W user manual

BenQ DVY22 user manual

BenQ

BenQ DVY22 user manual

Avigilon H4A-BO1-IR installation guide

Avigilon

Avigilon H4A-BO1-IR installation guide

Digital Watchdog DWCA-C128-64 manual

Digital Watchdog

Digital Watchdog DWCA-C128-64 manual

Ganz ZN8 Series user manual

Ganz

Ganz ZN8 Series user manual

ShareTech AV1 user manual

ShareTech

ShareTech AV1 user manual

HOME8 V33040US quick start guide

HOME8

HOME8 V33040US quick start guide

Ezviz C6C quick start guide

Ezviz

Ezviz C6C quick start guide

Melchioni UCAM 2015 manual

Melchioni

Melchioni UCAM 2015 manual

Zxtech Tropox user manual

Zxtech

Zxtech Tropox user manual

Arecont Vision MegaBall AV3146DN-3310-D-LG installation manual

Arecont Vision

Arecont Vision MegaBall AV3146DN-3310-D-LG installation manual

Mitel 6800i Series Administrator's guide

Mitel

Mitel 6800i Series Administrator's guide

Vitek VTC-IR403-212NP quick start guide

Vitek

Vitek VTC-IR403-212NP quick start guide

THOMSON DSC - 323W user guide

THOMSON

THOMSON DSC - 323W user guide

ACTi TCM-5311 Hardware user manual

ACTi

ACTi TCM-5311 Hardware user manual

Eneo MCB-64A0003M0A Quick installation guide

Eneo

Eneo MCB-64A0003M0A Quick installation guide

deView electronics CBDNI36F instruction manual

deView electronics

deView electronics CBDNI36F instruction manual

manuals.online logo
manuals.online logoBrands
  • About & Mission
  • Contact us
  • Privacy Policy
  • Terms and Conditions

Copyright 2025 Manuals.Online. All Rights Reserved.

connecons Connect to network
Quick Installaon Guide
Tips:
This is Quick Installaon Guide, for more detailed instrucon,
please download it by this link:
hp://cd.ipcamdata.com
.
Camera ID & QR Code label
X Series IP Camera
Username: admin
Password: 123456
DID: VIEW-XXXXXX-CEOWH
DDNS: xxxxxxx.nwsvr1.com
iSmartViewPro icon
2. Click on "Add Camera via WiFi mode".
2
X Series IP Camera
Username: admin
Password: 123456
DID: VIEW-XXXXXX-CEOWH
DDNS: xxxxxxx.nwsvr1.com
This is the Quick Installaon Guide, for more detailed manual,
please download it from this link: hp://cd.ipcamdata.com.
• Plug the camera in with the included power supply
• Connect your phone to your WiFi
• Connect the camera to your wifi router with ethernet cable
Tips:
• We suggest you to use the included power supply to
avoid any damage of the camera.
•You can find the camera ID and QR code in the label on
the camera.
X Series IP Camera
Username: admin
Password: 123456
DID: VIEW-XXXXXX-CEOWH
DDNS: xxxxxxx.nwsvr1.com
OUTIN
RESET
Power adapter ADSL
Router
IP camera
1.Go to the Google Play to search and download,if you are
Andriod “iSmartViewPro” APP to your smart phone or tablet.
VIEW-XXXXXX-CEOWH
QR Code
2) Your WiFi name is input already (if this WiFi is not
what you want to connect it to, please tap to switch to
other WiFi. But please note the wifi you are connecng to
should be the 2.4GHz wifi), and input the correct WiFi
Password (Wi-Fi name and Password should not contain
special characters ' and &) and click “ Connect to WiFi".
And hold your phone close to the camera and turn up the
phone volume, then click on“Next” and "Start".
Status LED
Download APP (Android)
3
1. Click on "Add Camera".
1) Please check the blue light on the camera, if it is flashing
slowly, please tap “Blue ligh t is flashing slowly”, and Scan the
1
QR code in the label on the camera, and name the camera.
Then click on “Next” (Please don't change the user name and
password here, please use the default one "admin"and
"123456")
wifi
wifi
Blinking SlowlySolid Light Blinking Quickly
Status LED
2.Or scan below QR code to get the APP.
iSmartViewPro
(Anadroid)
iSmartViewPlus
(ios)
Factory Default Accout Info
Camera ID(DID)
DDNS QR Code
iSmartViewPro
iSmartViewPlus
Quick Installation Guide
1. connecons
2. Download APP
3. Connect to network
OUT IN
RESET
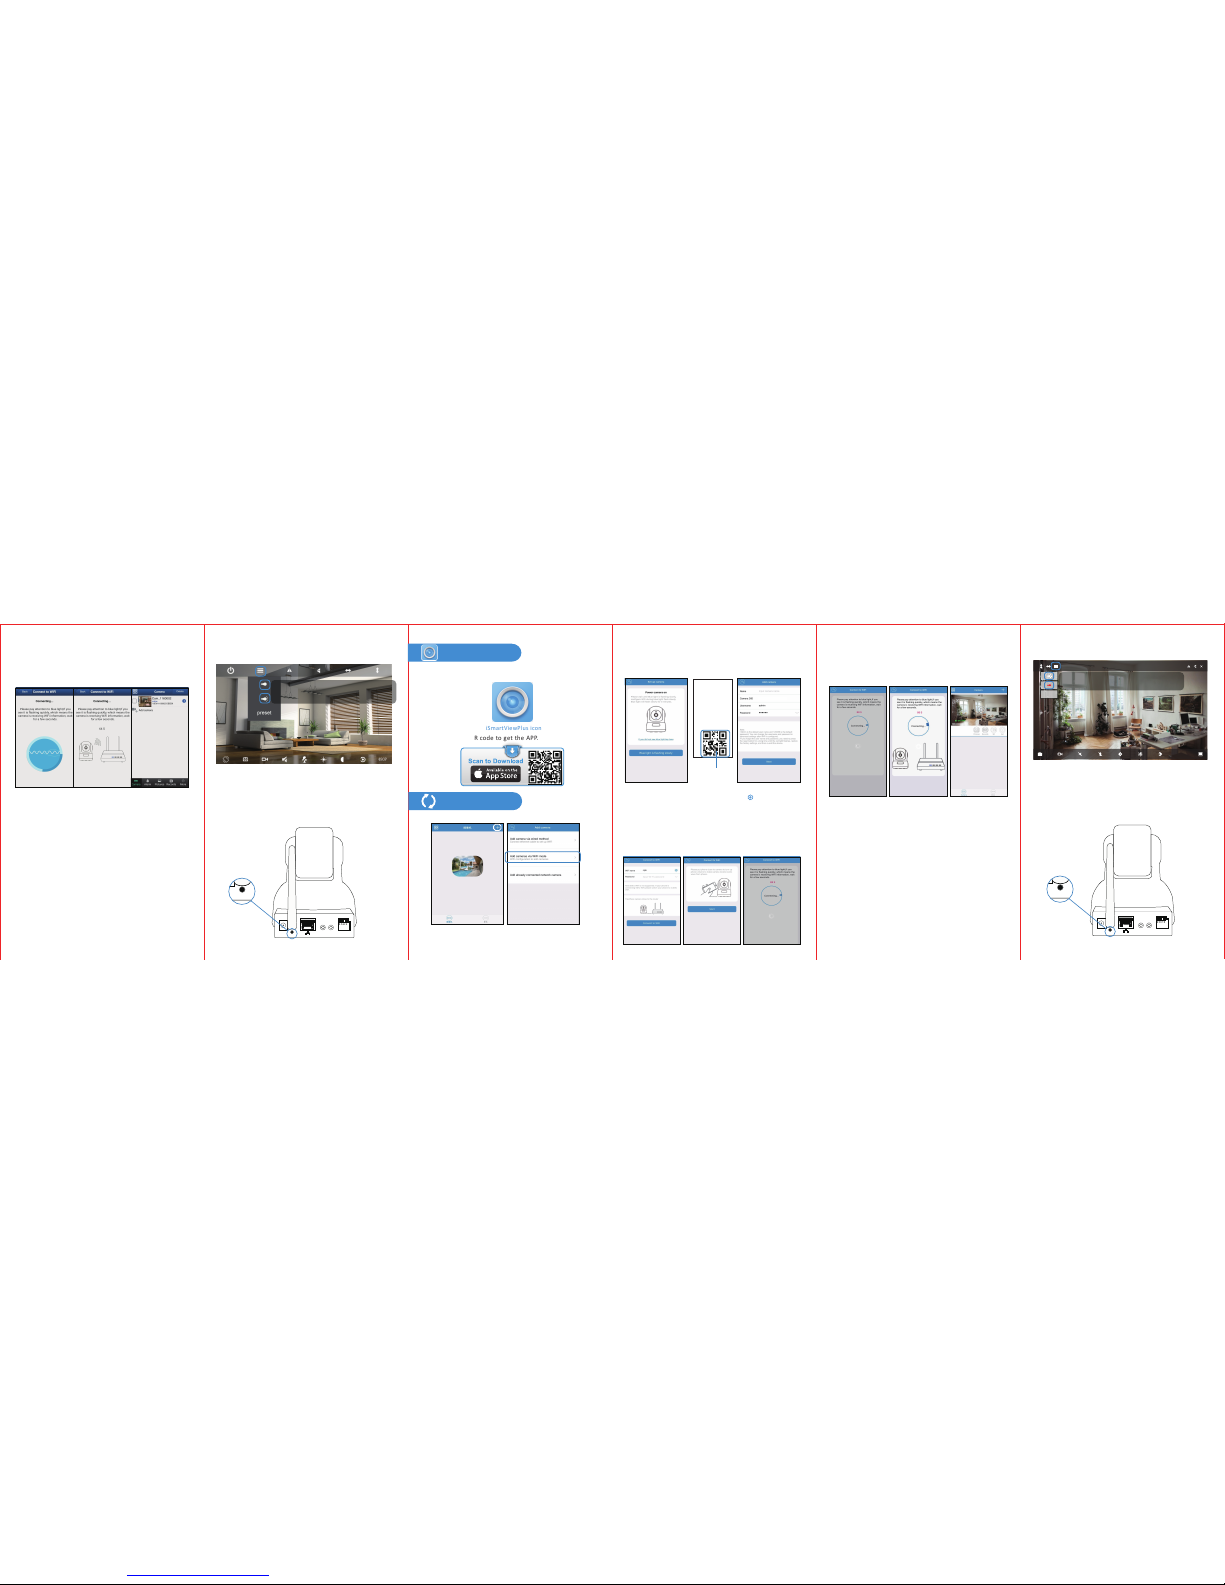
3) The phone will send a sequence of beeps to the camera
and try to connect to WiFi,
If WiFi setup is succeeded, it will go back to Camera
interface and show "Configuraon Succeed" and the
camera will be "online".
Tips:
•If you have several cameras, please configure them one
by one. This process will only work for one camera once.
• The camera is a 2.4GHz wifi based one. Please make sure
your phone is connected to your 2.4GHz wifi before doing
the setup.
• The whole process of configuraon should be completed
in 5 minutes aer the camera plugged in.
Otherwise, the camera should be unplugged and replugged
in again to get another 5 minutes setup me.
•If it is failed, please tap "Try again".
3. If the night vision doesn't work, please turn on the IR
lights as below instrucon.
4.If you forgot the password, hold down the "Reset" buon
for around 15-20 seconds unl you see the red light is blinking
very fast, let it go. And then the camera will be restored to
factory default. The default username /password:
admin/123456. Please do the setup of the camera again as
what you did.
OUT IN
RESET
Tap this icon to turn night vision on
Tap this icon to turn night vision off
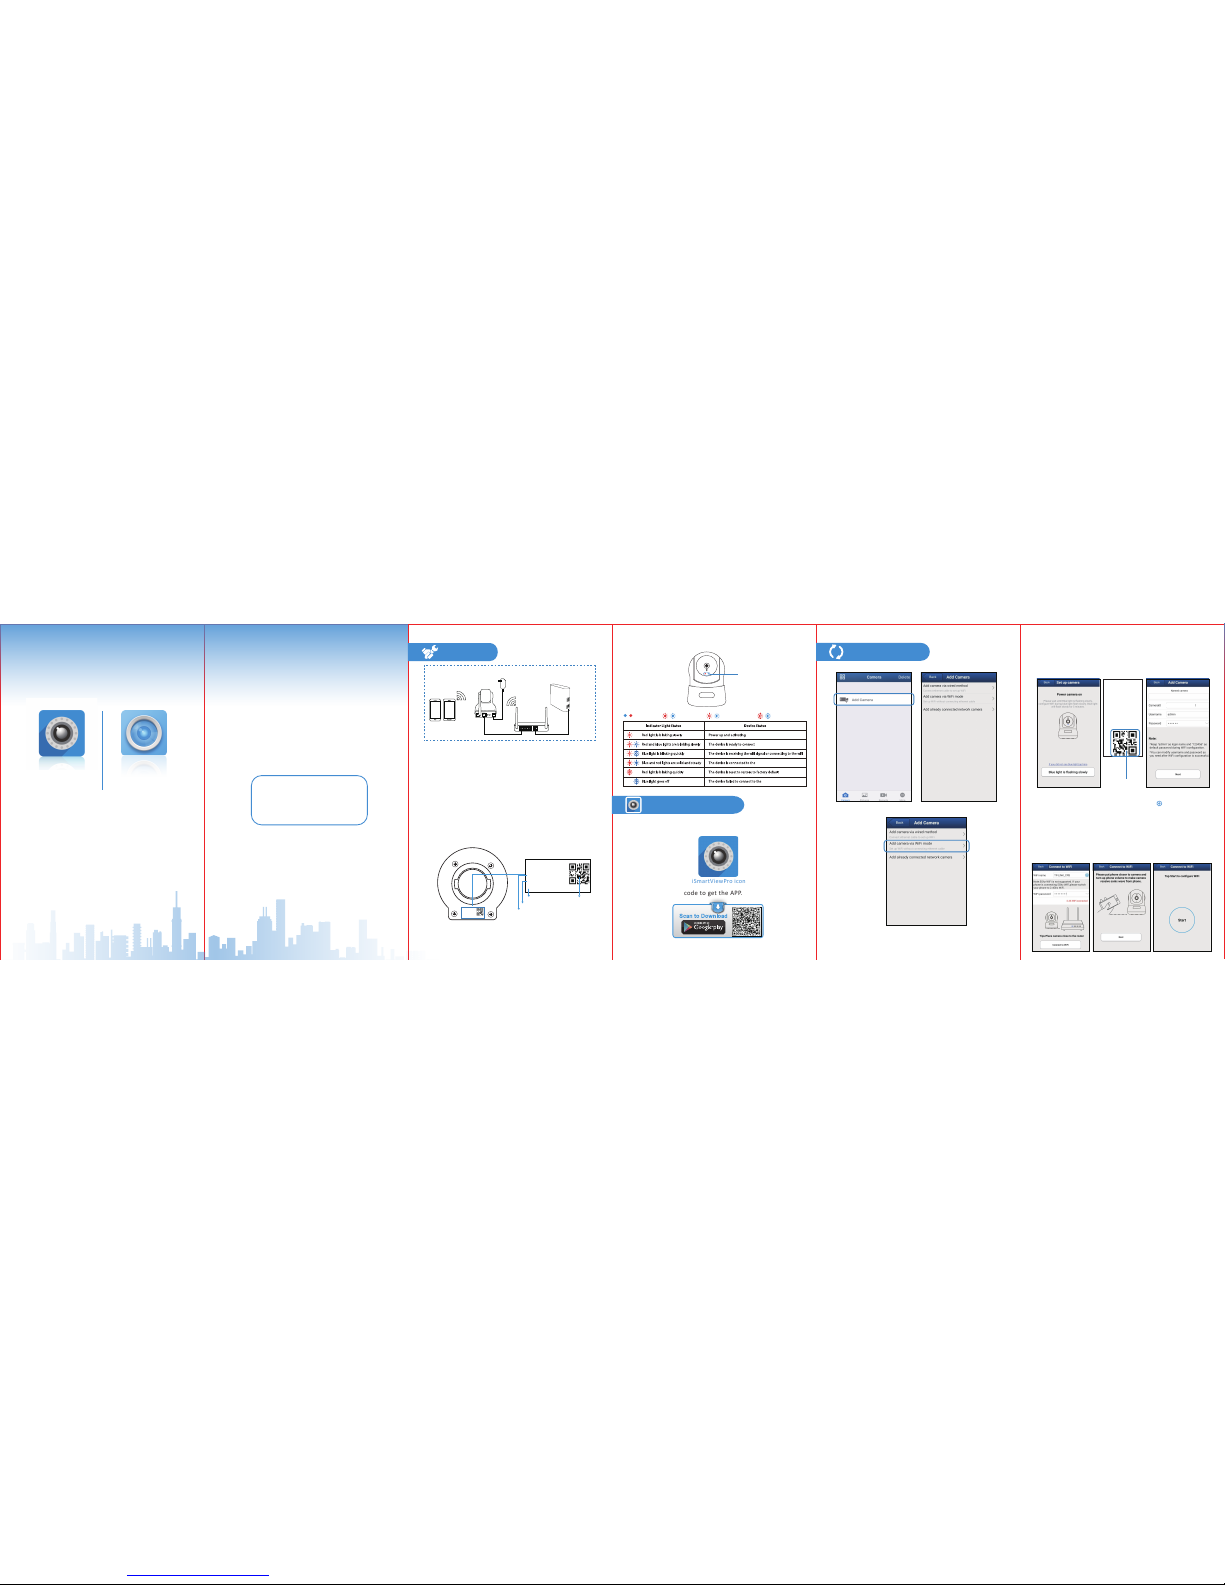
1.Go to the App Store to search and download
“iSmartViewPlus” APP to your smart phone or tablet.
iSmartViewPlus icon
2.Or scan below QR code to get the APP.
Download APP (ios)
1) Click on "Add Camera"and “via WiFi mode".
Connect to network
2) Please check the blue light on the camera, if it is flashing
slowly, please tap “Blue ligh t is flashing slowly”, and Scan the
X Series IP Camera
Username: admin
Password: 123456
DID: VIEW-XXXXXX-CEOWH
DDNS: xxxxxxx.nwsvr1.com
QR Code
3) Your WiFi name is input already (if this WiFi is not
what you want to connect it to, please tap to switch to
other WiFi. But please note the wifi you are connecng to
should be the 2.4GHz wifi), and input the correct WiFi
Password (Wi-Fi name and Password should not contain
special characters ' and &) and click “ Connect to WiFi".
And hold your phone close to the camera and turn up the
phone volume, then click on“Next” and "Start".
3
QR code in the label on the camera, and name the camera.
Then click on “Next” (Please don't change the user name and
password here, please use the default one "admin"and
"123456")
OUT IN
RESET
4) The phone will send a sequence of beeps to the camera
and try to connect to WiFi,
If WiFi setup is succeeded, it will go back to Camera
interface and show "Configuraon Succeed" and the
camera will be "online".
Tips:
•If you have several cameras, please configure them one
by one. This process will only work for one camera once.
• The camera is a 2.4GHz wifi based one. Please make sure
your phone is connected to your 2.4GHz wifi before doing
the setup.
• The whole process of configuraon should be completed
in 5 minutes aer the camera plugged in.
Otherwise, the camera should be unplugged and replugged
in again to get another 5 minutes setup me.
•If it is failed, please tap "Try again".
3. If the night vision doesn't work, please turn on the IR
lights as below instrucon.
4.If you forgot the password, hold down the "Reset" buon
for around 15-20 seconds unl you see the red light is
blinking very fast, let it go. And then the camera will be
restored to factory default. The default username /password:
admin/123456. Please do the setup of the camera again as
what you did.
OUT IN
RESET
1
2
VIEW-XXXXXX-CEOWH
1080P
ipcam
preset
Tap this icon to turn night vision on
Tap this icon to turn night vision off