Ipcamdata iSmartViewPro User manual

We keep improving the app, if the app interface is not accordance with the instructions,
please go to IPcmera website: http://cd.ipcamdata.com for the latest instructions.
Wire-Free Battery-Powered
1080P Indoor & Outdoor Home Security Camera
User Manual
801RTB
EN Version Updated on 25 September 2018
iSmartviewPro
850G
2
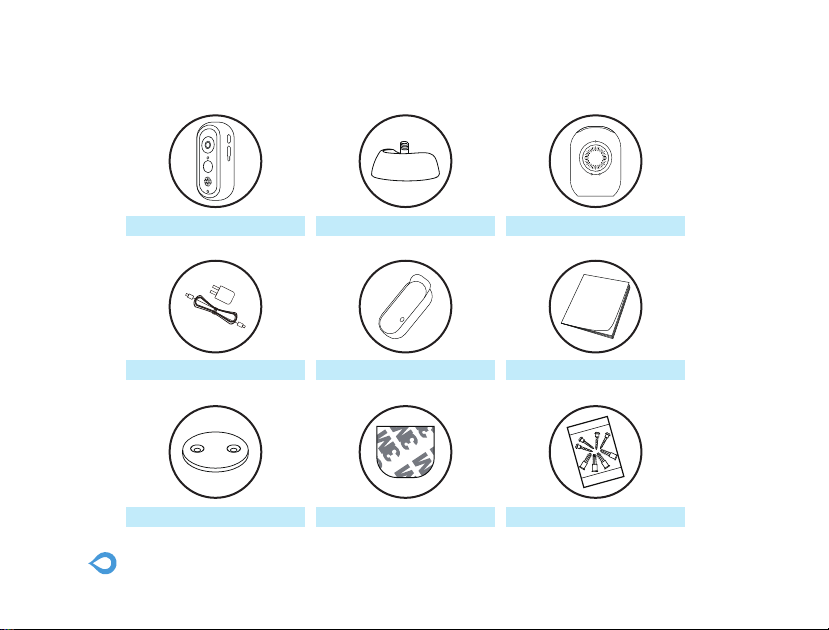
Base StationBase bottom
Magnetic wall mount 3M tape
Battery Camera
Mounting screws&Anchors
Power adapter User ManualWeathproof cover
What’s in the Box

3
Memory card slot
Speaker
Indicator Light
WiFi Pair ButtonSync Button
Base Station
Speaker
Microphone
Micro Memory Card
Internet Connection
Max Number of Connected Cameras
Adapter Power
Dimensions
Weight
Built-in 1W 8Ω
Built-in
Up to 128GB
2.4 Ghz WiFi Connection
4
5V 2A
60*31.5*81.9mm
54g
Working Environment -10°C to 50°C / 14°F to 122°F,RH≤95%
Microphone
Product Diagram(Base Station)

4
Button
LED indicaton
OFF
Solid on in red
Flashes red&blue slowly alternately
Solid on in blue
Flashes blue slowly
Flashes red quickly
Working status
Sleep mode/Power Off
NO Internet
WiFi configuration
Connected to internet
Pairing mode
Restore to factory setting
Wi-Fi Pair Button
Sync Button
Press the Wi-Fi Pair Button & Sync
Button at the same time
Pair with the WIFI
Pair with the camera
Restore to factory settings
Press and hold 5 seconds to enter pairing mode
with the LED indicator flashing red&blue slowly
Press and hold 6-8 seconds to enter pairing mode
with the LED indicator flashing blue slowly
Press and hold for 3 seconds
Function Operation
LED Indicator & Working Status(Base Station)
Button Controls(Base Station)

5
Camera
Lens
Sensor
Resolution
Microphone
Speaker
PIR Detection
Battery life
Weight
105°wide angle ,f=2.0
1/2.7 inch
1080P(1920*1080)Full HD Resolution
Built-in
Built-in 1W 8Ω
Detection angle110
Two 18650 Lithium batteries(not
include),Battery life will vary based on
device settings,
usage, and environmental factors.
Actual results may vary.
Adapter Power 5V 2A or Two 18650 Lithium batteries
(not include )
Internet 2.4G Wi-Fi
193g
Weather Proof IP65
Dimensions 61.8*61.8*130.2mm
Working Environment -10°C to 50°C / 14°F to 122°F,
RH≤95%
Microphone
2.0 MP Lens
Photoresistance
Night
vision LED
Motion sensor
Speaker
Indicator light
Base
Sync Button Battery
compartment
Screw
Button
Battery Cover
Micro USB Port
Product Diagram(Camera)

6
LED indicaton
OFF
Solid on in red
Flashes red & blue slowly
Solid on in blue
Working status
Sleep mode/Power Off
Connected the Base station or charge the camera
Pairing mode
Fully charged
Button
Sync Button Pair with the Base station Press and hold 10 seconds to enter pairing mode
with the red&blue LED indicator flashing red&blue
slowly
Function Operation
· Use the included power adapters only to charge the camera and the base station within the permitted voltage range.
· Only the camera is waterproof. The base station and adapters are for indoor use only.
· Make sure the internet is functional and fast for live data feed.
· Do not use the product at temperatures higher or lower than the specified range.
· Do not use in environments with strong electromagnetic interferences or near corrosive substances.
· The warranty does not cover defects and damages caused by misuse, unauthorized dismantling, or natural hazards.
· The 18650 battery life varies according to the frequency of the triggers and the video resolution settings.
· The PIR motion sensor can only detect motions within a certain ranges and will not be activated by motions out of the range
LED Indicator & Working Status (Camera)
Button Controls(Camera)
Caution

7
Get Started
Download APP
1Go to the App Store or Google Play to search and download “iSmartviewPro” APP to your smart
phone or tablet.
2Or scan below QR code to get the APP.
8
Note:
The LED indicator on the Base Station will keep
solid blue light when connected to the internet
successfully.
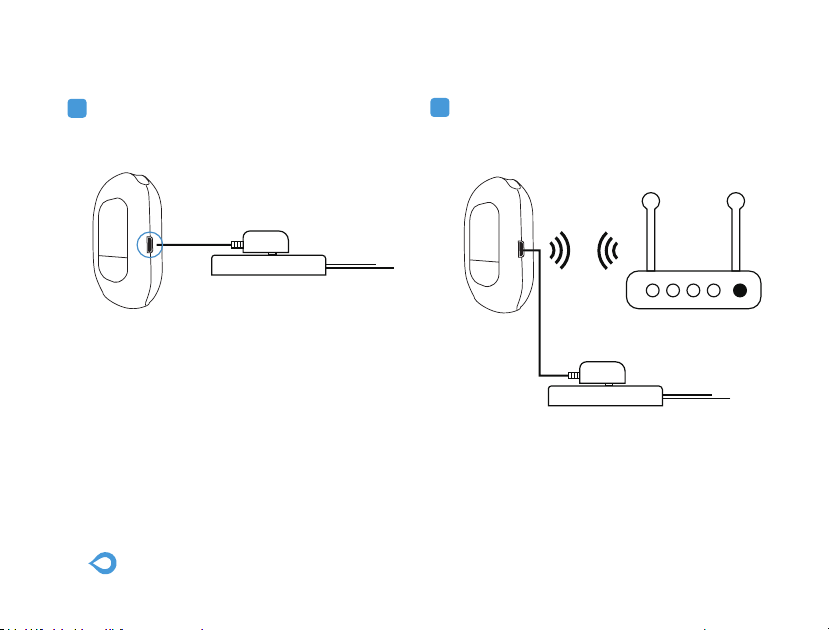
1Connect the Base Station to a power source. 2Place the Base Station next to the router
before configuring.
Power On Base Station

9
PRESS
Power the Camera
Tips:In order to extend the working time of the
battery, please turn off the motion sensor when
using it outdoors.
1Please install two 18650 lithium batteries in
the camera before using.
2Coming with micro USB connector on the
battery, the wifi camera can be charged by
universal 5V 2A phone adapter,Save your
money for new batteries continuously.(No
power adapter packed in).
10
Connect your mobile phone with 2.4G WiFi. (5G is not supported for the Base station)If you are
using a dual band router, make sure your 2.4G WiFi name is different from your 5G one.
Connect Base Station to Network
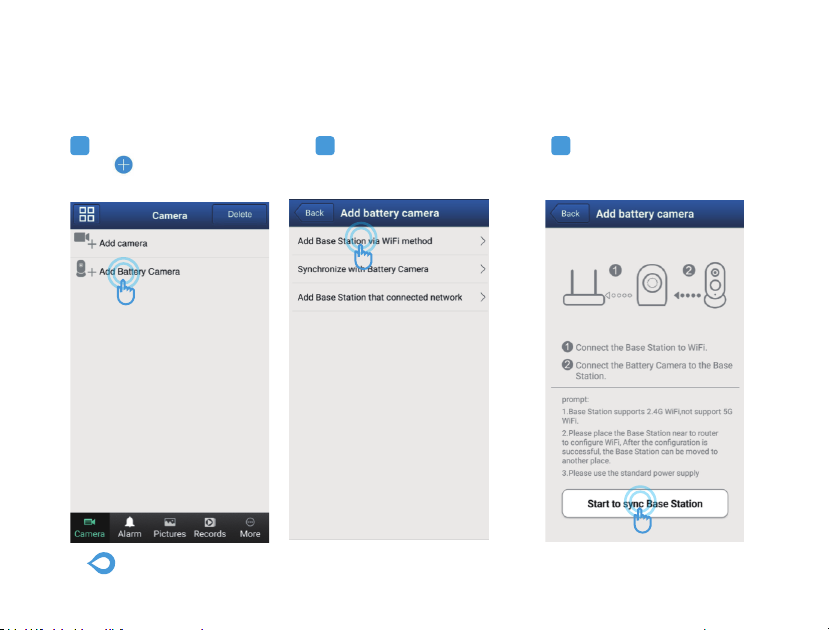
1Launch iSmartviewPro App,
Click on Add Battery
Camera.
2Select [Add Base Station
via WiFi method]
3Click on [Start to sync
Base Station]
Other manuals for iSmartViewPro
1
Table of contents


