iroda o-grill 1000 User manual

ftodo.
@@ C€
o-GRtttl000
Portable LP Gas Grill Ownet's Manual
lmportant:
CONSUMER / USER:
This instru.tion manual contains important information
necessary for the proper as5embly and safe use of the
Read and follow all warningt and instructions before
assembling and usinq the appliance. Keep thir manua
for future reference

Portable LP Gas Grill Owner's Manual
Contents:
. General safety lnformation
-P'l
. Operating lnstructions
-P3
. Gas lnstructions
-p3
. Leak Check
-P5
. Cooking
-P6
.Cleaning and Maintenance _P6
.Storage P8
'Trou bleshooting
-P6
. Parts List P9
.warranty_Pl0
G e ne ra I Safety I nform ati on
lf you smell gas:
1. Shut off gas to the appliance.
2. Extinguish any open flame.
3. Open lid.
4. lf odor continues, keep away from the appliance and
immediately call your fire department.
Failure to follow these instructions could result in fire
or explosion. which could cause property damage,
personal iniury or death.
l.Never operate this appliance unattended.
2.Never operate this appliance within 3M/1oft of any
structure, combustible material or other gas cylinder.
3.Never operate this appliance within 7.5M125ft of any
flammable liquid.
4.Do not fill cooking vessel beyond maximum fill line.
s.Never allow oil or grease to get hotter than
200'c / 400"F.
lf the temperature exceeds 200"C / 400'F, or if oil
begins to smoke, immediately turn the burner or
gas supply OFF.
6.Heated liquids remain at scalding temperatures long
after the cookinq process. Never touch cooking
appliance until liquids have cooled to 45'C / 113"F
or less.
7.lf a fire should occur, keep away from the appliance
and immediately call your fire department.
Do not attempt to extinguish an oil or grease fire
with water.
Failure to follow these instructions could result in fire,
explosion or burn hazard, which could cause property
damage, personal injury or death.
. The use of alcohol, prescription or non-prescription
drugs may impair the consumer's ability to properly
assemble or safely operate the appliance.
. When cooking with oil or grease. have a type BC or
ABc fire extinguisher readily available. ln the event
of an oil or grease fire do not attempt to extinguish
with water. lmmediately call the fire department.
A Type Bc or ABC fire extinguisher may, in some
circumstances contain the fire.
. ln the event of rain, snow. hail. sleet or other forms
of precipitation while cooking with oil or grease,
cover the cooking vessel immediately and turn off
the appliance burners and gas supply.
Do not attempt to move the appliance or cooking
vessel.
. When cooking, the appliance fryerlboiler must be on
a level, stable noncombustible surface in an area
clear of combustible material. An asphalt surface
(blacktop) may not be acceptable for this purpose.
. Do not leave the appliance unattended.
Keep children and pets away from the appliance at
all times.
. Do not place empty cooking vessel on the appliance
while in operation. Use caution when placing
anything in cooking vessel while the appliance is in
operation.
. Do not move the appliance when in use. Allow the
cooking vessel to cool to 45"c / 1 13'F or less before
moving or storing.
. This appliance is not intended for and should never
be used as a heater.
The following symbols shown below are used extensively
throughout these instructions. Always heed
these precautions, as they are essential when using
any mechanical or propane fueled equipment.
DANGER indicates an imminently hazardous situation
which, if not avoided. will result in death or serious
iniu ry.

P o rt a b le LP Gas Grill Owner's Manual
WARNING indicates a potentially hazardous situation
which, if not avoide-d, could result in death or serious
iniury.
CAUTION indicates a potentially hazardous situation
which, if not avoided, may result in minor or moderate
personal iniury, or property damage.
A lmproper atrembly may be dangerous.
Please carefully follow the assembly instructions
in this manual.
A Do not store a spare or disconnected propane
cylinder under or near the O-crill.
A Do not operate the O-crill if there is a gas leak
present.
{ Do not use a flame to check for gas leaks.
A Combustible materials should never be within
0.6M(24 inches) of the top, bottom, back or sides
of your O-Grill.
A Do not use charcoal or lava rock in your O-crill.
A fhe O-crill should never be used by children.
Accessible parts of the grill may be very hot.
Keep children away while it is in use.
AYou should exercise reasonable care when
operating your O-Grill. lt will be hot during
cooking or cleaning and should never be left
unattended, or moved while in operation.
A Should the burner go out while in operation,
turn the gas valve off. Open the lid and wait 5
minutes before attempting to relight, using the
lighting instructions.
I Never lean over an open grill or place hands or
fingers on the front edge of the cooking box.
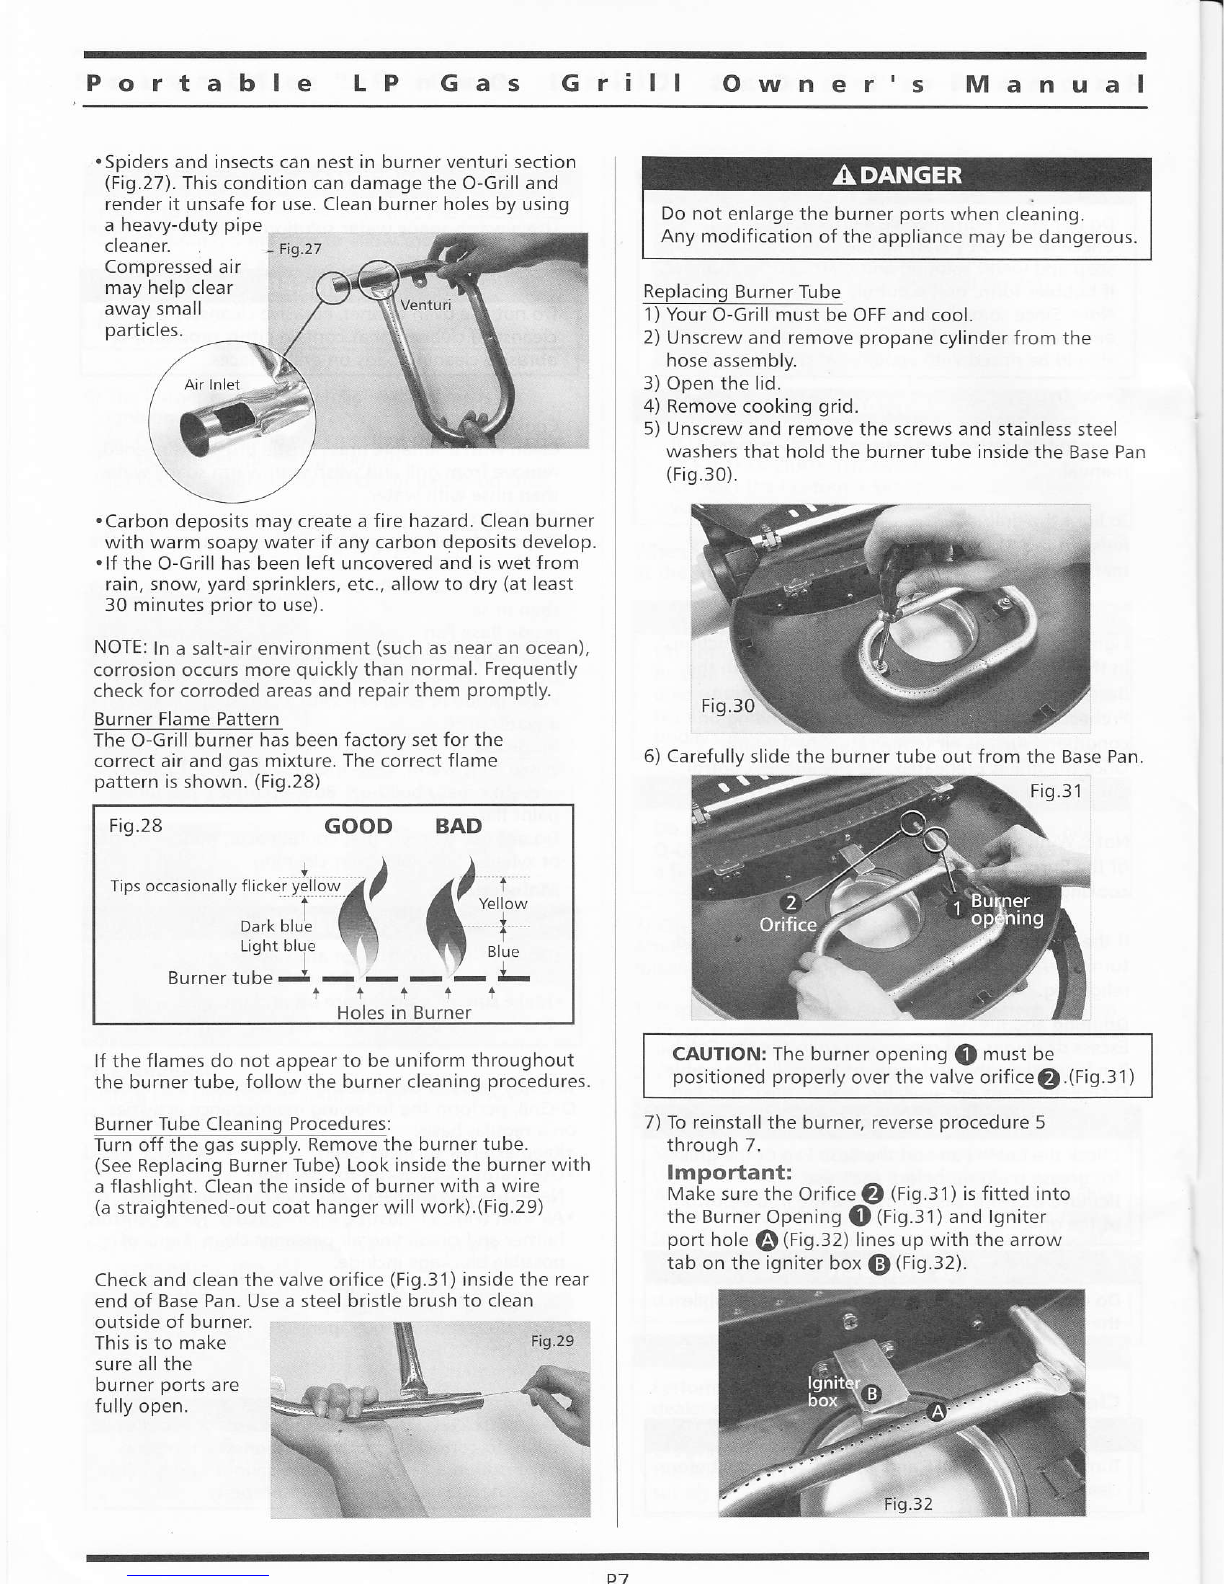
A Do not enlarge valve orifice or burner ports when
cleaning the valve or burner.
A Should a grease fire occut turn off the burner and
leave lid closed until fire is out.
A th" O-Crill should be thoroughly cleaned on a
regular basis.
A Aft"r u period of storage, and/or nonuse, the O-Grill
should be checked for gas leaks and burner
obstructions before use. See instructions in this
manual for correct procedu res.
Propane gas is not natural gas. The conversion or
attempted use of natural gas in a propane unit or
propane gas in a natural gas unit is dangerous and
will void your warranty.
A Do not attempt to disconnect any gas fitting while
the O-Grill is in operation.
I Use heat-resistant BBQ mitts or gloves when
operating the O-Grill.
{ Keep any electrical supply cord away from any
heated surfaces.
[, Combustion byproducts produced when using this
product contain chemicals known to the state of
California to cause cancer, birth defects, or other
reproductive harm.
A Do not use the O-Grill unless all parts are in place.
The unit must be properly assembled according to
the instructions outlined in the "Cleaning and
Maintenance" section of the Owner's Guide.
A Do not use the O-grill in a vehicle trunk, station
wagon, mini-van, sport utility vehicle (SUV),
recreational vehicle (RV), or Boat.
[, Do not attempt to disconnect the gas regulator or
any gas fitting while the grill is in operation.
A This appliance is not intended for commercial use.
O-GRILL IS DESIGNED FOR OUTDOOR USE ONLY.
NOTICE
These instructions must be left with the owner and
the owner should keep them for future use,
Do not try to light this appliance without reading
the "Liqhting lnstructions" section of this manual.
Follow all leak-check procedures carefully in this
manual prior to barbecue operation. Do this even
if the O-Grill was dealer-assembled.

Portable LP Gas Grill Owner's Manual
Operating lnstructions
Getting Started
lnspect all packing and remove all parts (Fig.1)
Unfold the retractable legs (Fig.2)
Release the lock switch then open the lid (Fig.3)
Fig.l
Gas Instructions
Attach Fuel / Hose Connection
2. Primus-Power Gas (6459m, 3909m, and 1989m, Fiq.8)
canister requires O-Daptor E type (optional, Fi9.9) to fit
into O-Grill gas inlet.
Fig.8 Primus-Power Gas
(6459m.3909m,
and 1 98qm)
3909m
Screw O-Daptor type E into O-Grill gas inlet by turning
clockwise until it is tight.(Fig. 10)
Use liquid propane canister in Primus thread type with
capacity 1989m (7 oz), 3909m (13.7 oz) or 6459m
(22.7 oz) Fig. 8.
3, lwata ni Butane Canister
requires O-Daptor Type A
(optional, Fig.12) to {it
into O-Grill gas inlet.
1989m
Fig.4
Worthington or
coleman 1 lb
(16 oz)
Fig.5
Worthington
114.1 oz)
o-Grill has equipped with built-in regulator for your
convenience. Please follow the below instructions
for various applications:
A. For portable canisters (Worthington or Coleman
l lb (Fig.4, Fig.5), Primus-Power Gas (Fig 8), and
lwatani Butane Ca nister (Fig.13):
1, Worthington orColeman 1lb (16oz, 497gm, Fig 4)
or 14.1 oz (4009m, Fig. 5) canisters can easily
screw into gas inlet of O-Grill.
.:ii

Portable LP Gas Grill Owner's Manual
fl"
lwatani butane
B.For floor type gas tank:
Please refer to following Table-1 for appropriate type of
extension hose and gas tank adapter.
Screw extension hose with connector into O-Grill gas inlet
by turning clockwise until it is tight. (optional Fi9.16)
Fig.17
Connector type for GB
(creat Britain)
Screw O-Da ptor type A (Fiq.1 2) into O-c rill gas inlet by
turning clockwise until it is tight (Fig. 1 ).
Do not lean over the open grill. Keep your face and
body at least one foot away from the grill when
li9 hting the 9rill.
To Light
1)open the lid.
2)Make sure the control knob is turned OFF.
(Push control knob in and turn clockwise to ensure
that it is in the OFF position.)
3)Push burner control knob down and turn to
Hr / srARr (/) Gis.18)
4)Push the red ignition button several times, so it clicks
each time (Fig.19)
5)Check that the burner is lit by looking down through
the cooking grid. You should see a flame.
6. Turn OFF the gas supply at the gas container after use.
Do not use a wrench to tighten the connection.
Using a wrench could damage the regulator coupling
and could cause a leak.
Country.odes are n a.cordan.e with EN SO 3166 1
lf the burner does not light, turn the burner control
knob to OFF and wait 5 minutes to let the gas clear
before you try again.
P4

Portable LP Gas Grill Owner's Manual
Failure to open the lid while igniting the grill's burner,
or not waiting 5 mlnutes to allow the gas to clear if
the grill does not light, may result in an explosive
flame-up which can cause serious bodily injury or
death.
6) The burner may be match lighted if there is no
ignition.
(a) First, remove the match extension stick from the
storage com partment (Fig.20)
(b) Push the match into the clip of extension stick
(Fig.21)
(c) Hold extension stick close to Burner and turn
gas control knob slowlY (Fig.22)
(d) Adjust flame to desired heat level. (Fig.23)
Fig.21
rg
To Extinguish
Push in and turn burner control knob clockwise to
the oFF position (Fi9.23)
Leak Check
check:
1-1) Built-in Regulator to O-Daptor type E or type A
(Fig.'1 2) connection. (Fig.24)
'l-2) Gas canister to O-Daptor type E or type A
connection. (Fiq.2 5)
1-3) Extension hose
connector ({or grou nd
type gas cylinder) to
o-Grill bu ilt-in regulator
con nection.
(optional Fig.26).
When leak checks are complete, turn gas supply OFF
at the source and rinse connections with water.
2) Check for gas leaks periodically:
After a period of nonuse you should perform the
following maintenance procedures for your safety.
1. lnspect the burner for correct flame pattern.(Fig.15)
Clean if necessary, following the procedures outlined
in the "Maintenance" section of this manual.
2. Check all gas fittings for leaks.
lf there is a leak at connection turn OFF the gas.
DO NOT OPERATE THE GRILL.
Contact the Customer Service Representative in
your a rea.
Do not use an open flame to check for gas leak.
Be sure there are no sparks or open flames in the
area while you check for leaks. Sparks or flames will
result in a fire or explosion which can cause serious
bodily injury or death, and damage to property.
Do not store a spare LP-Gas cylinder under or near
O-crill. lf the instructions are not followed exactly,
a fire causing death or serious injury may occur.
You should check for gas leaks every time you
disconnect and reconnect a gas fitting.
All factory-made connections have been thoroughly
checked for gas leaks. The burners have been flame
tested. As a safety precaution however, you should
recheck all fittings for leaks before using your O-Grill.
Shipping and handling may have loosened or
damaged a gas fitting.
Perform these leak checks even if your grill was
dealer or store assembled.
You will need soap and water solution and a rag or
brush to apply it. To perform leak checks make sure
the Burner is in the of{ position and turn on gas
su p ply.
P5

Portable LP Gas Grill Owner's Manual
Do not ignite burner while leak checking.
Check for leaks by w-etting the connections with the
soap and water solution and watching for bubbles.
lf bubbles form, or if a bubble grows, there is a leak.
Note: Since some leak test solutions, including soap
and water, may be slightly corrosive, all connections
should be rinsed with water after checking for leaks.
Cooking
Getting started:
Refer to "Operating lnstructions" in this owner's
manual.
To light the grill:
Refer to the "Lighting lnstructions" in this owner's
manual.
To Preheat the grill:
Light the O-Grill according the "Lighting tnstructions"
in this owner's manual. Close the lid and turn the
Burner Control Knob to HI/START (/) Oosition.
Preheat the grill for 5-10 minutes (depending on
conditions such as air temperature and wind).
Once the grill is preheated, set the Burner Control
Knob to the low setting.
Note: Wind and weather may require adjustment
of the Burner Control Knob to obtain the correct
cooking tem perature.
lf the burner goes out during cooking, open the lid.
turn off the burner, and wait 5 minutes before
relighting.
Dripping and grease:
Excess drippings and grease will collect in the Catch
Pan located on the underside of the grill. Disposable
are available that fit the Catch Pan.
Check the Catch Pan and the Base Pan of the grill
for grease build-up before each use.
Remove excess grease to avoid a fire in the bottom
of the grill.
Do not move the O-Grill when operating or while
the grill is hot.
Turn your gas grill OFF and wait for it to cool before
clea ning.
Cleaning and Maintenance
PA
Do not use oven cleaner, a
cleansers) cleaners that contain citrus products, or
abrasive cleaning pads on grill surfaces.
Cleaning
Outside surfaces
Use a \/arrn soapy water solution to clean, then rinse
with water.
Clean with a suitable brass bristle brush. As needed,
remove from grill and wash with warm soapy water,
then rinse with water
Catch Pan
OisposaOte toit trays are available, or you can line the
catch pan with aluminum foil.
To clean the Catch Pan. wash with warm soapy water.
then rinse.
lnside Base Pan
Bruih= anydebris off of burner tubes.
DO NOT ENLARGE BURNER PORTS (OPENINGS).
Wash inside of Base Pan with warm soapy water and
a water rinse.
lnside Lid
While lid is warm. wipe inside with paper towel to
prevent grease build-up. Built-up grease resembles
paint flakes.
Do not use cleaners that contain acid, mineral spirits
or xylene. Rinse well after cleaning.
Maintenance
To enjoy years of outstanding performance from your
O-Grill, perform the following maintenance activities
on a regular basis:
. Keep exterior surfaces clean.
. U5e warm soapy water for cleaning.
Never use flammable or abrasive cleaning agents.
.Air lnlet (Fig.27) must be unobstructed. Keep controls,
burner and circulating air passages clean. Signs of
possible blockage include:
1. The smell of gas in conjunction with burner flames
a ppearing yellow and lazy.
2. Grill does not reach temperature.
3. Grill heats u nevenly.
4. Burner does not ignite.
. Do not touch or attempt any maintenance on
O-Grill for at least one hour after use.
.Make sure all controls are off and propane tank
has been turned OFF before doing maintenance.
Failure to correct the above mentioned symptoms
may result in a fire, which cause serious bodily injury
or death, and cause damage to property.

Portable LP Gas Grill Owner's Manual
.Spiders and insects can nest in burner venturi section
(Fig.27). This condition can damage the O-crill and
render it unsafe for use. Clean burner holes by using
a heavy-duty pipe
cleaner. - Fig-2-l
Compressed air
may help clea r
away small
particles.
.carbon deposits may create a fire hazard. Clean burner
with warm soapy water if any carbon deposits develop.
.lf the O-Grill has been left uncovered and is wet from
rain. snow, yard sprinklers, etc., allow to dry (at least
30 minutes prior to use).
NoTE: In a salt-air environment (such as near an ocean).
corrosion occurs more quickly than normal. Frequently
check for corroded areas and repair them promptly.
Burner Flame Pattern
The o-crill burner has been factory set for the
correct air and qas mixture. The correct flame
pattern is shown. (Fig.28)
Fi9.28 GOOD BAD
'-..,,:,jii'4" ft
+++tt
Holes in Burner
lf the flames do not appear to be uniform throughout
the burner tube, follow the burner cleaning procedures.
Burner Tube clea n ing Procedures:
Turn off the gas supply. Remove the burner tube.
(See Replacing Burner Tube) Look inside the burner with
a flashlight. Clean the inside of burner with a wire
(a stra ig htened-out coat hanger will work).(Fig.29)
Check and clean the valve orifice (Fig.31) inside the rear
end of Base Pan. Use a steel bristle brush to clean
outside o{ burner.
This is to make
su re all the
burner ports are
fully open.
Fi9.29
Do not enlarge the burner ports when cleaning.
Any modification of the appliance may be dangerous.
Replacing Burner Tube
'I ) Your O Grill must be OFF and cool.
2) Unscrew and remove propane cylinder from the
hose assembly.
3) Open the lid.
4) Remove cooking g rid.
5) Unscrew and remove the screws and stainless steel
washers that hold the burner tube inside the Base Pan
(Fiq.3 0).
6) Carefully slide the burner tube out from the Base Pan.
CAUTION: The burner opening O must be
positioned properly over the valve orifice@.(Fig.31)
7) To reinstall the burner, reverse procedure 5
throug h 7.
lmDortant:
Maie sure the Orifice @ (Fig.31 ) is litted into
the Burner OpeninO O (fig.:,l1 and lgniter
port hole 6 (Fiq.32) lines up with the arrow
tab on the igniter box @ (Fig.32).
p7

Portable LP Gas Grill Owner's Manual
Failure to follow the above mentioned procedures,
may result in a fire, which cause serious bodily injury
or death, and cause damage to property.
lgnition System Operations
lf the ignition system fails to ignite the burner, light the
burner with a match. lf the burner lights with a match,
then check the ignition system.
.check that both the white and black ignition wires are
attached properly.
.Check that the ignition button pushes the igniter
(buiton) down, and returns to the up position.
lf the ignition system still fails to light, Contact the
(ustomer Service Representative in your area.
Storage
And/ Or Nonuse
.When the O Grill is not in use, the propane cylinder
must be DISCONNECTED and the propane cylinder
stored outdoors in a well-ventilated space.
Close the regulator inlet protection cap(Fig. 33 and 34)
when your O Grill is not in use.
.The O-Grill should be checked for gas leaks and
obstructions in the burner tubes before using.
(See Sections: "Cleaning and Maintenance")
. The Burner venturi section
should also be checked
for any obstructions.
(See Section: "Clea n ing
and Maintenance.')
. The O-Grill can be
stored easily by
stand-u p position to
save space. (Fig.35)
Troubleshooting
lf problems cannot be corrected by us ng these methods,
Please contact the CLrstorr1er Service Representative in your region.
any
orfame is ow if HIGH
s LP.y inder fue low or
emPtY? s gniter wet?
Does lhe burner lghiwth
Repla.e propane cyl nder.
rf you can ight the burner
with a makh, then check
lsthereair n the g.s Ine?
Burner maytake up io
one m nute to lghl afler
a propane cy inder has
ye low or orange flame, ls there blockage n the
burner tube or Veniur ?
Exper en. ng of f are ups c ean thorouqhly (See
section cleaninq ) clean
Burner J arne pattern is
when burner s on HlcH
Flame does no run the
c ean burner(See section
s LP-cylnder P,e$u,e ow Replace Propane.yl nden
ls outd oor tem peraiu re
cy inder le$than 1/4 ful?
ls fue fow restricted?
check burner and orlfices
.ontrol knob to fu ON
when igniter buiton ss burner iube posioned
s too far away from the
Check that ihe b!rrer
.orredly over lhe igniter
[/]a nt€nan(e- Rep:.nq
Burner 1arne does not
qnite cornpletey around dean and fulyopen?
Cean burner{See seciion
N4alntenance'.) Use a
!ndog any dirty ports.
ls d!n and/or dlrt buit up Clean d rt and/or dust
frorn a.ound burner ports
PR

Portable LP Gas Grill Owner's Manual
Pafts List
Explosive View
O-Grill 1000
1OG '10001
2o6 10002 lqniter
3 OG 10003 LP Cvlinder (Ootional)
4OG 10004 Uooer Handel 2
OG 10005
6OG '10005
7OG 10007 upper HandJe Spacer
8OG '10008 Uooer Handle Lockino Pin
9OG 10009 Lid Hinqe 2
10 OG 10010 Heat lsolator 5
OG 10011 M5 x L16mm Philio s.rew 55
12 OG 14012 M5 x L22mm PhiliD Screw 4
13 OG 10013 M5rLI2 Philip Screw 6
14 OG 10014 M3 x L 8mm Philip Screw 4
OG 10015 Coolrnq Grate Retarner
15 OG 10015 R TvDe Sprino Lock 6
11 OG r0017 Retra.table Leq Locl Pin 4
18 OG 10018 Retractable Leo Lock Pin Sorino 4
19 OG 10019 Cookinq Grate Retainer
)o oG110020 2
21 oG110021 Lockrnq Pin B
22 oG110022 Mat.h Enension Stick 1
23 oG110023 Base Pan 1
24 oG110024 Lid l
25 oG110025 Cookinq Grate 1
26 oG110026 Handle Heat lsolato( R )2
2l oG110027 Handle Heat lisolator( L )
28 oG110028 Retractable Leq
29 oG110029 lqniter Box 1
30 oG110030 Grease Catch Pan 1
oG110031 Grill End Front Cover 1
32 oG110032 Grill End Rear Cover l
33 oGt 10033 I
34 oG1',l0034 Burner 1
35 oc11003s Requlator & Valve Assembly
36 oG110036 cylinder Top cover
31 oG110037 CVlinder Bottom Cover l
38 oct 10038 LPG lnlet Cao I

Portable LP Gas Grill Owner's Manual
Warranty
Limited One Year Warranty
Pro-iroda lndustries, Inc. (iroda) warrants that
for a period of one years from the date of original
retail purchase, this product will be free from
defects in material and workmanship.
At its option, lroda will repair or replace this
product or any component of the product found
to be defective during the warranty period.
Replacement will be made with a new or
remanufactured product or component. This is
our exclusive warranty. This warranty is valid for
the original retail purchaser from the date of initial
retail purchase and is not transferable. Keep the
original sales receipt. Proof of purchase is required
to obtain warranty performance.
What This Warranty Does Not cover
This warranty does not cover normal wear of parts,
parts that are not genuine parts, or damage
resulting from any of the following:
Negligent use or misuse of the product; commercial
use of the product; use contrary to the operating
instructions; disassembly, repair or alteration by
anyone other than or an authorized service
center. Further, the warranty does not cover Acts
of God, such as fire, flood, hurricanes and
tornadoes.
Warranty is void if damage to product results from
the use of a part other than a genuine part.
iroda SHALL NOT BE LIABLE FOR DEFECIS THAT
ARE CAUSED BY THE USE OF UNAUTHORIZED PARTS
OR SERVICE. iroda SHALL NOT BE LIABLE FOR
ANY INCIDENTAL OR CONSEQUENTIAL DAMAGES
CAUSED BY THE BREACH OF ANY EXPRESS OR
IMPLIED WARRANTY OR CONDITIONS. EXCEPT TO
THE EXTENT PROHIBITED BY APPLICABLE LAW, ANY
IMPLIED WARRANW OF MERCHANTABILITY OR
FITNESS FOR A PARTICULAR PURPOSE IS LIMITED
IN DURATION TO THE DURATION OF THE ABOVE
WARRANTY OR CONDITIONS. SOME sTATE5,
PROVINCES, OR JURISDICTIONS DO NOT ALLOW
THE EXCLUSION OR LIMITATION OF INCIDENTAL OR
CONSEQUENTIAL DAMAGES OR LIMITATIONS ON
HOW LONG AN IMPLIED WARRANTY LA5T5, 50 THE
ABOVE LIMITATIONS OR EXCLUSION MAY NOT
APPLY TO YOU. THIS WARRANry GIVES YOU SPECIFIC
LEGAL RIGHTS, AND YOU MAY ALSO HAVE OTHER
RIGHTS THAT VARY FROM STATE TO STATE OR
PROVINCE TO PROVINCE
The costs of transporting the product to authorized
service center for warranty service is the responsibility
of the purchaser. Do not mail products with fuel in
tanks, or with disposable propane cylinders.
Warra nty Service
Warranty service is available by contacting the
Pro-lroda Service Center
irodo, Manutactured by: Uni-O (Xiamen) lndustries Corporation
P1n
Table of contents
Other iroda Grill manuals
Popular Grill manuals by other brands

Trisa electronics
Trisa electronics 7558.42 Instructions for use

Fiammetta
Fiammetta MOMENTUM HS-18MA9401 Assembly & operating instructions

PERMASTEEL
PERMASTEEL Grill Zone PG-4020200LA user manual

Hamilton Beach
Hamilton Beach 38545 use & care

Backyard
Backyard BY16-101-003-04 operating instructions

Eastman Outdoors
Eastman Outdoors 37211 Instruction and safety manual

Thermador
Thermador CGB30RCULP Service manual

Bron COUCKE
Bron COUCKE RACL01 manual

Landmann
Landmann Black Dog 28 Assembly and operating instructions

Riviera & Bar
Riviera & Bar Plancha Pro QPL 1045 operating instructions

Onward
Onward Broil King 9572-44 Assembly manual & parts list

Jenn-Air
Jenn-Air 720-0720 Installation instructions and user guide