Ironman4x4 luxury rooftop tent User manual

USER GUIDE
IMPORTANT: Please read all procedures and precautions before installing and
using the Ironman 4x4 Luxury Rooftop Tent. If you have any questions please
contact our customer service department listed in the back of the user guide.
Luxury Rooftop Tent With Annex (Optional)
Ladder / Annex Extension (Optional)
LUXURY ROOFTOP TENT
THIS USER GUIDE ALSO INCLUDES
INSTALLATION & SETUP FOR OPTIONAL
IRONMAN 4X4 ANNEX + LADDER / ANNEX
EXTENSION
ANNEX

Thank you for purchasing an Ironman 4x4 Luxury Rooftop Tent
Your Ironman 4x4 Luxury Rooftop Tent is designed to fit a variety of different roof rack styles.
The following User Guide will help you adapt your new Luxury Rooftop Tent to suit your application.
PRE-INSTALLATION
2 - 15
1. Find a flat area to work. Open carton out. This will provide
a clean surface to work on whilst tent is being set up.
2. Locate the four mounting points under the tent floor and
lay tent down with this side facing upwards. Remove four
rubber bungs.
3. Remove protective plastic coating from tent floor.
4. Release the four velcro securing straps and open tent
enough to access the mounting rails, installation kit, ladder
and cover which can found inside the tent.

3 - 15
5. The Ironman 4x4 Rooftop Tent can be installed to the
vehicle so that it opens to the rear or either side. This will
determine which way the mounting rails are fitted to the
tent floor.
The mounting rails need to be running at right angles to
the roof bars on the vehicle.
6. The mounting rails will need to be shortened if they are
required to be mounted across the tent from the hinge.
To do this place the mounting rails in position, with the
mounting holes lined up with the mounting holes in tent
floor.
Mark both ends of rail level with the edge of the tent and
cut to length.
7. Slide two 6mm Nyloc nuts into mounting rails and align
with mounting holes. Locate the mounting holes under the
mattress and insert the M6 x 40mm bolts and flat washers
from inside out.
PRE-INSTALLATION

4 - 15
12. Attach the ladder to the brackets using M6 bolts, flat
washers and Nyloc nuts, placing plastic spacers between
the ladder mounts and brackets as shown.
PRE-INSTALLATION
11. Turn over tent over and remove rubber bungs from ladder
mounting holes. Attach the ladder brackets as shown,
using M6 bolts, washers and Nyloc nuts.
10. Attach hooks for bungee cord into pre-drilled holes using
self-tapping screws provided.
Note: Depending on direction of rails, some hooks will not
be required.
9. Secure the ends of the mounting rails using the self drilling
screws provided through the pre-drilled holes as shown.
8. Attach the mounting rails to the tent floor using the M6
bolts and tighten firmly.

13. Stand tent up on it’s side and slide the four M8 x 55mm
bolts and mounting plates into each mounting rail and
install plastic end caps.
Your tent is now ready to be fitted to your vehicle.
PRE-INSTALLATION
• Itistheresponsibilityoftheinstallertoensuretheroofrackhasanadequateloadratingtosupportthe
Ironman 4x4 Luxury Rooftop Tent. Tent weighs approximately 55kg.
• Although two people can possibly lift the Luxury Rooftop Tent onto the vehicle, we recommend that four people
be used due to the weight and size of the tent. This is to prevent personal injury or damage to the vehicle
• Ifmountingthetentforrearopening,makesurethatthetailgateoperationdoesnotinterferewithtent.
• Whenliftingthetentontotheroofofthevehicle,makesurethatmountingboltsdonotcontacttheroofasthis
will cause damage to the vehicle. In some cases the mounting bolts might need to be shortened to clear the
roof.
• In some cases, 6.5mm holes will need to be drilled through roof bars to secure tent.
The manner in which your Luxury Rooftop Tent can be attached depends on the type of roof rack / roof bars fitted to
your vehicle.
Below are some of the more common roof rack styles and mounting techniques.
This diagram shows the rooftop tent clamped to a
cross bar using clamp plate and bolts provided.
This diagram shows the rooftop tent clamped to a
roof rack using clamp plate and bolts provided.
This diagram shows the rooftop tent bolted to
a roof bar by drilling through the roof bar and
attaching with bolts provided.
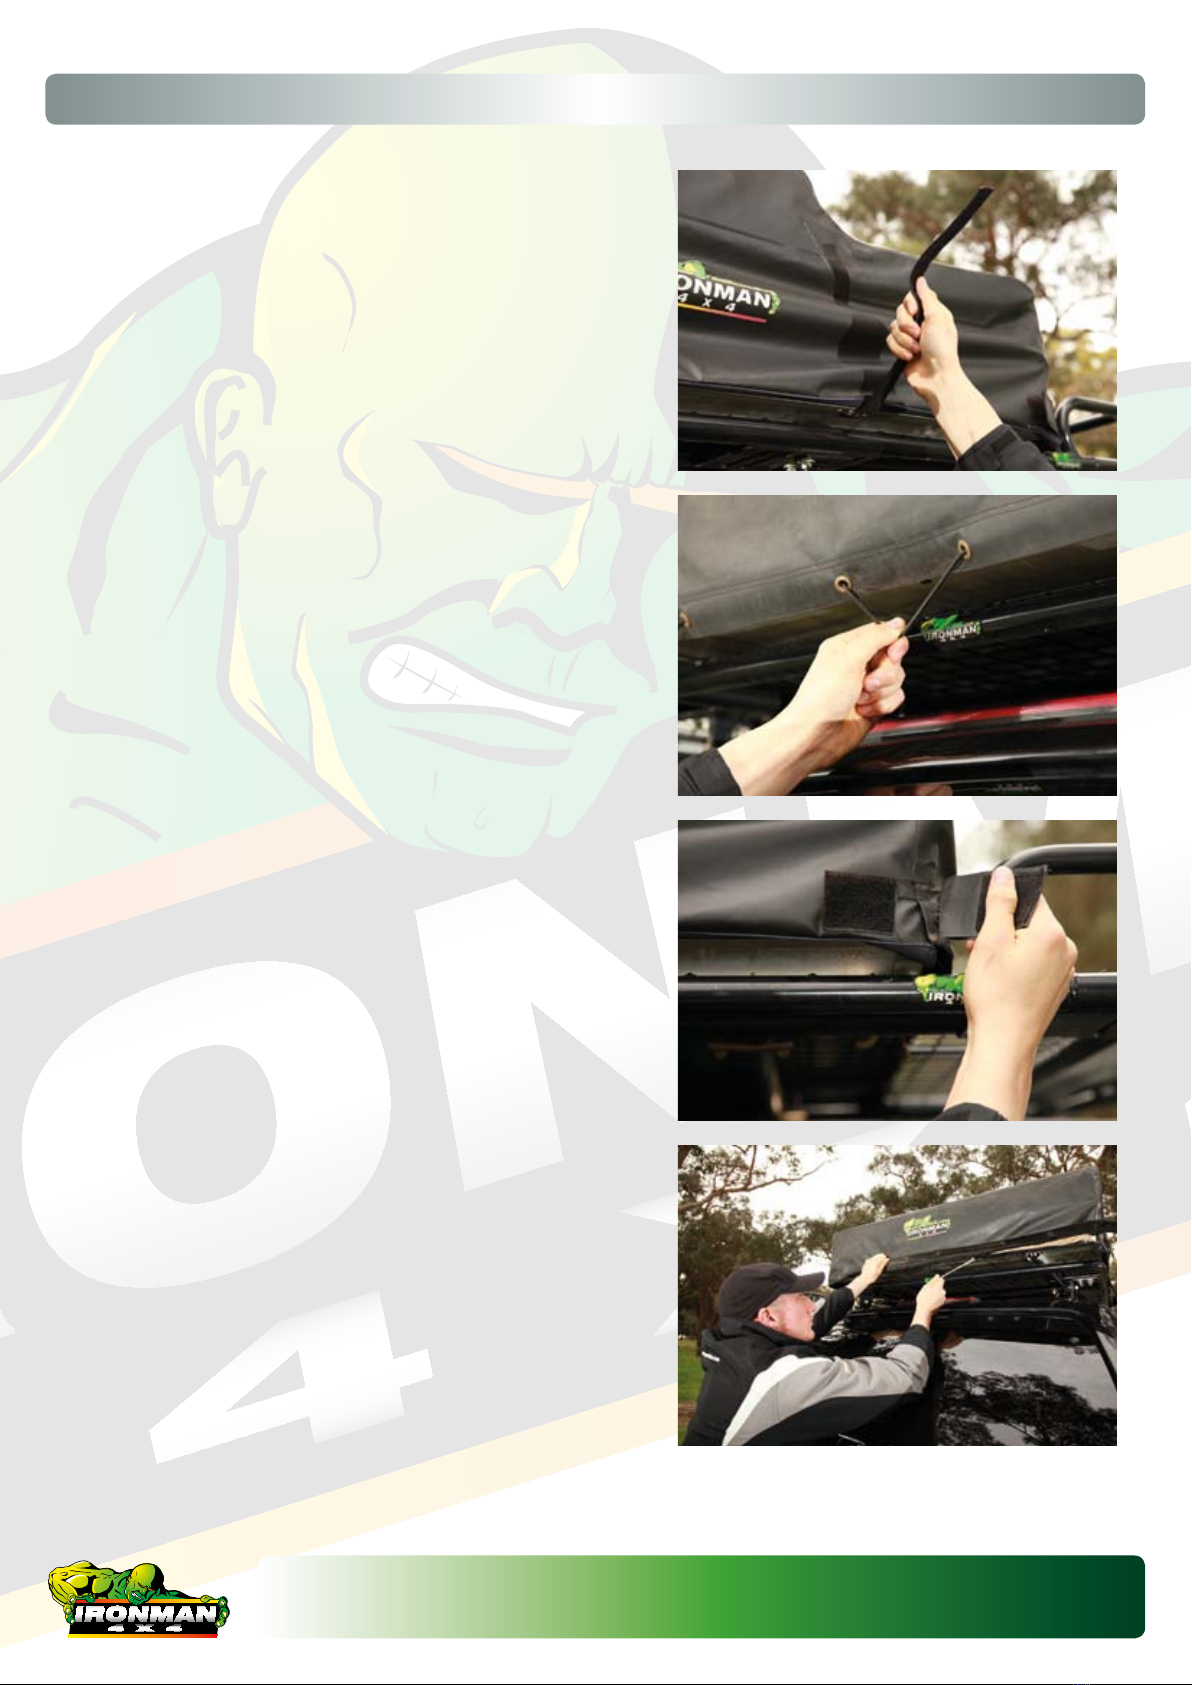
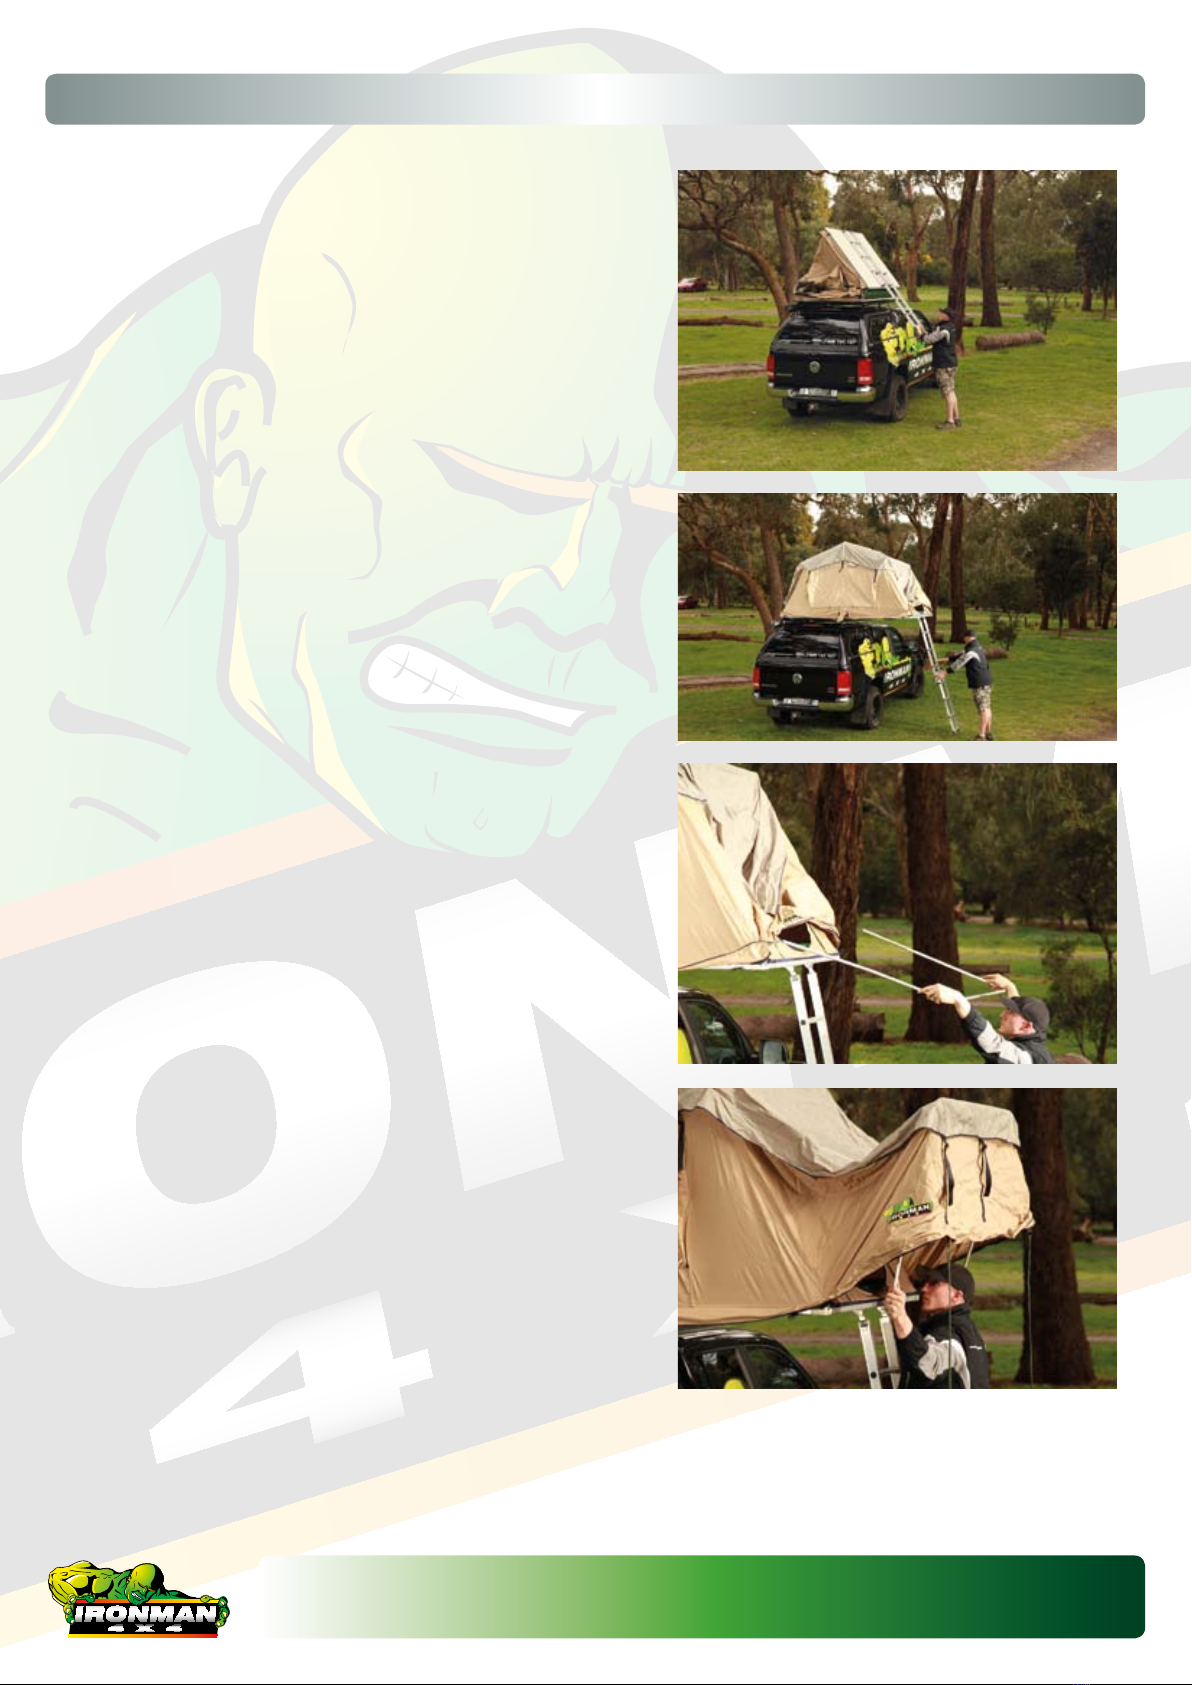
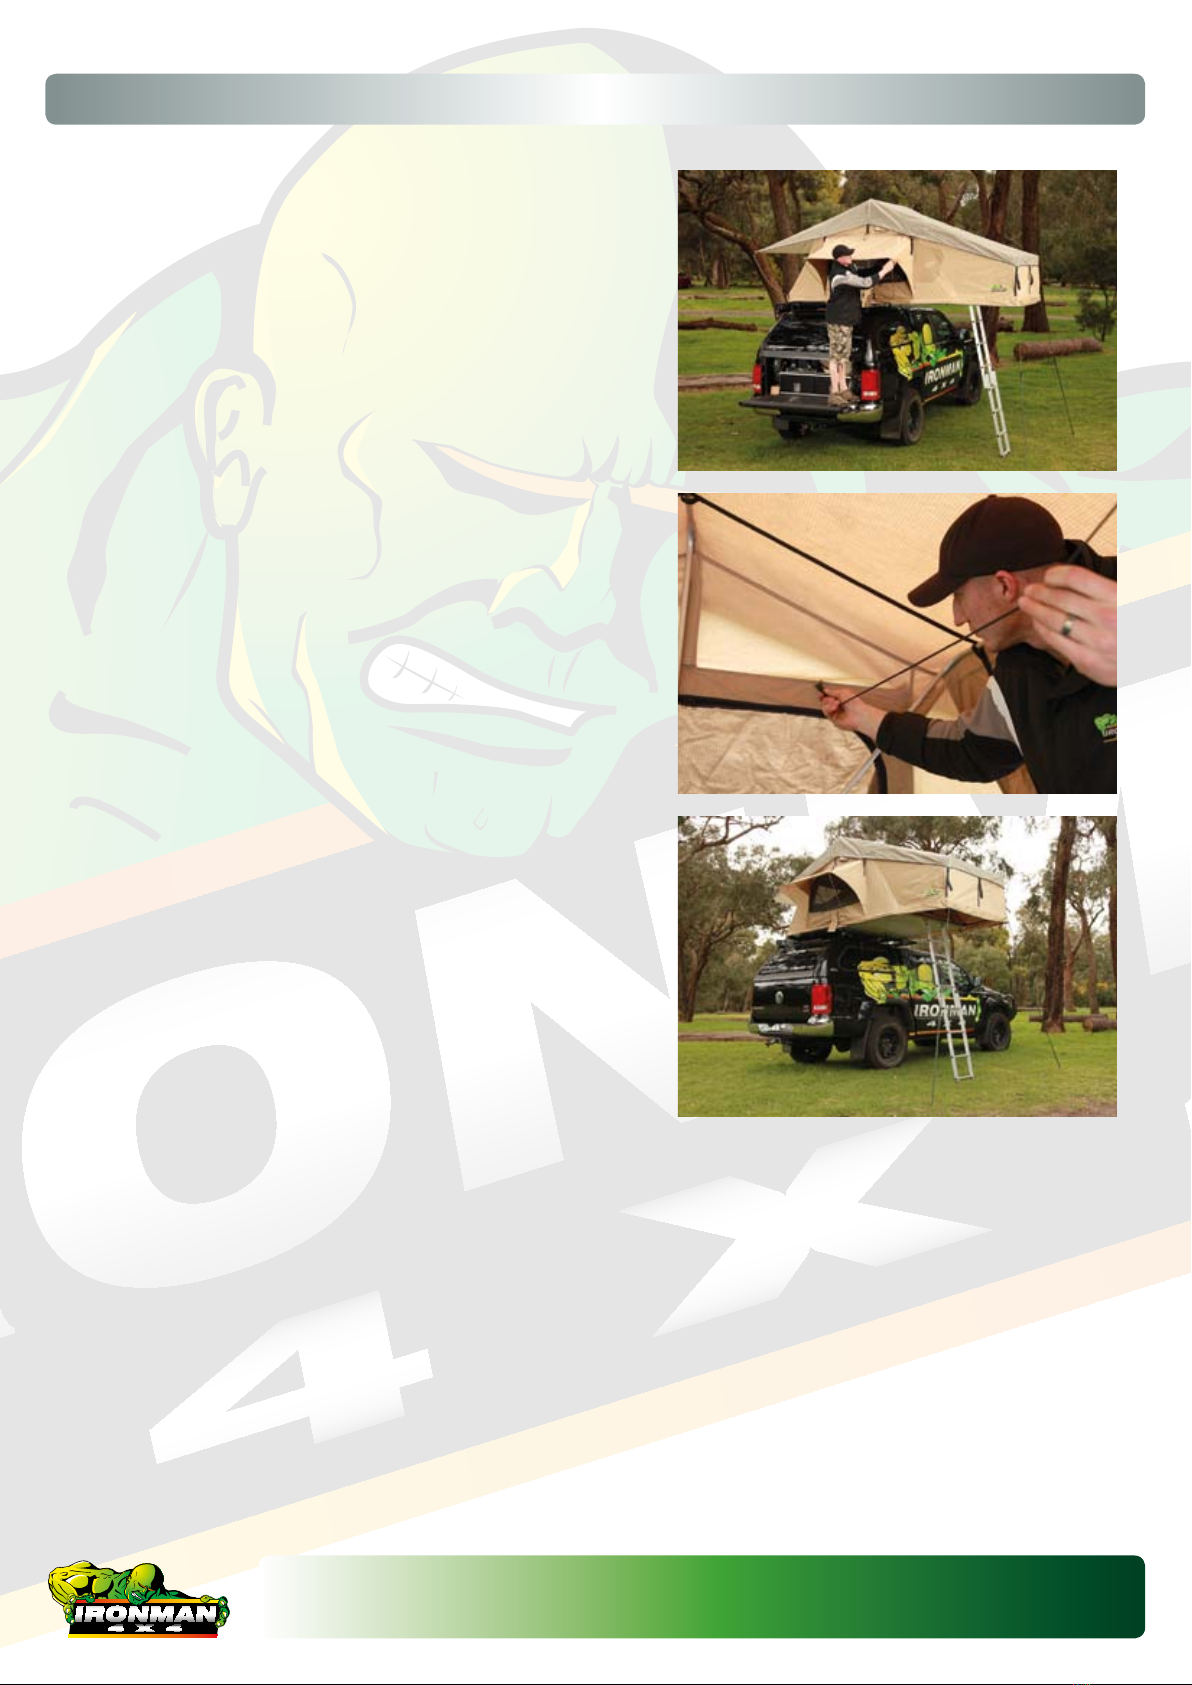
INSTALLATION HINTS
5 - 15

ROOFTOP TENT SETUP
1. Undo velcro securing straps.
2. Unhook all bungee cords from tent base.
3. Undo velcro corner straps.
4. Unzip tent cover. Care must be taken not to catch tent
material in zip.
6 - 15

ROOFTOP TENT SETUP
5. Remove tent cover.
6. Undo both velcro securing straps.
7. The two ladder locking pins require spring pressure to
engage them into the locked position. To do this, twist
locking pins in an anti-clockwise direction.
8. Slide ladder out until locking pins lock ladder into place.
7 - 15

9. Whilstpullingdownontheendoftheladder,walk
backwards away from the vehicle allowing the tent to
unfold.
10.Whententisfullyunfoldedtheendoftheladdershould
touch the ground.
Note: if your vehicle is too tall to allow the ladder to touch
the ground, a ladder extension will be required. See Pages
13 - 14.
11. Remove support bow from under mattress above ladder.
12. Slip support bow under tent opening and push into outer
corners as shown.
ROOFTOP TENT SETUP
8 - 15

ROOFTOP TENT SETUP
13. Push bow away from the tent and insert ends into bow
brackets on corners of tent base.
14. Although the tent is self-supporting, we recommend the
use of pegs and guy ropes in case of potentially windy
conditions.
15. Engage the two long support rods through eyes in canvas
into support holes in aluminium base.
Flex support rod to engage hook end with eyelet, in
corner of fly.
Eyelet Holes
9 - 15

16. Repeat step 15 using short support rods for window
awnings.
17. Remove all four bungee cords from inside of tent. These
should be refitted when packing up the tent.
18. Rooftop Tent complete.
ROOFTOP TENT SETUP
10 - 15

ANNEX SETUP
1. Slightly raise the ladder off the ground to allow easier
access to sail track on base of tent.
2. Slide material of annex into sail track as shown.
3. Attach the annex to the base of the tent via the zipper.
4. Cut outs in annex allow window support rods to be
connected.
5. Continue to zip all the way around base of tent.
11 - 15

6. Connect floor to annex via the zipper and secure annex
with pegs supplied.
7. Place rubber mat supplied, under the ladder / annex
extension to prevent damaging the floor.
Note: if your vehicle is too tall to allow the ladder to touch
the ground, a ladder / annex extension will be required. See
Pages 13 - 14.
• Packtentupinreverseordertosetup.
• Reattachedtheelasticcordstotheinsideofthetent.Thisistopullthesidesofthetentinmakingitmuch
easier to pack up.
• Whenreattachingthetentcovertothetent,extremecaremustbetakennottocatchthetentmaterialin
the zipper.
ANNEX SETUP
PACKING UP YOUR LUXURY ROOFTOP TENT
12 - 15

1. WiththeLuxuryRooftopTentpre-ttedtothevehicleand
parked on level ground, slide the ladder extension into
channels on tent ladder.
3. Twist locking pins in an anti-clockwise direction to
disengage and push firmly whilst twisting to mark locking
hole location onto ladder.
2. Withbaseofladderangledawayfromvehicle,slideladder
extension down until it contacts the ground.
LADDER / ANNEX EXTENSION
Ladder / Annex Extension will be required for vehicles that are too tall for the ladder or annex to touch the ground.
To attach the annex extension, simply connect it between the bottom of the annex and the floor via the zippers.
13 - 15

5. Slide ladder extension back up, making sure that pins
engage and lock into place.
LADDER / ANNEX EXTENSION
CARE & MAINTENANCE
• IfyourLuxuryRooftopTenthasbeenpackedupwetorhasbecomedamp,werecommendthatitbeairedoutto
prevent staining of the material.
• IfyourLuxuryRooftopTentrequirescleaning,werecommendtouselukewarmsoapywaterandacleanspongeto
wipe down the material.
14 - 15
4. Slide ladder extension down to expose marked locking hole
locations. Drill holes to 6.5mm.

WARRANTY TERMS & CONDITIONS
15 - 15
Ironman 4x4 will provide warranty to the original purchaser and only the original
purchaser of the Ironman product under the following conditions;
Ironman 4x4 will warrant against manufacturing faults and defects in material and
workmanship for a period of 12 months from original purchase date.
To obtain warranty, Ironman 4x4 or an authorised agent there of must be provided with
proof of purchase. This warranty does not cover the removal or re-installation of the
product.
Ironman 4x4 reserves the right, at its option, to repair, replace or refund the purchase
price of a faulty or defective product or its components if returned to the place of
purchase during the warranty period.
Whenreturningaproductforwarrantyassessmentitmustbeaccompaniedwiththe
customers name, address, contact phone number, a clear description of the fault and a
copy of the original sales receipt detailing the date of purchase.
This warranty does not apply to damage due to accident, misuse, abuse, misapplication,
collision, modification, improper installation or lack of improper maintenance.
THEWARRANTYSETFORTHABOVEISTHEONLYWARRANTY.THEREARENOOTHER
WARRANTIES,INCLUDINGBUTNOTLIMITEDTOIMPLIEDWARRANTIESORMERCHANT
ABILITY OR FITNESS FOR A PARTICULAR PURPOSE.
ANY IMPLIED WARRANTY WHICH BY LAW MAY NOT BE EXCLUDED IS LIMITED IN
DURATION TO TWELVE (12) MONTHS FROM THE DATE OF THE ORIGINAL RETAIL
PURCHASE OF THE PRODUCT.
NO IRONMAN 4X4 DEALER, AGENT OR EMPLOYEE IS AUTHORISED TO MAKE ANY
MODIFICATION,EXTENSIONORADDITIONTOTHISWARRANTY.
IRONMAN 4X4 SHALL NOT BE LIABLE FOR SPECIAL, INDIRECT, INCIDENTAL OR
CONSEQUENTIALDAMAGES(INCLUDING,BUTNOTLIMITEDTO,LOSTPROFITS,DOWN
TIME OR LOSS OF USE) UNDER ANY LEGAL THEORY, EVEN IF IRONMAN 4X4 WAS
ADVISEDOFTHEPOSSIBILITYOFSUCHDAMAGES.
IRONMAN4X4RESERVESTHERIGHTTOCHANGEPRODUCTDESIGNWITHOUTNOTICE.
INSITUATIONSINWHICHIRONMAN4X4HASCHANGEDAPRODUCTDESIGN,IRONMAN
4X4 SHALL HAVE NO OBLIGATION TO UPGRADE OR OTHERWISE MODIFY PREVIOUS
MANUFACTURED PRODUCTS.
Sales & service world wide
www.ironman4x4.com
LOCAL CALL 1300 731 137
Table of contents
Other Ironman4x4 Tent manuals
Popular Tent manuals by other brands

Costway
Costway NP10843 Assembly instructions

Coleman
Coleman Kenosha Pass 9278-137 instructions

Backyard Discovery
Backyard Discovery 2206038 Assembly instructions

Skandika
Skandika Canopy Gotland 6 Setup & maintenance

Ozark Trail
Ozark Trail W790 Assembly instructions

Ro-Man
Ro-Man ESCAPE II Assembly & care instructions