Isoplam A201001 User manual

USE AND MAINTENANCE MANUAL
A201001
EN
ORIGINAL
INSTRUCTIONS
Doc. 10047904
Ver. AB
ISOPISOPLAM S.R.L.
Via E. Mattei, 4 – Z. I. Maser (TV) – Italy
Tel. (+39) 0423 925023 - www.isoplam.it
Company certified UNI EN ISO 9001:2015

The descriptions contained in this document are not binding.
The company therefore reserves the right to make any modifications at any time to elements, details, or accessory
supply, as considered necessary for reasons of improvement or manufacturing/commercial requirements.
The reproduction, even partial, of the text and drawings contained in this document is prohibited by law.
The company reserves the right to make any technical and/or supply modifications. The images are shown as a
reference only, and are not binding as to the actual design and/or equipment.
SYMBOLS USED IN THE MANUAL
Open book symbol with an "i":
indicates the need to consult the instruction manual.
Open book symbol:
used to tell the operator to read the manual before using the machine.
Warning symbol:
carefully read the sections marked with this symbol and observe the indications, for the safety
of the operator and the machine.
Warning symbol:
indicates the risk of gas exhalation and leakage of corrosive liquids.
Warning symbol:
indicates the risk of fire.
Do not go near with naked flames.
Warning symbol:
indicates that the packed product should be handled with suitable lifting means that comply with
the legal requirements.
Warning symbol:
indicates that the packed product should be handled with suitable lifting means that comply with
the legal requirements concerning suspended loads.
Disposal symbol:
when disposing of the machine, carefully read the sections marked with this symbol.
ISOPISOPLAM S.R.L.
Via E. Mattei, 4 – Z. I. Maser (TV) – Italy
Tel. (+39) 0423 925023 - www.isoplam.it
Company certified UNI EN ISO 9001:2015

QUICK REFERENCE (ELECTRONIC DOCUMENT):
For quick reference of the electronic documents, use the Bookmarks and
Link Pages:
Bookmarks:
Activate the "Bookmarks" panel of the interface browser by clicking on the
relative icon (01) (the icon may vary dependingonthe Acrobat viewerversion).
To view the desired paragraph, simply click on the title in the browser (02)
that will take you to the desired destination.
Link Page:
To view the desired paragraph in the content of the document, simply click
on the title of the paragraph that will take you to the desired destination.
NB:
if the text directs you to a specific chapter or paragraph, you can go
directly to that page by clicking on the name of the paragraph in question
(the title is written in capital letters and underlined).
To return quickly to the contents of the document, simply click on the
company logo at the top of this page, and it will sends you back to the
desired destination.
01
02
ISOPISOPLAM S.R.L.
Via E. Mattei, 4 – Z. I. Maser (TV) – Italy
Tel. (+39) 0423 925023 - www.isoplam.it
Company certified UNI EN ISO 9001:2015

CONTENTS
ON CONSIGNMENT OF THE EQUIPMENT ........................................................................................................................................ 4
INTRODUCTORY COMMENT............................................................................................................................................................ 4
INTENDED USE ............................................................................................................................................................................... 4
SERIAL NUMBER PLATE.................................................................................................................................................................4
TECHNICAL DESCRIPTION..............................................................................................................................................................4
SYMBOLS USED ON THE MACHINE................................................................................................................................................ 5
GENERAL SAFETY REGULATIONS .................................................................................................................................................6
PREPARING THE MACHINE............................................................................................................................................................. 7
1. HANDLING THE PACKED MACHINE...............................................................................................................................................7
2. UNPACKING THE MACHINE .........................................................................................................................................................7
3. MOVING THE MACHINE...............................................................................................................................................................7
4. MACHINE COMPONENTS ............................................................................................................................................................8
5. COLLECTION TANK COMPONENTS...............................................................................................................................................8
6. FLOAT COMPONENTS (FOR VACUUMING LIQUIDS) ........................................................................................................................9
7. VACUUM HEAD COMPONENTS....................................................................................................................................................9
8. MACHINE SAFETY......................................................................................................................................................................9
9. INSERTING THE FILTER/COLLECTION BAG (OPTIONAL)................................................................................................................10
10. INSERTING THE NYLON FILTER (OPTIONAL)..............................................................................................................................10
11. INSERTING THE PERMANENT FABRIC FILTER (OPTIONAL)..........................................................................................................11
12. FIXING THE FRONT SQUEEGEE KIT (OPTIONAL)........................................................................................................................13
PREPARING TO WORK..................................................................................................................................................................15
13. PREPARING THE MACHINE......................................................................................................................................................15
WORK ...........................................................................................................................................................................................16
14. DRY VACUUM CLEANER .........................................................................................................................................................16
15. WET VACUUM CLEANER.........................................................................................................................................................17
16. WET VACUUM CLEANER WITH OPTIONAL FRONT SQUEEGEE KIT................................................................................................19
17. IMPROVING THE VACUUMING CAPACITY..................................................................................................................................20
AT THE END OF THE WORK.......................................................................................................................................................... 22
DAILY MAINTENANCE...................................................................................................................................................................23
18. EMPTYING THE COLLECTION TANK..........................................................................................................................................23
19. CLEANING THE ACCESSORIES................................................................................................................................................25
20. CLEANING THE FRONT SQUEEGEE (OPTIONAL) ........................................................................................................................25
WEEKLY MAINTENANCE............................................................................................................................................................... 27
21. CLEANING THE COLLECTION TANK..........................................................................................................................................27
22. CLEANING THE SPONGE FILTER..............................................................................................................................................28
23. CLEANING THE CARTRIDGE FILTER.........................................................................................................................................29
24. CLEANING THE FLOAT............................................................................................................................................................30
25. CLEANING THE PERMANENT FABRIC FILTER (OPTIONAL)...........................................................................................................31
26. CLEANING THE NYLON FILTER (OPTIONAL)...............................................................................................................................32
EXTRAORDINARY MAINTENANCE................................................................................................................................................33
27. REPLACING THE SPONGE FILTER............................................................................................................................................33
28. REPLACING THE CARTRIDGE FILTER .......................................................................................................................................34
29. REPLACING THE PERMANENT FABRIC FILTER (OPTIONAL).........................................................................................................35
30. REPLACING THE NYLON FILTER (OPTIONAL).............................................................................................................................36
31. REPLACING THE RUBBER BLADES OF THE FRONT SQUEEGEE (OPTIONAL)..................................................................................37
TROUBLESHOOTING.....................................................................................................................................................................39
32. THE MACHINE DOES NOT SWITCH ON......................................................................................................................................39
33. INSUFFICIENT VACUUM..........................................................................................................................................................39
DISPOSAL..................................................................................................................................................................................... 40
CHOOSING AND USING THE ACCESSORIES.................................................................................................................................41
EC DECLARATION OF CONFORMITY ............................................................................................................................................43
ISOPISOPLAM S.R.L.
Via E. Mattei, 4 – Z. I. Maser (TV) – Italy
Tel. (+39) 0423 925023 - www.isoplam.it
Company certified UNI EN ISO 9001:2015

Page 4
ON CONSIGNMENT OF THE EQUIPMENT
When the machine is consigned to the customer, an immediate check
must be performed to ensure all the material mentioned in the shipping
documents has been received, and also to check the machine has not
suffered damage during transportation. If this is the case, the carrier
must ascertain the extent of the damage at once, informing our
customer service office. It is only by prompt action of this type that the
missing material can be obtained, and compensation for damage
successfully claimed.
INTRODUCTORY COMMENT
A201001 is a vacuum cleaner for dusts and liquids.
The machine must be used for this purpose only. Even the best
machines will only work well ifused correctly and kept in good working
order.We therefore suggest you read this instruction booklet carefully,
and read it again whenever difficulties arise while using the machine. If
necessary, remember that our assistance service (organised in
collaboration with our dealers) isalways available for advice.
INTENDED USE
The wet/dry vacuum cleaner is designed exclusively for the
professional cleaning of surfaces and floors in industrial,
commercial and public environments. The machine is only suitable
for use in closed - or at least covered - locations.
The machine is not suitable for use in the rain, or under water jets. It is
FORBIDDEN to use the machine for picking up dangerous dusts or
inflammable liquids in places with an explosive atmosphere. In addition,
it is not suitable as a means of transport for people or objects.This
machine must only be used for the purpose for which it was built, i.e. the
cleaning of inert surfaces and the vacuum removal of solid, non-
flammable and non-explosive substances. Any other use must be
considered incorrect and hence dangerous. Make sure the working
machine does not come too close to delicate organs like the ears,
mouth, eyes, etc.
SERIAL NUMBER PLATE
The serial number plate is located on the rear of the vacuum head. It
indicates the general characteristics of the machine, in particular its
serial number.
The serial number is an extremely important piece of information
that must always be provided when requesting assistance or
purchasing spare parts.
TECHNICAL DESCRIPTION UM A201001
Power supply voltage V 230-240
Frequency
Hz
50-60
Rated power
W
1600
Type of vacuum cleaner
Wet & Dry
Number of vacuum motors
1
Vacuum
mmH
2
O - kPa
25
Air flow rate
l/s – m3/h
212
Collection tank capacity
l
80
Tank material
Polyetilene
Length of power supply cable
m
15
Dry weight kg 19
Dimensions (LxWxH)
cm
58x95x58
Diameter of accessories
mm
40
Sound pressure level (ISO 11201)
dB (A)
<70
Uncertainty K
pA
dB (A)
1.5
ISOPISOPLAM S.R.L.
Via E. Mattei, 4 – Z. I. Maser (TV) – Italy
Tel. (+39) 0423 925023 - www.isoplam.it
Company certified UNI EN ISO 9001:2015

Page 5
SYMBOLS USED ON THE MACHINE
Main switch symbol.
Used on the vacuum head, to indicate the main switch.
Symbol of the vacuum filter cleaning button.
Used on the vacuum head, to indicate the button for cleaning the vacuum filter.
ISOPISOPLAM S.R.L.
Via E. Mattei, 4 – Z. I. Maser (TV) – Italy
Tel. (+39) 0423 925023 - www.isoplam.it
Company certified UNI EN ISO 9001:2015

Page 6
GENERAL SAFETY REGULATIONS
The regulations below must be carefully followed in order to avoid harm to the operator and damage to the machine.
WARNING:
•Carefully read the warnings in this booklet. Keep it in a safe place for future consultation.
•The packaging elements (plastic bags, clips, etc.) are potential sources of danger and must not therefore be left within the reach of children,
incompetent persons, etc.
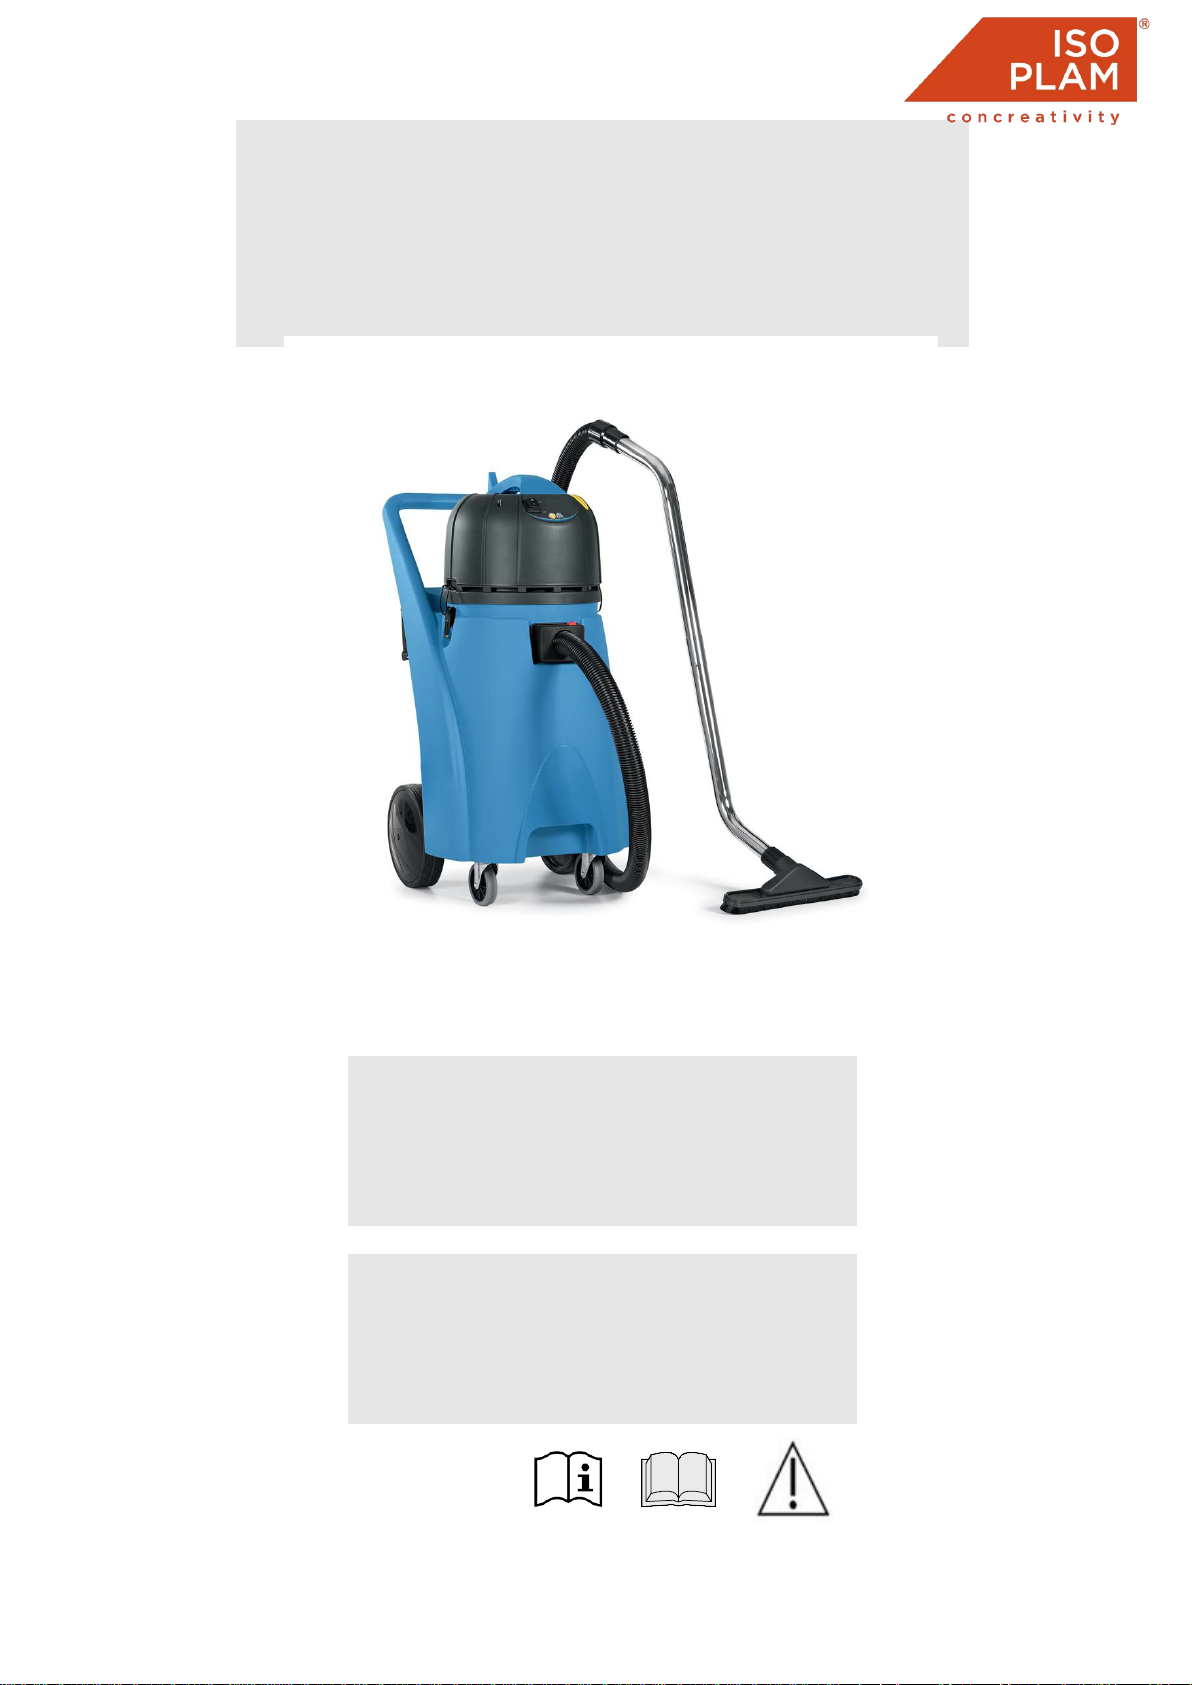
•This machine must only be used for the purpose for which it was built, i.e. the cleaning of inert surfaces and the vacuum removal of solid, non-
flammable and non-explosive substances. Any other use must be considered incorrect and hence dangerous.
•Make sure the working machine does not come too close to delicate organs like the ears, mouth, eyes, etc.
•This machine must not be used by people (including children) with reduced physical, sensorial or mental capabilities, or with no knowledge
or experience, unless supervised and instructed by people responsible for their safety.
•Children must be supervised to ensure they do not play with the device.
•Read the labels on the machine carefully. Do not cover them for any reason, and replace them immediately if they become damaged.
•The machine must only be used by authorised, trained personnel.
•Do not use the machine on surfaces with an inclination greater than the one shown on the serial number plate.
•The machine is not suitable for cleaning rough or uneven floors. Do not use the machine on slopes.
•It is important to make sure the power supply cable or extension cable is not damaged by the wheels of moving vehicles, by crushing, tearing, etc.
Protect the cable from heat, oil and sharp edges. Check the power cable regularly for damage, such as the formation of cracks or signs of ageing. If you
notice any damage, the cable must be replaced before using the machine. If you notice any damage to the power cable, contact an authorised technical
assistance centre immediately.
•In the event of danger, quickly remove the plug from the electricity socket.
•For all maintenance interventions, switch off the machine from the main switch and disconnect the power cable plug from the mains socket.
•While the machine is operating, pay attention to other people and especially to children.
•Only use the accessories supplied with the machine, or those specified in the instruction manual. The use of other accessories could compromise the
safety of the machine.
•When it is not being used, the machine must not remain plugged into the electricity supply. Before carrying out any maintenance on the machine:
disconnect the plug from the mains; do not immerse the machine in water; do not use solvents. The manufacturer cannot be held liable for any harm to
people or animals, or damage to property, resulting from any type of use considered improper and unreasonable or anyway not complying with the
above indications. When disposing of the machine, respect the regulations in force in the country of use. Do not use the vacuum cleaner with the power
supply cable wound up on the cover.
•Before connecting the machine to the power supply, make sure the electric data shown on the label correspond to those of the mains supply. The
machine must only be powered with a voltage of the level shown on the serial number plate.
•Make sure the working machine does not come too close to delicate organs like the ears, mouth, eyes, etc.
ATTENTION:
•The machine is not suitable for use by children and persons with reduced physical, mental and sensory capabilities, or people who lack experience and
knowledge.
•The machine must not be used or stored outdoors, in damp conditions or directly exposed to rain.
•The storage temperature must be between -25°C and +55°C; do not store outdoors in damp conditions.
•Conditions of use: room temperature between 0°°C and 40°°C, with relative humidity between 30 and 95%.
•The power supply cable outlet must have an earth connection in compliance with the regulatory standards.
•Do not use the machine as a means of transport for people or objects.
•The machine does not cause harmful vibrations.
•Never vacuum gases, liquids, explosive/inflammable powders, or undiluted acids and solvents! This list includes gasoline, paint thinners and
combustible oil (which, when mixed with the vacuum air, may form explosive vapours or mixtures), as well as acetone, undiluted acids and solvents,
and aluminium/magnesium powders. These substances may also corrode the materials that the device is made from.
•If the device is used in dangerous areas (e.g. petrol stations), the relative safety standards must be respected. It is forbidden to use the device in
environments with a potentially explosive atmosphere.
•Do not place any liquid containers on the machine.
•In the event of a fire, use a powder extinguisher. Do not use water.
•Do not knock against shelving or scaffolding, where there is a danger of falling objects. The operator must always be equipped with the appropriate
safety devices (gloves, shoes, helmet, goggles, etc.).
•If the machine does not work properly, check this is not caused by failure to carry out routine maintenance. Otherwise, ask for intervention of the
authorised technical assistance centre.
•If you need to replace any components, request the ORIGINAL spare parts from an Authorised dealer and/or Retailer.
•Restore all electrical connections after any maintenance interventions.
•Before using the machine, check that all the hatches and covers are positioned as shown in this Use and Maintenance Manual.Do not remove the
guards that can only be removed with the aid of tools, except for maintenance work (see the relevant paragraphs).
•Do not wash the machine with direct water jets or pressurised water, nor with corrosive substances.
•Have the machine checked by an authorised technical assistance centre every year.
•When disposing of consumable materials, observe the laws and regulations in force.When your machine has reached the end of its long working life,
dispose of the materials it contains in an appropriate manner, bearing in mind that it was constructed using 100% recyclable materials.
ISOPISOPLAM S.R.L.
Via E. Mattei, 4 – Z. I. Maser (TV) – Italy
Tel. (+39) 0423 925023 - www.isoplam.it
Company certified UNI EN ISO 9001:2015

Page 7
PREPARING THE MACHINE
1. HANDLING THE PACKED MACHINE
The machine is consigned in specific packaging. These packaging elements (plastic bags, clips, etc.) are
potential sources of danger and must not therefore be left within the reach of children, incompetent persons,
etc. The overall weight of the machine plus its packaging is 22 kg.
ATTENTION: the packaged machine must be handled in accordance with the legal
regulations relating to accident prevention and the size and weight of the package
itself.
The dimensions of the package are as follows:
A201001
A: 630 mm
B: 520 mm
C: 1040 mm
2. UNPACKING THE MACHINE
1.
Open the outer cardboard box.
2.
Remove the accessories from the box.
3.
Remove the vacuum head from its support and rest it carefully on the ground.
ATTENTION: you are advised to always wear protective gloves, to avoid the risk of
serious injury to your hands.
4. Remove the cardboard holding the vacuum head in position.
5.
Remove the vacuum hose from the collection tank.
6.
Take the machine out of the box, taking care not to damage either of them.
ATTENTION: you are advised to keep all the packaging elements for any future
transportation of the machine.
3. MOVING THE MACHINE
1.
Make sure the collection tank is empty. If this is not the case, empty it (read “EMPTYING THE
COLLECTION TANK”).
2.
Press the button (1) in the vacuum nozzle and pull on the vacuum hose (2) to remove it from the
collection tank.
ATTENTION: you are advised to always wear protective gloves, to avoid the risk of
serious injury to your hands.
ISOPISOPLAM S.R.L.
Via E. Mattei, 4 – Z. I. Maser (TV) – Italy
Tel. (+39) 0423 925023 - www.isoplam.it
Company certified UNI EN ISO 9001:2015

Page 8
PREPARING THE MACHINE
3. Insert the machine in the box, taking care not to damage either of them.Remember to place the machine
wheel restraint in the bottom of the box.
4.
Wind the vacuum hose around the collection tank.
5.
Close the box.
4. MACHINE COMPONENTS
The standard machine components are:
1. Collection tank unit
2. Kit of floats for vacuuming liquids
3. Vacuum head unit
5. COLLECTION TANK COMPONENTS
The collection tank components are:
1. Rear wheels
2. Pivoting front wheels
3. Vacuum nozzle
4. Vacuum hose coupling/uncoupling button
5. Collection tank
6. Vacuum head coupling/uncoupling hinges
7. Exhaust pipe
8. Exhaust cap
9. Collection tank drainage cap
10.Accessory-holder pocket
ISOPISOPLAM S.R.L.
Via E. Mattei, 4 – Z. I. Maser (TV) – Italy
Tel. (+39) 0423 925023 - www.isoplam.it
Company certified UNI EN ISO 9001:2015

Page 9
PREPARING THE MACHINE
6. FLOAT COMPONENTS (FOR VACUUMING LIQUIDS)
The float kit components are:
1. Float
2. Sponge filter
7. VACUUM HEAD COMPONENTS
The vacuum head components are:
1. Main switch
2. Vacuum head lifting handle bar
3. Vacuum filter cleaning button
4. Power supply cable
5. Power supply cable support hook
6. Vacuum filter
8. MACHINE SAFETY
To ensure that work is carried out in the best safety conditions, proceed as follows:
1. Make sure the collection tank is empty. If this is not the case, empty it (read “EMPTYING THE
COLLECTION TANK”).
ATTENTION: the place designated for this purpose must comply with the current
environmental protection regulations.
2. Make sure the main switch (1) is in the idle "0" position; if not, turn it to this position.
3. Make sure the plug (2) on the power supply cable (3) is disconnected from the mains socket (4). If
necessary, disconnect it.
ATTENTION: to avoid damage to the mains, disconnect the plug (2) from the socket
(4) by pulling directly on the plug (2) rather than the cable (3).
ISOPISOPLAM S.R.L.
Via E. Mattei, 4 – Z. I. Maser (TV) – Italy
Tel. (+39) 0423 925023 - www.isoplam.it
Company certified UNI EN ISO 9001:2015

Page 10
PREPARING THE MACHINE
9. INSERTING THE FILTER/COLLECTION BAG (OPTIONAL)
To insert the filter/collection bag in the collection tank, proceed as follows:
1. Make sure the machine is in a safe condition (read “MACHINE SAFETY”).
ATTENTION: you are advised to always wear protective gloves, to avoid the risk of
serious injury to your hands.
2. Free the vacuum head from the collection tank by releasing the hooks (1) on the side of the tank. Rotate
the levers as shown by the arrow in the picture on the right.
3. Use the handle (2) on the vacuum head unit to remove it from the collection tank.
4. Rest the head carefully on the ground.
5. Insert the filter/collection bag in the collection tank, taking care to insert the filter correctly in the vacuum
nozzle without damaging the cardboard support inside the bag itself.
ATTENTION: the paper filter/collection bag must only be used for collecting solid waste.
10. INSERTING THE NYLON FILTER (OPTIONAL)
To insert the nylon filter in the collection tank, proceed as follows:
1.
Make sure the machine is in a safe condition (read “MACHINE SAFETY”).
ATTENTION: you are advised to always wear protective gloves, to avoid the risk of
serious injury to your hands.
ISOPISOPLAM S.R.L.
Via E. Mattei, 4 – Z. I. Maser (TV) – Italy
Tel. (+39) 0423 925023 - www.isoplam.it
Company certified UNI EN ISO 9001:2015

Page 11
PREPARING THE MACHINE
2. Free the vacuum head from the collection tank by releasing the hooks (1) on the side of the tank. Rotate
the levers as shown by the arrow in the picture on the right.
6. Use the handle (2) on the vacuum head unit to remove it from the collection tank.
7. Rest the head carefully on the ground.
8. Insert the nylon filter (3) in the tank. To fix it in place, stick it to the edge of the tank opening.
ATTENTION: the nylon filter must only be used together with the filter/float kit or the
permanent fabric filter.
11. INSERTING THE PERMANENT FABRIC FILTER (OPTIONAL)
To insert the permanent fabric filter in the collection tank, pr
oceed as follows:
1.
Make sure the machine is in a safe condition (read “MACHINE SAFETY”).
ATTENTION: you are advised to always wear protective gloves, to avoid the risk of
serious injury to your hands.
2. Free the vacuum head from the collection tank by releasing the hooks (1) on the side of the tank. Rotate
the levers as shown by the arrow in the picture on the right.
ISOPISOPLAM S.R.L.
Via E. Mattei, 4 – Z. I. Maser (TV) – Italy
Tel. (+39) 0423 925023 - www.isoplam.it
Company certified UNI EN ISO 9001:2015

Page 12
PREPARING THE MACHINE
3. Use the handle (2) on the vacuum head unit to remove it from the collection tank.
4.
Rest the head carefully on the ground.
5. Insert the permanent fabric filter (3) in the tank.
6. Insert the filter tensioner (4) in the permanent fabric filter.
7. Use the handle (2) on the vacuum head unit to position it above the permanent fabric filter.
8. Fix the vacuum head to the collection tank by coupling the hooks (1) on the side of the tank. Rotate the
levers as shown by the arrow in the picture on the right.
ISOPISOPLAM S.R.L.
Via E. Mattei, 4 – Z. I. Maser (TV) – Italy
Tel. (+39) 0423 925023 - www.isoplam.it
Company certified UNI EN ISO 9001:2015

Page 13
PREPARING THE MACHINE
12. FIXING THE FRONT SQUEEGEE KIT (OPTIONAL)
Proceed as follows to fix the squeegee kit at the front ofthe machine:
1. Make sure the machine is in a safe condition (read “MACHINE SAFETY”).
ATTENTION: you are advised to always wear protective gloves, to avoid the risk of
serious injury to your hands.
2. Free the vacuum head from the collection tank by releasing the hooks (1) on the side of the tank. Rotate
the levers as shown by the arrow in the picture on the right.
3. Use the handle (2) on the vacuum head unit to remove it from the collection tank.
4.
Rest the head carefully on the ground.
5. Using the handle, rotate the collection tank until the handle is touching the ground.
6. Take hold of the front squeegee support (3).
ISOPISOPLAM S.R.L.
Via E. Mattei, 4 – Z. I. Maser (TV) – Italy
Tel. (+39) 0423 925023 - www.isoplam.it
Company certified UNI EN ISO 9001:2015

Page 14
PREPARING THE MACHINE
7. Use a suitable tool to fix thesqueegee support (3) to the collection tank with thescrews (5) and washers (4).
ATTENTION: remember to spread a bit of thread-locking fluid (medium resistance) on
the threaded part of the screws before tightening them on the collection tank.
8. Take hold of the front squeegee unit (6).
9.
Insert the right-hand pin (7) of the squeegee in the right-hand slot (8) of the squeegee connection.
ATTENTION: this operation can be simplified by first loosening the handwheel (9) on
the pin.
10. Repeat the same operation for the left pin.
11.
Then tighten the handwheels (9) to lock the squeegee in place.
12.
Finally, insert the vacuum hose (10) of the squeegee into the relative joint (11) of the vacuum nozzle.
13. Press the button (12) on the vacuum nozzle.
14.
Insert the vacuum hose (10) in the hole (13) on the vacuum nozzle.
ISOPISOPLAM S.R.L.
Via E. Mattei, 4 – Z. I. Maser (TV) – Italy
Tel. (+39) 0423 925023 - www.isoplam.it
Company certified UNI EN ISO 9001:2015

Page 15
PREPARING TO WORK
13. PREPARING THE MACHINE
Before beginning to work, it is necessary to:
1. Before use, it's important to check the good condition and working safety of the device with the work
equipment (especially the power supply cable and extension cable) connected. If the conditions are not
perfect, any use of the machine is forbidden.
2. Make sure the machine is in a safe condition (read “MACHINE SAFETY”).
3. Press the button (1) on the vacuum nozzle.
4. Insert the vacuum hose (2) in the hole (3) on the vacuum nozzle.
5. Select the most suitable accessory for the task to be carried out (read “CHOOSING AND USING THE
ACCESSORIES”).
6. Select the most suitable extension for the type of work to be carried out.
7. Insert the extension in the nozzle on the vacuum hose.
8. Connect the female part of the extension to the male part.
9. Insert the accessory.
ATTENTION: never use the machine without the right filter for the type of work being
carried out.
ISOPISOPLAM S.R.L.
Via E. Mattei, 4 – Z. I. Maser (TV) – Italy
Tel. (+39) 0423 925023 - www.isoplam.it
Company certified UNI EN ISO 9001:2015

Page 16
WORK
14. DRY VACUUM CLEANER
To start working, proceed as follows:
1.
Make all the checks indicated in “PREPARING THE MACHINE”.
2.
Free the vacuum head from the collection tank by releasing the hooks (1) on the side of the tank. Rotate
the levers as shown by the arrow in the picture on the right.
3. Use the handle (2) on the vacuum head unit to remove it from the collection tank.
4.
Rest the head carefully on the ground.
5. Remove the float unit from the collection tank.
ATTENTION: if you are using the paper filter/collection bag, read “INSERTING THE
FILTER/COLLECTION BAG”.
6. Use the handle (2) on the vacuum head unit to position it above the collection tank.Make sure the
machine's power supply cable is in the rear part of the tank.
7. Fix the vacuum head to the collection tank by coupling the hooks (1) on the side of the tank. Rotate the
levers as shown by the arrow in the picture on the right.
ISOPISOPLAM S.R.L.
Via E. Mattei, 4 – Z. I. Maser (TV) – Italy
Tel. (+39) 0423 925023 - www.isoplam.it
Company certified UNI EN ISO 9001:2015

Page 17
WORK
8. Insert the plug (3) of the power cable (4) in the mains socket (5).
9. Switch on the machine by bringing the main switch (6) to the work position “I”.
10.
Carry out the cleaning work.
ATTENTION: if the vacuuming intensity diminishes while you are working, read
“IMPROVING THEVACUUMING CAPACITY”.
15. WET VACUUM CLEANER
To start working, proceed as follows:
1.
Make all the checks indicated in “PREPARING THE MACHINE”.
2.
Free the vacuum head from the collection tank by releasing the hooks (1) on the side of the tank. Rotate
the levers as shown by the arrow in the picture on the right.
3. Use the handle (2) on the vacuum head unit to remove it from the collection tank.
4.
Rest the head carefully on the ground.
5. Make sure the float unit is inserted in the collection tank. If this is not the case, position it correctly.
ATTENTION: there must be no solid waste residue inside the collection tank.
ISOPISOPLAM S.R.L.
Via E. Mattei, 4 – Z. I. Maser (TV) – Italy
Tel. (+39) 0423 925023 - www.isoplam.it
Company certified UNI EN ISO 9001:2015

Page 18
WORK
6. Use the handle (2) on the vacuum head unit to position it above the collection tank.Make sure the
machine's power supply cable is in the rear part of the tank.
7. Fix the vacuum head to the collection tank by coupling the hooks (1) on the side of the tank. Rotate the
levers as shown by the arrow in the picture on the right.
8. Insert the plug (3) of the power cable (4) in the mains socket (5).
9. Switch on the machine by bringing the main switch (6) to the work position “I”.
10.
Carry out the cleaning work.
ATTENTION: if the vacuuming intensity diminishes while you are working, read
“IMPROVING THEVACUUMING CAPACITY”.
The machine is fitted with a mechanical device (float) under the vacuum lid. When the collection tank is full,
this device shuts off the air to the vacuum motor to protect it; you will recognise this condition by the deeper
noise made by the motor. When you hear this sound, you must empty the collection tank (read “
EMPTYING
THE COLLECTION TANK
”).
ISOPISOPLAM S.R.L.
Via E. Mattei, 4 – Z. I. Maser (TV) – Italy
Tel. (+39) 0423 925023 - www.isoplam.it
Company certified UNI EN ISO 9001:2015

Page 19
WORK
16. WET VACUUM CLEANER WITH OPTIONAL FRONT SQUEEGEE KIT
To start working as a wet vacuum cleaner with the optional front squeegee kit, proceed as follows:
1.
Make all the checks indicated in “PREPARING THE MACHINE”.
2.
Free the vacuum head from the collection tank by releasing the hooks (1) on the side of the tank. Rotate
the levers as shown by the arrow in the picture on the right.
3. Use the handle (2) on the vacuum head unit to remove it from the collection tank.
4.
Rest the head carefully on the ground.
5. Make sure the float unit is inserted in the collection tank. If this is not the case, position it correctly.
ATTENTION: there must be no solid waste residue inside the collection tank.
6. Use the handle (2) on the vacuum head unit to position it above the collection tank.Make sure the
machine's power supply cable is in the rear part of the tank.
7. Fix the vacuum head to the collection tank by coupling the hooks (1) on the side of the tank. Rotate the
levers as shown by the arrow in the picture on the right.
ISOPISOPLAM S.R.L.
Via E. Mattei, 4 – Z. I. Maser (TV) – Italy
Tel. (+39) 0423 925023 - www.isoplam.it
Company certified UNI EN ISO 9001:2015
Table of contents