Itek SLIMLINE I67001 User manual

www.itek-products.co.uk
SLIMLINE
DASH CAM
MODEL I67001
YOUR SAFETY &
INSTRUCTION MANUAL
PLEASE READ CAREFULLY

2
CUSTOMER SUPPORT TEAM: +44 (0) 333 220 6058
DOCUMENTATION
We declare that this product conforms to the following product legislation in accordance with the
following directive(s):
2014/30/EU Electromagnetic Compatibility Directive.
2011/65/EU Restriction of Hazardous Substances Directive.
RK Wholesale LTD Quality Assurance, United Kingdom
WARRANTY
This product is guaranteed for 12 months from the date of original purchase. If any defect arises due
to faulty materials of workmanship, the faulty products must be returned to the place of purchase.
Refund or replacement is at the discretion of the retailer.
The following conditions apply:
• The product must be returned to the retailer with proof of purchase.
• The product must be installed and used in accordance with the instructions contained in this
instruction guide.
• It must be used only for domestic purposes.
• It does not cover wear and tear, damage, misuse or consumable parts.
• RK Wholesale LTD has limited liability for incidental or consequential loss or damage.
• This guarantee is only Valid in the UK and Eire Only.
An extended warranty is available for this appliance.
See back page for details.
TECHNICAL DATA
Description: Slimline Dash Cam
Model: i67001
Power Output: DC 5V
Rechargeable Battery: Lithium 3.7V 150mAh
Car Charger:
Input power: DC 12-24V
Output: DC 5V 1 A

3
www.itek-products.co.uk
PRODUCT SAFETY
When using any electrical appliance, basic safety precautions should
always be followed including the following:
• When using any electrical
appliance, basic safety
precautions should always be
followed including the following:
• Check that the voltage of the
main circuit corresponds with
the rating of the appliance
before operating.
• Please ensure that the appliance
is used on a stable, level, and
heat resistant surface.
• DO NOT immerse cords, plugs
or any part of the appliance in
water or any other liquid.
• DO NOT leave the appliance
unattended while it is operating.
• Close supervision is necessary
when any appliance is used by
or near children or pets.
• This appliance can be used
by children aged from 8 years
and above and persons with
reduced physical, sensory or
mental capabilities or lack of
experience and knowledge
if they have been given
supervision or instruction
concerning use of the appliance
in a safe way and understand
the hazards involved.
• Children shall not play with the
appliance.
• Cleaning and user maintenance
shall not be made by children
without supervision.
• Switch o at the wall socket
then remove the plug from
the socket when not in use or
before cleaning.
• If the supply cord, adaptor for
this appliance is damaged, stop
using the appliance immediately
and seek advice from the
manufacturer or its service agent
or a similarly qualied person.
DO NOT carry on using the
supply cord or adaptor and
discard the adaptor
• DO NOT let the cord hang over
the edge of a table or counter or
let it come into contact with any
hot surfaces.
• The use of accessory
attachments is not
recommended by the appliance
manufacturer, apart from those
supplied with this product.
• DO NOT pull the plug out by the
cord as this may damage the
plug and/or the cable.
• DO NOT use this product for
anything other than its intended
use.
• This appliance is for household
use only.

4
CUSTOMER SUPPORT TEAM: +44 (0) 333 220 6058
• DO NOT carry the appliance by
the power cord.
• No naked ame sources, such
as lit candles, should be placed
on the appliance.
• DO NOT use the appliance
outdoors if there is damp
conditions.
• DO NOT use in direct sunlight.
• DO NOT spill liquid onto the
appliance. If this happens, mop
up the liquid and seek advice
from a qualied technician.
• DO NOT use next to a
swimming pool.
• DO NOT put objects into any of
the openings.
• Keep the unit free from dust, lint
etc.
• DO NOT install near any heat
sources such as radiators,
heat registers, stoves, or other
apparatus (including ampliers)
that produce heat.
• Only use attachments/
accessories specied by the
manufacturer.
• Unplug this apparatus during
lightning storms or when unused
for long periods of time.
• Please ensure that the appliance
has adequate ventilation
• Battery shall not be exposed
to excessive heat such as
sunshine, re or the like.
• Caution marking is located at
the bottom of apparatus.
• In the unlikely event the
appliance develops a fault,
stop using it immediately and
seek advice from the Customer
Support Team.
HIGH VOLTAGE

5
www.itek-products.co.uk
WHAT’S IN THE BOX
Instruction Manual
1 x Car suction mount
1 x Car Charger Cable
1 x USB to Mini USB Cable
1. Car suction mount
2. Mount connector
3. Right arrow button
4. Mode button
5. OK button
6. Menu button
7. Left arrow button
8. Power button
9. Screen
10. Mini USB Port
11. TF Card Slot
12. IR Lights
13. Lens
1
9
10
13 11
12
8 7 6 5 4 3
2
BEFORE YOUR FIRST USE:
1. Remove the product from the box.
2. Remove any packaging from the product.
3. Please retain all packaging until you have checked and counted all the parts and the contents
against the parts list.
Dispose of the packaging in a responsible manner.

6
CUSTOMER SUPPORT TEAM: +44 (0) 333 220 6058
USING YOUR APPLIANCE
Powering On and Off
The power switch is located on the left side of
the dash-cam.
Power options:
• Using with the built-in battery: The car
cam can be turned on and o after it has
been placed in the vehicle by pressing the
power switch for 3 seconds.
• In-car connection: When it is connected
to the car charger, the dash-cam will
automatically power on and record when
the car starts. When the car stops, the
dash-cam will turn o and save the latest
le.
CHARGING
Note: if you do not wish to charge the dash-
cam battery, the dash-cam can be used with
In-car connection.
Charging with the USB to Mini USB cable:
Connect the Mini USB end of the cable to the
dash-cam. Connect the other end of the cable
to your computers USB slot. The dash-cam
can be charged when it is switched o. During
charging, the indicator light will be red. Once
the battery is fully charged, the red light will
turn o.
Charging with the Car Charger:
Connect the Mini USB end of the car charger
to the dash-cam. Connect the other end of
the car charger into your vehicles outlet. The
dash-cam can be charged when it is switched
o. During charging, the indicator light will be
red. Once the battery is fully charged, the red
light will turn o.
Note: you cannot charge your dash-cam in the
car with the USB cable.
Micro SD card:
When a Micro SD card is inserted into the
dash-cam, the dash-cam will automatically
store the data on the Micro SD card.
1. Insert the Mirco SD card (not included)
into the card slot, paying attention to the
marking on the dash-cam in order to
insert the card correctly. Gently push the
card into the slot until you hear a faint
‘click’ sound.
2. To eject, push the Micro SD card gently
and it will pop up automatically. You can
now remove the card and store in a safe
place.
Micro SD card troubleshooting:
What size
Micro SD card
can be used?
The dash-cam supports
Micro SD cards of up to
32GB.
The screen
is showing
that the Micro
SD card is
incompatible.
Please eject the card and
reinsert.
What happens
if the Micro
SD card
is inserted
incorrectly?
If the card is inserted
incorrectly, it may damage
both the dash-cam and
the Micro SD card. Always
take care when inserting
the card and pay close
attention to the insertion
markings on the camera.

7
www.itek-products.co.uk
Using your Dash-cam and Mode selection:
Press the power switch on the left of the
appliance to switch the dash-cam on.
The mode button allows you to cycle through
the dierent modes:
• Video Camera & Night Recording
• Camera
• Sound Recording
• Playback
Press the mode button to move between the
modes.
Video Camera:
The dash-cam will automatically enter video
camera mode when rst turned on.
The blue LED indicator will turn on and the
red dot on the screen will blink to indicate it is
recording.
The recorded le will be saved on the Micro SD
card.
The recording will automatically stop once the
car stops.
To manually record, press the OK button whilst
in video camera mode. Press the OK button
again to stop recording.
Night Recording:
Turn the dash-cam on. Short press the power
button to begin night-time recording.
Press the OK button to begin recording audio.
The blue LED indicator will turn on and the
red dot on the screen will blink to indicate it is
recording.
Press OK to stop recording.
The recorded le will be saved on the Micro SD
card.
Camera:
Turn the dash-cam on and press the Mode
button once to enter into camera mode.
Press the OK button to take a photo. The
screen will ash when the photo has been
taken, and the image will saved onto the Micro
SD Card.
Audio:
Turn the dash-cam on and press the Mode
button twice to enter audio mode.
Press the OK button to begin recording audio.
The blue LED indicator will turn on and the
red dot on the screen will blink to indicate it is
recording.
Press OK to stop recording.
The recorded le will be saved on the Micro SD
card.
Playback:
Turn on the dash-cam and press the Mode
button three times to enter playback mode.
Use the right and left arrow buttons to scroll
through the saved les.
MENU
In any mode, press the Menu button to open
the menu. Each mode has specic menu
options. Use the arrow buttons to navigate
the menu and press OK to select and conrm.
Press the menu button close.
Video Mode:
Size: Select 1080P/720P/VGA
Time Stamp: Select O/On
This setting allows you to select whether
you would like a date or time stamp on your
images. It is recommend to use the time stamp
on your images when using your car cam.
Ensure that you have set the correct time
on the universal menu before choosing this
setting.

8
CUSTOMER SUPPORT TEAM: +44 (0) 333 220 6058
Motion Detect: Select O/On
The motion detection setting switches the unit
to standby when there is no movement i.e.
when the car is parked. If motion detection is
set to ON, the camera will start lming when it
detects movement.
Video Time: Select O/1 Min/3 Min/5
Min/10 Min
This setting allows you to select the running
length of each video to be stored.
Voice record: Select On/O
Use this setting to turn on/o the audio
recording function.
Camera Mode:
Size: Select 3M/2M/1.3M/VGA
This setting allows you to select the camera
image resolution. The resolution is the amount
of detail the camera can capture. The higher
the resolution selected, the more detail can be
seen.
PLAYBACK MENU OPTIONS
Turn on the dash-cam and enter into playback
mode. Press the Menu button to open the
menu. Use the arrow buttons to navigate the
menu and press OK to select and conrm.
Press the menu button close.
Delete:
1. To delete a le, select the le you want to
remove and then press the menu button.
2. When the menu opens, ‘delete’ will be
highlight. Press the OK button to select.
3. Select ‘delete one’ or ‘delete all’ using the
arrow buttons, and press OK to conrm.
4. The screen will now show ‘Cancel’ or
‘Execute’. Use the arrow buttons to select
‘Execute’.
5. Press okay to conrm. The le is now
deleted.
Lock/Unlock
As well as deleting a le, you can also choose
to lock a le. This means the les will not be
overwritten or deleted until you unlock it.
1. As before, open the playback menu.
2. Use the arrow buttons to select Lock/
Unlock and press OK.
3. The following options will display on the
screen:
• Lock One
• Lock All
• Unlock One
• Unlock All
4. Use the arrow keys to select one of the
options and then press OK.
5. The screen will now show ‘Cancel’ or
‘Execute’. Use the arrow buttons to select
‘Execute’.
6. Press OK to conrm. The le(s) are now
locked.
Thumbnail:
This allows you to display the les in playback
mode as thumbnails.
1. Open the playback menu.
2. Use the arrow buttons to select Thumbnail
and press OK.
3. The screen will now show ‘Cancel’ or
‘Execute’. Use the arrow buttons to select
‘Execute’.
4. Press OK to conrm. The les will now
be displayed as thumbnails in playback
mode.

9
www.itek-products.co.uk
Volume:
This gives you the options to turn o the beep
that sounds as you use the buttons on your
dash-cam. Select 0 (o) to 6 (loudest).
SETUP MENU
Turn on the dash-cam. Press the Menu button
twice in any mode to open the setup menu.
Use the arrow buttons to navigate the menu
and press OK to select and conrm. Press the
menu button close.
Format: Select Cancel/Execute
It is important to frequently format the SD card
in your dash-cam. This helps to ensure no
fragmented les clog up your SD card or aect
the running of your dash-cam.
Before formatting your dash-cam SD card
ensure all the les you want to keep are safely
stored on a PC.
Language: Select between 12
languages, including - English/Traditional
Chinese /Japanese/French/German/Italian/
Portuguese/Spanish
This selection allows you to change the
language. The default language is English.
Screen Saver: Select O/1 Min/3 Min/5 Min
This selection allows you to choose the length
of time before the screen saver activates.
Auto Off: Select O/1 Min/3 Min/5 Min
This selection allows you to choose an auto
power o time.
System Reset: Select Cancel/Execute
This setting allows you the reset to default
settings.
Light Frequency: Select 50/60Hz
This selection allows you to change the
frequency. The default frequency is 50 Hz.
Date Input: This selection allows you to
set the date and time.
The display will show YY/MM/DD and 00:00.
Use the arrow keys to select the correct year,
and then press OK to conrm, and so on.
USB: Select PC Cam/Disk Drive
Version: This selection shows you the
version number.
USB MODE:
Connect the USB to Mini USB cable to the
USB drive on your computer or laptop.
Connect your dash-cam to the Mini USB end
of the cable.
Accessing your files on a computer:
1. Connect the dash-cam to a computer
using the included USB cable. Ensure the
cable is inserted correctly.
2. The “Removable disk” icon will appear on
the computer’s taskbar. Select to open
les.
3. The recorded les will be stored similar
the contents of a ash drive.
4. Power the device by keeping the On/O
button pressed for 3 seconds.

10
CUSTOMER SUPPORT TEAM: +44 (0) 333 220 6058
IN CAR USE:
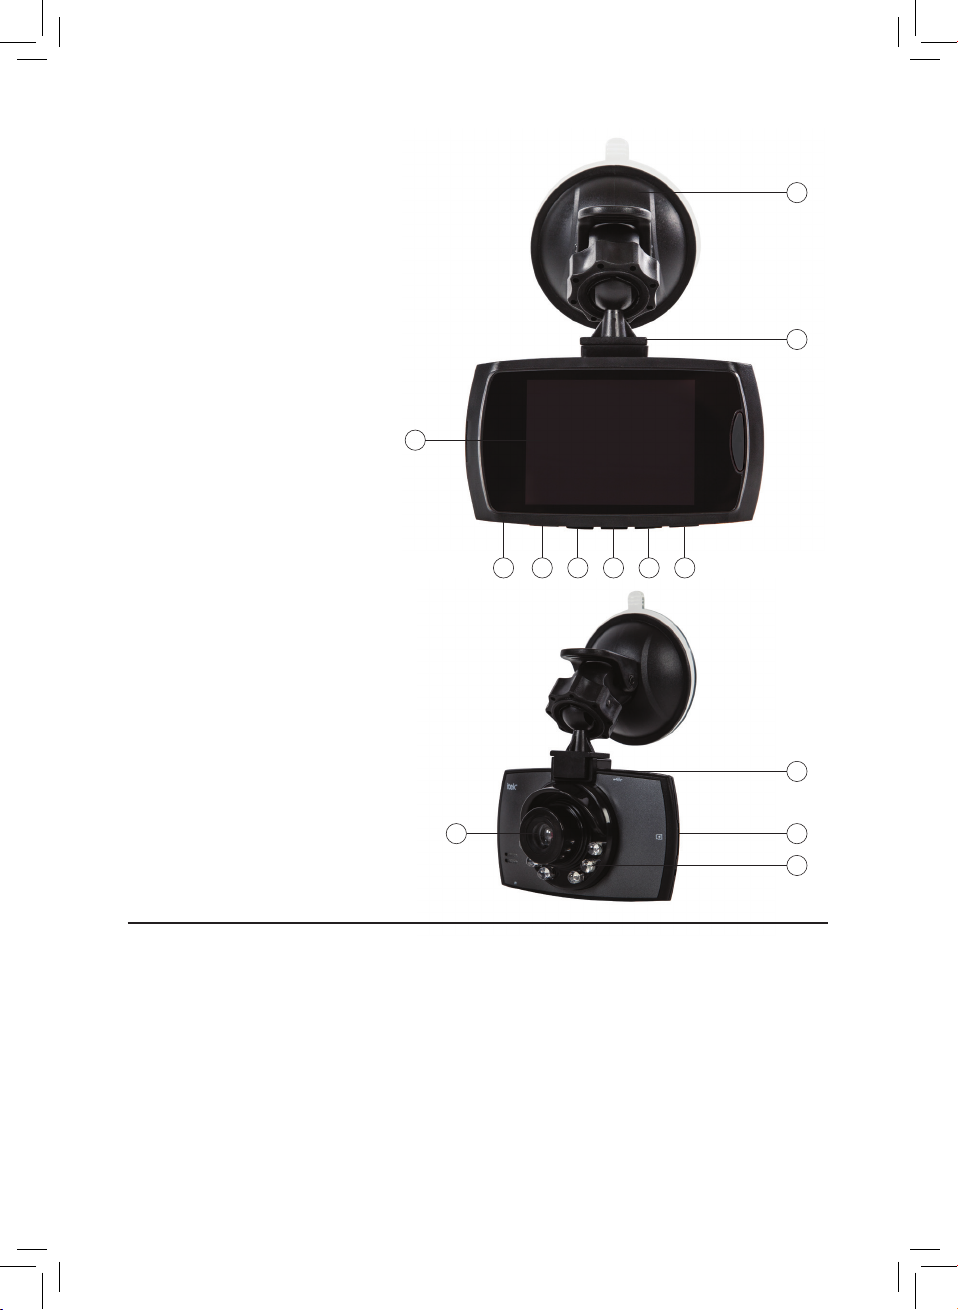
1. Attach your dash-cam to the suction
mount by sliding it onto the connector on
to the top of the mount.
2. Press the suction cup on to the
dashboard.
3. Push the suction lock downwards so it
snaps into places and locks the suction
cup.
4. Loosen the screw of the mount to angle it
in place. Tighten the screw to lock it into
position.
5. Gently pull on the suction mount to ensure
it is tted securely.
6. Plug the car charger cable in to your car’s
cigarette lighter and connect it to the USB
port on your dash-cam. The dash-cam
will automatically power on and start
recording.
7. If you have set the motion detection
setting, the dash-cam will not begin
recording until you move the car out of the
parked position.
8. If the dash-cam does not automatically
power on, turn it on manually using the
power button on the left of the camera.
Note: For in-car use the product dash-cam
must be used with the supplied car charger
cable. If the dash-cam is used with the USB
cable plugged into a USB port in the car, the
camera will automatically try to pair with a PC.
CLEANING & CARE:
• The camera needs very little maintenance
however the casing may become slightly
dirty. To clean use a damp soft clean cloth
and for stubborn stains a small amount
of detergent may be used on the outer
casing of the camera.
• IMPORTANT: Do not allow the camera
to get wet. Do not immerse in water.
Exposure to excess water can damage
the screen and camera.
• It is recommended that a commercial lens
cleaner is used to prevent damage to the
lens surface.
• This Unit is best stored in a cool dry
environment away from bright light and
dust.
• Remove all media when storing the
camera.
WARNING:
DO NOT IMMERSE ANY ELECTRICAL PART
OF THE APPLIANCE IN WATER SUCH AS
MOTOR UNITS OR PLUGS.
PLEASE SEE CLEANING SECTION FOR
FURTHER INSTRUCTIONS.
DISPOSAL OF THE UNIT
Appliances bearing the symbol shown here
may not be disposed of in domestic rubbish.
You are required to dispose of old electrical
and electronic appliances like this separately.
Please visit www.recycle-more.co.uk or
www.recyclenow.co.uk
for access to information about the recycling
of electrical items.
Please visit www.weeeireland.ie for access to
information about the recycling of electrical
items purchased in Ireland.
The WEEE directive, introduced in August
2006, states that all electrical items must be
recycled, rather than taken to landll.
Please arrange to take this appliance to your
local Civic Amenity site for recycling, once it
has reached the end of its life.

11
www.itek-products.co.uk
TROUBLESHOOTING
Questions Answers
How can I view my
les on a computer?
You can attach the camera to your computer via the USB cable, OR you
can use a card reader and access your les on your computer directly
from the camera’s SD card.
My dash-cam keeps
switching itself o.
Go into the dash-cam menu and check to ensure you do not have auto
shut-o on, or a screen saver set. If you do, return these options to ‘OFF’.
I can’t record video.
Check that you have inserted the SD card correctly and that there is
enough free space on the SD card to record.
Also check that the dash-cam has enough battery to record.
Image has cross strip
interference.
The light frequency is incorrect. Try swapping between 50Hz and 60Hz
depending on your local power supply values.
Image is blurred. Clean the camera lens and the windshield of your car. Dust, ngerprints or
any dirt will obscure the lens and aect the image clarity.
Dash-cam shows
wrong screen when
used in car.
If the dash-cam is used with the USB cable plugged into a USB port in a
car then the camera will think it is being paired to a PC.
For in-car use the product must be used with the supplied charging
adaptor.
If used with the supplied power adaptor the dash-cam will turn itself on
and begin to record.

We hope you enjoy your appliance for many years.
As a thank you for purchasing one of our fantastic products,
we are oering you an extra 1 year peace of mind.
*To receive your extra guarantee period, register your appliance online
within 28 days of purchase by visiting:
www.itek-products.co.uk
Make sure to retain your original receipt.
Should you have a problem
with your appliance or need any spare parts please call our
Customer Support Team on:
+44 (0) 333 220 6058
Distributed throughout the UK by RK Wholesale LTD
0218.V3
Table of contents