IVT GBC-52 User manual

www.ivt-ht.com | tools for every use
GBC-52
EN Gasoline brushcutter 8 - 17
DE Motorstrauchschneider 18 - 31
RU Бензомоторный кусторез 32 - 45
KZ Бензомоторлы қырыққыш 46 - 59
PL Kosa spalinowa 60 - 71
BE Бензаматорны кустарэз 72 - 85
IT Decespugliatore a benzina 86 - 97
FR Débroussailleur à moteur 98 - 111

2
EN CONGRATULATION!
Dear customer,
IVT team would like to thank you for your choice and for
the condence you put in our product.
Our aim is always to offer an innovative, high-class-
strong and prize-adequate product to the customer.
We wish you’ll get much satisfaction from all your do-it-
yourself activities, by using this tool.
Y
our IVT Swiss SA Team
NOTE: Illustrations, gures, photos and contents might
vary slightly due to our program of continuous product
improvements.
DE WIR GRATULIEREN!
Sehr geehrter Kunde,
das Team der Firma IVT dankt Ihnen für Ihr Vertrauen
und für die Wahl unserer Produktion.
Wir streben danach, damit unsere Kunden die Möglichkeit
haben, nur moderne, feste und hochwertige Produkte zu
benutzen.
Wir hoffen, dass mit unseren Werkzeugen Sie ein
wirkliches Vergnügen von der Arbeit bekommen.
Mit freundlichen Grüßen, Team IVT Swiss SA
ANMERKUNG: Bilder, Mengenangaben, Fotos und der
Inhalt der Anleitung können sich kraft der ständigen
Nacharbeit unserer Produktion verändern.
RU ПОЗДРАВЛЯЕМ!
Уважаемый Покупатель,
Коллектив компании IVT благодарит вас за оказанное
доверие и выбор в пользу нашей продукции.
Мы стремимся к тому, чтобы у наших покупателей
была возможность пользоваться только
современными, прочными и высококачественными
продуктами.
Надеемся, что с нашими инструментами вы получите
истинное удовольствие от работы.
С уважением, коллектив IVT Swiss SA
ПРИМЕЧАНИЕ: Рисунки, количественные
данные, фотографии и содержание инструкции
могут изменяться в силу постоянного
усовершенствования нашей продукции.
KZ ҚҰТТЫҚТАЙМЫЗ!
Құрметті сатып алушы,
IVT компаниясының ұжымы Сізге бізге сенім
артқаныңыз үшін және біздің өнімімізді таңдағаныңыз
үшін алғыс білдіреді.
Біз Сіздерге инновациялық, жоғарғы классты және
жоғары сапалы өнімді тиімді бағамен ұсынуға үнемі
ұмтылып келеміз.
Біздің құралдарыңызбен сіз өз жұмысыңыздан
рахаттанасыз деп үміттенеміз.
Ізгі ниетпен, IVT Swiss SA ұжымы
ЕСКЕРТУ: Суреттер, сандық мәліметтер және
нұсқаудың мазмұны біздің өнімнің үздіксіз жетілуіне
байланысты өзгеруі мүмкін.

3
PL GRATULUJEMY!
Szanowny Kliencie,
Załoga rmy IVT dziękuje Państwu za okazane
zaufanie i wybranie naszego produktu. Dążymy do
tego, aby nasi klienci mieli możliwość użytkowania
jedynie nowoczesnych, trwałych i wysokojakościowych
produktów.
Mamy nadzieję, że używając naszych narzędzi będziecie
Państwo mieć prawdziwą satysfakcję z pracy.
Z poważaniem, załoga IVT Swiss SA
UWAGA: Rysunki, dane ilościowe, fotograe i treść
instrukcji mogą ulegać zmianom z powodu doskonalenia
naszych produktów.
BE ВІНШУЕМ!
Паважаны Кліент,
Кампанія IVT дзякуе Вам за выбар і давер, аказаны
нашай марцы. Наша мэта - заўсёды прапаноўваць
Вам інавацыйны, якасны інструмент па прымальнай
цане.
Спадзяемся, што з нашымі інструментамі вы
атрымаеце задавальненне ад працы.
Кампанія IVT Swiss SA
НАТАТКА: Малюнкі, колькасныя дадзеныя,
фатаграфіі і ўтрыманне інструкцыі могуць
змяняцца ў сілу сталага ўдасканалення нашай
тавараў
IT CONGRATULAZIONI!
Gentile cliente,
l’azienda IVT desidera ringraziarLa per la scelta e per la
ducia dimostrata nel nostro prodotto.
Il nostro obiettivo è offrire sempre prodotti innovativi che
garantiscano un adeguato rapporto qualità/prezzo.
Le auguriamo che i suoi lavori di bricolage possano
diventare un piacere, utilizzando il nostro prodotto.
La squadra IVT Swiss SA
Nota: illustrazioni, gure, foto e contenuti potrebbero
variare leggermente a causa del nostro programma di
continuo miglioramento del prodotto.
FR FÉLICITATIONS!
Cher client,
Le personnel de l’entreprise IVT vous remercie pour votre
choix et la conance que vous portez à nos produits.
Notre objectif est d’offrir à nos clients le plus moderne
des produits, le plus sûr et de meilleure qualité à un prix
raisonnable.
Nous souhaiterions que votre travail manuel soit, grâce à
notre appareil, un véritable plaisir.
Le personnel de l’entreprise IVT Swiss SA est toujours à
votre disposition.
REMARQUE: Les images, observations quantitatives,
photographies et le contenu du manuel peuvent
sensiblement changer du au perfectionnement
permanent de notre produit.

4
1
10
13
14
11
2
21
22
20
5
4
7
9
19
28
30
6
8
3
36
GBC-52

5
[F1] [F2]
[F3]
[F4] [F5]
12 2
5
8
4
6
10 1311
34 14 33 9
12

6
15
32
28
16
17
30
34 14 33
37
26
35
13
24
7
[F7]
[F9]
[F8]
[F10] [F11]
[F6]

7
0.7 - 0.8 mm
31
32
2928
18
27
23
38
7
[F15]
[F16] [F17]
[F18]
[F13]
[F14]
[F12]

8
EN
Instruction manual
PART LIST
1. Engine housing
2. Clutch cover
3. On/Off switch
4. Front handle
5. Handle bracket assembly
6. Main shaft
7. Cutting line
8. Locking knob
9. Cutting head
10. Safety guard
11. Safety guard bracket
12. Guard extension
13. Brushcutter blade
14. Gearhead
15. Recoil starter
16. Choke lever
17. Fuel pump
18. Fuel lter
19. Strap hanger
20. Throttle set button
21. Throttle lock-out
22. Throttle lever
23. Cutting head cover
24. Cutting line feed button
25. Line cutter
26. Blade protector
27. Idling speed screw
28. Air lter cover
29. Filter element
30. Fuel tank plug
31. Spark plug
32. Spark plug cap
33. Inner ange
34. Metal bar
35. Locking nut
36. Shoulder strap
37. Outer ange
38. Trimmer spool
CONTENT OF THE BOX
Instruction manual (1 pc), cutting head with trimmer
spool (1 set), brushcutter blade (1 pc), mixing canister
(1 pc), combination wrench (1 pc), shoulder strap
assembly (1 pc), hex key (2 pcs), screws and nuts set (1
pc), screwdriver (1 pc), spark plug spanner (1 pc), line
cutter (1 pc), safety guard (1 pc), guard extension (1 pc).
INTENDED USE
This tool is intended for cutting lawns and small
areas of grass or similar soft vegetation in private and
TOOL SPECIFICATIONS
Model GBC-52
Rated power [W] 1750
Max. speed [RPM] 9000
Idle speed [RPM] 3000
Displacement [cc] 52
Nr. of strokes of engine 2
Type of engine cooling air cooled
Type of fuel unleaded gasoline
Mixture ratio [gasoline:oil] 25:1
Employed gasoline 90# gasoline
Fuel tank capacity [ml] 1200
Fuel consumption [g/kwh] 355
Max. cutting diameter (cutting line) [mm] 355
Blade diameter [mm] 230 (3 teeth)
Cutting line diameter [mm] 2
Reserve of the cutting line [m] 2
Vibration level [m/s2] 9.12 (K=1.5)
Sound pressure level [dB(A)] 94.5 (K=3)
Sound power level [dB(A)] 110.2 (K=3)
Weight [kg] 7.5

9
EN
Instruction manual
hobby gardens and along bed edges, if equipped with
appropriate cutting attachment.
The device is not allowed to be used in public gardens,
parks, sports centres or at roadsides as well as in
agriculture and forestry.
SAFETY REGULATION FOR THE USE
General safety rules
The following listed safety instructions should serve you
for the right use of the tool and for the protection of your
own safety, therefore, please read this very carefully.
When passing this tool to a third person, these
instructions must be handed too.
Retain this user’s manual and all other literature supplied
with your tool for any future reference.
Comply with all the safety information and the warnings
on the tool.
Be familiar with the controls and the proper use of the
tool before attempting to use it and above all, make sure
you know how to stop to use it in case of emergency.
Following these simple instructions will also maintain
your tool in good working order.
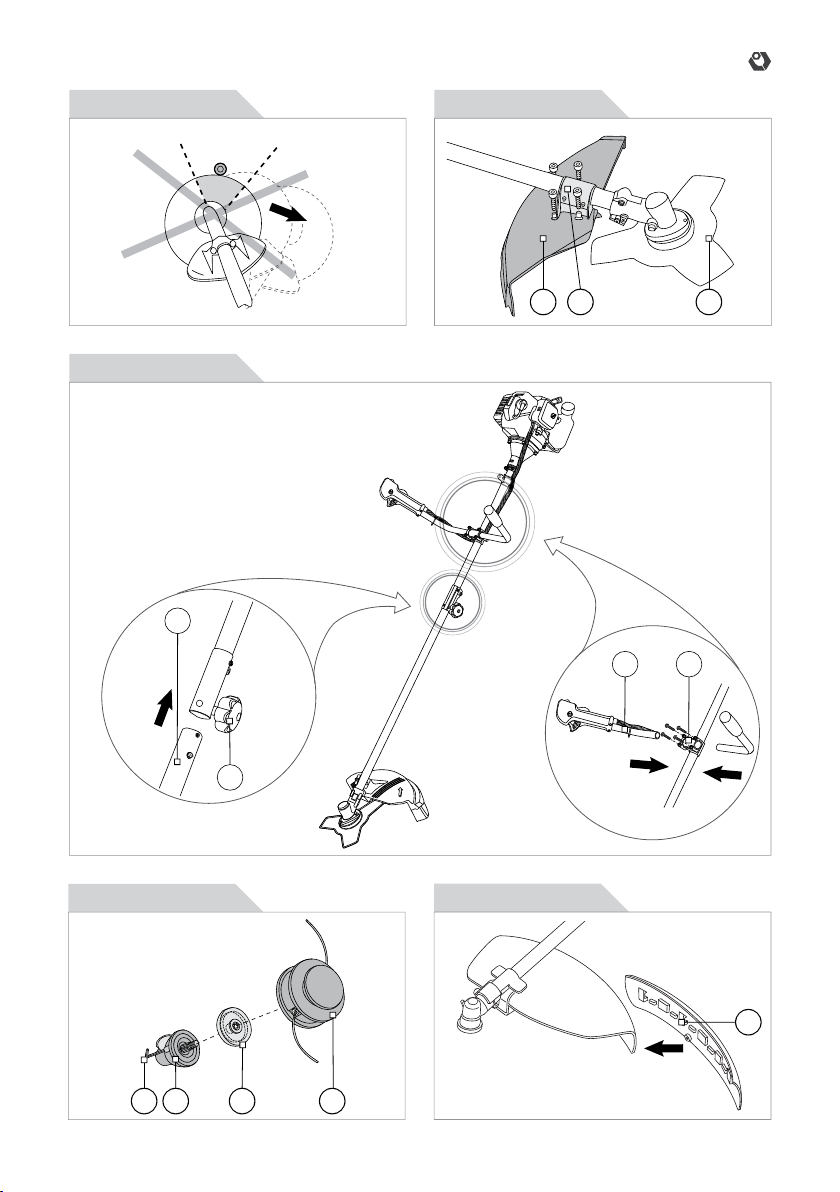
∙The tool must be assembled correctly before use.
∙Only use the tool for its designed purposes.
∙On the tool, there may be also decals and further
indications about the safety equipment to use that
must be considered. The prevention of accidents is
dependent upon the awareness, common sense and
proper training of everyone involved in the operation,
transport, maintenance and storage of the tool.
∙Never leave the tool unattended.
∙Never allow children to use the tool. Children
should be supervised to ensure that they do not play
with the tool.
∙Keep children and pets away. All onlookers should
be kept at a safe distance away from the tool when it
is in use.
∙The user is responsible for third parties while
working with the tool.
∙People who aren’t acquainted with the operating
instructions, children, juveniles who have not yet
reached the minimum age for using this tool and people
under the inuence of alcohol, drugs or medication
are not allowed to use the tool. Local regulations may
restrict the age of the operator.
WARNING! The consumption of
alcohol, medication and drugs, plus
states of illness, fever and fatigue will
affect your ability to react. Do not use
this tool in any of these situations.
∙Make sure that all the protective devices (if present)
are tted and are in good condition.
∙Never operate the tool with defective safety devices
or guards (if present), or without safety devices in place.
∙Inspect the entire tool to look for loose parts (e.g.
nuts, bolts, screws, etc.) and for any damage. Check
at frequent intervals if screws and bolts (if present)
are properly tight to be sure the equipment is in safe
working condition. Repair or replace them, if necessary,
before using the tool. Serious injury to the operator and
to the bystanders could result if there’s any damage to
the tool.
∙While using the tool, dress properly. Do not
wear loose clothing or jewelery that could become
caught by the tool. Wear suitable working clothes.
It is recommended that legs and feet are covered, to
protect them from eventual ying debris. Do not work
barefoot or wearing open sandals. Long air should be
tided back.
∙Keep handles and grips dry, clean and free from
oil and grease.
∙Use proper protective equipment. Use safety
glasses and safety gloves. Also use a dust mask during
pulverulent operations or if exhaust gases are present.
When necessary, use also non-slipping boots or shoes,
hardhat and earplugs. If the noise level exceeds 85
dB(A), ear protection is obligatory.
WARNING! Use personal protective
equipment! Safety devices and
personal protective equipment protect
your own health and the health of
others and ensure a trouble-free
operation of the tool.
∙Do not start to use the tool if it is in an inverted
position or it is not in the right working order.
∙Ensure that you have a good stand, while you
operate with the tool. Keep proper footing and balance
at all times.
∙Keep work area clean. Cluttered areas invite
injuries. Before use, all foreign bodies must be removed
from the working area, also pay attention to foreign
objects during operation.
∙Do not force the tool.
∙Only work in daylight or sufciently good articial
light. Never operate the tool without good visibility.
∙Be careful not to drop the tool or hit it against
obstacles.
ATTENTION! Stay alert. Watch what you are doing.
Distraction can cause you to lose control. Use
common sense.

10
EN
Instruction manual
Gasoline engine safety rules
WARNING! Petrol is highly ammable.
Handle fuel with care.
∙Store fuel in containers specically designed for
this purpose.
∙Refuel outdoors only and do not smoke while doing
this operation.
∙Add fuel before starting the engine.
∙Always allow mufer to cool before lling fuel tank.
∙Never remove the cap of the fuel tank or add fuel
while the engine is running or when the engine is still
hot.
∙If petrol is spilled, do not attempt to start the engine,
but move the machine away from the area of spillage
and avoid creating any source of ignition until petrol
fumes have dissipated.
∙Clean up spilled fuel before restarting.
∙Replace all fuel tanks and container caps securely.
∙Do not run the engine indoor or in a conned space:
dangerous carbon monoxide fumes can collect. Exhaust
fumes are dangerous.
WARNING! Exhaust contains
poisonous carbon monoxide, a
colourless and odourless gas.
Breathing exhaust can cause loss of
consciousness and may lead to death.
Provide an adequate ventilation to
keep exhaust gas level as low as
possible.
∙Never store the equipment with fuel in the tank
inside a building where fumes can reach an open ame
or spark.
∙To reduce re hazard, keep the engine, silencer,
battery compartment and petrol storage area free of
vegetative material and excessive grease.
∙The exhaust system gets hot enough to ignite
some materials. Keep ammable materials away from
the device.
∙The mufer becomes very hot during operation and
remains hot for a while after stopping the engine. Be
careful not to touch the mufer while it is hot. Let the
engine cool before storing the machine indoors.
∙Remove adjusting keys or wrenches before starting
the machine.
WARNING! During the use of certain
gasoline tools, some dust containing
chemicals known to cause cancer,
may occur.
Some of these chemicals are: lead from lead based
paints, crystalline silica from bricks and cement and
other masonry products, arsenic and chromium from
chemically treated lumber and other dangerous
products. If dust is present, your risk from these
exposures varies, depending on how often you do this
type of work.
To reduce your exposure to these chemicals, any
time you do pulverulent operations, work in a well
ventilated area and work with approved safety
equipment, such as dust masks that are specially
designed to lter out microscopic particles.
∙If the machine strikes a foreign body, examine the
device for signs of damage and carry out any necessary
repairs before restarting and continuing to work.
∙If the machine starts to vibrate abnormally, switch
off the motor and check for the cause immediately.
Vibration is generally a warning of trouble.
∙Always turn off the machine and wait until the
machine completely stops whenever you leave
the machine, before carrying out maintenance,
before changing accessories, checking, cleaning,
troubleshooting or working on the machine.
∙It is forbidden to move or modify any of the internal
parts of the machine.
Specic safety rules
∙Use suitable working clothes and personal
protective equipment! Basically, wear protective goggles
or eye protection, protection for the ears, boots or shoes
with anti-slip sole and robust, long trousers, as well as
working gloves. Do not operate the unit when barefoot
or wearing open sandals.
∙The operation of the machine can result in foreign
objects being thrown into your eyes, which can result
in severe eye damaged. Before beginning operation,
always wear safety goggles or safety glasses with side
shields and a full face shield when needed.
∙Always wear an approved helmet when working in
the forest.
∙Only use the unit in daylight or good articial light.
∙Do not use the unit near ammable liquids or gases:
danger of explosion.
∙Never use the machine on slippery ground, at night,
in heavy fog, during rain storms or in any other weather
condition that might make it unsafe to use this product
or difcult to gain a clear view of the area.
∙Do not operate the unit in awkward positions, off
balance, outstretched arms, or one-handed. Always use

11
EN
Instruction manual
two hands when operating unit.
∙The device has normally to be used at ground level
with the cutting attachment parallel to the ground. Do
not use the device to cut grass that is not on the ground
level, e.g. grass that grows on walls, rocks etc.
∙Before cutting, inspect the area for stones, glass,
pieces of metal, trash or other solid objects. Make sure
that the cutting equipment does not come in contact
with stones, gravel, wire or other foreign bodies during
the start-up and while working. The cutting attachment
could throw object of this kind.
∙Always keep a safety distance of 15 m around
yourself. Stones and gravel can be thrown off, which
can cause injuries.
∙Within the range of action, the user is responsible
for damages to third parties which have been caused by
the use of the device.
∙Stop using the machine while people, especially
children, or pets are nearby.
∙Never operate the unit with damaged safety guards
or without the safety guard in place. Make sure the
appropriate safety guard is in place.
∙Before using the machine and after any impact,
check for signs of wear or damage and repair as
necessary.
∙Keep the cutting tool, especially when rotating, at a
distance from all parts of your body, particularly hands
and feet.
∙Always keep proper footing and balance at all
times. Be especially cautious while working on slopes,
on overgrown terrain or in slippery conditions. Watch out
for hidden obstacles.
∙Take care against injury from the line cutter tted for
trimming the cutting line length.
∙Do not cross any gravel-strewn roadways or paths
with device still running.
∙Do not operate unit for prolonged periods, rest
periodically. Limit the amount of time over which the
device is to be used continuesly (around 30-40 minutes
per session), and take 10-20 minutes of rest between
work sessions. Also try to keep the total amount of work
performed in a single day under 2 hours or less.
∙Replace trimmer spool if cracked, chipped or
damaged in any way. Be sure it is properly installed and
securely fastened.
∙Never use blades that are uncorrect, bent, warped,
cracked, broken or damaged. Keep the blade always
sharp. Check the bolt to fasten the blade and be sure
the blade turns freely without abnormal noise.
CAUTION! After stopping the engine,
the cutting equipment keepson rotating
for some seconds. Never attempt to
stop it with your hands. Always wait
until it stops by itself completly.
∙Operate the brushcutter only with the shoulder
strap (or backpack) attached. Check it is not damaged
before use. It should be properly adjusted to user’s size
before putting the brushcutter into operation.
∙Stop the engine during transport.
CAUSES AND OPERATOR PREVENTION
OF THE KICKBACK
When operating the brushcutter, uncontrolled kickback
can occur. Kickback is the sudden and uncontrolled
motion of the machine and cutting tools towards the
operator that can occur:
∙if the blade binds in the cut;
∙if the blade segment between 12 and 2 o’clock, as
viewed from the operator’s position [F1] of a rotating
blade comes in contact with a solid rigid object like tree,
rock, bush or wall.
This kickback can cause loss of control of the unit and
may result in serious or fatal injury to the operator or
bystanders.
To avoid kickback and reduce the risk of loss of control:
∙before beginning work, watch out for hidden
obstacles, such as rocks, stumps, roots, etc., that could
cause the blade to kick back if struck.
∙always handle the device securely with two hands
and do not grip other parts except the handles.
∙replace or resharpen dull blades.
∙never raise the unit above your waist.
∙avoid operating the brushcutter using the blade
segment between the 12 and 2 o’clock position.
UNPACKING
When unpacking, check to make sure that all
components are included. Refer to the drawings on this
manual. If any parts are missing or broken, please call
an IVT assistance center.

12
EN
Instruction manual
ASSEMBLY AND ADJUSTING
INSTRUCTIONS
Fitting the safety guard (10) [F2]
WARNING! Never operate the tool
without the safety guard (10) properly
in place!
Fix the safety guard (10) to the end of main shaft
(6), using the safety guard bracket (11) and the bolts
provided.
WARNING! Take care against injury
from the line cutter (25) tted below
the safety guard (10) for trimming the
cutting line (7) to length: it has a very
sharp cutting edge.
ATTENTION! When converting from brushcutter
mode (with brushcutter blade (13)) to trimmer mode
(with trimmer spool (38)), or vice versa, make sure
the correct guard is being used.
Fitting the front handle (4) [F3]
1. Loosen the bolts on the handle bracket assembly
(5).
2. Insert the right part of front handle (4) (with control
grip) and the left part of front handle (4) into the handle
bracket assembly (5). Insert the two parts equally.
3. Retighten the bolts securely.
PRIOR TO OPERATION
WARNING! Perform the following procedures, with
the engine cooled down.
Fuel recommendations
The machine is equipped with a two-stroke engine and
must always been operated using a mixture of petrol
and two-stroke oil. It is important to accurately measure
the amount of oil to be mixed to ensure that the correct
mixture is obtained.
∙Pour the correct quantities of regular gasoline
(leaded or unleaded, alcohol free) and 2-stroke oil into a
mixing bottle (a clean container intended for fuel), then
shake the container well.
RECOMMENDED MIXING RATIO
GASOLINE : OIL > 25 : 1
ATTENTION! Never use oil intended for four-stroke
engines, nor oil intended for water cooled 2-cycle engines.
Refueling
1. Always shut off the engine and let it cool for a few
minutes, before refueling.
2. Rest the machine on the ground with the fuel tank
plug (30) facing up.
3. Open the fuel tank plug (30) slowly so that any
excess pressure is released gently.
4. Clean the area around the fuel tank plug (30):
Contamination in the fuel tank can cause operating
problems.
5. Ensure that the fuel is well mixed by shaking the
mixing container before lling the tank.
6. Fill the tank with correct gasoline-oil mixture. Do not
overll.
7. Tighten the fuel tank plug (30) securely.
ATTENTION! If the machine is not used for fairly long
time (more than 4 weeks), the fuel tank should be
emptied and cleaned.
CAUTION! Wipe up all spills and
always move the machine away from
the refueling area (min. 3 meters)
before starting.
CHANGING THE CUTTING MODE
FROM BRUSHCUTTER TO GRASS TRIMMER MODE
Assembling the trimmer spool (38) [F4]
1. Align the hole of gearhead (14) with the hole of inner
ange (33) and insert the hex key (34) (or Allen key) into
the holes to block the shaft so that parts won’t rotate.
2. Loosen the locking nut (35) (clockwise) and take it
off.
3. Remove the cover plate (if present), outer ange
(37) and brushcutter blade (13).
4. Install the cutting head (9) on inner ange (33),
screwing it onto the threaded output of the shaft as far
as stop.
5. Remove the hex key (34).
6. Attach the guard extension (12) to the safety guard
(10).
Fitting the guard extension (12) [F5]
ATTENTION! The guard extension (12)
must always be tted when using the
cutting head (9). The guard extension
(12) shall always be removed when
using the brushcutter blade (13).
1. Attach the guard extension (12) to the safety guard
(10), by placing the locking tabs into the notches.

13
EN
Instruction manual
2. Snap the guard extension (12) and safety guard
(10) together to lock into place.
FROM GRASS TRIMMER TO BRUSHCUTTER MODE
Assembling the brushcutter blade (13) [F6]
CAUTION! Wear gloves and be
cautious when handling the
brushcutter blade (13). Put the
blade protector (26) (if supplied) on
the brushcutter blade (13) before
handling it.
1. Align the hole of gearhead (14) with the hole of
inner ange (33) and insert the hex key (34) (or Allen
key) into the holes to block the shaft, so that parts won’t
rotate.
2. Loosen and remove the cutting head (9).
3. Install the brushcutter blade (13) on inner ange
(33).
4. Insert the outer ange (37).
5. Insert the cover plate (if present) and the locking
nut (35).
6. Tighten the locking nut (35) (anti-clockwise).
7. Remove hex key (34).
ATTENTION! Be sure guard extension (12) is not
installed, if using brushcutter blade (13).
STARTING/STOPPING THE ENGINE
Starting the engine [F7]
1. Set the machine down on a hard, level surface
2. Move the on/off switch (3) to the “start” “I” position.
3. Close the choke lever (16). NOTE: The CLOSED
position enriches the fuel mixture for starting a cold
engine. For restarting a warm engine, leave the choke
lever (16) in the OPEN position.
4. Press the fuel pump (17) (if present) repeatedly,
until fuel begins to ll the bulb (to start a warm engine,
it’s not necessary to press it).
5. The throttle lever (22) should be set to the starting
position, in order to do that: press the throttle lock-out
(21) , by gripping the control handle and hold the throttle
set button (20) (if present), while releasing the throttle
lever (22).
6. Hold the body of the machine on the ground using
your left hand (CAUTION! Not with your foot!).
7. Grip the handle of recoil starter (15), slowly pull
out the cord with your right hand until you feel some
resistance, then quickly and powerfully pull the cord
(CAUTION! Never twist the recoil starter (15) around
your hand!).
8. Repeat pulling the cord of recoil starter (15) until
the engine starts.
9. When the engine starts, slowly open the choke
lever (16) ONLY if it had been put on CLOSE position
because the engine was cold.
10. Allow the engine to warm up for a few minutes.
When the engine is warm enough to idle well, pull and
release the throttle lever (22) to disengage the throttle
set button (20).
NOTE: the throttle set button (20) is used to hold the
throttle lever (22) at the fast idle position for starting.
ATTENTION! Do not allow the cutting equipment to
contact any obstruction when starting the engine
with the throttle set button (20) engaged!
ATTENTION! Do not use the throttle set button (20)
while operating the unit! The machine will not return
to idle, and the cutting head (9) or brushcutter blade
(13) will continue to spin until the throttle set button
(20) is disengaged and the throttle lever (22) is
released.
Stopping the engine
1. Reset the throttle lever (22) to the low speed
position and slow down the engine RPM.
2. Set the on/off switch (3) in “STOP” “O” position.
WARNING! The brushcutter blade (13)
will continue to spin briey after the
engine has stopped or the throttle lever
(22) is released. A coasting blade can
cause injury. Maintain proper control
of the machine until the cutting tool
has completely stopped rotating.
SUPPORTING THE MACHINE DURING
OPERATION
ATTENTION! Always use the shoulder
strap (36) or backpack (if present)
when working with the machine!
Before putting the brush cutter on shoulders, start the
engine following the correct procedures, and let it warm
up. Turn throttle lever (22) to the lowest speed position
and be sure the cutting device does not turn.
Be careful not to accidentally touch the throttle lever
(22), because if the cutting device starts to rotate,
there can be an high risk of injury.

14
EN
Instruction manual
Attach and wear the support device as soon as you
have started the engine and it is running in idle mode.
Switch off the engine before taking off the shoulder strap
(36) or backpack (if present).
Fitting and adjusting the shoulder strap (36) [F8]
1. Connect the latch on the shoulder strap (36) to one
of the holes of the strap hanger (19) on the main shaft (6).
2. Adjust the shoulder strap (36) to a comfortable
position.
3. Adjust length and position of the shoulder strap
(36), so that the brushcutter blade (13) will be parallel to
the ground in the working position.
ADVANCING THE CUTTING LINE (7)
Check the cutting line (7) regularly if it is damaged.
Short or worn cutting tools cut less efciently.
NOTE: Hitting hard and abrasive objects, such as
fences, concrete and rocks within and around long
grass may cause the cutting line (7) to disappear and
can be easily advanced from the trimmer spool (38) by
following simple instructions.
Semi-Matic feed of cutting line (7) (bump-feed) [F9]
1. Tap the cutting head (9) lightly on the ground while
the device is running at full speed. This will automatically
supply extra cutting line (7). Several taps may be
required until cutting line (7) strikes the line cutter (25).
2. The line cutter (25) which is situated under the
safety guard (10) will automatically trim the cutting line
(7) to the correct length during operation.
ATTENTION! Do not use excessive force nor tap the
cutting head (9) on pavement or concrete.
NOTE: if the cutting line (7) is worn too short you may
not be able to advance the cutting line (7) by tapping
it on the ground. If so, stop the engine, and manually
advance the cutting line (7). If the end of the cutting
line (7) is not visible: the trimmer spool (38) should be
replaced.
ATTENTION! Check the condition
of line cutter (25) regularly. Do
not employ the device under any
circumstances without line cutter (25)
or with a defective one. Clean the line
cutter (25) from grass and debris on a
regular basis to avoid any inuence of
the cutting effect.
Manual feed of cutting line (7) [F10]
1. Stop the engine and disconnect the spark plug cap
(32).
2. Push the cutting line feed button (24) while pulling
on ends of cutting line (7) to manually advance it.
3. After extending new cutting line (7), always return
the machine to its normal operating position, before
turning on the engine.
OPERATING INSTRUCTIONS
∙Inspect and clear the area of any hidden objects
such as glass, stones, concrete, fencing, wire, wood,
metal etc.
∙Make sure you can move and stand safely. Check
the area around you for possible obstacles (roots, rocks,
branches, ditches, etc.) in case you have to move
suddenly. Take great care when working on sloping
ground.
∙Hold the unit with a rm grip with both hands while
in operation and maintain balance on both feet.
∙Keep cutting attachment below waist level.
∙Maintain the speed of the engine at the level
required to perform cutting work, and never raise the
speed of the engine above the level necessary.
∙Keep all parts of your body away from rotating
cutting attachment and hot surfaces.
∙Make sure shoulder strap (36) or backpack (if
present) and the suitable safety guard (10) are properly
tted and adjusted.
Operating the unit as grass trimmer [F11]
∙Cut tall grass from the top down.
∙If grass becomes wrapped round the cutting head
(9), stop the engine, disconnect the spark plug cap (32),
and remove the grass.
∙Use the tip of cutting line (7) to do the cutting; do
not force cutting head (9) into uncut grass.
Operating the unit as brushcutter [F12]
∙Position yourself so that you will not be drawn off
balance by the kick-back reaction of the brushcutter
blade (13).
∙The brushcutter blade (13) is used for tall or coarse
grass, but it must not be used for woody stems.
∙For cutting ease and safety, approach the weeds
being cut from the right to the left. In the event an
unexpected object or woody stock is encountered, this
could minimise the blade thrust reaction.
∙Cut down grass with a sideways, swinging
movement, where the movement from right-to-left is
the clearing stroke and the movement from left-to-
right is the return stroke. Let the left-hand side of the
brushcutter blade (13) (from 8 o’ clock to 12 o’ clock) do
the cutting. If the brushcutter blade (13) is angled to the
left when clearing grass, the grass will collect in a line,
and it will be easier to collect it.
∙Try to work rhythmically. Stand rmly with your feet

15
EN
Instruction manual
apart. Move forward after the return stroke and stand
rmly again.
∙Never use a brushcutter blade (13) near footpaths,
fencing, posts, buildings or other immovable objects.
∙Never use a brushcutter blade (13) after hitting a
hard object without rst inspecting it for damage. Do not
use if any damages detected.
MAINTENANCE AND STORAGE
CAUTION! Before carrying out any
maintenance operation, turn off
the engine and wait until it stops
completely.
∙Always keep the tool and the ventilation slots (if
present) cleaned. Regular cleaning and maintenance of
the appliance will ensure efciency and prolong the life
of your tool.
∙If the tool should fail despite the rigorous
manufacturing and testing procedures, the repair should
be carried out by an authorized IVT customer service.
∙Keep all nuts, bolts, and screws tight, to be sure the
tool is in safe working condition.
∙Replace worn or damaged parts for safety.
∙Use only original spare parts. Parts not produced
by manufacturer may cause poor t and possible injury.
∙Store the tool in a dry room out of reach of kids and
away from any ammable material.
∙Store all fuel tanks securely. Never store the
equipment with fuel in the tank inside a building, where
fumes can reach an open ame or sparks.
Blade protector (26) (if supplied)
Always place the blade protector (26) on the
brushcutter blade (13) when the unit is not in use. The
blade protector (26) has clips round the edges to snap
over the brushcutter blade (13) and keep it in place.
CAUTION! Always remove the blade protector (26)
before using the unit.
Air lter [F13]
Soiled air lters reduce the engine output. Regular
checks are therefore essential. The air lter should
be checked after every 25 hours of use and cleaned if
necessary. If the air contains a lot of dust, it should be
checked more frequently.
1. Remove the air lter cover (28).
2. Remove the lter element (29).
3. Clean the lter element (29) by tapping it or blowing
it or, if necessary, by washing with warm soapy water.
Dry completely before installing. If the air lter element
(29) is broken or shrunk, replace with a new one.
NOTE: Never clean the air lter element (29) with petrol
or inammable solvents.
Mufer
Inspect periodically the mufer for loose fasteners, any
damage or corrosion. If any sign of exhaust leakage
is found, stop using the machine and have it repaired
immediately.
Spark plug (31) [F14]
Check the spark plug (31) for dirt and grime after about
10 hours of operation and if necessary clean it with a
copper wire brush. Thereafter service the spark plug
(31) after every 50 hours of operation.
1. Pull off the spark plug cap (32).
2. Remove the spark plug (31) with a spark plug
spanner.
3. Inspect the condition of spark plug (31). Check
that the electrode gap is 0,6-0,7 mm, if not, adjust. If it
is dirty, clean it. If it is damaged, replace it with one of
recommended type!
4. Assemble in reverse order.
Fuel lter (18) [F15]
The fuel lter (18) of the suction head is used to ll the
fuel required by the carburetor. When the engine run
short of fuel supply, check fuel lter (18) for blockage.
A periodical visual inspection of the fuel lter (18) is to
be conducted, clean after about 50 hours of use. Filters
found to have hardened, been polluted or clogged up
are to be replaced.
1. Open the fuel tank plug (30) and carefully drain all
fuel from fuel tank.
2. Use a wire hook to pull out the suction head through
the tank opening.
3. Inspect the fuel lter (18). If it is dirty, remove it and
wash it with non-ammable solvent.
4. Remove water and dirt stood in the fuel tank by
rinsing its inside.
5. Place all parts back correctly.
Gearhead (14)
Supply multi-purpose grease to the gearhead (14)
through the grease hole every 25 hours of use.
Sharpening the brushcutter blade (13) [F16]
Check the condition of the brushcutter blade (13)
regularly. If needed, sharpen each cutting edge and
make sure the bottom corner is rounded. If damaged or
cracked, replace it.
ATTENTION! Do not cool brushcutter blade (13) with
water, in case of using grinder, because it may cause
cracks on the brushcutter blade (13).

16
EN
Instruction manual
Setting the idling speed [F17]
∙If the engine stalls when the throttle lever (22) is
not pressed, the idling speed may be adjusted: turn the
idling speed screw (27) clockwise until the machine runs
smoothly at idling speed (rotation increases).
∙If the idling speed is so fast that the cutting tool
continues to rotate, when the throttle lever (22) is not
pressed, idling speed has to be reduced by turning the
idling speed screw (27) counter-clockwise for as long as
is required for the cutting tool to stop turning as well.
IMPORTANT! Set the idling speed when the machine
is warm.
Carburettor settings
Settings on the carburetor should be made by authorized
customer service center.
REPLACING THE TRIMMER SPOOL (38)
/ CUTTING LINE (7) [F18]
WARNING! Use only cutting lines (7)
with correct diameter. Other sizes of
cutting line (7) will not feed properly
and will result in improper function or
can cause serious injury. Do not use
metal-reinforced cutting lines.
1. Stop the engine and disconnect the spark plug cap
(32).
2. Press and hold in the cover release latches to open
the cutting head cover (23) .
3. Pull out the trimmer spool (38) from the cutting head
(9). Keep the spring (or washers, if present) attached to
the cutting head (9).
4. Remove any old cutting line (7) remaining on the
trimmer spool (38).
5. Put one end of new cutting line (7) through the
holes of trimmer spool (38) and pull it until the length is
equal between each part of the cutting line (7).
6. Wind up the new cutting line (7) with tension,
following the direction shown by arrows.
7. Hook each end of the cutting line (7) in the slot on
the edge of the trimmer spool (38).
8. Put the ends through the eyelets on the cutting
head (9).
9. Put the trimmer spool (38) into the cutting head (9).
(Ensure that the spring (and washers, if present) are in
the correct position.)
10. Press the cutting head cover (23) onto the cutting
head (9).
11. Pull the two ends of cutting line (7) briey and
powerfully to release them from the slots in the trimmer
spool (38).
12. Cut the excess of cutting line (7) to a length of
around 15 cm.
13. Fit the cutting head (9) again on the gearhead (14).
If you are replacing the complete trimmer spool (38)
and cutting line (7), ignore points 4-7.
MAINTENANCE BEFORE LONG-TERM
STORAGE
∙Brush off all dirt from the machine.
∙Check damage or slack of each part. If you nd out
abnormalities, repair them for next use.
∙Drain all fuel from fuel tank, then turn on engine;
leave it running until it stops naturally.
∙Remove the spark plug (31) and put 1-2 cc of
2-stoke engine oil in the engine.
∙Apply anti-rust oil to the metal parts such as throttle
cable.
∙Put the blade protector (26) (if supplied) on the
brushcutter blade (13).
∙Keep machine stored indoor avoiding dampness.
ENVIRONMENTAL PROTECTION
Recycle raw materials instead of
disposing as waste.
Tool, accessories and packaging should be sorted for
environment-friendly recycling.
The plastic components are labeled for categorized
recycling. These instructions are printed on recycled
paper manufactured without chlorine.
ATTENTION! DO NOT ATTEMPT TO REPAIR THE PRODUCT BY YOURSELF AND DO NOT
TAMPER WITH IT! Any operation of repairing or extraordinary maintenance must be carried
out only by a qualied and authorized IVT Service Center. Do not try to modify any internal
part of the product! THIS WILL COMPLETELY VOID THE WARRANTY AND IT COULD CAUSE
SERIOUS INJURY AND DAMAGE.

17
EN
Instruction manual
TROUBLESHOOTING
CAUTION! Turn off the engine and wait until the machine stops completely before investigating
fault.
Conventional trouble Trouble reason Remedy
Engine does not start. ∙Failure to operate fuel pump (17). ∙Push it 7-10 times.
∙On/off switch (3) in ‘OFF’ ‘O’
position.
∙Turn On/off switch (3) in ‘ON’ ‘I’
position.
∙Choke lever (16) not in CLOSED
position (cold engine).
∙Move choke lever (16) to the
CLOSED position.
∙Lack of fuel. ∙Feed fuel.
∙Fuel lter (18) clogged, carburetor
malfunction, ignition malfunction, valves
stuck, etc.
∙Replace or repair faulty
components as needed.
∙Deteriorated fuel. ∙Replace with new recommended fuel.
∙Spark plug (31) faulty, fouled,
detached or has incorrect gap.
∙Clean, gap, attach or replace.
Engine stops soon.
Engine speed does not
increase.
∙Insufcient warm-up. ∙Perform warm-up operation
∙Choke lever (16) is set to CLOSED
position although engine is warmed up.
∙Set it to OPEN position.
∙Clogged fuel lter (18) or
contaminated or clogged lter element
(29).
∙Clean.
∙Throttle cable out of adjustment,
broken, or bent.
∙Adjust or replace if necessary.
Brushcutter blade (13)
does not rotate
> Stop engine
immediately
∙Loosened locking nut (35). ∙Tighten securely.
∙Twigs caught by brushcutter blade
(13).
∙Remove foreign matter.
∙Worn or broken clutch, broken
throttle cable, worn or broken gearhead
(14) parts.
∙Replace or repair faulty
components as needed.
Main unit vibrates
abnormally.
> Stop engine
immediately
∙Broken, bent or worn brushcutter
blade (13).
∙Replace it.
∙Loosened locking nut (35). ∙Tighten securely.
∙Abnormal drive system. ∙Make request for inspection and
maintenance to an authorized Service
Center.
Brushcutter blade
(13) does not stop
immediately.
∙High idling rotation. ∙Adjust.
∙Fault in throttle lever (22) or throttle
cable.
∙Check throttle control parts, adjust
or replace throttle cable.
If the problem cannot be remedied on the basis of the information above, please take the device to an authorized
IVT Service Center.

18
DE
Bedienungsanleitung
ZUBEHÖRTEILE
1. Motorgehäuse
2. Ankopplungsgehäuse
3. Zweistellungsschalter Ein./Aus.
4. Vorderer Handgriff
5. Tragarm des Handgriffs komplett
6. Hauptwelle
7. Schneidsaite
8. Griff-Feststeller schnelltrennbarer Koppler
9. Schneidkopf
10. Schutzvorrichtung
11. Tragarm der Schutzvorrichtung
12. Verlängerung der Schutzvorrichtung
13. Buschschneidemesser
14. Antriebsreduktor
15. Handanlasser
16. Drosselungshebel
17. Brennstoffpumpe
18. Brennstofflter
19. Schelle zur Tragbandbefestigung
20. Fixierungsknopf der Drosselklappe
21. Blockhebel der Drosselklappe
22. Hebel der Drosselklappe
23. Deckel des Schneidkopfes
24. Zufuhrknopf der Schneidsaite
25. Schneider für Saite
26. Abschirmung des Schlegels
27. Regelschraube der Leerlaufdrehzahl
28. Deckel des Luftlters
29. Filterelement
30. Tankverschraubung
31. Zündkerze
32. Kappe der Zündkerze
33. Innenansch
34. Steckling
35. Gegenmutter
36. Tragegurt
37. Außenansch
38. Druckbehälter des Trimmers
BOXGEHALT
Bedienungsanleitung (1 St.), Schneidkopf
mit Druckbehälter des Trimmers (1
Satz), Buschschneidemesser (1 St.),
Kanister zur Brennstoffmischung (1 St.),
Universalschraubenschlüssel (1 St.), Traggurt komplett
(2 St.), Satz der Schrauben und der Mutter (1 St.),
Schraubdreher (1 St.), Zündkerzenschlüssel (1 St.),
Schneider für Saite (1 St.), Schutzvorrichtung (1 St.),
Verlängerung der Schutzvorrichtung (1 St.).
TECHNISCHE DATEN DES WERKZEUGES
Modell GBC-52
Nominalleistung [W] 1750
Maximale Drehzahl [UpM] 9000
Leerlaufdrehzahl [UpM] 3000
Hubraum [cm3]52
Motortaktzahl 2
Motorkühlungsart Luftkühlung
Brennstoffsorte Mischung (Benzin-Öl)
Mischungsverhältnis [Benzin-Öl] 25:1
Anzuwendendes Benzin 93 Kraftstoff
Tankinhalt [ml] 1200
Kraftstoffverbrauch [g/kW-h] 345
Maximaler Durchmesser des Schneidens
(Schneidesaite) [mm] 355
Durchmesser des Schlegels [mm] 230 (3 Zähne)
Durchmesser der Schneidesaite [mm] 2
Vorrat der Schneidsaite [m] 2
Vibrationsniveau [m/s2] 9.12 (K=1.5)
Schalldruckpegel [dB(A)] 94.5 (K=3)
Schallleistungspegel [dB(A)] 110.2 (K=3)
Gewicht [kg] 7.5

19
DE
Bedienungsanleitung
VORAUSSICHTLICHE BENUTZUNG
Dieses Gerät ist für Scheren von Rasen und kleinen
Grasabschnitten oder dem analogen weichen
Panzenbestand in privaten und Laiengärten sowie am
Rande von Beeten, wenn das Gerät mit einer geeigneten
Schneidvorrichtung ausgerüstet ist, bestimmt.
Dieses Gerät ist für die Verwendung in öffentlichen
Anlagen, Parks, Sportzentren oder an Straßenrändern
sowie in der Land- und Forstwirtschaft bestimmt.
ARBEITSSICHERHEIT BEI DER
BENUTZUNG
Allgemeine Regeln der Arbeitssicherheit
Folgende Anleitungen zur Arbeitssicherheit helfen
Ihnen das Werkzeug richtig benutzen und Ihre eigene
Sicherheit gewährleisten. Deswegen lesen Sie sie
besonnen und aufmerksam.
Im Falle der Übergabe des Werkzeuges für die
Benutzung eines Dritten, geben Sie ihm auch
vorliegende Anleitungen der Arbeitssicherheit.
Behalten Sie diese Anleitung und sonstige Literatur, die
mitgeliefert werden. Wenden Sie sich an sie, wenn die
Fragen entstehen.
Folgen Sie strikt den Regeln der Arbeitssicherheit und
Warnungen, die am Werkzeug angegeben sind.
Vor der Arbeit machen Sie sich mit der
Werkzeugsteuerung bekannt, aber, vor allem, studieren
Sie die Verfahren seines Nothalts.
Indem Sie diesen einfachen Anleitungen folgen, werden
Sie Ihr Werkzeug im einwandfreien Zustand halten.
∙Vor dem Einsatz ist das Werkzeug richtig zu
montieren.
∙Setzten Sie das Werkzeug streng zweckgemäß.
∙Nehmen Sie Warnungstafeln und Hinweise
am Werkzeug und studieren Sie sie aufmerksam.
Aufmerksamkeit, vernünftiges Herangehen zur Arbeit
und eine entsprechende Ausbildung von Personen,
die am Betrieb, Transportieren, an der Wartung und
Lagerhaltung des Werkzeuges teilnehmen, helfen
Unfälle verhindern.
∙Lassen Sie das Werkzeug ohne Aufsicht nicht.
∙Lassen Sie die Benutzung des Werkzeuges durch
Kinder nicht zu. Erlauben Sie den Kindern nicht, mit
dem Werkzeug zu spielen. играть с инструментом.
∙Lassen Sie das Aufnden von Kindern und
Tieren in der Nähe des Werkzeuges nicht zu. Die, die
den Wunsch haben, die Arbeit des Werkzeuges zu
beobachten, sollen sich im sicheren Abstand von ihm
benden.
∙Bei der Arbeit mit dem Werkzeug haftet der
Benutzer für die Sicherheit von Dritten.
∙Personen, die Bedienungsanleitung nicht studiert
haben, Kinder, Minderjährige, die das Alter, das die
Benutzung des Werkzeuges erlaubt, nicht erreicht
haben, sowie Personen, die sich im Alkohol- oder
Rauschzustand oder unter Wirkung medizinischer
Präparate benden, werden zur Arbeit mit dem
Werkzeug nicht zugelassen. Das Alter des Bedienenden
wird durch örtliche Rechtsvorschriften bestimmt.
VORSICHT! Alkohol, einige
Heilmittelpräparate und berauschende
Mittel sowie Krankheit, Fieber
und Müdigkeit vermindern die
Geschwindigkeit der Reaktion. In
oben genannten Fällen benutzen Sie
das Werkzeug nicht.
∙Versichern Sie sich, dass alle Schutzeinrichtungen
(falls vorhanden) installiert und nutzungsfähig sind.
∙Benutzen Sie das Werkzeug ohne
Schutzeinrichtungen (falls vorhanden), oder falls sie
beschädigt sind, nicht.
∙Prüfen Sie das Werkzeug in bezug auf den Bestand
von losen Teilstücken (Muttern, Bolzen, Schrauben
usw.) oder Beschädigungen. Um sichere Arbeit des
Werkzeuges zu gewährleisten, prüfen Sie regelmäßig,
ob Bolzen und Schrauben gut festgezogen sind (falls
vorhanden). Bei Bedarf führen Sie vor dem Einsatz
des Werkzeuges ihre Reparatur oder ihren Austausch
durch. Im Falle des Einsatzes des beschädigten
Werkzeuges können dem Bedienenden oder Dritten
ernste Verletzungen zugefügt werden.
∙Verwenden Sie bei der Arbeit eine entsprechende
Arbeitskleidung. Weite Kleidung, Schmuckstücke können
von beweglichen Teilen mitgenommen werden. Arbeiten
Sie nur in entsprechender Arbeitskleidung. Schützen
Sie ihre Beine und Füße vor auseinanderiegender
Feine. Arbeiten Sie barfuß oder in offenen Sandalen
nicht. Tragen Sie langes Haar hinten zusammen.
∙Halten Sie Haltegriffe und Halter trocken und
sauber.
∙Verwenden Sie entsprechende PSA. Verwenden
Sie Schutzbrille und Handschuhe. Bei der Arbeit mit
Pulvern oder bei dem Auswurf von Abgasen verwenden
Sie den Staubrespirator. Bei Bedarf ziehen Sie
gleitsichere Schuhe, den Schutzhelm und schützen Sie
ihre Gehörorgane mit Ohrstöpseln. Wenn die Lautstärke
85 dB(A) überschreitet, verwenden Sie unbedingt
Gehörschütze.

20
DE
Bedienungsanleitung
VORSICHT! Verwenden Sie
persönliche Schutzausrüstung!
Die Schutzeinrichtungen und PSA
gewährleisten die Sicherung ihrer
Gesundheit und die Gesundheit der
Umstehenden sowie garantieren
störungsfreie Arbeit des Werkzeuges.
∙Lassen Sie das Werkzeug nicht an, wenn es
umgedreht oder im Ruhezustand ist.
∙Während der Arbeit nehmen Sie die
Beharrungsstellung. Halten Sie immer das
Gleichgewicht.
∙Halten Sie die Sauberkeit im Arbeitsbereich ein.
Auf den gesperrten Abschnitten ist ein hohes Niveau
von Unfällen. Vor dem Einsatz des Werkzeuges räumen
Sie von der Arbeitsäche alle Fremdkörper auf sowie
vermeiden Sie den Eintritt von Fremdkörpern unter das
Werkzeug während der Arbeit.
∙Drücken Sie stark auf das Werkzeug während der
Arbeit nicht.
∙Benutzen Sie das Werkzeug nur bei gutem Tages-
oder Kunstlicht. Benutzen Sie das Werkzeug bei
schlechter Sicht nicht.
∙Lassen Sie das Werkzeug nicht fallen, lassen
Sie den Anstoß des Werkzeuges auf irgendwelche
Hindernisse nicht zu.
VORSICHT! Gut aufpassen. Schauen Sie von dem
durch das Werkzeug bearbeitenden Stück nicht
weg. Indem man ablenkt, kann man die Steuerung
verlieren. Arbeiten Sie vernünftig.
Arbeitsschutzbestimmungen bei der Arbeit mit
Benzinmotor
ACHTUNG! Benzin ist ein
leichtentammender Stoff. Vorsichtig
mit dem Brennstoff.
∙Bewahren Sie den Brennstoff nur in speziellen
Kanistern auf.
∙Tanken Sie nur in der Freiluft auf, rauchen Sie beim
Tanken nicht.
∙Zuerst tanken, dann den Motor anlassen.
∙Bevor Sie auftanken, lassen Sie den Dämpfer
abkühlen.
∙Öffnen Sie das Tankdeckel nicht und tanken Sie bei
dem laufenden oder nicht abgekühlten Motor nicht auf.
∙Im Falle des Übergießens des Benzins lassen Sie
den Motor nicht an, schieben Sie das Werkzeug von
dem übergossenen Benzin zur Seite und lassen Sie die
Entstehung der Entammung nicht, bis Benzindämpfe
abströmen.
∙Reiben Sie den übergossenen Brennstoff trocken,
bevor Sie den Motor anlassen.
∙Schließen Sie den Benzintank oder Kanister fest.
∙Lassen Sie das Werkzeug in dem Raum oder im
geschlossenen Raum nicht an, um die Ansammlung
vom gefährlichen Stickoxid zu vermeiden. Die Abgase
sind gesundheitsgefährlich.
ACHTUNG! In Abgasen ist giftiges
Stickoxid, das weder Farbe,
noch Geruch hat, enthalten. Das
Aufatmen von Abgasen kann zum
Bewusstseinsverlust und Todesfall
führen. Zur Vermeidung von der
Ansammlung der Abgase sichern Sie
entsprechende Lüftung.
∙Bewahren Sie das Werkzeug mit Benzin im Tank in
dem Raum, wo Dämpfe entammen können, nicht auf.
∙Um das Risiko des Brandes zu reduzieren, halten
Sie den Platz der Aufbewahrung des Motors, des
Dämpfers, des Batteriekastens und der Benzinlagerung
sauber.
∙DasAbgassystemerhitzt sich genug dafür, um einige
Stoffe zu entammen. Bewahren Sie das Werkzeug
in der sicheren Entfernung von leichtentammenden
Stoffen auf.
∙Während der Arbeit erhitzt sich der Dämpfer sehr
und bleibt nach dem Ausschalten einige Zeit heiß.
Berühren Sie den Dämpfer nicht, um die Brandverletzung
zu vermeiden. Bevor Sie das Werkzeug in den
geschlossenen Raum tragen, lassen Sie den Motor
abkühlen.
∙Vor dem Anlass des Werkzeuges entfernen Sie
Einstellkeile und Stellschlüssel.
ACHTUNG! Manchmal während der
Arbeit der Werkzeuge mit Benzinmotor
bildet sich Staub, der die den Krebs
erregende Stoffe enthält.
Zu solchen chemischen Stoffen gehören: Blei in
Bleioxid, Quarz, der zum Bestand des Backsteins und
des Zements gehört, Arsen und Chrom, die im
Schnittholz, das durch chemische Reagens behandelt
ist, enthalten sind, und sonstige schädliche Stoffe. Das
Risiko der Einwirkung dieser chemischen Stoffe hängt
von der Häugkeit der Durchführung der mit ihnen
verbundenen Arbeiten ab.
Um ihre schädliche Einwirkung zu reduzieren,
arbeiten Sie in einem gut gelüfteten Raum und
benutzen Sie entsprechende fehlerfreie PSA, z.B.,
Staubrespiratoren, die speziell für die Auslterung
von mikroskopischen Teilchen entwickelt sind.
Table of contents
Languages:
Other IVT Brush Cutter manuals