Jacobs Douwe Egberts Professional L'OR Lucente Pro Fancy Dosata User manual

Coffee machine
Translation of the Original Instructions
Model: Fancy Dosata
UK
WARNING: Read this user manual carefully before using the machine.
OPERATION AND MAINTENANCE
L'OR LUCENTE PRO

English
1
21
1 INTRODUCTION
Thank you for choosing our new L'OR Lucente espresso coffee machine. This is an easy to use product designed to
occupy small spaces and easy to clean. However, before using this appliance, take some minutes to read this instruction
booklet carefully and keep it for future reference. Also check the appliance is in good condition after being shipped.
2 PACKING CONTENTS
The machine is delivered in a special customised box; the contents of the packaging are: 1) machine; 2) security info and
first use sheet; 3) power cable. Check that none of these three are missing, that neither the machine nor the package has
been damaged and there are no missing pieces. In case of damaged or missing pieces, contact the dealer immediately
before installing.
3 UNPACKING THE APPLIANCE
The packaging protects the appliance from being damaged during transport. Open the box, lift the appliance and place the
appliance on a firm surface.
Keep all packing components (box, bags, etc..) out of the reach of children since they are potentially dangerous. Dispose
of them safely and without harming the environment, in compliance with the regulations in force. The packaging materials
are recyclable and therefore, need to be sorted accordingly to make it easier to dispose and reintegrate the materials into
future production cycles.
4 GENERAL SAFETY RULES
Strictly follow the operating instructions contained in this manual at all times and keep the manual for future reference.
This appliance must be used only and exclusively for the intended uses described in this manual (section "Classification of
the appliance and allowed use"), any other use not described herein will be considered as misuse. The manufacturer shall
not be liable for any damage or injury caused by incorrect or irrational use of this appliance.
It is advisable to keep the packing material (box, bags, etc..) in order to use it again for storage, transport.

English
1
22
This appliance can be used by children aged from 8 years and above and persons with reduced physical, sensory or mental
capabilities or lack of experience and knowledge if they have been given supervision or instruction concerning use of the
appliance in a safe way and understand the hazards involved.
Cleaning and maintenance operations shall not be carried out by children unless they are older than 8 and supervised.
Keep the appliance and its cord out of reach of children aged less than 8 years.
DANGER for children
Children should be supervised in order to make sure that they do not play with the appliance.
The use of this appliance is not intended for people (including children) with any physical or mental disability or any
sensory impairment or for people unacquainted with the appliance or unfamiliar with its use, unless they are supervised
or instructed by a person responsible for their safety.
Do not leave the appliance on unattended.
DANGER from electricity
Before connecting or disconnecting the machine, make sure that the switch is at ‘0’ position.
Before connecting the appliance, make sure that its rating (rating plate on the back of the machine) matches the mains
rating. The manufacturer shall not be liable for any damage or injury caused by the lack of an earth connection or by
failure to observe the measures above mentioned. For electrical safety reasons regarding this appliance, the mains should
be earthed and provided with a residual current device.
Never touch the appliance with wet hands or feet.
Uncoil the power supply cable completely in order to avoid dangerous overheating.
Do not let power cord hang over edge of table or counter, or touch hot surfaces.
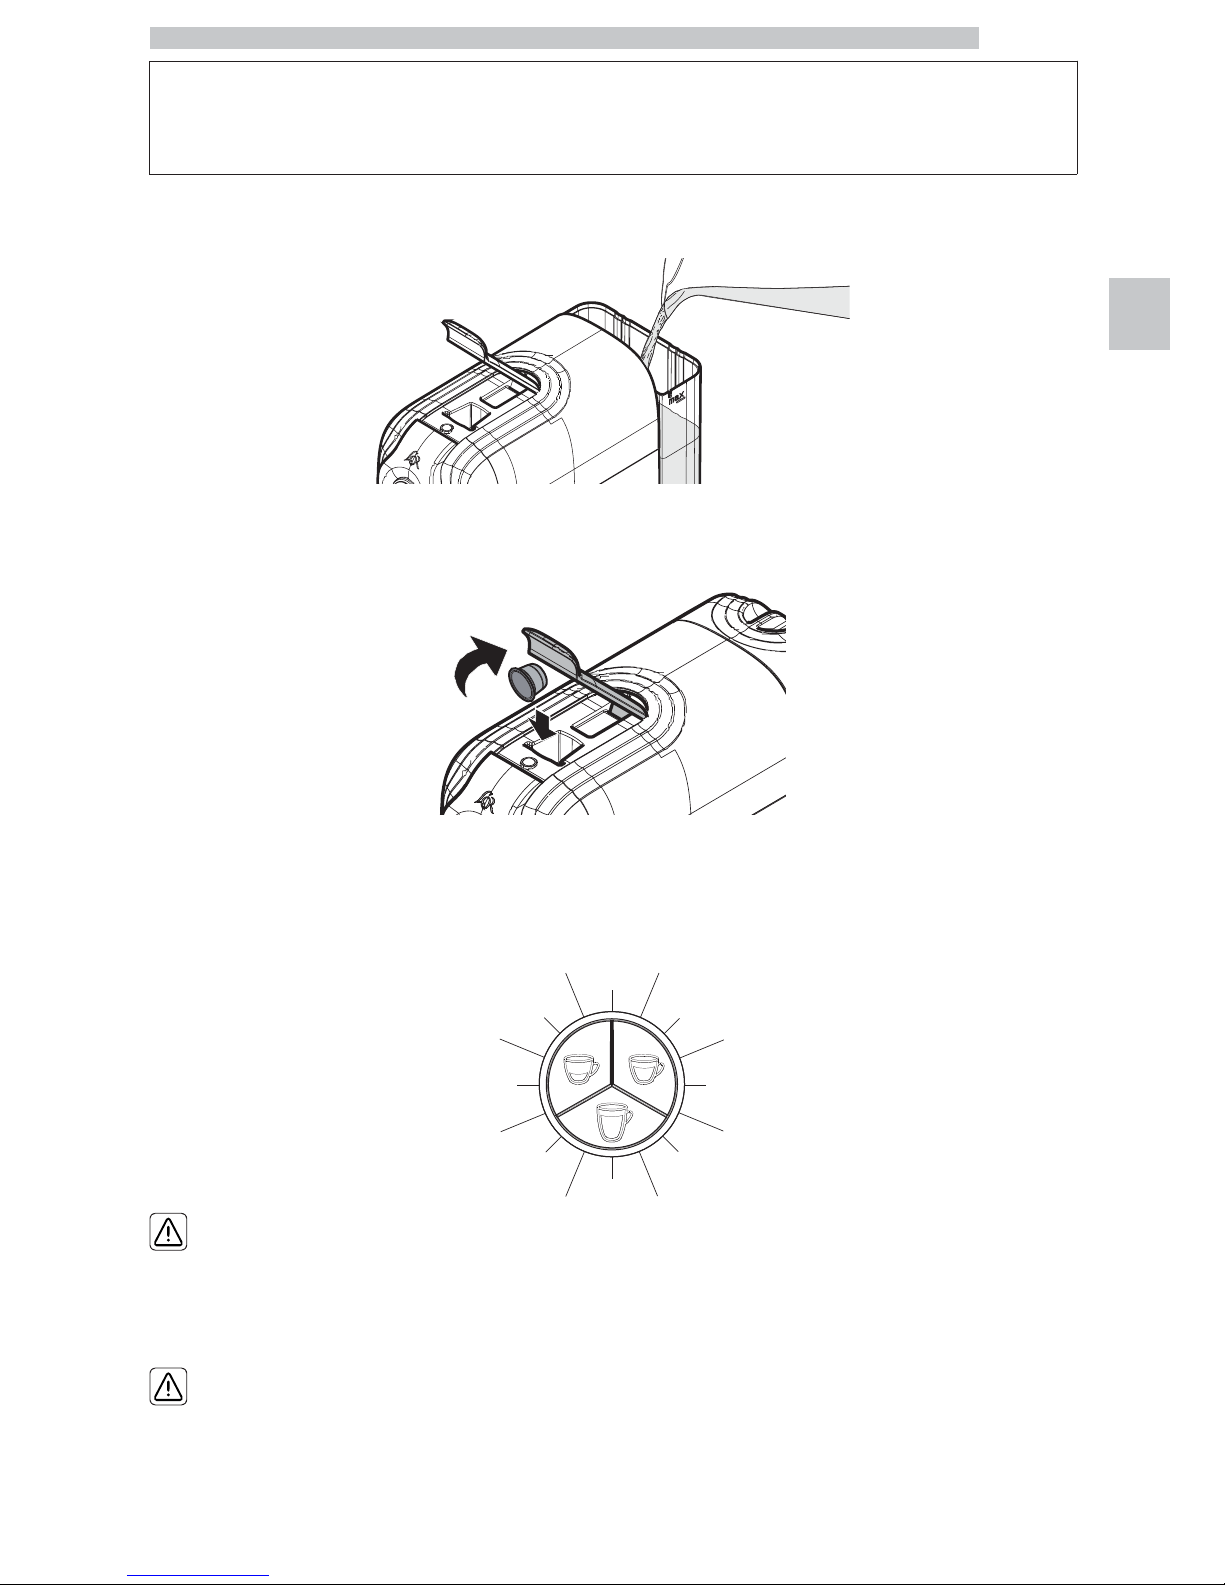
Always disconnect the appliance before filling the water tank or carrying out any checking operations.
In case of failure or malfunction of the appliance, turn it off, disconnect it from the mains; do not attempt any repair or
operation. For any fixing, please only refer to an authorised service centre in order to obtain guidance for the original
spare parts supply. Failure to comply with these rules could compromise the appliance safety.
If the power supply cable gets damaged, the manufacturer or its technical support service centre, or an adequately
qualified technician should replace it to prevent any risks. Keep an approximate 15 cm distance between the appliance and
any walls or machines surrounding it in order to help ventilation.
To disconnect, remove the power cord from wall outlet, always hold the plug, but never pull the cord.
This appliance has been incorporated with a grounded plug. Please ensure the wall socket is well earthed.
DANGER from other causes
Never touch hot parts. Some parts of the machine are hot when operated; therefore, do not touch them. For handling,
use handles or knobs only.
Never immerse the appliance in water.
To avoid all possibility of contact with splashes, the machine must never be placed under a draining rack or close to a
sink.
The machine must never be placed near to ovens or other sources of heat.
Always look after the appliance while it is functioning.
The environment temperature of operating or storing shall be more than 0°C.
Do not leave the machine exposed to atmospheric agents (sun, rain and so on).
IMPORTANT possible damage to materials
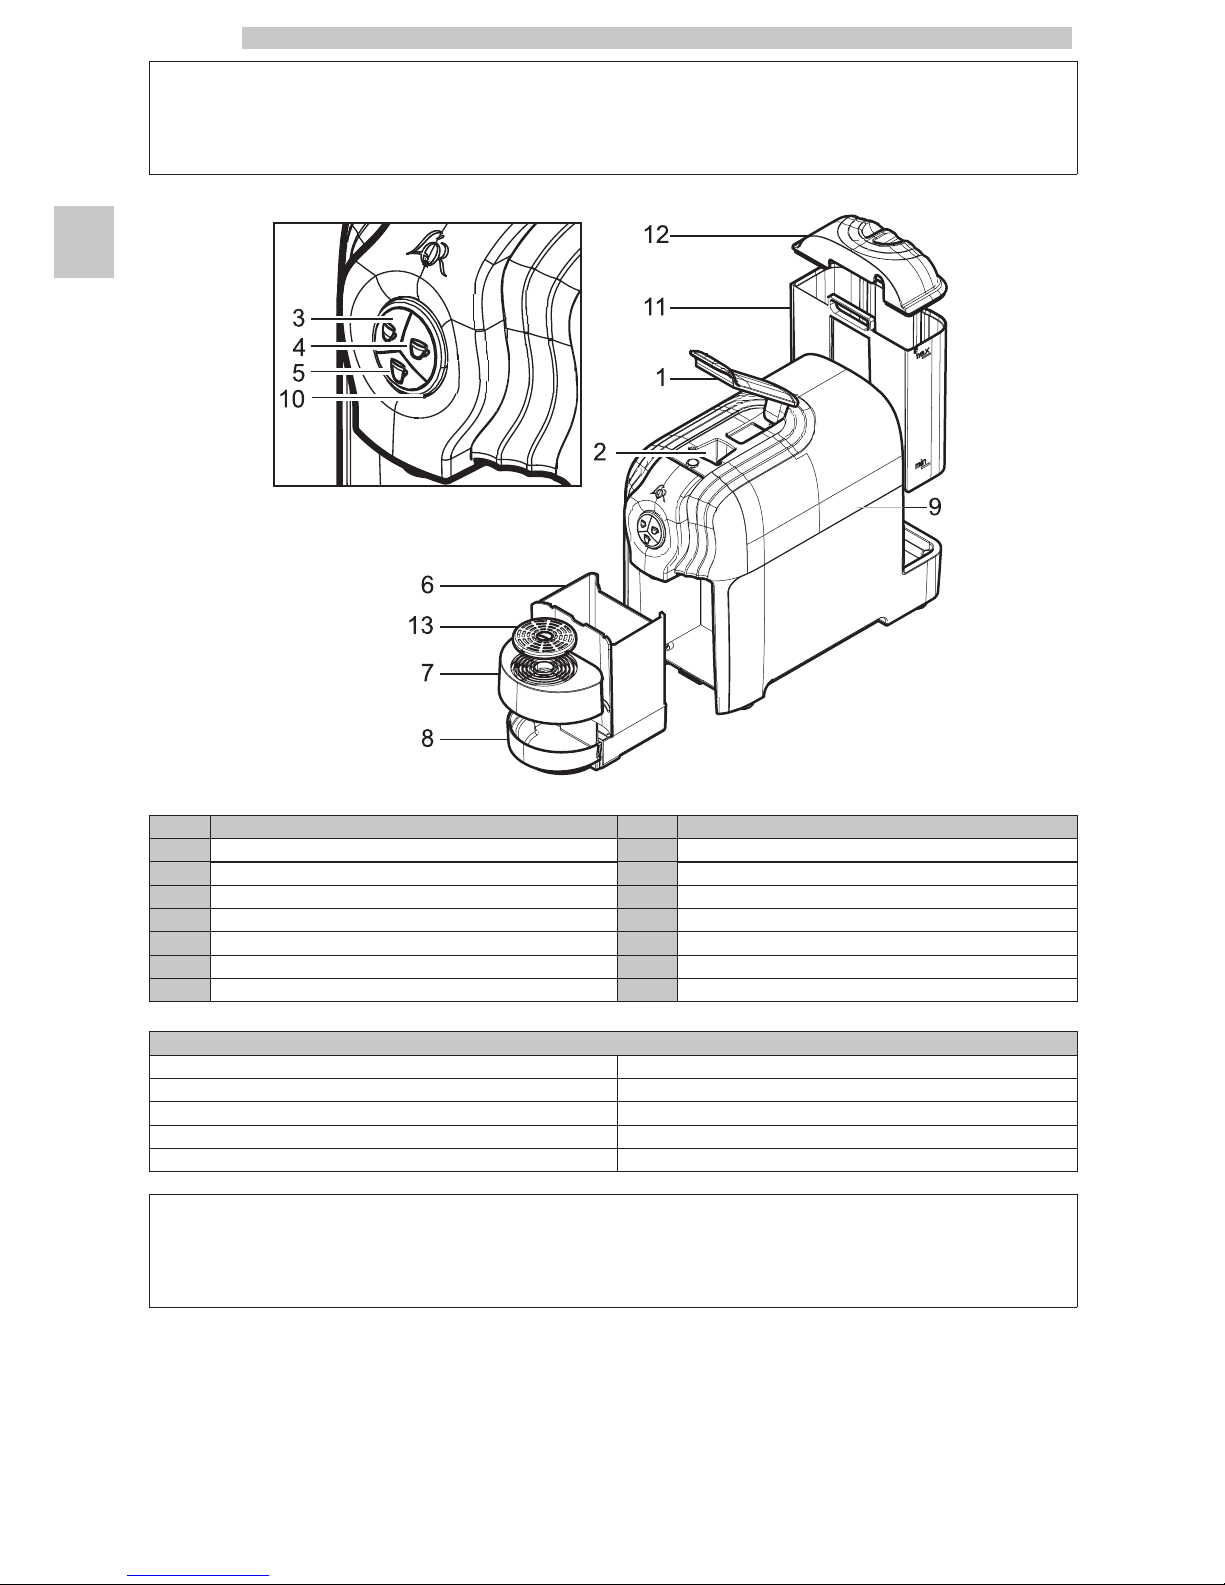
Never place foreign objects or body parts into the capsule hatch.
Use only L'OR* capsules.
* The brand L'OR is not owned by SGL Italia Srl or by related companies.

English
5
23
5 CONTENTS
1 INTRODUCTION 21
2 PACKING CONTENTS 21
3 UNPACKING THE APPLIANCE 21
4 GENERAL SAFETY RULES 21
5 CONTENTS 23
6 DESCRIPTION OF THE APPLIANCE 24
7 CLASSIFICATION OF THE APPLIANCE AND
ALLOWED USES
24
8 FIRST USE 24
9 COFFEE PREPARATION 27
10 NO WATER 29
11 CLEANING AND MAINTENANCE 30
12 TEMPERATURE SETTING 30
13 DOSE SELF-LEARNING 32
14 PROLONGED MACHINE INACTIVITY 32
15 CLEANING THE DRIP TRAY 33
16 WATER TANK 33
17 REMOVING MINERAL DEPOSITS 34
18 WARNING SUMMARY CHART 34
19 TROUBLESHOOTING 35
20 INSTRUCTIONS FOR END OF
OPERATIONAL LIFE DISPOSAL
36

English
6
24
6 DESCRIPTION OF THE APPLIANCE
Ref. Description Ref. Description
1Handle 8Drip tray
2Capsule holder 9Power button
3Caffè Ristretto button 10 Indicator
4Caffè Espresso button 11 Removable water tank
5Caffè Lungo button 12 Water tank cover
6Used capsule drawer 13 Inox grill
7Cup holder grill
Technical Specifications
ELECTRICAL DATA (See data plate on the back)
Capsule drawer capacity 25
Water tank capacity 1,4 lt
Dimensions (H - W - D) 280 x 160 x 370 mm
Weight 6 kg
7CLASSIFICATION OF THE APPLIANCE AND ALLOWED
USES
Coffee brewing machine.
This appliance is intended to be used in household and similar applications such as:
• Staff kitchen areas in shops, offices and other working environments.
• Farm houses.
• By clients in hotels, motels and other residential type environments.

English
7
25
8FIRST USE
Check that all accessories are complete and the unit is not damaged.
Take out the power cord that is stored inside the capsule drawer.
Before using the appliance for the first time, remove the tank cover 12 and take out the tank 11, wash it thoroughly.
Fill tank 11 with fresh water, natural drinking water whenever possible, or, if the system water is calcareous, natural
mineral water.
Place the tank 11 back into its position.
Connect the appliance to the mains power and ensure it is correctly earthed.
WARNING: Do not let the machine operate without water
in the tank.

English
8
26
Switch on the machine by pressing the power button 9.
Make sure that the handle is closed.
Place a container on the cup holder grid 7
Press the Caffè Lungo brewing button 5.
Start the warm-up phase of the machine (indicator 10 will flash red).
Upon reaching the working temperature the indicator 10 will light up in white and the brewing buttons 3, 4 and 5 will
light up.
Press the Caffè Lungo button 5 again.
The dispensing spout starts to dispense water.
Repeat this instruction until the minimum water level in the tank is reached.
Discard the remaining water and clean all detachable parts with hot water.
Note: While pressing down any coffee brewing button, the
machine may produce a pumping sound. This is normal.

English
9
27
9 COFFEE PREPARATION
Fill the detachable water tank 11 with drinking water.
The water level should not exceed MAX level marked on the tank.
Open the handle 1 by lifting it and insert a coffee capsule.
Close the handle 1 by pushing it down directly.
When the machine is switched on from the power button 9, the machine is in stand-by mode and the indicator 10 blinks
with red light (slowly). By pushing any button, the machine warms up and the indicator 10 blinks with red light (fast).
When the machine is ready, the indicator 10 lights up with fixed white light and the brewing buttons 3, 4 and 5 will light
up.
At this point, the appliance is ready for use.
WARNING: before use in the machine, capsules must not
be damaged. Deformed or broken capsules may get
blocked in the appliance and may damage it.
WARNING: The coffee capsules are for single use; never
attempt to re-use them.

English
9
28
Position a cup on the cup holder grid 7.
Make sure the drip tray 8 is assembled in place.
Note: adjust the height of the cup holder grill 7 based on
the size of your cup, by moving the cup holder grill higher
on its base, a second brewing height is obtained.
With the machine ready, press the brewing button (3, 4 or 5); the selected button will begin to flash and the coffee will
flow out from the coffee spout.
With the pressing of the buttons 3, 4 or 5, the coffee brewing will stop automatically at the setting doses:
• Strong coffee (Ristretto): 30 ml (± 10 ml)
• Espresso: 50 ml (± 10 ml)
• Long coffee (Caffè Lungo): 120 ml (± 10 ml)
Once the coffee brewing has been performed, always expel the capsule. Capsules are automatically expelled into the used
capsule drawer 6, by raising and lowering the handle 1.
WARNING: Never open the handle 1 during brewing
cycles.
If you want to brew another coffee, insert a new capsule for operating.
Empty the used capsule drawer 6 and the tank 11, then rinse frequently.

English
9
29
Note: it is recommended to open and close the handle 1.
This operation is used to release the capsule in the drawer.
Note: if the capsule drawer 6 is not emptied in time, other
capsules in the channel may fall into the compartment
when emptying. Therefore you must take care to clean the
indicated area regularly.
Always turn the machine off and disconnect the power supply when not use.
Note: to guarantee an optimal efficiency of the machine, it
is suggested to often empty the capsule drawer, before its
complete filling.
WARNING: the handle should only be opened for the
time needed to introduce the capsule in its corresponding
seat. Avoid touching the parts not involved in loading with
your hands or any other foreign object and do not tamper
with the handle capsule insertion or any other moving
components.
WARNING: Do not take out the drip tray while coffee is
being brewed.

English
10
30
10 NO WATER
This condition is shown by the "min" and "max" limits on the side of the tank and by the blinking of the white LED lights
of the beverage selection buttons.
11 CLEANING AND MAINTENANCE
CLEANING AFTER USE
Before starting any cleaning operation, unplug the plug from the power socket.
WARNING: NEVER IMMERSE THE MACHINE IN
WATER!
Empty the capsule drawer 6 and clean it.
Clean with a cloth damped with water and dry thoroughly.
Always place the machine on degreased and dry surfaces.
Remove the grill 7, take out and empty drawers 6-8.
To clean the capsule drawer by running a coffee empty cycle (without inserting any capsule), see section "PREPARING
COFFEE".
Wash every removed part with hot water and kitchenware detergent. Dry thoroughly and refit them.

English
11
31
12 TEMPERATURE SETTING
The temperature of the coffee can be adjusted for your preference.
To enter the temperature setting mode for heating, proceed as follows:
Turn off the machine, using the power button 9 on the back. Press the button 3 whilst switching on the machine by
means of the power button. Hold the button for 10 seconds and release it. In default configuration the LED light indicator
will be simultaneously white and red. You can now change the temperature as described below.
Once the temperature setting has been entered, select by means of the Ristretto brewing button 3.
NOTE: The machine set up sets the temperature at 3
levels, at intervals of 4°C (-4°C, Standard, +4°C).
The three temperature levels are shown by the White LED light and/or the Red one, as follows:
TEMPERATURE LEVEL LED light
Minimum White (steady light on)
Standard White and Red (steady light on)
Maximum Red (steady light on)
The temperature level changes every time the coffee brewing button is pressed.
The setting sequence is the following:
1st Push 2nd Push 3rd Push
+4 Standard -4
RED LED light on White and Red LED lights on White LED light on
To exit the temperature setting mode, switch the machine off then on again.

English
13
32
13 DOSE SELF-LEARNING
The dose of beverage brewed can be adjusted according to your preference.
To enter the dose self-learning mode, switch the machine on and wait until it reaches the heating temperature, and then:
Press and hold the coffee brewing button according to your taste.
When the indicator 10 and the LED light of the selected button start blinking with white light and faster, the machine
enters in a dose self-learning mode.
Continue to hold the coffee button to set, until the machine has brewed the desired coffee dose.
By releasing the button, the new dose is saved;
It is possible to set the new dose immediately through the same button or another available one.
Note: the machine is designed to have a maximum brewing
time of 90 seconds, for each coffee button.
14 PROLONGED MACHINE INACTIVITY
If the appliance is not going to be used for a long time, it is advisable to:
Turn it off and disconnect all electrical connections;
Empty the water tank;
Empty the used capsule drawer and the drip tray.
It is also advisable to turn off the appliance every day, when it is not used, for energy saving purposes.
After 30 minutes of inactivity, the machine turns back into energy saving mode (Stand-by).
Using the appliance for the first time after it has not been used for a long period, it is recommended to run a rinse cycle,
dispensing around half a tank of water using a cup (for more details see also Chapter "FIRST USE").

English
15
33
15 CLEANING THE DRIP TRAY
The drip tray 8 should to be rinsed thoroughly in order to remove coffee scales.
It can be washed with hot water and liquid detergent or specific washing powder in order to eliminate traces of coffee.
Note: the drip tray is dishwasher safe. Despite this,
recurrent cleaning cycles at high temperatures may cause
aesthetical deterioration, like discolouring and/or scratches.
16 WATER TANK
Tank 11 has to be cleaned weekly with liquid detergent.
The water in the tank has to be replaced every day.
It is advisable to use good quality water with low mineral content but not de-ionised or distilled water.
Note: the water tank is also dishwasher safe. Despite this,
recurrent cleaning cycles at high temperatures may cause
aesthetical deterioration, like discolouring and/or scratches.
WARNING: Only fill the tank 11 with clean and cold water.
Never fill the tank 11 with carbonated water, milk or other
liquids.
After washing the tank 11 make a rinsing wash cycle of the machine without a capsule.
See FIRST USE Chapter 8

English
17
34
17 REMOVING MINERAL DEPOSITS
To keep the machine operating efficiently, it is necessary to regularly clean the mineral deposits left by the descaling
water.
This operation must be carried out at least every thousand brewings or, in absence of brewing records, every three
months, using exclusively the Evoca descaling product (product code 21002666). You can buy Evoca Descaling product at
the following link: https://ecommerce.evocagroup.com/ Using other descaling products or disregarding the above
mentioned intervals may lead to brewing or operational faults.
In order to carry out the procedure for removing the mineral deposits, proceed as follows:
1. Fill the water tank with 0.25l of Evoca descaling product and fill up with fresh water up to the MAX level.
2. If not yet done, switch on the machine with the power button 9 and press any of the brewing buttons 3, 4 or 5 to exit
the stand-by mode: the LED indicator 10 flashes red during warm-up. When the machine is ready, the indicator 10 and
the brewing buttons are lit up in white.
3. Place a suitable capacity container on the cup holder grill 7.
4. Discharge any capsule remained in the mechanism by opening and closing handle 1.
5. Press the Caffè Lungo brewing button 5.
6. Wait for 2 minutes.
7. Repeat steps 5 and 6 until the liquid in the tank is exhausted.
8. Rinse the tank and fill it with fresh water. Empty the container placed on the grill and the drip tray 8.
9. Press the Caffè Lungo (Long coffee) brewing button repeatedly for brewing until the water in the tank is exhausted.
10. Refill the tank with fresh water and empty the drip tray 8.
11. The machine is now ready to brew normally.
18 WARNING SUMMARY CHART
Warning signals
MACHINE STATUS White LED light Caffè Ristretto
(Strong coffee) button White LED light
Espresso button
White LED light Caffè Lungo
(Long Coffee) button Red LED light
Machine on (Warm-up phase) Off Off Off ON at 1Hz frequency
Machine ready On On On Off
Strong coffee (Ristretto) brewing ON at 1Hz frequency Off Off Off
Espresso brewing Off ON at 1Hz frequency Off Off
Long coffee (Caffè Lungo)
brewing
Off Off ON at 1Hz frequency Off
Stand-by Off Off Off ON with fade effect
Missing water in the tank ON at 2Hz frequency ON at 2Hz frequency ON at 2Hz frequency Off
Functional problem* ON at 2Hz frequency ON at 2Hz frequency ON at 2Hz frequency ON at 2Hz frequency
* To restore the functioning of the machine, switch the machine off and on again. If the fault persists, please call a
technician.

English
19
35
19 TROUBLESHOOTING
Problem Possible causes SOLUTION
The machine does not turn on.
Indicator light 10 off.
Machine not connected to the
mains.
Electrical problem.
Connect the machine to the electric network.
Make sure that the rating values match the mains
rating.
The machine does not brew. Water is missing in the tank.
The handle is not correctly
closed.
Make sure that the handle 1 is completely closed
and check the water level in the tank 11.
The lights are on but the
machine does not brew coffee.
The capsule inserted may be
faulty.
Open and close the handle to discharge the capsule.
Wait for a few seconds then try again with a new capsule.
Carry out descaling operations.
Coffee is brewed only in drops or not
correctly brewed.
Coffee dispensing spout is blocked. Carry out a wash cycle for the coffee dispensing spout.
Carry out descaling operations.
Water spills out of the drip tray. High water level in the tray. Empty the tray and resume regular operation.
There are signs of water at the bottom
of machine.
The water tank is not correctly placed. Make sure that the tank 11 has been correctly installed.
A slight hiss can be heard after
the coffee has been brewed.
This is not a fault, but a normal setting of the
pressure control valve.
Machine blocked.
The capsule insertion handle will
not open.
Carry out a brewing empty cycle.
If the problem persists, please contact your
nearest assistance centre.
The table above lists the solutions to problems that may occur. For other failures not included in the table above, contact
the nearest authorised service centre.
An independent institute verified the EC Conformity of this appliance to the 2014/30/EU and 2014/35/EU directives.
This product also conforms the 2011/65/UE e 2009/125/EC directives and EC regulation n°1935/2004.

English
20
36
20 INSTRUCTIONS FOR END OF OPERATIONAL LIFE
DISPOSAL
INFORMATION FOR THE USER
in compliance with art. 13 of the Italian Legislative Decree dated 25 July 2005, no. 151 "Implementation of the directives
2002/95/EC, 2002/96/EC and 2003/108/EC on the restriction of the use of certain hazardous substances in electrical and
electronic equipment, as well as waste disposal".
The crossed-out wheeled bin icon on the appliance or its packaging indicates that the product must be disposed of
separately from other waste at the end of its operational life.
Separate collection of the appliance, once at the end of its operational life, is organised and managed by the manufacturer.
Therefore, for an appropriate disposal, the user must contact the manufacturer and observe its separate collection
management adopted for this appliance at the end of its operational life.
Separating this product for subsequent recycling, treatment and environmentally-friendly disposal will help prevent
potential environmental and health risks, and allow the materials which make up the appliance to be re-used and/or
recycled.
Specific administrative sanctions provided for by current regulations will be applied for illicit disposal of the product by
the user.
Table of contents
Other Jacobs Douwe Egberts Professional Coffee Maker manuals
Popular Coffee Maker manuals by other brands

CMA Dishmachines
CMA Dishmachines Luna Use and maintenance manual

Gastroback
Gastroback Design Espresso Maschine Advanced S operating instructions

Jura
Jura J90 Instructions for use

DeLonghi
DeLonghi KG 49 instructions

Black & Decker
Black & Decker Infuze VB100 Use and care book

AEG
AEG CG 6200 operating instructions

Nespresso
Nespresso ESSENZA PLUS instruction manual

Philips
Philips HD8942/12 operating instructions

Miele
Miele CVA 4070 EN-CA installation instructions

Philips Saeco
Philips Saeco CA6801/00 operating instructions

Cuisinart
Cuisinart Grind & Brew DGB-500 instruction manual

Black & Decker
Black & Decker BCM1410B Use and care book