JAK Max Greenworks BLG302 User manual

1
2
3
1.
45
2.
6
7
3. 4.
BLG302

BLG302
www.greenworksaustralia.com
Greenworks Australia
A Division Jak Max P/L
380 Foley’s Road Derrimut
Victoria, Australia 3026
2402207AU
EN OPERATOR MANUALBLOWER

1 Description......................................... 2
1.1 Purpose.............................................................. 2
1.2 Overview........................................................... 2
2 Introduction....................................... 2
2.1 Residual risks.....................................................2
3 General power tool safety
warnings............................................. 2
3.1 Training..............................................................2
3.2 Preparation.........................................................2
3.3 Maintenance.......................................................3
4 Blower safety warnings.....................3
5 Symbols on the product.................... 4
6 Risk levels...........................................4
7 Recycle................................................5
8 Installation......................................... 5
8.1 Unpack the machine.......................................... 5
8.2 Install the blower tube....................................... 5
8.3 Install the battery pack.......................................5
8.4 Remove the battery pack................................... 5
9 Operation........................................... 5
9.1 Start the machine............................................... 5
9.2 Stop the machine............................................... 5
9.3 Operation tips.................................................... 5
10 Maintenance.......................................6
10.1 Clean the machine............................................. 6
11 Transportation and storage..............6
11.1 Move the machine............................................. 6
11.2 Store the machine.............................................. 6
12 Troubleshooting................................. 6
13 Technical data.................................... 6
14 Warranty............................................6
1
English EN

1 DESCRIPTION
1.1 PURPOSE
The machine is used to propel air out of a tube to move
unwanted materials such as leaves in the yard. Some
machines also suck in leaves and small twigs through a
vacuum, and shred them into a bag.
1.2 OVERVIEW
Figure 1 - 4
1Trigger
2Rear tube
3Front tube
4Groove
5Tab
6Hole
7Tab
2 INTRODUCTION
Your product has been engineered and manufactured to high
standards for dependability, ease of operation, and operator
safety. When properly cared for, it will give you years of
rugged, trouble-free performance.
2.1 RESIDUAL RISKS
Even when using the power tool properly, remaining risks
may exist. The following hazards may occur based on the
construction of the equipment:
• Lung damage when not wearing a suitable protective
mask.
• Hearing damage when not wearing suitable ear
protection.
• Hand/arm damage due to vibration when you use the
equipment for extended periods, or the machine is not
properly operated and maintained.
3 GENERAL POWER TOOL
SAFETY WARNINGS
WARNING
Read all safety warnings and all instructions. Failure to
follow the warnings and instructions may result in electric
shock, fire and/or serious injury.
Save all warnings and instructions for future reference.
The term “power tool” in the warnings refers to your battery-
operated (cordless) power tool.
3.1 TRAINING
• Read the instructions carefully.
Be familiar with the controls
and the correct use of the
machine.
• Never allow children, persons
with reduced physical, sensory
or mental capabilities or lack
of experience and knowledge
or people unfamiliar with these
instructions to use the
machine. Local regulations can
restrict the age of the operator.
• Keep in mind that the operator
or user is responsible for
accidents or hazards occurring
to other people or their
property.
3.2 PREPARATION
• While operating the power tool
always wear substantial
footwear and long trousers. Do
not operate the power tool
when barefoot or wearing open
sandals. Avoid wearing
clothing that is loose fitting or
that has hanging cords or ties.
• Thoroughly inspect the area
where the power tool is to be
used and remove all objects
which can be thrown by the
power tool.
• Before using, always visually
inspect to see, that fasteners
2
English
EN

are secure, the housing is
undamaged and that guards are
in place.
• Never operate the machine
while people, especially
children, or pets are nearby.
• Obtain ear protection and
safety glasses. Wear them at all
times while operating the
machine.
3.3 MAINTENANCE
• Keep all nuts, bolts and screws
tight to be sure the power tool
is in safe working condition.
• Always allow the power tool
to cool down before storing.
• Maintain the machine with
care and keep it clean. Do not
to touch moving hazardous
parts until the battery is
removed and the moving
hazardous parts have come to a
complete stop.
• Allow the machine to cool
before making any inspections,
adjustments, storing etc.
• Replace worn or damaged
parts for safety. Use only
genuine replacement parts and
accessories.
4 BLOWER SAFETY
WARNINGS
• Operate the appliance only in
daylight or in good artificial
light.
• Keep all cooling air inlets clear
of debris.
• Never blow debris in the
direction of bystanders.
• Before starting the machine,
make certain that the tube inlet
is empty.
• Keep your face and body away
from the air intake opening.
• Do not allow hands or any
other part of the body or
clothing inside the tube inlet,
discharge chute, or near any
moving part.
• Inspect unit to ensure no
foreign material/ debris is in
the machine prior to operation.
• Never operate the machine
with defective guards or
shields, or without safety
devices or if the cord is
damaged or worn.
• Do not overreach. Keep
balance at all times, and
always be sure of the footing
on slopes. Walk, never run.
3
English EN

• Stop the machine and remove
the battery pack. Make sure
that all moving parts have
come to a complete stop,
• whenever the machine is left
by the user
• before clearing a blockage
• before checking, cleaning or
working on the machine
• after striking a foreign object
to inspect the machine for
damage
• If the machine starts to vibrate
abnormally,
• inspect for damage
• replace or repair any
damaged parts
• check for and tighten any
loose parts
5 SYMBOLS ON THE PRODUCT
Some of the following symbols may be used on this tool.
Please study them and learn their meaning. Proper
interpretation of these symbols will allow you to operate the
tool better and safer.
Symbol Explanation
Read operator's manual.
Keep bystanders away.
Symbol Explanation
Wear eye and ear protection.
Do not expose the product to rain or
moist conditions.
Keep all bystanders at least 15m away.
Do not touch the fan when you oper-
ate this machine.
Failure to keep loose clothing from
being drawn into air intake could re-
sult in personal injury.
Failure to keep long hair away from
the air inlet could result in personal in-
jury.
Rotating impeller blades can cause se-
vere injury.
6 RISK LEVELS
The following signal words and meanings are intended to
explain the levels of risk associated with this product.
SYM-
BOL
SIGNAL MEANING
DANGER Indicates an imminently haz-
ardous situation,which, if not
avoided, will result in death
or serious injury.
WARNING Indicates a potentially hazard-
ous situation,which, if not
avoided, could result in death
or serious injury.
CAUTION Indicates a potentially hazard-
ous situation, which, if not
avoided, may result in minor
or moderate injury.
CAUTION (Without Safety Alert Sym-
bol) Indicates a situation that
may result in property dam-
age.
4
English
EN

7 RECYCLE
Separate collection. You must not discard
with usual household waste. If it is necessa-
ry to replace the machine, or if it is no more
use to you, do not discard it with household
waste. Make this machine available for sepa-
rate collection.
Separate collection of used machine and
packaging let you recycle materials and use
them again. Use of the recycled materials
helps prevent environmental pollution and
decreases the requirements for raw materi-
als.
At the end of their useful life, discard batter-
ies with a precaution for our environment.
The battery contains material that is danger-
ous to you and the environment. You must
remove and discard these materials separate-
ly at a equipment that accepts lithium-ion
batteries.
8 INSTALLATION
8.1 UNPACK THE MACHINE
WARNING
Make sure that you correctly assemble the machine before
use.
WARNING
• If the parts have damage, do not use the machine.
• If you do not have all the parts, do not operate the
machine.
• If the parts are damaged or missing, speak to the service
center.
1. Open the package.
2. Read the documentation in the box.
3. Remove all the unassembled parts from the box.
4. Remove the machine from the box.
5. Discard the box and package in compliance with local
regulations.
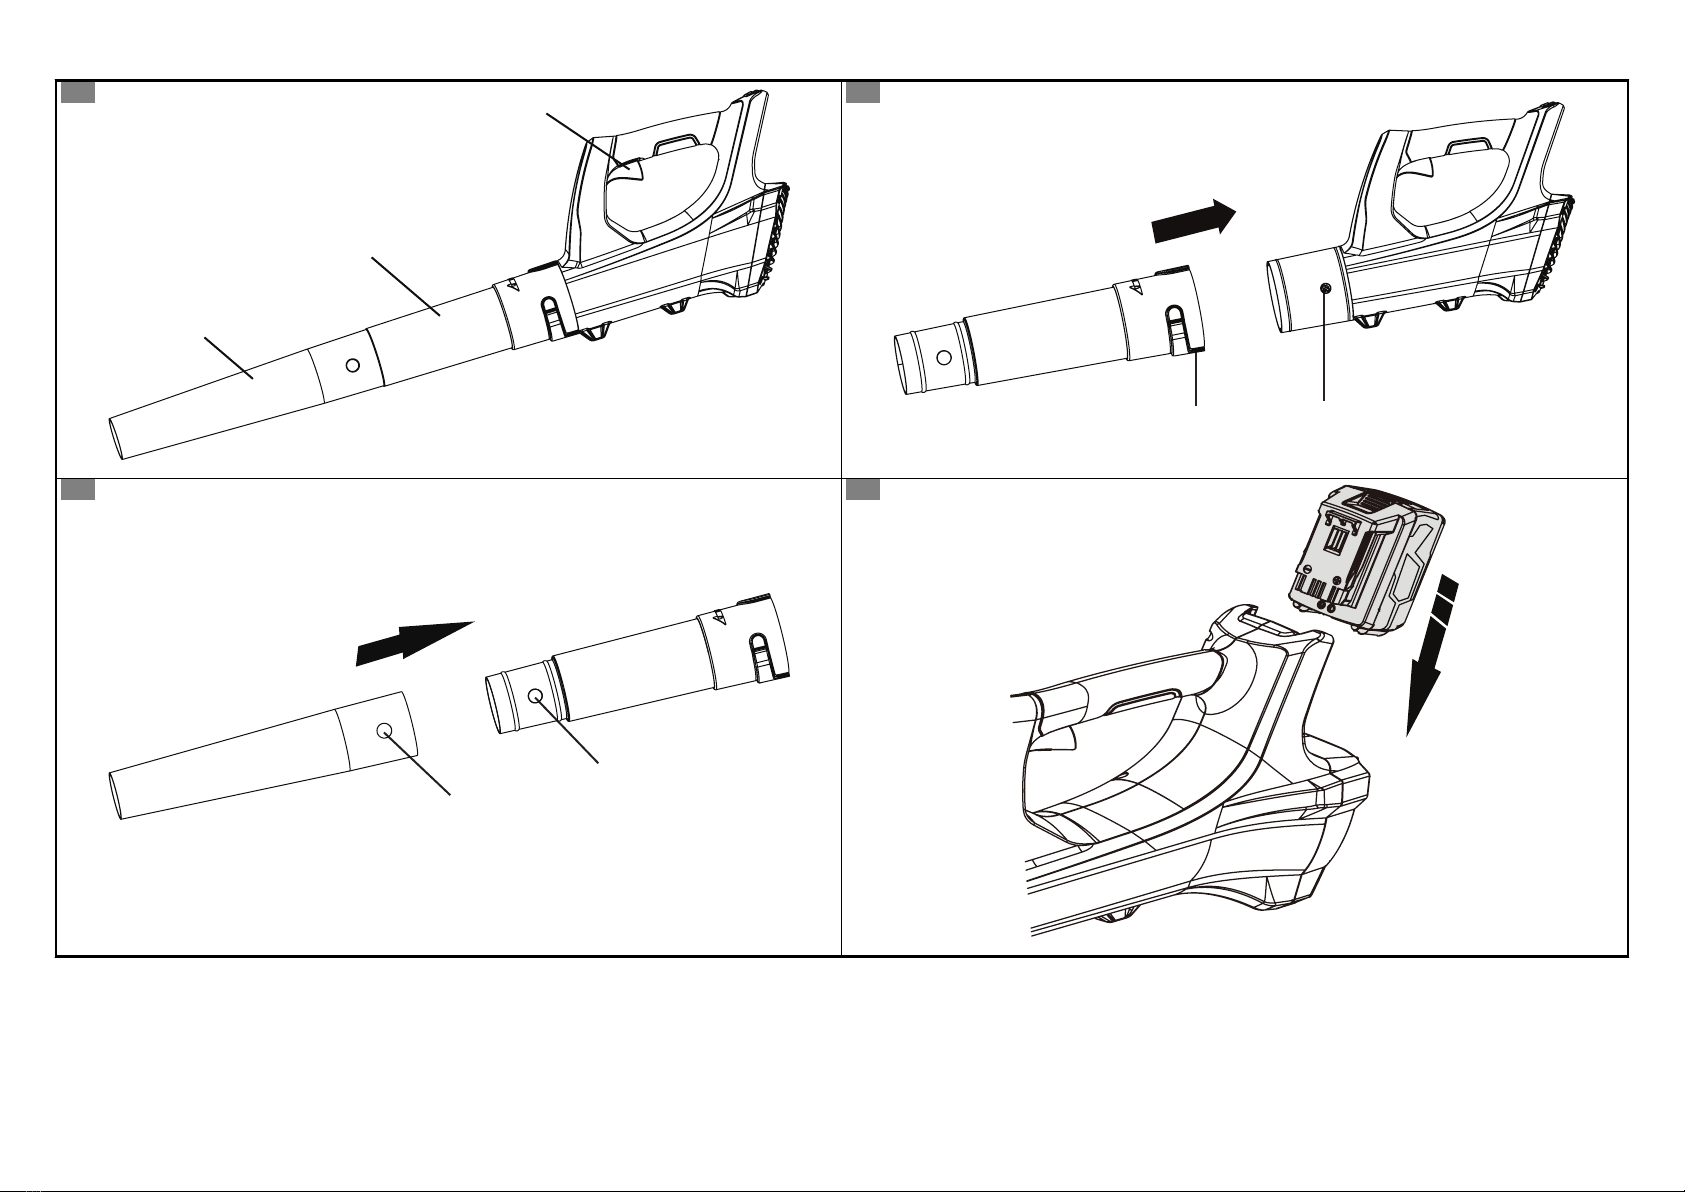
8.2 INSTALL THE BLOWER TUBE
Figure 2 - 3.
1. Align the grooves on the rear tube with tabs on the
blower housing.
2. Install the rear tube onto the blower housing until the tabs
engage the grooves.
3. Turn the rear tube in the direction of the arrow until the
two tabs lock into the positions.
4. Align the hole on the front tube with the tab on the rear
tube.
5. Install the front tube onto the rear tube until the tab lock
into the position.
8.3 INSTALL THE BATTERY PACK
Figure 4.
WARNING
• If the battery pack or charger is damaged, replace the
battery pack or the charger.
• Stop the machine and wait until the motor stops before
you install or remove the battery pack.
• Read, know, and do the instructions in the battery and
charger manual.
1. Align the lift ribs on the battery pack with the grooves in
the battery compartment.
2. Push the battery pack into the battery compartment until
the battery pack locks into place.
3. When you hear a click, the battery pack is installed.
8.4 REMOVE THE BATTERY PACK
Figure 4.
1. Push and hold the battery release button.
2. Remove the battery pack from the machine.
9 OPERATION
WARNING
Make sure the blower tube is in position before operation.
9.1 START THE MACHINE
Figure 1.
1. Pull the trigger to start the machine.
2. Pull the trigger fully to increase the speed.
3. Release the trigger to decrease the speed.
9.2 STOP THE MACHINE
Figure 1
1. Release the trigger to stop the machine.
NOTE
Wait until the engine stops after you stop the machine.
9.3 OPERATION TIPS
• Blow around the outer edge of the unwanted materials to
prevent the unwanted materials from scattering.
• Use rakes and brooms to clear the unwanted material
before you blow.
5
English EN

• Make the surfaces wet before you clear the unwanted
material in dusty conditions.
• Look out for children, pets, open windows, and cleaned
cars during operation.
• Clean the machine.
• Discard the unwanted material when you complete work.
10 MAINTENANCE
CAUTION
Do not let brake fluids, gasoline, petroleum-based materials
touch the plastic parts. Chemicals can cause damage to the
plastic, and make the plastic unserviceable.
CAUTION
Do not use strong solvents or detergents on the plastic
housing or components.
WARNING
Remove the battery pack from the machine before
maintenance.
10.1 CLEAN THE MACHINE
CAUTION
The machine must be dry. Humidity can cause risks of
electrical shocks.
• Clear the unwanted material out of the air vent with a
vacuum cleaner.
• Do not spray the air vent or put the air vent in solvents.
• Clean the housing and the plastic components with a
moist and soft cloth.
11 TRANSPORTATION AND
STORAGE
WARNING
Remove the battery pack from the machine before
tranportation and storage.
11.1 MOVE THE MACHINE
• Only hold the machine with the handgrip.
11.2 STORE THE MACHINE
• Clean the machine before storage.
• Make sure that the motor is not hot when you store the
machine.
• Make sure that the machine does not have loose or
damaged parts. If it is necessary, do these steps/
instructions:
• Replace the damaged parts.
• Tighten the bolts.
• Speak to a person of an approved service center.
• Store the machine in a dry area.
• Make sure that children cannot come near the machine.
12 TROUBLESHOOTING
PROBLEM POSSIBLE
CAUSE
SOLUTION
The motor does
not start when
you pull the trig-
ger.
The battery pack is
not installed tight-
ly.
Make sure that
you tighlty install
the battery pack in
the machine.
The battery pack is
out of power.
Charge the battery
pack.
The machine does
not start.
The power switch
is defective. Replace the defec-
tive parts by an ap-
proved service
center.
The motor is defec-
tive.
The PCB board is
defective.
The air does not
flow through the
tube when you
start the machine.
The air inlet or
tube outlet has a
blockage.
Remove the block-
age.
13 TECHNICAL DATA
Voltage 24 V DC
Air volume 9.4 m³/min
Air speed 161 km/h
Weight (without battery pack) 1.5 kg
Measured sound pressure level LPA= 86.8 dB(A),
KPA= 3 dB(A)
Guaranteed sound power level LWA.d= 106 dB(A)
Vibration < 2.5 m/s2 , K = 1.5
m/s2
14 WARRANTY
(The full warranty terms and conditions can be found on
Greenworks webpage)
The Greenworks warranty is 4 years on the product, and 2
years on batteries (consumer/private usage) from the date of
purchase. This warranty covers manufacturing faults. A faulty
product under warranty might be either repaired or replaced.
A unit that has been misused or used in other ways then
described in the owner’s manual might be rejected for
warranty. Normal wear, and wear parts are not considered as
warranty. The original manufacturer warranty is not affected
by any additional warranty offered by a dealer or retailer.
6
English
EN

A faulty product must be returned to the point of purchase in
order to claim for warranty, together with the proof of
purchase (receipt).
7
English EN
Table of contents