LawnMaster NPTBL26A User manual
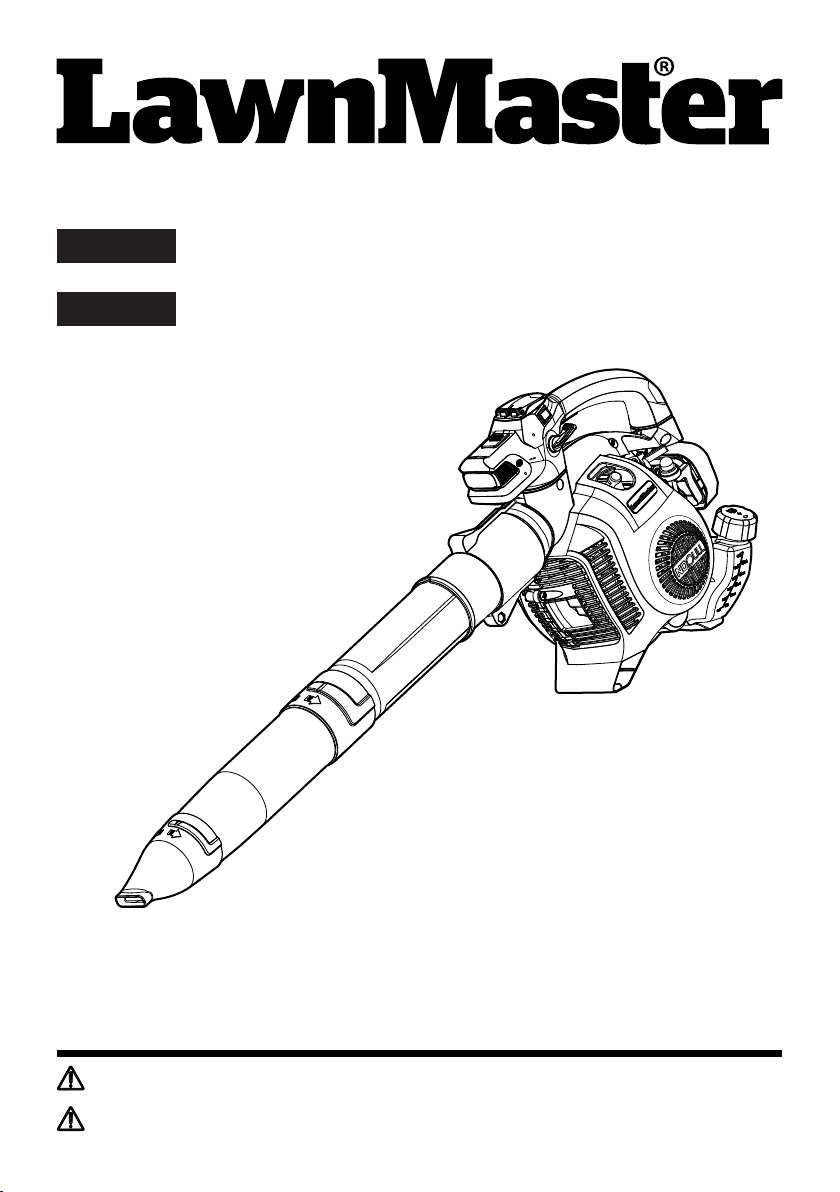
Operator's Manual / Manual del usuario
26cc 2-Cycle Leaf Blower NPTBL26A
EN p. 2
Read all safety rules and instructions carefully before operating this tool.
601 Regent Park Court Greenville, SC 29607, SC 29650 1-866-384-8432
Lea con cuidado todas las reglas e instrucciones de seguridad antes de utilizar esta herramienta.
601 Regent Park Court Greenville, SC 29607, SC 29650 1-866-384-8432
NOTICE:
Only use unleaded gasoline containing up to 10% ethanol. Do not use E15 or E85 fuel in this blower. It
will violate the federal law, damage the blower and void your warranty.
AVISO:
Utilice solo gasolina sin plomo que contenga un máximo de 10 % de etanol. No reposte este soplador
con gasolina E15 o E85. Es una violación de la ley Federal, dañará el soplador y anulará su garantía.
Save this manual for future reference
Conserve este manual para referencia futura.
Sopladora de Hojas de 26cc y 2 Tiempos NPTBL26A
ES p. 40

2
Section Page
TABLE OF CONTENTS
TABLE OF CONTENTS 2
SPECIFICATIONS 3
IMPORTANT SAFETY INSTRUCTIONS 4-7
SYMBOLS 8-9
KNOW YOUR BLOWER 10
ASSEMBLY 11-14
BATTERY PACK AND CHARGER 15-16
OPERATION 17-23
MAINTENANCE 24-29
ENVIRONMENTALLY SAFE BATTERY DISPOSAL 30
TROUBLESHOOTING 31-32
LAWNMASTER®WARRANTY 33
EXPLODED VIEW 34
PARTS LIST 35
EXPLODED VIEW 26CC 2-CYCLE ENGINE 36
PARTS LIST 26CC 2-CYCLE ENGINE 37
NOTES 38-39

3
SPECIFICATIONS
Engine Size 2-Stroke / Full Crank
Engine Displacement 26 cc
Power / Speed 0.65 kW / 7500 RPM
Idle Speed 3000 RPM
Max Torque / Speed 0.9 Nm / 6000 RPM
Fuel Tank Capacity 400 ml
Fuel / Oil Ratio 40 : 1
Max Air Speed 200 MPH
Max Air Volume 350 CFM
Net Weight 11.3 lbs (5.1 kg)
Battery Model No. 07LB2001-S
Battery Type 7.2 VDC Lithium-Ion, 2.0 Ah
Charger Model No. YLS0042-T084045
Charger Input 100-240 V ~ 50/60 Hz 0.3 A Max
Charger Output 8.4 V 450 mA
Charging Period (Battery Fully Discharged) 4-6 Hours
26cc-2 CYCLE LEAF BLOWER

4
READ ALL INSTRUCTIONS AND SAVE THESE INSTRUCTIONS.
Read the Operator’s Manual and follow all warnings and safety instructions. Failure to do so can result
in serious injury to the operator and/or bystanders.
IMPORTANT SAFETY INSTRUCTIONS
WARNING
■ Do not allow children or persons unfamiliar with the product and these instructions to use the
blower.
■ Use the blower only for clearing or removing leaves, grass, lawn clippings, paper, dust, and other
debris off the ground.
■ Clear the work area of large and dangerous objects before each use. Remove all objects such as
rocks, broken glass, nails, wire, or string, which can be thrown or become entangled in the blower.
■ To reduce the risk of hearing loss associated with sound levels, hearing protection is required.
■ To reduce the risk of injury associated with thrown objects, always wear eye protection. Eye
protection should meet the requirements of ANSI Z87.1.
■ To reduce the risk of injury associated with the inhalation of dust, use a face lter mask in dusty
conditions.
■ Do not operate this blower when you are tired, ill, or under the inuence of alcohol, drugs, or
medication.
■ Always wear heavy, long pants, boots, gloves, and a long-sleeve shirt. To reduce the risk of injury
associated with objects being drawn into rotating parts, do not wear loose clothing, scarves, jewelry,
etc. Secure hair so it is above shoulder level.
■ Inspect the blower before each use. Replace damaged parts. Check for fuel leaks. Make sure
all visible fasteners are in place and secure. Make sure attachments are properly installed and
securely fastened. Be sure accessories are properly attached and in the position recommended by
the manufacturer.
■ Maintain a rm grip while using this blower. Hold the handle in one hand with thumb and ngers
encircling the handle to prevent the blower from dropping.
■ Keep rm footing and balance. Do not overreach. Keep all parts of your body away from hot
surfaces.
■ Never start or run the blower inside a closed room or building; breathing exhaust fumes can cause
serious personal injury or death.
■ Mix and pour fuel outdoors where there are no sparks or ames. Slowly remove the fuel cap only
after stopping the engine and letting it cool completely. Do not smoke while fueling or mixing fuel.
Wipe spilled fuel from the blower. Move at least 10 ft. (3 m) away from the fueling source and site
before starting the engine. Always store gasoline in a container approved for ammable liquids.
■ Clear the area of children, bystanders, and pets. At a minimum, keep all children, bystanders, and
pets outside a 50 ft. (15 m) radius; outside the 50 ft. (15 m) zone, there is still a risk of injury from
thrown objects. Bystanders should be encouraged to wear eye protection. If you are approached,
stop the engine.
■ Maintain stable footing on a solid surface at all times when using the blower in order to have better
control of the blower. Do not use the blower whilst on a ladder, roof, tree or other unstable support.
Working from ladders or high places could result in severe injury.
■ Before transporting the blower in a vehicle, allow the engine to cool completely and empty the fuel
tank. Always secure the blower to avoid movement during transportation.

5
IMPORTANT SAFETY INSTRUCTIONS
■ Empty the fuel tank and clean the blower before long-term storage. Empty the fuel tank following the
city or neighborhood regulations on disposal of fuel.
■ Store the blower in an area that children and unapproved persons cannot access.
■ To reduce the risk of injury associated with contacting rotating parts, stop the engine before
installing or removing attachments. Do not operate without tubes in place. Always disconnect the
spark plug before performing maintenance or accessing movable parts.
■ Operate the blower only at reasonable hours, not early in the morning or late at night when people
might be disturbed. Comply with times listed in local ordinances.
■ To reduce sound levels, limit the number of pieces of equipment used at any one time.
■ To keep sound levels down, operate blowers at the lowest possible engine speed.
■ Use rakes and brooms to loosen debris that may be packed down, before blowing.
■ In dusty conditions, slightly dampen surfaces when water is available.
■ Conserve water by using blowers instead of hoses for many lawn and garden applications, including
areas such as gutters, screens, patios, grills, porches, and gardens.
■ Avoid blowing debris towards people, pets, open windows, or cars.
■ Use the full blower nozzle extension when blowing.
■ Clear and dispose of debris in trash bins or bags after using blowers and other equipment. Do not
allow debris to settle on the street where it can wash down a drain.
■ Make sure that the blower is in good condition before operation; check the mufer, air intake and air
lter in particular.
■ Do not touch the engine or the mufer when the engine is on and avoid contact after it has been
used; wait until the surfaces cool down. Contact with hot surfaces could result in serious burns.
■ Do not operate the blower in poor lighting.
■ Do not place any objects inside the blower tubes. Make sure the tubes are clear before using.
■ Never use the blower near res, replaces, re pits, hot ashes, outdoor cooking grills, etc., which
may cause the re to spread.
■ Never place the blower on any surface, except a hard, clean surface when the engine is running.
Gravel, sand, and other debris can be picked up by the air inlet and thrown at the operator or
bystanders, causing possible serious injuries.
■ Before fueling or storing the blower, stop the engine and allow it to cool completely.
■ Only use replacement parts or accessories provided or listed in this Operator’s Manual.
■ This blower is not intended for extended use. Extended periods of operation can cause circulatory
problems in the user’s hands due to the vibration caused by the tool. Take regular breaks from
operating the tool.
■ Always take your blower to an authorized service center for repair. Service performed by
inexperienced or unqualied persons may damage the blower, create unsafe conditions, increase
the risk of personal injury, and/or void your warranty.
BATTERY PACK
■ The battery pack is only compatible with the YLS0042-T084045 charger.
■ Charge the battery only with the charger specied by the manufacturer and listed in this manual. A
charger that is suitable for one type of battery pack may create a risk of re when used with another
battery pack.
■ Do not place battery powered tools or their batteries near re or heat. This will reduce the risk of
explosion and possibly injury.
■ Do not open or mutilate the battery pack. Released electrolyte is corrosive and may cause damage
to the eyes or skin. It may be toxic if swallowed.

6
IMPORTANT SAFETY INSTRUCTIONS
■ Do not dispose of battery packs in re. They will explode or leak and cause injury. Liquid ejected
from the battery may cause irritation or burns.
■ Do not crush, drop or damage the battery pack. Do not use a battery pack or charger that has been
dropped or received a sharp blow. A damaged battery is subject to explosion. Properly dispose of a
dropped or damaged battery immediately.
■ Batteries can explode in the presence of a source of ignition, such as a pilot light. To reduce the
risk of serious personal injury, never use any cordless product in the presence of open ame. An
exploded battery pack can propel debris and chemicals. If exposed, ush with water immediately.
■ Under extreme usage or temperature conditions, battery pack leakage may occur. If liquid comes in
contact with your skin, wash immediately with soap and water, then neutralize with lemon juice or
vinegar. If liquid gets into your eyes, ush them with clean water for at least 10 minutes, then seek
immediate medical attention.
■ When the battery pack is not in use, keep it away from other metal objects like: paper clips, keys,
nails, screws, or other small metal objects that can make a connection from one terminal to another.
Shorting the battery pack terminals together may cause sparks, burns, or a re.
■ Do not expose a battery pack to re or excessive temperature. Exposure to re or temperature
above 265°F (130°C) may cause an explosion.
■ Do not modify or attempt to repair the battery pack (as applicable) except as indicated in the
instructions for use and care.
■ Follow all charging instructions and do not charge the battery pack outside the temperature range
specied in the instructions. Charging improperly or at temperatures outside of the specied range
may damage the battery and increase the risk of re.
BATTERY CHARGER
■ This charger is only compatible with a 07LB2001-S lithium-ion battery.
■ To reduce the risk of injury, charge only the specied lithium-ion rechargeable batteries. Other types
of batteries may burst, causing personal injury or damage.
■ Do not charge the battery in a damp or wet location. Following this rule will reduce the risk of electric
shock.
■ Keep the cord and charger away from heat to prevent damage to housing or internal parts.
■ Do not operate charger with a damaged cord or plug, which could cause shorting and electric shock.
If damaged, immediately discontinue use. Replace the charger with an identical model as listed in
this manual.
■ Do not use a charger that has been dropped or received a sharp blow.
■ Do not disassemble charger. Take it to a qualied service center to be checked or replaced.
Incorrect reassembly may result in a risk of electric shock or re.
■ Do not abuse the charger cord. Never use the cord for carrying, pulling or unplugging.
■ Keep the cord away from heat, oil, sharp edges or moving parts. Damaged or entangled cords
increase the risk of electric shock. If the charger cord is damaged, replace the charger with an
identical model as listed in this manual.
■ A charger that is suitable for one type of battery pack may create a risk of re when used with
another battery pack.
■ Charge the battery at the normal charging temperature between 40°F (4°C) and 100°F (38°C).
FCC COMPLIANCE
■ This device complies with Part 15 of the FCC Rules. Operation is subject to the following two
conditions:

7
IMPORTANT SAFETY INSTRUCTIONS
- This device may not cause harmful interference, and
- This device must accept any interference received, including interference that may cause
undesired operation.
NOTE: This equipment has been tested and found to comply with the limits for a Class B digital device,
pursuant to Part 15 of the FCC Rules. These limits are designed to provide reasonable protection
against harmful interference in a residential installation.
■ This equipment generates, uses and can radiate radio frequency energy and, if not installed and
used in accordance with the instructions, may cause harmful interference to radio communications.
However, there is no guarantee that interference will not occur in a particular installation. If
this equipment does cause harmful interference to radio or television reception, which can be
determined by turning the equipment off and on, the user is encouraged to try to correct the
interference by one or more of the following measures:
- Reorient or relocate the receiving antenna.
- Increase the separation between the equipment and receiver.
- Connect the equipment into an outlet on a circuit different from that of the receiver.
- Consult the dealer or an experienced radio/ TV technician for help.
SAVE THESE INSTRUCTIONS
Refer to them frequently and use them to instruct others who may use this product. If you loan someone
this product, loan them these instructions also.
The engine exhaust from this product can expose you to chemicals including carbon monoxide, which
is known to the State of California to cause cancer, birth defects, or other reproductive harm. To reduce
the risk of serious or fatal injury/illness, never run the machine indoors or in poorly ventilated locations.
For more information go to www.P65Warnings.ca.gov.
WARNING
8
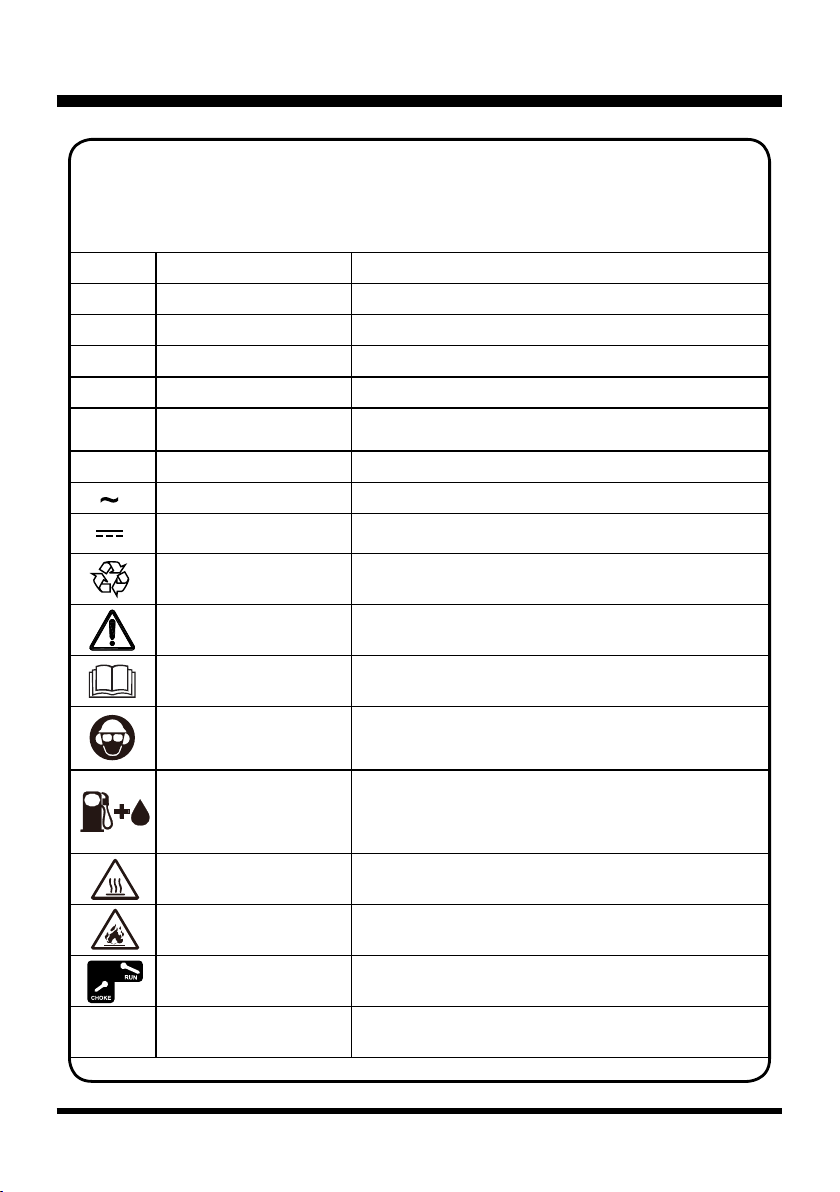
SYMBOLS
SYMBOL NAME DESIGNATION/EXPLANATION
VVolts Voltage
AAmperes Current
Hz Hertz Frequency(cycles per second)
WWatt Power
hrs Hours Time
/min Per Minute Revolution, strokes, surface speed, orbits etc, per
minute
noNo Load Speed No Load Speed
Alternating Current Type of current
Direct Current Type or a characteristic of current
Lithium-Ion Battery
Recycling
Designates that this tool is in compliance with
Lithium-Ion battery recycling program requirements.
Safety Alert Precaution that involves your safety.
Read The Operator’s
Manual You must read the operating instructions carefully.
Eye and Hearing
Protection
Always wear eye protection with side shields marked
to comply with ANSI Z87.1 along with hearing
protection when operating this equipment.
Gasoline and Lubricant
Use unleaded gasoline intended for motor vehicle
use with an octane rating of 87 [(R + M) / 2] or higher.
This product is powered by a 2-cycle engine and
requires pre-mixing gasoline and 2-cycle lubricant.
Hot Surface Taking care to avoid coming into contact with a hot
surface.
Warning; Flammable
Material
Taking care to avoid causing a re by igniting
ammable material.
Choke Lever State “RUN” and “CHOKE” position of choke lever.
START Start Press the start button.
Some of the following symbols may be used on this product. Please study them and
learn their meaning. Proper interpretation of these symbols will allow you to operate
the product better and safer.
9
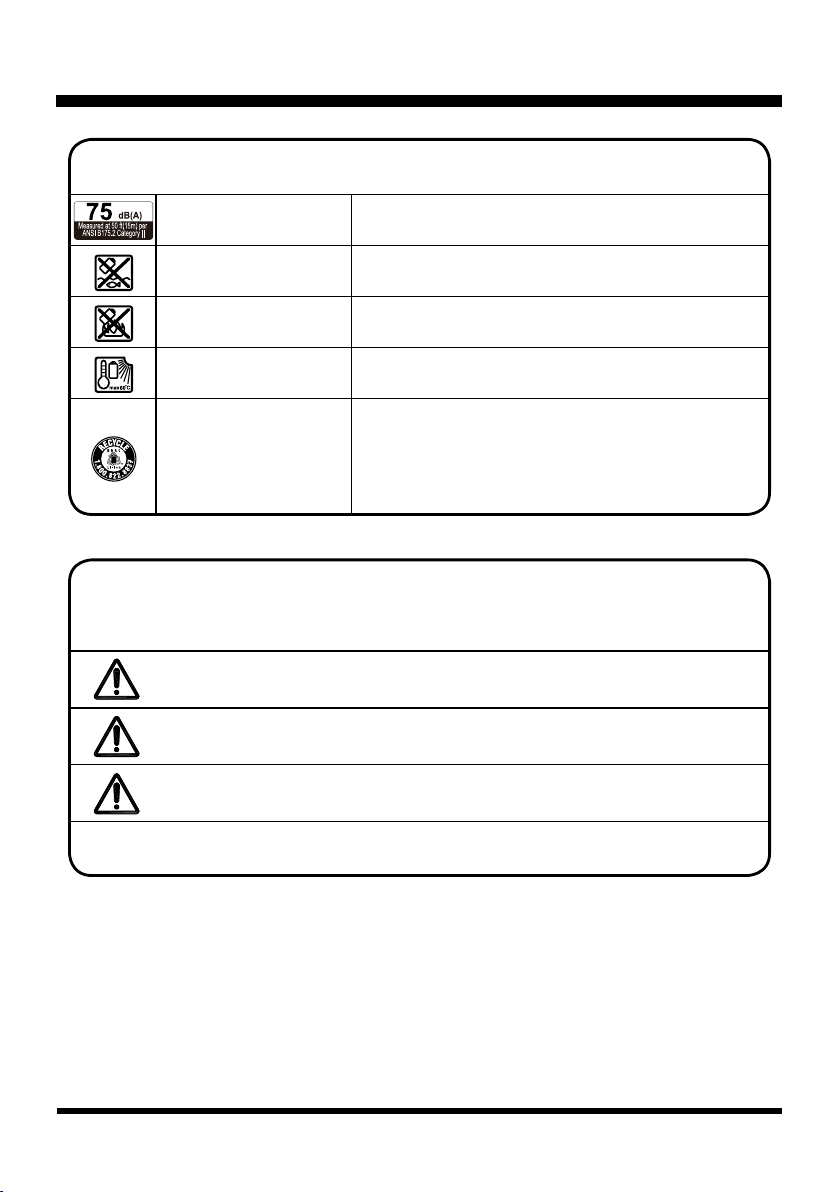
SYMBOLS
SYMBOL NAME DESIGNATION/EXPLANATION
Sound Level 50 ft. (15 m) bystander sound level of the unit.
Keep Away From Water Do not dispose of battery packs in rivers or immerse
in water.
Keep Away From Fire Do not dispose of battery packs in re. They will
explode or leak and cause injury.
Heat Alert Do not expose battery packs to heat in excess of
140°F (60°C).
Recycle Symbol
This product uses lithium-ion batteries. Local, state,
or federal laws may prohibit disposal of batteries in
ordinary trash. Consult your local waste authority
for information regarding available recycling and/or
disposal options.
SYMBOL SIGNAL MEANING
DANGER Indicates an imminently hazardous situation, which, if not
avoided, will result in death or serious injury.
WARNING Indicates a potentially hazardous situation, which, if not
avoided, could result in death or serious injury.
CAUTION Indicates a potentially hazardous situation, which, if not
avoided, may result in minor or moderate injury.
NOTICE (Without Safety Alert Symbol) Indicates a situation that may
result in property damage.
The following signal words and meanings are intended to explain the levels of risk
associated with this product.
10
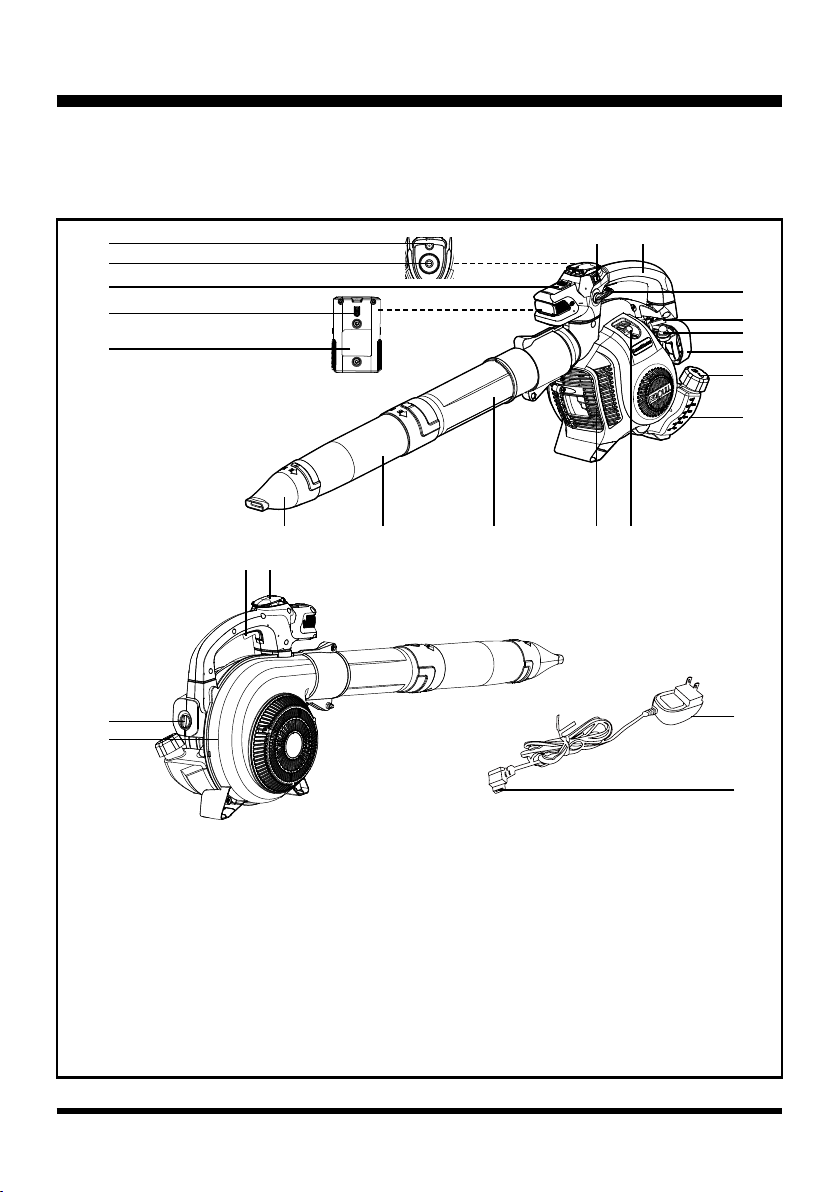
KNOW YOUR BLOWER
The safe use of this product requires an understanding of the information on the product and in this
Operator’s Manual, as well as knowledge of the project you are attempting. Before use of this product,
familiarize yourself with all operating features and safety rules.
Components
1. Stop Switch
2. Handle
3. Cruise Control Lever
4. Choke Lever
5. Primer Bulb
6. Air Filter Cover
7. Fuel Tank Cap
8. Fuel Tank
1 2
3
4
5
6
7
23
8
24
910111213
20
21
14
22
15
18
17
16
19
9. Spark Plug Cap
10. Mufer with Spark Arrestor
11. Rear Blower Tube
12. Front Blower Tube
13. Concentrator Nozzle
14. Battery Pack
15. Charging Port
16. Battery Release Button
17. Start Button
18. Battery Indicator
19. Throttle Lever
20. Start Button Cover
21. Engine Housing
22. Air Filter Knob
23. Charger
24. Charging Connector

11
ASSEMBLY
WARNING
WARNING
WARNING
If any parts are damaged or missing do not operate this product until the parts are replaced. Use of
this product with damaged or missing parts could result in serious personal injury.
Do not attempt to modify this product or create accessories not recommended for use with this
product. Any such alteration or modication is misuse and could result in a hazardous condition
leading to possible serious personal injury.
To prevent accidental starting that could cause serious personal injury, always remove the battery pack
from the product when assembling parts.
This product requires assembly.
■ Carefully remove the product and any accessories from the box. Make sure that all items listed in
the packing list are included.
■ Inspect the product carefully to make sure no breakage or damage occurred during shipping.
■ Do not discard the packing material until you have carefully inspected and satisfactorily operated
the product.
■ If any parts are damaged or missing, please return the product from place of purchase and
exchange for a new one or call the service center.
PACKING LIST
(1) Blower
(1) Front Blower Tube
(1) Rear Blower Tube
(1) Concentrator Nozzle
(1) Operator's Manual
(1) 7.2V Lithium-Ion 2.0Ah Battery Pack
(1) Battery Charger
(1) Spanner
(1) Socket Wrench
12
ASSEMBLY
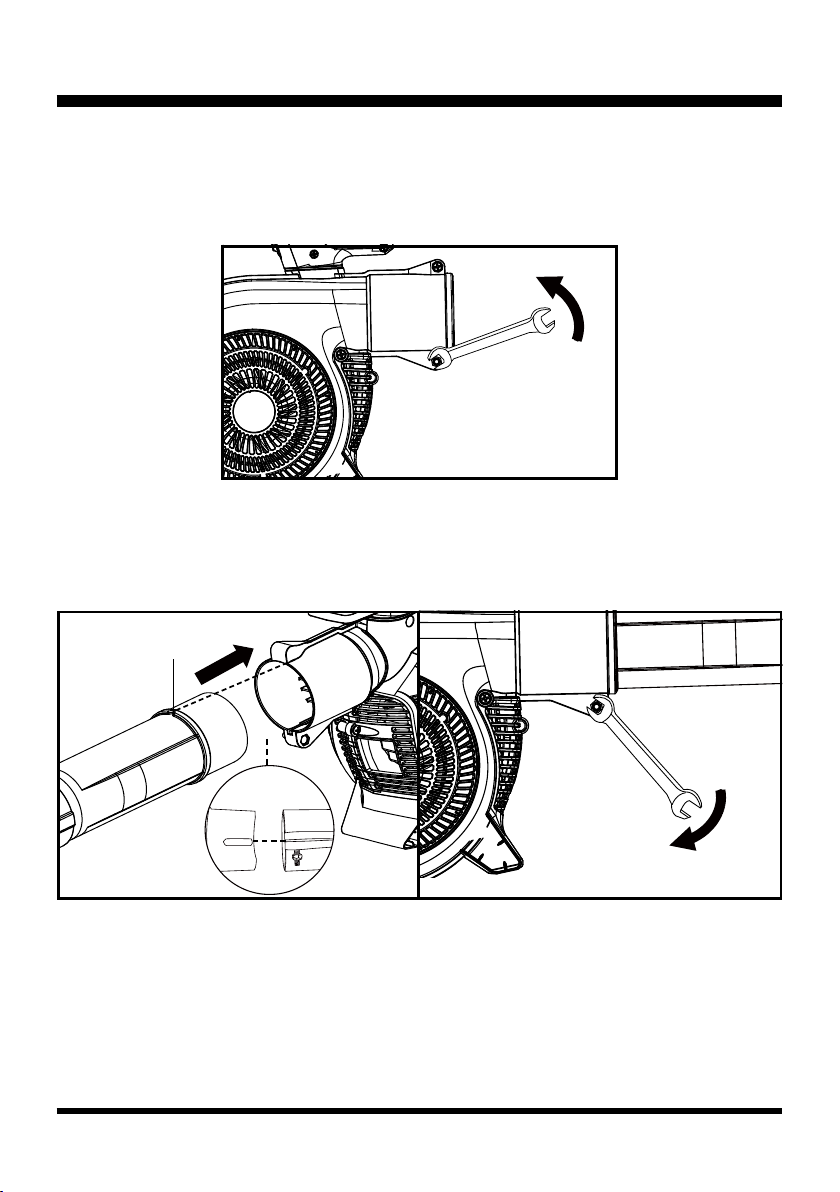
ASSEMBLING THE BLOWER TUBES (See Figs. 1-6)
■ The nut on the screw securing the front opening on the blower shall be sufciently loose to insert the blower
tube into the front opening on the blower. Turn the nut counter clockwise using the spanner provided to
loosen it (Fig. 1).
■ Insert the rear blower tube into the front opening on the blower. Pay attention that the notch on the blower
tube aligns with the middle of the upper part of the front opening. Make sure the raised tab on lower part of
the blower tube aligns with the slot on the lower part of the front opening. Insert the rear blower tube into
place and secure the nut tight using the spanner (Fig. 2 & 3).
Fig. 1
Fig. 3
Fig. 2
Notch

13
ASSEMBLY
■ Install the widest end of the front blower tube onto the rear blower tube. Align the indexing tabs with correct
sized index channels; once achieved, turn clockwise to lock into place (Fig. 4).
■ Install the concentrator nozzle onto the front blower tube. Align the indexing tabs with correct sized
index channels; once achieved, turn clockwise to lock into place. Make sure the blower tubes and the
concentrator nozzle are assembled securely into place. (Fig. 5 & 6).
NOTE: The concentrator nozzle is optional. Assemble it when high air speed is required.
Fig. 4
Fig. 5 Fig. 6
Front Blower Tube
Index
Channel
I
II
Indexing
Tab
Rear Blower Tube
Index
Channel
Indexing
Tab
I
II
14
ASSEMBLY
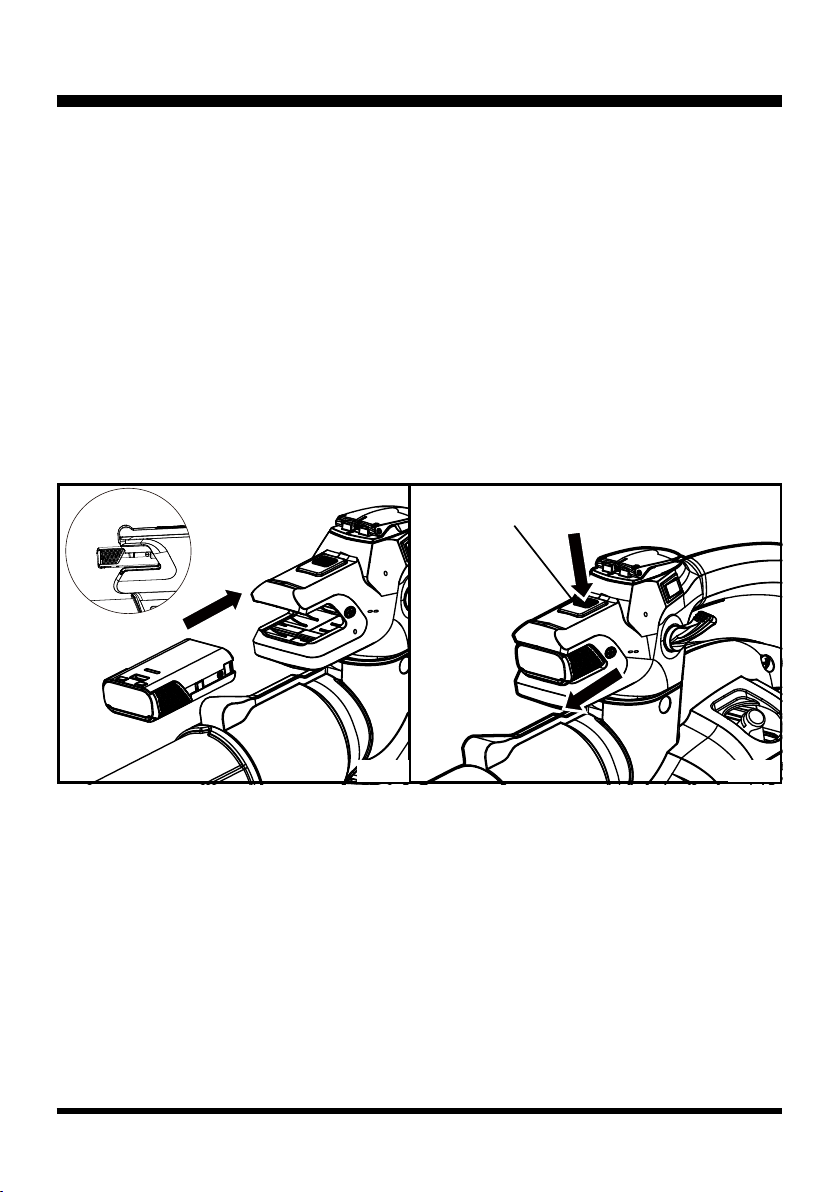
INSTALLING AND REMOVING THE BATTERY PACK (See Figs. 7-8)
To install the battery pack:
■ Align the battery pack with the battery slot.
■ Insert the battery pack into the battery slot until the battery pack secures into place. Make sure the battery
inserted in the correct direction (Fig. 7).
■ Do not use force when inserting the battery pack. It should slide into position and "click".
To remove the battery pack:
■ Locate the battery release button, press and hold the button up (Fig. 8).
■ Slide the battery pack off the battery slot.
Fig. 7 Fig. 8
Battery Release Button
Wrong
■ To remove the concentrator nozzle and front blower tube, rotate the concentrator nozzle and front blower
tube counter clockwise to unlock them and remove.
■ To remove the rear blower tube, loosen the nut and remove the rear blower tube from the front opening on
the blower.

15
BATTERY PACK AND CHARGER
BATTERY CHARGING
■ Use only with 8.4V LawnMaster®YLS0042-T084045 battery charger. The battery charger supplied
is specically designed for the lithium-ion battery used in this tool.
■ Check the power voltage! Battery chargers operate on 100-240V AC.
■ Charge the battery between 40°F (4°C) and 100°F (38°C) to ensure an optimum battery service life.
■ Protect the battery from heat, from continuous exposure to sun, and keep away from radiation or
other heat sources. Do not leave the battery in the tool in direct sunlight over long periods.
■ The battery is supplied uncharged. Fully charge the battery before using the tool for the rst time.
The lithium-ion battery can be charged at any time without reducing its service life. Interrupting the
charging procedure does not affect the battery.
CHARGER LEDS
■ If the battery is not connected to the charger, a continuous green LED light indicates that the plug is
plugged into an outlet socket and the battery charger is ready for operation.
■ Charging: a continuous red LED on the charger indicates that the battery is charging normally.
■ Charged: a continuous green LED on the charger indicates that the battery is ready for use.
■ After continuous or repeated charging cycles without interruption, the charger may warm up. This is
normal and does not indicate a technical defect of the battery charger.
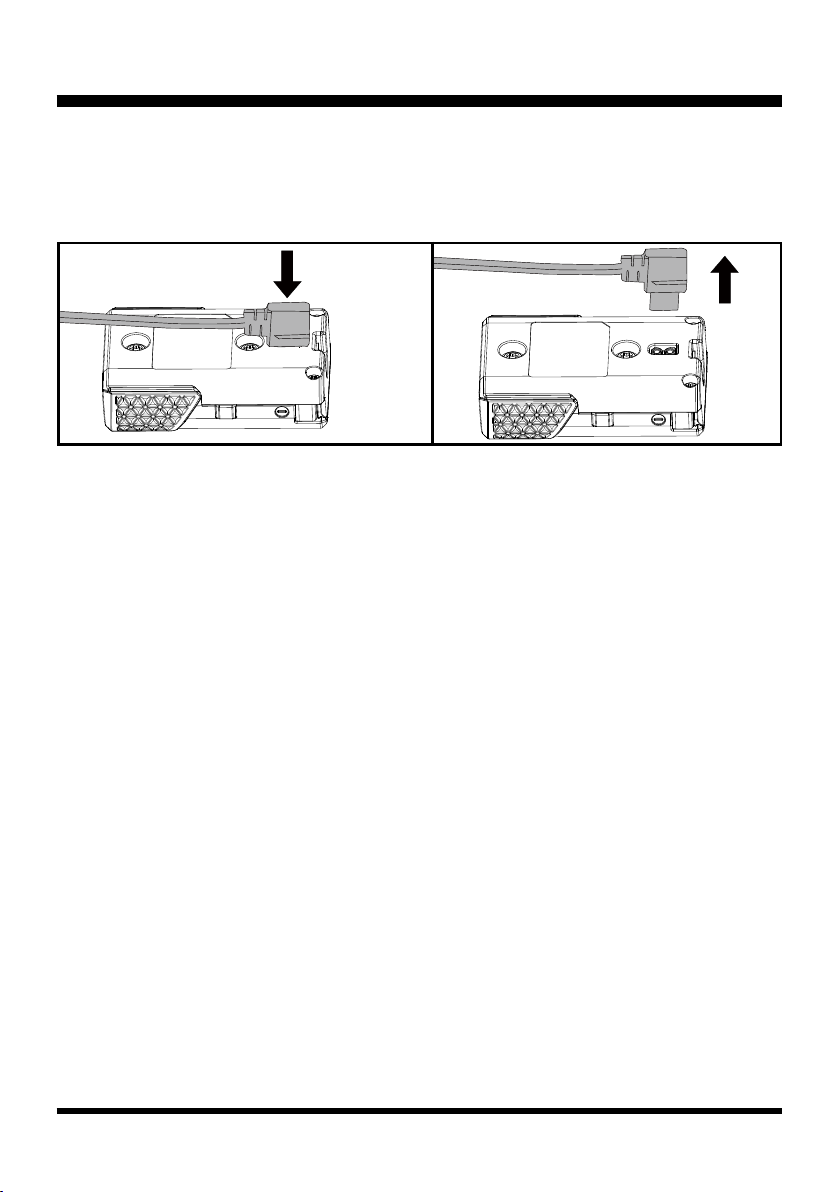
CHARGING THE BATTERY PACK (See Figs. 9-10)
INDICATOR LIGHTS STATUS
Green, continuous Fully charged / Connected to
power supply (Standby)
Red, continuous Charging
WARNING
If any part of the charger is missing or damaged, do not operate it! Replace the charger with a new
one. Failure to heed this warning could result in possible serious injury.
Check the voltage! The voltage must comply with the information on the rating label.
16
BATTERY PACK AND CHARGER
■ Insert the charging connector into the charging port on the battery (Fig. 9).
■ Connect the charger to the power supply.
■ Allow sufcient charging time (see Specications), and then disconnect the charger from the power supply.
■ Remove the charging connector from the charging port (Fig. 10).
NOTE: It is normal for the battery pack and the charger to become warm (but not hot) during the charging
process. If the battery does not charge properly, check to make sure the electrical outlet is operational. Always
charge the battery before storage!
Fig. 9 Fig. 10

17
OPERATION
WARNING
DANGER
WARNING
WARNING
Do not allow familiarity with products to make you careless. Remember that a careless fraction of a
second is sufcient to inict serious injury.
The fuel is VERY ammable. Use extreme care when mixing, storing or handling, or serious
personal injury may result.
Always wear eye protection with side shields marked to comply with ANSI Z87.1, along with head
protection. Failure to do so could result in objects being thrown into your eyes and other possible
serious injuries.
Do not use any attachments or accessories not recommended by the manufacturer or retailer of this
product. The use of attachments or accessories not recommended can result in serious personal
injury. Before each use, inspect the entire product for damaged, missing, or loose parts such as
screws, nuts, bolts, caps, etc. Tighten securely all fasteners and caps and do not operate this product
until all missing or damaged parts are replaced.
HANDLING THE FUEL
■ Mix and store in a container approved for storing fuel.
■ DO NOT smoke when handling or close to fuel.
■ DO NOT allow ames or sparks near the fuel.
■ Maintain the pressure in the fuel tank; always loosen the fuel tank cap slowly allowing the
pressure to equalize. NEVER refuel a blower when the engine is HOT or RUNNING!
■ DO NOT ll fuel tanks indoors. ALWAYS ll fuel tanks outdoors over bare ground.
■ DO NOT overll the fuel tank and clean up spills immediately.
■ Securely tighten the fuel tank cap and close the fuel container after refueling.
■ Check for fuel leakages. If a fuel leakage is present, remove the battery and do not use the

18
OPERATION
blower until the leakage is repaired.
■ Move at least 10 ft. (3 m) from refueling location before starting the engine.
FUEL MIXTURE (See Fig. 11)
This blower is powered by a 2-cycle engine; the operator is required to use premixed gasoline and
2-cycle lubricant. Prepare a mixture of unleaded gasoline and 2-cycle engine lubricant in a clean
container approved for storing gasoline. Only prepare quantities that can be used up within a few days.
DO NOT prepare quantities that will need to be stored for more than 30 days.
Recommended Fuel
This engine is certied to operate on unleaded gasoline intended for automotive use.
U.S. EPA regulations make it illegal to use gasoline containing higher than 10% ethanol content
in outdoor power equipment like your LawnMaster®power equipment and doing so can void your
LawnMaster®Limited Warranty.
If the proper precautions are taken, however, gasoline containing a 10% quantity of ethanol can safely
be used in your LawnMaster®products.
Much of the gasoline sold throughout the United States contains ethanol. The maximum ethanol
content allowed by law for use in outdoor power equipment is limited to 10% (E10). Most small power
equipment engines are designed to use no more than a 10% ethanol gasoline blend.
If you are not sure of the ethanol content in the gasoline you are purchasing, ask the retailer. If they are
unsure, purchase your fuel from another retailer that offers gasoline with no more than 10% ethanol.
NOTE: We recommend you use a high-quality synthetic 2-cycle lubricant in this product.
Recommended specication: JASO-FC or above. Mix at 3.2 oz. per gallon (US).
Do not use automotive lubricant or 2-cycle outboard lubricant.
Mixing Tips
■ Always start by lling an approved fuel container with half
of the required amount of gasoline.
■ Then add the entire amount of 2-cycle lubricant. Close the
container and shake to mix the lubricant with the gasoline.
■ Add the remaining amount of gasoline, close the fuel
container, and shake again.
■ Ensure that the fuel is well mixed by shaking the container
before lling the fuel tank (Fig. 11).
Gasoline to Lubricant Mix - 40 : 1 Ratio
GASOLINE LUBRICANT
1.0 gal. (US) (3.8 liter) 3.2 oz. (95 ml)
2.5 gal. (US) (9.5 liter) 8.0 oz. (236 ml)
Fig. 11
WRONG

19
OPERATION
FILLING THE FUEL TANK (See Fig. 12)
NOTICE: Before each use, ALWAYS shake the fuel container thoroughly to ensure that the fuel is
mixed completely.
■ Place the tool on a at, level surface, outdoors.
■ Clean the area around the fuel tank and cap to prevent any contamination.
■ Loosen the fuel tank cap by turning it counter clockwise and remove (Fig. 12).
■ Carefully pour the fuel into the fuel tank, avoiding any spillage.
■ DO NOT leave the fuel tank unsealed while it contains fuel. Replace the cap immediately after lling
and inspecting the tank. Check that the cap is sealed tightly and wipe clean any spillage that may
have occurred.
NOTICE: It is normal for smoke to be emitted from a new engine after rst use.
Fig. 12
WARNING
The operation of this tool requires gasoline, an extremely ammable liquid. Always turn off the engine
and allow it to cool completely before fueling. Never remove the fuel tank cap or add the fuel to the tool
while it is running or the engine is still hot. Make sure to fuel the tool outdoors on a at, level surface.
After fueling, immediately replace the fuel tank cap and tighten it securely. DO NOT ll the fuel tank
on the work site; fueling must occur at least 10 ft. from where the operator intends to start the engine.
Keep the tool away from smoke, open ames and sparks! Failure to follow these instructions could
result in an explosion, re and cause serious personal injury.
20
OPERATION
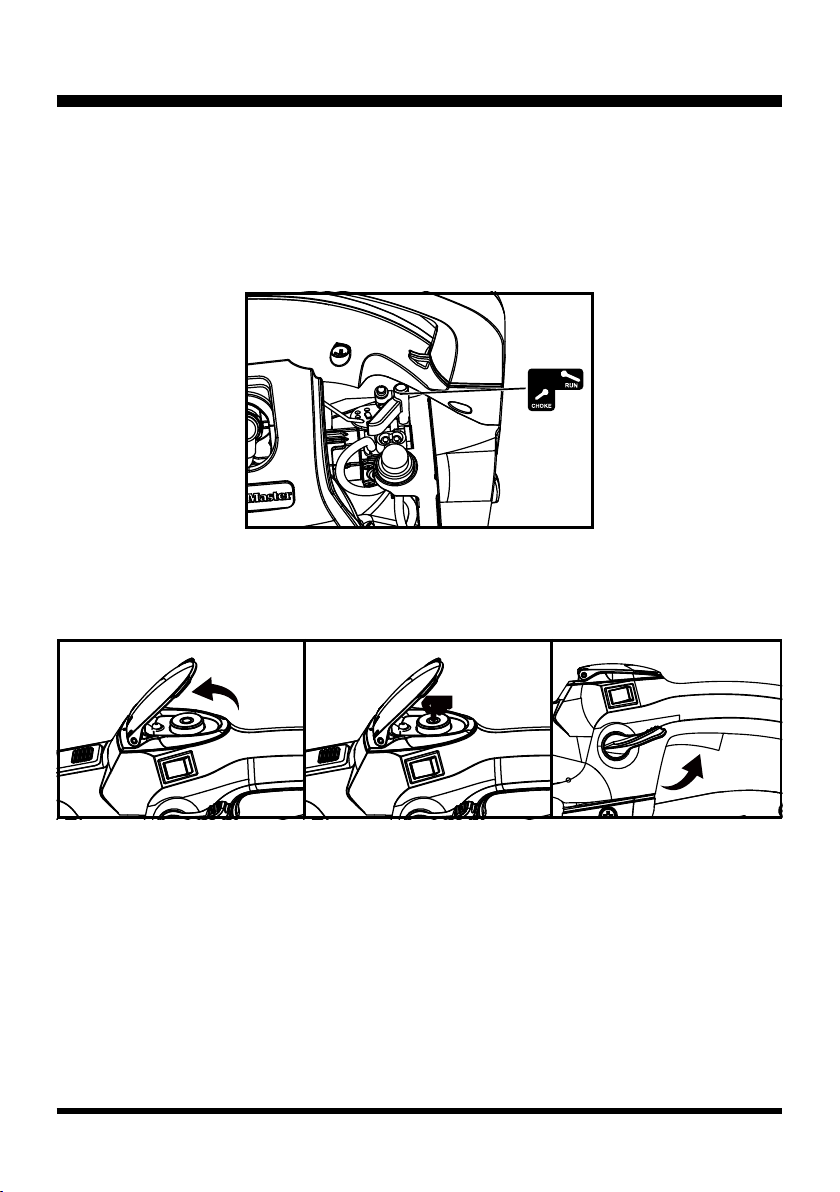
STARTING AND STOPPING THE BLOWER (See Figs. 13-17)
For cold start:
■ Make sure that the battery pack is securely in place.
■ Place the blower on a level surface, outdoors.
■ Press the primer bulb 5 times.
■ Turn the choke lever to the CHOKE position (Fig. 13).
■ Lift the start button cover and press the start button until the engine starts (Fig. 14 & 15). Then
engage the throttle lever to start the blower (Fig. 16). The choke lever will automatically switch to
RUN position.
NOTE: If the engine does not start, repeat step 5 until the engine starts.
■ If the blower fails to start, check the Troubleshooting section in the manual.
NOTE: This 2-cycle blower is equipped with an automatic choke reset. The user must switch the choke
lever to CHOKE position for cold starts. As soon as the throttle lever is engaged, the choke lever will
automatically switch to the RUN position.
NOTE: After the engine starts and runs, release the throttle lever and allow the blower to warm up at
idle for several minutes.
For warm start:
■ Make sure that the battery pack is securely in place.
Fig. 13
Fig. 14 Fig. 15 Fig. 16
START
Other manuals for NPTBL26A
2
Table of contents
Languages:
Other LawnMaster Blower manuals

LawnMaster
LawnMaster CLBL2406-1 01 User manual

LawnMaster
LawnMaster LMEB260 Installation manual

LawnMaster
LawnMaster LMEBV260 Installation manual

LawnMaster
LawnMaster CLBL6015ACE User manual

LawnMaster
LawnMaster CLBL2406-1 User manual

LawnMaster
LawnMaster CLBL6015A User manual

LawnMaster
LawnMaster BL805E 1201 User manual

LawnMaster
LawnMaster BV1210E 1201 User manual

LawnMaster
LawnMaster BL705 User manual

LawnMaster
LawnMaster CLBL6015A User manual


