JAVAC JAV-1041 Operation and maintenance manual

DIGITAL VACUUM GAUGE
Safety Instructions & Operation Manual
Instructions de sécurité et notice d’utilisation
Sicherheitsanweisungen und Bedienungsanleitung
Instrucciones de seguridad y manual de funcionamiento
Istruzioni di sicurezza e manuale d’uso
EN
FR
DE
ES
IT
* One year guarantee subject to terms and conditions. Please see website for details.
* Un an de garantie sous réserve des termes et conditions. Veuillez visiter le site internet pour plus de détails.
* Eine einjährige Garantie unterliegt den Allgemeinen Geschäftsbedingungen. Details nden Sie auf der Website.
* Un año de garantía sujeto a términos y condiciones. Por favor, consulte el sitio web para más detalles.
* Garanzia di un anno soggetta a termini e condizioni. Si prega di consultare il sito web per i dettagli.
JAV-1041
JAV-1041 JAVAC Digital Micron Gauge instructions A6.indd 1 19/12/2017 14:29

2
DIGITAL VACUUM GAUGE
EN
SPECIFICATIONS
RANGE AND RESOLUTION
Range 0 - 25,000 Microns
(3330 Pa, 33.30 mBar, 25 mmHg)
Accuracy ± (5% of Reading + 5 Microns)
Resolution 1 Micron
(0.1 Pa, 0.001 mBar, 0.001 mmHg)
Units Microns, Pa, mBar, mmHg, Torr
Warm-up Time Instant
Response Time Instant
Power Two ‘AAA’ Alkaline Batteries
Battery Life Up to 100 Hours
Operating Temperature -10°F (-12°C - 50°C)
Maximum Overpressure 500 PSI (34.5 Bar)
Units Range Resolution
Pa 0 - 3,330
10 (@ > 1,000)
1 (@ > 100)
0.1 (@ < 100)
mBar 0 - 33.3
0.1 (@ > 10)
0.01 (@ > 100)
0.001 (@ < 100)
mmHg Torr 0 - 25
0.1 (@ > 10)
0.01 (@ > 1)
0.001 (@ < 1)
Microns 0 - 25,000
100 (@ > 10,000)
10 (@ > 1,000)
1 (@ < 1,000)
FEATURES
• Patented vacuum gauge technology
• Measures Microns, Pascals, Millibar and mmHg
• Automatic oil sensor
• Up to 100 hours with two ‘AAA’ batteries
• Calibration self-test and eld calibratable
• Small and lightweight
• Coupler and pouch included
JAV-1041 JAVAC Digital Micron Gauge instructions A6.indd 2 19/12/2017 14:29

3
DISPLAY
QUICK START
01. Install 2 ‘AAA’ batteries.
02. Press and hold for 1 second.
03. Press and hold to change the vacuum measurement units.
04. Using the supplied coupler, connect the Micron Gauge to an unused service port, core removal tool, or
hose attached to the system.
05. Start the vacuum pump. Display will show vacuum pressure in selected units.
06. Press and hold for 1 second to turn the power o.
WARNING: To avoid damage, only hand tighten sensor connection. If greater torque is required, support the
sensor housing with a 3/4” wrench.
AUTO POWER-OFF
After 1 hour in Sleep Mode the Digital Vacuum Gaugewill automatically power o to further conserve
battery life.
BATTERY INSTALLATION
01. Remove battery cover from the back of the instrument.
02. Install 2 ‘AAA’ Alkaline batteries observing polarity.
03. Replace battery cover.
BATTERY LEVEL INDICATOR
Four bars in the battery level indicator indicate full battery strength. As battery power is depleted, the
number of bars displayed decreases, until no bars are left. The Digital Vacuum Gaugewill turn itself o when
the batteries are fully consumed.
BACKLIGHT
Press and release to toggle the backlight on and o. To conserve battery power, the backlight will
automatically turn itself o after one minute.
HI-PRESSURE INDICATION
If the vacuum pressure exceeds 25,000 Microns (3330 Pa, 33.3 mBar, 25 mmHg/Torr), the display will show:
CAL: Indicates Calibration Self-Test and Field Calibration Mode
Torr: Torr Units Selected
Pa: Pascal Units Selected
mBar: Millibar Units Selected
Microns: Micron Units Selected
mmHg: mmHg Units Selected
Battery Level Indicator
JAV-1041 JAVAC Digital Micron Gauge instructions A6.indd 3 19/12/2017 14:29

4
SLEEP MODE
After one minute in HI-P, the Digital Vacuum Gaugewill reduce power to conserve battery life. This is
indicated on the display:
Full power operation will resume when a button is pressed, or if the vacuum pressure is reduced below
25,000 microns.
OIL SENSOR & CLEANING
If oil or other contamination is inadvertently drawn into the sensor, the display will show:
TO CLEAN THE SENSOR
01. Turn the Digital Vacuum Gaugepower on.
02. Shake out any excess oil.
03. Using an eye dropper or syringe, ll the sensor port hole with isopropyl alcohol. Do not insert any object
into the port.
04. Shake out the alcohol.
05. Repeat steps (3) and (4) three times.
06. Thoroughly dry the sensor by pulling a vacuum for about 1 minute, or allow at least 1 hour to air dry.
07. If OIL still shows on the display, perform a freezer calibration.
CALIBRATION SELF-TEST
To ensure highest accuracy, periodically perform a calibration self-test:
01.Turn the Digital Vacuum Gaugepower is off.
02.Expose the Digital Vacuum Gaugeto atmospheric pressure.
03. Press and continue to hold . After 5 seconds, the display will show:
if the unit is in calibration, or:
if calibration is required.
JAV-1041 JAVAC Digital Micron Gauge instructions A6.indd 4 19/12/2017 14:29

5
CALIBRATION
To calibrate the Digital Micron Gauge:
01. Ensure the sensor is clean and dry.
02.Install fresh batteries, place dust cap over vacuum port, and turn the power off.
03. Insert the unit into a small Ziplock (resealable zipper bag) and seal.
04. Place the bagged unit into a freezer with a temperature of less than -5°C (23°F).
05. After about 45 minutes, remove the unit from the freezer (do not remove unit from bag).
06. While holding , press and continue to hold . After 5 seconds, the display will show ‘H’ and the
sensor temperature:
07. Place the unit in an undisturbed location with a room temperature of at least 23°C (74°F).
08. Allow the unit to warm slowly to 20°C.
09. When complete, the display will show:
NOTE:
The sensor temperature in step (6) must be less than -2°C (28°F) for calibration to start.
LOW TEMPERATURE OPERATION
The Digital Vacuum Gaugecan operate accurately at temperatures below freezing, though battery life may
not be optimum. Use Lithium ‘AAA’ batteries for best battery life at low temperatures.
MAINTENANCE
The Digital Vacuum Gaugeshould provide many years of service with no maintenance required. When not in
use, the dust cap should remain in place over the sensor port. Clean the plastic enclosure with a damp (not
wet) rag. Mild detergent is acceptable, but use no solvents.
JAV-1041 JAVAC Digital Micron Gauge instructions A6.indd 5 19/12/2017 14:29

6
VACUOMÈTRE ÉLECTRONNIQUE
FR
CARACTÉRISTIQUES
ÉTENDUE DE VIDE ET RÉSOLUTION
CARACTÉRISTIQUES
• Technologie de vacuomètre brevetée
• Mesures : micron, Pascals, millibar et mmHg
• Détecteur d’huile automatique
• Jusqu’à 100 heures avec deux piles ‘AAA’
• Auto-contrôle d’étalonnage, et possibilité d’étalonnagesur le terrain
• Compact et léger
• Coupleur et pochette incluses
Étendue de vide entre 0 et 25 000 microns, 25 Torr
3330 Pa, 33,3 mBar, 25 mmHg
Précision 5 % de lecture +/- 5 microns
Résolution 1 micron (< 1000 microns),
0,1 Pa, 0,001 mBar/mmHg/Torr
Unité Microns, Pa, mBar, mmHg, Torr
Temps de préchauage Instantanée
Réponse Instantanée
Alimentation 2 piles alcalines ‘AAA’
Autonomie Jusqu’à 100 heures
Température d’utilisation -10°F – 122°F (-12°C – 50°C)
Surpression maximale 500 PSI (34.5 Bar)
Unités Gamme Résolution
Pa 0 - 3,330
10 (@ > 1,000)
1 (@ > 100)
0.1 (@ < 100)
mBar 0 - 33.3
0.1 (@ > 10)
0.01 (@ > 100)
0.001 (@ < 100)
mmHg Torr 0 - 25
0.1 (@ > 10)
0.01 (@ > 1)
0.001 (@ < 1)
Microns 0 - 25,000
100 (@ > 10,000)
10 (@ > 1,000)
1 (@ < 1,000)
JAV-1041 JAVAC Digital Micron Gauge instructions A6.indd 6 19/12/2017 14:29

7
DISPLAY
DÉMARRAGE RAPIDE
01. Installez les 2 piles ‘AAA’.
02. Appuyez sur le bouton et maintenez-le enfoncé durant 1 seconde.
03. Appuyez sur le bouton et maintenez-le enfoncé pour changer l’unité de mesure du vide.
04. Utilisez le coupleur fourni pour raccorder le μBluVac à un orice de service inutilisé, un outil d’extraction
de vanne ou à un tuyau raccordé au système.
05. Démarrez la pompe à vide. L’acheur indiquera la pression vacuométrique dans les unités sélectionnées.
06. Appuyez sur le bouton et maintenez-le enfoncé durant 1 seconde pour éteindre l’appareil.
AVERTISSEMENT:
Serrez le raccord du détecteur à la main uniquement, pour éviter tout endommagement. Si un couple de
serrage supérieur est requis, maintenez le boîtier du détecteur au moyen d’une clé 3/4”.
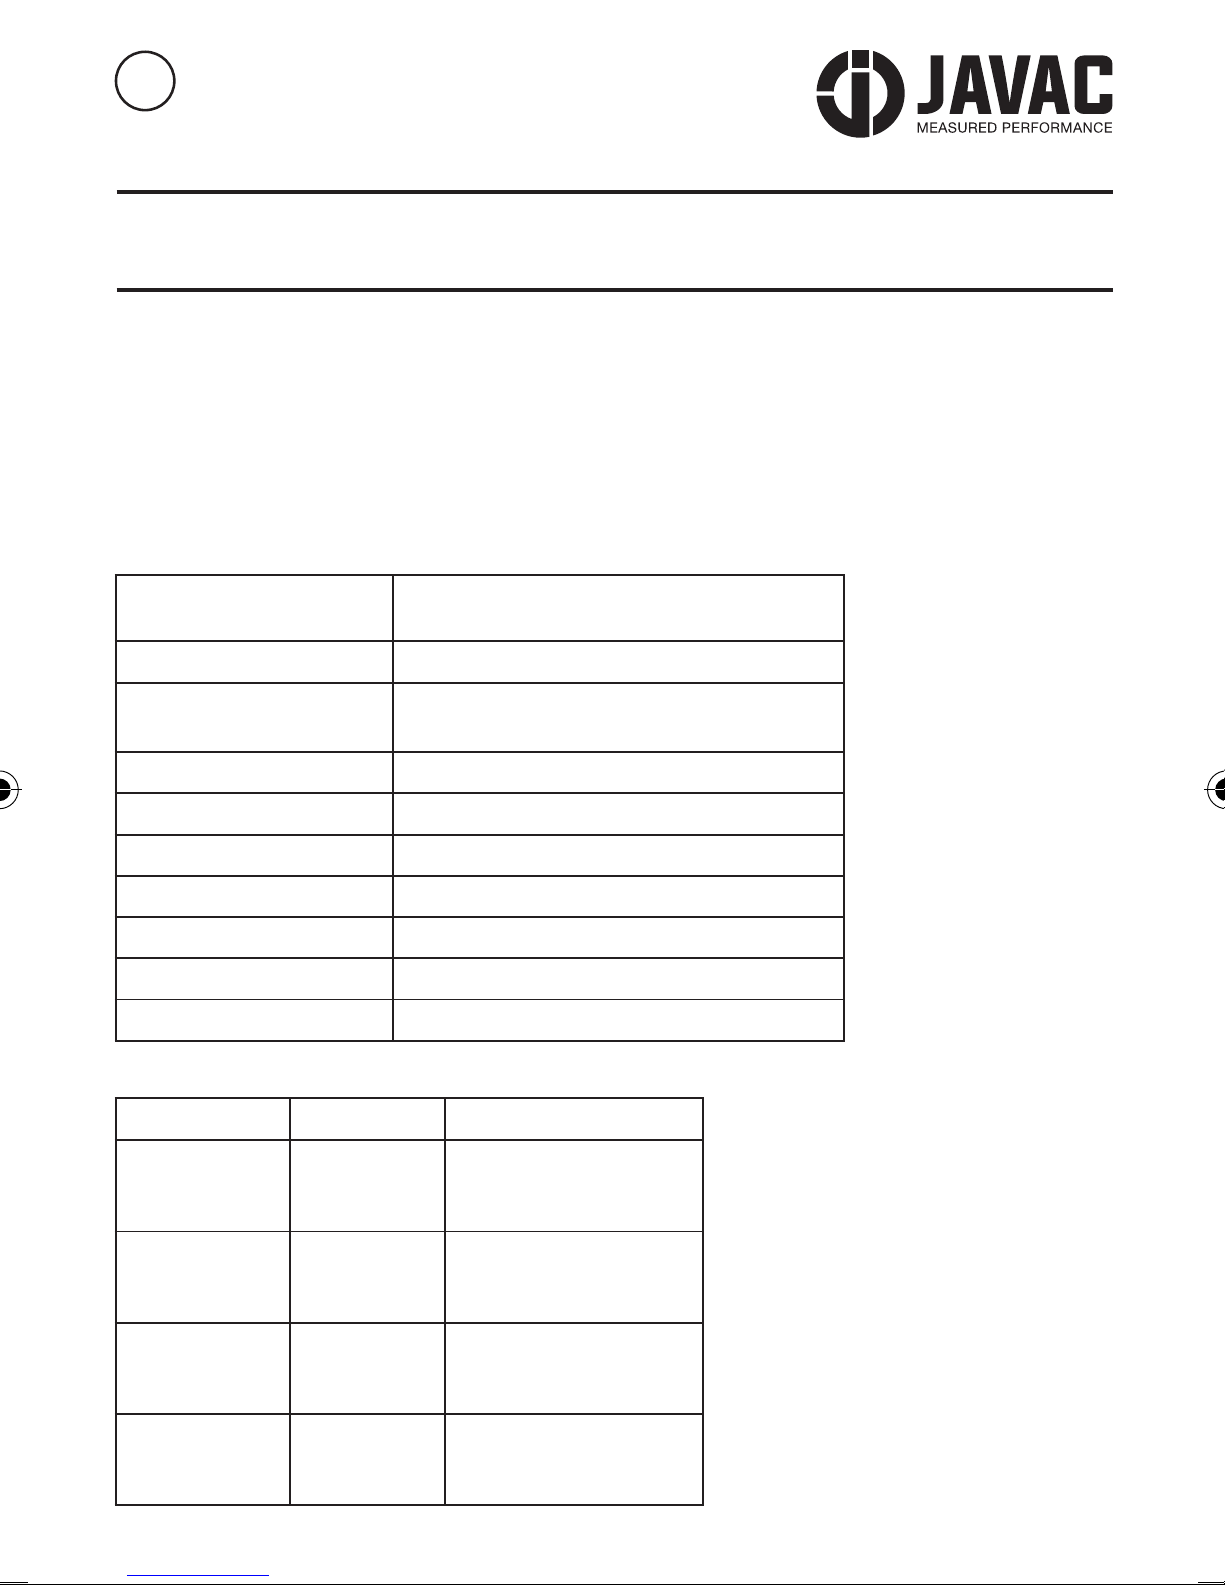
ARRÊT AUTOMATIQUE
Le vacuomètre électronnique s’éteindra automatiquement au bout d’une heure en mode Veille, pour
économiser l’énergie des piles.
INSTALLATION DES PILES
01. Enlevez le couvercle des piles au dos de l’appareil.
02. Installez 2 piles alcalines ‘AAA’ en respectant la polarité.
03. Replacez le couvercle des piles.
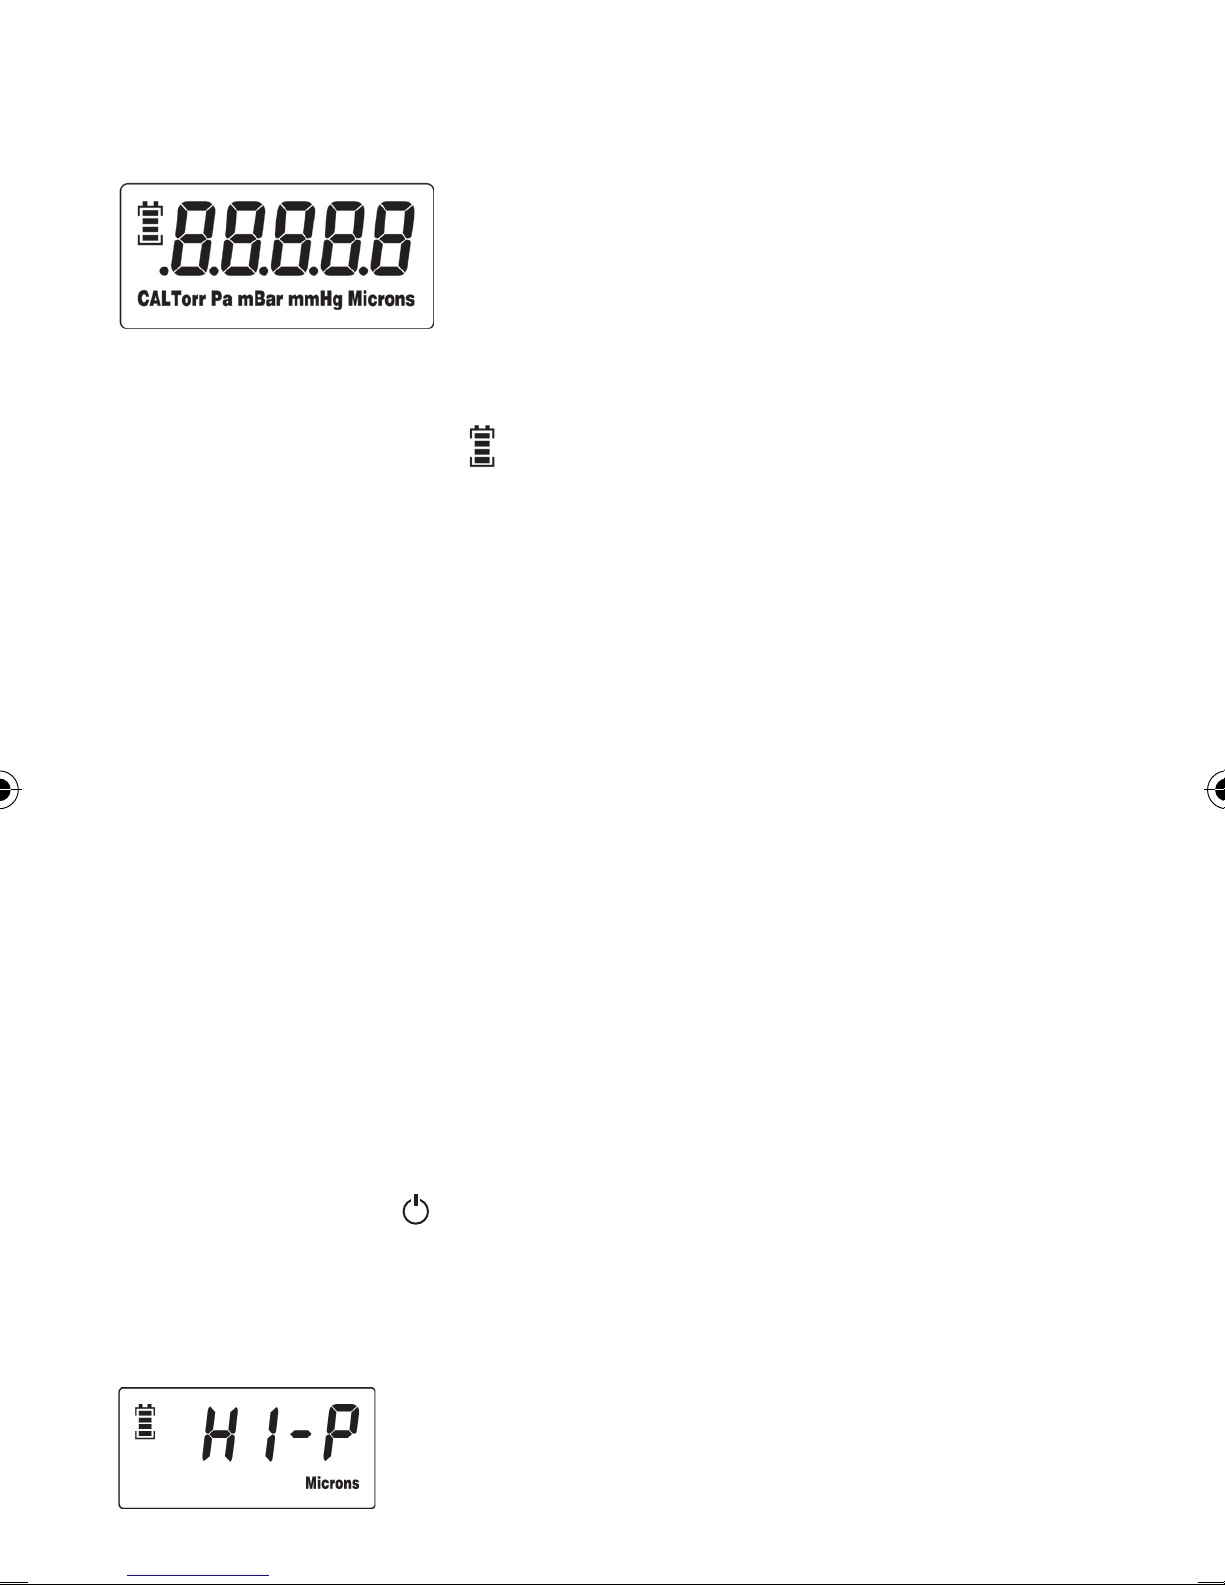
INDICATEUR DE NIVEAU DE PUISSANCE DES PILES
Si l’indicateur de niveau de puissance des piles ache quatre barres, les piles sont pleines. le nombre de
barres achées baisse au fur et à mesure que la pile se vide, jusqu’à ce qu’il ne reste aucune barre. le
vacuomètre électronnique s’éteindra tout seul lorsque les piles sont à plat.
RÉTROÉCLAIRAGE
Appuyez sur le bouton Marche et relâchez-le pour allumer ou éteindre le rétroéclairage. Pour économiser
l’énergie des piles, le rétroéclairage s’éteindra automatiquement au bout d’une minute.
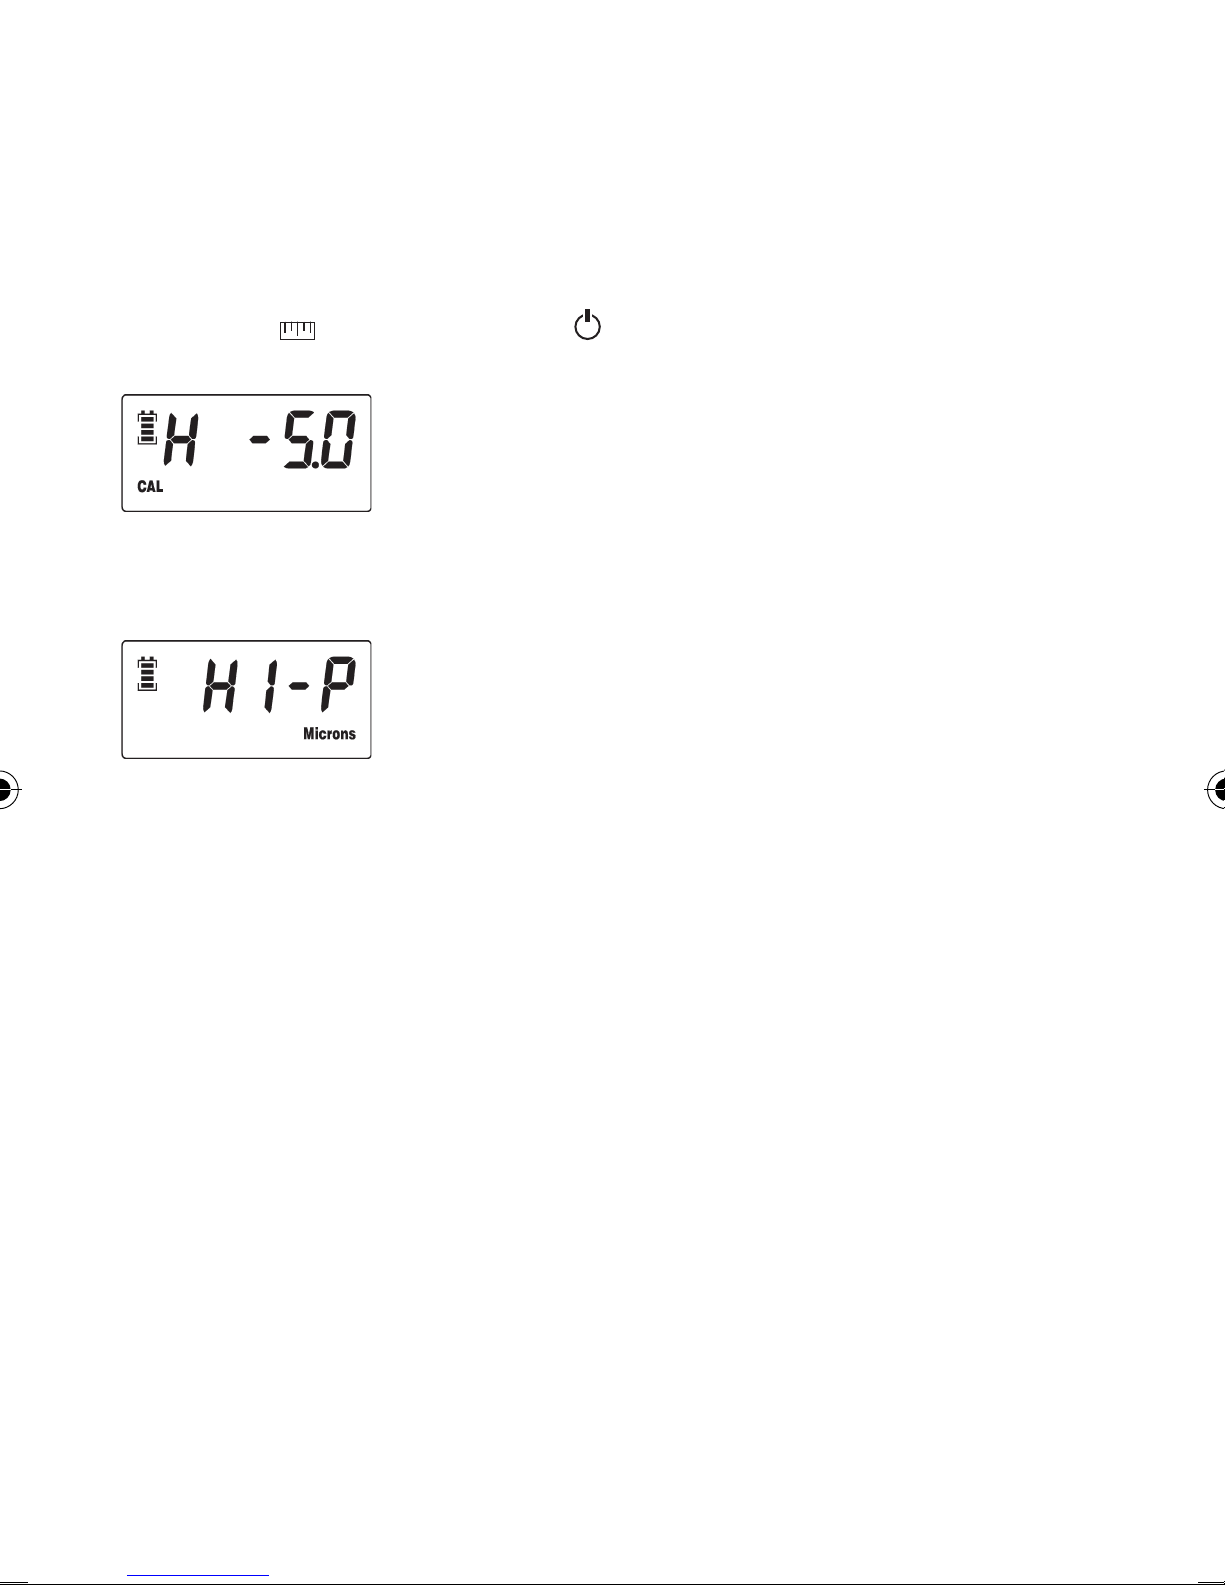
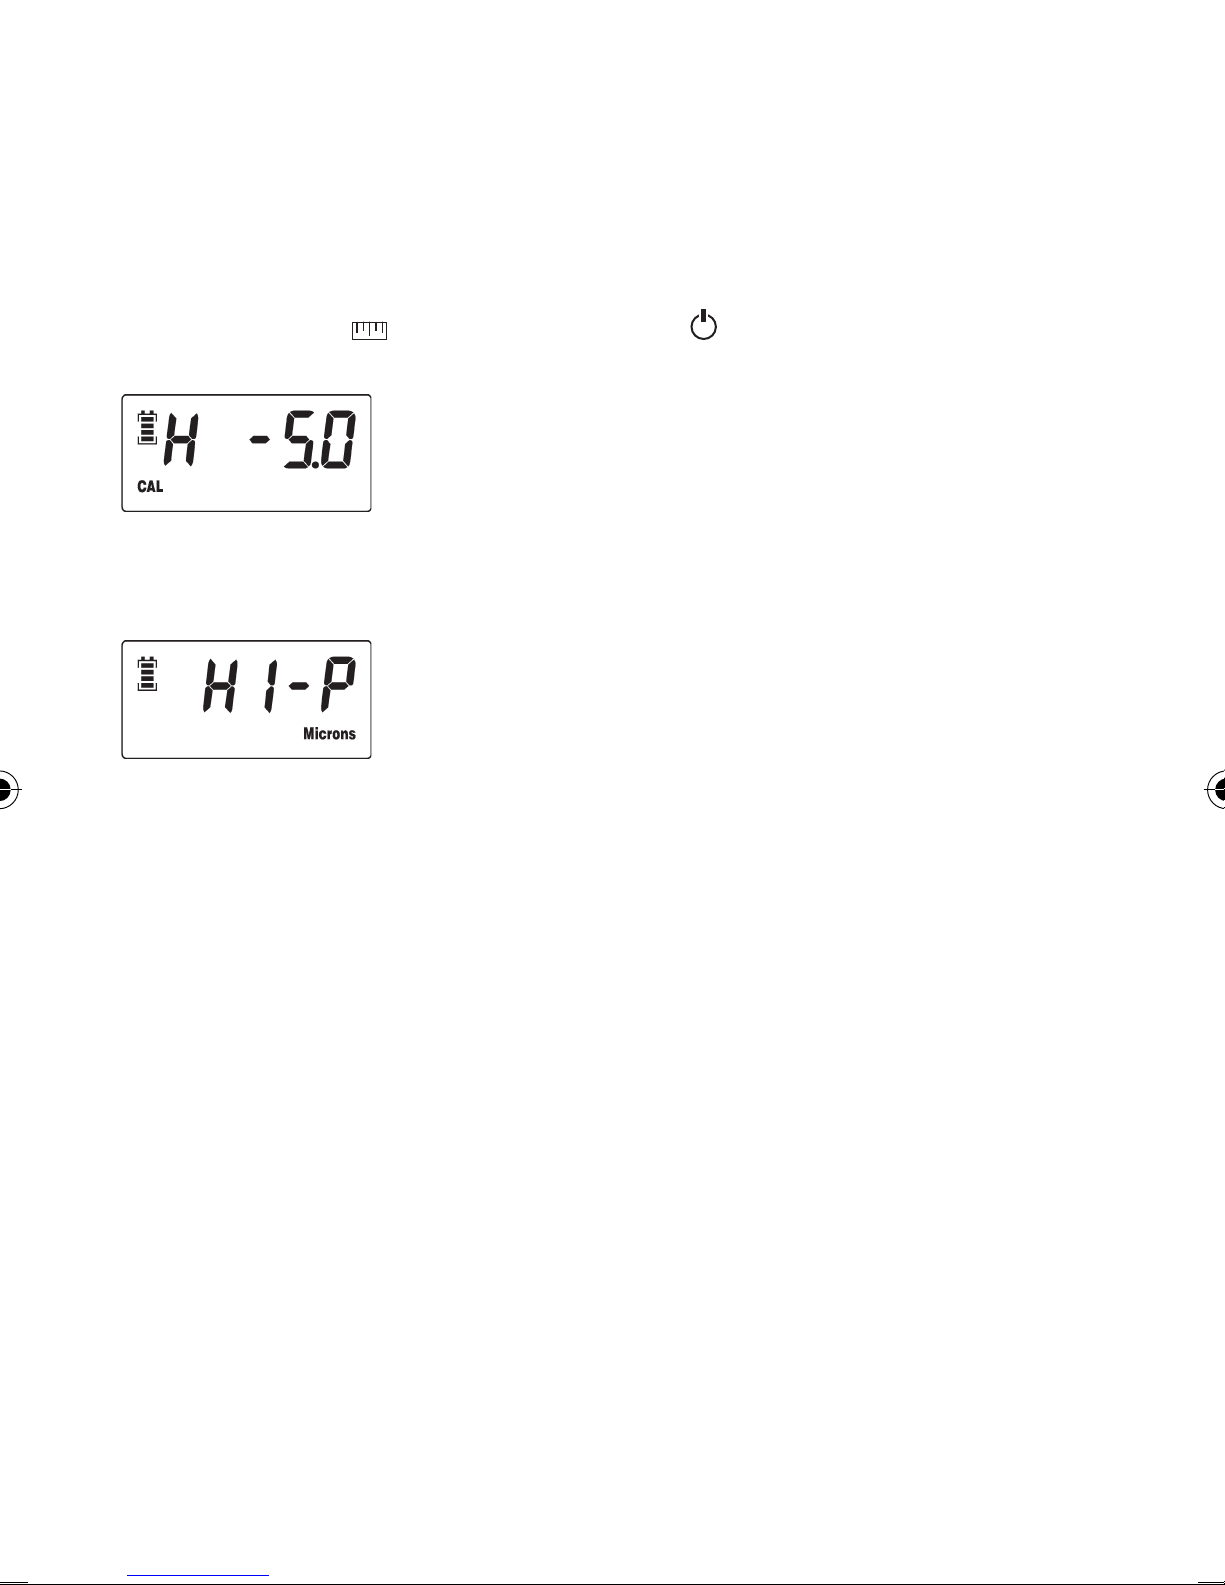
INDICATION DE HAUTE PRESSION
Si la pression vacuométrique est supérieure à 25 000 microns (3330 Pa, 33,3 mBar, 25 mm Hg/Torr),
l’acheur indiquera :
CAL: Indique les modes auto-contrôle d’étalonnage et d’étalonnage
sur le terrain
Torr: Unité Torr sélectionnée
Pa: Unité Pascal sélectionnée
mBar: Unité millibar sélectionnée
Microns: Unité micron sélectionnée
mmHg: Unité mmHg sélectionnée
Indicateur de niveau de puissance des piles
JAV-1041 JAVAC Digital Micron Gauge instructions A6.indd 7 19/12/2017 14:29

8
MODE VEILLE
Le vacuomètre électronnique réduira sa puissance au bout d’une minute en haute puissance, pour
économiser l’énergie des piles. L’acheur indique le passage de l’appareil à ce mode :
Le fonctionnement à pleine puissance reprendra à l’enclenchement d’un bouton ou si la pression
vacuométrique descend à moins de 25 000 microns.
DÉTECTEUR D’HUILE ET NETTOYAGE
Si de l’huile ou d’autres contaminants sont aspirés par inadvertance dans le détecteur, l’acheur indiquera :
POUR NETTOYER LE DÉTECTEUR :
01. Allumez le vacuomètre électronnique.
02. Secouez l’appareil pour éliminer l’excès d’huile.
03. Remplissez le détecteur d’alcool isopropylique par l’orice prévu à l’aide d’un compte-gouttes oculaire
ou d’une seringue. N’introduisez aucun objet dans l’orice.
04. Secouez l’appareil pour évacuer l’alcool.
05. Reprenez les étapes (3) et (4) trois fois.
06. Séchez bien le détecteur en générant un vide durant environ 1 minute ou laissez-le sécher à l’air libre
durant au moins 1 heure.
07. Si OIL (HUILE) est toujours indiqué sur l’acheur, eectuez un étalonnage du congélateur.
AUTO-CONTRÔLE D’ÉTALONNAGE
Pour garantir une précision optimale, eectuez régulièrement un auto-contrôle d’étalonnage :
01. Éteignez le vacuomètre électronnique.
02. Mettez le vacuomètre électronnique à la pression atmosphérique.
03. Appuyez sur le bouton et continuez à le maintenir enfoncé. Au bout de 5 secondes, l’acheur indiquera :
si l’appareil est en cours d’étalonnage ou :
si l’étalonnage est requis.
JAV-1041 JAVAC Digital Micron Gauge instructions A6.indd 8 19/12/2017 14:29

9
ÉTALONNAGE
Pour étalonner le vacuomètre électronnique :
01. Vériez si le détecteur est propre et sec.
02. Installez des piles neuves, posez le bouchon anti-poussière sur l’orice de vide et éteignez l’appareil.
03. Placez appareil dans un petit sac Ziplock (sac à glissière refermable) et refermez-le bien.
04. Placez le sac contenant l’appareil dans un congélateur dont la température est inférieure à -5°C (23°F).
05. Retirez le sac du congélateur au bout d’environ 45 minutes (ne retirez pas l’appareil du sac).
06. Tout en maintenant le , enfoncé, appuyez sur le bouton . Aet continuez à le maintenir enfoncé. Au
bout de 5 secondes, l’acheur indiquera ‘H’ et la température du détecteur :
07. Placez l’appareil dans un endroit protégé où température ambiante est de 23°C (74°F) minimum.
08. Laissez l’appareil se réchauer lentement jusqu’à 20°C.
09. L’acheur indiquera ensuite :
REMARQUE :
La température du détecteur à l’étape (6) doit être inférieure à -2°C (28°F) pour que l’étalonnage
puisse démarrer.
UTILISATION À BASSE TEMPÉRATURE
Le vacuomètre électronnique peut fonctionner avec précision à des températures inférieure à zéro, mais il
se peut que l’autonomie des piles ne soit pas optimale. Utilisez des piles au lithium ‘AAA’ pour une meilleure
autonomie à basse température.
MAINTENANCE
Le vacuomètre électronnique fournit de nombreuses années d’utilisation sans entretien. Lorsque l’appareil
n’est pas utilisé, le bouchon anti-poussière doit rester en place sur l’orice du détecteur. Nettoyez le boîtier
plastique avec un chion humide (pas trempé). Un détergent sans solvant peut être utilisé.
JAV-1041 JAVAC Digital Micron Gauge instructions A6.indd 9 19/12/2017 14:29

10
DIGITALES VAKUUMMETER
DE
TECHNISCHE DATEN
MESSBEREICH UND AUFLÖSUNG
EIGENSCHAFTEN
• Patentierte Vakuummeter-Technologie
• Misst Micron, Pascal, Millibar und mmHg
• Automatischer Ölsensor
• Bis zu 100 Stunden Betrieb mit zwei AAA-Batterien
• Kalibrierungsselbsttest und vor Ort kalibrierbar
• Klein und leicht
• Inklusive Kupplung und Tasche
Bereich 0 – 25.000 Micron, 25 Torr
3330 Pa, 33,3 mbar, 25 mmHg
Genauigkeit 5% der Messung +/- 5 Micron
Auösung 1 Micron (< 1000 Micron),
.1 Pa, .001 mbar/mmHg/Torr
Units Microns, Pa, mBar, mmHg, Torr
Warmlaufzeit Sofort
Reaktion Sofort
Stromversorgung 2 „AAA“-Alkalibatterien
Batterielaufzeit Bis zu 100 Stunden
Betriebstemperatur -12°C – 50°C (-10°F – 122°F)
Sicherer Überdruck 500 PSI (34.5 Bar)
Einheiten Messbereich Auflösung
Pa 0 - 3,330
10 (@ > 1,000)
1 (@ > 100)
0.1 (@ < 100)
mBar 0 - 33.3
0.1 (@ > 10)
0.01 (@ > 100)
0.001 (@ < 100)
mmHg Torr 0 - 25
0.1 (@ > 10)
0.01 (@ > 1)
0.001 (@ < 1)
Microns 0 - 25,000
100 (@ > 10,000)
10 (@ > 1,000)
1 (@ < 1,000)
JAV-1041 JAVAC Digital Micron Gauge instructions A6.indd 10 19/12/2017 14:29

11
DISPLAY
SCHNELLSTART
01.2 „AAA“-Batterien einsetzen.
02. Drücken und 1 Sekunde lang gedrückt halten.
03. Drücken und gedrückt halten, um die Vakuumeinheiten zu ändern.
04. Mithilfe der mitgelieferten Kupplung, den μBluVac an einen ungenutzten Wartungsanschluss, einen
Ventileinsatzentferner oder einen an das System angeschlossenen Schlauch anschließen.
05. Die Vakuumpumpe einschalten. Die Anzeige zeigt den Vakuumdruck in der ausgewählten Einheit an.
06. Drücken und 1 Sekunde lang gedrückt halten, um das Gerät auszuschalten.
ACHTUNG: Um Schäden zu vermeiden, den Sensoranschluss nur handfest ziehen. Ist ein größeres
Drehmoment erforderlich, Sensorgehäuse mit einem 3/4” Schraubenschüssel festhalten.
AUTOMATISCHE AUSSCHALTUNG
Nach einer Stunde im Ruhemodus schaltet sich das digitale Vakuummeter automatisch aus, um die
Batterien weiter zu schonen.
EINSETZEN DER BATTERIEN
01. Hinten am Instrument den Batteriedeckel abnehmen.
02. 2 „AAA“‘ Alkalibatterien einsetzen und dabei auf die Polarität achten.
03. Batterieabdeckung wieder aufsetzen.
BATTERIESTANDSANZEIGE
Vier Balken an der Batteriestandsanzeige zeigen einen vollen Ladezustand an. Bei abnehmender Ladung
nimmt die Anzahl der angezeigten Balken ab, bis keine Balken mehr angezeigt werden. Wenn die Batterien
ganz leer sind, schaltet sich das digitale Vakuummeter aus.
HINTERGRUNDBELEUCHTUNG
Das drücken und loslassen, um die Hintergrundbeleuchtung ein- und auszuschalten. Um Batterie zu
sparen, schaltet sich die Hintergrundbeleuchtung nach einer Minute automatisch aus.
HOCHDRUCKANZEIGE
Ist der Vakuumdruck höher als 25.000 Micron (3330 Pa, 33,3 mbar, 25 mmHg/Torr), zeigt die Anzeige
Folgendes an:
CAL: Zeigt die Modi Kalibrierungsselbsttest und Kalibrierung
vor Ort an
Torr: einheit torr ausgewählt
Pa: Einheit Pascal ausgewählt
mBar: Einheit Millibar ausgewählt
Microns: Einheit Micron ausgewählt
mmHg: Einheit mmHg ausgewählt
Batteriestandsanzeige
JAV-1041 JAVAC Digital Micron Gauge instructions A6.indd 11 19/12/2017 14:29

12
RUHEMODUS
Nach einer Minute in Hochdruck reduziert das digitale Vakuummeter den Stromverbrauch, um die Batterien
zu schonen. Die Anzeige zeigt Folgendes an:
Der Betrieb bei vollem Stromverbrauch wird fortgesetzt, sobald eine Taste gedrückt wird oder der
Vakuumdruck unter 25.000 Micron fällt.
ÖLSENSOR & REINIGUNG
Falls versehentlich Öl oder eine sonstige Kontamination in den Sensor gelangt, zeigt die Anzeige
folgendes an:
UM DEN SENSOR ZU REINIGEN
01. Das digitale Vakuummeter einschalten.
02. Überschüssiges Öl herausschütteln.
03. Mithilfe einer Pipette oder einer Spritze Isopropylalkohol in die Önung des Sensoranschlusses füllen.
Keine Gegenstände in den Anschluss einführen.
04. Den Alkohol herausschütteln.
05. Die Schritte (3) und (4) dreimal wiederholen.
06. Den Sensor gründlich trocknen, indem Sie ca. 1 Minute lang ein Vakuum erzeugen oder den Sensor
mindestens 1 Stunde lang an der Luft trocknen lassen.
07. Zeigt die Anzeige immer noch OIL (ÖL) an, führen Sie eine Kalibrierung im Gefrierfach durch.
KALIBRIERUNGSSELBSTTEST
Um höchste Genauigkeit zu gewährleisten, führen Sie regelmäßig einen Kalibrierungsselbsttest durch:
01. Digitales Vakuummeter ausschalten.
02. Digitales Vakuummeter dem Atmosphärendruck aussetzen.
03. Drücken und gedrückt halten. Nach 5 Sekunden zeigt die Anzeige Folgendes an:
falls das Gerät kalibriert ist, oder:
falls eine Kalibrierung erforderlich ist.
JAV-1041 JAVAC Digital Micron Gauge instructions A6.indd 12 19/12/2017 14:29

13
KALIBRIERUNG
To calibrate the Digital Micron Gauge:
01. Ensure the sensor is clean and dry.
02. Install fresh batteries, place dust cap over vacuum port, and turn the power off.
03. Insert the unit into a small Ziplock (resealable zipper bag) and seal.
04. Place the bagged unit into a freezer with a temperature of less than -5°C (23°F).
05. After about 45 minutes, remove the unit from the freezer (do not remove unit from bag).
06. While holding , press and continue to hold . After 5 seconds, the display will show ‘H’ and the
sensor temperature:
07. Das Gerät an einen ungestörten Ort mit einer Raumtemperatur von mindestens 23°C (74°F) bringen.
08. Das Gerät langsam auf 20°C aufwärmen.
09. Nach Abschluss zeigt die Anzeige Folgendes an:
HINWEIS:
Die Sensortemperatur in Schritt (6) muss weniger als -2°C (28°F) betragen, damit die Kalibrierung
beginnen kann.
BETRIEB BEI NIEDRIGEN TEMPERATUREN
Das digitale Vakuummeter funktioniert präzise bei Temperaturen unter dem Gefrierpunkt, auch wenn
die Batterielaufzeit dabei eventuell nicht optimal ist. Für eine optimale Batterielaufzeit bei niedrigen
Temperaturen verwenden Sie „AAA“-Lithiumbatterien.
WARTUNG
Das digitale Vakuummeter sollte ohne erforderliche Wartung einen langjährigen Betrieb bieten. Bei
Nichtgebrauch sollte die Staubkappe auf dem Sensoranschluss aufgesetzt bleiben. Reinigen Sie das
Kunststogehäuse mit einem feuchten (nicht nassen) Tuch. Es dürfen milde Reinigungsmittel jedoch keine
Lösungsmittel verwendet werden.
JAV-1041 JAVAC Digital Micron Gauge instructions A6.indd 13 19/12/2017 14:29

14
MANÓMETRO DE VACÍO DIGITAL
CARACTERÍSTICAS
RANGO Y RESOLUCIÓN
CARACTERÍSTICAS
• Manómetro de vacío con tecnología patentada
• Mide en micrones, pascales, milibares y mmHg
• Sensor de aceite automático
• Hasta 100 horas de duración con dos pilas ‘AAA’
• Verificación automática de la calibración y campo calibrable
• Pequeño y ligero
• Manguito y bolsa incluidos
ES
Registro 0 – 25.000 micrones, 25 torr
3330 Pa, 33,3 mBar, 25 mmHg
Precisión 5 % de lectura +/- 5 micrones
Resolución 1 micrón (< 1000 micrones),
.1 Pa, .001 mBar/ mmHg/ Torr
Units Microns, Pa, mBar, mmHg, Torr
Preparación Instantánea
Respuesta Instantánea
Alimentación 2 pilas alcalinas ‘AAA’
Duración de las pilas Hasta 100 horas
Temperatura de funcionamiento -10°F – 122°F (-12°C – 50°C)
Sobrepresión segura 500 PSI (34.5 Bar)
Unidades Rango Resolución
Pa 0 - 3,330
10 (@ > 1,000)
1 (@ > 100)
0.1 (@ < 100)
mBar 0 - 33.3
0.1 (@ > 10)
0.01 (@ > 100)
0.001 (@ < 100)
mmHg Torr 0 - 25
0.1 (@ > 10)
0.01 (@ > 1)
0.001 (@ < 1)
Microns 0 - 25,000
100 (@ > 10,000)
10 (@ > 1,000)
1 (@ < 1,000)
JAV-1041 JAVAC Digital Micron Gauge instructions A6.indd 14 19/12/2017 14:29

15
PANTALLA
INICIO RÁPIDO
01. Instale 2 pilas ‘AAA’.
02. Mantenga pulsado durante 1 segundo.
03. Mantenga pulsado para cambiar las unidades de medición del vacío.
04. Con el manguito incluido, conecte el μBluVac a un puerto de servicio que no esté en uso, un eliminador de
núcleo o una manguera conectada al sistema.
05. Encienda la bomba de vacío. En la pantalla, aparecerá la presión del vacío en las unidades seleccionadas.
06. Mantenga pulsado durante 1 segundo para apagarla.
ADVERTENCIA: Para evitar que se produzcan daños, apriete la conexión del sensor con la mano. Si fuera
necesario utilizar una llave más grande, apriete la carcasa del sensor con una llave de 3/4”.
APAGADO AUTOMÁTICO
Después de una hora en el modo de suspensión, el manómetro de vacío digital se apagará
automáticamente para mejorar la duración de las pilas.
INSTALACIÓN DE LAS PILAS
01. Retire la tapa de las pilas de la parte posterior del dispositivo
02. Instale 2 pilas alcalinas ‘AAA’ comprobando su polaridad.
03. Vuelva a colocar la tapa.
INDICADOR DEL NIVEL DE LAS PILAS
Cuatro barras en el indicador del nivel de las pilas indican que las pilas están al 100 % de su capacidad. A
medida que las pilas se vayan agotando, disminuirá el número de barras de la pantalla, hasta que no quede
ninguna. El manómetro de vacío digital se apagará únicamente cuando las pilas se hayan
agotado completamente.
LUZ DE FONDO
Pulse y suelte para activar y desactivar la luz de fondo. Para mejorar la capacidad de las pilas, la luz de
fondo se apagará automáticamente pasado un minuto.
INDICACIÓN DE ALTA PRESIÓN
Si la presión de vacío sobrepasa los 25.000 micrones (3330 Pa, 33,3 mBar, 25 mmHg/ Torr), en la
pantalla aparecerá:
CAL: Indica la vericación automática de la calibración y el modo
del campo calibrable
Torr: Unidad en torr seleccionada
Pa: Unidad en pascales seleccionada
mBar: Unidad en milibares seleccionada
Microns: Unidad en micrones seleccionada
mmHg: Unidad en mmHg seleccionada
Indicador del nivel de las pilas
JAV-1041 JAVAC Digital Micron Gauge instructions A6.indd 15 19/12/2017 14:29

16
MODO DE SUSPENSIÓN
Después de un minuto en alta presión, el manómetro de vacío digital reducirá la potencia para mejorar la
vida útil de las pilas. Esto se indicará en la pantalla:
El funcionamiento a pleno rendimiento se reanudará al pulsar un botón o si la presión de vacío baja de
25.000 micrones.
SENSOR DEL ACEITE Y LIMPIEZA
Si se introduce aceite u otra sustancia contaminante en el sensor de forma involuntaria, en la
pantalla aparecerá:
PARA LIMPIAR EL SENSOR
01. Encienda el manómetro de vacío digital.
02. Elimine el exceso de aceite.
03. Con un cuentagotas o una jeringa, llene el oricio del puerto del sensor con alcohol isopropílico. No
introduzca ningún objeto en el puerto.
04. Elimine el alcohol.
05. Repita los pasos (3) y (4) tres veces.
06. Seque bien el sensor retirando el vacío durante aproximadamente 1 minuto o deje que se seque al aire
durante, al menos, 1 hora.
07. Si «OIL» (aceite) aún aparece en la pantalla, realice una calibración en un congelador.
VERIFICACIÓN AUTOMÁTICA DE LA CALIBRACIÓN
Para garantizar la máxima precisión, realice de forma regular una vericación automática de la calibración:
01. Apague el manómetro de vacío digital.
02. Exponga el manómetro de vacío digital a la presión atmosférica.
03. Mantenga pulsado. 5 segundos después, en la pantalla aparecerá:
si la unidad se está calibrando o:
si es necesario realizar una calibración.
JAV-1041 JAVAC Digital Micron Gauge instructions A6.indd 16 19/12/2017 14:29

17
CALIBRACIÓN
Para calibrar el manómetro de vacío digital:
01. Asegúrese de que el sensor esté limpio y seco.
02. Instale pilas nuevas, coloque una tapa antipolvo sobre el puerto de vacío y apague la unidad.
03. Inserte la unidad en una pequeña bolsa con cierre hermético.
04. Coloque la unidad que esté dentro de la bolsa en un congelador a una temperatura inferior a -5°C (23°F).
05. Después de aproximadamente 45 minutos, retire la unidad del congelador (no saque la unidad
de la bolsa).
06. Mientras mantiene pulsado , mantenga pulsado . Pasados 5 segundos, en la pantalla aparecerá
‘H’ y la temperatura del sensor:
07. Coloque la unidad en un lugar tranquilo con una temperatura ambiente de, al menos, 23°C (74°F).
08. Deje que la unidad se caliente lentamente a 20°C.
09. Cuando haya terminado, en la pantalla aparecerá:
NOTA:
La temperatura del sensor en el paso (6) debe ser inferior a -2°C (28°F) para comenzar la calibración.
FUNCIONAMIENTO A BAJA TEMPERATURA
El manómetro de vacío digital funciona con precisión a temperaturas por debajo del punto de congelación,
aunque es posible que la duración de las pilas se vea afectada. Utilice pilas de litio ‘AAA’ para mejorar su
duración a bajas temperaturas.
MANTENIMIENTO
El manómetro de vacío digital debe funcionar sin problemas durante muchos años sin la necesidad de
realizarle ningún mantenimiento. Cuando no esté en uso, la tapa antipolvo deberá permanecer colocada
en el puerto del sensor. Limpie la carcasa de plástico con un trapo húmedo (no mojado). Puede utilizar un
detergente suave, pero no disolventes.
JAV-1041 JAVAC Digital Micron Gauge instructions A6.indd 17 19/12/2017 14:29

18
VACUOMETRO DIGITALE
IT
SPECIFICHE
GAMMA E RISOLUZIONE
CARATTERISTICHE
• Tecnologia indicatore del vuoto brevettata
• Misura micron, Pascal, millibar e mmHg
• Sensore dell’olio automatico
• Fino a 100 ore con due batterie “AAA”
• Prova automatica di calibrazione e calibrabile sul campo
• Piccolo e leggero
• Accoppiatore e astuccio inclusi
Gamma 0 - 25.000 micron, 25 Torr
3330 Pa, 33,3 mBar, 25 mmHg
Precisione 5% della lettura +/- 5 micron
Risoluzione 1 micron (< 1000 micron),
0,1 Pa, 0,001 mBar/mmHg/Torr
Units Microns, Pa, mBar, mmHg, Torr
Riscaldamento Istantaneo
Risposta Istantaneo
Alimentazione 2 batterie alcaline “AAA”
Durata batteria Fino a 100 ore
Temperatura di esercizio -12°C - 50°C (-10°F - 122°F)
Sicura 500 PSI (34.5 Bar)
Unità Gamma Risoluzione
Pa 0 - 3,330
10 (@ > 1,000)
1 (@ > 100)
0.1 (@ < 100)
mBar 0 - 33.3
0.1 (@ > 10)
0.01 (@ > 100)
0.001 (@ < 100)
mmHg Torr 0 - 25
0.1 (@ > 10)
0.01 (@ > 1)
0.001 (@ < 1)
Microns 0 - 25,000
100 (@ > 10,000)
10 (@ > 1,000)
1 (@ < 1,000)
JAV-1041 JAVAC Digital Micron Gauge instructions A6.indd 18 19/12/2017 14:29

19
DISPLAY
AVVIO RAPIDO
01. Inserire 2 batterie “AAA”.
02. Tenere premuto per 1 secondo.
03. Tenere premuto per cambiare le unità di misura del vuoto.
04. Utilizzando il raccordo in dotazione, collegare l’unità μBluVac a un attacco di servizio inutilizzato, un utensile di
rimozione steli o un flessibile collegato all’impianto.
05. Avviare la pompa a vuoto. Il display visualizza la pressione del vuoto nelle unità selezionate.
06. Tenere premuto per 1 secondo per disattivare l’alimentazione.
AVVERTENZA: Per evitare danni, serrare il collegamento del sensore a mano. Qualora sia richiesta una
coppia maggiore, sostenere l’alloggiamento del sensore con una chiave da 3/4”.
SPEGNIMENTO AUTOMATICO
Dopo 1 ora in modalità sospensione, l’Vacuometro digitale si spegne automaticamente per risparmiare
ulteriormente batteria.
INSTALLAZIONE DELLA BATTERIA
01. Rimuovere il coperchio della batteria dal retro dello strumento.
02. Installare 2 batterie alcaline “AAA”, prestando attenzione alla polarità.
03. Riposizionare il coperchio della batteria.
INDICATORE LIVELLO BATTERIA
Quattro barre sull’indicatore di livello della batteria indicano che la batteria è completamente carica. Quando
la batteria si scarica, il numero di barre visualizzato diminuisce, nché non resta alcuna barra. L’Vacuometro
digitale si spegne automaticamente quando le batterie sono completamente scariche.
RETROILLUMINAZIONE
Tenere premuto e lasciare per attivare/disattivare la retroilluminazione. Per risparmiare batteria, la
retroilluminazione si spegne automaticamente dopo un minuto.
INDICAZIONE ALTA PRESSIONE
Se la pressione del vuoto supera 25.000 micron (3330 Pa, 33,3 mBar, 25 mmHg/Torr), il display visualizza:
CAL: Indica la prova automatica di calibrazione e la modalità di
calibrazione sul campo
Torr: Unità Torr selezionata
Pa: Unità Pascal selezionata
mBar: Unità millibar selezionata
Microns: Unità micron selezionata
mmHg: Unità mmHg selezionata
Indicatore livello batteria
JAV-1041 JAVAC Digital Micron Gauge instructions A6.indd 19 19/12/2017 14:29

20
MODALITÀ SOSPENSIONE
Dopo un minuto ad alta pressione, l’Vacuometro digitale riduce la potenza per risparmiare batteria. Questo
viene indicato sul display:
Il funzionamento a potenza massima riprende quando viene premuto un pulsante o se la pressione del vuoto
scende al di sotto dei 25.000 micron.
SENSORE DELL’OLIO E PULIZIA
Se olio o altri contaminanti sono inavvertitamente versati sul sensore, il display visualizza:
PER PULIRE IL SENSORE
01. Accendere l’vacuometro digitale.
02. Ripulire l’olio in eccesso.
03. Utilizzando un contagocce o una siringa, riempire il foro di apertura del sensore con alcol isopropilico.
Non inserire oggetti nell’apertura.
04. Rimuovere l’alcol.
05. Ripetere i punti (3) e (4) tre volte.
06. Asciugare accuratamente il sensore estraendo vuoto per circa 1 minuto oppure lasciare almeno 1 ora in
modo che asciughi all’aria.
07. Se è ancora visualizzato OIL (OLIO) sul display, eettuare la procedura di calibrazione con congelatore.
PROVA AUTOMATICA DI CALIBRAZIONE
Per garantire la massima precisione, eettuare periodicamente una prova automatica di calibrazione:
01. Spegnere l’vacuometro digitale.
02. Esporre l’vacuometro digitale alla pressione atmosferica.
03. Premere e tenere premuto. Dopo 5 secondi, il display visualizza:
se l’unità è nell’intervallo di calibrazione, oppure:
se è richiesta calibrazione.
JAV-1041 JAVAC Digital Micron Gauge instructions A6.indd 20 19/12/2017 14:29
Table of contents
Languages:
Popular Measuring Instrument manuals by other brands

Interacoustics
Interacoustics Callisto Instructions for use

Max Machinery
Max Machinery 213 Operational manual

Maico
Maico HY 5 Mounting Instructions and Directions for Use

TESTO
TESTO 230 instruction manual

CDI Meters
CDI Meters CDI 25 Installation and operating instructions

Schaller
Schaller Humimeter BLW operating manual

ABB
ABB FEX300 Operating instruction

Seca
Seca 264 Mounting instructions

ARJAY ENGINEERING
ARJAY ENGINEERING GasAlert II user manual

Lignomat
Lignomat Ligno-VersaTec User instructions

Texmate
Texmate DL-40 instructions

ICS Schneider Messtechnik
ICS Schneider Messtechnik Anton Paar DMA 501 Instruction Manual and Safety Information