Jaycar Electronics QC8602 User manual

Integrated Intelligent Speed Dome
User Manual
V 1.0
1

Index
CHAPTER1MAJORFEATURES...................................................................................................................3
1.1BUILD‐INPTZ ...........................................................................................................3
1.2BUILD‐ININTEGRATEDCAMERA ....................................................................................3
1.3FEATURES .................................................................................................................3
CHAPTER2INSTALLATION ........................................................................................................................5
2.1INSTALLATIONPREPARATION .........................................................................................5
2.2INSTALLATION ............................................................................................................5
2.3INITIALSETTING .........................................................................................................8
2.4SWITCHSETTING ........................................................................................................9
CHAPTER3OPERATIONINSTRUCTION ...................................................................................................12
3.1POWER‐ONACTION..................................................................................................12
3.2BASICFUNCTIONGUIDE ............................................................................................12
3.3PRESETPOINTSFUNCTIONS ........................................................................................13
APPENDIXALIGHTNINGANDSURGINGPROTECTION ..........................................................17
APPENDIXBRS485BUSCOMMONSENSE .......................................................................18
APPENDIXCWIREDIAMETERANDTRANSMISSIONLENGTHFOR24VAC...............................21
APPENDIXDWIREGAUGECOMPARISONLISTHOMEANDABROAD ......................................22
2

Safety Instruction
These instructions are intended to ensure that user can use the product correctly to avoid danger or
property loss.
The precaution measure is divided into “Warnings” and “Cautions”:
Warnings: Serious injury or death may cause if any of the warnings is neglected.
Cautions: Injury or equipment damage may cause if any of the cautions is neglected.
Warnings Follow these
safeguards to prevent
serious injury or death.
Cautions Follow these
precautions to prevent
potential injury or
material damage.
Warnings
1. In the use of the product, you must be strict compliance with the electrical safety regulations of the nation and
region.
2. Please use the power adapter, which is provided by normal company. Please refer to the specific for the
requirements.
3. Do not connect several devices to one power adapter as adapter overload may cause over-heat or fire hazard.
4. Please make sure that the plug is firmly connected on the power socket.
5. When the product is installed on wall or ceiling, the device shall be firmly fixed.
6. If smoke, odor or noise rise from the device, turn off the power at once and unplug the power cable, and then
please contact the service center.
7. If the product does not work properly, please contact your dealer or the nearest service center. Never attempt
to disassemble the camera yourself. (We shall not assume any responsibility for problems caused by
unauthorized repair or maintenance. )
Cautions
1. Do not drop the dome or subject it to physical shock, and do not expose it to high electromagnetism radiation.
Avoid the equipment installation on vibrations surface or places subject to shock (ignorance can cause
equipment damage).
2. Do not place the dome in extremely hot, cold (the operating temperature shall be -20°C ~ +60°C), dusty or
1

damp locations, or fire or electrical shock will occur otherwise.
3. Do not aim the camera at extra bright places (e.g. the sun or the light). A blooming or smear may occur
otherwise (which is not a malfunction however), and affecting the endurance of CCD at the same time.
4. The dome cover for indoor use shall be kept from rain and moisture.
5. Exposing the equipment to direct sun light, low ventilation or heat source such as heater or radiator is
forbidden (ignorance can cause fire danger).
6. Please use the provided glove when open up the dome cover, avoid direct contact with the dome cover,
because the acidic sweat of the fingers may erode the surface coating of the dome cover.
7. Please use a soft and dry cloth when clean inside and outside surfaces of the dome cover, not to use alkaline
detergents.
2

Chapter 1 Major Features
Integrated speed dome adopts completely digital control, and its drive system is designed elaborately. There are
functions like auto-day and night functionality, auto tracing white balance, back-light compensation besides
presets, auto scan, patrol, park movement. It can realize o-overall real time surveillance. The speed dome
supports PELCO-D, PELCO-P and HIK Code protocols, and can identify them automatically.
1.1 Build-in PTZ
Integrated design with compact structure.
360 degrees horizontal rotate with endless, no surveillance blind zone, the speed can reach up to 75
degrees per second.
0 degree to 90 degrees vertical tilt, the speed can reach up to 50 degrees per second.
Elaborate electric machine drive device; move smoothly and quietly, the images have no vibration.
1.2 Build-in Integrated Camera
Auto focus
Auto back light compensation
Auto white balance tracking
Auto day and night functionality (depending on the camera)
1.3 Features
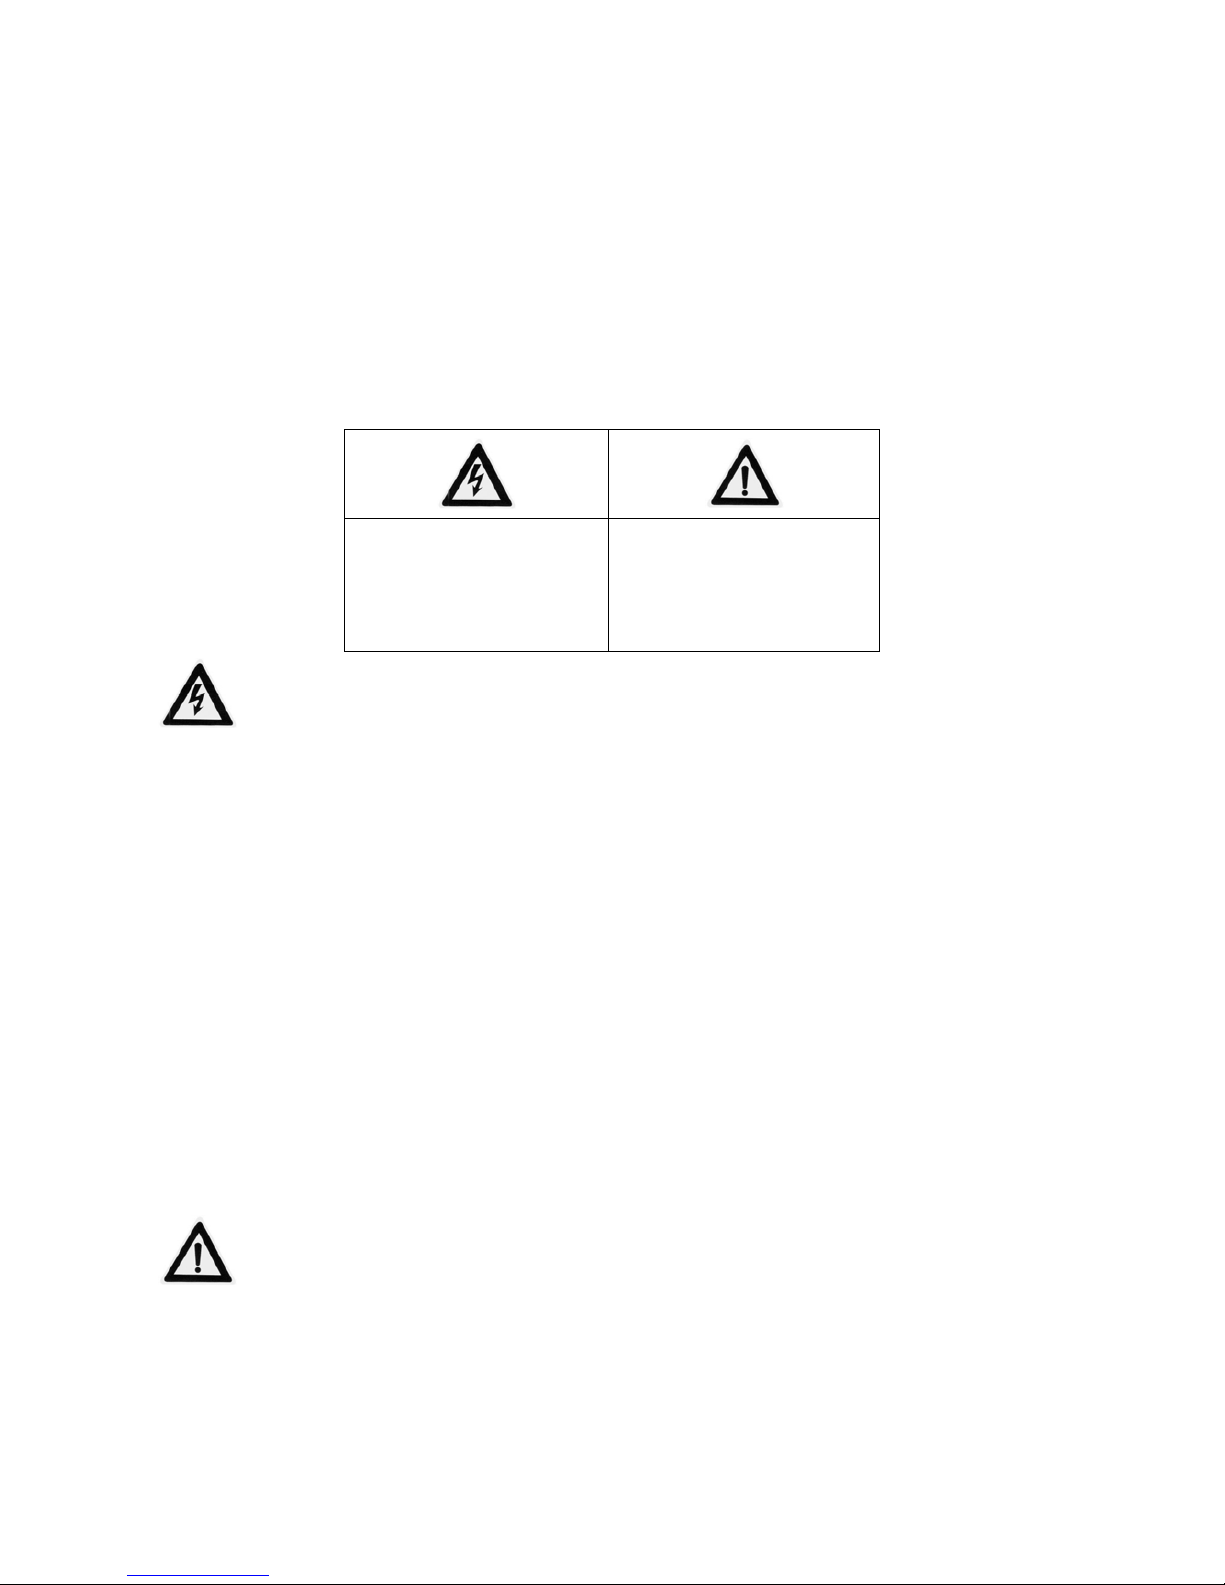
Self-adaptive to Multiple Protocols
The dome camera supports PELCO-D, PELCO-P and HIKVISION protocols, and self-adaptive to them.
Keyboard Control
The vertical and horizontal camera movement and zoom can be controlled with keyboard, DVR and client
software.
Manual Stops
When the device is controlled by keyboard with this function on, the horizontal motion of camera will be
limited within the restricted area, and users can’t see the scene outside the area.
Preset Point
Each preset point includes PTZ horizontal, vertical position and lens zooming factors, etc. When preset point is
initiated, the dome will move to the position corresponding to preset point message. Users can add, delete and
call each preset point.
Mouse Tracking
3

The speed dome can be controlled with the 2 buttons and scroll of mouse can be used under HIKVISION
protocols with devices and client software. Click on a certain area and the device will move to the scene with
corresponding point as the center. When a rectangular area is selected by left-clicking, device will move to its
center and enlarge it. With right-clicking, the lens will zoom in, and the scroller can easily make the lens
zooming, and mouse operation automatically incorporates zooming effect
Proportional Zooming
Vertical and Horizontal scan speed will be changed during zoom time, as speed down if zoom out and speed up
if zoom in to get better monitoring performance.
IR Cut Filter
IR can be set as auto illumination convert mode or manual illumination convert mode. The integrated engine
will automatically change CCD illumination with regard to environment lightening conditions. Without this
function on, users can choose “Day” or “Night” mode to choose color or B/W display.
Patrol
Users use a group of preset positions to guide the camera on the patrol path. Scan speed between 2 preset points
and dwell time on each point can be set separately.
4

Chapter 2 Installation
2.1 Installation preparation
Please check if all the items on the package list have been included with your camera before installation
and make sure they are in good condition.
[Notice]: The standard of the power adapter isAC24V/3A.
2.2 Installation
1. Install the speed dome brackets. Please refer to “Quick Installation Guide” for the details.
2. Open the transparent cover, remove the camera, uncover the sticking plaster that protects the camera, and
remove the pearl cotton. When remove the camera, pull the hook locks at the two sides of the camera with
two hands, and drag out the camera at the same time. Removing the camera expose the speed dome chassis,
shown in Figure 2.1(take analog speed dome as an example). Screw part 2 to loose bolt for fixing the
chassis. Open the chassis upwards and we can see the back of the chassis and the circuit board on it, shown
in figure 2.2. Part 1 are video output socket and RS-485 control wire socket, and part 2 is 24V AC power
input socket.
Figure 2.1 The Bottom of the Speed Dome
Figure 2.2 circuit board on the chassis
(Take analog speed dome as an example)
1: Video Output and RS-485 interfaces 2: 24V AC power supply interface
5

3. Set Speed Dome Address and Baud Rate. At the back of speed dome attached the dial-up switches
description, shown in figure 2.3. At the profile there are SW1 and SW2, shown in figure 2.4, used for
setting the address, baud rate, communication protocol. Please refer to section 2.4, “Switches Settings”, for
details.
Figure 2.3 Dial-up switches description
O
N
12345678 O
N
12345678
SW1 SW2
on on
Figure 2.4 Dial-up switches on the profile of the camera.
4. Install the dome cover. Open the joint interface on the cover, pull the wire twisted in the bracket into the
dome cover through the interface (Note: don’t plug in the supply power, or else wire whip may happen).
Rotate the cover onto the brackets, and lock the locking screw on the bracket, shown in figure 2.5. Fix the
cover, then install the sockets, fix the joint interface.
Note: When install a Speed dome outdoor, please wind the interface between the cover and bracket with
Teflon Tape to avoid water entering into the dome.
6

Figure 2.5 Install the cover
5. Install the camera. Install this unit by holding it with both hands, aim APRAGAZ sockets on the camera
(shown in figure 2.8) to the APRAGAZ sockets on the dome chassis (shown in figure 2.7). Plug the camera
into the cover with the guide arc along with the guide pillar on the chassis until you will hear a voice “ka”.
Figure 2-6 Installation of camera unit
Figure 2.7 APRAGAZ sockets and guide pillar on the chassis
7

Figure 2.8 APRAGAZ sockets and guide arc on the camera
6. Install the transparent cover. Please aim the two gaps on the flange of transparent cover (shown in figure 2.9)
at the hook lock on the cover (shown in figure 2.10). Finally, fasten the two fixing screws on the two sides.
Figure2.9 The transparent lower dome casing
Figure 2.10 Installation of lower dome casing
2.3 Initial setting
Address: 0
Baud rate: 2400
120Ωmatching resistance: OFF
8

2.4 Switch setting
Figure 2.11 Dial-up switches description
1: SW1 address dial-up switch 2: SW2 baud rate and parity switch
The two dialing switches SW1 and SW2 on device base board are used to set device address, baud rate,
communication protocol and other parameters (as shown in the Figure 2.11, in which switch ON stands for 1).
In SW1 and SW2, 1 is the lowest position and 8 is the highest position. Please refer to the following list for
specific setting:
Note: This speed dome Self-adaptive Pelco-P, Pelco-D and HIK Code protocols.
2.4.1 Device address setting
SW1 is used to set device address as follow:
Device address Dialing setting schematics 1 2 3 4 5 6 7 8
0 OFF OFF OFF OFF OFF OFF OFF OFF
1 ON OFF OFF OFF OFF OFF OFF OFF
255 ON ON ON ON ON ON ON ON
More examples for address codes dialing mode:
Code dialing SW1 switch setting
address 1 2 3 4 5 6 7 8
0 OFF OFF OFF OFF OFF OFF OFF OFF
1 ON OFF OFF OFF OFF OFF OFF OFF
2 OFF ON OFF OFF OFF OFF OFF OFF
3 ON ON OFF OFF OFF OFF OFF OFF
4 OFF OFF ON OFF OFF OFF OFF OFF
5 ON OFF ON OFF OFF OFF OFF OFF
6 OFF ON ON OFF OFF OFF OFF OFF
7 ON ON ON OFF OFF OFF OFF OFF
9

8 OFF OFF OFF ON OFF OFF OFF OFF
9 ON OFF OFF ON OFF OFF OFF OFF
10 OFF ON OFF ON OFF OFF OFF OFF
11 ON ON OFF ON OFF OFF OFF OFF
12 OFF OFF ON ON OFF OFF OFF OFF
13 ON OFF ON ON OFF OFF OFF OFF
14 OFF ON ON ON OFF OFF OFF OFF
15 ON ON ON ON OFF OFF OFF OFF
16 OFF OFF OFF OFF ON OFF OFF OFF
17 ON OFF OFF OFF ON OFF OFF OFF
18 OFF ON OFF OFF ON OFF OFF OFF
19 ON ON OFF OFF ON OFF OFF OFF
20 OFF OFF ON OFF ON OFF OFF OFF
21 ON OFF ON OFF ON OFF OFF OFF
22 OFF ON ON OFF ON OFF OFF OFF
23 ON ON ON OFF ON OFF OFF OFF
24 OFF OFF OFF ON ON OFF OFF OFF
25 ON OFF OFF ON ON OFF OFF OFF
26 OFF ON OFF ON ON OFF OFF OFF
27 ON ON OFF ON ON OFF OFF OFF
28 OFF OFF ON ON ON OFF OFF OFF
29 ON OFF ON ON ON OFF OFF OFF
30 OFF ON ON ON ON OFF OFF OFF
31 ON ON ON ON ON OFF OFF OFF
32 OFF OFF OFF OFF OFF ON OFF OFF
33 ON OFF OFF OFF OFF ON OFF OFF
34 OFF ON OFF OFF OFF ON OFF OFF
35 ON ON OFF OFF OFF ON OFF OFF
36 OFF OFF ON OFF OFF ON OFF OFF
37 ON OFF ON OFF OFF ON OFF OFF
38 OFF ON ON OFF OFF ON OFF OFF
39 ON ON ON OFF OFF ON OFF OFF
40 OFF OFF OFF ON OFF ON OFF OFF
41 ON OFF OFF ON OFF ON OFF OFF
42 OFF ON OFF ON OFF ON OFF OFF
43 ON ON OFF ON OFF ON OFF OFF
44 OFF OFF ON ON OFF ON OFF OFF
45 ON OFF ON ON OFF ON OFF OFF
46 OFF ON ON ON OFF ON OFF OFF
47 ON ON ON ON OFF ON OFF OFF
48 OFF OFF OFF OFF ON ON OFF OFF
49 ON OFF OFF OFF ON ON OFF OFF
50 OFF ON OFF OFF ON ON OFF OFF
51 ON ON OFF OFF ON ON OFF OFF
52 OFF OFF ON OFF ON ON OFF OFF
53 ON OFF ON OFF ON ON OFF OFF
54 OFF ON ON OFF ON ON OFF OFF
55 ON ON ON OFF ON ON OFF OFF
56 OFF OFF OFF ON ON ON OFF OFF
57 ON OFF OFF ON ON ON OFF OFF
58 OFF ON OFF ON ON ON OFF OFF
59 ON ON OFF ON ON ON OFF OFF
60 OFF OFF ON ON ON ON OFF OFF
61 ON OFF ON ON ON ON OFF OFF
62 OFF ON ON ON ON ON OFF OFF
10

63 ON ON ON ON ON ON OFF OFF
64 OFF OFF OFF OFF OFF OFF ON OFF
65 ON OFF OFF OFF OFF OFF ON OFF
66 OFF ON OFF OFF OFF OFF ON OFF
67 ON ON OFF OFF OFF OFF ON OFF
68 OFF OFF ON OFF OFF OFF ON OFF
69 ON OFF ON OFF OFF OFF ON OFF
70 OFF ON ON OFF OFF OFF ON OFF
71 ON ON ON OFF OFF OFF ON OFF
2.4.2 Baud rate setting
Switch positions 1, 2 and 3 in SW2 are used to set device baud rate from 100 to 101, representing baud
rates of 2400bps, 4800bps, 9600bps, 19200bps and 38400bps respectively. If setting figure is not in the above
range, the default baud rate will be 9600bps. The code dialing mode for specific baud rate is listed as below:
SW2-baud rate switch setting
Baud rate Dialing setting schematics 1 2 3
2400 ON OFF OFF
4800 OFF ON OFF
9600 ON ON OFF
19200 OFF OFF ON
38400 ON OFF ON
2.4.3 Parity verify and Manchester protocol setting
Switch positions 4, 5 and 6 in SW2 are used to set device parity verify and Manchester protocol. The code
dialing modes for parity verify and Manchester protocols are as follows:
SW2-parity verify and Manchester protocol setting
function Dialing
indication 4 5 6
parity/none OFF OFF OFF
/odd ON OFF OFF
/even OFF ON OFF
Manchester ON ON ON
2.4.4 Single/ duplex mode and resistance setting
SW2 switch 7 OFF position is single mode and ON position is semiduplex mode. With switch 8 ON, the
resistance is matched through 120 ΩRS-485 circuit terminal.
11

Chapter 3 Operation Instruction
Note: Analog speed dome does not support operations through menu; all the functions are invoked or
configured by special presets.
3.1 Power-on Action
After power is turned on, device will perform self-test action that begins with lens motion, then horizontal
motion and finally vertical motion. After power-on self-test action, the interface as shown in following Figure
will be displayed. Analog camera’s interface (related with camera) is shown as the Figure3.1, including address,
baud rate, parity bit, data bit, stop bit. The start-up interface will disappear after 40 seconds.
Figure 3.1 Analog Speed Dome Startup Picture
Lens motion: Lens zoom in and out, and then close iris. Iris keeps closed until motor action finishes.
Horizontal motion: Dome turns clockwise first and then counter-clockwise after it detects zero position. It will
stop after a short trip.
Vertical motion: camera will begin with slow downward motion. After reaching contact point, it will move up
quickly and stop at 45o.
3.2 Basic Function Guide
The following operation shall be done in collaboration with backline control device or client software. Control
devices include control keyboard and DVR, etc. Client software is the software on customer’s end. Examples
are given here for common operation only with assumption that the current control system supports following
operation. Please refer to Client Software User Manual for detail operation guide.
Horizontal and vertical motion: move the joystick toward the expected direction, or press
Up/Down/Left/Right buttons.
Lens zooming operation: press TELE button to pull the lens closer and the scene will be bigger. Press WIDE
button to pull the lens farther and the scene will be smaller.
Focusing operation: After FAR button is pressed, the object far away will become more legible and the object
in vicinity will become ambiguous. After NEAR button is pressed, the object in vicinity will become more
legible and the object far away will become ambiguous.
Under auto focus mode, camera will focus automatically to maintain legible Figure. Now, manual focusing
12

operation will still be possible. However, after other operation of device, camera will resume auto focus.
Iris operation: press OPEN and the iris will enlarge and image brightness will increase. Press CLOSE and the
iris will gradually shrink that leads to brightness decrease. Under automatic iris mode, both OPEN and CLOSE
buttons are still valid. However, after other operation on dome, camera will resume automatic iris motion.
Preset point operation:
Preset point can be set or called through keyboard, DVR font panel. For example, press “Preset”, a numeric key,
“Enter” in order on the keyboard to call a preset. Preset 51 to preset 101 are special presets, please refer to
section 3.3.
The analog speed dome supports 104 presets, 70 presets using Manchester code protocol. The presets that can
be defined is related to the control system. Please refer to the control system manual.
Using keyboard or DVR’s front panel can call preset. Take analog camera for example. When use keyboard to
call preset, please orderly press the “call preset” + three numbers, “entry”; 50th ~ 104th is used for special preset
and is reserved. Refer to chapter 3.3.
3.3 Preset points functions
3.3.1Analog speed dome special preset function
Analog integrated speed dome can only be operated by preset, and all the operations are realized by calling or
setting a preset. The functions of preset point in detail are given as follow Figure 3.3 and Figure 3.4.
1. Using HIKVISION, PELCO-D, PELCO-P protocols, the preset and corresponding function are as below:
Presets Operation Call the preset Set the preset
1 to 50 Call functions Set functions
51(No.1 auto scan path) Start auto scan(high speed) Set auto scan starting position
52 Start auto scan(medium speed) Set auto scan end position
53 Start auto scan(low speed) ---
54 Reboot Restore to factory settings
55 Close camera auto restore Open camera auto restore
56(No.1 patrol) Start patrol (high speed) Set the patrol to stop for 10
seconds
57 Start patrol (medium speed) Set the patrol to stop for 30
seconds
58 Start patrol (low speed) Set the patrol to stop for 60
seconds
59 Start Sens Up(for SONY camera ) Close Sens Up(for SONY camera)
60 Auto focus Half-auto focus
61 Open park action Auto park action 10s
62 Close park action Auto park action 30s
63 Preset 1 Auto park action 60s
64 Preset 2 Auto park action 300s
65 Preset 3 Zoom Trigger focus
13

66 No.1 patrol Manual focus
67 No.1 Auto scan Open zoom display
68 No.1 Pattern (customized) Close zoom display
69 --- Night mode
70 --- Day mode
71 Start Pattern(customized) D/N auto switch
72 Pattern remember start(customized) Indoor
73 Pattern remember end(customized) Outdoor
74 Auto Trace White Balance Auto White Balance
75 Auto IRIS Manual IRIS
76 Open proportional pan/tilt Open BLC
77 Close proportional pan/tilt Close BLC
78 Open scan limit Open digital zoom
79 Close scan limit Close digital zoom
80(Auto scan path 2) Open speed level controlling Open camera power
81 Close speed level controlling Close camera power
82 Open camera configuration Open parity and Verification
83(Auto scan path 3) Close camera configuration Close parity and Verification
84 --- Clear all presets information
85 --- ---
86(Auto scan path 4) --- ---
87 --- ---
88 --- ---
89(Auto scan path 5) --- ---
90 --- ---
91(No.2 auto scan) Start auto scan path (high speed) Set scan start position
92 Start auto scan path (medium speed) Set scan end position
93 Start auto scan path (low speed) ---
94 --- ---
95 --- ---
96(No.2 patrol) Start patrol(high speed) Set the patrol to stop for 10
seconds
97 Start patrol (medium speed) Set the patrol to stop for 30
seconds
98 Start patrol (low speed) Set the patrol to stop for 60
seconds
99(No.3 auto scan) Start auto scan path (high speed) Set scan start position
100 Start auto scan path (medium speed) Set scan end position
101 Start auto scan path (low speed) ---
102(No.3 patrol) Start auto scan path (high speed) Set the patrol to stop for 10
seconds
103 Start auto scan path (medium speed) Set the patrol to stop for 30
seconds
14

104 Start auto scan path (low speed) Set the patrol to stop for 60
seconds
Figure 3.3
2. Using Manchester code protocols(turn the 4th, 5th, 6th of SW2 on), the preset and corresponding function are
as below:
Presets Operation Call the preset Set the preset
1 to 35 Call functions Set functions
36(No.1 auto scan
path) Start auto scan(high speed) Set auto scan starting position
37 Start auto scan(medium speed) Set auto scan end position
38 Start auto scan(low speed) ---
39 Reboot Restore to factory settings
40 Close camera auto restore Open camera auto restore
41(No.1 patrol) Start patrol (high speed) Set the patrol to stop for 10 seconds
42 Start patrol (medium speed) Set the patrol to stop for 30 seconds
43 Start patrol (low speed) Set the patrol to stop for 60 seconds
44 Start Sensor Up(for SONY camera ) Close Sensor Up(for SONY camera)
45 Auto focus Half-auto focus
46 Open park action Auto park action 10s
47 Close park action Auto park action 30s
48 Preset 1 Auto park action 60s
49 Preset 2 Auto park action 300s
50 Preset 3 Zoom Trigger focus
51 No.1 patrol Manual focus
52 No.1 Auto scan Open zoom display
53 No.1 Pattern (customized) Close zoom display
54 --- Night mode
55 --- Day mode
56 Start Pattern(customized) D/N auto switch
57 Pattern remember start(customized) Indoor
58 Pattern remember end(customized) Outdoor
59 Auto Trace White Balance Auto White Balance
60 Auto IRIS Manual IRIS
61 Open proportional pan/tilt Open BLC
62 Close proportional pan/tilt Close BLC
63 Open scan limit Open digital zoom
64 Close scan limit Close digital zoom
65 Open speed level controlling Open camera power
66 Close speed level controlling Close camera power
67 Open camera configuration Open parity and Verification
68 Close camera configuration Close parity and Verification
69 --- Clear all presets information
70 --- ---
15

Figure 3.4
Explanation:
Take using Pelco-P/D, HIKVISION protocols for example, integrated analog speed dome supports 3 patrols,
each of which support 16 presets(patrol 1 supports preset 1 to present 16, patrol 2 supports preset 17 to present
32, patrol 3 supports preset 33 to present 48), the stay time and speed can be set. The dome also support 2 auto
scan path with movement limitation, the speed is adjustable. If don’t set the movement limitation, it moves
continuously. It support park action as well, and park action time is optional from 10s to 300s. There are 6
modes can be chosen from (preset 1 to preset 3, auto scan 1 and patrol 1and pattern 1).
Detailed operation is described as below:
Call 56th preset to call patrol 1. Select the video in the DVR, press “PTZ” and “Rec”, and input 056 to start
patrol 1, and the dome will continuously scan among pre-set 16 presets. User can realize other function through
the same meaning.
16

Appendix A Lightning and Surging Protection
This product uses TVS plate lightning protection technology to avoid damage caused by pulse signal that is
below 3000W, like instantaneous lighting, surging, etc. According to the actual situation outdoors, necessary
protection measures must be taken to secure the electrical safety.
Signal transmission line should be at least 50 meters from the High-tension apparatus or high-tension cable.
Outdoor wiring would better be along with the eave.
In the open fields, wiring should be buried underground in sealed steel pipe, and the steel pipe should be
grounding. It is forbidden to wiring hang in the air
In strong thunderstorm area or high induction voltage areas(such as high-voltage transformer substation), high
power lightning protection apparatus and lightning conductor are necessary to be appended.
The design for installation and wiring with lightning protection and grounding in mind should be combined with
the lightning protection consideration of the building, and be conform to the related national standards and
industry standards.
The whole system should be equipotential grounding, the grounding units should meet the demands for
anti-jamming and electrical safety, and can’t short circuit or hybrid join with the null line of strong grid. When
the system ground separately, and the grounding resistance should be smaller than 4Ω, the sectional area of
ground conductor should be smaller than 25mm2. Please refer to section 3.2 and figure 3-2 “circuit board on the
chassis” for finding the speed dome earth point.
17

Appendix B RS485Bus Common Sense
1. RS485 Bus Basic Features
According to RS485 Industry Bus Standard, RS485 Industry Bus is semiduplex communication bus with
120ΩResistance, the maximum loading capability is 32 effective loads (including main control equipment and
controlled plant)
2. RS485 Bus Transmission Length
When using 0.56mm (24AWG) cross wire as communication wire, the maximum transmission length in theory
is relevant with the baud rate, the details are showed in the following tables:
Baud Rate The maximum transmission length
2400bps 1800m
4800bps 1200m
9600bps 800m
When using thin communication wire, or using the products in strong electromagnetic interference environment,
or many devices are connected on the bus, the maximum length should become shorter accordingly, on the
contrary, the maximum length should become longer.
3. Connection Way and Terminal Resistance
1) RS485 industry bus standards ask the devices being connected in daisy chained way, there are 120Ω
terminal resistance at the two ends(show as figure one); simplified connection can use the connection
method shown in figure two, but the length of “D” should be smaller than 7 meters.
Figure 1
Figure 2
2) The Connection Method of Speed dome Terminal 120ΩResistance
Speed dome Terminal 120Ωmatched resistance can be connected by setting the dial-up switches on the
18
Table of contents
Other Jaycar Electronics Security Camera manuals