Jaycar QV3856 User manual

- 1-
Introduction:
Thank you for purchasing this FHD Digital vehicle driving recorder. This product is
based on maintaining the original appearance of the original vehicle, and hard
evidence for today's traffic accident specially developed a fashion, beautiful,
convenient and durable multi-vehicle driving recorder, can record your life lit by lit
and it’s the best choice for escort for your trip.
Product Overview:
This product is a leading FHD Digital vehicle driving recorder, with FULL HD 1296P
high resolution video (A7LA30 Support Max 1080P), G-Sensor, SOS emergency
saving, ADAS (A7LA30 do not support), Audio saving, HDMI output etc. function.
Compared with the traditional video, this product is exclusive design, elegant
appearance, does not affect the overall appearance, humanized design concept
allows you to enjoy the noble class treatment!
Warm prompt:

- 2 -
●This user manual will detail how to use, operation, technical specifications and
precautions. Before use, please read this manual thoroughly and fully understand,
Please keep this manual, we hope our products can meet your needs and long-term
service to you!
Using this product, enjoying the real high quality life.
●This manual in the printing process, the machine because of the appearance,
software or hardware repair process leads to the same part of the manual operation
of non-conformance, the Company has maintained the final interpretation!
●Do not put the machine into the damp working condition, this machine have no
waterproof function, so please make the machine no pour water or exposed to rain water.
●Do not try open the shell or try repair by yourself, if the accessories for this machine
have any problem, please do to the professional maintenance station to repair.
●Do not use the thrill chemical substance, clean solvent or cleaner to clean this
machine, please use the moist soft cloth to clean.
●Do not use this machine under the condition that the dust and density is too large,
to avoid affecting the video.
●Please protect the environment, don’t discard this machine randomly; do not throw
this machine into fire, otherwise will have an explosion.
●Please pay attention to clean the lens surface, use the moist soft cloth clean the
lens then use, to avoid the video is not so good.
Content Guide
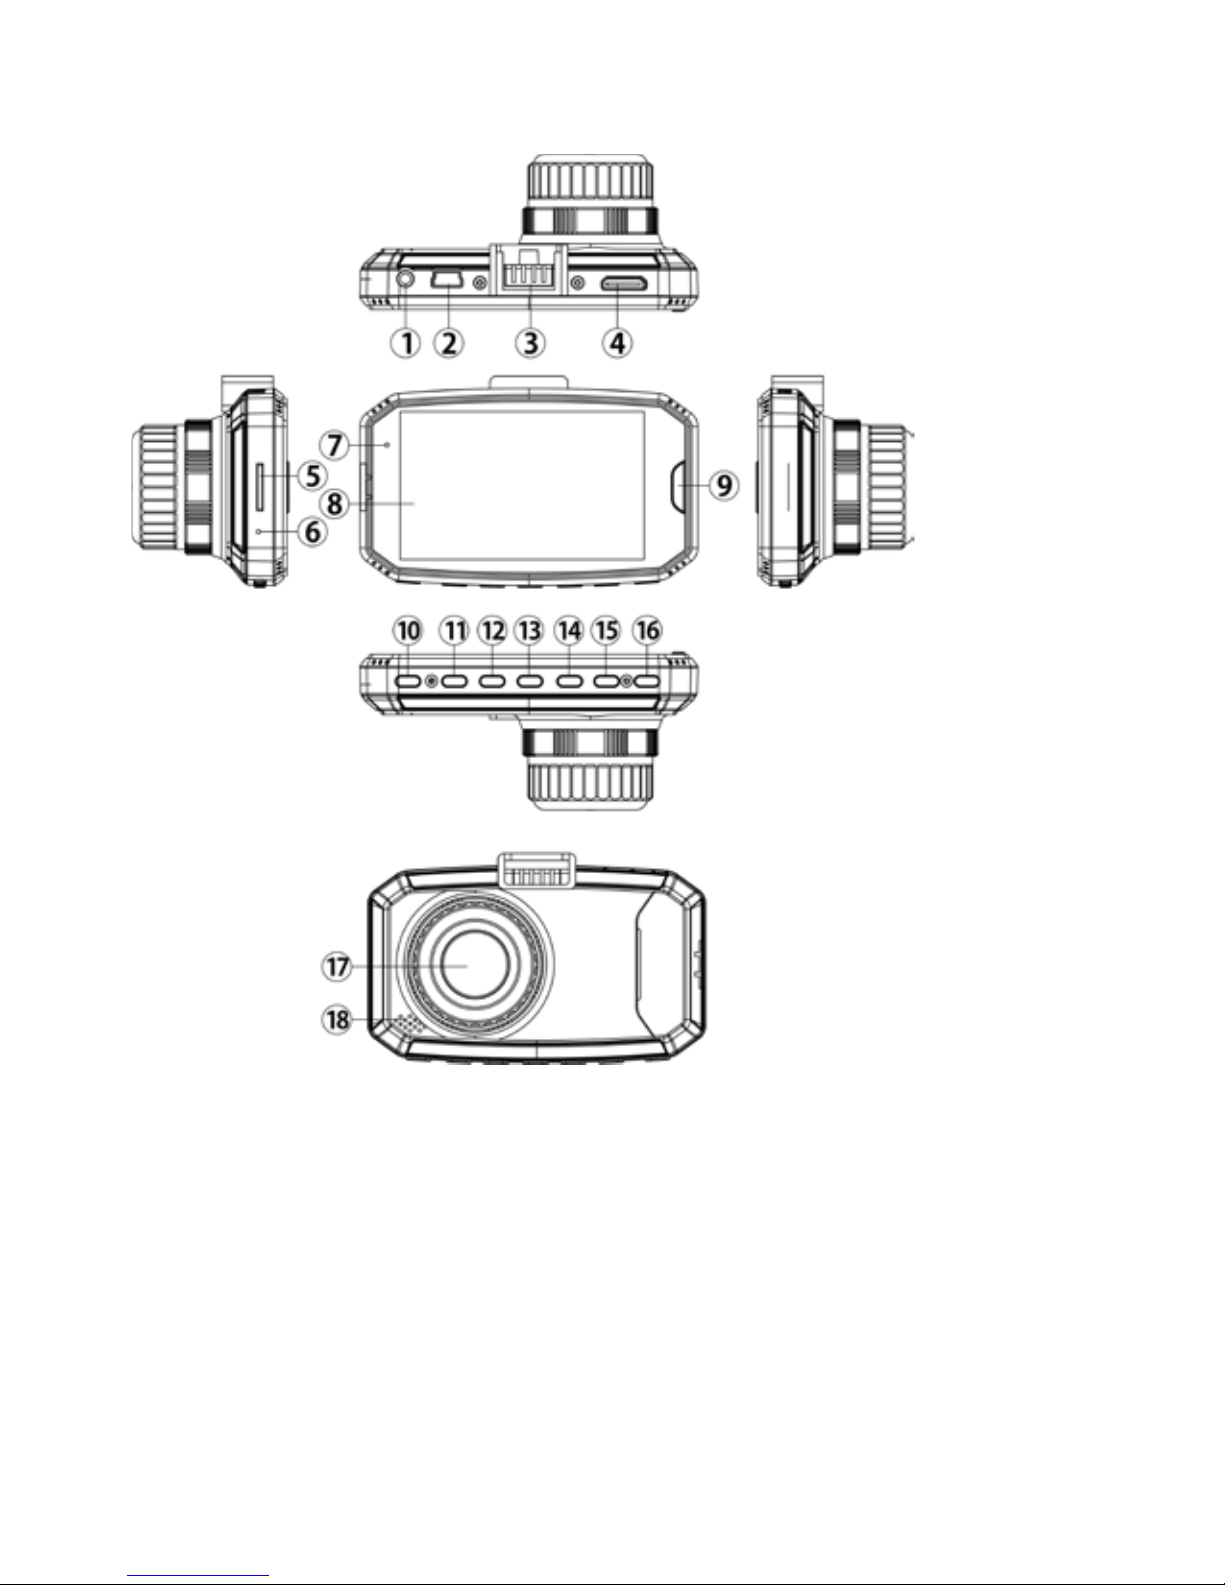
(A)Unit Structure chart

- 3-
(B)Button and Interface Instruction
(C)Charge and Power on/off instruction
(D)Photograph/Video/Playback basic operation instruction
(E)Menu Setting Instruction
(F)Product Specification
(G)Frequently Asked Questions

- 4-
A. Unit Structure chart

1)AV-OUT or GPS 2)USB Interface 3)Holder Connector 4)HDMI
5)TF card slot 6)Mic 7)Indicator 8)LCD screen
9)SOS Button 10)Power Button
- 5-
11) Up 12)Menu

- 6-
13)Ok 14)Mode 15)Down
16)Reset 17)HD Camera 18)Speaker
B:Button and Interface Instruction:
Button Name Button Function Instruction for Use
Power Power on/off 1.Power on
:
Short press to turn on and the red indication lamp on.
2. Power off
:
Long press to turn off and the red indication lamp off.
Reset Reset 1.short press to turn on again when the machine standby
OK Confirmation
Video
start/stop/photogra
ph function
Menu confirmation
1
:
In the video mode
:
short press to start record, short press
again to stop recording
2
:
In the photograph mode
:
short press to confirm make photo
3
:
In the menu mode
:
set and confirm
Menu Photograph/recor
d/ playback, all
functions setting
1. In the video mode: short press once to switch video setting; short
press twice to switch system setting.
2. In the photograph mode: short press once to switch photograph
setting; short press twice to switch system setting;
3.In the video/photo playback mode: short press once to switch
playback setting; short press twice to switch system setting;

- 7-
Up
Choose up
Turn on/off the
audio recording
function
1. In the menu mode
:
Up
2. In the video mode
:
short press to turn on/off the audio recording
Down Choose down 1. In the menu mode
:
Down
Mode Switch among
photograph/
record/playback
1.In the video mode: Switch among photograph/ record/playback.
2.Screen shot
:
In the video mode, short press mode button could
screen shot the current figure.(Do not support at resolution:
2560x1080 30P 21:9 / HDR1920x1080 30P 16:9)
SOS Emergency
Button Press to lock the
file Press to lock the file when under the video status.
TF card Slot TF card Slot Insert the TF card into this Slot
HDMI Interface High definition
output Connect the HD television by HDMI cable, replay video and photo.
AV Slot AV Output or GPS
Output
1.The AV slot can’t be acted as AV output if the machine be set with
GPS, only acted as GPS output.
2.The AV slot can’t be acted as GPS output if the machine be set
without GPS, only acted as AV output.
Holder Interface Install holder Install the holder on the machine
USB Output storage/charging 1: Connect USB cable for auto recording, and view the video/photo.
2
:
Connect USB cable for auto charging

- 8-
C.Charge and Power on/off instruction:
1. Charge Method:
1.1: Charge by connecting the cigarette lighter
1.2: Charge by connecting the computer via USB data cable
The blue indication light will on when charging, and need about 60 minutes to be full,
after it’s full the indication light will off.
2.Operating guide
Auto power on/off:
After the vehicle connect with the vehicle power, this machine support auto video
record when the vehicle startup, auto power off and save the video when the vehicle
shut down.
2.1: the vehicle startup- cigarette lighter connect power- auto power on and video
record.
2.2: the vehicle shut down - cigarette lighter disconnect power- auto power off and
save the video.

- 9-
(PS: The key for power on/off: 1. The vehicle power connect the cigarette lighter;
2.the vehicle start on/shut down, the cigarette lighter must have the two actions of
electrify/outage)
Attention: very few vehicles the cigarette lighter have no outage after the vehicle
shut down; if there is no two actions of electrify/outage, then the machine can’t auto
power on/off, if such condition happened please consult 4’S shops or vehicle beauty
shops for modify to solve the problem. The GPS symbol will not appear when the
unit without GPS function in below picture, and this GPS shows tracking of the
longitude and latitude of driving,without navigation function.
3. Before installation, operate instructions by hand:
3.1. Power on/off by hand
Short press Power button, the red indication lamp will be on. Enter the video mode,

- 10 -
Long press Power button again , the red indication lamp will be off.
Attention: the device will be turn off automatically after a warning of low battery when
the power is very low.
3.2 Charge by connecting the computer via USB data cable
vehicle DVR mainly use while charging, the full built-in battery could maintain about
3-5minutes for standby, if use for long time, must connect the power cable for
charging; and use by connecting the mobile power at home.
D:Photograph/Video/Playback basic operation instruction:
Video Mode:
Short press mode button to switch to video mode, there is a video recording icon
shown on the top left corner of the LCD; short press OK button to start recording,
the red video indication light start to flash, that is the DVR is under recording, short
press OK button again to stop recording.
Video process: Power on——enter video mode——short press REC button to
record——short press REC button again to stop recording.

- 11 -
Photo Mode:
Short press MODE button to switch to photo mode, there is a photo shooting icon
shown on the top left corner of the LCD, short press OK button to shooting, when
photography is finished, the LCD will be flash one time.
Attention:1. Under the video status, press MODE button to screen shot the
current video; first stop recording, then press MODE button one time to switch the
photograph mode; 2. This machine is limited only for 50pcs photos, and can’t take
photos when over 50pcs.
Photograph process: Power on——enter video mode——press MODE button to
switch the photograph mode——press OK button to make photos.

- 12 -
Video/Photo Playback
Short press MODE button twice to switch playback mode, the playback icon will be
shown on the LCD top left corner:
1. Short press up/down button to selecting the file section(locked section/ regular file
section);
2. Short press OK button to enter the playback section, then short press up/down
button to selecting the file, press OK button again to enter single file
playback(press OK button again to start playback the video)
Attention:Under the video status, press MODE button to screenshot the current
video; first stop recording, then press MODE button twice to switch the playback
mode

- 13 -
Playback process: Power on——enter playback mode——press MODE button
twice to switch the playback mode——press up/down button to enter the section and
press OK button to choose——press OK button to enter single file playback(press
OK button again to start playback the video)
E:Menu Setting Instruction
Video setting
After power on enter the video mode, the video icon will be shown on the LCD top
left corner: short press MENU button one time to switch the video setting, the video
icon will be shown on the LCD top right corner: there are 4 setting options at the first
page( Video resolution, Image quality, Time Lapse Setting, Meter mode setting);
there are 4 setting options at the second page(Anti-flicker, Stamp setting, Loop

- 14 -
Record Setting,ADAS Detect):there are 4 setting options at the third page
(ADAS Calibration ,G-sensor, Motion detection, MIC);there is 1 setting option at
the forth page(Park Mode);short press up/down to switch the setting options,
short press OK button to enter the setting, short press up/down button to modify the
setting, and short press OK button to confirm the modification.
Attention:
Under the video status no any use to press MENU button, first stop recording, then
press MENU button again to switch the video mode
Video resolution
1.Chipset A7LA30:Four modes:1920×1080 30P 16:9/HDR 1920×1080 30P 16:9/
1280×720 60P 16:9/1280×720 30P 16:9
2. Chipset A7LA50:Six modes:2560×1080 30P 21:9/2304×1296 30P

- 15 -
16:9/1920×1080 30P 16:9/HDR 1920×1080 30P 16:9/1280×720 60P
16:9/1280×720 30P 16:9
3. Chipset A7LA70:Seven modes:2560x1080 30fps/2304x1296 30fps/1920x1080
60fps/1920x1080 30fps/HDR1920x1080 30fps/1280x720p 60fps/1280x720 30fps,
Image quality:Three effects:superior/good/general, the default is good,
recommend the default is superior;
Time Lapse Setting: off/0.2 seconds/1 seconds/5 seconds/30 seconds, the default
is off Time Lapse Setting means function of 1 second 1 shoot, also could extend
shooting time, support Park mode 0.2second means 1 second 5 photos, 1second
means 1 second 1 photo, and s on
Intelligent Mode
:
If detect objects are moving ahead, entering video recording; when
detecting the recorded image keep static for 3minutes, then unit will stop recording, and
turns to time lapse recording(the default setting is 1 second 2 shoots), during this
process, when detect objects are moving ahead, the time lapse recording will stop and
turn on regular recording, all the above process will act recycle.
Meter mode setting:Three modes:center/average/point, the default is center;

- 16 -
Anti-flicker:Three modes:Auto/60Hz/50 Hz (please set according to local
frequency)
Stamp Setting:Three modes:date/time/vehicle driver no. the default is off
Loop Record Setting:Three modes:1minute/3 minutes /5 minutes the default is
5 minutes
ADAS Detect:on/off the default is off.(only suitable for chipset A7LA50/A7LA70)
ADAS include below 4 parts/functions: (Do not support at resolution 2304x1296、
HDR1920x1080)
LDWS - Lane Departure Warning system: when vehicle exceed white lines during
changing lanes, it will remind.
FCWS - Front Collision Warning system: when predict the dangerous driving it will
remind the driver 3 seconds before dangerous happens, and called the third eye
which never tired.
FCMD - Front vehicle Moving Detection: when the traffic red light turns green, and
the front vehicle moving, it will remind.
LLWS - Low light Warning System: it will remind the driver when low light
environment.

- 17 -
ADAS Calibration:show purple/red two lines, purple line represent the farthest
line, and red line represent the nearest line to vehicle headstock, DVR could
distinguish whether there's vehicle in front (FCWS) or whether the vehicle change
lane (LDWS)according to these two lines,。So when open the ADAS setting,
please set these two lines firstly accordingly, press up/down button directly to
adjust the purple line, press MODE button then press up/down button to adjust the
red lines. (only suitable for chipset A7LA50/A7LA70)

- 18 -
PS: Environment like weather, light etc is possible to influence its work exactness of
ADAS.
G-sensor setting:Four modes:off/high/middle/low the default is middle,
recommend the default is middle。
Motion detection:on/off the default is off, recommend the default is off.
MIC:on/off the default is on, recommend the default is on.
Park Mode: on/off, the default is off
System setting:
After power on enter the video mode, the video icon will be shown on the LCD top
left corner: short press MENU button twice to switch the system setting, the video
icon will be shown on the LCD top right corner: there are 4 setting options at the first
page( Language setting, Car Volume, System Mode, Drive ID Setting); there are 4
setting options at the second page(Time setting, Format, Default setting, Auto
Power off setting):there are 4 setting options at the third page(Backlight setting,
Delay power off, GPS setting, Warning tone setting); there are 2 setting options at

- 19 -
the forth page ( Version information);short press down button to switch the setting
options, short press OK button to enter the setting, short press up/down button to
modify the setting, and short press OK button to confirm the modification.
Attention:Under the video status no any use to press MENU button, first stop
recording, then press MENU button twice to switch the system setting
Language setting:English//Simplified Chinese/Traditional
Chinese/Russian/Polish…etc
Card volume:Three modes:total capacity /usage /surplus
System mode:NTSC/PAL the default is PAL
Driver ID setting: set1-9 9 positions

- 20 -
Time setup:set year/month/date/time
Format:choose √ or ×,choose √ means format, choose × means no;
Default setting: choose √ or ×,choose √ means reset, choose × means no;
Auto Power off setting:Four modes:off/1 minute /3 minutes/5 minutes the
default is off;
Backlight Off setting:Four modes:off/1 minute /3 minutes/5 minutes the default
is 3 minutes;
Without any buttons press operation for unit during the setted time,the screen will off,
but the unit is still working.
Delay Power Off:Four modes:off/15 seconds /30 seconds /1minute the default
is 15 seconds;
GPS set:on/off(only for the unit with GPS function)
Beep sound setting:on/off the default is on;
Table of contents