JDM A 4346 Guide
JDM®CD/USB/FM-RDS Receiver Module
1
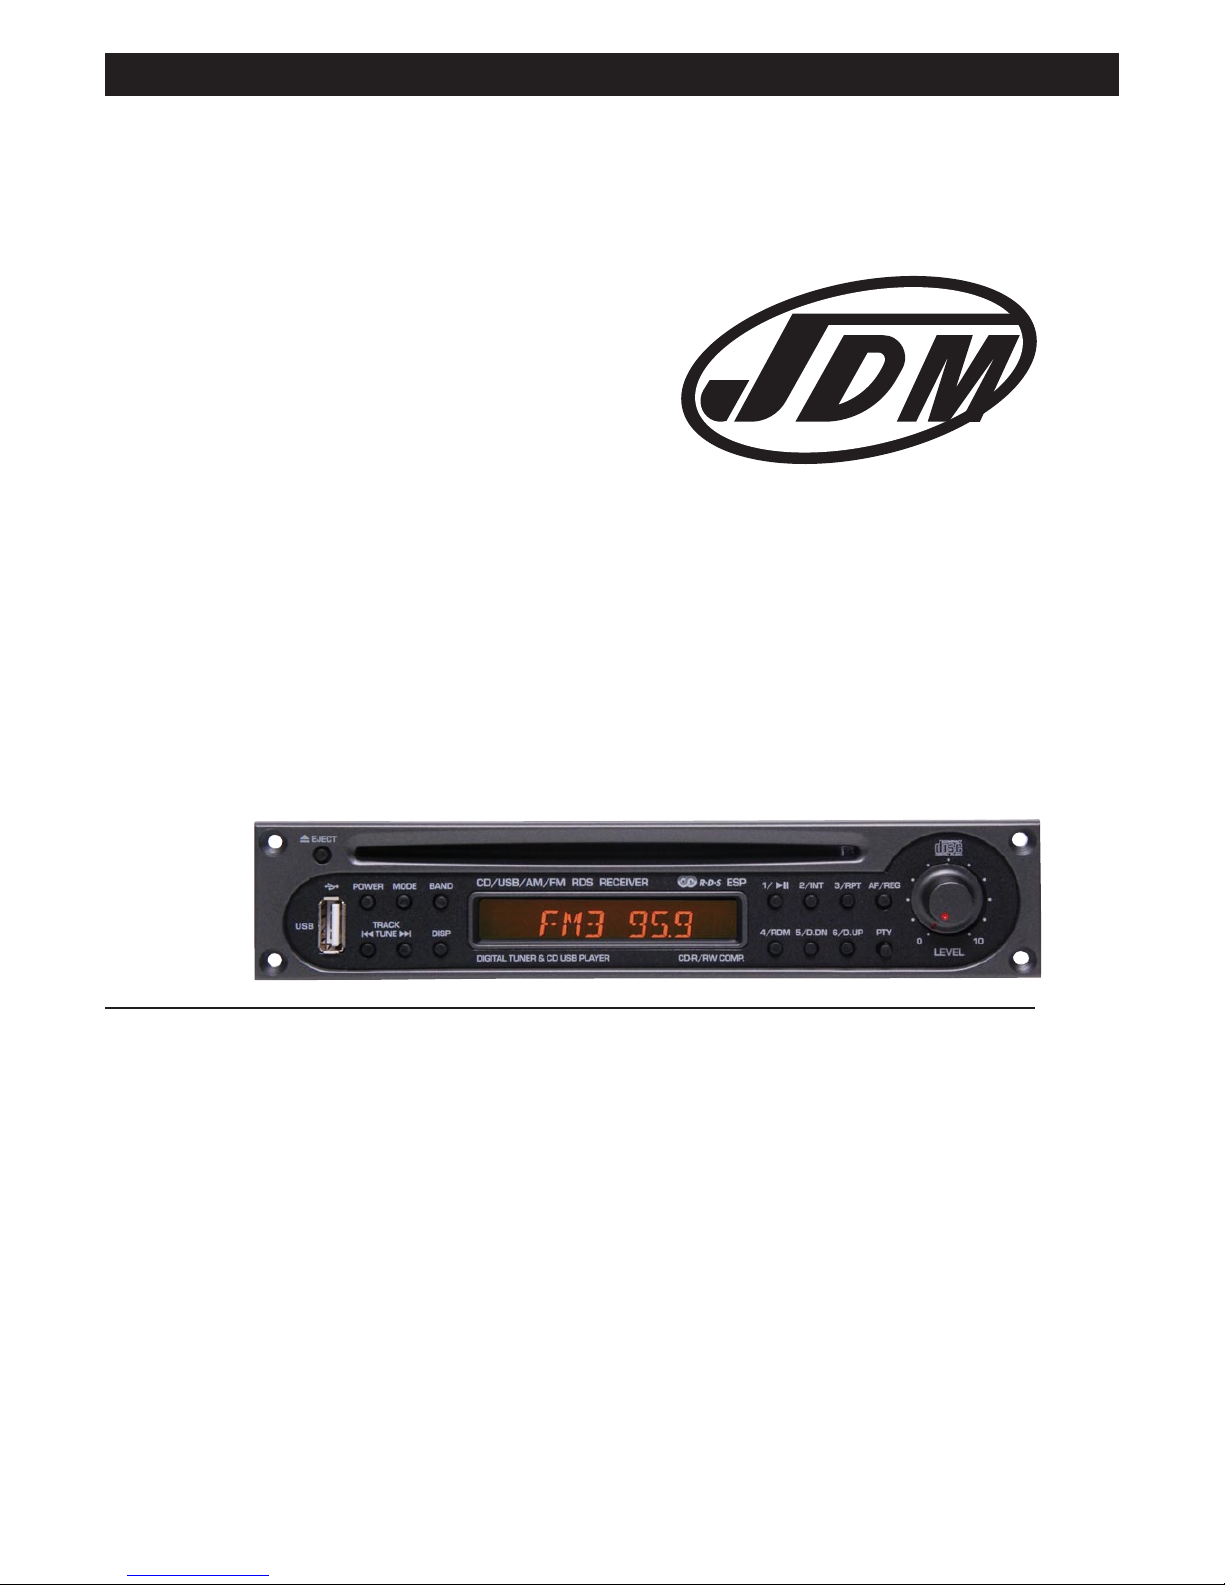
CD/USB Player/ FM-RDS Receiver
A 4346
JD Media model CDR-100RDSU
Distributed by Altronic Distributors Pty. Ltd. Perth. Western Australia.
Phone: 1300 780 999 Fax: 1300 790 999
Internet: www.altronics.com.au
Installation & Operation

JDM®CD/USB/FM-RDS Receiver Module
2
FEATURES:
Receiver Section:
• Digital electronic analogue tuner AM/FM bands
• Radio Data System (RDS) function for FM radio
• 24 station preset memories (FM:18; AM:6)
• Manual or Scan (Seek) tuning, up and down
CD Section:
• Play/Pause button.
• Repeat and Random playback.
• Intro Scan play.
• Cue/Review function.
• Track skip and seek function.
• USB socket for USB stick.
IN THE BOX:
• CDR-100RDSU includes CD Player / AM and FM RDS Radio
Tuner / USB module.
• Antenna Terminal module – to insert into the PA Amplifier rear
panel and allow AM and FM antenna wiring to be connected.
• 300Ωbalanced FM cable.
• Screws to attach module to PA system.
SUITABLE FOR:
This module is designed to be used as an accessory to the JDM
PA amplifier products:
JDM ZA-6120 (Altronics code: A 4330)
JDM ZA-6240 (Altronics code: A 4332)
JDM ZA-6480 (Altronics code: A 4336)
JDM TA-1060 (Altronics code: A 4320)
JDM TA-1120 (Altronics code: A 4322)
JDM TA-1240 (Altronics code: A 4324)
INTERNAL CONNECTIONS:
Before commencing installation, familiarise yourself with the
location of the Antenna and Power/Signal headers as shown in
Figure 1.
Figure 1: Location of antenna and power/signal headers.
ANTENNA POWER
& SIGNAL
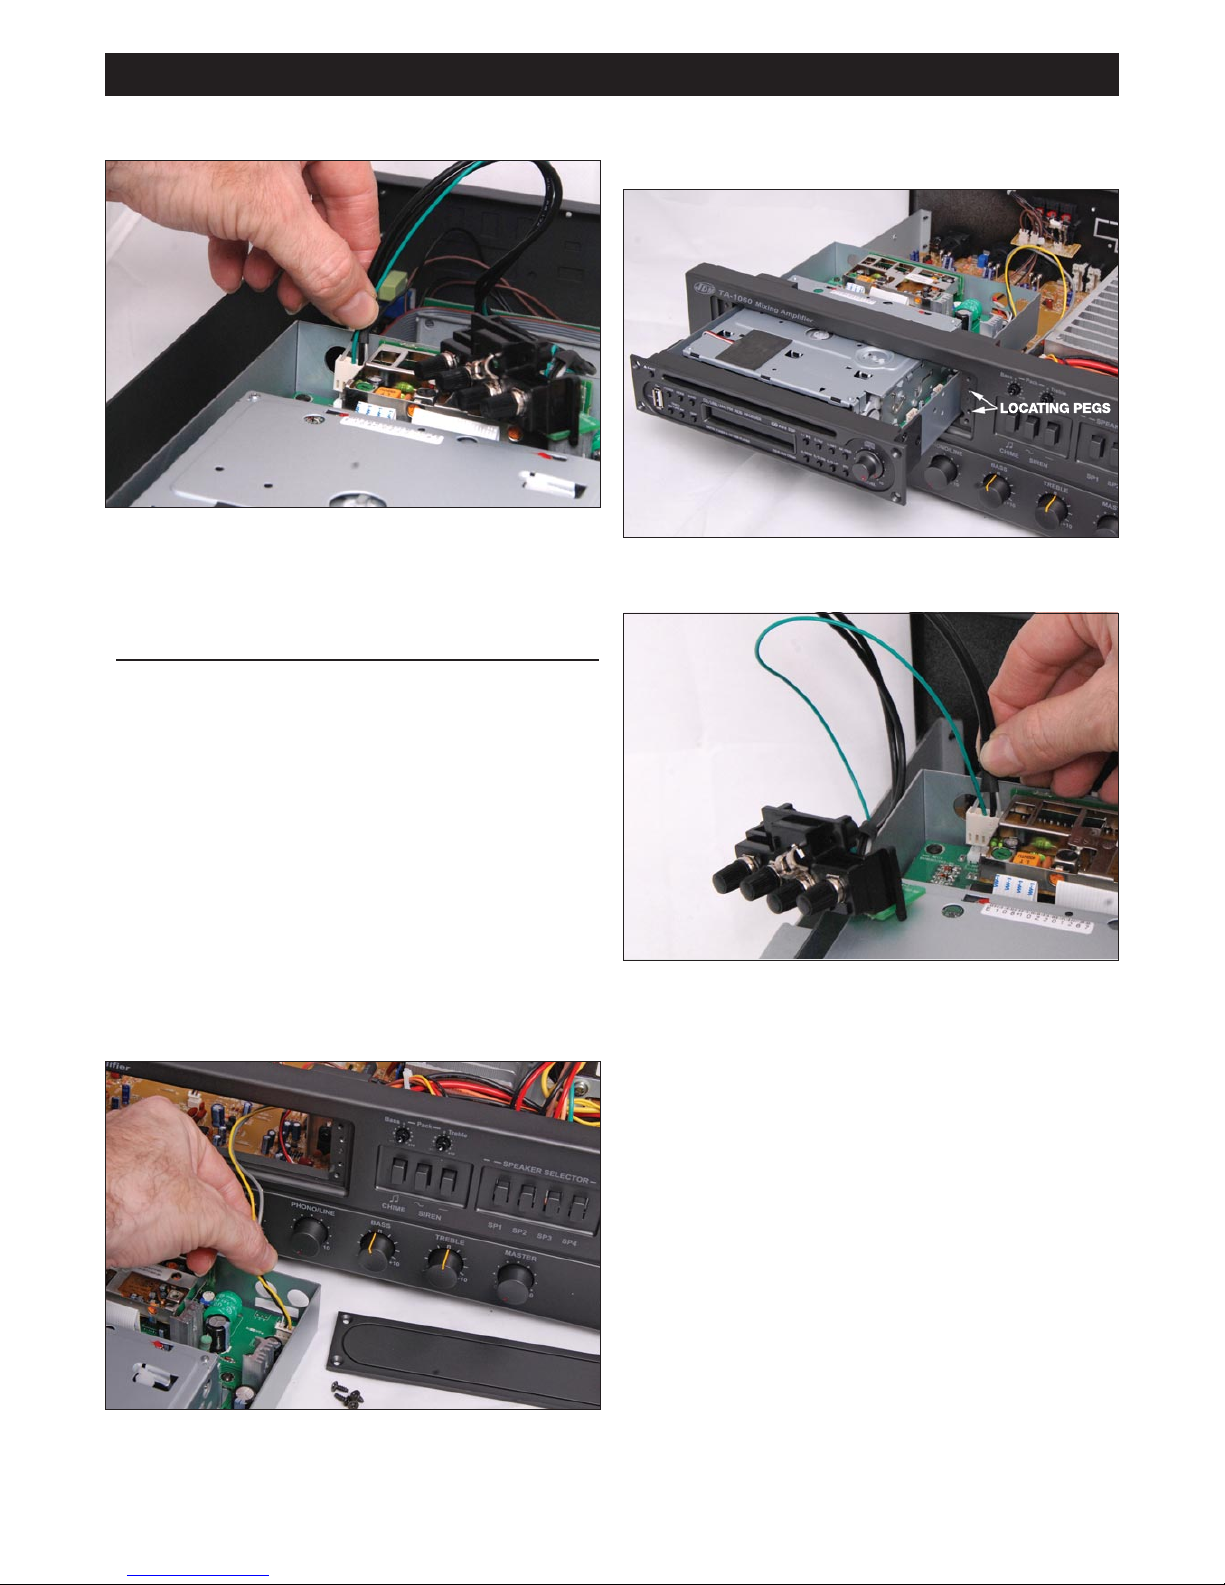
Step 4: Insert module into amplifier and screw to front panel.
Ensure the plastic locating pegs on the module panel fit into the
amplifier front panel correctly. See photo:
INSTALLATION INSTRUCTION FOR A 4330 - A 4336 JDM ʻ
ZAʼSERIES AMPLIFIERS
Warning: Before commencing installation ensure amplifier is dis-
connected from power socket.
Step 1: Open the cover of the amplifier and unscrew the blank
panel located on the front of the amplifier.
Step 2: Locate the punchout panel marked “FM 75Ω” on the rear
panel and remove it. You may need to cut the panel supports
with some heavy duty cutters or a small saw.
Step 3: A fly lead and header will be taped to the back of the
front blank panel. Remove the tape and connect this lead to the
Power/Signal header on the tuner module. See photo:
JDM®CD/USB/FM-RDS Receiver Module
3
Step 5: Connect antenna module to the antenna header in the
main tuner module. See photo:
Step 6: Attach the antenna module to the rear panel using the
self tapping screws provided.
Step 7: Connect antenna to antenna module on rear panel. See
figure 3 and 4 for examples of FM and AM antenna wiring.
INSTALLATION INSTRUCTIONS A 4320 - A 4324
JDM ʻTAʼSERIES AMPLIFIERS
Warning: Before commencing installation ensure amplifier is
disconnected from power socket.
Step 1: Open the cover of the amplifier and unscrew the blank
panel located on the front of the amplifier.
Step 2: Locate the punchout panel marked “FM 75Ω” on the
rear panel and remove it. You may need to cut the panel sup-
ports with some heavy duty cutters or a small saw.
Step 3: A fly lead and header will be taped to the back of the
front blank panel. Remove the tape and connect this lead to the
Power/Signal header on the tuner module. See photo:
Step 4: Insert module into amplifier and screw to front panel.
Ensure the plastic locating pegs on the module panel fit into the
amplifier front panel correctly. See photo:
Step 5: Connect antenna module to the antenna header in the
main tuner module. See photo:
Step 6: Attach the antenna module to the rear panel using the
self tapping screws provided.
Step 7: Connect antenna to antenna module on rear panel. See
figure 3 and 4 for examples of FM and AM antenna wiring.
JDM®CD/USB/FM-RDS Receiver Module
4
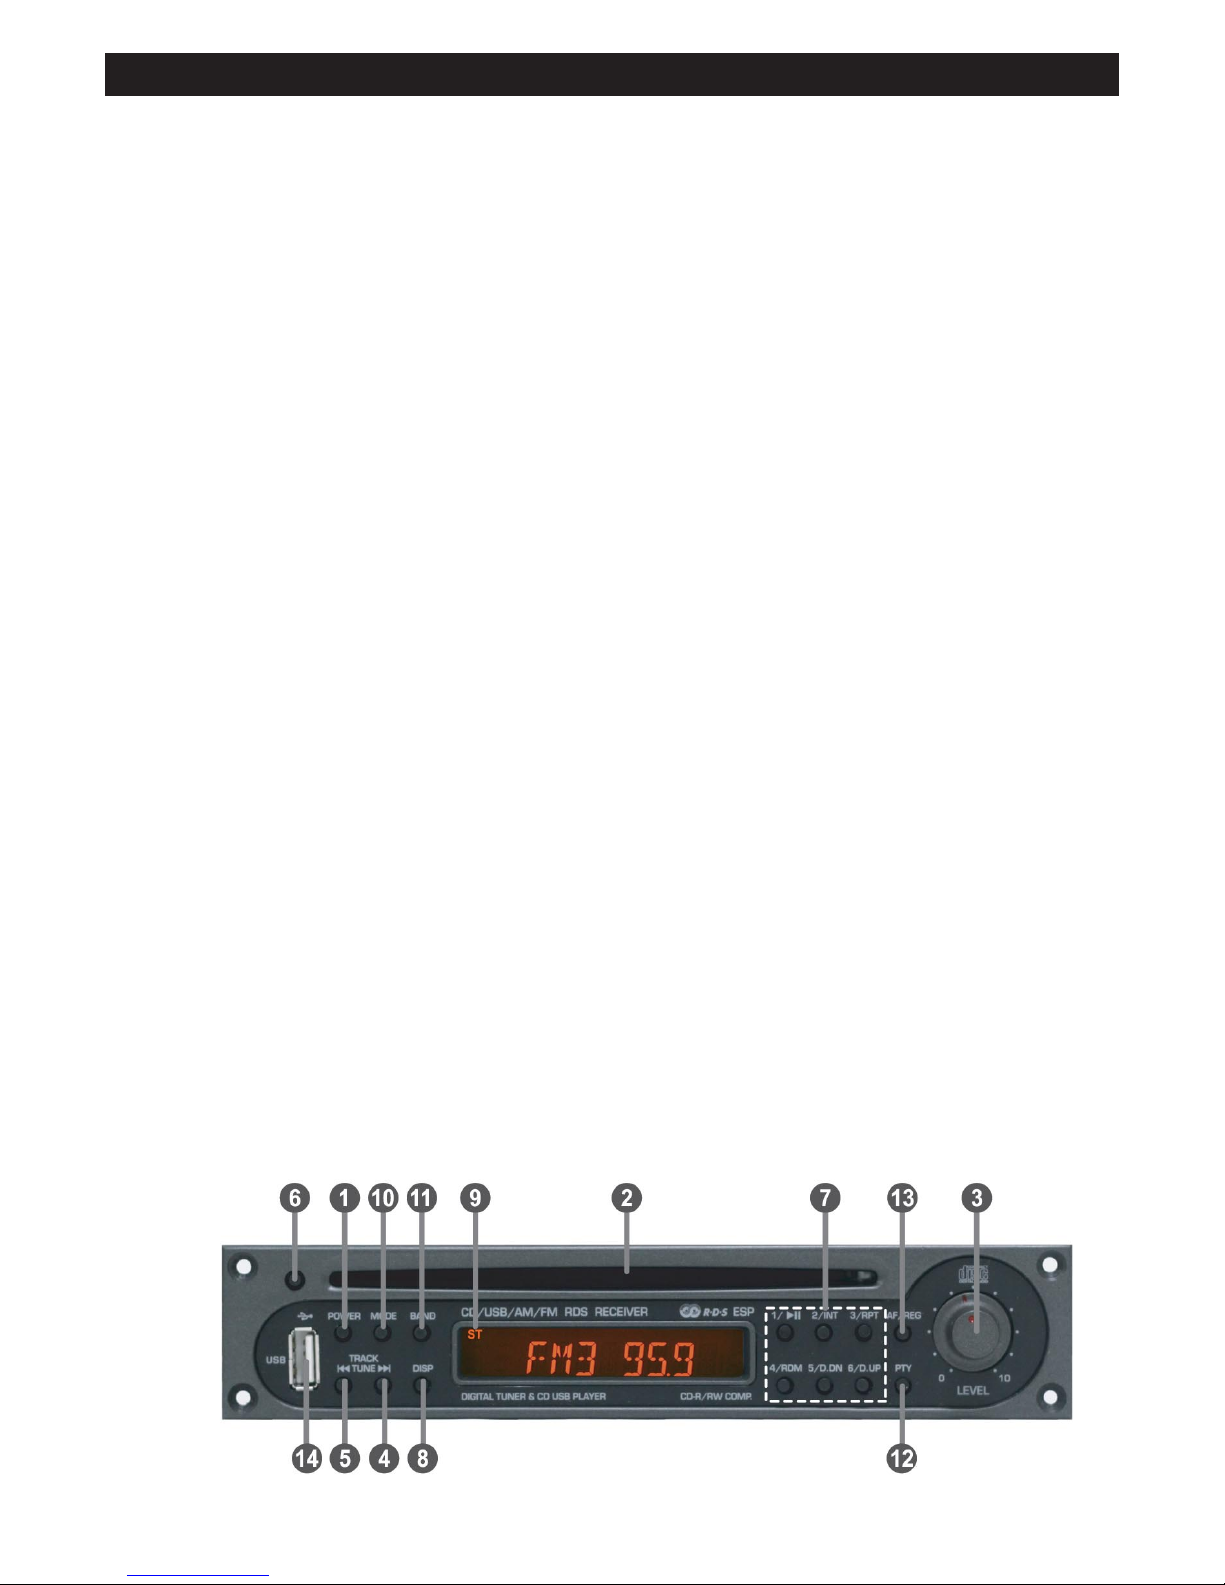
FRONT PANEL: (Figure 2.)
1. POWER:
Press this to turn the power on to the unit. Press again to switch
it off.
2. DISC SLOT:
When a CD is inserted into the slot, it is loaded automatically,
and will show ʻLOADʼthen ʻPLAYʼthen disc information (ʻTotal
Tracksʼ, ʻTotal Timeʼ) on the LCD, and then start playback.
3.VOLUME LEVEL:
Turn this knob clockwise to increase the volume, anti-clockwise
to decrease.
4 & 5. TUNE / TRACK |<< >>|:
Radio Mode: Press these buttons to adjust the frequency,
moving through the available frequencies. Press and hold for
manual tuning. The unit will display ʻManualʼ. Release button
and use |<< or >>| to tune manually. After a few seconds of no
activity the tuning will revert back to auto (Search) tuning. Press
briefly to activate SEEK tuning mode, and the tuner will stop on
the next frequency with a signal.
CD Mode: Press these buttons to skip to the next or previous
track on the disc or USB. Press and hold to rewind / review or
cue / fast forward through the track that is playing.
6. EJECT:
Press this button to eject the inserted CD from the unit and
return to radio mode operation. If the disc is not removed from
the unit within 10 seconds, it will again be reinserted into the CD
slot and commence playing.
7.BUTTONS NUMBERED 1 TO 6:
Radio Mode: These buttons provide preset memories for radio
station frequencies (Station Presets). A total of 24 frequencies
can be stored in the preset memory buttons – 18 for FM band
(FM1, FM2, FM3 x 6 each) and 6 for AM band frequencies.
Simply chose the band (FM or AM – button 11), tune the
frequency (see above) and press and hold a memory button to
store that favourite frequency in that memory number.
CD / USB Mode: Each button has a different function relating to
playback, as indicated on the button labels, which are described
below.
(1) PLAY/PAUSE – start or pause playback of track.
(2) INT (Intro Scan) – when pressed, the Intro Scan function
will play the first 10 seconds of a track and then skip to do the
same on the next track. A convenient method to find a track
you like on a CD or USB stick. Just press the button again to
turn the function off.
(3) RPT (Repeat) – Press this button to repeat the single track
currently playing [ʻS-RPTʼappears on the LCD] Press again to
switch repeat off. Press and hold for a few seconds to
activate DIRECTORY REPEAT [ʻD-RPTʼappears on the LCD]
which will repeat all tracks in a selected USB / CD directory.
Press button again to turn off.
(4) RDM (Random) – Press this button to RANDOMISE
(Shuffle) the playback order of tracks on the CD or USB. LCD
will show ʻRDMʼwhen the function is active.
(5) D-DN (Directory Down) – press to return to previous
directory.
(6) D-UP (Directory Up) – press to advance to the next
directory.
8. DISP (Display):
Radio Mode – Press this button to display either clock time or
RDS information on the LCD. Clock time is obtained from the
RDS code transmissions when available.
CD Mode – Press this button to display the track name or album
name and/or file list on the CD / USB.
9. ST:
Indicates ʻSTʼon the LCD if an FM stereo signal is being
received. Default status is to receive in stereo. If the FM signal
is too weak then the unit automatically reverts to mono.
Note: Some low-power FM stations operating in Australia on
88 MHz and below may be transmitting in mono. AM analogue
radio in Australia is currently broadcasting only in mono.
10. MODE:
Press this button to select the playback mode - Radio, CD or
USB. For CD / USB modes to function, the CD / USB Stick must
be inserted into their respective slots.
11. BAND (also provides loudness function):
Press this button to switch between FM and AM band
frequencies for the tuner. The tuner will display FM1, FM2, FM3
for the FM frequencies and MW for AM frequencies.
Press and hold the band button to turn loudness on or off.
12. PTY (Program Type)
This button is used to scan for stations of a selected program
type. When active, the top of the display will show ʻPTYʼ. For
normal tuning of the complete band, this button MUST be turned
off.
Pressing this button once starts the tuner scanning only for the
RDS program type selected (format or genre, eg Pop, Rock,
News etc). When this button is pressed the RDS program type is
temporarily displayed on screen. Note that it may take up to 20
seconds to scan for a station of the selected program type.
To select another RDS program type, press PTY button once
and then any of the buttons numbered 1 to 6 once. Each button
Figure 2: Front Panel
JDM®CD/USB/FM-RDS Receiver Module
5
SPECIFICATIONS:
Receiver Section:
Tuning Range:..................FM: 87.5 – 108MHz
AM: 522 – 1620kHz
Note: AM tuning is preset to 9khz for
Australian models
Usable Sensitivity:...........FM: 6dBuV; AM: 25dBuV
Antenna Impedance: .......FM: 300Ωbalanced
75Ωunbalanced
AM: High Impedance lead antenna
(Not supplied)
Signal to Noise: ...............FM: >60dB; AM: >50dB
T.H.D: ................................FM: Less than 0.5%
AM: Less than 0.5%
CD Section:
Digital Filter:.....................8 times over sampling
T.H.D: ................................Less than 0.03%
Signal to Noise Ratio: .....More than 85 dB
Frequency Response: .....10Hz – 20kHz
Loading Time: ..................6 seconds
General:
Dimensions: ....................195(W) x 40(H) x 215(D) mm
Weight: .............................CDR-100RDSU: 1.3kg
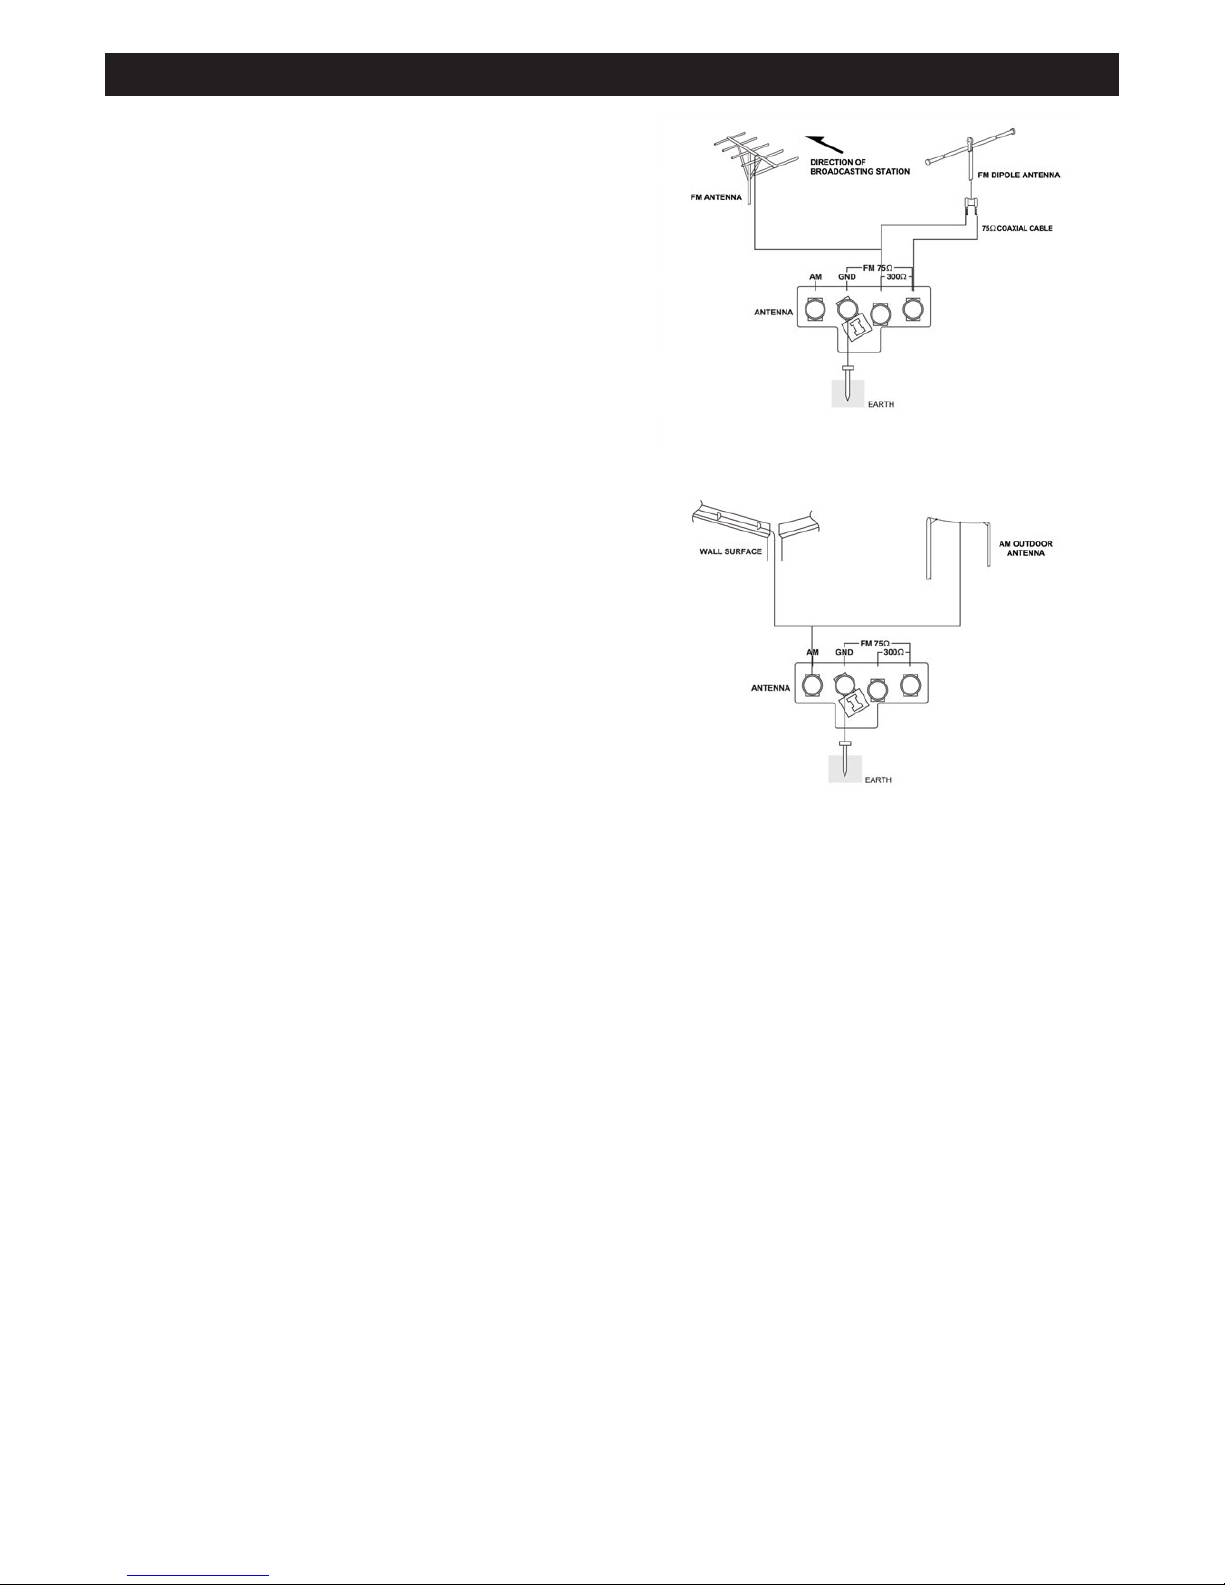
Figure 3: FM Antenna Wiring
Figure 4: AM Antenna Wiring
numbered 1 to 6 holds up to five RDS program types. The RDS
program types can be accessed in two stages.
Press PTY and then press any of the buttons numbered 1 to 6
twice will yield two separate codes per button.
To access the other three codes per button, press PTY then PTY
again, and then press any of the buttons numbered 1 to 6 from
one to three times.
After pressing the buttons the tuner will scan and lock into the
RDS code type station. If no RDS code type station exists the
tuner will display PTY NONE (no program type).
To find the next station of the designated program type press
one the TUNE buttons.
To turn off the PTY function, press the PTY button twice in
succession. The PTY will disappear from the display.
13. AF/REG
AF( Alternative Frequency): Using this button allows the user
to know if a searched station has an RDS signal strength strong
enough to display the RDS information.
Press the AF button and ʻAFʼwill appear at the top of the display.
If the current station (or stations) being scanned has a good
RDS signal strength button ʻAFʼwill display in bold. If a poor
RDS signal strength or no RDS is found for the tuned station the
ʻAFʼwill flash. In this situation press the AF/REG button to turn
off the flashing display.
REG (Regional mode): To activate this function, AF must be on
(either bold or flashing in the display). Press this button for three
seconds to switch to regional mode. The main display will show
ʻREG ONʼand ʻREGʼwill display at the top of the display. Tuning
can now commence to find stations with weaker signals. Press
the AF/REG button for 3 seconds to turn off this function. The
display will show ʻREG OFFʼmomentarily
Pressing this button allows the tuner to lock into strong signal
strength stations only.
14. USB Slot:
Connect a USB stick to this socket and the ʻUSB PLAYʼsign will
appear on the LCD. Remove the USB stick and the unit will
revert to CD or Radio mode.
Important Note About Antenna Cabling.
75Ωcoaxial antenna cable will provide better shielding than the
supplied 300ΩFM cable, which will reduce noise and
interference on the tuner. A better antenna, oriented toward the
signal source (i.e. broadcast towers) will also improve signal
reception. Connecting the GND connection to the earth on the
PA amplifier will also reduce electrostatic noise, especially for
AM reception.
About RDS Functions - Radio Data System.
Allows a tunerʼs LCD screen to display text information being
transmitted by FM analogue radio stations. RDS technology is
becoming more prevalent in Australia. RDS Codes: PTY –
Program Type (ie Station format or music genre); PS - Station
Name or ID; DATE or CLOCK TIME; TEXT - Song Title, Artist,
Station slogan, traffic updates etc. If the FM radio station in
question has not activated and/or is not broadcasting RDS data,
then the RDS feature will show nothing, no scrolling text, time,
station name etc.
Table of contents


