JDW RZ677 User manual
Copies of the I/B. Please reproduce them without any
changes except under special instruction from Team
International BELGIUM. The pages must be reproduced
and folded in order to obtain a booklet A5 (+/- 148.5 mm
width x 210 mm height). When folding, make sure you keep
the good numbering when you turn the pages of the I/B.
Don’t change the page numbering. Keep the language
integrity.
Front cover page (first page)
Assembly page 1/16
Fax +32 2 359 95 50
I/B Version
170407
220-240V~ 50Hz 650W
Instruction Booklet
650W Stand Mixer

Copies of the I/B. Please reproduce them without any
changes except under special instruction from Team
International BELGIUM. The pages must be reproduced
and folded in order to obtain a booklet A5 (+/- 148.5 mm
width x 210 mm height). When folding, make sure you keep
the good numbering when you turn the pages of the I/B.
Don’t change the page numbering. Keep the language
integrity.
2 170407
Assembly page 2/16
Fax +32 2 359 95 50
Know Your Appliance
1. Splash Guard with feeding spout
2. Splash Guard Lock
3. Tool Shaft
4. Stainless Steel Mixing Bowl
5. Mixing Bowl Lock
6. Mixing Arm
7. Tilt Switch
8. On/Off Speed Dial
9. Mixing Body
10. Whisk
11. Beater
12. Dough Hook
Please note that the pattern / colour of your product may differ to as shown above.
These user instructions apply regardless of pattern / colour.

Copies of the I/B. Please reproduce them without any
changes except under special instruction from Team
International BELGIUM. The pages must be reproduced
and folded in order to obtain a booklet A5 (+/- 148.5 mm
width x 210 mm height). When folding, make sure you keep
the good numbering when you turn the pages of the I/B.
Don’t change the page numbering. Keep the language
integrity.
3 170407
Assembly page 3/16
Fax +32 2 359 95 50
JD Williams Stand Mixer
Let’s Get Baking!
Thanks for picking the JD Williams Stand Mixer.
Please ensure that you read all of the content within this
booklet before using the Stand Mixer. You’ll need to keep it
somewhere safe too in case you need it in future.
Our Stand Mixer is tailor made for a number of different
functions including mixing, kneading, whipping and folding of
various ingredients to make the perfect breads, cakes and
biscuits!
Each Stand Mixer includes three changeable attachments,
which are suitable for different mixing methods. For the lower
level speeds the dough hook is used for mixing heavier
ingredients such as bread dough to combine slowly with
liquids. The beater attachment is best used at medium speeds
to mix together ingredients for pastry, biscuits and icing. At high
speeds the whisk is perfect for whipping, creaming and of
course whisking ingredients such as egg whites and batters.
Every Stand Mixer uses a planetary mixing action rather than a
circular motion. This ensures that ingredients are thoroughly
mixed at all 6 speeds as the planetary motion touches all areas
of the mixing bowl using the powerful 650W motor which also
features a pulse setting. A 3.8 litre stainless steel bowl holds all
the ingredients you need and is fitted with a splash guard to
prevent ingredients from escaping mid-mix!
All of our products are carefully selected and rigorously tested
before they are available to you so you can be certain that
you’re buying a quality product that will be your baking
companion for many years to come.

Copies of the I/B. Please reproduce them without any
changes except under special instruction from Team
International BELGIUM. The pages must be reproduced
and folded in order to obtain a booklet A5 (+/- 148.5 mm
width x 210 mm height). When folding, make sure you keep
the good numbering when you turn the pages of the I/B.
Don’t change the page numbering. Keep the language
integrity.
4 170407
Assembly page 4/16
Fax +32 2 359 95 50
IMPORTANT SAFEGUARDS
Please read these instructions carefully before
using the appliance, and always follow the
safety and operating instructions.
Important: This appliance can be used by
children over 8 years old and people with
reduced physical, sensory or mental capacities
or with a lack of experience or knowledge if
they have been given supervision or
instructions concerning the safe use of the
appliance and the risks involved. Children shall
not play with the appliance. Cleaning and user
maintenance shall not be made by children
unless they are older than 8 years and
supervised. Never leave the appliance and its
cord unsupervised and within reach of children
less than 8 years old or irresponsible persons
when it is plugged into the wall or when it is
cooling down.
Check that your mains voltage corresponds
to that stated on the appliance.
Never leave the appliance unsupervised
when in use.
From time to time check the appliance for
damages. Never use the appliance if cord or
appliance shows any signs of damage. In

Copies of the I/B. Please reproduce them without any
changes except under special instruction from Team
International BELGIUM. The pages must be reproduced
and folded in order to obtain a booklet A5 (+/- 148.5 mm
width x 210 mm height). When folding, make sure you keep
the good numbering when you turn the pages of the I/B.
Don’t change the page numbering. Keep the language
integrity.
5 170407
Assembly page 5/16
Fax +32 2 359 95 50
that case, repairs should be made by a
competent qualified electrician(*). Should
the cord be damaged, it must be replaced
by a competent qualified electrician(*) in
order to avoid all danger.
Only use the appliance for domestic
purposes and in the way indicated in these
instructions.
Never immerse the appliance in water or
any other liquid for any reason whatsoever.
Never place it into the dishwasher.
Never use the appliance near hot surfaces.
The speed switch has to be in off-position "0"
and the appliance has to be unplugged
from the power supply before cleaning the
appliance, changing the accessories or
when not in use. Never leave the appliance
unsupervised when in use.
Never use the appliance outside and always
place it in a dry environment.
Never use accessories that are not
recommended by the producer. They could
constitute a danger to the user and risk to
damage the appliance.
Never move the appliance by pulling the
cord. Make sure the cord cannot get caught

Copies of the I/B. Please reproduce them without any
changes except under special instruction from Team
International BELGIUM. The pages must be reproduced
and folded in order to obtain a booklet A5 (+/- 148.5 mm
width x 210 mm height). When folding, make sure you keep
the good numbering when you turn the pages of the I/B.
Don’t change the page numbering. Keep the language
integrity.
6 170407
Assembly page 6/16
Fax +32 2 359 95 50
in any way in order to avoid the appliance’s
fall.
Stand the appliance on a stable surface so
that it cannot fall over.
Only use this appliance for culinary
preparations.
This kind of appliance cannot function
continuously; it is not a professional type of
appliance. It is necessary to make temporary
stops. Check the section "Important
information" in the instruction manual.
It is absolutely necessary to keep this
appliance clean at all times as it comes into
direct contact with food. Check the section
"Cleaning" in the instruction manual.
Never let children use the appliance, even
when they are supervised.
Make sure the accessory is solidly and
correctly tightened at the motor block
before starting the appliance.
Make sure the appliance is switched off
and unplugged before inserting, removing
or cleaning the processor bowl and/or the
accessories.
Make sure your hands and/or any kind of
utensil stay clear of the receptacle when the
appliance is in use in order to avoid serious

Copies of the I/B. Please reproduce them without any
changes except under special instruction from Team
International BELGIUM. The pages must be reproduced
and folded in order to obtain a booklet A5 (+/- 148.5 mm
width x 210 mm height). When folding, make sure you keep
the good numbering when you turn the pages of the I/B.
Don’t change the page numbering. Keep the language
integrity.
7 170407
Assembly page 7/16
Fax +32 2 359 95 50
injuries. Never touch the accessories when
the appliance is in use. Furthermore, never
try to stop the movement of the accessories
in any way whatsoever. Use the function 0 of
the switch or unplug the appliance.
The appliance is designed for the
preparation of small quantities of food that
have to be consumed rather quickly. It is not
designed for the preparation of large
quantities at once.
Do not touch the accessory while the
appliance is operating and do not try to
block its movement in any way.
Do not use the appliance without any food
in it.
(*) Competent qualified electrician: after-sales
department of the producer or importer or any
person who is qualified, approved and
competent to perform this kind of repairs in
order to avoid all danger. In case of need you
should return the appliance to this electrician.
UK STYLE PLUG WIRING INSTRUCTIONS (IN THE UK ONLY)
This product must only be used from a 13 amp power socket. If a BS1363 approved 13 amp
plug is used, it should be fitted with a 13 amp fuse conforming to BS1362 and be ASTA
approved. The wires on the power cord are colour coded:
blue = neutral, brown = live, green or green & yellow = earth.
The blue wire must be connected to the terminal marked N or coloured in black.
The brown wire must be connected to the terminal marked L or coloured in red.
The green (& yellow) wire must be connected to the terminal marked E or coloured in green (&
yellow).

Copies of the I/B. Please reproduce them without any
changes except under special instruction from Team
International BELGIUM. The pages must be reproduced
and folded in order to obtain a booklet A5 (+/- 148.5 mm
width x 210 mm height). When folding, make sure you keep
the good numbering when you turn the pages of the I/B.
Don’t change the page numbering. Keep the language
integrity.
8 170407
Assembly page 8/16
Fax +32 2 359 95 50
IMPORTANT INFORMATION
This appliance is not intended for professional use. You should follow the requested breaks.
Failure to follow this instruction carefully may result in damage to the motor. Please refer to the
rating label for the maximum continuous usage time (KB xx min where xx is the allowed
maximum usage time). The breaks should last at least 10 minutes.
SET UP YOUR STAND MIXER AND OPERATE FOR THE FIRST TIME
Please unpack the stand mixer from the gift box and remove all product packaging from
within.
To raise the mixing arm press the ‘TILT’ button which is located next to the on/off speed
dial, and lift the mixing arm slowly with one hand on top of the mixing arm.
All of the mixing attachments can be found within the mixing bowl. Please remove all
attachments from the mixing bowl. The splash guard must be removed by holding it firmly
with both hands and turning it in an anticlockwise direction. This will bring the splash guard
free from the mixing arm. Please note that the splash guard may be stiff at first but will
loosen after repeated use.
To remove the mixing bowl, twist the mixing bowl anticlockwise using both hands and lift
free from the mixing bowl lock.
Use a clean damp cloth to wipe over the base unit before you use the Stand Mixer for the
first time.
All attachments as well as the mixing bowl and splash guard need to be washed using
warm soapy water before being used. Please ensure all attachments are dried well before
use.
All parts must be clean and dry before the product is put together and used.
Warning: The plug of the stand mixer must not be inserted into a wall socket and turned on
until all parts have been fully assembled.
The base of the stand mixer must be situated on a flat area near a wall socket with all
walls and other surfaces at least 10cm away. This will ensure that the Stand Mixer has
sufficient airflow.
Before any of the attachments, mixing bowl or splash guard can be removed or added
the mixing arm must be raised using the ‘TILT’ button. Make sure to press the ‘TILT’ button
each time you wish to raise the mixing arm.
Attaching the mixing bowl
To attach the mixing bowl insert the mixing bowl into the mixing bowl lock ensuring that
the tabs found at the bottom of the mixing bowl line up with the notches in the mixing
bowl lock. Once inserted turn the mixing bowl using both hands and twist in a clockwise
direction using the ‘Lock’ arrow as a guide until the bowl is firmly in place.
Attaching the splash guard
The splash guard is best used when mixing with liquids and ingredients such as flour to
prevent dust escaping and splatters of liquid.
Position the splash guard into the splash guard lock. Using both hands align the arrow on
the splash guard with the unlock symbol which can be found on the mixing arm. Once in
place turn the splash guard clockwise until the arrow is aligned with the lock symbol and is
firmly in place.
Fitting the attachments
Please select which attachment you wish to use. Underneath each attachment there are
two notches which need to be aligned with the tabs found on the tool shaft.
Once aligned push the attachment up over the notches, once in place turn the
attachment in an anticlockwise direction, which will lock the attachment in place.

Copies of the I/B. Please reproduce them without any
changes except under special instruction from Team
International BELGIUM. The pages must be reproduced
and folded in order to obtain a booklet A5 (+/- 148.5 mm
width x 210 mm height). When folding, make sure you keep
the good numbering when you turn the pages of the I/B.
Don’t change the page numbering. Keep the language
integrity.
9 170407
Assembly page 9/16
Fax +32 2 359 95 50
Please ensure the attachment is locked and in place before use.
To move the mixing arm into position press the ‘TILT’ button and using your other hand
push the mixing arm down until the ‘TILT’ button clicks fully out. The splash guard should fit
securely over the bowl.
Removing the attachments
To remove the attachment push the attachment upwards towards the tool shaft and then
turn in a clockwise direction to release.
INSTRUCTIONS FOR USE
The Stand Mixer is fully interlocked for safety, it won’t switch on unless the mixing arm is tilted
downwards.
Check the speed dial is in the ‘0/OFF’ position.
Plug in and switch on the stand mixer at the socket.
The light around the speed dial will blink.
Press the ‘TILT’ button to raise the mixing arm into the upwards position. Add your
ingredients into the mixing bowl.
Do not operate the appliance when empty. The maximum working capacity is 2 litres
(2kg), or 1.2 litres (1.2kg) for heavier ingredients such as flour and water, or dough.
Press the ‘TILT’ button to lower the mixing arm into the downwards position, the ‘TILT’
button will click fully out.
When you switch on the stand mixer for the first time there may be a slight burning smell,
this is normal for a new appliance and will stop after a few uses.
To start mixing, twist the speed dial clockwise. Move slowly through the speeds to the
speed you require, the light around the speed dial will be solid when the appliance is
mixing.
DO NOT put your hands or utensils inside the mixing bowl while the stand mixer is on. If
adding food to the mixing bowl while the stand mixer is on, twist the speed dial to ‘0/off’
first. If you are using the splash guard, add food through the feed spout, pulse the stand
mixer if the attachment is blocking the feed spout.
If you need to scrape down food from the sides of the mixing bowl, switch off the
appliance and use a spatula.
Always switch off and unplug the appliance before you attach or remove any of the
attachments.
Do not operate the stand mixer continuously for more than 6 minutes. Allow the motor to
rest for 15 minutes between each use. Most mixing tasks will take around 3 minutes.
To stop the stand mixer, twist the speed dial back to ‘0/OFF’. The stand mixer will continue
to rotate for a few seconds after being switched off. Wait until it has fully stopped before
pressing the ‘TILT’ button to raise the arm and remove the bowl.
A GUIDE TO SPEED SETTINGS
The stand mixer has six different speed settings and also has an additional pulse setting which
can all be used for a number of different functions including mixing, kneading, whipping and
folding of various ingredients to make the perfect breads, cakes and biscuits.
When you first begin to mix ingredients start on the ‘1’ setting, if required turn the speed dial in
a clockwise direction to increase the speed in small increments up to the ‘6’ setting if required.
Please find below a simple guide for each attachment and which speeds we recommend
using for each attachment.
Copies of the I/B. Please reproduce them without any
changes except under special instruction from Team
International BELGIUM. The pages must be reproduced
and folded in order to obtain a booklet A5 (+/- 148.5 mm
width x 210 mm height). When folding, make sure you keep
the good numbering when you turn the pages of the I/B.
Don’t change the page numbering. Keep the language
integrity.
10 170407
Assembly page 10/16
Fax +32 2 359 95 50
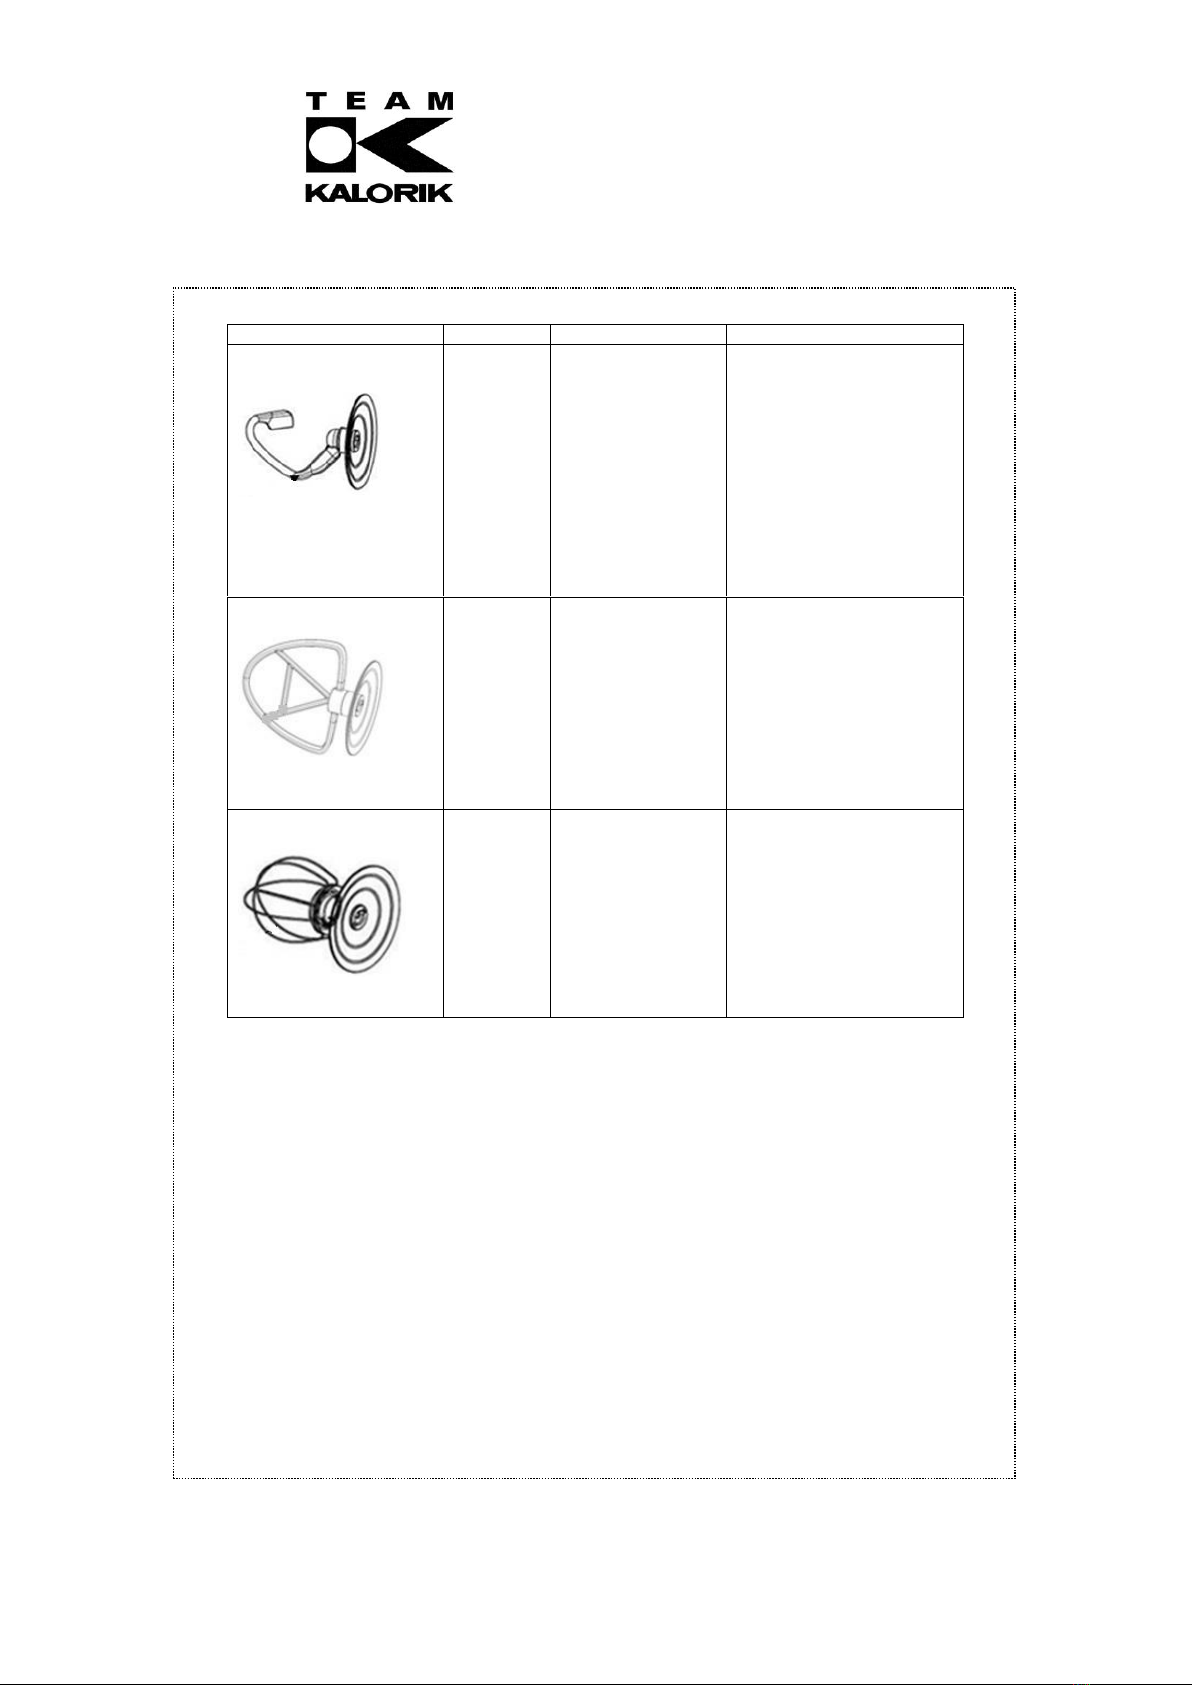
Attachment
Speed
Use
Tips
Dough Hook
1-3
Use on lower level
speeds for mixing
heavier ingredients
such as bread
dough to combine
it slowly with liquids.
Once the mixture has
formed into a ball turn the
stand mixer off and use the
‘TILT’ button to raise the
arm. The mixture can now
be removed using a
spatula. When making short
crust pastry all ingredients
should be cold.
Beater
1-4
Use at medium
speeds to mix
together
ingredients for
pastry, biscuits and
icing. This is suitable
for medium to
heavy mixtures.
When using butter and
margarine these
ingredients should be at
room temperature.
Whisk
1-6
Use for whipping,
creaming and of
course whisking
ingredients such as
egg whites and
batters. This is
suitable for light
mixtures.
When whisking, eggs
should be at room
temperature to gain the
best results.
Pulse Setting
To pulse your ingredients for a short burst of 2-3 seconds you can twist the speed dial to
the ‘pulse’ position. This can be found anticlockwise of the off position.
The pulse feature mixes ingredients together quickly without causing them to ‘over-
process’. Most ingredients should mix together after a couple of pulses.
HINTS AND TIPS
For the best results, add liquids to your mixture before mixing.
Use the splash guard when mixing flour and liquid, to prevent splattering and flour dusting.
DO NOT use the stand mixer with very heavy ingredients or the motor could overheat. If
the stand mixer seems to be struggling to mix, switch the stand mixer off and then unplug
the appliance at the wall socket and reduce the amount of ingredients in the mixing
bowl.
FREQUENTLY ASKED QUESTIONS
Question: My stand mixer isn’t working, why is this?

Copies of the I/B. Please reproduce them without any
changes except under special instruction from Team
International BELGIUM. The pages must be reproduced
and folded in order to obtain a booklet A5 (+/- 148.5 mm
width x 210 mm height). When folding, make sure you keep
the good numbering when you turn the pages of the I/B.
Don’t change the page numbering. Keep the language
integrity.
11 170407
Assembly page 11/16
Fax +32 2 359 95 50
Answer: It is possible that the stand mixer has not been switched on at the wall socket or the
speed setting has not been selected. Before re-attempting to turn the stand mixer back on
check that it is plugged in and switched on (the light around the speed dial will be blinking). To
check that the stand mixer is working correctly, move the speed dial to speed setting 1. Finally
ensure that the attachment and splash guard are fitted correctly. If this is all in place the mixing
arm will have to be completely tilted down otherwise the stand mixer will not work.
Question: Why is my mixture splashing out over my work surface?
Answer: The speed used for the attachment may be too high for the ingredients in the bowl,
please lower the speed being used. Please ensure that the splash guard has been correctly
fitted to the bowl.
Question: My stand mixer moves a lot on the kitchen counter when mixing. Is this normal?
Answer: Whilst this stand mixer is fitted with anti-slip rubber suction feet, heavier ingredients such
as dough may cause your stand mixer to move from side to side while in use. Some kitchen
surfaces will allow the mixer to walk slightly across the kitchen counter as a result. This is normal
for heavy ingredients. Your stand mixer will be fine but it should never be left unattended
during the mixing process.
CARE AND CLEANING OF YOUR STAND MIXER
Always unplug the appliance from the power supply before cleaning it.
Remove the accessories before washing them in soapy water. Do not use scouring pads
for the plastic materials. Do not place them in the dishwasher.
Do not clean with any abrasive scouring pad or steel wool, as this will damage the finish.
You can wipe the motor block with a soft damp cloth.
Do not immerse the motor block in water or any other liquid.
PROTECTION OF THE ENVIRONMENT –DIRECTIVE 2012/19/EU
In order to preserve our environment and protect human health, the waste electrical and
electronic equipment should be disposed of in accordance with specific rules with the
implication of both suppliers and users. For this reason, as indicated by the symbol on the
rating label or on the packaging, your appliance should not be disposed of as unsorted
municipal waste. The user has the right to bring it to a municipal collection point performing
waste recovery by means of reuse, recycling or use for other applications in accordance with
the directive.
ErP Declaration –Regulation 1275/2008/EC
We, JD Williams Ltd., hereby confirm that our product meets the requirements of regulation
1275/2008/EC. Admittedly, our product does not dispose of a function to minimize the power
consumption, which should according to regulation 1275/2008/EC put the product in off or
standby mode after finishing the main function, but this is practically impossible, as it would
compromise the main function of the product so strongly, that using the product would no
longer be possible!
For this reason we always tell the customer in our instruction manual to unplug the appliance
immediately after use.
The user manual is by simple request also available in electronic format from the after-sales
service (see warranty card).

Copies of the I/B. Please reproduce them without any
changes except under special instruction from Team
International BELGIUM. The pages must be reproduced
and folded in order to obtain a booklet A5 (+/- 148.5 mm
width x 210 mm height). When folding, make sure you keep
the good numbering when you turn the pages of the I/B.
Don’t change the page numbering. Keep the language
integrity.
12 170407
Assembly page 12/16
Fax +32 2 359 95 50
GUARANTEE
This product is guaranteed against manufacturing defects for a period of 1 year.
This does not cover the product where the fault is due to misuse, abuse, use in contravention of
the instructions, or where the product has been the subject of unauthorised modifications or
alterations, or has been the subject of commercial use.
In the unlikely event of a problem with the product within the guarantee period please return it
to the place of purchase. If the item is shown to have had an inherent defect present at the
time of sale, the seller will provide you with a replacement. Your statutory rights remain
unaffected.
Guarantor:
JD Williams Ltd.,
Griffin House, 40 Lever Street, Manchester, M60 6ES
SIMPLE RECIPES TO GET YOU STARTED
Classic Victoria Sandwich –Speed Dial Setting: 2
Ingredients:
For the Cake -
200g caster sugar
200g softened butter
4 eggs
200g self-raising flour
1 tsp baking powder
2 tbsp milk
For the Filling -
100g butter
140g icing sugar, sifted
drop vanilla extract (optional)
170g strawberry jam
Icing sugar, to decorate
Preparation:
Preheat the oven to 180C fan/ conventional 190C/ gas mark 5. Butter two 20cm sandwich tins
and line with non-stick baking paper. Place all the cake ingredients into the stainless steel
Mixing Bowl, and attach the Beating tool. Turn the Speed Dial to the number 2, and beat for
approximately 2 –2 ½ minutes or until the mixture is a smooth, soft batter.
Turn the Speed Dial to the ‘Off’ position before pressing the tilt switch to raise the mixing arm.
Divide the mixture between the tins, smooth the surface with a spatula or the back of a spoon,
then bake for about 20 - 22 mins until golden and the cake springs back when pressed.
Remember –all ovens cook slightly differently so adjust the cooking time accordingly. Turn
onto a cooling rack and leave to cool completely before adding the filling.

Copies of the I/B. Please reproduce them without any
changes except under special instruction from Team
International BELGIUM. The pages must be reproduced
and folded in order to obtain a booklet A5 (+/- 148.5 mm
width x 210 mm height). When folding, make sure you keep
the good numbering when you turn the pages of the I/B.
Don’t change the page numbering. Keep the language
integrity.
13 170407
Assembly page 13/16
Fax +32 2 359 95 50
To make the filling, beat the butter by hand until smooth and creamy, then gradually beat in
icing sugar, and add the vanilla extract. This action should be completed by hand as the
volume may not be sufficient for the large capacity of the Mixing Bowl to complete this task
automatically.
Spread the butter cream over the bottom of one of the sponges, spread the jam over the
bottom of the second sponge, and sandwich the two together. Dust with a little icing sugar
before serving. Keep in an airtight container and eat within 2 days. Delicious!
Simple Meringues –Speed Dial Setting: 4-5
Ingredients:
4 large organic egg whites, room temperature
115g caster sugar
115g icing sugar
Preparation:
When it comes to whisking eggs, Stand Mixers are a real time saver! Preheat the oven to 100C
fan/ conventional 110C/gas mark 4. Line 2 baking sheets with parchment paper, as meringue
can sometimes stick to greaseproof paper and foil. Pour the 4 large egg whites into the
stainless steel Mixing Bowl. Whisk the egg whites on Speed Setting 4 until the mixture stands up
in stiff peaks when the whisk is raised. Turn the Speed Dial to the ‘Off’ position before pressing
the tilt switch to raise the mixing arm. Close the mixing arm by pressing the TILT switch until you
hear an audible ‘click’, and turn the speed up to Speed Setting 5, gradually adding 115g
caster sugar through the feeding spout, a dessertspoonful at a time every 3-4 seconds. TOP TIP!
Adding the sugar slowly helps prevent the meringue from weeping later. However, be careful
not to over-whisk. When ready, the mixture should be thick and glossy. Sift one third of the 115g
icing sugar over the mixture, then gently fold it in with a big metal spoon or rubber spatula.
Continue to sift and fold in the remaining icing sugar a third at a time, taking care not to over-
mix. Scoop up a heaped dessertspoonful of the mixture and drop them in rough rounds onto
the parchment paper. Bake for 1 1⁄2-1 3⁄4 hours in a fan oven, 1 1⁄4 hours in a conventional or
gas oven, until the meringues sound crisp when tapped underneath and are a pale coffee
colour. TOP TIP! Once you are happy the meringues are baked to your preference, turn the
oven off –however, leave the meringues in the oven with the door closed until fully cooled. This
helps to avoid the surface of the meringues becoming sticky. Enjoy!
Pizza dough –Speed Dial Setting: 1-4
Ingredients:
400g plain flour
250ml warm water
1/2 tsp sugar
1 sachet active dried yeast (about 2-1/2 tsp)
1-1/2 tsp olive oil and 1 tsp table salt
Preparation:

Copies of the I/B. Please reproduce them without any
changes except under special instruction from Team
International BELGIUM. The pages must be reproduced
and folded in order to obtain a booklet A5 (+/- 148.5 mm
width x 210 mm height). When folding, make sure you keep
the good numbering when you turn the pages of the I/B.
Don’t change the page numbering. Keep the language
integrity.
14 170407
Assembly page 14/16
Fax +32 2 359 95 50
Preheat the oven to 200C fan/conventional 210C/gas mark 6. First, sift the flour into the mixing
bowl, and combine the remaining ingredients in a separate bowl or jug. Using the dough hook
attachment, run the mixer at Speed Setting 1-2, and gradually add the liquid via the feeding
spout ensuring that the Splash Guard is firmly in the ‘Lock’ position. As the ingredients
incorporate and the dough ball begins to form, increase the Speed Setting to 3-4. Knead for 2 -
3 minutes on this Speed, until the dough ball is smooth. Turn the Speed Dial to the ‘Off’ position
before pressing the tilt switch. Remove the dough from the mixing bowl and split into 2 pieces
for large pizzas, or 4 if you would like smaller portions. On a floured surface, roll into pizza bases
approximately 1cm thick (this recipe advises circular of rectangular bases for a classic Italian
style thin & crispy base). Then, lay the bases on a baking sheet or pizza tray. Spread the pizza
bases with a tomato purée and add toppings –mushrooms, ham, olives, sun dried tomatoes,
spinach, artichoke, etc. Top with a sprinkling of dried herbs, chunks of mozzarella, and a drizzle
of olive oil to taste. Bake in a preheated oven at 200°C/gas mark 6 for 15-20 minutes, till the
toppings are bubbling and golden brown. Buon appetito!
YOUR OWN RECIPE NOTES AND IDEAS
____________________________________________________________________________________________
____________________________________________________________________________________________
____________________________________________________________________________________________
____________________________________________________________________________________________
____________________________________________________________________________________________
____________________________________________________________________________________________
____________________________________________________________________________________________
____________________________________________________________________________________________
____________________________________________________________________________________________
____________________________________________________________________________________________
____________________________________________________________________________________________
____________________________________________________________________________________________
____________________________________________________________________________________________
____________________________________________________________________________________________
____________________________________________________________________________________________
____________________________________________________________________________________________
____________________________________________________________________________________________
____________________________________________________________________________________________

Copies of the I/B. Please reproduce them without any
changes except under special instruction from Team
International BELGIUM. The pages must be reproduced
and folded in order to obtain a booklet A5 (+/- 148.5 mm
width x 210 mm height). When folding, make sure you keep
the good numbering when you turn the pages of the I/B.
Don’t change the page numbering. Keep the language
integrity.
15 170407
Assembly page 15/16
Fax +32 2 359 95 50
____________________________________________________________________________________________
____________________________________________________________________________________________
____________________________________________________________________________________________
____________________________________________________________________________________________
____________________________________________________________________________________________
____________________________________________________________________________________________
____________________________________________________________________________________________
____________________________________________________________________________________________
____________________________________________________________________________________________
____________________________________________________________________________________________
____________________________________________________________________________________________
____________________________________________________________________________________________
____________________________________________________________________________________________
____________________________________________________________________________________________
____________________________________________________________________________________________
____________________________________________________________________________________________
____________________________________________________________________________________________
____________________________________________________________________________________________
____________________________________________________________________________________________
____________________________________________________________________________________________
____________________________________________________________________________________________
____________________________________________________________________________________________
____________________________________________________________________________________________
____________________________________________________________________________________________
____________________________________________________________________________________________
____________________________________________________________________________________________
____________________________________________________________________________________________

Copies of the I/B. Please reproduce them without any
changes except under special instruction from Team
International BELGIUM. The pages must be reproduced
and folded in order to obtain a booklet A5 (+/- 148.5 mm
width x 210 mm height). When folding, make sure you keep
the good numbering when you turn the pages of the I/B.
Don’t change the page numbering. Keep the language
integrity.
Back cover page (last page)
Assembly page 16/16
Fax +32 2 359 95 50
____________________________________________________________________________________________
____________________________________________________________________________________________
____________________________________________________________________________________________
____________________________________________________________________________________________
____________________________________________________________________________________________
____________________________________________________________________________________________
____________________________________________________________________________________________
____________________________________________________________________________________________
____________________________________________________________________________________________
____________________________________________________________________________________________
____________________________________________________________________________________________
____________________________________________________________________________________________
____________________________________________________________________________________________
____________________________________________________________________________________________
____________________________________________________________________________________________
____________________________________________________________________________________________
____________________________________________________________________________________________
____________________________________________________________________________________________
____________________________________________________________________________________________
____________________________________________________________________________________________
____________________________________________________________________________________________
____________________________________________________________________________________________
____________________________________________________________________________________________
____________________________________________________________________________________________
____________________________________________________________________________________________
____________________________________________________________________________________________
____________________________________________________________________________________________
Table of contents


