Egger ESG 2 User manual

ESG 2
Inhaltsverzeichnis
1. Allgemeines
2. Sicherheitshinweise
2.1 Sicherheitsbewusst arbeiten
3 Installation
3.1 Lieferumfang
3.2 Leistungsmerkmale
3.3 Ersatzteile / Zubehör
4. Bedienung
4.1 Bedien- und Kontrollelemente
5. Inbetriebnahme
5.1 Befüllen des Gerätes
5.2 Flaschen- / Kanisterwechsel
6. Pflege und Wartung
7. Service/Kundendienst
Seite 1 von 16

1 Allgemeines
Das egger ESG 2 ist ein automatisches Misch- und Dosiergerät für dünnfließende, ad-
ditionsvernetzende Zweikomponenten-Dubliersilikone. Auf Knopfdruck werden die
Komponenten 1:1 gemischt und dosiert. Die Schnellkupplungen erlauben die An-
wendung der 1 kg-Gebinde, nachfüllbarer Materialreservoirs oder der 5 kg, bzw.
25 kg Großgebinde.
2. Sicherheitshinweise
Das egger ESG 2 ist ein automatisches Misch- und Dosiergerät. Ein anderer Einsatz, als
der in dieser Betriebsanleitung beschriebene, kann zu Personenschäden des Benut-
zers oder Dritter führen. Ferner können das Gerät oder andere Sachwerte beschädigt
werden. Deshalb darf das Gerät nur in technisch einwandfreiem Zustand benutzt
werden. Die Sicherheitshinweise sind unbedingt zu beachten.
2.1 Sicherheitsbewusst arbeiten
Das Gerät darf nur von sachkundigen Personen benutzt werden, die entsprechend
qualifiziert und ausgebildet sind (insbesondere Kinder sind vom Gerät fernzuhalten!).
Vor der Inbetriebnahme muss der Benutzer die Betriebsanleitung lesen und bei even-
tuellen Unklarheiten beim Hersteller rückfragen.
Das Gerät nur an zugelassene Steckdosen anschließen (siehe Leistungsmerkmale,
Abschnitt 3.2).
Gerät nur an einem trockenen Arbeitsplatz betreiben.
Geltende Verarbeitungsanleitung für das jeweils zu verarbeitende Material beach-
ten.
Keine Gegenstände in das Gerät einführen.
Das Gerät muss auf einem standfesten und ebenen Untergrund stehen.
Es dürfen nur Zubehör und Ersatzteile verwendet werden, die vom Hersteller freige-
geben sind. Für Schäden, die durch Einsatz fremder Teile entstehen, übernehmen wir
keine Haftung.
Den Bedienungsknopf des Gerätes nicht arretieren.
Das Gerät ist vor dem Betrieb auf ordnungsgemäßen Zustand und Betriebssicherheit
zu überprüfen. Falls der Zustand nicht einwandfrei ist, darf das Gerät nicht benutzt
werden und muss entsprechend gekennzeichnet werden.
Vor der Reinigung und der Wartung des Gerätes oder dem Auswechseln von Teilen
ist unbedingt der Netzstecker zu ziehen.
Schilder und Aufkleber müssen stets in gut lesbarem Zustand gehalten werden und
dürfen nicht entfernt werden.
Das Öffnen des Gerätes und Instandsetzungen dürfen nur von zugelassenen Fach-
kräften durchgeführt werden.
Seite 2 von 16

3 Installation
3.1 Lieferumfang
Prüfen Sie alle Teile der Lieferung auf Vollständigkeit und Transportschäden. Fehlende
Teile oder Transportschäden bitte sofort Ihrem Händler/Hersteller melden.
1 Gerät
1 Netzkabel
1 Fußschalter
2 Materialreservoirs
1 Betriebsanleitung
3.2 Leistungsmerkmale
Netzspannung: 230V
Netzfrequenz: AC 50Hz
Maße: H 315 x B 320 x T 300 mm
Gewicht: 17,5 kg
3.3 Ersatzteile und Zubehör
1 Liter Kupplungen Art. Nr.: 54505
5 Liter Kupplungen Art. Nr.: 54553
Ständer für 5 Liter Kanister Art. Nr.: 54504
Material-Reservoir (2 Stück à 1,3L.) Art. Nr.: 54552
Mischkanülen S 50 System 40 Stk. Art. Nr.: 25151
Mischkanülen S 50 System100 Stk. Art. Nr.: 25152
3.4 Gerät aufstellen und anschließen
Das egger ESG 2 entspricht dem aktuellen Stand der Technik und den anerkannten
sicherheitstechnischen Regeln, trotzdem können Gefahren auftreten. Beachten Sie
daher vor der Inbetriebnahme folgende Punkte:
Gerät darf nur von qualifiziertem Fachpersonal betrieben werden.
Anerkannte Regeln für Arbeitssicherheit beachten.
Das Gerät nur in einwandfreiem Zustand und unter Beachtung der Betriebsanleitung
betreiben.
Stellen Sie das Gerät waagrecht auf und bringen Sie es in die geeignete Arbeitsposi-
tion.
Schützen Sie das Gerät vor Erschütterungen.
Prüfen Sie das Gerät auf technisch einwandfreien Zustand. Besonders das Netzkabel.
Seite 3 von 16

4. Bedienung
4.1 Bedien- und Krontrollelemente
Netzschalter mit Kontrollleuchte
Ort: Frontplatte des Gerätes
Funktion: Er versorgt das Gerät mit Strom, im eingeschalteten Zustand leuchtet zusätz-
lich die grüne Kontrollleuchte.
Drucktaster mit Kontrollleuchte
Ort: Frontplatte des Gerätes
Funktion: Durch das Drücken wird der Mischvorgang gestartet, im gedrückten Zu-
stand leuchtet zusätzlich die orangefarbene Kontrollleuchte.
Mischkopf zur Befestigung der Mischkanüle
Ort: Seitlich des Gerätes
Funktion: Aufnahmehalterung für die Mischkanüle
Kupplungsstecker für Komponenten A und B
Ort: Rückseite der Gerätes
Funktion: Anschlussstecker zur Befestigung der Kupplungen der Materialgebinde
Buchse für Netzkabel
Ort: Rechte Seite des Gerätes
Funktion: Zum Anschluss des Netzkabels zur Stromversorgung
Buchse für Fußschalter
Ort: Linke Seite des Gerätes
Funktion: Durch das Drücken wird der Mischvorgang gestartet.
5 Inbetriebnahme
5.1 Vorbereitung der Silikonbehältnisse
Es können Materialreservoirs, 1 Liter Flaschen oder 5 Liter Kanister an das egger ESG 2
angeschlossen werden.
MATERIALRESERVOIR: Die mitgelieferten Materialreservoirs, gekennzeichnet mit A und
B sind bereits mit Schnellkupplungen versehen.
FLASCHEN: Die Flaschen mit den Komponenten A und B öffnen und Flaschenadapter
aufschrauben.
ACHTUNG: Den farbig gekennzeichneten Flaschenadapter ausschließlich auf die mit
farbiger Silikonmasse gefüllte Flasche – bei klaren Material Komponente B – auf-
schrauben.
KANISTER: Kanisterverschlüsse abschrauben und die optional erhältlichen Verbin-
dungsschläuche aufschrauben.
ACHTUNG: Beide Silikonkomponenten stets getrennt halten - Anschlüsse niemals
verwechseln! Durch eine Vermischung der Komponenten härtet das Silikon im Gerät
aus, wodurch eine umfangreiche Instandsetzung des Gerätes im Werk erforderlich
wird.
Seite 4 von 16
5.2. Befüllen des Gerätes
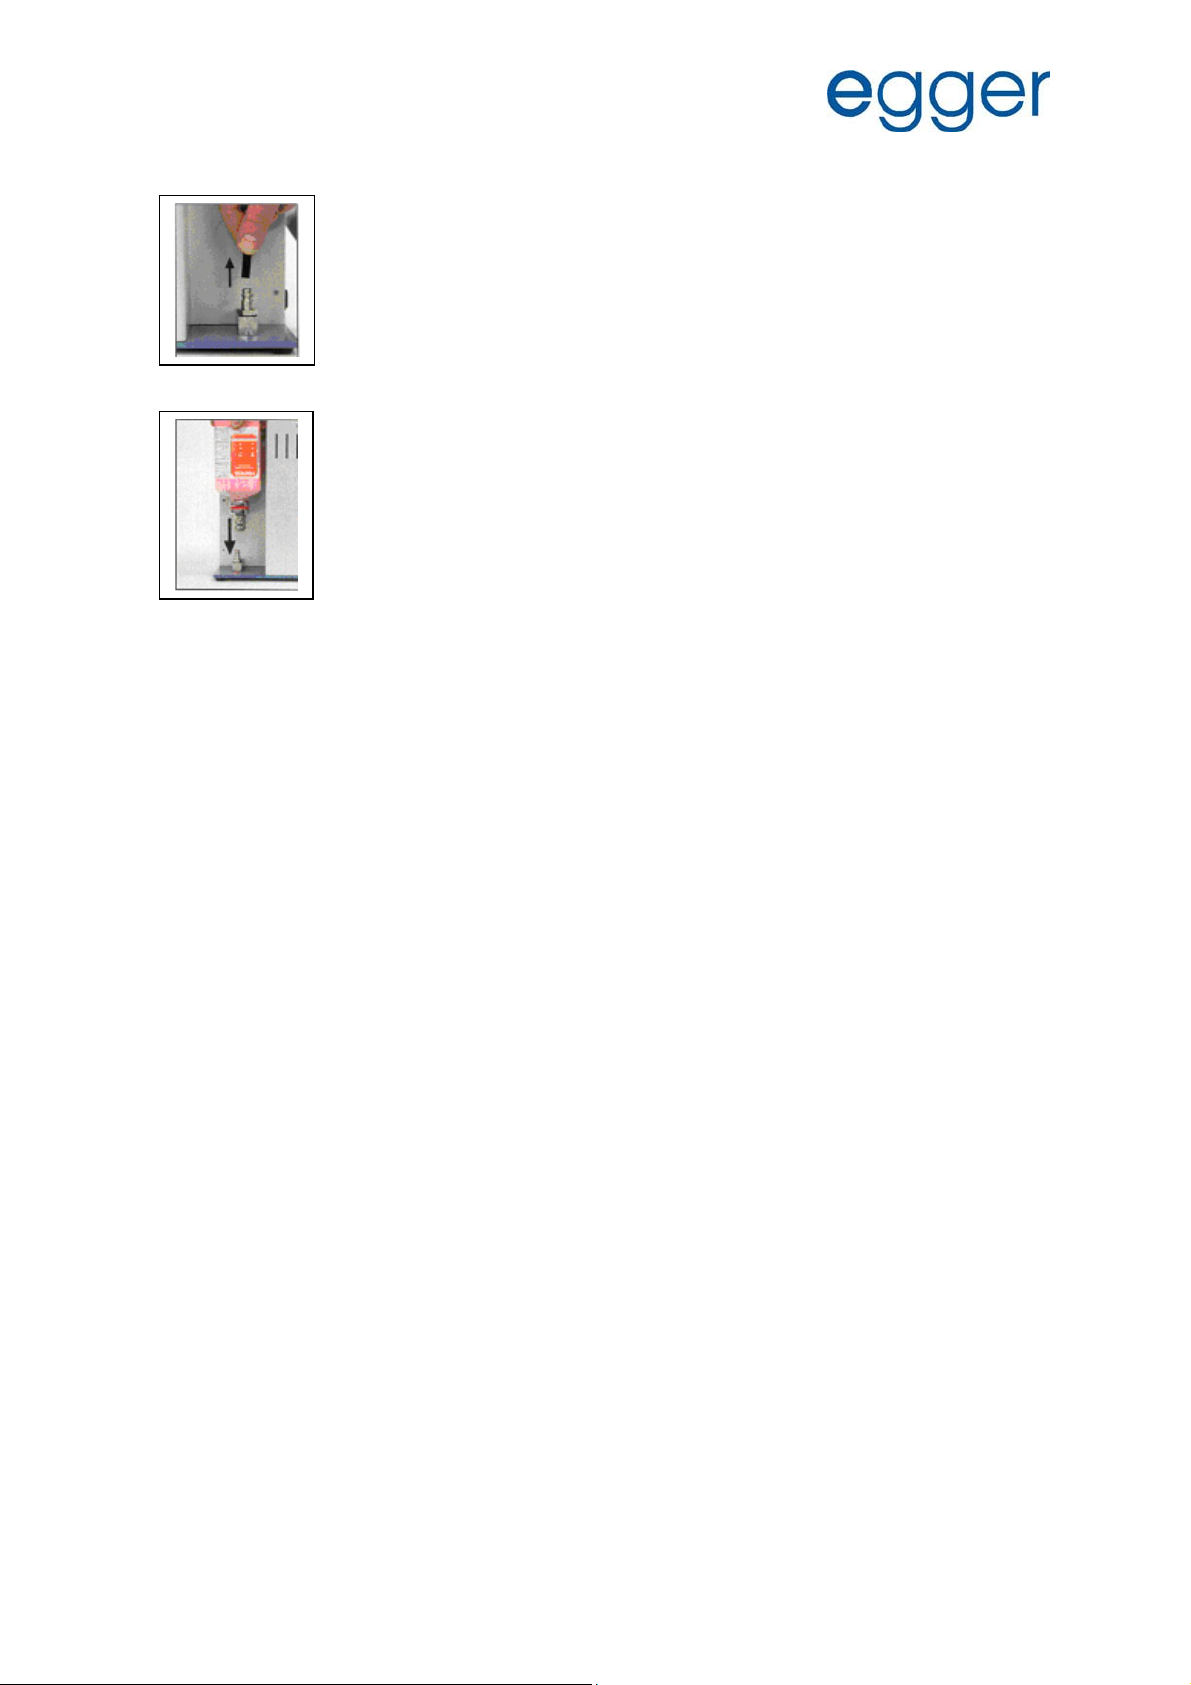
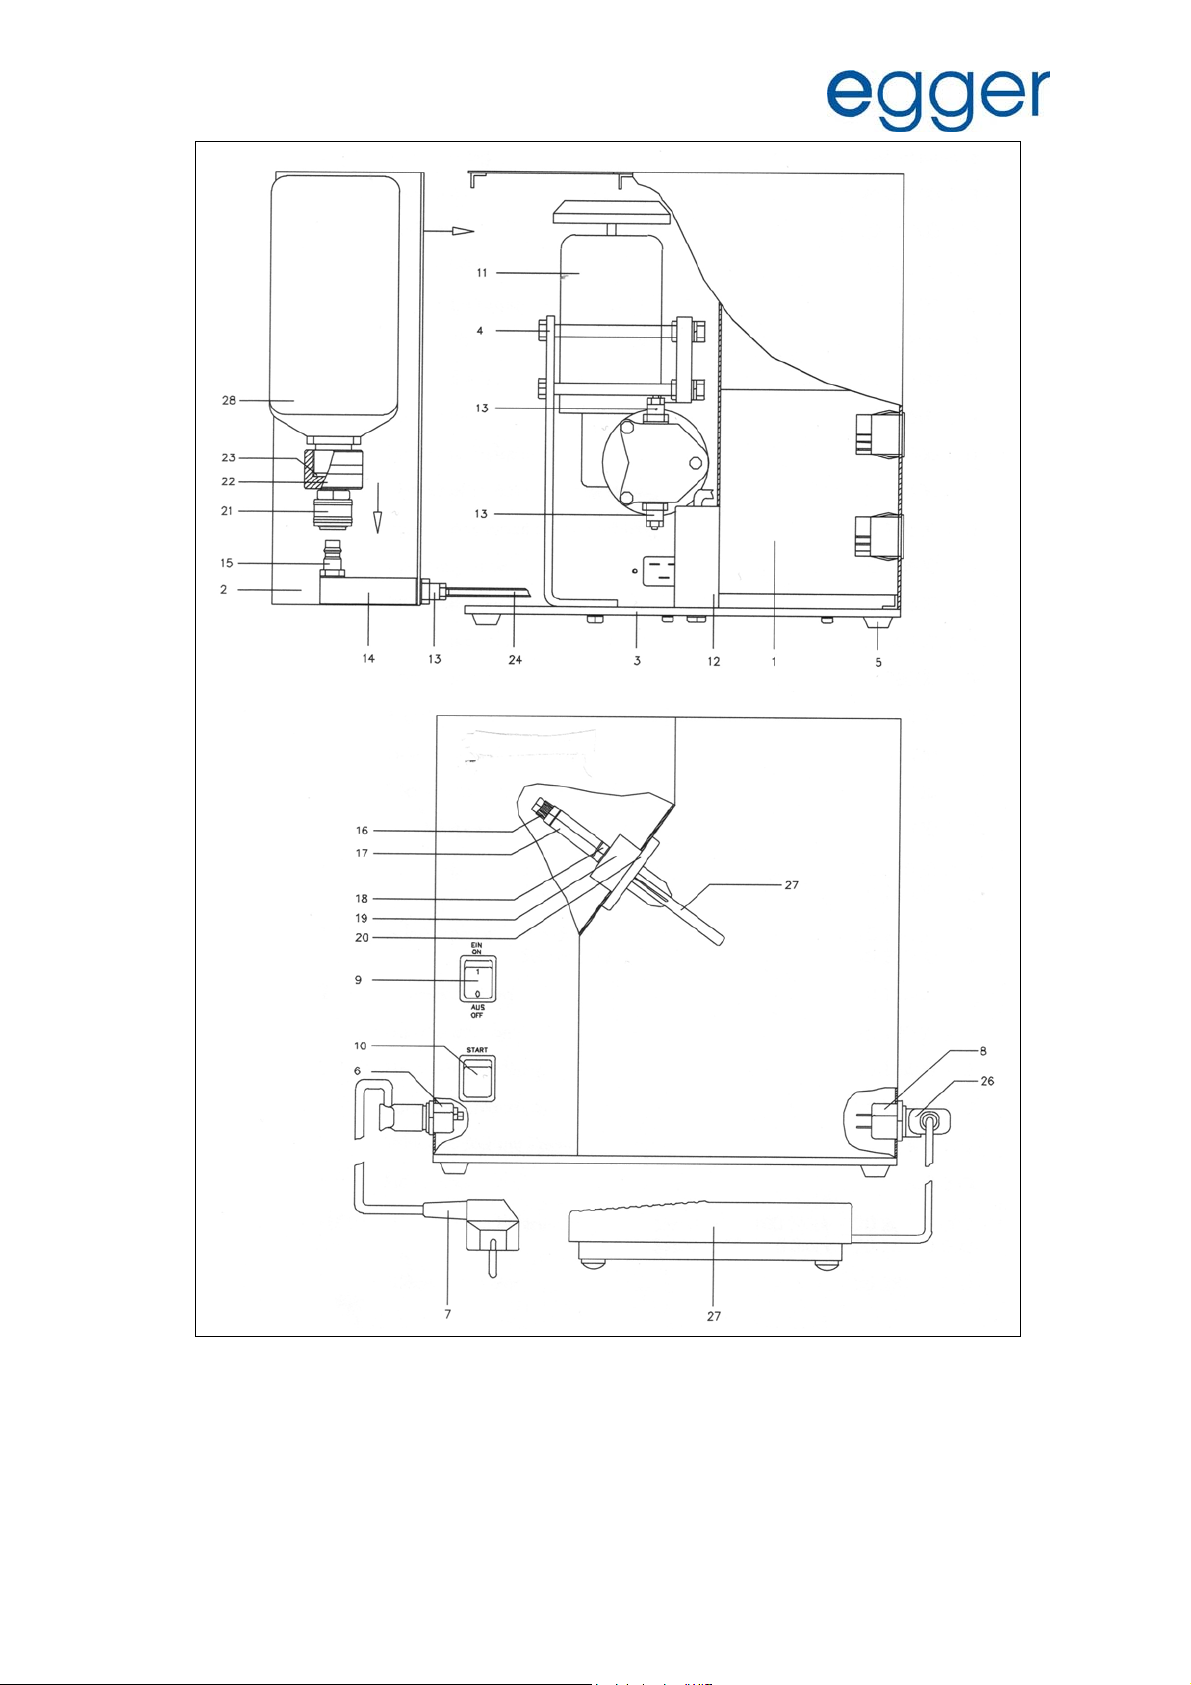
Verschlussstopfen an den Kupplungssteckern entfernen.
Die Schnellkupplungen der Materialreservoirs bzw. Silikon-
behältnisse auf die Kupplungsstecker des Gerätes drücken
und hörbar einrasten lassen.
Bei der Erstinbetriebnahme müssen die Schlauchleitungen mit Silikon befüllt werden,
indem per Knopfdruck, solange Silikon gefördert wird, bis dieses am Mischkopf aus-
tritt.
ACHTUNG: Die Komponenten A und B müssen entsprechend des Aufdruckes auf
dem Gerät und der angebrachten A/B Markierung zugeordnet werden. In die Fla-
schen-, bzw. die Kanisterböden, mit einem spitzen Gegenstand den Gebindeboden
durchstoßen, damit bei der Förderung Luft nachströmen kann. Gerät am Netzschal-
ter einschalten. Ein Auffanggefäß unter den Mischkopf stellen und Drucktaster betä-
tigen. Taster so lange gedrückt halten, bis das Silikon komplett herausgefördert ist
und beide Komponenten gleichmäßig am Mischkopf austreten. Mischkanüle durch
90°-Rechtsdrehung am Mischkopf befestigen.
Das egger ESG 2 ist nun betriebsbereit. Negativform unter die Auslauföffnung der
Mischkanüle stellen und Drucktaster, bzw. Fußschalter betätigen. Solange das Silikon
in der Mischkanüle nicht ausgehärtet ist (ca. 4 Minuten), können nacheinander meh-
rere Formen gefüllt werden. Nach Beendigung der Entnahme die Mischkanüle nicht
entfernen. Die Mischkanüle mit ausgehärtetem Material erst vor der nächsten Dublie-
rung durch 90°-Linksdrehung entfernen.
ACHTUNG: Nie gegen eine Mischkanüle mit ausgehärtetem Material fördern!
5.3 Flaschen-/Kanisterwechsel
Die Schnellkupplungen/Flaschenadapter durch Hochziehen der Arretierung vom Ge-
rät entfernen. Schnellkupplungen/Flaschenadapter auf die neuen Flaschen/Kanister
schrauben und, wie oben beschrieben, anschließen. Die farbliche bzw. A und B Zu-
ordnung der Komponenten muss unbedingt beachtet werden.
Es muss stets auf den Füllstand der Behältnisse geachtet werden! Sie dürfen niemals
vollständig leergefördert werden, da andernfalls Luft in das System gelangt und das
Gerät dann aufwändig entlüftet werden muss. Etwa 2-3 cm Minimalfüllstand muss in
den Behältnissen verbleiben.
Seite 5 von 16

6. Pflege und Wartung
Vor Pflege- und Wartungsarbeiten den Netzstecker ziehen!
Die Reinigung erfolgt mit einem milden Reinigungsmittel. Silikonreste vom Gerät wi-
schen. Kupplungsstecker und Mischkopf sauber halten. Die verwendeten Reinigungs-
mittel dürfen nicht in das Gerät gelangen.
Reparatur- und Instandsetzungsarbeiten am egger ESG 2 dürfen nur von Fachkräften
ausgeführt werden. Die Stromzufuhr zum Gerät ist in jedem Falle zu unterbrechen.
Die Firma egger ist nur dann für die Sicherheit, Zuverlässigkeit und Leistung des Gerä-
tes verantwortlich, wenn
– das Gerät nur für den entsprechenden Anwendungszweck verwendet wird.
– die Bedienung nur durch fachlich geschultes Personal erfolgt.
– das Gerät in Übereinstimmung mit dieser Bedienungsanleitung verwendet wird.
– Erweiterungen, Neueinstellungen, Änderungen oder Reparaturen durch von ihr er-
mächtigte Personen ausgeführt werden.
7 Service/Kundendienst
Die Garantiezeit unserer Geräte beträgt ab Auslieferungsdatum 24 Monate. Von der
Garantie ausgeschlossen sind Modifikationen des Gerätes sowie Verschleißteile (z.B.
Zahnräder der Pumpe).
ACHTUNG: Bei nicht bestimmungsgemäßer Verwendung des egger ESG 2 erlöschen
sämtliche Garantie- und Haftungsansprüche!
Bei Schadensfällen und Störungen
Für die Behebung von Schadensfällen und Störungen stehen wir Ihnen gerne zur Ver-
fügung:
egger Otoplastik + Labortechnik GmbH
Aybühlweg 59
D-87439 Kempten
Telefon: ++ 49 – (0) 8 31 – 5 81 13-20
Fax: ++ 49 – (0) 8 31 – 5 81 13-13
www.egger-labor.com
Geben Sie bitte folgende Daten an:
Gerätetyp: ............................
Geräte-Nummer: ............................
Seite 6 von 16

ESG 2
Content
1 General information
2 Safety instructions
2.1 How to work in a safe way
3 Installation
3.1 Equipment
3.2 Technical data
3.3 Spare parts/Equipment
3.4 Setting up/connecting the unit
4 Operating instructions
4.1 Operating and controlling elements
5 Bringing the machine into service
5.1 Fillling of the unit
5.2 Change of bottles/cans
6 Guarantee
7 Service/Customer service
Page 7 of 16

1 General information
The egger ESG 2 is an automatic mixing and dosing unit for thin-flowing addition-
vulcanising two-component duplicating silicones. At the touch of a button the com-
ponents are mixed in a ratio of 1:1 and dosed. The quick-coupling allows the use of
the 1 kg drums, refillable material reservoirs or the 5 kg resp. 25 kg large cans.
2 Safety Instructions
The egger ESG 2 is an automatic mixing and dosing unit. The device has to be used
only for the aims described in this manual. Misuse could lead to personal injury of the
user or other persons. Furthermore, the unit or other objects of value could be dam-
aged. This is the reason why the device has to be used only in technical perfect
conditions. The safety regulations have to be strictly observed.
2.1 How to work in a safe way
The device has to be used only by qualified and trained persons (especially children
have to be kept away from the unit!).
Read the manual carefully before starting the unit! In case of questions please con-
tact the producer.
Use only standard plug sockets (as described in chapter 3.2). Make sure that the de-
vice is only used on a dry working place.
Please observe the working instructions of the materials on which you work.
The unit has to be placed onto a stable and even surface.
Do not intrude any objects into the unit.
Only those appliances and spare parts may be used which are released by the ma-
nufacturer. We are not responsible for damages caused by the use of outside parts.
Do not lock the operation button of the unit.
The unit has to be examined before operation in view of proper condition and gen-
eral safety. If the unit is not in proper condition, it must not be used and has to be
marked accordingly.
Before cleaning and maintenance of the unit or the changing of parts the plug has
to be removed.
Plates and labels have to be maintained in a well legible condition and must not be
removed.
The opening of the unit and repairs are only to be carried out by experts trained ac-
cordingly.
3. Installation
3.1 Equipment
Please check if all listed articles are packed and in perfect conditions. Please inform
the producer/trader about missing parts or transport damage.
1 Unit
1 Main Plug
1 Foot-operated switch
2 Material reservoirs
1 Manual
Page 8 of 16

3.2 Technical data
Rated voltage: 230 V, 115 V
Frequency: 230 V: AC 50 Hz / 60 Hz – 115 V: 60 Hz
Dimensions: 315 x 320 x 300 mm
Weight: 17.5 kg
3.3 Spare parts and equipment
1 Liter coupling kit Art. No.: 54505
5 Liter coupling kit Art. No.: 54553
Support for 5 Liter canister Art. No.: 54504
Material Reservoir (2 pcs. à 1.3 L.) Art. No.: 54552
Mixing canulas (50 pcs.) Art. No.: 25151
Mixing canulas (100 pcs.) Art. No.: 25152
3.4 Set up/Connecting the unit
The egger ESG 2 corresponds to the current technical standard and is in accor-
dance with the safety regulations. Nevertheless, you have to observe carefully the
safety regulations which are the following:
Only qualified persons are to work on the device.
Observe the current safety regulations.
Only work on a device which is in perfect technical condition.
Observe the manual.
Set up the device horizontally and bring it in a perfect position.
Please make sure that the device has a solid base.
Check if the device is in technical perfect condition especially the main plug.
4. Operation
4.1 Operation and controlling elements
Main plug with controlling lamp
Place: Front plate of the device
Function: The plug supplies the device with electric power. The additional green
lamp shows that the device is switched on.
Push-button with additional lamp
Place: Front plate of the device
Function: By pressing the button the mixing process is started. Additionally, in pressed
condition an orange control lamp is activated.
Mixing head for fixing the mixing canula
Place: On side of device
Function: Receiving holder for the mixing canula
Coupling plug for the components A and B
Place: Reverse side of the device.
Function: Coupler plug for fixing the coupling of the material
Page 9 of 16

Sleeve for power cable
Place: Reverse side of the device
Function: For connecting the mains lead with power supply
Socket for foot-operated switch
Place: Left side of device
Function: Mixing process start with pressing
5 Bringing the machine into service
5.1 Preparation of the silicone containers
Material reservoirs, 1 L bottles or cubitainers can be connected with the egger ESG 2.
MATERIAL RESERVOIR: The supplied material reservoirs, labeled with A and B are
equipped with quick coupling.
BOTTLES: Open the bottles with the components A and B and apply bottle adaptor.
ATTENTION: Colored bottle adaptor onto the bottle filled with colored silicone mass -
component B.
CUBITAINER: Take off canister lids and screw optional connection hoses.
ATTENTION: Keep the two silicone components always separated - do not inter-
change connections! In case the two components have been mixed the silicone
cures in the unit which makes considerable repairs in our plant necessary.
5.2 Filling of the unit
Remove the lock caps from the coupling plugs.
Press the quick-coupling of the material reservoir or of the
silicone containers onto the coupling plugs of the unit and
let them snap hearably.
At first operation, hoses must be filled with silicone by pressing the button as long as
silicone is transported to reach the mixing head.
Page 10 of 16

ATTENTION: The components A and B have to be connected according to the print-
ing on the unit and the applied color marking. Perforate bottom of container with
sharp-pointed object in order to let air come in when producing. Turn on the unit at
the operation button. Put a reception bowl under the mixing head and press push-
button. Keep the push-button pressed until the test silicone has been produced
completely and both components come out homogeneoulsy at the mixing head.
The egger ESG 2 is now ready to operate. Put negative form under the opening of
the mixing canula and press push-button or foot-operated switch. As long as the ma-
terial is not cured in the mixing canula (approx. 4 minutes) several gaskets can be
filled in succession. After having finished the filling process do not remove the mixing
canula. Do only remove the mixing before the next duplication by means of a 90°
turn to the right.
ATTENTION: Never produce against a mixing canula with cured material!
5.3 Change of bottles/cans
Remove the quick-coupling/bottle adaptor from the unit by means of tearing up-
wards the lock-up. Screw quick-coupling/bottle adaptor onto the new bottles/cans
and connect as described above. Observe the correct coordination of the compo-
nents according to the color.
Observe the contents of the containers at any time! They must not be emptied com-
pletely, as otherwise air gets into the system and the unit has to be deaerated under
great effort. A minimal filling of 2 - 3 cm has to remain in the cans.
6 Care and maintenance
Disconnect the unit from mains supply before care and maintenance!
Cleaning is effected with a mild cleaning liquid.
Wipe away silicone remainders from the unit. Keep coupling plug and mixing head
clean. The cleaning liquid must not get into the unit.
Repairs on the egger ESG 2 may only be executed by experts. Disconnect the unit
from mains supply at any rate.
Egger company is only responsible for the safety, reliability and performance of the
unit, if
- the unit is exclusively used for the corresponding field of application.
- operation is only carried out by personnel trained accordingly.
- the unit is operated in accordance with these working instructions.
- extensions, new adjustments, changes or repairs are executed by persons author-
ised by the company.
As we are currently developing our products, we reserve the right for technical
changes.
7 Service / Customer service
The manufacturer gives a device warranty of 24 months starting from the date of
purchase. For weat and tear parts (e. g. tooth wheels, etc.) and modifictaions on the
device as well we grant a guarantee of 6 months, corresponding to the German Citi-
zen’s Copde of Law § 477.
NOTE: In case of improper handling of the egger ESG 2 all warranty and liability
claims will become extinct!
Page 11 of 16

In case of damage and malfunctions
Your distributor will be pleased to be of assistance to you in case of damage or other
malfunctions. You may also contact:
egger Otoplastik + Labortechnik GmbH
Aybühlweg 59
D-87439 Kempten
Telefon: ++ 49 – (0) 8 31 – 5 81 13-60
Fax: ++ 49 – (0) 8 31 – 5 81 13-14
ww.egger-labor.com
Please give the following information:
Model: ............................
Device number: ............................
Page 12 of 16
Seite 13 von 16
Page 13 of 16

Pos. Stück/pcs. Bezeichnung Article
1 1 Gehäuse Case
2 1 Rückwand Back panel
3 1 Bodenplatte Bottom plate
4 1 Pumpenhalterung Pump peg
5 4 Gerätefüße Device mount
6 1 Netzsteckdose Power outlet
7 1 Netzkabel Power cord
8 1 Steckdose Fußschalter Socket foot-operated switch
9 1 Netzschalter grün Power switch green
10 1 Taster transparent Push button transparent
11 1 Zahnradpumpe Gear pump
12 1 Betriebskondensator Operating condenser
13 4 Einschraubverbindung G1/4 Screw-in connection G1/4
14 2 Verlängerung Extension
15 2 Kupplungsstecker G1/4 Coupling plug G1/8
16 2 Einschraubverbindung G1/8 Screw-in connection G1/8
17 2 Rückschlagventil G1/8 Check valve G1/8
18 2 Doppelnippel Double nipple
19 1 Mischkopf S 50 Mixing head S 50
20 1 Adapterplatte S 50 Adapter plate S 50
21 2 Schnellkupplung Quick-release coupling
22 2 Flaschenadapter Bottle adapter
23 2 Flachgummidichtung Gasket
24 1 Kunststoffschlauch 6/4 Plastic tube 6/4
25 1 Winkelstecker mit Kabel Angular connector with cord
26 1 Fußschalter Foot-operated switch
Seite 14 von 16
Page 14 of 16
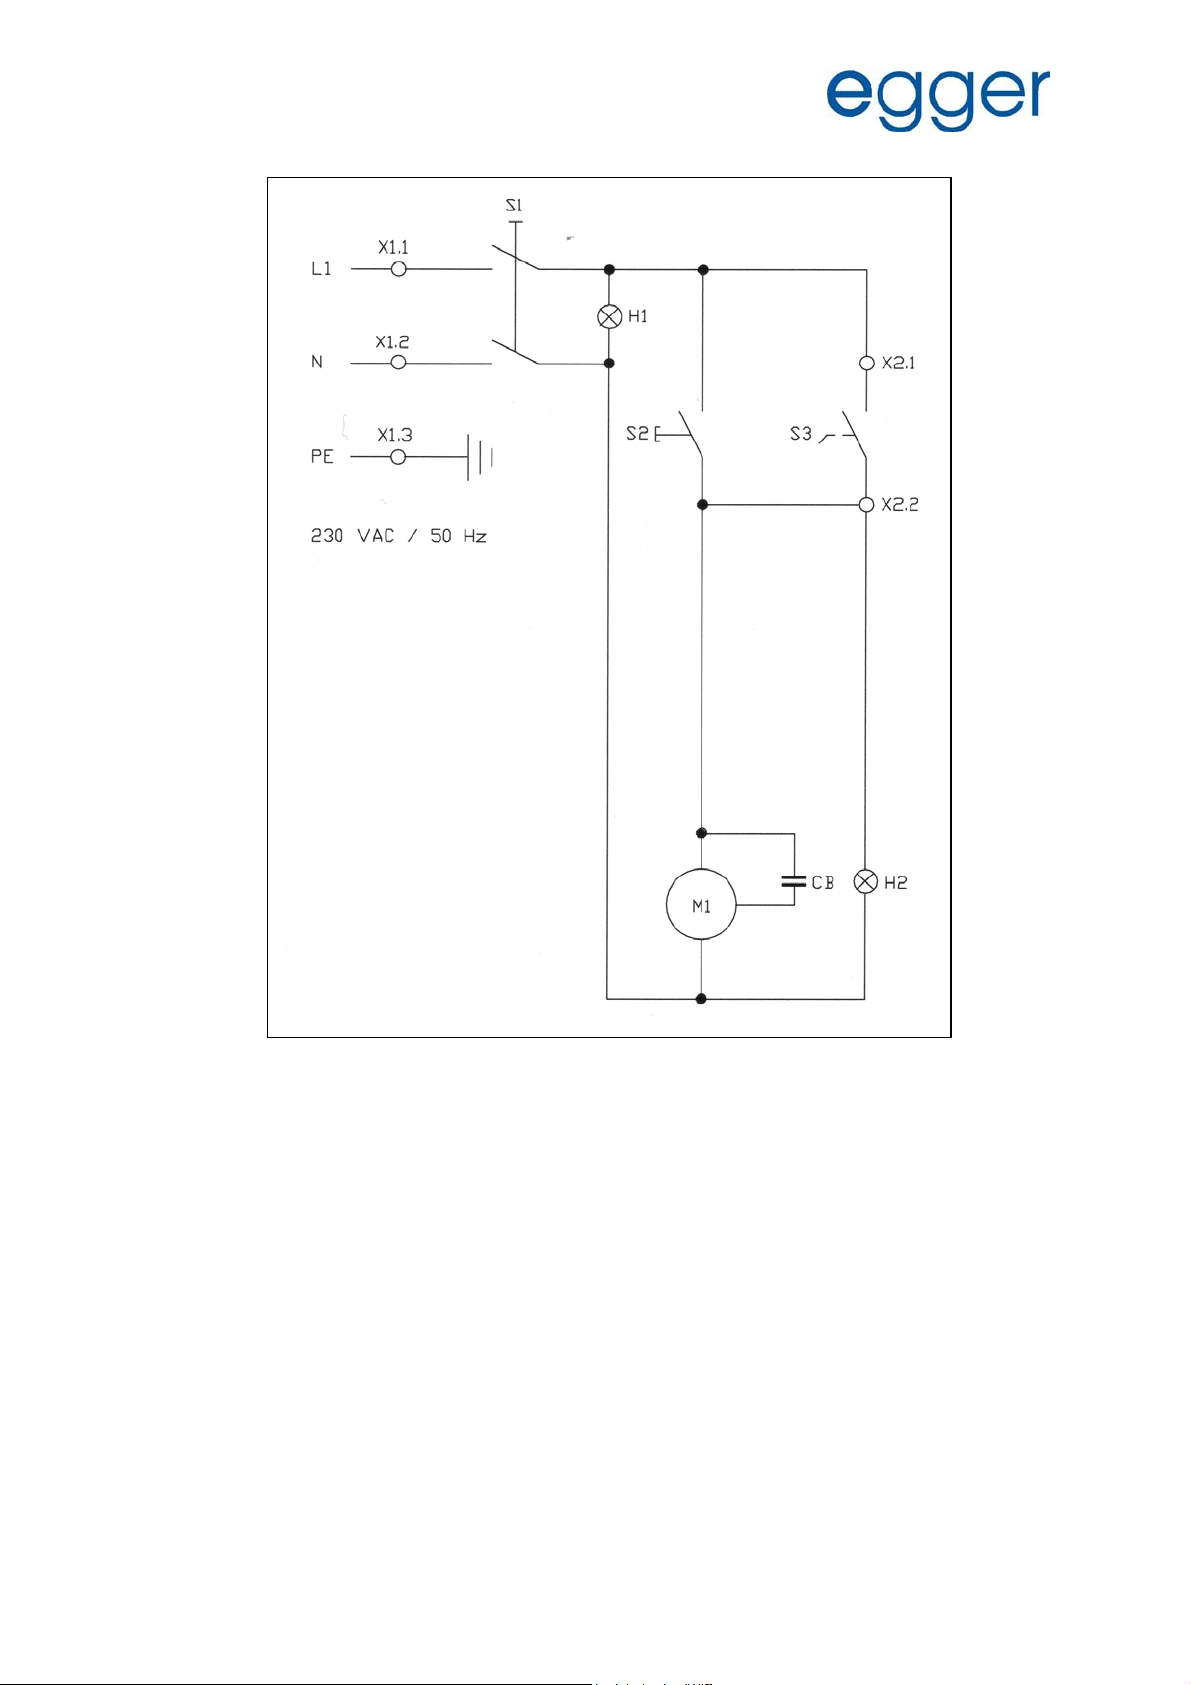
X1 Steckdose Netzanschluss Power outlet
X2 Steckdose Fußschalter Socket foot-operated switch
M1 Zahnradpumpe Gear pump
CB Betriebskondensator Operating condenser
S1 Netzschalter mit Beleuchtung Power switch with lights
S2 Taster ‚START’ mit Beleuchtung Push button with lights
S3 Fußschalter Foot-operated switch
Seite 15 von 16
Page 15 of 16

Notizen / Notes:
Seite 16 von 16
Page 16 of 16
Other manuals for ESG 2
1
Table of contents
Languages:
Popular Mixer manuals by other brands

Electrolux
Electrolux ASSISTENT EKM55 Series Instruction book

KitchenAid
KitchenAid 5KSM3311XEER manual

KitchenAid
KitchenAid 5K45SS manual

Videonics
Videonics MX-1 instruction manual

Maytag
Maytag JSM900EAAU - Jenn-Air Attrezzi Antique Copper Stand... Repair parts list

VocoPro
VocoPro PA-PRO 900 owner's manual

Globe
Globe SP8 instruction manual

Collomix
Collomix Collomatic XM 2-650 operating instructions

Philips
Philips HR2860 user manual

Linear Technology
Linear Technology 642 quick start guide

Electrolux
Electrolux ESTM6 Series Instruction book

Hamilton Beach Commercial
Hamilton Beach Commercial HMD300-UK Operation manual


