Jefferson Professional Tools & Equipment JEFWASPET075HP User manual

JEFWASPET075HP
7.5HP Petrol Pressure Washer
1
www.jeffersontools.com
User Manual
v.1.2
7.5HP Petrol Pressure Washer
JEFWASPET075HP

JEFWASPET075HP
7.5HP Petrol Pressure Washer
2
www.jeffersontools.com

JEFWASPET075HP
7.5HP Petrol Pressure Washer
3
www.jeffersontools.com
Contents:
Important: This manual is an essential part of this Jefferson product and should be kept safe with the product for future reference.
This manual outlines the purpose for which the product has been designed and contains important information to ensure its
correct and safe use. It is essential that you read and understand the information in this manual before operating this equipment.
General Safety
Parts Indentication
Specications
Unpacking & Assembly
Connections
Pressure Washer Nozzles
Starting the Washer
Using the Spray Gun
Washing Cleaning
Pressure Adjustment
Using Chemicals & Cleaning Solvents
Shutdown Procedure
Maintenance
Storage
Troubleshooting
Parts Lists & Diagrams
Limited Warranty Statement
Declaration of Conformity
4
5
6
6
7
8
9
10
10
11
11
12
13
15
16
18
26
29
JEFWASPET075HP
7.5HP Petrol Pressure Washer
4
www.jeffersontools.com
General Safety
1.
This equipment should only be operated by qualified
and responsible individuals who have read and
understood the information and guidelines described
in this document. In particular, the following safety
instructions should be followed to reduce the risk of
injury to the operator and members of the public.
1. Ensure that all the necessary safety precautions
are observed for the handling of fuel.
2. Familiarise yourself with this equipment and its
operation before use - read this user manual
carefully before use. Save for future reference.
3. This appliance is for outdoor use only. Ensure that
all bystanders are kept at a safe distance and that ani-
mals and children are kept from the work area. Ensure
that the exhaust emissions are kept away from
air intakes.
4. Never use this equipment if any part or accessory
is damaged or malfunctioning.
5. This appliance has been designed for use with
detergents specified by the manufacturer (for example
neutral shampoo based on biodegradeable anionic
surface active detergents). Please consult the
manufacturer for advise before using other
detergents or chemicals in order to prevent damage
to the equipment and the environment.
6. Do not direct the nozzle towards mechanical parts
containing lubricant grease. High pressure jet can be
harmful and dangerous always ensure a safe working
distance when spraying objects and assess and fix
the appropriate nozzle for the job at hand.
Never point the high pressure hose directly
at people animals, live electrical parts or the
appliance itself.
7. Do not step or stand on the high pressure hose
and ensure that the hose is clean, free from debris,
obstructions and kinks before use. Always unwind the
hose fully before use.
8. Check and ensure that the nozzle has been fitted
correctly before use as the high pressure can result in
the nozzle being "fired" from the lance with
considerable force if not fitted correctly.
9. Beware of kick-back force and the sudden torque
on the spray gun assembly when operating the trig-
ger.
10. Ensure that you have evaluated the pressure
required for the job at hand and selected the
appropriate nozzle before use. High pressure jets can
remove paint and other specialised surface
treatments (including alloy wheel lacquer). High
pressure jets may also breakdown and remove the
grouting between paving slabs and can even damage
tarmac.
11. Always shut the equipment off completely when
not in use and if left unattended.
12. Keep the hose clear from the engine exhaust as
this can be extremely hot before and after use and
can burn and damage the hose.
13. Never refuel the engine when it is running, and
allow the engine to cool sufficiently before refuelling.
Dry up any fuel spillage before restarting the
equipment. Only use fresh clean high-quality fuel.
Always restart the equipment away from the refuelling
area. Fill tank to within 10mm of neck to allow space
for fuel expansion.
14. Do not operate this equipment in an explosive
atmosphere, near combustible materials.
15. Only operate outdoors in well-ventilated areas.
16. Never run the engine without oil - always check
for oil and refill where necessary before use.
17. Only Jefferson approved engineers should carry
out repairs and maintenance on this equipment.
Only use Jefferson-approved replacement parts to
repair this equipment. Never modify the equipment
in anyway. Ensure that the equipment is kept in good
working order and cleaned and serviced regularly.
Regularly check external nuts and fixings to ensure
that they have not loosened from vibration during use.
18. After use: remove the spark plug ignition lead
from the back of the spark plug and position the lead
to prevent avoid accidental reconnection. Store in a
clean dry environment. Store all fuel in a suitable con-
tainer designed for petrochemical applications - away
from heat and out of direct sunlight.

JEFWASPET075HP
7.5HP Petrol Pressure Washer
5
www.jeffersontools.com
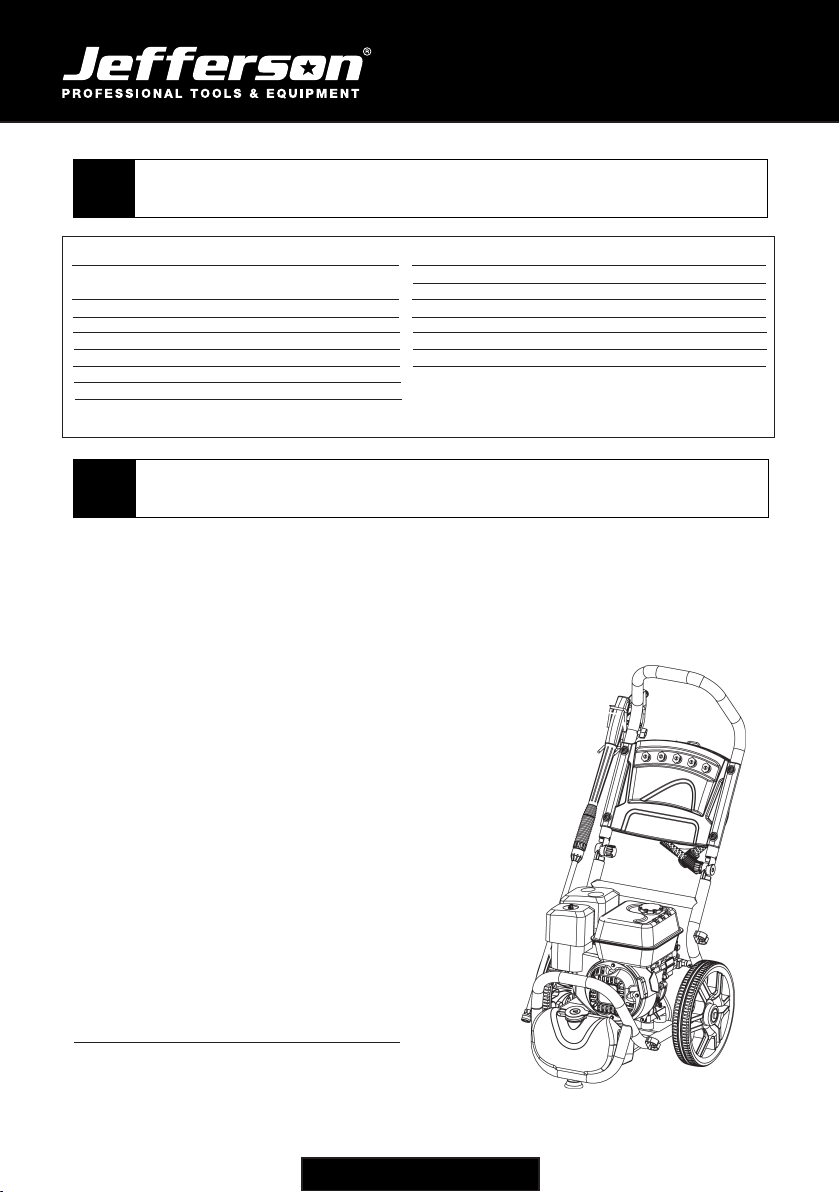
General Safety Parts Identication
2.
Important: After unpacking, inspect the equipment carefully and ensure that the product is in perfect condition without any
defects or no damaged or worn parts. Please dispose of all the packaging materials appropriately, recycling all materials where
facilities are available.
JEFWASPET075HP
7.5HP Petrol Pressure Washer
6
www.jeffersontools.com
Unpacking & Assembly
4.
Specications
3.
Rated Flow:
Working Speed:
Guaranteed Noise Level:
Fuel Tank:
Hose Length:
Wheel Diameter:
Dimensions:
Net Weight:
9.6L/Min
3350 - 3550rpm
99dB Lwa
3.6L
10M x ø 7.2mm
12"
590mm x 540mm x 595mm
34kg
Model Number:
Engine:
Starting System:
Displacement:
Bore & Stroke:
Compression Ratio:
Pump:
Maximum Pressure:
Rated Pressure:
JEFWASPET075HP
7.5HP Single Cylinder, 4 Stroke
OHV Petrol
Recoil
223cc
70 x 54mm
8.5:1
Direct Drive Triplex Pump
3200psi / 220bar / 22.6Mpa
2700psi / 158bar / 18.6Mpa
Frame assembly:
1. Carefully tip the washer forward and place on its front side and
proceed to assemble the parts with the tools provided.
2. Insert the axle into the corresponding holes on the lower frame.
3. Attach the wheels to the shadt using the bushings, washers
and cotter pins provided. Insert the cotter pins into the holes in
the axle and bend back the cotter pins using a pair of pliers (not
provided)
4. Attach the rubber feet to the lower frame using the nuts and
bolts provided (tighten all mounting hardware)
5. Reposition the washer so that it stands normally on the wheels
and rubber feet.
6. Pull the handle lock pin and raise the handle to the upright
position. Release and snap the locking pin into the corresponding
hole in the frame.
7. Assemble the top and bottom spray gun holders to the frame
using the nuts and bolts provided. Again tighten all mounting
hardware.
Unpacking & inspection:
After opening the carton, unpack the washer and related parts and accessories. Inspect the equipment for any
damage that may have occurred during transit, contact your nearest Jefferson Dealer is any damage or defects
are discovered. Check that all nuts and bolts are secure before putting the washer into operation.
Warning: Do not use this equipment is damaged or defective in any way.
JEFWASPET075HP
7.5HP Petrol Pressure Washer
7
www.jeffersontools.com
Unpacking & Assembly
Specications
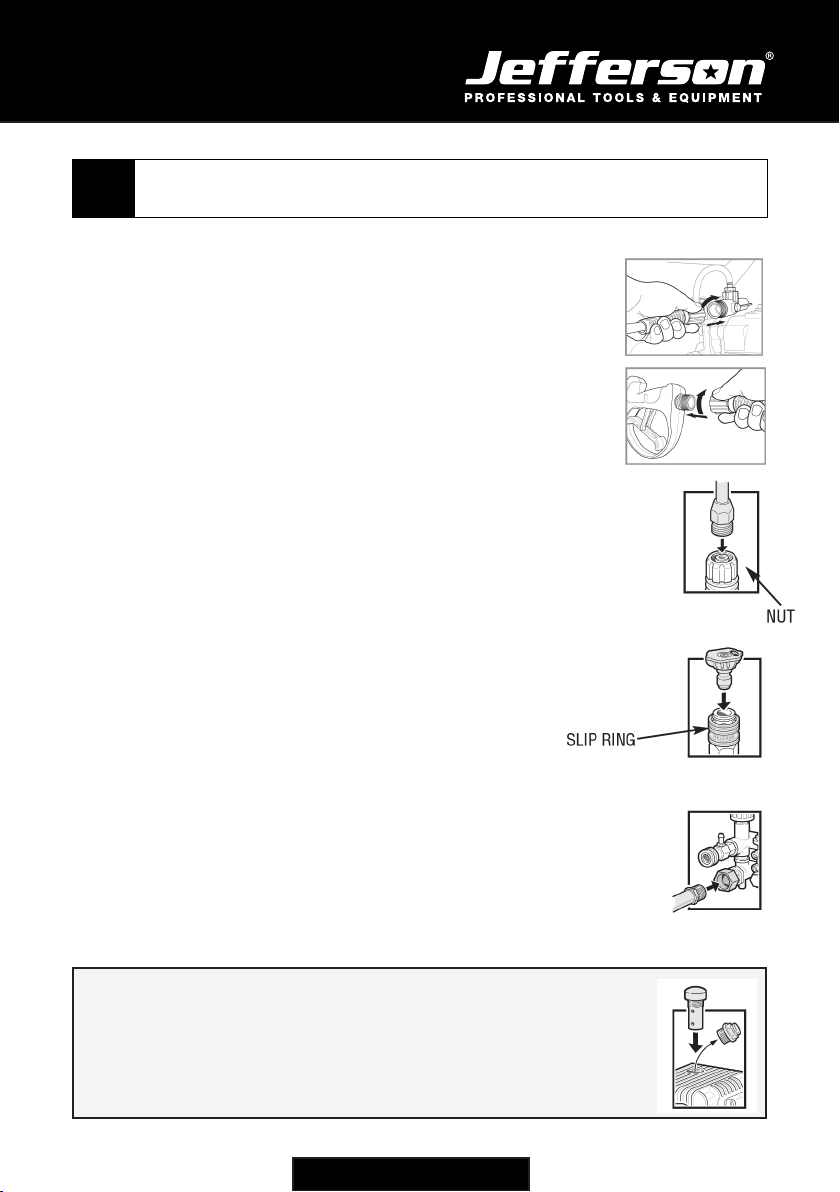
Connecting the pressure hose to the pump
1. Pull back the high pressure outlet fitting collar. Insert the connector into
the quick release fitting and release the collar to close the fitting.
Carefully tug on the fitting to ensure it is secured.
Connecting the hose to the spray gun
1. Pull back the slip ring on the female quick connect fitting and
connect with the male outlet on the spray gun.
2. Release the slip ring on the female quick disconnect and twist. Listen
for a "click" to ensure that the coupling is secure.
Connecting the Lance to the Spray Gun
1. Remove the protective plastic cap on the lance connection.
2. Thread the lance connection onto the spray gun as shown
3. Tighten the nut to secure
Connecting the Nozzle / Removing the Nozzle
1. Insert the nozzle into the quick- connect fitting on the lance and press
to snap in the nozzle.
2. To remove pull back the slip ring to eject the nozzle. See page 8 for
more information about nozzle selection for various applications.
Connecting the pressure pump to the water supply
1. Connect the garden hose to the water supply and turn the water supply
on to run water through the hose and remove any debris prior to
connecting to the pressure washer, then turn off the supply.
2. Check the filter inside the pressure washer inlet is clean and
undamaged. Thread the garden hose fitting into the water hose inlet. Hand
tighten to make a secure connection.
3. Turn on the water supply and check that there are no leaks. Ensure that
there is a minimum of 20psi and a flow rate of 5GPM.
Connections
5.
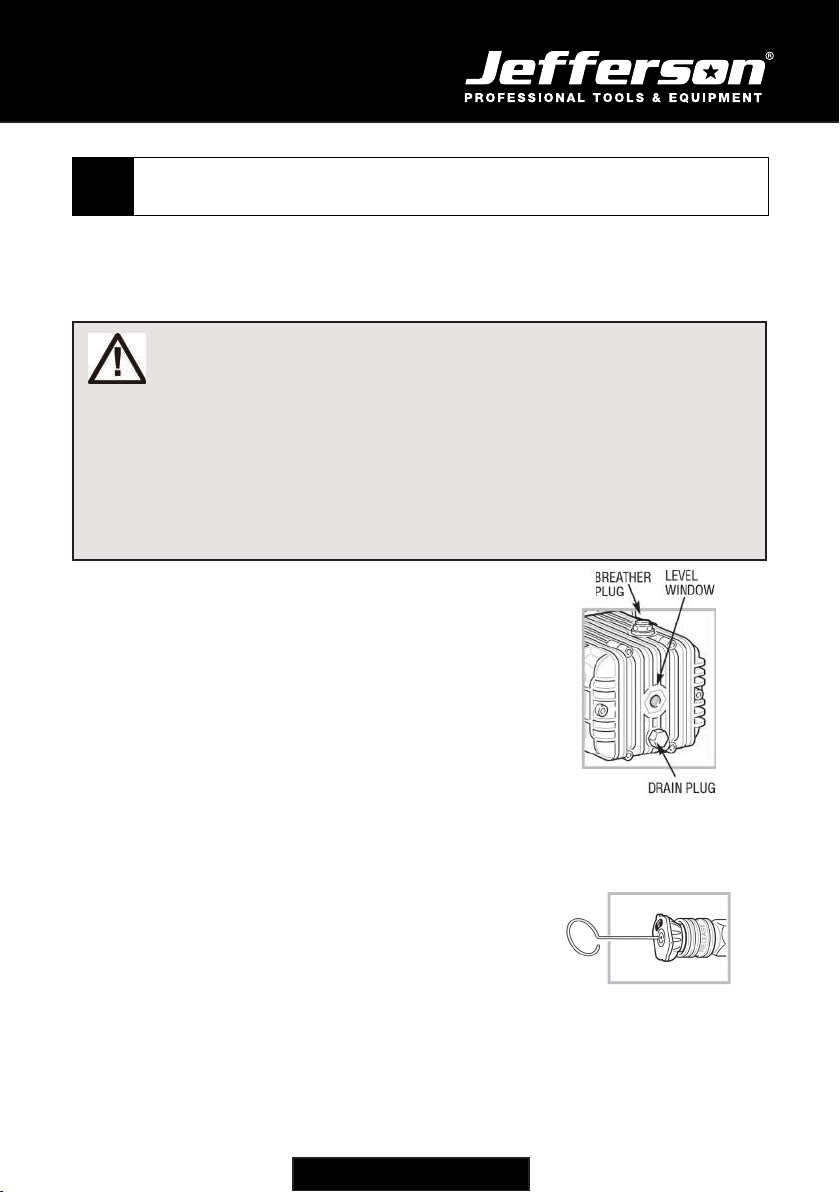
Preparing the pump for first use
This equipment is shipped with a special oil plug to prevent oil leak-
age from the pump during shipping.
You will need to replace the shipping plug with the breather plug pro-
vided before use. Hand tighten the breather plug to avoid damaging
the threads.
JEFWASPET075HP
7.5HP Petrol Pressure Washer
8
www.jeffersontools.com
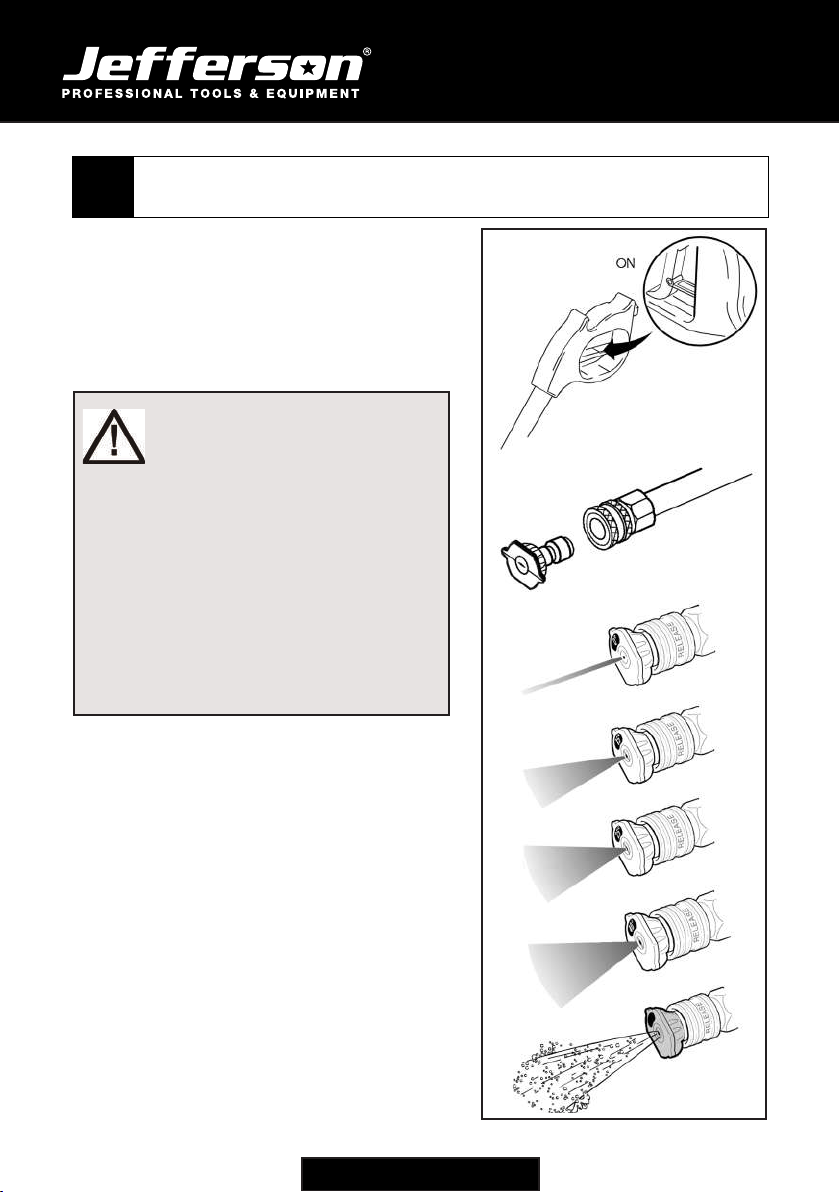
This equipment comes complete with ve different
colour-coded spray nozzles. Each nozzle delivers a
specic spraying pattern for a particular cleaning
application. The size of the nozzle determines the size
of the spray jet and the pressure delivered from the nozzle.
The 0˚, 15˚, 25˚, 40˚ nozzles are high pressure nozzles,
the 84˚ chemical nozzle is for use in low pressure
applications.
Changing Nozzles:
1. Pull back the collar on the end of the lance and insert the
nozzle into the female quick release socket.
2. Release the collar and twist the nozzle to make sure
that it is secure in the quick release socket. Ensure that the
nozzle is secure before squeezing the gun trigger when the
engine is running.
Basic Nozzle Types and Applications:
•Cutting Nozzle (0˚):
High pressure cleaning (stone, metal etc.)
•Chisel Nozzle (15˚):
Mid pressure cleaning (stone, metal, wood etc.)
•Flushing Nozzle (25˚):
Low - Mid pressure cleaning (metal, plastics, wood etc.)
•Wide Wash Nozzle (40˚):
Low pressure, everyday use (wood plastics etc.)
•Detergent Nozzle (84˚):
Delicate materials
WARNING
This equipment operates at fluid pressures
and velocities high enough to penetrate
human flesh. Leaks caused by loose
fittings or worn or damaged hoses can
result in injection injuries. Do not direct the
spray jet towards people or animals as the
jet is very powerful and serious injury can
occur. Wear the appropriate safety
equipment when operating this equipment.
Do not attempt to change the
nozzles when the equipment is
running. Always shut down the
engine completely before changing
the nozzles. 0˚
15˚
40˚
84˚
25˚
Pressure Washer Nozzles
6.

JEFWASPET075HP
7.5HP Petrol Pressure Washer
9
www.jeffersontools.com
Starting the Washer
7.
1. Ensure that the equipment is operating in a well ventilated outdoor area. Check fuel level and top-up if
necessary.
2. Check the engine oil level. On first use there will be a small amount of oil left from factory testing but this
will always require topping up.
This equipment is shipped with a low-oil sensor that will prevent startup if insufficient oil is
available for operation. The low oil sensor will also shut down the engine when level is too low to protect the
engine.
3. Check that the filter is clean and in place at the water inlet (cone side facing out).
4. Connect the water supply to the pump inlet. (Note: the water source must provide a minimum of 19L / Min
at 20PSI for this equipment to operate.
5. Connect the high pressure water hose to the pump outlet. Turn on the water supply.
6. Make sure that the Throttle lever is set to the "Fast" position. Slide the fuel lever to the "On" position and
allow the fuel to flow to the engine. Slide the choke lever to the "Start" position. Turn the Engine ON/OFF
switch to the ON position. Pull the starter cord to start the engine. Slide the choke lever to RUN position.
7. Stand on a stable surface, gripping the gun with both hands, and press the trigger to begin spraying -
expect the gun to kickback when triggered. Adjust the spray nozzle as required for the task.
8. Release the trigger to stop water flow and enter bypass mode pior to spraying.

JEFWASPET075HP
7.5HP Petrol Pressure Washer
10
www.jeffersontools.com
Using the Spray Gun
8.
WARNING
Do not leave the pressure washer in bypass mode for more than 2 minutes at a
time. Water temperature inside the pressure washer pump will rise to
dangerous level and can result in damage to internal components within the
pump. Failure to follow this warning can result in personal injury and damage to
the equipment and will void the warranty.
Do not run the pump without a connection to the water supply. Any damage caused by such
use will void the warranty.
Always wear the appropriate safety equipment when using this equipment.
The high pressure water jet produced can cut through skin and underlying tissues resulting in
serious injury. Never point the jet at people or animals. Beware of kickback when
spray gun trigger is pressed.
1. To engage the Trigger Lock, pull the lock up until it clicks into the slot.
2. To disengage the Trigger Lock push the lock down and into its original
position.
To operate the trigger:
Squeeze the trigger to start the water flow through the nozzle.
Release the trigger to stop the water flow.
Washing / Cleaning
9.
1. Grip the spray gun with both hands.
2. Point the nozzle in a safe direction and
squeeze the spray gun trigger to allow the pump
to purge air and impurities in the system and
then redirect the nozzle to the working surface.
3. When finished release the trigger gun
to stop the water flow.
Important: For most effective cleaning keep
the spray nozzle approximately 8 to 24 inches
away from the cleaning surface. When cleaning
tyres do not bring the nozzle within 6 inches
of the surface to avoid damage and potential
injury.
JEFWASPET075HP
7.5HP Petrol Pressure Washer
11
www.jeffersontools.com
Using the Spray Gun
Washing / Cleaning
Pressure Adjustment
10.
1. Vary the Cleaning Distance.
One method of adjust the pressure on the cleaning surface is to vary the distance between the nozzle and the
object you are cleaning.
2. Change the pressure nozzle.
Completely shut down the pressure washer and stop
the petrol engine. Change the spray nozzle as required
for the cleaning application.
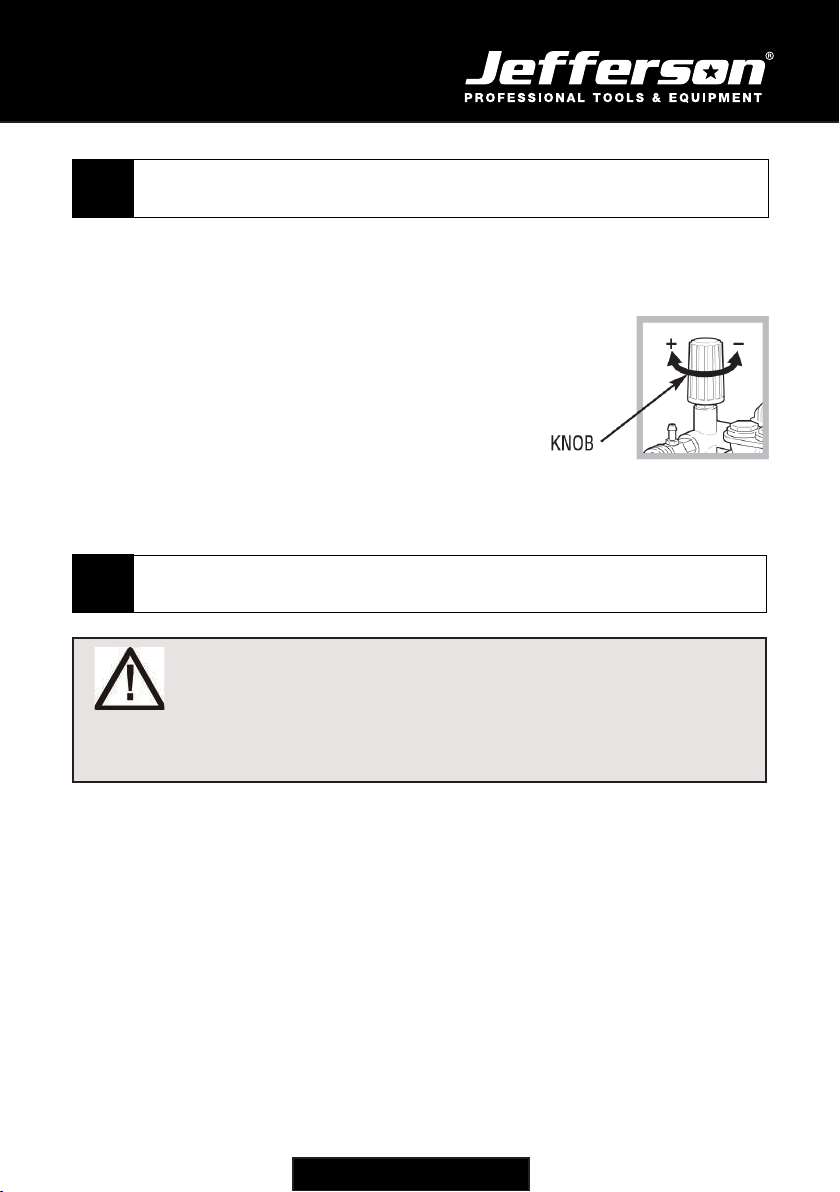
3. Adjust the pump pressure regulator.
The pump pressure regulator allows pressure adjustment at the pump.
Turn the pressure regulator knob on the pressure pump counterclockwise / clockwise to increase and decrease.
To Apply detergent
1. With pressure washer turned off, Prepare the detergent solution as recommended by the manufacturer.
2. Remove the detergent tank cap (located in front of the pressure washer).
3. Fill the tank with the prepared detergent solution using a funnel if necessary. Replace the detergent tank cap.
4. Lock the trigger and attach the Black Detergent Nozzle to the wand.
5. Start the pressure washer. Unlock the trigger and squeeze the spray gun trigger and apply detergent to the
cleaning surface using long, even & overlapping strokes.
6. Allow the detergent to "soak in" for 3-5 minutes before washing and rinsing. Reapply as required to prevent
the surface from drying. Do not allow the detergent to dry on the surface (this will result in streaking).
WARNING
Use only soaps and chemicals designed for petrol washers - if in doubt contact your
nearest Jefferson Tools retailer for advise. Do not use bleach to spray with this equipment.
Applying chemicals or cleaning solvents is a low pressure operation. Chemicals, soaps
and cleaning solvents will not siphon when a high pressure nozzle is used. Always use the
black detergent nozzle for chemical and solvent cleaning .
Using Chemicals and Cleaning Solvents
11.

JEFWASPET075HP
7.5HP Petrol Pressure Washer
12
www.jeffersontools.com
1. If you have used any chemicals rinse system thoroughly as outlined on pg.11 to prevent damage to the
pump.
Never turn the water supply off when the engine is running.
2. To stop the engine set the engine switch on the side of the engine to the OFF position.
3. Turn the water supply off and disconnect the garden hose from the pressure washer.
4. Pull the trigger on the spray gun to relieve any water pressure in the hose or the gun.
Allow the engine to cool before folding down the frame in preparation for storage.
To Rinse
1. Shut down the pressure washer. Replace the detergent nozzle with a suitable cleaning nozzle. Squeeze
the trigger and wait for the detergent to clear.
2. Keep the spray gun a safe distance from the area you plan to spray.
3. Start at the top of the cleaning area working down with consistent overlapping strokes.
Flush the system
1. Turn off the engine and ll the detergent tank with clean water.
2. Remove the nozzle and turn the washer back on.
3. Point the wand in a safe direction and squeeze the trigger to ush clean water through the detergent tank
and pressure washer system until it is thoroughly clean.
WARNING
Leaving chemicals and cleaning solutions in the pressure pump could result in damage to the
pump components. Any damage caused by soap or detergent residue will not be
covered under warranty.
Shut Down Procedure
12.
JEFWASPET075HP
7.5HP Petrol Pressure Washer
13
www.jeffersontools.com
Maintenance
13.
To ensure efficient operation and longer life of your pressure washer a routine maintenance schedule should
be prepared and followed. If the equipment is used in unusual conditions such as high-temperature or dusty
conditions more frequent maintenance checks will be required.
Engine:
Check the engine regularly, replace oil, clean spark plugs and maintain
parts as required.
Pump Oil:
Change the pump oil regularly. Change the pump oil after the first 50 hours
of work and successively every 100 hours. In either case ensure that the oil
is changed at least once a year. Oil Type: SAE 15W-40
Spray Gun:
If the nozzle becomes clogged with dirt and debris excessive pressure can build up. If the nozzle becomes
partially clogged or restricted the pump pressure will fluctuate and can become harmful and dangerous.
Clean the nozzle immediately and follow these instructions:
1. Shut-off the engine and turn off / disconnect the water supply.
2. Pull the trigger on the gun to relieve any water pressure
3. Disconnect the lance from the gun
4. Remove the nozzle from the lance - remove any obstructions
with the nozzle cleaning tool provided and back flush with clean water
5. Direct the water supply into the spray wand end to back flush loosened
particles for 30 seconds.
6. Reassemble the nozzle onto the lance
7. Reconnect the lance to the gun and turn on the water supply
8. Start the washer pump and place the lance into the high pressure setting to test.
WARNING
Before performing any maintenance be aware that the equipment should be completely
shutdown, depressurised and allowed to cool down. This will ensure that no injuries can be
sustained by moving parts, water pressure or hot surfaces.
Engine contains flammable fuel do not smoke near or work near naked flames
while maintaining this equipment.
Please note: All repairs should be carried out by Jefferson approved
engineers. All replacement parts should be supplied or recommended by
Jefferson. Any unapproved repairs or modifications will invalidate the warranty.
Shut Down Procedure

JEFWASPET075HP
7.5HP Petrol Pressure Washer
14
www.jeffersontools.com
Cleaning The Water Filter:
The water filter should be checked regularly and cleaned if necessary:
1. Remove the filter by grasping the end and removing it from the water
inlet on the pump
2. Clean the filter by flushing it with water on both sides
3. Re-insert the filter in the water inlet on the pump
Cleaning the Fuel Tank Filter:
The fuel tank filter should be removed and cleaned after every 150 hours of running or every 3 months using an
environmentally-friendly water-based de-greasing agent. Refit when clean.
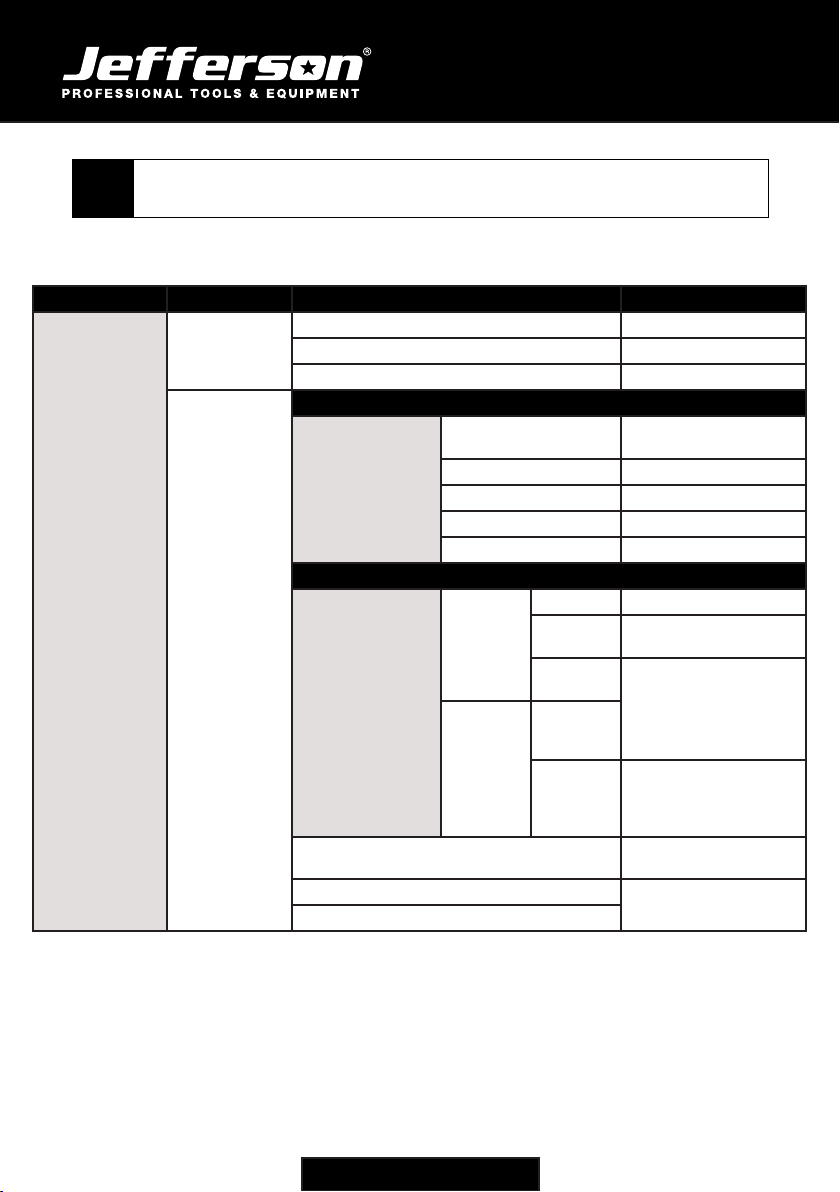
Frequency
Item Task Description Each Use 1st Month
(20Hrs)
Each
Season
(50Hrs)
Every
6 Months
(100Hrs)
Every
Year
(300Hrs)
Engine Oil Oil Level Check •
Replace • •
Reduction gear
oil
Oil Level Check •
Replace • •
Air Cleaner
Check •
Clean •x•x*
Replace •**
Deposit Cup Clean •
Spark Plug Clean, adjust •
Replace •
Spark Eliminator Clean •
Idling Check, Adjust •∆
Valve Clearance Check, Adjust •∆
Fuel Tank &
Filter
Clean •∆
Fuel Supply Line Check Check with your Jefferson dealer for advice
if any problems are detected
Key:
* = Only for inside ventilating double core carburettors
** = Only for paper core cleaners
x = Repeat task more often than scheduled if equipment is used in dusty working environments
∆ =Maintenance to be carried out by Jefferson approved technician

JEFWASPET075HP
7.5HP Petrol Pressure Washer
15
www.jeffersontools.com
Storage
14.
After General / Regular Use
1. Drain all water from the high pressure hose, coil it and hang on the cradle on the petrol washer frame. If
chemicals where used ensure the pump and chemical hose are thoroughly cleaned out
2. Drain all the water from the gun and lance by holding the gun in a vertical position with the nozzle end
pointing down and squeeze the trigger. Store in the gun/hose holder
Preparation for Winter and Long-term Storage
Note: It is recommended that you follow these steps tp protect the internal seals of the pump when storing the
equipment for more than 30 days and or when, freezing temperatures are expected.
1. Obtain a funnel, 200ml of anitfreeze and approximately 1M of garden hose with a male hose connector
attached to one end
2. Disconnect the spark plug wire
3. Connect the hose to water inlet on the pump
4. Pour the antifreeze into the hose via the funnel
5. Pull the engine starter cord slowly several times until antifreeze comes out of the high pressure water hose
connection on the pump
6. Remove the short hose from the water inlet on the pump
7. Reconnect the spark plug wire
Service After Storage
Before reusing the equipment after storage, you should carry out the following to keep the equipment in good
condition.
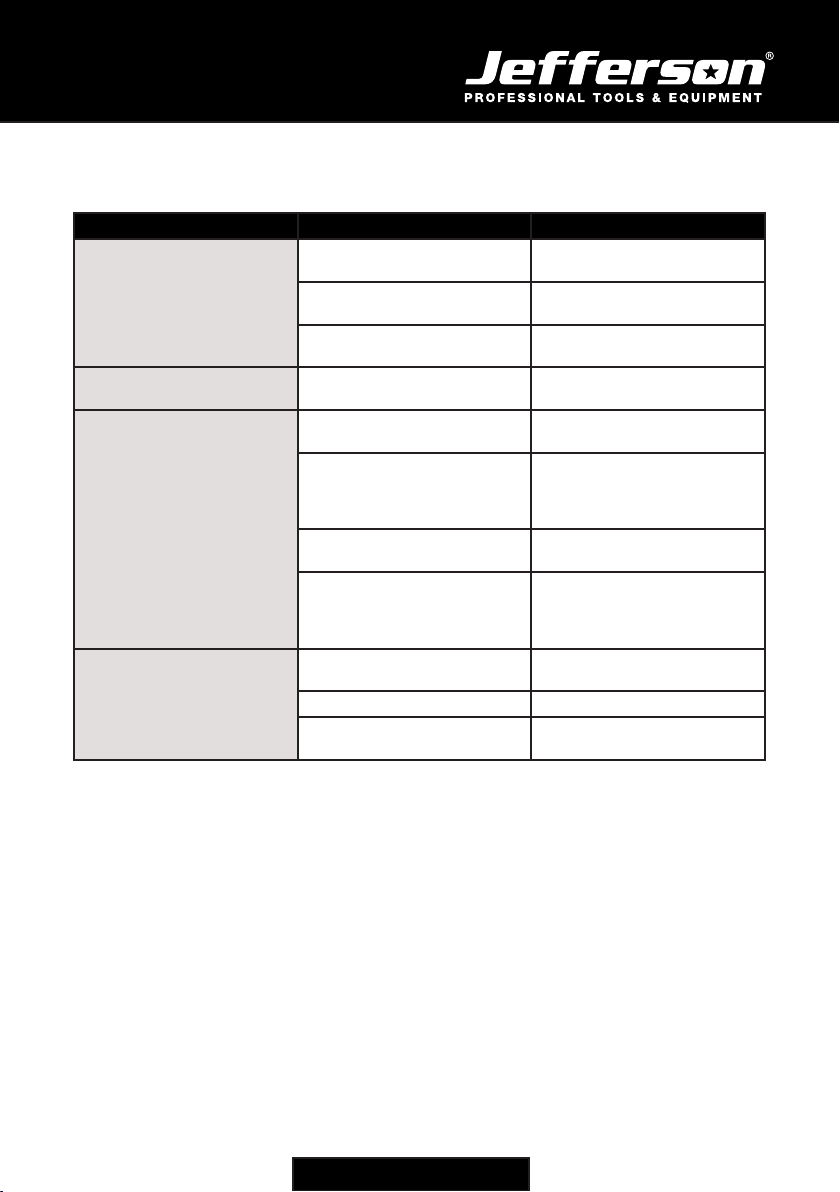
Storage Time Service Task
Within one month No service required
One - two months Drain out the existing fuel out of the fuel tank and fresh fuel
Two months - one year Drain out the existing fuel out of the fuel tank and fresh fuel
Drain the fuel out of the carburettor*
Empty the deposit cup**
Over a year Drain out the original fuel of the fuel and refuel
Drain the fuel out of the carburettor*
Empty the deposit cup**
Start the engine and allow to run for a few minutes
Key:
* = Unscrew the drain plug and drain out the fuel in the carburettor
** = Turn engine switch to the off position, disconnect the deposit cup and empty contents safely
Note: Do not dump oil vessels or discarded engine oil onto the ground. Take all discarded engine oil in a closed
container to your nearest recycling station.
JEFWASPET075HP
7.5HP Petrol Pressure Washer
16
www.jeffersontools.com
Troubleshooting Guide
15.
Fault Probable Cause Repair
Engine fails
to start
Low engine
output
Engine runs
erratically
Insufficient
compression
Loose spark plug Tighten the spark plug
Loose cylinder head bolt Tighten the head bolt
Damaged gasket Replace the gasket
Sufficient
compression
Fuel System Problems
No fuel supplied
to the combustion
chamber
Starter cord Pull the start cord
sharply
Debris in the fuel tank Clean the tank out
Blocked fuel line Clean the fuel line*
Insufcient fuel in the tank Refuel
Fuel tap is closed Open the tap
Electric System Problems
Combustion
chamber supplied
with fuel
Poor spark
from the
plug
Dirty plug Clean / dry the plug
Damaged
spark plug
Replace the spark plug
Faulty
magneto
Contact your nearest
Jefferson dealer for
advice
Good spark
Carburetor
incorrectly
adjusted
Insufcient
pull speed
on recoil
cord
Pull the recoil starter
rope sharply
Wrong grade of fuel being used Check the quality of
the fuel
Overloading Assess the working
conditions
Overheating
Engine Troubleshooting:
JEFWASPET075HP
7.5HP Petrol Pressure Washer
17
www.jeffersontools.com
Troubleshooting Guide Pump Troubleshooting:
Fault Probable Cause Solution
Fluctuating pressure
levels
Pump is drawing in air Check connections
and tighten if required to seal
Faulty or dirty valves Contact your nearest Jefferson
dealer for advice
Blocked nozzle jet Remove debris from the nozzle
using the cleaning tool
Water leaking from the pump Seals are worn out Contact your nearest Jefferson
dealer for advice
Pump will not reach the
required pressure
The pump is sucking air from
connections or the hose
Check all connections and
tighten if required
The suction delivery valves are
clogged
Clean the valves
Arrange to have the equipment
serviced at your nearest Jef-
ferson repair centre
The unload valve is stuck Loosen and re-tighten the
regulating screw
Nozzle is dirty, worn out or there is
a problem with the lance
Clean the nozzle
Check the connections on the
lance
Replace parts if required
Pump is running but no
water
Kinked inlet or pressure hose
Damaged hose
Check, clean, straighten
Replace the hose
Blocked inlet filter Remove and clean the filter
Blocked jet Remove the blockage using the
nozzle cleaning kit
JEFWASPET075HP
7.5HP Petrol Pressure Washer
18
www.jeffersontools.com
Parts Lists & Diagrams
16.
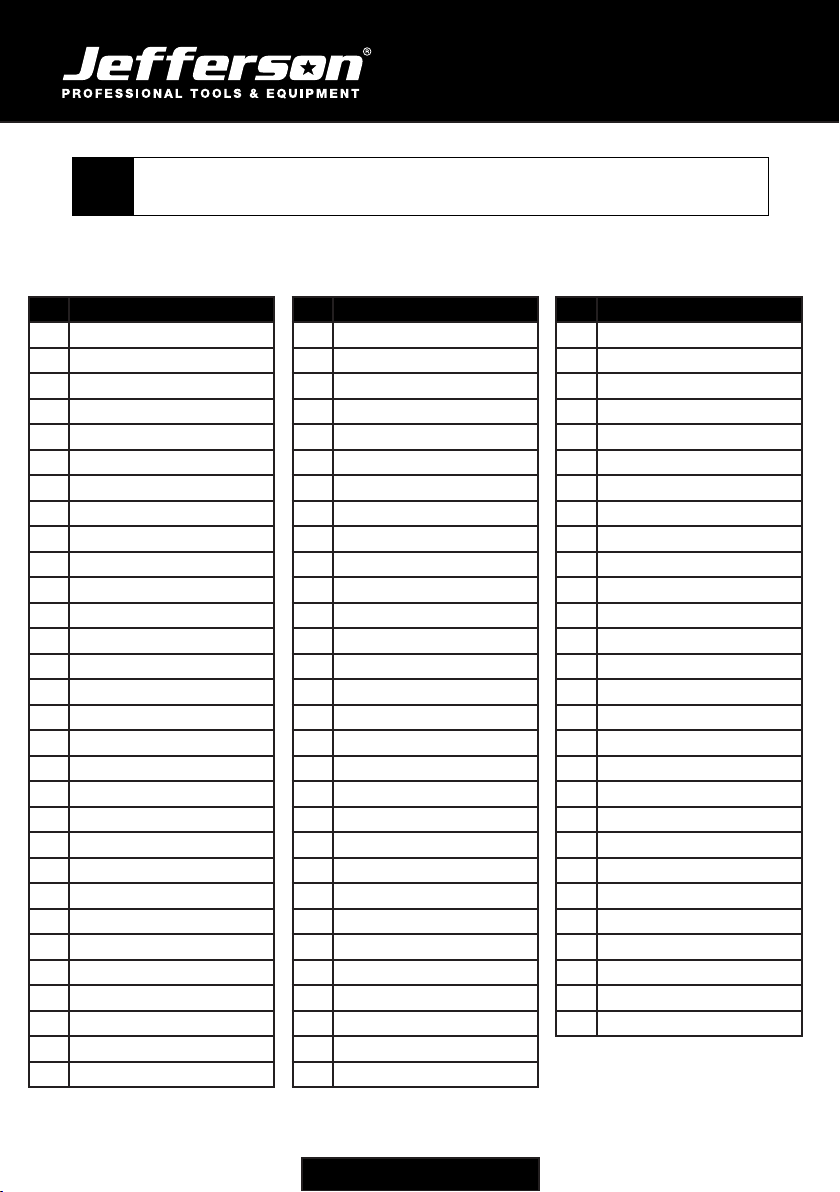
Pump Parts List
No. Description
1Inner Hexagonal Bolt
2Oil Draining Bolt
3O' Ring
4Rear Cap
5O' Ring
6Rear Oil Level
7Oil Level Indicator
8Circlip
9O' Ring
10 Fuel Filter Cap
11 O' Ring
12 Crank Chamber
13 O' Ring
14 3/8" Plug
15 Inner Hexagonal Bolt
16 Pressure Plate
17 Side Oil Cap
18 O' Ring
19 Internal Circlip
20 Internal Circlip
21 Bearing
22 Crank
23 Needle Bearing
24 Circlip
25 Crank Oil Seal
26 Flange
27 Bolt Assembly
28 Bolt Assembly
29 Bolt Assembly
30 Connecting Rod
No. Description
31 Plunger Pin
32 Plunger Rod
33 Plunger Oil Seal
34 Carriage
35 Rear Guard Sleeve
36 Auxillary Water Seal
37 O Seal Ring
38 Supporting Ring
39 Flat Gasket
40 Main Water Seal
41 Supporting Gasket
42 Voltage Regulating Handwheel
43 Voltage Regulating Tube
44 Check Nut
45 Voltage Regulating Spring
46 Spring Retainer
47 Voltage Regulating Valve Stem
48 O' Ring
49 Adjustable Valve Stem
50 O' Ring
51 Seal Assembly
52 O' Ring
53 Seal Guiding Gasket
54 Cone Valve
55 O' Ring
56 Valve Seat
57 Valve Body
58 O' Ring
59 Inlet Connector
60 Inlet Pipe
No. Description
61 O' Ring
62 Check Valve Body
63 O' Ring
64 Return Connector
65 Connector Inlet Pipe
66 O' Ring
67 O' Ring
68 Outlet Valve
69 Outlet Valve Spring
70 O' Ring
71 Base
72 O' Ring
73 Cylinder Block
74 O' Ring
75 Valve
76 O' Ring
77 Valve Nut
78 Bolt Assembly
79 Bolt Assembly
80 O' Ring
81 1/2" Plug
82 O' Ring
83 3/8" Plug
84 Outlet
85 Connector
86 Inlet Connector
87 Outlet Valve
88 Filter
JEFWASPET075HP
7.5HP Petrol Pressure Washer
19
www.jeffersontools.com
Parts Lists & Diagrams
No. Description
61 O' Ring
62 Check Valve Body
63 O' Ring
64 Return Connector
65 Connector Inlet Pipe
66 O' Ring
67 O' Ring
68 Outlet Valve
69 Outlet Valve Spring
70 O' Ring
71 Base
72 O' Ring
73 Cylinder Block
74 O' Ring
75 Valve
76 O' Ring
77 Valve Nut
78 Bolt Assembly
79 Bolt Assembly
80 O' Ring
81 1/2" Plug
82 O' Ring
83 3/8" Plug
84 Outlet
85 Connector
86 Inlet Connector
87 Outlet Valve
88 Filter
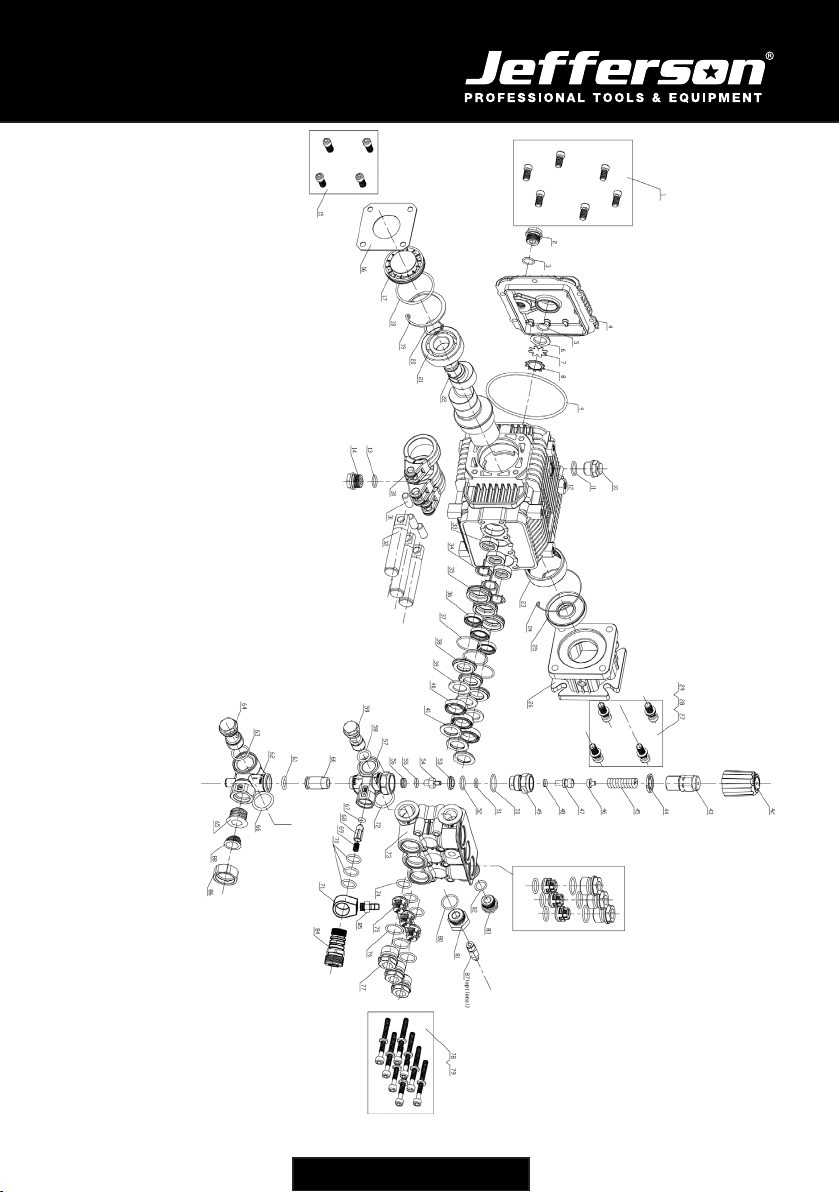
Pump Parts Diagram
JEFWASPET075HP
7.5HP Petrol Pressure Washer
20
www.jeffersontools.com
Table of contents
Other Jefferson Professional Tools & Equipment Pressure Washer manuals


