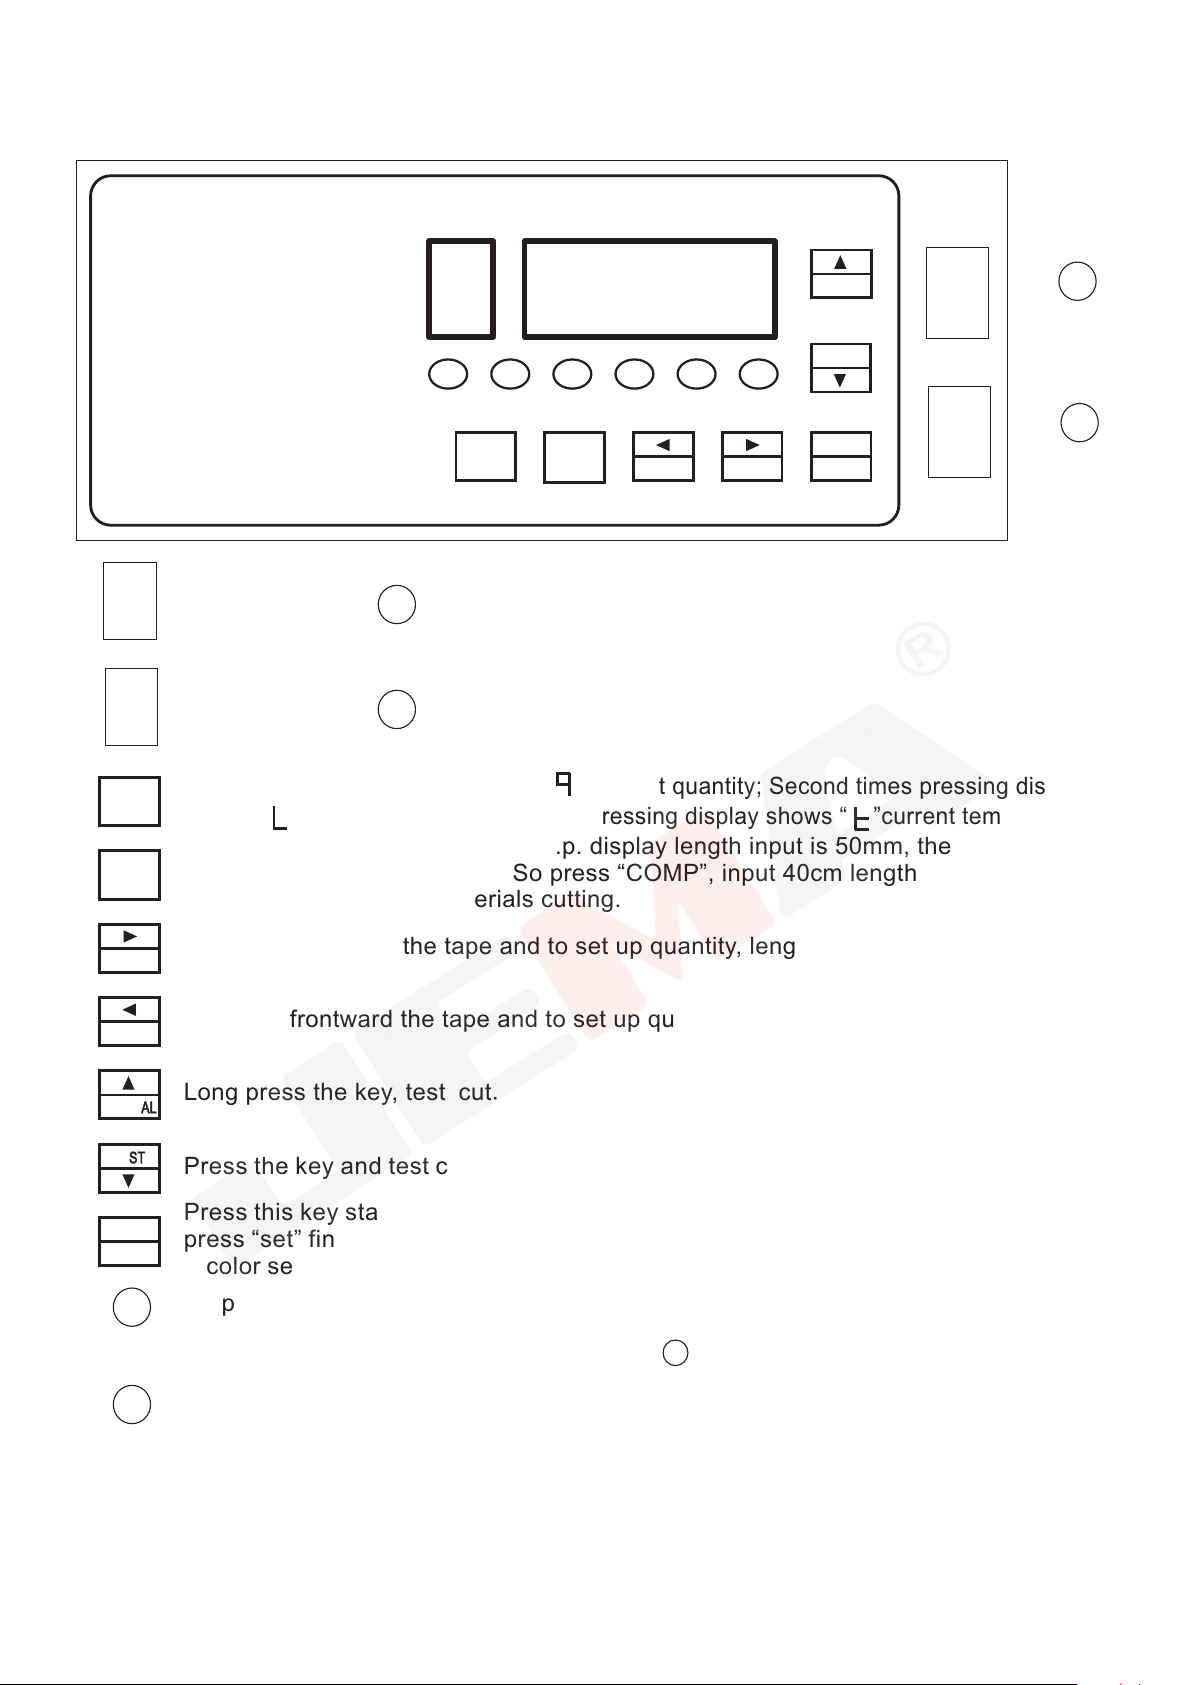
Jema 110 Series User manual

AUTO CUTTING MACHINE
INSTRUCTION MANUAL

1.General Discription
0.14(COLD)
0.54(HEAT) 95 10-9999 70-90 110/220 50/60 350(LR)
300-450(H)
-1-
The machine adopts microcomputer numerical control device, length, speed, volume can be set
freely, with features of high precision, fast, smooth cutting surface and easy operation. And It’s
suitable for braided belt, velcro belt tape, casing, plastic zipper. etc..It’s your choice to increase
productivity, improve product quality and saving labor.
2.Specifications
Max. cutting
width(MM)
Cutting
length(MM)
Cutting speed
(pcs/min)
Voltage
(V)
Frequency
(Hz)
Temperature
(℃)
3.Use Environment
The machine should work under the normal temperature, if the environment temperature is more
than 70 ℃, would influence the performance of the machine.
4.Operation
(1).Operation
“ “ shows current quantity
“ “ shows current length
“ “ shows current temperature
“ 1 “ is to set up speed
“ 2 “ is to set up length
“ 3 “ is to set up quantity
“ 4 “ is to set up compensation
“ 5 “ is to set up temperature
“ 6 “ is to set up label: input 1(open)、0(shut down)
2).Set Up
Please press SET UP button and put in datas by direction keys. And don’t forget to confirm by
ENTER.
Note: you can not start work while setting.

-2-
COMP
RESET
STOP
5.Key Functions
POWER SPEED LENGTH QTY
MANUAL
TEST
ENTER
SET
FEED
FEED
CURRENT
POWER SW
HOT SW
COMP
START
POWER SW
HOT SW
Power
Hot knife
Reset
Stop
Start
CURRENT
FEED
FEED
MANUAL
Press the key and test cut one time.
TEST
ENTER
SET
RESET
STOP
START
Manually backward the tape and to set up quantity, length and speed
Manually frontward the tape and to set up quantity, length and speed
Long press the key, test cut.
Start work.
HEAT
Press “CURRENT” display shows “ ” current quantity; Second times pressing display
shows “ ” current length; Third times pressing display shows “ ”current temperature.
Press “COMP”, input cut length. e.p. display length input is 50mm, the effect of
actual cutting length is 40mm.So press “COMP”, input 40cm length.
Compensation use for materials cutting.
COMP
Press this key start setting. e.p. display 1-speed,input numbers for speed. Then again
press “set” finish setting. 1-speed 2-length 3-quantity 4-compensation 5-temperature
6-color sensor(input “0": OFF; input “1": ON)
Stop working; Finish setting; Keeping pressing two times length back to “0"; Pressing
continue few seconds, length 、 quantity return back to “0".
After each parameter setting done, press “ ”finish setting.
RESET
STOP

-3-
6.Caution
1.Before operation, please confirm the voltage and make ground(earth) connection.
2.Do not access hands or any object close to the working knife.
3.Pls do not take off any of the parts except for normal maintenance.
4.Lubricate the machine every few day use the machine. (Attention: no sewing oil)
5.When the knife blade becomes dull, pls use it after grinding with the grinding machine
(pls do not let the unskilled person grind manually or install the knife blade)
6.Cut off the electricity before any adjustment(for safety)
7.Welcome to contact us for any further information.
7.Fault Clearance
1.Check the connection, if the temperature does not work.
2.Increase the temperature if the cut unsealed.
3.Please wait the temperature reaches to the set temperature before working and with right
material putting.
Right Wrong
4.If you couldn’t loose the screw while exchange the knife, you may open the temperature
control and adjust the temperature to about 200℃. Then loose the screw and turn off the
control. And screw out completely after the knife is cool. (Note that is hot and not burned
yourself)
Caution:
-Do not cut two velcro in the same time.
-When cut velcro, please make sure that the rough surface is upward.
The rough surface is upward(correct) The rough surface is downward(false)

-4-
2
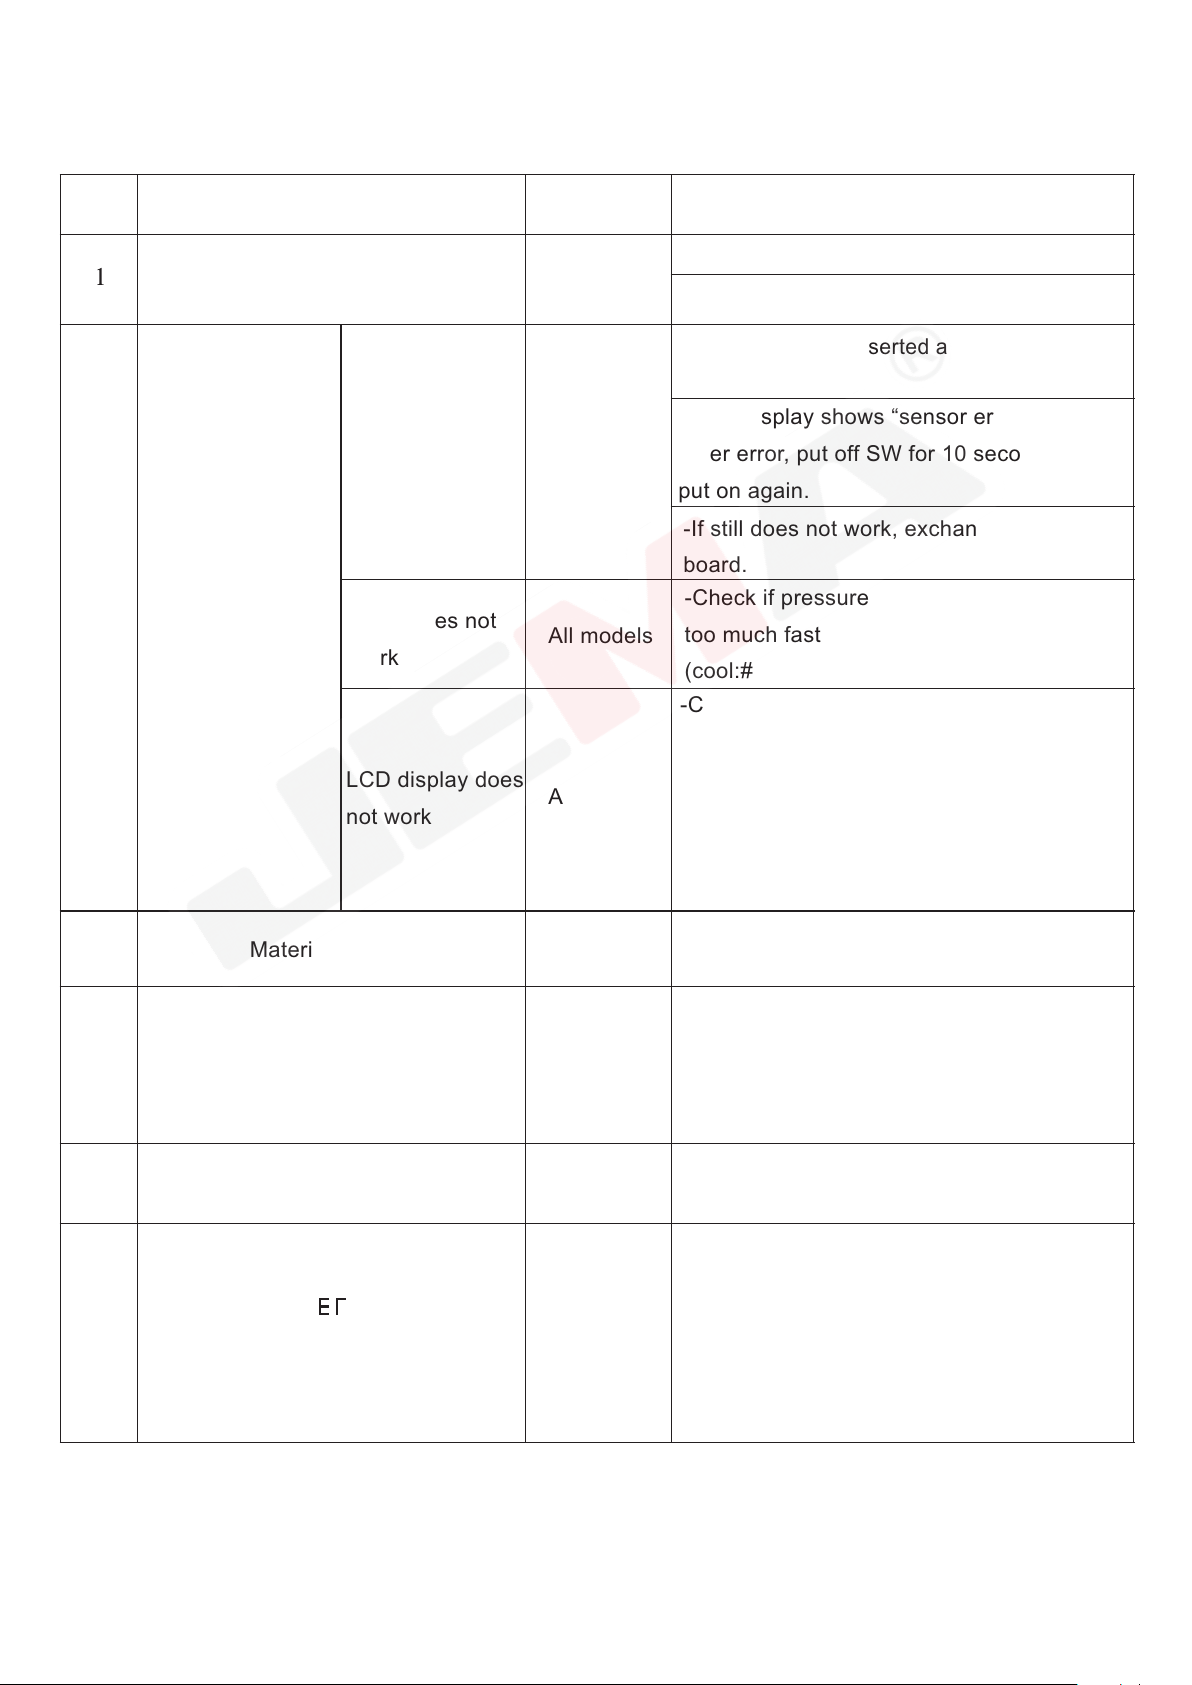
8.Trouble shooting of 110 series(only reference)
NO.Troubles Applicable
Model Causes & Measures
No power supply All models
All models
Power is on,
but no work
Feed roller does
not work
-Check if electric cord is connected well
-Check if the fuse blows out or not
-Check if there is inserted any alien substance
in roller
-If the display shows “sensor error” or any
other error, put off SW for 10 seconds and
put on again.
-If still does not work, exchange the drive
board.
Knife does not
work
All models
-Check if pressure plates of upper knife are
too much fastened or not.
(cool:#20&29,hot:#32&36)
LCD display does
not work All models
-Check if the temperature is too high with
over-time working, switch off the machine
for seconds, if still doesn’t after several
times’ trying.. Please opening the cover
and check the connection. (Especially
between operation and CPU board)
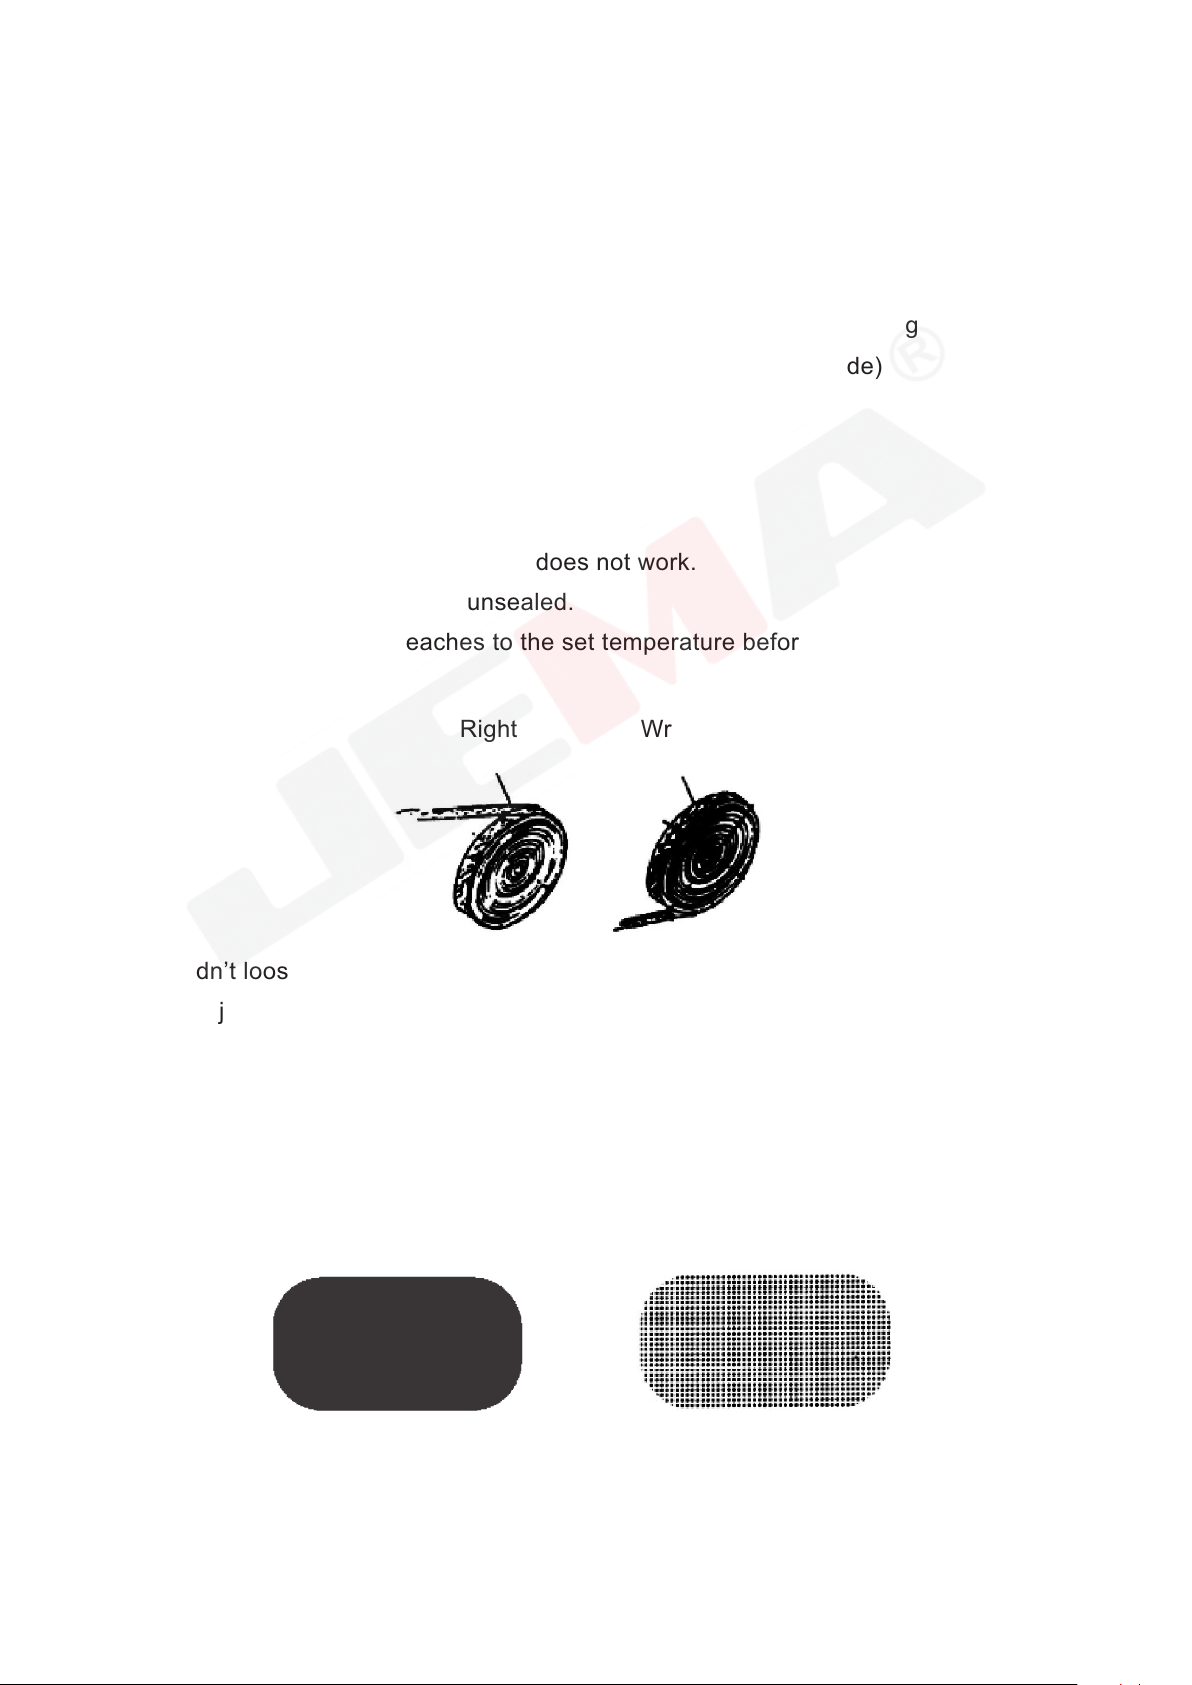
3Material is no cut Hot cutter -Check if temperature goes up to set-degree
-Check if knife blades are even.
4Material is cut one side All models
-Check if blades are damaged or wears
-After making both knives close each other
by M/CUT button and check if they are even
or not. (If they are not, adjust them by bolts)
5Cut-length is different from set-length All models
-Test after loosening material from the reel
by hand or attaching feeding device.
01
Alarm of no material All models
-Check if the materials are used up, and
please replace with new materials then needed.
-Check if there is material or if the pressing
plate drops into the slot.
-If all is confirmed normal, check if the travel
switch is stuck and doesn’t bounce back.
6

-5-
NO.Troubles Applicable
Model Causes & Measures
All models
Troubles in cutting motor or counting sensor
-Turn on the machine and press the
button, check if the knife can be moved or
knife may locked.
-Open the button cover of the knife, check if
the sensor is loose and wrong positioned.
-Open main cover, check the SW of cutting
sensor is right or not. If not, exchange it.
Check the cutting motor is right or not.
02
Cutting error
6
03
Label error
It cuts before the
cutting line of label
It cuts after the
cutting line of label
Label
Label
Move the sensor towards knife side as long
as the difference by pushing.
Move the sensor towards counter-knife side
as long as the difference by pushing.
MARK error Label
-Trouble in MARK sensor.
-Check if the sensor is connected well or not.
-Check if the sensor is adjusted well or not.
-Check if the input length is cord with the
label length.
7Operator feels electric current in
touch of machine All models Connect the earth cord (green) to any bolt
of backside of machine.
MANUAL
No heating
Lamp on
Lamp off
Heating
series
-Check if the heating tube connected well
or not.
-Change a new heating tube.
-Check if the heating sensor connected well
or not.
-Change a new heating sensor..
8

-6-
SPARE PARTS

-7-
PARTS DRAWING

-8-
SPARE PARTS

-9-
PARTS DRAWING

-10-
SPARE PARTS

-11-
PARTS DRAWING

-12-
PARTS DRAWING

This manual suits for next models
1
Table of contents
Other Jema Sewing Machine manuals