Jensen JensenGrill Estate 2.1 User manual

Model: JensenGrill Estate 2.1 English 2019
1
JensenGrill - Coal/briquette and gas combination grill
Model: JensenGrill Estate 2.1 English 2019
CE-2531CS-0203
ID: 0845
2531CS-0203
ID: 2531
INSPIRATION FOR CULINARY CREATIVITY
USER MANUAL ESTATE 2.1
F/S R/S

Model: JensenGrill Estate 2.1 English 2019
2
JensenGrill - Coal/briquette and gas combination grill
Warnings:
• Do not let children use the grill
• The grill and parts of it can be warm so keep children away.
• Grill modications can be riskfull.
• It is dangerous to alter the settings of the louvers on the burners
• Do not move the grill during use. Only use transport handle on the
right side of the grill when moving.
• Lock the wheels before using the grill.
• Read the manual before using the grill!
• Parts sealed by the manufacturer are not to be broken by the user.
• The grill may not be used indoor.
• The grill specications are to be found on the backside of the grill.
• Do not keep half full or empty gas cylinder by the grill.
• Keep the gas hose away from warm surfaces.
• Do not twist or bend the gas hose unnecessary.
• Check the gas hose visually for leaks, wear or damage before use.
• Never make any modications to the connector or gas assemb-
lings.
• Replace the gas hose, if it becomes damaged, and if national
circumstances require.
• Never turn on the grill when the lid is closed.
• Do not turn on the side burner when the lid is closed.
• Never lean over the grill while igniting.
• Always empty the catch pan before use to avoid catching re in old
grease.
• Remove the gas cylinder when stored indoors. The gas cylinder
must be stored in a well ventilated area outdoors.
• If the grill has not been in use for a long time, check for gas leaks
and clogging of the gas burners before use. See the sections ”
check for gas leaks” and ”rst-time use or use for longer storage”.
• Do not use an open ame to check for gas leaks.
• Flammable material must not come within 70 cm of the back or
sides of the grill.
• If the ame turnes o during lighting or grilling, turn o all gas
regulator knobs, open the lid and wait 5 minutes before the gas is
turned on again (refer to the instruction manual).
• If there is a are up, remove the food from the grill until the re has
died out.
• Occasionally clean the grill thoroughly.
• Never overload the coaltrays. The maximum total amount of coal /
briquettes is 0.8 kg. in each coaltray
• Use only coal briquettes, this ensures a controlled, slow burning
and prevents overheating.
IMPORTANT! READ THIS MANUAL BEFORE USING THE GRILL

Model: JensenGrill Estate 2.1 English 2019
3
JensenGrill - Coal/briquette and gas combination grill
TABLE OF CONTENTS
Exploded drawing 4
I. Part list 5
II. Screw overview 6
III. Before installation 7
IV. Installation instructions 7
A. Installing extra equipment 9
V. Instruction for use of gas 10
A. Check for gas leaks 10
B. Gas safety precautions 10
VI. Initiation or start-up after prolonged storage 10
VII. Cleaning 10
VIII. Storage 11
IX. Operating instructions 11
C. Igniting the grill with charcoal/briquettes and gas 12
D. Using the grill as a gas grill 13
E. Using the side burner 14
F. Using a Rotisserie 14
G. Heat shelf / Drawer 14
X. Grill instructions 14
A. Direct heat 14
B. Indirect heat 14
C. Using the grill as a smoker 14
D How to use the coal tray and grate cleaning tool 15
XI. Troubleshooting operating problems 15
XII. For further information contact: 16
We also refer to the individual instruction videos on the
website.
See more at http://www.jensengrill.com/guides_manuals/

Model: JensenGrill Estate 2.1 English 2019
4
JensenGrill - Coal/briquette and gas combination grill
3
3
12
4
4
13 14 2
1
3
52 32
4
3
5
5
53
53
6
36
455
37
37
48 47
35
34 33
7
9
10
8
16
30
11
3
4
4
3
5
5
5
5
49
4645
494644
45
23
20
50
21
15
17
15
38
40
41
42
42
43
30
31
42
43
43 30 31
18
19
28
28
19
29
29
24
24
2222
26
252525
26
26
27
27
27
54
51
39
EXPLODED DRAWING

Model: JensenGrill Estate 2.1 English 2019
5
JensenGrill - Coal/briquette and gas combination grill
I. PART LIST
Part Name Pcs.- Part Name Pcs.
1Thermometer 129 Coaltray 2
2Handle, lid 130 Gas tube bracket, front 2
3Insolation ring, handle 631 Gas tube bracket front (2) 2
4Bracket, handle 432 Stop for upper grate 1
5Insolation disc 833 Logo plate 1
6Rounded lid 134 Hinge lid, right 1
7Flat lid 135 Hinge lid, left 1
8Front panel 136 Rotisserie ap 1
9 Outer panel, sides 1 37 Heating clip, lid 2
10 Door 138 Heat shield, valves 1
11 Handle, door 139 Gas hose w. regulator 1
12 Handle, gas container
compartment 140 Gas tube 1
13 Gas cylinder compartment 141 European standard con-
nector 1
14 Gas cylinder locking pin 142 Gas regulator knobs 3
15 U-proles 243 Valves 3
16 Core unit 144 Transport handle 1
17 Coaltray holder 145 Insolation disc, transport
handle
1
18 Height adjustment u-bar
(long) 146 Bracket, transport handle 2
19 Height adjustment bar
(short) 147 Grate 1
20 Height adjustment bar,
(horizontal) 148 Grate handle 1
21 Lifting arm 149 Lock clip, transport handle 2
22 Perforated plates 250 Height adjustment handle 1
23 Catch pan 151 Compartment spacer 1
24 Smoking plates 252 Upper grate 1
25 Burners 353 Bushings, lid 2
26 Flame tamers 354 Coaltray and grate cleaning
tool
1
27 Spacers 3
28 Cross igniters 2

Model: JensenGrill Estate 2.1 English 2019
6
JensenGrill - Coal/briquette and gas combination grill
M8 x 30 mm
S 2
M6 x 10 mm
S 21
M5 x 10 mm
S 7
M6 x 16 mm
S 5
M4 x 10 mm linse
S 28
M6 lock nut
S 9
M5 lock nut
S 11
M6 x 10 mm
S 24
M6 x 6 mm + 8 mm
S 19
M4 x 10 mm
S 22
M5 x 35 mm
S 25
Washer M6
S 26
M6 x 25 mm
S 27
M6 x 50 mm
S 23
II. SCREW OVERVIEW

Model: JensenGrill Estate 2.1 English 2019
7
JensenGrill - Coal/briquette and gas combination grill
III. BEFORE INSTALLATION
Check the box for any damage
The total grill assembled consists of 1 box
Extra equipment comes in seperate boxes.
- Gas cylinder compartment, 1 box
- Frying plate, 1 box
- Side burner, 1 box
- Side table, 1 box
- Rotisserie, 1 box
- Grill tool spatula or tong, 1 box
- Cover, 1 box
IV. INSTALLATION INSTRUCTIONS
Installation of the grill
Unboxing the grill
Take the top box o the grill, take of the supporters and plastic
bag and pull down the box in the front with your feet, to pull/drive
out the grill from the box.
Open the lid and take out the box lying on the grate
Lift the grill grate of the grill
First cut all the wires holding the grate and upper grate.
Set (48) in the brackets at the front of (47) then lift (47) rst to
the vertical position before lifting it out of the grill.
Open the box from the grate and remove the contents con-
sisting of:
1 pcs. Height adjustment handle (50)
1 pcs. Grill grate handle (48)
1 pcs. Catch pan (23)
3 pcs. Flame tamers (26)
2 pcs. Coal trays (29)
2 pcs. Perforated plates (22)
2 pcs. Smoking plates (24)
3 pcs. Spacers (27)
1 pcs. Coal tray and grate cleaning tool (54)
6
19
54
16
Screw (50) onto the grill and place handle in top position
Place ame tamers in the grill
Place (26) in the grill by sliding the ends into the recesses in the
combustion chamber of each burner.
Place the coal trays (29) and spacers (27) in the grill
The height adjustment handle for the coal trays on the front
of the grill should be in the top position, which places the coal
trays (29) in the bottom position. Open (47) with (48) to the
locked vertical position. Place (29) and (27) under the grate
in coal tray holder (26). Do not overload the coal trays with
briquettes or coal, to avoid over heating the unit.
When (29) and (27) are in place, close (48) and (48) is removed.
48
47
52
32
50
26
54 27
29
48
47
17

Model: JensenGrill Estate 2.1 English 2019
8
JensenGrill - Coal/briquette and gas combination grill
Put 23 into the grill
(23) is pushed into the two rails at the top of the cabinet.
Fitting the gas hose and regulator (39)
Regulator, hose and connections vary from country to country.
In some countries the adapter is mounted (European commen
connector) on the hose, which can be mounted on the grill.
Moist the hose connection on the regulator and adapter, so
they are easier to mount on the hose. Put the clamps on both
ends and tighten.
IMPORTANT! The thread on the gas connectors on the grill is
left thread (tighten counterclockwise).
Be aware that the regulator must be approved for the current
gas pressure and gas mixture.
Installation of gas hose should be in accordance with the
national rules.
Drag a safety chain through the two holes on the back of the grill
onto something solid and secure the grill with a lock, to secure
against theft.
39
14
A. INSTALLING EXTRA EQUIPMENT
Installation of the gas cylinder compartment
1 pcs. Gas cylinder compartment (13)
2 pcs. U-proles (15)
1 pcs. Gas cylinder locking pin (14)
8 pcs. Screws (S21)
1 pcs. Gas cylinder spacer (51)
1 pcs. Screw (S23)
Install u-proles on the gas cylinder compartment.
Place (13) (gas cylinder compartment) on top of (15) (u-proles)
and make sure that the four holes in the bottom of gas con-
tainer compartment match with the holes in (15) (u-proles).
Secure loose u-proles for gas container compartment with
four M6 10mm screws.
Open the door on the grill and proceed the gas cylinder compart-
ment installation,
Installing the gas container compartment on the grill.
Place the gas cylinder compartment to the left side of the grill
(front view) and shoot u-proles into the brackets under the grill.
When the gas cylinder compartment is in place, mounted on
the grill by means. (15) being tted from the inside of the cover
cylinder with an M6 screw 50mm. Attach (15) (u-proles) with
four M6 10mm screws. Tighten all screws at the end.
Slide (14) into the two slots on the back of the gas cylinder
compartment to secure the gas container.
23
14

Model: JensenGrill Estate 2.1 English 2019
9
JensenGrill - Coal/briquette and gas combination grill
SIDE TABLE
Installing the side table
The side table is mounted on brackets to the transport handle
on the right side of the grill, the same as when mounting the
burner. Refer to the section ”installation of side burner.”
ROTISSERIE
Installing the rotisserie
Mount the bracket that supports the skewer on the right side of
the grill using two screws (S7) and two nots. Mount the motor
bracket on the left side by sliding the bracket into the slots and
turn the locking pin on the motor bracket. Slide the motor over
the motor bracket. Slide the two skewer forks, locking ring
and spear thrust pad into the spear. Shoot the skewer into the
engine and place the skewers in the bracket on the right side.
Store the motor inside when the grill is not in use.
23
14
GRILL READY TO USE
Burners, ame tamers, spacers and coal trays installed cor-
rectly.
SIDE BURNER
Install the side burner on the right side of the grill
Installing the side burner
The burner is mounted on brackets to the transport handle on
the right side of the grill. The screws (S17) are screwed into the
upper and lower hole on the back of the brackets. The burner is
then fastened on the grill by sliding the holes on the side burner
over the screws (S17) and then into the xed position. The bur-

Model: JensenGrill Estate 2.1 English 2019
10
JensenGrill - Coal/briquette and gas combination grill
V. INSTRUCTION FOR USE OF GAS
• Do not use this grill without using gas regulator.
• Use only gas hose and gas regulator approved in your
country.
• Use the appropriate clamps to attach the gas hose.
• Please contact your local gas supplier for information
about the gas category to be used, as well as information
about the gas regulator and gas hose to be used in accor-
dance with national rules. The overview in regards to types
of gas and gas pressure must be used only as guidelines
Gas standards EU
Model name JensenGrill
Estate 2.1
JensenGrill
Estate 2.1
JensenGrill
Estate 2.1
JensenGrill
Estate 2.1
Gas categories I3+(28-30/37) I3B/P (30) I3 B/P (50) I2H(20)/
I2E(20)
Gas and associated
pressure
G30 butan at
28-30 mbar
G30 butan /
G31 propan at
30 mbar
G30 butan/
G31 propan at
50 mbar
G20 Natural
gas at
20 mbar
G31 propan at
37 mbar
Used in the following
countries
BE, CY, CZ, EE,
FR, GR, IE, IT, LT,
LU, LV, PT, RO,
SK, ES, CH, GB
BG, CY, CR,
CZ, DK, EE, FI,
GR, HR, LV, LT,
LU, MT, NL,
NO, SK, SI, SE,
TR, HU, IS
DE, AT DE, DK, NO,
SE, UK
Rated power, all grill
burners
13,58 KW 13,58 KW 13,62 KW
Nozzle size Ø 1.0 mm Ø 1.0 mm Ø 0.87 mm
Total gas consump-
tion, all grill burners
G30
991,03 g/h 991,03 g/h 992,49 g/h
Total gas consump-
tion, all grill burners
G301
972,54 g/h 972,54 g/h 973,97 g/h
Rated power, one grill
burner
4,53 KW 4,53 KW 4,54 KW
Rated power, side
burner
4.6 KW 4.6 KW 4.8 KW
Nozzle size, side
burner
Ø 1.0 mm Ø 1.0 mm Ø 0.90 mm
Total gas consump-
tion, side burner G30
335 g/h 335 g/h 350 g/h -
Total gas consump-
tion, side burner G31
329 g/h 329 g/h 344 g/h -
A. CHECK FOR GAS LEAKS
• Make a soap solution of water and detergent.
• All gas control knobs must be in the closed position.
• Turn on the gas at the gas cylinder.
• Apply soap solution to all gas connections. If there is a
leak, the resolution will ”bubble up”. Tighten or repair any
leaky connection.
• If the leak can not be stopped, switch o the gas at the
cylinder. Disconnect the hose and contact your local distri-
butor for assistance.
• DO NOT USE THE GRILL IF THERE IS A GAS LEAK.
• After the grill is examined for leaks, turn o the gas. Rinse
with clean water to remove traces of soap. Soap can be
slightly corrosive.
A. GAS SAFETY PRECAUTIONS
• The cylinder must never be stored indoors. Should be
stored outdoors in a well ventilated area.
• Store the gas cylinder vertically.
• Turn o the gas at the cylinder when the grill is not in use.
• The gas cylinder should not be exposed to high heat.
• Do not keep gas cylinder near ames.
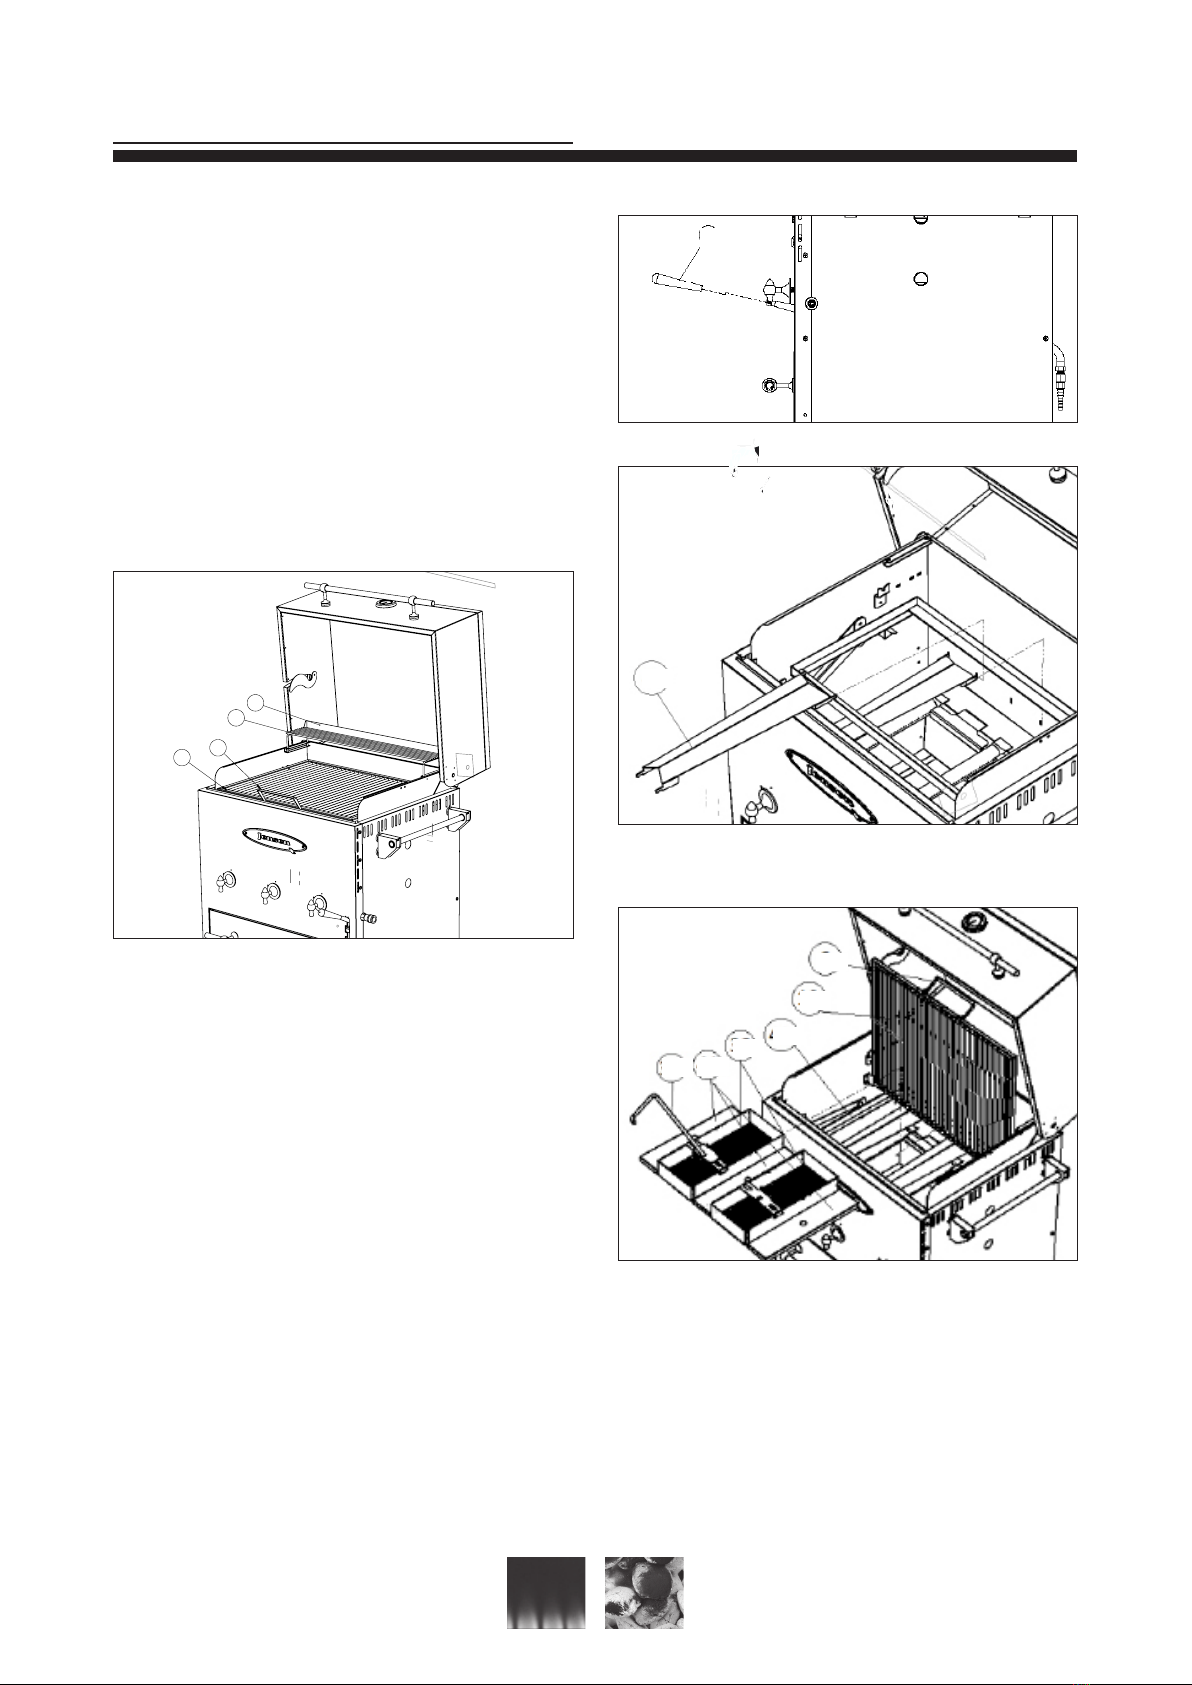
VI. INITIATION OR START-UP AFTER
PROLONGED STORAGE
• Read ”WARNINGS” and ”gas instruction” and ”instruc-
tions” carefully.
• Check nuzzles, valve openings and burners for clogging
(see also the section on troubleshooting).
• Spiders and other insects can in some cases textile tissue
or nestsin the burners. This can block the ow of gas and
cause an accidental are up or ”explosion” (ash back).
This can cause damage to the grill and result in a dange-
rous situation.
• Check burner for critical cracks and corrosion.
• Check that the burners are properly in place so that they
are above the valve openings.
• Check spark ignition at each burner by pressing the
throttle and turn counterclockwise until you hear a click
from the ignition and a spark lights a ame. (Do not touch
internal parts during this test, as the spark could cause
an electrical shock). If there is no spark, clean all spark
electrodes and check that the cable is properly secured
(see also the section on troubleshooting)
• Check whether there is gas in the gas cylinder.
• All gas regulator knobs must be in the closed position until
the gas hose is attached.
• Check for gas leaks using soapy water solution (see also
under ”check for gas leaks”).
• Before the grill is used for the rst time, remove the grate
and frying plate and clean in soapy water. Rinse in clean
water, wipe dry and place the parts in the grill again.
Then turn on the grill and ”incinerate” excess oil and other
particles by preheating the grill for about 10-15. minimum.
(USE ONLY GAS, NOT COAL/BRIQUETTES).
• For use of the grill after the gas cylinder has been remo-
ved, the gas supply might be lled with air. The gas supply
must be lled with gas in order to ensure the correct
ignition. This may mean that the need for several ”trial
ignitions”.
• Open the lid, place the gas regulator knobs on the
CLOSED position and open the gas regulator on the gas
cylinder.
• Press in one of the gas regulator knobs, turn counterclock-
wise until you hear a ”click” from the ignition. This creates
a gas ame, which turns on the burners. Immediately prior
clicked, it opens the valve for the gas. Make the ignition a
slow movement that allows the gas to ow to the igniter. Do
not lean over the grill when ring up the grill.
• Check whether the burner is on. If the burner does not
light, switch o the gas regulator knob and try again. If no
ignition occurs after three attempts, close the gas regulator
knob and wait 5 minutes before the procedure is repeated,
so that any gas may disappear.
• When the gas burner burns proper (uniform blue ame),
switch o the burner and repeat for the other two gas bur-
ners and maybe the side burner if connected.
• The grill is equipped with cross igniters that will light an
adjacent burner if not lid proper. This is an extra safety
precaution. Through the lower hole on the right side of the
grill you can check all 3 burners are on.
• Do not store, spare gas containers near the grill.
• We recommend the following cylinders:
Butane: > 7 kg. Propane: > 6 kg.

Model: JensenGrill Estate 2.1 English 2019
11
JensenGrill - Coal/briquette and gas combination grill
VII. CLEANING
Generally
Stainless steel parts that are exposed to high heat will gradually
get a slightly yellow tinge. The longer the stainless steel is expo-
sed to high heat, the more pronounced the yellow tinge will be.
Cleaning the grill grates, coal trays, spacers and ame
tamers
The grate must be cleaned with a sti brush. For thorough
cleaning: remove the grill grates, coal trays, spacers and ame
tamers and clean in warm soapy water´.
(Soak for one hour). Use a sti brush or sponge (do not use a
wire brush, as this can cause rust stains or scratching the steel
surface. Rinse all parts with clean water and dry).
Cleaning the side burner
Remove the pan holder and clean the burner. Use soapy water
and a soft brush or sponge. Dry with a cloth or sponge slightly
moistened in clean water. Avoid getting water into the burner.
Brushed stainless steel should always be cleaned parallel
to the bristle direction, this in order to avoid scratching the
surface.
Cleaning surfaces
Clean the surfaces with soapy water, use a soft brush or spon-
ge, rinse with clean water and dry. Be careful not to scratch the
surface by rubbing too hard. Brushed stainless steel should
always be cleaned parallel to the bristle direction. To ensure a
nice and shiny surface the grill can be treated with a stainless
steel cleaner, this should not be used on surfaces that come
into contact with food.
Cleaning the inside of the lid
Remove grease and food residue with a paper towel or cloth,
while the lid is still warm.
For thorough cleaning, use soapy water and a sti brush or
sponge and dry with clean water.
General oven cleaner can also be used, but be aware of stains
on aluminum handles. Read the instruction manual before
the product is used. If it gets on the aluminum handles quickly
remove with a wet cloth.
Cleaning the inside of the combustion chamber / Firebox
Cleaning the inside of the combustion chamber
When cleaning the inside of the combustion chamber remove
the grate, coal trays, spacers and ame tamers. Before clea-
ning wrap the burners with aluminum foil, to prevent dirt from
entering.
Apply soapy water, a sti brush or sponge when cleaning (do
not use a wire brush, steel brush can cause rust stains and
scratches on the surface). Rinse with clean water and dry. One
can also use dierent oven cleaners, but be aware that of stains
on the aluminum handles. Carefully read the instructions on the
product before use. If it gets on the aluminum handles quickly
remove with a wet cloth.
Water and dirt smoke into the drip tray. It may be a good idea
to remove the drip tray and put a bucket under the combustion
chamber before embarking.
Finally rinse the soap / ovnrensningsmidlet with clean water.
Remove the aluminum foil from the burners and set the dierent
parts back into the grill.
Cleaning the burners
Remove the burners (burners are removed by removing the
pins that holds the burner in place - the pins is located at the
rear of the ”combustion chamber”).
Removing the burners should be done in accordance with
national regulations.
Apply soapy water, a sti brush or sponge when cleaning.
Rinse with clean water and dry. Any clogging of the burners can
be removed with thin wire.
When put back into the grill, turn on the gas burners for CA.
5 MINUTES AFTER THOROUGH CLEANING, TO EVAPO-
RATE ANY LEFT WATER.
DEEP CLEAN AFTER THE ABOVE GUIDANCE SHOULD BE
MADE AT LEAST ONCE A YEAR.
VIII. STORAGE
• Remove the GAS cylinder from the grill. The gas cylinder
must never be stored indoors (see also the ”security of gas
cylinders”).
• The grill should be cleaned before storing. Stains on the
surfaces can lead to corrosion (see also the section on
cleaning).
IX. OPERATING INSTRUCTIONS
General operating instructions
• Only use the transport handle on the right side (front view)
of the grill when the grill is moved. The grills is tted with
four wheels. The two front wheels are lockable. Never
move grill when in use.
Visually preparing the grill:
• Check for damage to the gas line or gas connection.
• Check that the burners and ame tamers etc. are placed
correctly.
• If you smell gas, turn all gas regulators knobs to OFF posi-
tion and turn o the gas at the gas cylinder. Check for gas
leaks (see ”gas leak”).
• For rst time use of the grill or if the gas cylinder has been
removed, the gas supply can be lled with air. The gas
hose must be lled with gas before the burners turn on.
It may be necessary with multiple ignition attempts. If the
burners do not turn on after three attempts, turn the gas
regulator knobs to OFF position and wait 5 minutes before
turning on again, so that excess gas disappears.
• It is possible that insects and spiders can be clogging the
gas ow and causing non-uniform burning (yellow ame
or ”ash back”, the ”explosion”). This can damage the grill
and pose a risk to the user. In such cases, the gas regula-
tor knob should be turned to the OFF position. Refer to the
section on troubleshooting.
ROUTINE INSPECTION OF BURNER AND PIPES IS RE-
COMMENDED.
• Heat the grill with the lid closed for 10-15 minutes before
cooking begins. This ensures optimum hygiene during
cooking.
• A JensenGrill is totally exible with gas, coal / briquettes or
both simultaneously.
• JensenGrill can also be used as a smoke

Model: JensenGrill Estate 2.1 English 2019
12
JensenGrill - Coal/briquette and gas combination grill
• IGNITING THE GRILL WITH CHAR
COAL / BRIQUETTES AND GAS
NEVER LEAN OVER THE GRILL WHEN IGNITING
A. Loading of coal / briquettes
a. Bring the coal trays into bottom position by setting the
height adjustment handle (50) on the front of the grill in
top position.
b. Lock the grill grate (47) in vertical position (open).
c. Lift the coal trays (47) out of the grill using the supplied
coal tray and grate cleaning tool (54) (lifting and pull
upward toward the front of the grill). The coal trays will
”hang” at an angle that makes it easy to take them in
and out of the grill.
d. Fill with coal / briquettes. If required, one or both coal
trays lled.
e. Is there a need to replenish the coal trays during gril-
ling, the coal / briquette can advantageously be lled
remaining them in the grill.
NEVER OVER LOAD THE COAL TRAYS. EVERY COAL TRAY
MAY CONTAIN MAX. 0.8 KG COAL OR BRIQUETTES
A. Depending on the desired heat distribution / ll one or both
coal trays with coal/briquettes.
a. Placing the coal trays.
i. Each side.
ii. In the middle.
iii. Overall in one side.
b. Place the three spacers by the coal trays.
a.
Indirect heat
Even heat
Direct heat
Indirect heat with aluminium drip tray

Model: JensenGrill Estate 2.1 English 2019
13
JensenGrill - Coal/briquette and gas combination grill
A. Close the grate.(47)
B. Make sure the catch pan is empty, so that if necessary. fat
does not ignite.
C. Always open grill lid.
D. During the lighting of the grill the coal trays must be placed
in the top position (closest to the grate), so you can see that
the gas burners ignite. This can also be checked through
the inspection holes on the right side of the grill.
E. Check that all gas regulators knobs are in the closed
position.
F. Open the gas regulator on the gas cylinder.
G. Turn on the gas burners (the lid should always be open
when the gas is turned on).
a. Press the knob, hold it there for about three seconds
and turn it slowly counterclockwise until you hear a
”click” from the ignition, this creates a gas ame that
lights the burners. Check that the gas is turned on, if
not turn the knob back to OFF and repeat the proce-
dure.
H. When the gas burns proper, the coal trays are lowered back
into the base position. Close the lid to ensure optimal heat
generation and thus rapid ignition of coals
I. Check the coal and gas about every 5 minutes by opening
the lid or through the inspection holes on the right side of
the grill.
J. The coal / briquettes are ready after 10-15 minutes.
K. Depending on the desired amount of heat the gas ame is
regulated on the gas regulation knob. Most often, the gas is
not required when the coals are ready, the gas can be swit-
ched o. NOTE: When Coal/briquettes are complemented
with gas burners, raise the coal trays to the top position.
L. When all gas regulator knobs on the grill are closed, close
the gas regulator on the gas cylinder as an extra precau-
tion.
M. The coal /briquette heat is regulated simply by adjusting the
distance between the coal trays and the grate, this is done
using the height adjustment lever on the front of the grill
N. Heat control during grilling.
a. Adjust the distance between the coal trays and grate
(height adjustment lever on the front of the grill).
b. If additional heat is desired, turn on the burners on one
or more gas burners (refer to points C, D, E, F and G
above). If an aliminium pan is placed above the spacer
plates, the fat and grease in the aluminium pan can
be ignited. When switching on the gas burner below.
Remove the aluminium pan if the burners are ignited.
O. The ash from the coal trays are emptied easily. Take the coal
trays out of the grill, empty the ashes into a bag by reversing
the coal trays with the lid down and shake out the ashes in
the bag.
PLEASE NOTE THAT THERE MAY BE remaining embers
for a very long time.
Do not put a bag of hot ash near ammable material. It is im
A. portant that the ash is removed from the coal tray perforated
plate as it can corrode.
A. USING THE GRILL AS GAS GRILL
The procedure is the same as described above, when the grill
is used as a conventional gas grill. The coal trays must be
emptied from ash. Let the coal trays and spacers stay in the
grill for optimal heat distribution, or they can be removed if
desired. Grilling with maximum impact on all burners, raise the
coal trays to the top position. When cooking food with a high fat
content, a aluminium pan can be placed on top of the spacers
to collect the fat and juice. Pour a little water, wine or beer in
the aluminium pan to prevent are up from grease. Further, the
collected fat and juice can be used for sauce
Preheat the grill with the lid closed for 10-15 minutes.
Adjust the gas heat on the gas regulator knobs.
B. USING THE SIDE BURNER
A. Open the cover/lid of the side burner
B. Turn on the gas
1. Press the gas regulator knob, hold it there for about
three seconds and turn it slowly counterclockwise until
you hear a ”click” from the ignition that produces a
spark that ignites the gas.
2. Check that the burner is on. Otherwise, turn the gas regu-
lator knob back to OFF and repeat the procedure.
IF THE GAS IS NOT TURNED ON AFTER 3 TRIALS, TURN
OFF THE GAS (AT GAS REGULATOR KNOB) AND WAIT
5 MINUTES BEFORE ATTEMPTING AGAIN SO THAT ANY
Residues EVAPORATOR.
PLEASE NOTE THAT IT MAY BE DIFFICULT TO SEE THE
GAS IN HEAVY LIGHT.
3. If there is no spark at ignition, wait 5 minutes and check
the ignition (refer to the troubleshooting section). If eve-
rything is ne except for the lack of spark, the gas can be
lit with a match
4. When using a wok or pan, the max. can be 30 cm in
diameter. Larger diameter can course inadequate heat
distribution and overheating of parts on and around the
burner.
C. USING THE ROTISSERIE
• First time use, see ”installation instructions”.
• Place a coal tray in each side. Place the three spacers
between the coal trays. For cooking with much fat and
grease, an aluminium pan can be placed on top of the
distance spacers so that the fat and juices are collected.
Even better, if the aluminium pan can be placed under the
meat on the grate.
• Install one of the spit forks onto the rotisserie skewer.
• Put the skewer through the middle of the desired grilled
item, to balance the weight.

Model: JensenGrill Estate 2.1 English 2019
14
JensenGrill - Coal/briquette and gas combination grill
• Slide second spear fork on the skewer, push both spit forks
tightly around the meat to be grilled and tighten the two
screws.
• Insert the skewer in place the rotisserie motor on the left
side and place the skewer in the bracket on the right side.
• Start the motor and make sure that the skewer rotates
without touching the grate. If the spikes are not located at
the center of the meat, the Rotisserie will rotate uneven.
Reposition the meat centrally on the skewer.
• When cooking food with a high fat content, make sure the
central/middle gas burner is turned o.
• After cooking the skewer is removed by using the skewer
handle into the end of the skewer on its right side. The grilled
item can be removed without touching the hot parts of the
grill. Take the skewer out of the motor and remove the skewer
from the meat.
•
A. HEAT SHEL
The top shelf of the built-in cabinet acts as a heat shelf. The
heat from the gas burners and the coal is reected to the shelf
and provides a temperature of about 50 degrees C above the
ambient temperature. When food is prepared, it may be stored
on the hot-shelf, sheltered from the wind until everything is
ready to serve. Place the dishes with the cooked food on a
trivet in the closet on the shelf to insulate the cold bottom.
X. GRILL INSTRUCTIONS
There can be grilled with direct or indirect heating depending
on the food to be cooked.’
’
A. DIRECT HEAT
Direct heating means that it be grilled directly on top of the heat
source. You will often be grilling with the lid open at relatively
high heat. The heat can be regulated by adjusting the height
of the coal trays with the height adjustment lever on the front
of the grill and / or by turning on the gas burners. If the coal
trays are placed in the top position, and all the gas burners are
switched on, a very high temperature will be reached.
When the lid is closed, the heat will rise rapidly. Be careful not
to ”burn” the food. This method is used for grilling steaks, chop
steaks, burgers, etc. When grilling with direct heat the food
must be turned regularly to get an even frying surface and to
avoid that food gets ”burned”.
Be aware that grilling of food with high fat contains can cause a
”are up” when it drips into the grill. The coal trays are lowered
to the bottom position, to increase the distance between coal
and grill grate so the re does not burn the food. Remove any
food from the area until the re is extinguished. If there is an
”uncontrolled” are up, turn o the gas, remove the food and
close the lid. A small spray atomizer can eectively stop a are
up. In order to avoid are ups, excessive fat should be cut away
before the food is grilled.
B. INDIRECT HEAT
Using indirect heat means that the food is not placed directly
over the heat source. The grill is often at a lower temperature
for a longer time with the lid closed. Indirect grilling is used for
cooking large pieces of meat, sh, sausages, whole chickens,
etc. When grilling with charcoal / briquettes the coal trays must
be placed on the each side. Normally, the coal trays ar placed
in the bottom position. Using gas is generally used only with the
two burners on the sides lid. The gas regulator knob should be
positioned so that the desired heat is obtained.
Often, using indirect heat means longer grill time. With Jensen
Grill it is possible to turn on the gas if additional heat is desired.
For the purpose of indirectly heating the heat will circulate
around the food and be reected from the lid.
Place the food in the middle of the grill and close the lid. If pos-
sible, use a meat thermometer.
When cooking large pieces of meat, it is recommended to fry
the surfaces quickly by direct heat, so that the pores are closed
quickly and juice stays in the meat - and then leave at indirect
heat at lower temperatures.
To give a crisp surface of the meat, it can be nished in strong
direct heat (be careful not to ”burn” the meat).
When using the Rotesserie you will normally be using indirect
heat.
The use of indirect heat often means a large release of fat and
juices. In order to prevent this from are up the fat and juice is
collected in a aluminium pan which is placed on top of the three
spacers. Pour a little water, wine or beer in the tray when the
coals are lit to avoid oil ignited. If necessary, use the juice for a
sauce.
Even better if grilled in a aluminium pan placed directly on the
grill. The meat is grilled in its own juices and avoids drying out.
Moreover, there will be no fat dripping down and igniting.
C. USING THE GRILL AS A SMOKER
To use the grill as smoker, you have to put the supplied smo-
king plates into the bottom of the coal trays and sprinkle saw-
dust/wood chips in a thin layer of the smoking plates and place
the coal trays in the grill on each side in the lower position.
Then turn on the two outer burners on medium, close the lid
and keep an eye on the grill. When the grill starts to smoke put
the gas down to minimum or simply turn o the gas.
You can also use wood chips which have been soaked in water,
beer or wine, or fruit branches and herbs that are added on top
of the coal trays. Lower the coal trays into the bottom position
and close the lid.
Get more guidance and watch the lm on http://www.jensen-
grill.com/guides_manuals/ in ”Jensen Grill Summer Menu 2015

Model: JensenGrill Estate 2.1 English 2019
15
JensenGrill - Coal/briquette and gas combination grill
D. HOW TO USE THE COAL TRAY AND
GRATE CLEANING TOOL
Lift the coal trays out of the grill using the supplied coal tray
and grate cleaning tool (lifting and pull upward toward the front
of the grill). The coal trays will ”hang” at an angle that makes it
easy to take them in and out of the grill.
Use the tool to clean the grate, by sliding the tool on the grate
in the slots
.
The tool can also be used for cleaning of the upper grate.
XI. TROUBLESHOOTING PERFORMANCE
ISSUES
Visible spark, but no ignition
• Avoid smoking cigarettes while troubleshooting
• Close the gas regulator knob and turn o the gas at the
cylinder.
• Check the gas regulator, gas hose and the other intercon-
nection.
• Repeat ignition trial after 5 minutes.
If the grill still does not work, switch o the gas regulator
knob and turn o the gas at the cylinder.
Examin the following:
Is the gas container empty?
Change the gas cylinder.
Check if the regulator is installed correctly.
Pull the regulator o and reconnect it.
Reposition the lead of the am thrower in relation to the combu-
stion chamber.
The Flash barrow should be positioned at the bottom of the
hole in the front of the rebox. Adjust as necessary by ben-
ding the electrode carefully.
Misplaced burner
Place the burner properly.
Clogging of the valve and the burner.
Remove the cotter pin located at the rear of the ”rebox” that
hold the burner in place and remove the burner. Check valve
mouth and remove any particles with thin wire.
Be aware that removing the burner should be in accordan-
ce with national rules.
Clogging of the gas hose.
Remove the hose from the grill and open the gas cylinder
regulator for 1 second to check for clogging and to allow
any particles to be blown out. A safety mechanism in the
regulator can close when you do this. The controller is reset
by removing the controller from the gas container and ret.

Model: JensenGrill Estate 2.1 English 2019
16
JensenGrill - Coal/briquette and gas combination grill
•
•
•
•
•
•
•
•
•
•
•
•
•
•
•
•
•
If the gas burners burn unevenly, the ame is yellow or
there are are ups
Turn o the gas regulator knobs and turn o the gas at the
cylinder.
Examin the following:
Misplaced burner.
Place the burner correctly across the valves.
Clogging within the burner or at the air damper on burner.
Remove the cotter pin that holds the burner in place, remove
the burners and check and remove any particles in the bur
ner tube or burner, use a piece of wire.
Clogged gas burner mouth.
Remove the cotter pin that holds the burner in place and
remove the burner. Check valve mouth and clean of any
obstruction. Be aware that removing the burner should be
in accordance with national rules.
IF THE GRILL IS STILL NOT WORKING, PLEASE CONTACT
YOUR LOCAL DEALER OR THE MANUFACTURER.
DO NOT USE THE GRILL IF THERE IS A MALFUNCTION IN
THE GAS SYSTEM.
Lack of spark for ignition of the gas
Examin the following:
Look for grease and leftovers on the ignition electrode.
Clean the electrode with a brush.
Poor wiring.
The cable for the ignition must be tted correctly and be
properly insulated. The wires must be properly connected to
the voltage generator at the valves. This sits behind the front
panel. There is access to the voltage generator up under the
front panel. Make sure the wires are correctly using a pair of
pliers.
For easy access to the valves and voltage generator remove
the front panel. Pull the gas regulator knobs o the grill and
screw o the height adjustment handle. Take the 4 screws
PLEASE NOTE THAT THE VALVES CAN ONLY BE REPLACED
BY QUALIFIED INSTALLERS. contact your local JensenGrill
dealer for further information.
XII. FOR FURTHER INFORMATION CON-
TA C T: :
JensenGrill A / S
Tel. (+45) 31 32 33 72.
Fill in the subject line with ”technical issues”
www.JensenGrill.com
or go to http://www.jensengrill.com/en/contact/
Warranty Club:
In order to get 10 years warranty on main parts of the grill, go to
www.jensengrill.com/warrantyclub and register.
Table of contents
Other Jensen Grill manuals
Popular Grill manuals by other brands

Char-Broil
Char-Broil 463625217 Product guide

Linea 2000
Linea 2000 DOMO DO1028TP-BF Instruction booklet

Infrico
Infrico PG-60NS Installation and instructions

Hendi
Hendi 143087 user manual

Heatlie Barbecues
Heatlie Barbecues SNAPPY KING RB1000SS General Installation and Operation Instructions

Landmann
Landmann Black Taurus 660 Assembly and operating instructions

George Foreman
George Foreman GRS6090BC use and care manual

buschbeck
buschbeck Meran Assembly instruction

Proficook
Proficook PC-GG 1057 instruction manual

Orava
Orava Grillchef-6 instruction manual

Pisla
Pisla Kotakeittio Tundra Grill owner's manual

TAIKO
TAIKO YS60-UL Installation instructions operating instructions