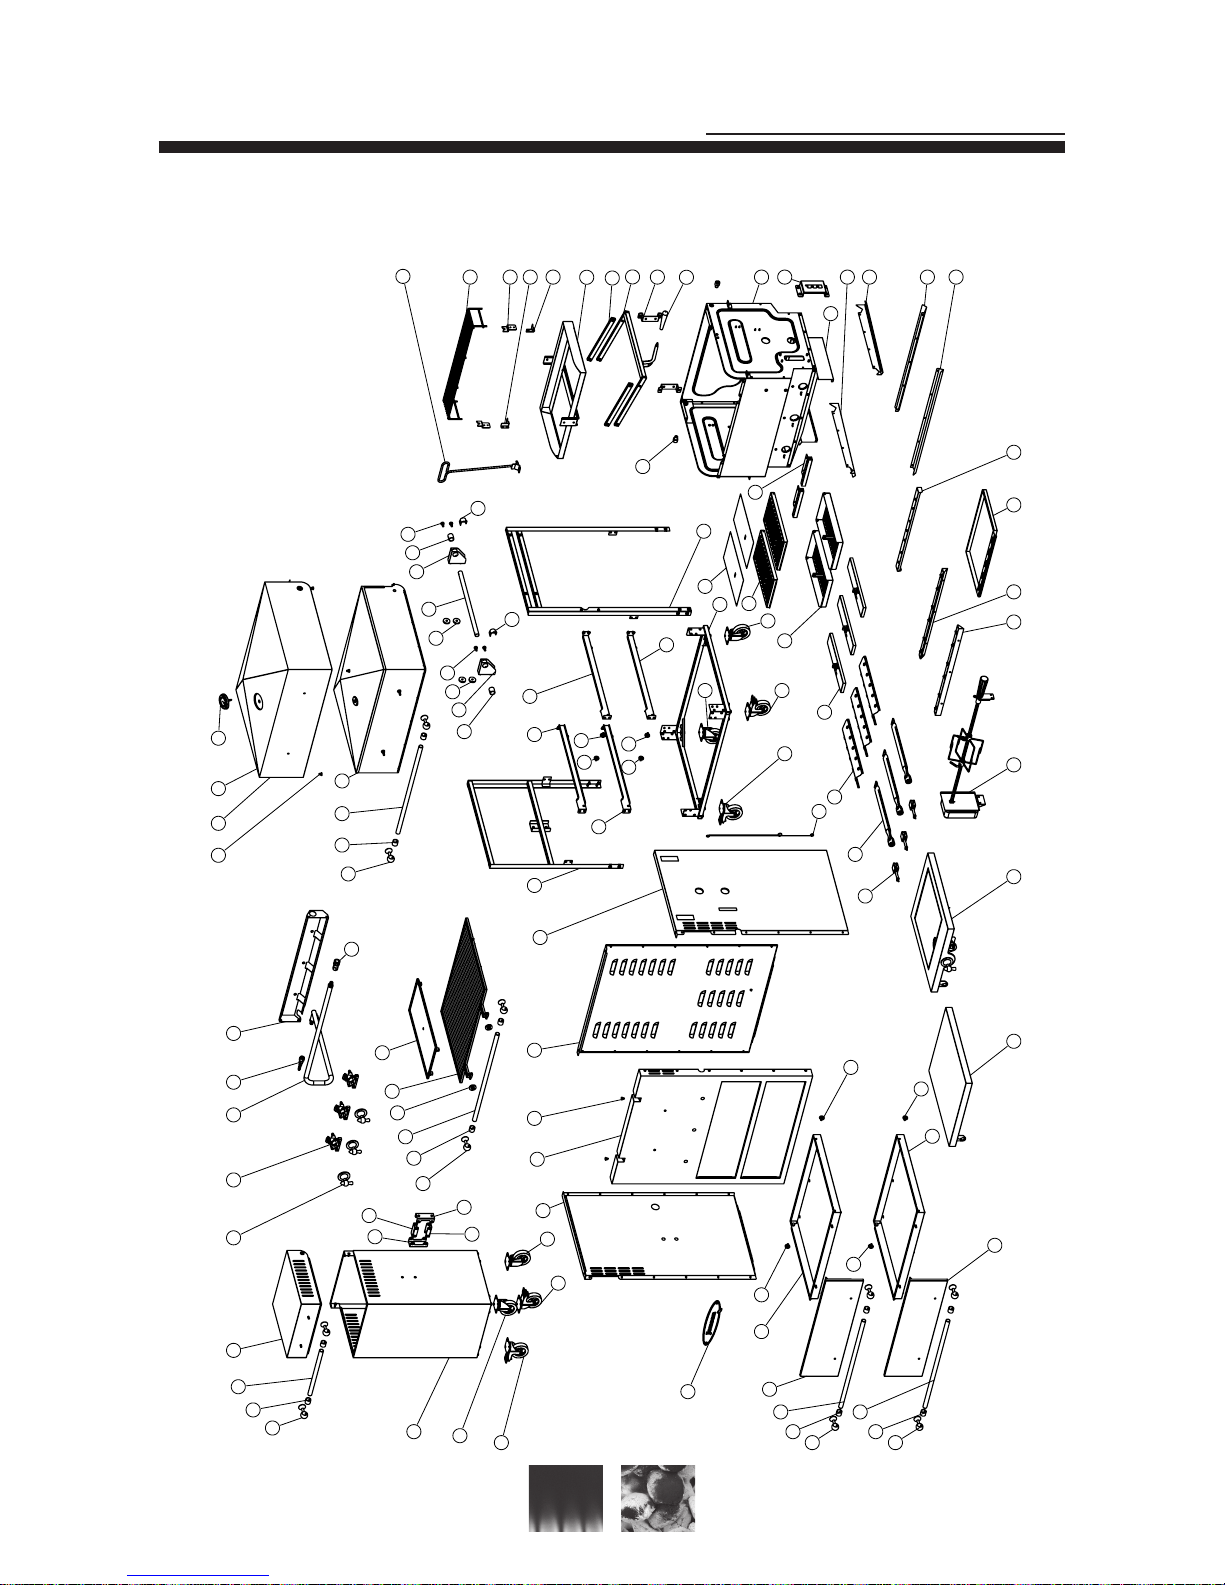
Jensen Estate S User manual

Model: JensenGrill Estate S / JensenGrill Estate B
3
Jensen gas and charcoal barbecue
Operating manual Assembly instructions
Mode d’emploi Instrutions d’assemblage
Betriebsanweisungen Montageanweisungen
Istruzioni per l’uso Istruzioni per il montaggio
Gebruiksinstructies Montage-instructies
Användning Montering
Käyttöohjeet Kokoamisohjeet
Instrucciones de funcionamiento Instrucciones de armado
Brugsanvisning Monteringsvejledning
Instruksjoner for bruk Montering
Model: JensenGrill Estate S / JensenGrill Estate B
CE 845CL-0014
ID: 0845
INSPIRATION FOR CULINARY CREATIVITY
OPERATION MANUAL

Model: JensenGrill Estate S / JensenGrill Estate B
4
Jensen gas and charcoal barbecue
Warnings:
• DonotallowchildrentooperatetheBBQ.
• Accessiblepartsmaybeveryhot.Keepchildrenaway.
• AnymodicationstothisBBQmaybedangerous.
• Donotchangeshutteropeningontheburners.
• DonotmovethisBBQduringuse.Useonlythe“transporthandle”
ontheright-handsidewhenmovingtheBBQaround.
• AlwayslockthecastorsbeforeusingtheBBQ.
• ReadtheinstructionscarefullybeforeusingtheBBQ.
• Partssealedbymanufacturerortheiragentmustnotbemanipu-
latedbytheuser.
• ThisBBQisonlytobeusedoutdoors.
• BBQspecicationscanbefoundonthedatalabelattachedonthe
backpaneloftheBBQ.
• Donotstoregascylinders(empty,fullorotherwise)neartheBBQ.
• Keepgashoseawayfromhotsurfaces.
• Avoidunnecessarytwistingofhose.
• Visualinspectionofhoseforcuts,cracks,excessivewearorother
damageisrecommendedpriortoeachuse.
• Neveralterormodifytheregulatororthegassupplyassembly.
• Thehosemustbereplacedifdamagedandwhenrelevantlegisla-
tionorregulationrequires.
• NeverlighttheBBQwiththelidclosed.
• Neverlightthesideburnerwiththelidclosed.
• NeverleanovercookingsurfacewhilelightingtheBBQ.
• Checktheashandgreasetraybeforeeveryuse.Removegrease
andashtoavoidagreasere.
• WhenstoringtheBBQinside,removegasbottle.Gasbottlesmust
bestoredinawell-ventilatedplaceoutside.
• AfteralongperiodofnouseorstoragetheBBQshouldbe
checkedforgasleaksandburnerobstructionsbeforeuse.See“test
forgasleaks”and“rstuseorstartupafterlongperiodofnouse
orstorage”.
• Donotuseaametocheckforgasleaks.
• Keepammablematerialsatadistance:aminimumof70cmaway
fromtheBBQ.
• Iftheburnersgooutduringstartorcooking,turnogassupply.
Openlidandwait5min.beforeattemptingtorelighttheburners
(see“operationinstruction”).
• Shouldanuncontrolledare-upoccur,movefoodawayfromthe
amesuntilthearehassubsided.
• TheBBQshouldbecleanedthoroughlyonaregularbasis.
• Neveroverllcharcoaltrayswithcharcoal.Makesurethelidcan
close.MAXIMUMTOTALAMOUNTOFCOAL:2.0KG.
• Useonlycoalbriquettestoensurecontrolledslowburningandto
preventoverheating.
YOUMUSTREADTHISMANUALBEFOREUSINGYOURBARBECUE

Model: JensenGrill Estate S / JensenGrill Estate B
5
Jensen gas and charcoal barbecue
TABLE OF CONTENTS
Exploded view 6
I. Part list 7
II. Screw overview 8
III. Screw part list 8
IV. Prior to assembly 8
V. Assembly instructions 9
A. Mounting extra equipment 13
VI. Gas instructions 14
A. Check for gas leak 14
B. Gas cylinder safety 14
VII. First use or start up after a long period of no use or storage 15
VIII. Cleaning 15
IX. Storage 16
X. Operating instructions 16
A. Procedure for starting up your BBQ with gas and charcoal 17
B. How to use the BBQ as a traditional gas BBQ 18
C. Starting the side burner 18
D. Using the rotesserie 19
E. Heating drawer 19
XI. Barbecuing instructions 19
A. Direct heat 19
B. Indirect heat 19
C. Heating drawer 19
D. Use your BBQ as a smoker 19
XII. Troubleshooting if the BBQ fails to operate properly 20
XIII. For further information contact: 21

Model: JensenGrill Estate S / JensenGrill Estate B
6
Jensen gas and charcoal barbecue
1
12 13 14 15 16 17
19 2018 22
68
67
66
65
63
62
61
60
58
57
55
54
54
53
51507473
10
9
99
910
8
34
18 36
24 23
1
2
26
12 3
7
7
5
23 24
41
42
43
44
45
77
47
49
40
40
9 9
99
32
29 28 30
33
29
33
69
11
1
3
1
3
11
25
3
71
2
21
27
28
39
56
64
38
30
21
35 37
52
39
5075
21
2
2
4
46
31
48
59
72
6
6
6
6
EXPLODED VIEW

Model: JensenGrill Estate S / JensenGrill Estate B
7
Jensen gas and charcoal barbecue
I. PART LISTE
Part Part name Ea.
S/B
Part or assembly
number S
Part or assembly
number B
Part Part name Ea.
S/B
Part number S Part number B
1Bracket, handle (silver) 10 M7CDR-7CVJ-000 M7CDR-7CVJ-000 38 Chassis, left 1H7CDQ-7FRH-038 H7CDR-7FRH-048
1Bracket, handle (gold) 10 M7CDQ-7CVL-000 M7CDQ-7CVL-000 39 Drawer runner, left 2M7CDQ-7DRF-017 M7CDR-7DRF-025
2Insulation ring, handle 10 M7CDQ-7CVM-000 M7CDQ-7CVM-000 40 Drawer runner, right 2M7CDQ-7DRG-017 M7CDR-7DRG-025
3Long handle (silver) 4M7CDR-7CVI-000 M7CDR-7CVI-000 41 Gas collector 3H7CDQ-7BBC-008 H7CDQ-7BBC-008
3Long handle (gold) 4M7CDQ-7CVK-000 M7CDQ-7CVK-000 42 Main burner (I3+ (28-30/37)
I3B/P (30))
3M7CCE-7BRE-017 M7CCE-7BRE-017
4Short handle (silver) 1M7CDR-7THH-000 M7CDR-7THH-000 42 Main burner (I3 B/P (50))3M7CDQ-7BR7-017 M7CDQ-7BR7-017
4Short handle (gold) 1M7CDQ-7THH-000 M7CDQ-7THH-000 43 Flame tamer 3M7CDR-7BRC-017 M7CDR-7BRC-025
5Gas cylinder compart-
ment
1H7CDQ-7T HA -039 H7C DR-7 THA-058 44 Charcoal tray spacer 3M7CDQ-7BR3-029 M7CDR-7BRX-029
6Castor without brake 4M7CDQ-7WHB-000 M7CDQ-7WHB-000 45 Charcoal tray lid 2 H7CDQ-7BRO-029 H7CDR-7BRK-029
7 Castor with brake 4 M7CDQ-7WHA-000 M7CDQ-7WHA-000 46 Cross lighter 2 M7CDQ-7BBB-017 M7CDR-7BBB-025
8Name plate (silver) 1M7CDR-7FRD-000 M7CDR-7FRD-000 47 Chassis, base 1H7CDQ-7BTA- 038 H7C DR-7BTA- 048
8Name plate (gold) 1M7CDQ-7FRD-000 M7CDQ-7FRD-000 48 Charcoal tray, bottom 2 H7CDQ-7BRM-029 H7CDR-7BRI-029
9Roller, drawer 8M7CBA-7Y90-000 M7CBA-7Y90-000 49 Chassis, right 1H7C DQ -7FRM -038 H7CDR-7FR M -0 48
10 Drawer, bottom 2M7CDQ-7DRC-029 M7CDR-7DRC-025 50 Flame tamer support 2M7CDQ-7BRD-017 M7CDR-7BBD-025
11 Drawer, front 2M7CDQ-7DRD-017 M7CDR-7DRD-025 51 Catch pan 1 M 7C D Q -7 Y P C- 0 2 9 M7CDR-7YPC-025
12 Lid, gas cylinder com-
partment
1H7CDQ-7THF-029 H7CDR-7THF-035 52 Burner support 1M7CDQ-7BBA-017 M7CDR-7BBA-025
13 Gas control knob (silver) 3 H7C DR-7SWA- 001 H7CDR-7SWA-000 54 Drip spout 2M7CDQ-7BDG-017 M7CDR-7BDG-025
13 Gas control knob (gold) 3 H7C DQ -7SWA-001 H7CDQ-7SWA-000 55 Drip spout, right 1M7CDQ-7BDI-017 M7CDR-7BDI-025
14 Main valve
(I3+ (28-30/37) I3 B/P (30)
3H7CDQ-7ADB-008 H7CDQ-7ADB-008 56 Drip spout, left 1M7CDQ-7BDH-017 M7CDR-7BDH-025
14 Main valve (I3 B/P (50))3H7CDQ-7ADF-008 H7CDQ-7ADF-008 57 Height adjustment lock 1M7CDQ-7BR5-017 M7CDR-7BRY-017
15 Gas pipe 1 M7CDQ-7ADC-000 M7CDQ-7ADC-000 58 Cooking box 1H7CDQ-7BDA-029 H7CDR-7BDA-035
16 European standard
connector
1M7CBU-7ADN-000 M7CBU-7ADN-000 59 Hood fix conjunction stalk 2 M7CDQ-7Y91-000 M7CDR-7Y91-000
17 Valve panel 1M7CDQ7ADD-017 M7CDR-7ADB-017 60 Handle height adjustment
(silver)
1M7CDR-7BRZ-000 M7CDR-7BRZ-000
18 Protective pad 6M7CBI-7FIB-000 M7CBI-7FIB-000 60 Handle height adjustment
(gold)
1M7CDQ-7BR6-000 M7CDQ-7BR6-000
19 Hood (stainless steel) 1/0 H7CDQ-7CVA-029 61 Hinge height adjustment 2M7CDQ-7BR1-017 M7CDQ-7BR1-017
20 Thermometer with
wing nut
1M7CDQ-7CVJ-000 M7CDQ-7CVJ-000 62 Height adjustment arm (lang) 1H7CDQ-7BRX-029 H7CDQ-7BRX-029
21 Insulation washer 6/8 M7CDQ-7Y20-000 M7CDQ-7Y20-000 63 Height adjustment arm (kort) 2M7CDQ-7BRW-017 M7CDQ-
7BRW-017
22 Hood (black) 0/1 H7CDR-7CVA-035 64 Charcoal tray support 1H7CDQ-7BRR-029 H7CDR-7BRM-029
23 Link bracket 1M7CDQ-7THJ-017 M7CDR-7THJ-025 65 Grate lock, right 1 M7CDQ-7BRH-017 M7CDQ-7BRH-017
24 Link, gas cylinder com-
partment
2M7CDQ-7THI-017 M7CDR-7THI-025 66 Grate lock, left 1 M7CDQ-7BRI-017 M7CDQ-7BRI-017
25 Grate 2M7CDQ-7BRE-000 M7CDR-7BRE-000 67 Grate hinge 2M7CDQ-7BRG-017 M7CDR-7BRG-017
26 Frying plate 1H7CDQ-7BRK-029 H7CDQ-7BRK-029 68 Upper grate 1M7CDQ-7BRJ-000 M7CDR-7BRH-000
27 Hood lining
(stainless steel)
1/0 H7CDQ-7CVG-029 H7CDR-7CVK-029 69 Charcoal tray moving tool 1 M7CDQ-7BR4-000 M7CDQ-7BR4-000
28 Insulation ring, trans-
port handle
1M7CDQ-7FRU-000 M7CDQ-7FRU-000 71 Match holder 1M7CDK-7FRF-000 M7CDK-7FRF-000
29 Bracket,
transport handle
2M7CDQ-7TBA-029 M7CDR-7TBA-035 72 Quick connect 1M7CDQ-7TBM-000 M7CDQ-
7TBM-000
30 Mounting screw, side
table
2M7CBV-7Y11-000 M7CDR-7Y16-000
31 Mesh, charcoal tray 4 M7CDQ-7BRQ-000 M7CDQ-7BRQ-000
32 Transport handle (silver) 2M7CDR-7FRS-000 M7CDR-7FRS-000 Extra Equipment
32 Transport handle (gold) 2M7CDQ-7FRS-000 M7CDQ-7FRS-000 73 Side table 1H7CDQ-7TBK-029 H7CDR-7TBH-035
33 Locking clip, transport
handle
1M7CD Q-7FRT-017 M7CDR-7FRT-025 74 Side burner (I3+ (28-30/37) I3
B/P (30))
1P7CDQ-7TBB-000 P7CDR-7TBB-000
34 External panel, left 2M7CD Q-7FRE- 02N M7CDR-7F RE- 03N 74 Side burner (I3 B/P (50)) 1 P7CDQ-7TBC-000 P7CDR-7TBC-000
35 External panel, front 1H7C DQ -7F R A- 03N H7C DR-7 FR A -0 4N 75 Rotisserie 1P7CDQ-7MDA-000 P7CDQ-7MDA-000
36 External panel, back 1M7CDQ -7FR G- 017 M7CDR-7FRG-025
37 External panel, right 1M7C DQ -7FRF-017 M7CDR-7FRF-025

Model: JensenGrill Estate S / JensenGrill Estate B
8
Jensen gas and charcoal barbecue
II. SCREW OVERVIEW
3/16x5 mm
S 1
1/4x1/2
S 3
3/16x32 mm
S 12
1/2x(10,5 mm+5 mm)
30
3/16x3/8
S 2
5/16x24 mm
S 9
M8x45 mm
S6.1
M8
S6.3
1x17 mm plastic
S6.2
M3x10 mm
S 7
M6X18 mm
S 10
M4 x 10 mm
S 11
3/16x8 mm
S5.1
S5.2
1/4x22 mm
S4.1
S4.2
M4x8 mm
S 8
5/16x12,7 mm
S 13
1/4 cell
lock nut
S 14
S15
33
III. SCREW PART LIST
Part Screw description Ea.
S/B
Screw part num-
ber S
Screw part num-
ber B
Part Screw description Ea.
S/B
Screw part num-
ber S
Screw part num-
ber B
S 1 3/16x5 mm M7CDQ-7Y19-000 M7CDR-7Y14-000 S 9 5/16x24 mm M7CDQ-7Y10-000 M7CDR-7Y10-000
S 2 3/16x3/8 M7CBJ-7Y15-000 M7CDD-7Y1D-000 S 10 M6x18 mm M7CDQ-7Y1C-000 M7CDQ-7Y1C-000
S 3 1/4x1/2 M7CBX-7Y11-000 M7CBX-7Y13-000 S 11 M4x10 mm M7CDQ-7Y15-000 M7CDQ-7Y15-000
S 4.1 1/4x22 mm M7CDQ-7Y13-000 M7CDQ-7Y13-000 S 12 3/16x32 mm M7CDQ-7Y1A-000 M7CDR-7Y13-000
S 4.2 1/4 M7CBJ-7Y41-000 M7CBJ-7Y41-000 S 13 5/16x12,7 mm M7CDQ-7Y11-000 M7CDR-7Y11-000
S 5.1 3/16x8 mm M7CBJ-7Y12-000 M7CBU-7Y1C-000 S 14 Cell nut M7CDQ-7Y40-000 M7CDR-7Y40-000
S 5.2 3/16 lock nut M7CBA-7Y45-000 M7CDR-7Y42-000 S 15 Locking washer M7CBK-7Y22-000 M7CBK-7Y21-000
S 6.1 M8x45 mm M7CDQ-7Y16-000 M7CDR-7Y19-000 30 Mounting screw, side table M7CDQ-7Y18-000 M7CDR-7Y18-000
S 6.2 1x17 mm plastic washer M7CDQ-7Y21-000 M7CDR-7Y21-000 33 Locking clip, transport
handle
M7CD Q-7FRT-017 M7C DR-7FRT-017
S 6.3 M8 lock nut M7CDQ-7Y41-000 M7CDR-7Y41-000
S 7 M3x10 mm M7CDQ-7Y12-000 M7CDQ-7Y12-000
S 8 M4x8 mm M7CCC-7Y12-000 M7CCC-7Y12-000
IV. PRIOR TO ASSEMBLY
Inspection of box for damage
Make sure you have all assembly packages:
- Main BBQ: 3 packages.
Extra equipment:
- Side burner: 2 packages.
- Side table: 1 package.
- Rotisserie: 1 package.
Unpack
Check that all specied parts are present

Model: JensenGrill Estate S / JensenGrill Estate B
9
Jensen gas and charcoal barbecue
V. ASSEMBLY INSTRUCTIONS
Assembling BBQ
Check screws have not loosened during transportation
All handles are made of aluminum. It is therefore very im-
portant to make sure that the screws are placed straight in
the holes when mounting the handles to prevent damaging
the threads.
8
60
13
Mount 13
Push (13) in place on the valve studs.
Mount 60
Mount (60) by screwing it on.
Mount 8
Mount (8) from the front with 2 screws (S11).
1
2
3
Mount (1), (2), (3) on “Hood”
Slide (2) onto (3). Slide (1) over (2). Line up the holes in (1), (2)
and (3). Tighten the small setting screw (S 7). Mount handle
from the inside of the hood with screws (S 10). Make sure the
small setting screws are pointing downwards. N.B. Take care
when mounting the handle. Should you drop anything (e.g. a
screw) between the hood and the hood lining you will need to
dismantle the lid to get it out.
1
2
4
Mount (1), (2), (3) on the “Lid, gas cylinder compartment”
Slide (2) onto (4). Slide (1) over (2). Line up the holes in (1), (2)
and (4). Tighten the small setting screw (S 7). Mount handle
with screws (S 10) from the inside of the lid. Make sure the
small setting screws are pointing downwards.

Model: JensenGrill Estate S / JensenGrill Estate B
10
Jensen gas and charcoal barbecue
1
2 3
Mount (1), (2) and (3) on drawers
Slide (2) onto (3). Slide (1) over (2). Line up the holes in (1), (2)
and (3). Tighten the small setting screw (S 7). Mount handles
from the inside of the drawer with screws (S 10). Make sure the
small setting screws are pointing downwards.
Place the drawers in the BBQ. Lift up the front of the drawer
and insert the “roller, drawer” into the “drawer runners”. Lower
the front and close the drawer.
Adjust position of drawers
If the drawer font is hitting the “External panel, front” or there
is another need for adjustment. Loosen the screws holding the
drawer runners. Adjust them and tighten the screws again.
2 3
21
26
1
Mount (1), (2), (3) and (21) on the “grate”
Slide (2) onto (3). Slide (1) over (2). Line up the holes in (1), (2)
and (3). Tighten the small setting screw (S 7). Mount handle
with screws (S 10) from the inside with (21) between the grate
and handle. Make sure the small setting screws are pointing
downwards.
Mount (26)
(26) is tted with clips in each corner. Place it anywhere on top
of the grate. Push it in place so the clips secure it.
28
32
33
Mount (28), (32) and (33) on the right-hand side of the BBQ
Place (28) inside the two brackets on the BBQ. Slide (32)
through (28) in the bracket. Take (33) and place over (28)
inside the bracket with the hole with the thread facing upwards.
Line up the holes in (28), (32) and (33). Put the screws (S 12)
through the holes. Make sure the screw is vertical before the
handle is xed by tightening the screw up against the brackets.

Model: JensenGrill Estate S / JensenGrill Estate B
11
Jensen gas and charcoal barbecue
2423
S 2
S 2
S 2
S 2
Mount “Gas cylinder compartment” onto the BBQ
Mount (23) on the “gas cylinder compartment and the BBQ with
2 screws each (S 3).Mount (24) from the front with 4 screws (S
6.1). Place a washer (S 6.2) on each side between the bracket
and (24). Place the nut (S 6.3) on the other side. Do not over-
tighten because (24) should be able to turn.
43
50
Place 43 in the BBQ
Place (43) on top of (50) at the front and back. Place it on top of
the small positioning tabs to keep it in place. Place the other 2
(43) in the BBQ.
68
Mount (68) inside the BBQ
Slide (68) into the holes in the brackets on the back of the BBQ.
25
Mount 25 in to the BBQ
Put the height adjustment handle on the right-hand side in the
top position (charcoal support in the bottom position). Lift (25)
by the handle and place it vertically in the grate hinges.

Model: JensenGrill Estate S / JensenGrill Estate B
12
Jensen gas and charcoal barbecue
69
44
Charcoal tray
(31), (45), (48)
64
25
Place “charcoal tray” and (44) in the BBQ
Put the height adjustment handle on the right-hand side in the
top position ((64) will be in the bottom position). Open (25) into
the locked vertical position. Place the “charcoal tray” and (44)
into the BBQ underneath the grate in (64). When the “charcoal
tray” is lifted with the (69) it will tip to an angle which makes
it easy to t into place. The “charcoal tray” can only slide into
place if the lid is closed. This is a precaution to prevent over-
lling with charcoal.
51
Put 51 in place
Open top drawer and slide (51) into place.
Mount gas hose and regulator
Types of regulator, hose and the way they connect to the BBQ
vary from country to country.
In some country (16) “European commen connector” is
mounted on the hose and then it can be mounted on the BBQ.
The connection is tighten with a spender (Please be aware that
the threat on the BBQ tighten counter clockwise).
Make the hose wet on the inside in order to make it easier to
slide on to regulator and European commen connector. Secure
the hose with a clamp in each end.
Please note that the regulator must apply to the certied
gas pressure and gas mixture.
Mounting of the gas hose should be performed according
to relevant national regulations.

Model: JensenGrill Estate S / JensenGrill Estate B
13
Jensen gas and charcoal barbecue
A. MOUNTING EXTRA EQUIPMENT
Locking screw (S 3)
Mount side burner
(33) is mounted on the transport handle bracket on the right-
hand side of the BBQ. The screws (30) must be mounted in
the transport handles brackets. Slide the side burner into place
over the screws (30). The side burner can be locked into place
with one screw in each bracket (S 3). Connect the gas hose
with the quick connect on the right-hand side of the BBQ.
Mount rotisserie
Mount spit support on the right-hand side with two screws (S 2).
Slide the motor bracket into place on the left-hand side. Tighten
the 2 screws beneath the bracket (S 2). Slide the motor onto the
motor bracket. Slide the 2 spit forks, locking ring and the spit
support ring on to the spit. Slide spit into motor and place the
spit support ring in the spit support. Bring the motor inside after
using it.
Mount side table
The side table is mounted on the transport handle bracket
on the right-hand side of the BBQ (like the side burner). See
description in the “mount side burner” paragraph.

Model: JensenGrill Estate S / JensenGrill Estate B
14
Jensen gas and charcoal barbecue
GAS INSTRUCTIONS
• Never use the BBQ without a regulator.
• Only use gas regulator and hoses which comply with rele-
vant regulations.
• Use appropriate Jubilee clip or twin-eared fasteners to
secure hose connection.
• Depending on which gas category used, you will need to ap
proach your local gas dealer for a regulator and hose which
complies with relevant national standards/ legislation. The
overview of gas categories and supply pressures below are
provided as a guideline.
Gas standards CE
Article number
main BBQ, black
P7CDR-7000
-000
P7CDR-7000
-000
P7C DR-70 01
-000
Modified for
natural gas
Article number
main BBQ, stain-
less steel
P7CDQ-7000
-000
P7CDQ-7000
-000
P7C DQ -7001
-000
Modified for
nautral gas
Model name JensenGrill
Estate
JensenGrill
Estate
JensenGrill
Estate
JensenGrill
Estate
Appliance cate-
gories
I3+(28-
30/37)
I3B/P (30) I3 B/P (50) I2H(20)/
I2E(20)
Gas and corre-
sponding pressure
G30 butan at
28-30 mbar
G30 butan /
G31 propan
at
30 mbar
G30 butan/
G31 propan
at
50 mbar
G20 Natural
gas at
20mbar
G31 propan
at
37 mbar
Marketed in vari-
ous countries
BE, CY, CZ,
EE, FR, GR,
IE, IT, LT,
LU, LV, PT,
RO, SK, ES,
CH, GB
BG, CY, CR,
CZ, DK, EE,
FI, GR, HR,
LV, LT, LU,
MT, NL, NO,
SK, SI, SE,
TR, HU, IS
CY, CZ, DE,
MT, SK, HU,
AT
DE, DK, NO,
SE, UK
Nominal heat
input, burners
12.6 KW 12.6 KW 12.5KW 12.5KW
Orifice size Ø 1.03 mm Ø 1.03 mm Ø 0.9 mm Ø 1.65 mm
Total gas con-
sumption burners
G30
918 g/h 918 g/h 911 g/h -
Total gas con-
sumption burners
G31
902 g/h 902 g/h 895 g/h -
Nominal heat
input, one burner
4.2 KW 4.2 KW 4.2KW 4.2KW
Nominal heat in-
put, side burner
4.6 KW 4.6 KW 4.8 KW 4.6KW
Orifice size, side
burner
Ø 1.0 mm Ø 1.0 mm Ø 0.9 mm Ø 1.6 mm
Total gas con-
sumption, side
burner G30
335 g/h 335 g/h 350 g/h -
Total gas con-
sumption side
burner G31
329 g/h 329 g/h 344 g/h -
B. CHECK FOR GAS LEAKS
• Make a soap solution of detergent and water.
• Apply soap solution using a brush, cloth or spray.
• Make sure all “gas control knobs” are in the OFF position
• Turn on the gas at the gas cylinder
• Apply soap solution to all gas connections. If there is a
leak, bubbles will appear in the soap solution. Tighten or
repairconnection if necessary.
• If you are not able to eliminate the leak, turn off the gas at
the gas cylinder. Disconnect hose and contact Dealer or
supplierfor assistance.
• DO NOT OPERATE BBQ IF THERE IS A LEAK.
• After checking the BBQ, turn off gas at gas cylinder and
rinse connections with water, to remove soup solution.
Soap solution can be slightly corrosive.
GAS CYLINDER SAFETY
• Never store gas cylinder indoors. Store outside in a well-
ventilated place.
• Keep gas cylinder in an upright position.
• Turn off gas at gas cylinder when BBQ is not in use.
• Do not subject gas cylinder to excessive heat.
• Keep cylinder away from any ignition source.
• Do not store gas cylinders (empty, full or otherwise) near
the BBQ.
• The following gas cylinders are recommended:
• Butane: > 7 kg. Propane: > 6 kg.

Model: JensenGrill Estate S / JensenGrill Estate B
15
Jensen gas and charcoal barbecue
VI. FIRST USE OR START UP AFTER LONG
PRIOD OF NO USE OR STORAGE
• Read “WARNINGS”, “Gas instructions” and “Operating
instructions” carefully.
• Check gas regulator, valves orices, burner tubes and
burner ports for any obstructions (see further procedure in
the “troubleshooting” paragraph).
• N.B.Spiders and insects may occasionally spin webs or
make nests in the burner tubes. This can obstruct gas ow
and cause an unintentional re or explosion (ash back).
This can cause damage to the BBQ and create a dange-
rous situation for the operator.
• Check burner for critical corrosion or cracks.
• Check that the burners are properly in place with burner
tubes over the valve orice.
• Check ignition spark at each burner by pushing in the gas
control knob and turning anti-clockwise until you hear a
click from the ignition and see a spark. (Do not touch part
inside during this test, because the spark may cause an
electric shock). If there is no spark, clean ignition electrode
and check ignition lead is rmly attached (see further
procedure in the “troubleshooting” paragraph).
• Ensure gas cylinder is full.
• Make sure all gas control knobs are OFF and then connect
the gas cylinder.
• Check for gas leaks with a soap solution (see the “check
for gas leaks” paragraph).
• Before cooking on the BBQ for the rst time, remove grate,
upper grate, frying plate etc. and wash with soap and hot
water. Rinse with clean water and dry. Turn on the BBQ
and burn off any residual oils or foreign matter by preheat-
ing the BBQ for 12 min. (USE ONLY GAS NOT COAL).
• If it is the rst time you are using the BBQ or if the gas
cylinder has been disconnected, the gas lines may be full
of air. The lines must ll with gas before the burners can be
ignited. This may require several ignition attempts.
• Open lid and put the gas control knob in off position and
turn on gas at the gas cylinder
• Push the gas control knobs and turn anti-clockwise until
you hear a click from the ignition. This will trigger a spark
to light the burners. Just before the click the gas will start
owing. Turn the gas control knob in a slowly movement
allowing the gas to ow to the ignition. Do not lean over the
BBQ during ignition.
• Check if burner is ignited. If not, turn knob back to closed
vertical position and repeat ignition attempt. If the burner
fails to ignite after three attempts, turn off gas control knob
and wait 5 minutes before trying again.
• When burner is ignited and burning correctly (steady blue
ame), turn off the burner and repeat ignition procedure for
the other two burners and the side burner.
VII.CLEANING
General
If the BBQ is stainless steel, parts exposed to high levels of heat
will tarnish (yellow) over time.
Cleaning grate, upper grate, charcoal tray spacer, charcoal
tray and ame tamer
The “grate” and “upper grate” should be cleaned with a stiff
brush after each use.
For thorough cleaning, remove the “grate”, “upper grate”, “char-
coal tray spacer”, “charcoal tray” and “ame tamer” and clean
with soap and warm water solution using a stiff brush or sponge
(alternative leave it soaking for 1 hor) (do not use a steel brush,
this can create rust patches and scratch the stainless steel
surface). Rinse with clean water, and dry.
Cleaning the side burner
Remove “side burner pot support” and clean surfaces with a
soft sponge or soft brush with soap and warm water solution.
Rinse with clean water, and dry. Prevent water from getting
inside the burner. N.B. Scrub gently so as not to scratch the
surface. On brushed or polished stainless steel surfaces,
always scrub in the same direction as the steel grain.
Cleaning the outside
Clean the outside with a soft sponge or soft brush with a soap
and warm water solution. Rinse with clean water on a sponge
and dry. N.B. Scrub gently so as not to scratch the surface. On
brushed or polished stainless steel surfaces, always scrub in
the same direction as the steel grain. To get a nice shinning
surface specialised stainless steel cleaning products after-
wards. Do not use on surfaces that will be in direct contact with
food.
Cleaning inside the lid
While lid is warm, remove grease and other cooking residue
with paper towel or cloth.
For thorough cleaning, use stiff brush or sponge with soap and
warm water solution. Rinse with clean water on a sponge and
dry. Other cleaning products are also an option, but note that
some products will stain the aluminium handles and the painted
outer panels. Remove any cleaning products from the handles
and the painted surfaces. Read bottle carefully before use.
Cleaning the inside of the cooking box
To clean inside the cooking box, remove the “grate”, “upper
grate”, “charcoal tray spacers”, “charcoal trays” and “ame
tamer”. Cover the burners with 3 pieces of aluminium foil to pre-
vent the water from getting into the burners. Remove drawers
to prevent soiling should the “catch pan” overow. Clean with
soap and hot water solution using a stiff brush or sponge (do
not use a steel brush, this can create rust patches and scratch
the stainless steel surface). Rinse with clean water, and dry.
Other cleaning products are also an option, but note that some
products will stain the aluminium handles and the painted outer
panels. Remove any cleaning products from the handles and
the painted surfaces. Read instructions on the bottle carefully
before use.
Empty the “catch pan” and rinse with water. Remove aluminium
foil from the burners and put back in the other part that has
been removed.

Model: JensenGrill Estate S / JensenGrill Estate B
16
Jensen gas and charcoal barbecue
Cleaning burners
Remove burners (burners are removed by unscrewing the
screws which keep the burners in place at the back of the coo-
king box). Please note that burners should be removed according
to relevant regulations. Clean with soap and hot water solution
using a stiff brush or sponge. Rinse with clean water and make
sure it is dry inside. If blockages remain inside, remove with wire.
AFTER THOROUGH CLEANING START UP THE BBQ FOR 5
MINUTES TO EVAPORATE ANY LEFT OVER WATER.
CLEAN THE BBQ THOROUGHLY AT LEAST ONCE A YEAR.
VIII. STORAGE
• Remove gas cylinder from BBQ. Never store gas cylinders
indoors (for further information, see “gas cylinder safety”).
• Before storage clean the BBQ. Cooking residue that is
burnt on to the surfaces may cause corrosion. For cleaning
instructions, see “Cleaning”.
IX. OPERATING INSTRUCTIONS
Generel operating instructions
• Use only the “transport handle” on the right-hand side
when moving the BBQ. Do not move BBQ during use.
• Lock the castors before using the BBQ.
Visual inspection of BBQ
• Check for any damage to hose or gas connections etc.
• Check that burners, ame tamer etc. are in correct posi-
tion.
• If you smell gas, turn all gas control knobs to off position
and turn off the gas at the cylinder. Check for gas leaks
(see the “check for gas leaks” paragraph).
• If the BBQ is being used the rst time or the gas cylinder
has been disconnected, the gas lines may be full of air.
The lines must ll with gas before the burners can ignite.
This may require several ignition attempts. If the burner
does not light after three attempts, turn gas control knobs
to off position and wait 5 minutes to clear out gas before
trying again.
• Spiders and insects may occasionally spin webs or make
nests in the burner tubes. This can obstruct gas ow
and cause unintentional burning (yellow ame), re or
explosion (ashback). This can cause damage to the BBQ
and create a dangerous situation for the operator. Turn
gas control knobs to off position. See “troubleshooting” to
solve the problem.
FREQUENT INSPECTION AND CLEANING OF BURNER
TUBES ARE RECOMMENDED.
• Always preheat for 5-10 minutes with lid closed before
cooking to prevent hygiene hazard.
• The JensenGrill Estate barbecue can be used as a traditio-
nal gas barbecue, as a charcoal barbecue or a combina-
tion of both at the same time.

Model: JensenGrill Estate S / JensenGrill Estate B
17
Jensen gas and charcoal barbecue
A. PROCEDURE FOR STARTING UP YOUR
BBQ WITH GAS AND CHARCOAL
NEVER LEAN OVER COOKING SURFACE WHILE LIGHTING
BBQ.
A. Add charcoal to your BBQ
a. Move “charcoal trays” to bottom position by putting the
“handle height adjustment” in the top position
b. Open the “grate” to locked vertical position
c. Use “charcoal tray moving tool” to take out the “char-
coal trays”. Lift up and pull towards the front at the
same time, to remove from charcoal tray support.
d. Open “charcoal trays” and add charcoal. You can ll
one or both charcoal trays. If barbequing for a long
time it is recommended that the charcoal are organised
nicely as illustrated above in order to maximize the
amount of charcoal.
NEVER OVERFILL CHARCOAL TRAYS. MAKE SURE LID
CAN CLOSE. MAXIMUM TOTAL AMOUNT OF CHARCOAL
(IN BOTH BOXES): 2.0 KG.
B. Depending on the barbecuing task, charcoal may be added
to one or both “charcoal trays”.
a. Place charcoal trays in position.
i. Left and rightI
ii. Middle.
iii. One side.
b. Finally add the 3 charcoal tray spacers.

Model: JensenGrill Estate S / JensenGrill Estate B
18
Jensen gas and charcoal barbecue
c. If you BBQ food with a high fat content, place a stan-
dard aluminium foil tray on top of the 3 “charcoal tray
spacers” to collect the fat and juices. This will help
prevent a are up and enable collection of juices to
make gravy.
C. Close the grate.
D. Make sure that grease and ash tray is empty.
E. Open the BBQ lid.
F. Put the “charcoal trays” in the top position during igni-
tion, so you can see the burners ignite. Alternatively, look
through the inspection holes on the right-hand side.
G. Make sure all the gas control knobs are in off position
H. Turn on the gas at the gas cylinder.
I. Light the burners. (Always keep lid open when lightning the
burners.)
a. Push the “Gas control knobs” and turn slowly anti-
clockwise until you hear a click from the ignition. This
will trigger a spark to light the burners.
b. Check if burner is ignited. If not, turn knob back to
closed vertical position and repeat.
IF IGNITION IS UNSUCCESSFUL AFTER THREE ATTEMPTS,
TURN OFF GAS CONTROL KNOBS AND WAIT 5 MINUTES
BEFORE TRYING AGAIN.
c. If ignition fails to produce spark, turn off all gas control
knobs and wait 5 min. Then check ignition (see proce-
dure in the “troubleshooting” paragraph). If spark still
fails to activate, and there seem to be no other pro-
blems, use match in “match holder” to light the burner
through the hole on the right-hand side of the BBQ.
d. The BBQ is tted with a “cross lighter” as a safety
precaution. If the ignition fails on only one burner, it will
be ignited by the adjacent burner. The “cross lighter”
function enables the gas from one burner to shift to the
adjacent burner.
J. When the burners are burning correctly, put the “charcoal
trays” back in the bottom position and close the lid to build
up heat inside the BBQ so as to preheat and light the
charcoals.
K. Check the burners and the coals every 5 min. by opening
the lid, or look through the two inspections holes on the
right-hand side of BBQ.
L. The coals will be ready in 15-20 min.
M. The desired level of heat can be attained by adjusting the
gas control knobs. In some cases, the gas burner may
not be required and can be turned off, by turning the gas
control knobs to the off position.
N. If all burners and side burners are turned off, turn off the
gas at the cylinder as an extra safety precaution.
O. Use “handle height adjustment” on the right-hand side to
adjust the distance between the “grate” and the “charcoal
trays”.
P. If more heat is required during barbecuing
a. Adjust distance between “charcoal tray” and “grate”
b. If more heat is required, turn on one or more of the gas
burners. Follow instructions in C, D, E, F and G above.
Adjust burner heat to the desired level. N.B. If you have
placed an aluminium foil tray on top of the “charcoal
tray spacers”, lighting the burner beneath the tray may
light the grease in the tray and create a are up.
Q. After the charcoal has burned out, the ash in the charcoal
trays can be easily removed by taking the charcoal trays
out of the BBQ. Put the charcoal tray into a bag and turn it
upside down and shake it until all the ash is out of the box.
PLEASE NOTE THAT CHARCOAL MAY GLOW AND RE-
MAIN HOT FOR A VERY LONG TIME. Do not put bag with
hot ash in the vicinity of ammable material. If the ash is left
inside the charcoal trays, the tray mesh will rust rapidly.
B. HOW TO USE THE BBQ AS A TRADITIO
NAL GAS BBQ
When the BBQ is used as a traditional gas BBQ, the procedure
is the same as above. Make sure ash is emptied from charcoals
trays. Leave charcoal tray spacers and charcoal trays in place
in the BBQ to create the best heat distribution. If you wish a
more diversied heat across the grate the charcoals trays and
the charcoal tray spacers must be removed.
If you BBQ food with a high fat content, place a standard
aluminium foil tray on top of the three “charcoal tray spacers” to
collect fat and juices. This will help prevent are-up and enable
the collection of juices to make gravy.
Preheat with lid closed for 5-10 minutes.
When cooking, leave the gas turned on at the desired level.
C. START SIDE BURNER
A. Open lid on side burner.
B. Light the burner.
1. Push the gas control knob and turn slowly anti-clock-
wise until you hear a click from the ignition. This will
trigger a spark to light the burner.
2. Check if burner is ignited. If not, turn knob back to closed
vertical position and repeat 1.
IF IGNITION IS UNSUCCESSFUL AFTER THREE ATTEMPTS,
TURN OFF GAS CONTROL KNOBS AND WAIT 5 MINUTES
BEFORE TRYING AGAIN.
PLEASE NOTE THAT IT MAY BE DIFFICULT TO SEE THE
FLAME IN BRIGHT LIGHT.
3. If ignition fails to produce a spark, wait 5 min. and check
ignition (see procedure in “troubleshooting” paragraph).
If spark still fails to activate, and there seem to be no
other problems, use match to light the burner.
4. Use wok, pot or pan up to 30 cm in diameter. Using a
larger pan can result in unintended heat distribution
creating overheating of parts on and around the side
burner.

Model: JensenGrill Estate S / JensenGrill Estate B
19
Jensen gas and charcoal barbecue
D. USING THE ROTISSERIE
• Using your rotisserie for the rst time (see “assembly
instructions”)
• Move the charcoal trays to the left-hand and right-hand
side. Put the three “charcoal box spacers” in the middle. If
the food has a high fat content, place a standard alumi-
nium foil tray on top of the three “charcoal tray spacers” to
collect the fat and juices dripping down.
• Take the spit and mount one spit fork.
• Insert the spit through the middle of the food you intend to
roast.
• Slide the other spit fork onto the other end of the spit. Push
both spit forks into the food and tighten the screws.
• Insert the spit into the motor and place the spit support
ring on the spit support bracket. Tighten the screw in the
locking ring to keep the spit in place.
• Start the motor and make sure the spit can rotate freely
with no obstacles. If the spit is not inserted correctly
through the centre of the food, the rotisserie will be une-
ven, and results sub-optimal. To address this, remove the
food from the spit and reposition the spit in the centre.
• If the food collides with the “upper grate” you must take it
off.
• If the food is very greasy, turn off the centre burner.
• When the food is ready and you need to remove the spit,
screw the “spit handle” on to the end of the spit to remove
the spit without touching any hot parts. If the food is heavy
you can use the “charcoal tray moving tool” to support the
spit on the other side. Remove the spit from the motor and
take the food off the spit.
E. HE ATI NG DR AWER
The top drawer functions as a heating drawer. The heat from
the burners and the charcoal will reect onto the cooking box
creating a temperature of 40 oC above background tempera-
ture.
When the food is ready, it can be placed on a plate in the
drawer out of the wind until serving. Put the plate on a trivet to
prevent cooling from below.
N.B. DO NOT PUT FLAMMABLE MATERIALS INTO THE
DRAWER
X. BARBEQUING INSTRUCTIONS
Depending on the type of food, you can choose between direct
or indirect heat.
A. DIRECT HEAT
Using direct heat means that the food you are barbecuing is
directly above the heat source. Often you will be cooking with
the lid open and relatively high levels of heat (In the winter time
it is often not possible to get the desireable heat with the lid
open). When you want to do direct heat the best way is to place
the 2 charcoals trays to right and the 3 charcoal spacers to the
left. You can adjust the heat by altering the handle height on the
right-hand side to adjust the distance between the charcoal tray
and the grate or/and by turning on the gas burners.
By closing the lid, the heat will increase quickly. Be careful not
to burn the food. This method is used for steaks, chops etc.
When barbecuing with direct heat, you need to turn the food to
cook it on both sides and prevent it from burning.
When the food is cooked it can be moved to the upper grill or
put on a plate in the heating drawer to keep it warm until you
are ready to serve.
Please note that cooking food with a high fat content may
cause ames to occur. If a are-up occurs, move the food away
from the area or place on the upper grill until the ames have
subsided. If you have minor are-up put the charcoal trays
in the bottom positon to increase the distance to the grate
preventing the ames to reach the food. In the event of serious
are-up, turn off the burners, remove the food and close the lid.
One way to help prevent major are-ups is to trim excess fat
from the meat before barbecuing.
B. INDIRECT HEAT
Using indirect heat means that the food is not directly above the
heat source. You will barbecue with the lid closed for a long time.
This method is used for roasting large pieces of meat, sh, whole
chickens etc. When using charcoal, place the charcoal trays to
the left and right-hand sides. Normally the charcoal tray will be in
the bottom position. When using gas, you should generally keep
the centre burner off. The gas control knob should generally be
on a medium or low heat level (at winter time it can be necessary
to put the burners on maximum).
Often when you use indirect heat you will be barbecuing for a
long time. With the JensenGrill you can always turn on the gas if
you need to increase the heat.
When you use indirect heat the heat will surround the food and
reect on the lid.
Place the meat or sh in the middle of the BBQ and close the lid.
It can be very helpful to use a cooking thermometer.
With a large joint of beef, sealing or browning on high direct heat
before roasting is highly recommended – to prevent excess drip
and retain the juices in the meat.
When the meat is roasted, application of further direct heat can
be recommended, to brown and crisp the surface (take care not
to burn).
When using the rotisserie you will normally use indirect heat.
When using indirect heat, there will be a lot of fat and juices
dripping down. Place a standard aluminium foil tray on top of the
three “charcoal tray spacers” to prevent are-ups and to enable
collection of juices for making gravy.
Alternatively, you can place the meat directly in an aluminium foil
tray on top of the grate. When the meat cooks in its own juices, it
will not dry out. The juice can be used for gravy.
PREHEAT BBQ FOR 10 MINUTES BEFORE PLACING THE
MEAT ON THE GRILL.
C. HE ATI NG DR AWER
The heating drawer is a fantastic feature helping you to serve
warm food from the BBQ. Often when you are barbecuing sau-
sages, steaks, vegetables, bread etc., it is almost impossible
to get everything ready to serve at the same time. The heating
drawer gives a unique exibility where you can remove the food
from the grill and still keep the food warm until serving.
The heating drawer can also be used for preheating plates. The
temperature in the heating drawer will be approximately 40oC
above ambient temperature depending on how warm the BBQ
is. Place the plate on a trivet to prevent cooling from below the
drawer.
If the charcoal trays are in the top position and the gas burners
are turned off the radiation heat in the drawer will be limited.

Model: JensenGrill Estate S / JensenGrill Estate B
20
Jensen gas and charcoal barbecue
D. USE YOUR BBQ AS A SMOKER
If you want a tast of smoke put the charcoal trays in the top
position and drop some smoking chips or herbs through the
grate on top of the charcoal trays. Lower the trays to the bottom
position and close the lid.
The BBQ can also be used as a more traditional smoker.
Take out the charcoal trays as described in the “Procedure for
starting up your BBQ with gas and coal” paragraph. Put the
smoker chips (about 1 cm) into the trays. N.B. Some smoker
chips needs to soak in water (see instructions on the pack-
age). Place the coal trays back into the BBQ. Put the charcoal
trays in the bottom position depending on how much heat you
require. Place the meat on the “grill” or on the “Rotisserie”. Turn
on the gas on all 3 burners. Put them in medium or low position
and close the lid. You will have a beautiful piece of smoked
meat. Never place meat with a high fat content on top of the
charcoal tray with the smoker chips in. This will create a serious
are-up when the dripping fat lands on the wood chips.
Alternative put 5-10 charcoals in each tray. The coals will be
ignited as described in the “Procedure for starting up your BBQ
with gas and charcoal”. When the charcoals are ready turn off
the gas remove and open the Charcoal trays and ad the smoker
chips around the charcoals. Place the trays back in the BBQ
and close the lid.
Orifice
Burner
Electrode
Lead
Valve

Model: JensenGrill Estate S / JensenGrill Estate B
21
Jensen gas and charcoal barbecue
XI. TROUBLESHOOTING IF THE BBQ FAILS
TO OPERATE PROPERLY
Spark is visible but BBQ will not light
• Do not smoke.
• Turn gas control knobs to OFF and turn off gas at the gas
cylinder.
• Check regulator, hose, and connections.
• Repeat ignition procedure after 5 minutes.
If BBQ still fails to operate, turn off gas control knobs and
turn off gas at gas cylinder.
Check for following:
Gas cylinder is empty.
Change gas cylinder.
Make sure regulator is tted correctly.
Take off regulator and reconnect regulator.
Misalignment of ignition on burner.
The tip of the electrode should be pointing towards the col
lector box. The gap between the spark electrode and the tip
of the collector box should be 3-5 mm. Adjust if necessary by
carefully bending.
Misaligned burner tube over orice.
Place burners correctly over orice.
Blocked orice.
Remove the screw which keeps the burner in place at the
back of the cooking box and remove the burner. Check valve
orice and clear any obstructions with a thin wire. Please
note that burners should be removed according to relevant
regulations.
Obstructions in gas lines.
Remove hose from BBQ and open gas at gas cylinder for
one second to check and blow out any blockages. Please
note that the gas hose should be removed according to rele
vant regulations.
If the burners are burning unevenly, the ame is yellow or
ash-back occurs
Turn gas control knobs to OFF position and turn off gas at the
gas cylinder.
Check for following
Misaligned burner tube over orice.
Place burners correctly over orice
Obstruction inside burner
Remove the screw which keeps the burner in place, remove
burners and check and remove any obstructions inside the
burner tube and burner. Use a piece of thin wire. Please note
that burners should be removed according to relevant regula
tions.
Blocked orice
Remove the screw which keeps the burner in place and
remove the burner. Check valve orice and clear any
obstructions. Please note that burners should be removed
according to national regulations.
IF BBQ STILL FAILS TO OPERATE PROPERLY, CONTACT
DEALER OR SUPPLIER.
DO NOT USE WHEN THERE IS ANY SIGN OF MALFUNC-
TION IN THE GAS SUPPLY SYSTEM.
No spark occurs when gas control knob is turned to igni-
tion position
Check for following:
Cooking residue around the ignition electrode.
Clean the ignition with a brush.
Bad connection.
Ignition lead is rmly attached and correctly insulated. To
check connection at voltage generator on the valve, remove
the top drawer. Inside the “external panel front” there are
some access holes in the “valve panel” to the voltage gene
rator. Check the connection using pliers.
Voltage generator at valve is broken.
Swap ignition lead and electrode on two burners. The elec
trode can be unscrewed from the inside of the cooking box.
Remove the electrode lead from the voltage generator on the
valve. Remove the top drawer. Inside the “external panel,
front” there are some access holes in the “valve panel” to the
voltage generator. Disconnect the lead using pliers.
If this solves the problem it is likely that the lead and elec
trode are broken. If this does not solve the problem, the
voltage generator is broken. You need to replace the valve.
To replace the valve with voltage generator.
Remove all the burners. Then remove the “external
panel, front” and the “external panel, left”. Remove
“valve panel” including the “valves” and the “gas pipe”
sliding it out to the left. Remove the “valve panel”. Now
it is possible to take the valve off the gas pipe and
replace the “valve”. Put it all together. Before mounting
the “external panel, front”, check for gas leak. See the
“Check for gas leaks” paragraph.
PLEASE NOTE THAT VALVES CAN ONLY BE REPLACED BY
GAS-AUTHORISED PERSONNEL.
XII.For further information contact your local
dealer.
For further information you can contact:
JensenGrill A/S
+45 31 32 33 72.
Please write “regarding technical issues” as subject
www.JensenGrill.com
Table of contents
Other Jensen Grill manuals
Popular Grill manuals by other brands

Char-Broil
Char-Broil 463625217 Product guide

Linea 2000
Linea 2000 DOMO DO1028TP-BF Instruction booklet

Infrico
Infrico PG-60NS Installation and instructions

Hendi
Hendi 143087 user manual

Heatlie Barbecues
Heatlie Barbecues SNAPPY KING RB1000SS General Installation and Operation Instructions

Landmann
Landmann Black Taurus 660 Assembly and operating instructions

George Foreman
George Foreman GRS6090BC use and care manual

buschbeck
buschbeck Meran Assembly instruction

Proficook
Proficook PC-GG 1057 instruction manual

Orava
Orava Grillchef-6 instruction manual

Pisla
Pisla Kotakeittio Tundra Grill owner's manual

TAIKO
TAIKO YS60-UL Installation instructions operating instructions