Jensen JEP-175 User manual

Portable Bluetooth Rechargeable Speaker with
Built-in Emergency USB Charging Port, FM Radio,
Fla hlight and Solar Charging Panel
MODEL: JEP-175
USER MANUAL
PLEASE READ THIS USER MANUAL COMPLETELY BEFORE OPERATING THIS UNIT
AND RETAIN THIS BOOKLET FOR FUTURE REFERENCE
Plea e contact Spectra Cu tomer Service at 1-800-777-5331 if you have any que tion
about operating thi product

E-1
WARNING
TO PREVENT FIRE OR SHOCK HAZARD, DO NOT USE THIS PLUG WITH AN
EXTENSION CORD, RECEPTACLE OR OTHER OUTLET UNLESS THE BLADES CAN BE
FULLY INSERTED TO PREVENT BLADE EXPOSURE. TO PREVENT FIRE OR SHOCK
HAZARD, DO NOT EXPOSE THIS APPLIANCE TO RAIN OR MOISTURE.
The Rat ng plate s located at the back enclosure of the apparatus
IMPORTANT SAFETY INSTRUCTIONS
1. Read these nstruct ons.
2. Keep these nstruct ons.
3. Heed all warn ngs.
4. Follow all nstruct ons.
5. Do not use th s apparatus near water.
6. Clean only w th dry cloth.
7. Do not block any vent lat on open ngs. Install n accordance w th the manufacturer’s
nstruct ons.
8. Do not nstall near any heat sources such as rad ators, heat reg sters, stoves, or other
apparatus ( nclud ng ampl f ers) that product heat. .
9. Only use attachments/accessor es spec f ed by the manufacturer.
10.
Use only w th a cart, stand, tr pod, bracket, or table recommended by the
manufacturer, or sold w th the product. When a cart s used, use caut on
when mov ng the cart/apparatus comb nat on to avo d njury from t p-over.
11. Unplug th s apparatus dur ng l ghtn ng storms or when unused for a long
per od of t me.
12. Refer all serv c ng to qual f ed serv ce personnel. Serv c ng s requ red when the apparatus
has been damaged n any way, such as power-supply cord or plug s damaged, l qu d has
been sp lled or objects have fallen nto the apparatus, the apparatus has been exposed to
ra n or mo sture, does not operate normally, or has been dropped.
13. Th s appl ance shall not be exposed to dr pp ng or splash ng water and that no object f lled
w th l qu ds such as vases shall be placed on the apparatus.
14. Do not overload wall outlet. Use only power source as nd cated.
15. Use replacement part as spec f ed by the manufacturer.
16. Upon complet on of any serv ce or repa rs to th s product, ask the serv ce techn c an to
perform safety checks.

E-2
17. Power Sources - Th s product should be operated only from the type of power source
nd cated on the mark ng label. If you are not sure of the type of power supply to your
home, consult your product dealer or local power company. For products ntended to
operate from battery power, or other sources, refer to the operat ng nstruct on.
18. Object and L qu d Entry - Never push objects of any k nd nto th s product through
open ngs as they may touch dangerous voltage po nts or short-out parts that could result
n a f re or electr c shock. Never sp ll l qu d of any k nd on the product.
19. Damage Requ r ng Serv ce - Unplug th s product from the wall outlet and refer serv c ng to
qual f ed serv ce personnel under the follow ng cond t ons:
a) When the power-supply cord or plug s damaged,
b) If l qu d has been sp lled, or objects have fallen nto the product,
c) If the product has been exposed to ra n or water,
d) If the product does not operate normally by follow ng the operat ng nstruct ons. Adjust
only those controls that are covered by the operat ng nstruct ons as an mproper
adjustment of other controls may result n damage and w ll often requ re extens ve
work by a qual f ed techn c an to restore the product to ts normal operat on.
e) If the product has been dropped or damaged n any way, and
f) When the product exh b ts a d st nct change n performance - th s nd cates a need for
serv ce.
20. The battery shall not be exposed to excess ve heat such as sunsh ne, f re or the l ke.
21. M n mum d stances of 4 nches around the apparatus for suff c ent vent lat on.
22. The vent lat on should not be mpeded by cover ng the vent lat on open ngs w th tems,
such as newspapers, tablecloths, curta ns, etc.
23. No open flame sources, such as l t candles, should be placed on the product.
24. The use of apparatus n moderate cl mates.
25. Attent on should be drawn to the env ronmental aspects of battery d sposal
SAVE THESE INSTRUCTIONS

E-3
COMPLIANCE WITH FCC REGULATIONS
FCC ID: 2A6QJ-75200
Th s dev ce compl es w th Part 15 of the FCC Rules. Operat on s subject to the follow ng two
cond t ons:
(1) Th s dev ce may not cause harmful nterference, and
(2) Th s dev ce must accept any nterference rece ved, nclud ng nterference that may cause
undes red operat on.
Th s equ pment has been tested and found to comply w th the l m ts for a class B d g tal dev ce,
pursuant to Part 15 of the FCC Rules. These l m ts are des gned to prov de reasonable
protect on aga nst harmful nterference n a res dent al nstallat on. Th s equ pment generates
uses and can rad ate rad o frequency energy and, f not nstalled and used n accordance w th
the nstruct ons, may cause harmful nterference to rad o commun cat ons. However, there s
no guarantee that nterference w ll not occur n a part cular nstallat on. If th s equ pment does
cause harmful nterference to rad o or telev s on recept on, wh ch can be determ ned by turn ng
the equ pment off and on, the user s encouraged to try to correct the nterference by one or
more of the follow ng measures:
- Reor ent or relocate the rece v ng antenna.
- Increase the separat on between the equ pment and rece ver.
- Connect the equ pment nto an outlet on a c rcu t d fferent from that to wh ch the rece ver s
connected.
- Consult the dealer or an exper enced rad o/TV techn c an for help.
CAUTION:
Changes or mod f cat ons not expressly approved by the party respons ble for
compl ance could vo d the user’s author ty to operate the equ pment.
PROTECT YOUR FURNITURE!!
Th s system s equ pped w th non-sk d rubber ‘feet’ to prevent the product from mov ng when you
operate the controls. These ‘feet’ are made from non-m grat ng rubber mater al spec ally formulated to
avo d leav ng any marks or sta ns on your furn ture. However certa n types of o l based furn ture
pol shes, wood preservat ves, or clean ng sprays may cause the rubber ‘feet’ to soften, and leave
marks or a rubber res due on the furn ture.
To prevent any damage to your furn ture we strongly recommend that you purchase small self-
adhes ve felt pads, ava lable at hardware stores and home mprovement centers everywhere, and
apply these pads to the bottom of the rubber ‘feet’ before you place the product on f ne wooden
furn ture.

E-4
DEAR JENSEN CUSTOMER
Select ng f ne aud o equ pment such as the un t you've just purchased s only the start of your
mus cal enjoyment. Now t's t me to cons der how you can max m ze the fun and exc tement
your equ pment offers. Th s manufacturer and the Electron c Industr es Assoc at on's
Consumer Electron cs Group want you to get the most out of your equ pment by play ng t at a
safe level. One that lets the sound come through loud and clear w thout annoy ng blar ng or
d stort on and, most mportantly, w thout affect ng your sens t ve hear ng.
Sound can be dece v ng. Over t me your hear ng "comfort level" adapts to h gher volumes of
sound. So what sounds "normal" can actually be loud and harmful to your hear ng. Guard
aga nst th s by sett ng your equ pment at a safe level BEFORE your hear ng adapts.
To e tabli h a afe level:
•
Start your volume control at a low sett ng.
•
Slowly ncrease the sound unt l you can hear t comfortably and clearly, and w thout
d stort on.
Once you have e tabli hed a comfortable ound level:
•
Set the d al and leave t there.
Tak ng a m nute to do th s now w ll help to prevent hear ng damage or loss n the future. After
all, we want you l sten ng for a l fet me.
We Want You Li tening for a Lifetime
Used w sely, your new sound equ pment w ll prov de a l fet me
of fun and enjoyment. S nce hear ng damage from loud no se
s often undetectable unt l t s too late, th s manufacturer and
the Electron c Industr es Assoc at on's Consumer Electron cs
Group recommend you avo d prolonged exposure to
excess ve no se.
Cu tomer' Record:
The ser al number of th s product s found on ts bottom. You should note the ser al number of
th s un t n the space prov ded as a permanent record of your purchase to a d n dent f cat on
n the event of theft of loss.
Model Number: JEP-175
Serial Number:

E-5
LOCATION OF CONTROLS
POWER SOURCE
A 3.7V DC rechargeable l th um battery s nstalled n JEP-175. Sl de the ON/OFFF SWITCH
(#9) to turn on the un t. Tap the MODE BUTTON (#2) to select Bluetooth, FM, AUX or USB
mode.
Lithium Battery Safety In truction
Do not burn or bury batter es. Do not puncture or crush. Do not d sassemble.
Recycle L th um batter es. Do not d spose of n the trash.
If the electrolyte n the cells should get on your sk n, thoroughly wash w th soap and water. If
n the eyes, r nse thoroughly w th cool water. Immed ately seek med cal attent on.
Use only chargers rated for L th um cells. Be sure the charger's voltage and current sett ngs
are correct for the battery pack be ng charged.
Charge batter es on a f reproof surface away from flammable tems or l qu ds. Batter es
should NEVER be left unattended wh le charg ng. Only adults should charge the batter es.
Follow the manufacturer's nstruct ons for charg ng the product and do not charge longer than
recommended. Unplug the charger when the battery s charged.
Recycle Rechargeable Batterie
Recycle your old rechargeable batterie at one of the many collection ite
in the U.S. and Canada. To find the ite neare t you, vi it
www.call2recycle.org or call toll-free 1-877-2-RECYCLE.
1 CARRYING HANDLE
2 MODE BUTTON
3
+
BUTTON
4 PLAY/PAUSE BUTTON
5
-
BUTTON
6 FLASHLIGHT BUTTON
7 TELECOPIC ANTENNA
8 FLASHLIGHT
9 ON/OFF SWITCH
10 POWER INDICATOR
11 DC IN (MICRO USB)
12 USB PORT
13 AUX IN JACK
14 SOLAR PANEL

E-6
USB POWER
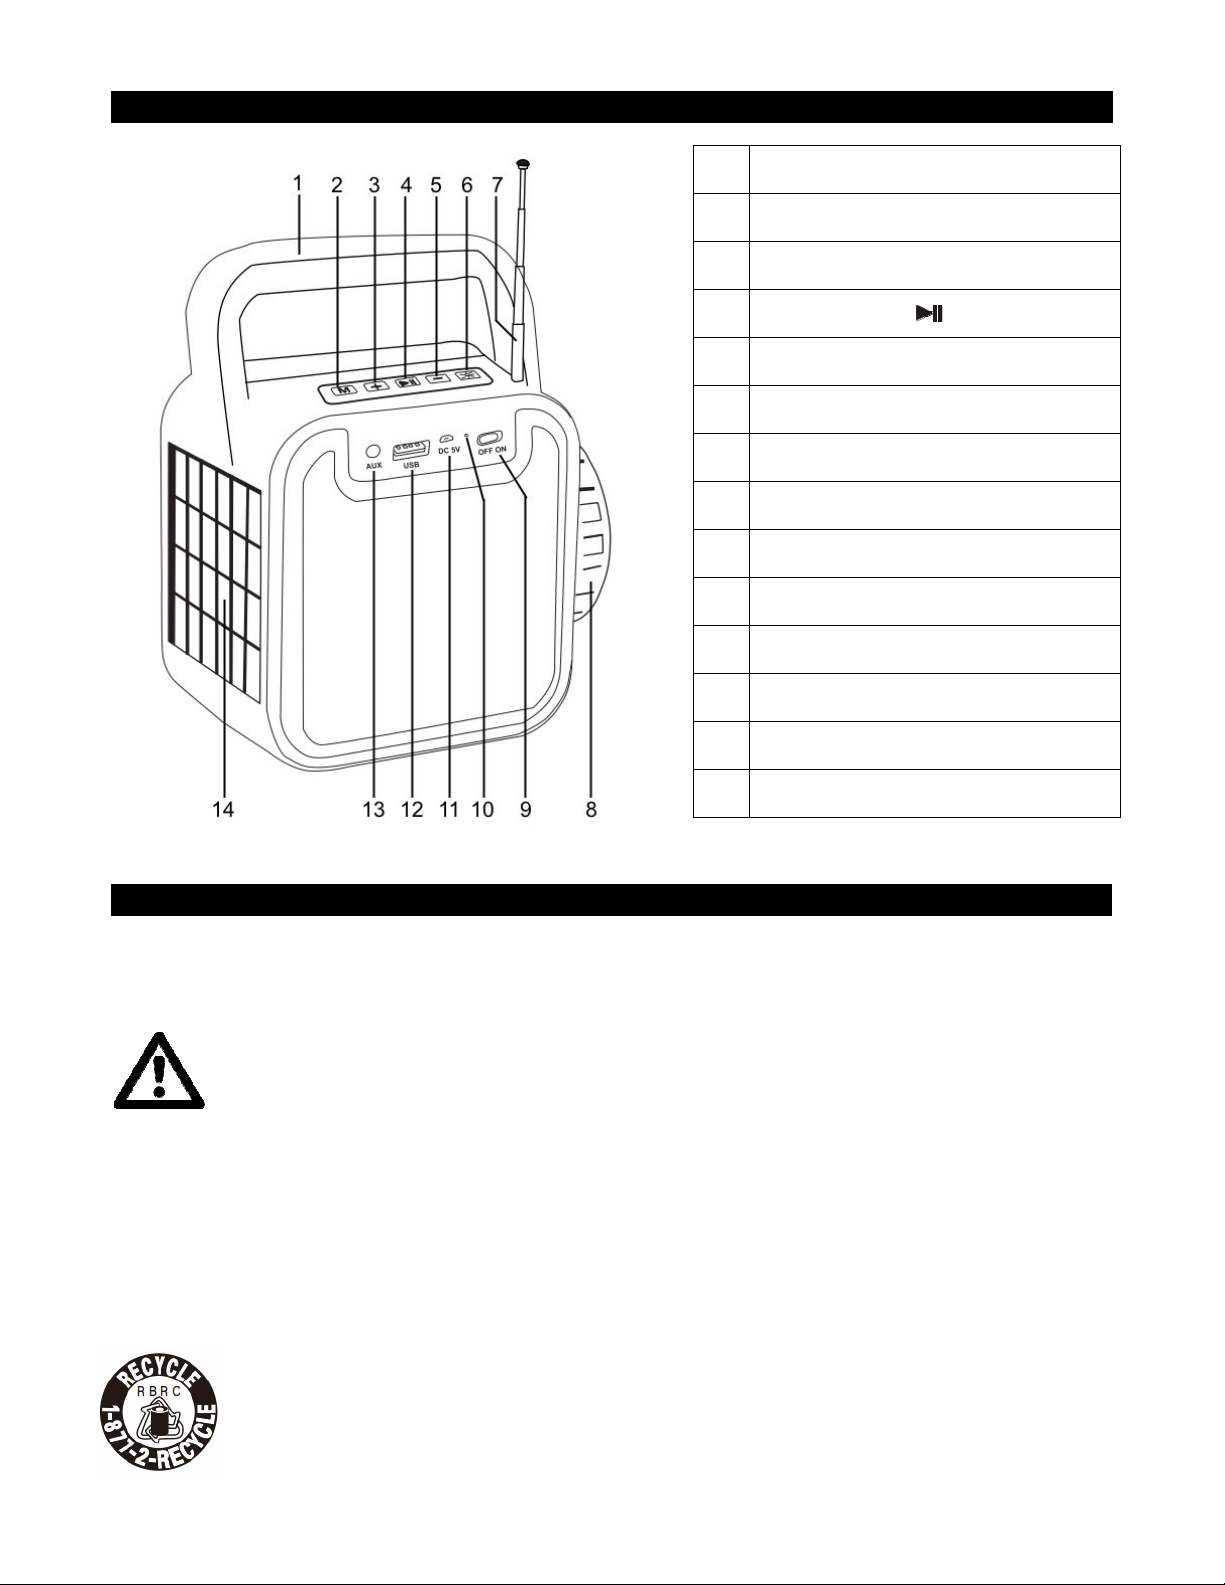
The un t has a DC IN (MICRO USB) JACK (#11) on the front of the un t.
1. Use the m cro USB plug s de of a 5V DC, 1A output AC adaptor (not ncluded), and
connect t to the DC IN (MICRO USB) JACK (#11) on the front of the un t.
2. Ensure plug the AC adaptor nto an 120V AC, 60Hz household outlet.
Note: The USB power adaptor (not ncluded) descr bed above s the same type commonly
used w th smartphones. A USB to m cro USB cord s also requ red for charg ng the un t
v a the m cro USB jack located on the front of the un t.
SOLAR POWER
1. A 3.7V rechargeable L - on Battery s nstalled n the un t.
2. Put the un t n d rect sunl ght, mak ng sure the SOLAR PANEL (#14) of the un t s fac ng
towards the sun. If the sunl ght s strong enough, the red LED of the POWER INDICATOR
(#10) w ll l ght nd cat ng the un t s charg ng when the un t Is off. More power s generated
the longer you leave the un t n d rect sunl ght.
Note: If the battery s completely dra ned, t may requ re very long exposure to d rect sunl ght
n order to charge the battery us ng the solar panel. You should use the USB POWER
f you need to use the rad o mmed ately.
FM RADIO OPERATION
Li tening to the radio:
1. Sw tch the ON/OFF SWITCH (#9) to on pos t on to turn on the un t. The mult colors LED
accent l ghts n speaker w ll turn on and flash.
2. Repeatedly tap the MODE BUTTON (#2), you w ll step through the d fferent modes
ava lable: Bluetooth -> FM Rad o -> USB* -> AUX LINE-IN*
*Note: When stepp ng through the modes, USB and AUX LINE-IN w ll be sk pped unless a
USB flash dr ve s nserted and an Aux l ary l ne- n cord s plugged n.
3. Tap the MODE BUTTON (#2) repeatedly to select FM rad o mode. The blue LED of the
POWER INDICATOR (#10) w ll l ght and flash. A vo ce “FM RADIO” s to conf rm the un t
sw tch to FM RADIO mode.
4. Press and hold the PLAY/PAUSE BUTTON (#4). The un t w ll scan from the lowest
frequency to the h ghest frequency and w ll automat cally save the stat ons found. The
POWER INDICATOR (#10) flashes fast dur ng the un t s scann ng.
5. The un t w ll start to play the f rst stat on saved after scanned the whole FM band.
6. Tap the + / - BUTTONS (#3/#5) to adjust the volume to obta n the des red volume level.
7. Press and hold the + / - BUTTONS (#3/#5) to select next or prev ous preset stat on.
8. Tap the PLAY/PAUSE BUTTON (#4) to mute the speaker. The blue LED of the
POWER INDICATOR (#10) w ll l ght stead ly. Tap The PLAY/PAUSE BUTTON (#4)
aga n to turn off the mute funct on. The blue LED of the POWER INDICATOR (#10) w ll
flash aga n.
9. Sw tch the ON/OFF SWITCH (#9) to off pos t on to turn off the un t.
TIPS FOR BEST RADIO RECEPTION
If FM recept on s weak, fully extend the TELESCOPIC ANTENNA (#7) and vary the locat on
of the un t unt l you f nd the strongest s gnal.

E-7
BLUETOOTH OPERATION
1. Sw tch the ON/OFF SWITCH (#9) to on pos t on to turn on the un t. The mult colors LED
accent l ghts n speaker w ll turn on and flash.
2. Tap the MODE BUTTON (#2) repeatedly to select Bluetooth mode. A vo ce “Bluetooth” s
to conf rm the un t sw tch to Bluetooth mode.
3. The POWER INDICATOR (#10) l ght and flash.
4. Turn on the Bluetooth funct on of your dev ce and enable the search or scan funct on to
f nd the JEP-175.
5. Select the JEP-175 from the dev ce l st when t appears on your dev ce’s screen. If
requ red, enter the pass code “0000” to pa r (l nk) the JEP-175 w th your dev ce.
6. If you are pa r ng (l nk ng) your computer to the JEP-175 us ng Bluetooth, you may need to
set the JEP-175 as your computer’s default sound dev ce.
7. After pa r ng the JEP-175 w th your Bluetooth dev ce successfully, the POWER
INDICATOR (#10)
w ll l ght blue stead ly. A connected tone w ll be heard to conf rm the
un t s connected to your dev ce.
8. If you want the JEP-175 to pa r w th another Bluetooth dev ce, press and hold the
PLAY/PAUSE BUTTON (#4) unt l the POWER INDICATOR (#10) flashes. A
d sconnected tone w ll be heard to conf rm the un t s d sconnected from your dev ce. The
un t w ll go nto Pa r ng/D scoverable mode.
9. Repeat steps 4 & 5.
Now you can play mus c from your Bluetooth dev ce w relessly to the JEP-175.
1. Select a song and press the Play/Pause Button on your Bluetooth dev ce or
PLAY/PAUSE BUTTON (#4) on the JEP-175 to play or pause the Bluetooth dev ce
playback. The POWER INDICATOR (#10)
w ll flashes slow.
2. Press and hold the + / - BUTTONS (#3/#5) to select next or prev ous track.
3. Tap the + / - BUTTONS (#3/#5) to adjust the volume to obta n the des red volume level.
Notes:
1. Refer to the manual of your cell phone, tablet PC, computer or other Bluetooth enabled
dev ces for Bluetooth operat on s nce t may vary from model to model.
2. If your Bluetooth enabled dev ce does not support A2DP prof le, t w ll not play the mus c
through the speaker, even f pa red (l nked).
3. Remember to turn off the JEP-175 when you have f n shed l sten ng.
4. Don't forget to sw tch off the power of your external aud o dev ce as well.
AUX IN OPERATION
You can play other mus c sources ( Pod, MP3 or other d g tal aud o players) through the
speaker of the JEP-175 by connect ng the AUX IN JACK (#13) to your external player’s aud o
out jack or headphone jack.
1. Sw tch the ON/OFF SWITCH (#9) to on pos t on to turn on the un t. The mult colors LED
accent l ghts n speaker w ll turn on and flash.
2. Plug one end of an aud o cable nto the AUX IN JACK (#13) and the other end of the cable
to the headphone jack of your d g tal aud o player.

E-8
3. The un t w ll sw tch to AUX mode automat cally or tap the MODE BUTTON (#2) to select
AUX mode. The blue LED of the POWER INDICATOR (#10) w ll l ght and flash. A vo ce
“AUX LINE IN” s to conf rm the un t sw tch to AUX mode.
4. Turn on and start play ng the external dev ce you plugged nto the AUX IN JACK (#13).
5. Tap the + / - BUTTONS (#3/#5) to adjust the volume to obta n the des red volume level.
6. Tap the PLAY/PAUSE BUTTON (#4) to mute the speaker. The blue LED f the POWER
INDICATOR (#10) w ll l ght stead ly. Tap The PLAY/PAUSE BUTTON (#4) aga n to turn
off the mute. The blue LED of the POWER INDICATOR (#10) w ll flash aga n.
Notes:
• If you connect the un t to the L ne-Out Jack on your external dev ce, you only need to
adjust the volume control of your un t. If you connect to the Headphone Jack of your
external dev ce, you may need to adjust both the volume controls of your external dev ce
and the un t to obta n the des rable l sten ng level.
• Remember to turn off the un t when you have f n shed l sten ng. Don't forget to sw tch off
the power of your external aud o dev ce as well.
USB OPERATION
The system s able to decode and playback all MP3 f les wh ch are stored n the memory
med a v a a USB connect ng port.
USB PLAY / PAUSE mode
1. Sw tch the ON/OFF SWITCH (#9) to on pos t on to turn on the un t. The mult colors LED
accent l ghts n speaker w ll turn on and flash.
2. Insert a USB dr ve nto the USB PORT (#12) or tap the MODE BUTTON (#2) to select
USB mode. A vo ce “USB” s to conf rm the un t sw tch to USB mode. The blue LED of the
POWER INDICATOR (#10) flashes.
3. Dur ng USB play mode, press PLAY/PAUSE BUTTON (#4) on the JEP-175 to play or
pause the USB dr ve. The blue LED of the POWER INDICATOR (#10) w ll l ght stead ly.
4. Tap the + / - BUTTONS (#3/#5) to adjust the volume to obta n the des red volume level.
SKIP MODE
1. Dur ng PLAY mode, press and hold the + BUTTON (#3), the player w ll go to next track.
2. Dur ng PLAY mode, press and hold the - BUTTON (#5), the player w ll go to the prev ous
track.
Remark
- The system w ll read all the nd v dual tracks from the oldest one stored n the USB dr ve
up to the latest one. After f n sh ng all nd v dual tracks, t w ll go to play the folder based on
the t me sequence wh ch s the t me of access.
- USB port does not support connect on w th a USB extens on cable and s not des gned to
commun cate w th computer d rectly.
- The system can detect and read the f le under MP3 format only though the USB port.
- If connect the system to MP3 player v a the USB PORT, due to var ances n MP3
encod ng format, some MP3 player may not be able to play v a the USB PORT. Th s s not
a malfunct on of the system.

E-9
USB CHARGING
THE JEP-175 FEATURES A FRONT MOUNTED USB CHARGING PORT
(DC 5V 1 A) FOR CHARGING YOUR CELL PHONE.
1. Plug the standard end of the USB cable nto the USB
PORT (#12) located on the front of
the un t. Plug the other end of the cable nto the dev ce you w sh to charge.
2. Observe the battery charge nd cator on your dev ce to make sure the charg ng process
starts normally.
3. Unplug the cable when your dev ce s fully charged.
WARNING!
The USB port located on the front of the un t s des gned for charg ng a smart phone or
small portable dev ce and does not support data transfer or connect on to a computer
Don’t connect the USB port of the un t to another USB charger. It may damage both un ts
and vo d the warranty.
FLASHLIGHT
Press and hold the FLASHLIGHT BUTTON (#6) to turn on the FLASHLIGHT (#8). Press and
hold the FLASHLIGHT BUTTON (#6) aga n to turn off the FLASHLIGHT (#8).
CARE AND MAINTENANCE
1. Do not subject the un t to excess ve force, shock, dust or extreme temperature.
2. Do not tamper the nternal components of the un t.
3. Clean your un t w th a dry cloth. Solvent or detergent should never be used.
4. Avo d leav ng your un t n d rect sunl ght or n hot, hum d or dusty places.
5. Keep your un t away from heat ng appl ances and sources of electr cal no se such as
fluorescent lamps or motors.
TROUBLE SHOOTING GUIDE
If you exper ence d ff cult es n the use of th s clock rad o, please check the follow ng or call 1-
800-777-5331 for Customer Serv ce and support
Symptom Po ible Cau e Solution
No se or sound
d storted on FM
broadcast
- Stat on not tuned properly for
FM.
- The antenna s not pos t oned
correctly
- Retune the FM broadcast stat on.
- Fully extend the telescop c antenna
or repos t on the un t unt l the best
recept on s obta ned.
FM no sound - Un t not n “RADIO” funct on
mode.
- Volume set at m n mum
- Tap the MODE BUTTON to select
FM mode.
- Increase Volume.
Sound appears
d storted at h gh
volume sett ng
- Volume control s set to
max mum.
- Adjust Volume control to a lower
comfortable level.
No charg ng from the
USB port
- The USB cable s damaged or
not securely attached
- Replace the USB cable or try
reconnect ng t aga n

E-10
SPECIFICATION
Power: Bu lt- n DC 3.7V, 4800mAh L - on rechargeable battery or
USB Power: DC 5V 1A
Solar Panel for charg ng (70-80mAh/hour)
USB Charg ng: DC 5V 1A
Frequency Range: FM 87.5 – 108 MHz
At Spectra, env ronmental and soc al respons b l ty s a core value
of our bus ness. We are ded cated to cont nuous mplementat on
of respons ble n t at ves w th an a m to conserve and ma nta n the
env ronment through respons ble recycl ng.
Please v s t us at http://www.spectra ntl.com/green.htm for more nformat on on Spectra’s
green n t at ves or to f nd a recycler n your area.
The Bluetooth® word mark and logos are reg stered trademarks owned by Bluetooth SIG, Inc.
and any use of such marks by Spectra Merchand s ng Intl, Inc. s under l cense. Other
trademarks and trade names are those of the r respect ve owners.

E-11
1 YEAR LIMITED WARRANTY AND SERVICE
VALID IN THE U.S.A. ONLY
SPECTRA MERCHANDISING INTERNATIONAL, INC. warrants th s un t to be free from
defect ve mater als or
factory workmansh p for a per od of 1 year from the date of or g nal
customer purchase and prov ded the
product s ut l zed w th n the U.S.A. Th s warranty s
not ass gnable or transferable. Our obl gat on under th s
warranty s the repa r or
replacement of the defect ve un t or any part thereof, except batter es, when t s
returned
to the SPECTRA Serv ce Department, accompan ed by proof of the date of or g nal consumer
purchase, such as a dupl cate copy of a sales rece pt.
You must pay all sh pp ng charges requ red to sh p the product to SPECTRA for warranty
serv ce. If the product s repa red or replaced under warranty, the return charges w ll be at
SPECTRA’s expense. There are no other express warrant es other than those stated here n.
Th s warranty s val d only n accordance w th the cond t ons set forth below:
1. The warranty appl es to the SPECTRA product only wh le:
a. It rema ns n the possess on of the or g nal purchaser and proof of purchase s
demonstrated.
b. It has not been subjected to acc dent, m suse, abuse, mproper serv ce, usage outs de
the descr pt ons and warn ngs covered w th n the user manual or non-SPECTRA
approved mod f cat ons.
c. Cla ms are made w th n the warranty per od.
2. Th s warranty does not cover damage or equ pment fa lure caused by electr cal w r ng not
n compl ance w th
electr cal codes or SPECTRA user manual spec f cat ons, or
fa lure to prov de reasonable care and
necessary ma ntenance as outl ned n the user
manual.
3. Warranty of all SPECTRA products appl es to res dent al use only and s vo d when
products are used n nonres dent al env ronment or nstalled outs de the Un ted States.
Th s warranty g ves you spec f c legal r ghts, and you may also have other r ghts wh ch vary
from state to state. TO OBTAIN SERVICE please remove all batter es ( f any) and pack the
un t carefully and send t fre ght prepa d to SPECTRA at the address shown below. IF THE
UNIT IS RETURNED WITHIN THE WARRANTY PERIOD shown above, please nclude a
proof of purchase (dated cash reg ster rece pt) so that we may establ sh your el g b l ty for
warranty serv ce and repa r of the un t w thout cost. Also nclude a note w th a descr pt on
expla n ng how the un t s defect ve. A customer serv ce representat ve may need to contact
you regard ng the status of your repa r, so please nclude your name, address, phone
number and ema l address to exped te the process.
It s recommended that you contact SPECTRA f rst at 1-800-777-5331 or by ema l at
custserv@spectra ntl.com for updated nformat on on the un t requ r ng serv ce. In some
cases, the model you have may be d scont nued, and SPECTRA reserves the r ght to offer
alternat ve opt ons for repa r or replacement.
SPECTRA MERCHANDISING INTERNATIONAL, INC.
4230 North Normandy Avenue,
Ch cago, IL60634, USA. 1-800-777-5331
To reg ster your product, v s t the l nk on the webs te below to enter your nformat on.
http://www.spectra ntl.com/wform.htm
0522 Pr nted n Ch na
(JEP-175/JEP-175-TE/JEP-175-BK)
Table of contents
Other Jensen Speakers manuals

Jensen
Jensen MSX60CSS User manual

Jensen
Jensen JPW410 User manual

Jensen
Jensen MXS60CSS Guide

Jensen
Jensen JTA-315 User manual

Jensen
Jensen SMPS-621 User manual

Jensen
Jensen SMPS-650 User manual

Jensen
Jensen JSB-550 User manual

Jensen
Jensen TRIAXIAL Series Operating instructions

Jensen
Jensen SMPS-627 User manual

Jensen
Jensen JXHD35 User manual

Jensen
Jensen SMPS-625 User manual

Jensen
Jensen SMPS-627 User manual

Jensen
Jensen SFA900 User manual

Jensen
Jensen BUDDY User manual

Jensen
Jensen SMPS-1000 User manual

Jensen
Jensen Multi-Purpose Speakers JS43 User manual

Jensen
Jensen SMPS-665 User manual

Jensen
Jensen Champion Quick start guide

Jensen
Jensen MS6151DC - SCHEMA User manual

Jensen
Jensen JSB-1000 User manual