Jensen JTA-315 User manual

STEREO BLUETOOTH 3-SPEED TURNTABLE
WITH SPEAKERS
MODEL: JTA-315
USER MANUAL
PLEASE READ THIS USER MANUAL COMPLETELY BEFORE OPERATING THIS
UNIT AND RETAIN THIS BOOKLET FOR FUTURE REFERENCE.

E-1
WARNING
TO PREVENT FIRE OF SHOCK HAZARD, DO NOT USE THIS PLUG WITH AN
EXTENSION CORD, RECEPTACLE OR OTHER OUTLET UNLESS THE BLADES CAN
BE
FULLY INSERTED TO PREVENT BLADE EXPOSURE. TO PREVENT FIRE OR
SHOCK
HAZARD, DO NOT EXPOSE THIS APPLIANCE TO RAIN OR MOISTURE.
The rating plate is located at the back panel of the apparatus.
IMPORTANT SAFETY INSTRUCTIONS
1. Read these instructions.
2. Keep these instructions.
3. Heed all warnings.
4. Follow all instructions.
5. Do not use this apparatus near water.
6. Clean only with dry cloth.
7. Do not block any ventilation openings. Install in accordance with the manufacturer’s instructions.
8. Do not install near any heat sources such as radiators, heat registers, stoves, or other apparatus
(including amplifiers) that product heat.
9. AC adaptor is used as disconnect device and it should remain readily operable during intended
use. In order to disconnect the apparatus from the mains completely, the AC adaptor should be
disconnected from the mains socket outlet completely.
10. Only use attachments/accessories specified by the manufacturer.
11. Use only with a cart, stand, tripod, bracket, or table recommended by the
manufacturer, or sold with the product. When a cart is used, use caution when
moving the cart/apparatus combination to avoid injury from tip-over.
12. Unplug the AC adaptor of this apparatus during lightning storms or when unused
for a long period of time.
13. Refer all servicing to qualified service personnel. Servicing is required when the apparatus has been
damaged in any way, such as AC adaptor cord or enclosure is damaged, liquid has been spilled or
objects have fallen into the apparatus, the apparatus has been exposed to rain or moisture, does not
operate normally, or has been dropped.
14. This appliance shall not be exposed to dripping or splashing water and that no object filled with
liquids such as vases shall be placed on the apparatus.
15. Do not overload wall outlet. Use only power source as indicated.
16. Use replacement part as specified by the manufacturer.
17. Upon completion of any service or repairs to this product, ask the service technician to perform
safety checks.

E-2
18. Power Sources - This product should be operated only from the type of power source indicated on
the marking label. If you are not sure of the type of power supply to your home, consult your product
dealer or local power company.
19. Object and Liquid Entry - Never push objects of any kind into this product through openings as they
may touch dangerous voltage points or short-out parts that could result in a fire or electric shock.
Never spill liquid of any kind on the product.
20. Damage Requiring Service - Unplug the AC adaptor of this product from the wall outlet and refer
servicing to qualified service personnel under the following conditions:
a) When theAC adaptor is damaged,
b) If liquid has been spilled, or objects have fallen into the product,
c) If the product has been exposed to rain or water,
d) If the product does not operate normally by following the operating instructions. Adjust only
those controls that are covered by the operating instructions as an improper adjustment of
other controls may result in damage and will often require extensive work by a qualified
technician to restore the product to its normal operation.
e) If the product has been dropped or damaged in any way, and
f) When the product exhibits a distinct change in performance - this indicates a need for
service.
21. Excessive sound pressure from earphones and headphones can cause hearing loss.
22. Minimum distances of 4 inches around the apparatus for sufficient ventilation.
23. The ventilation should not be impeded by covering the ventilation openings with items, such as
newspapers, table-cloths, curtains, etc.
24. No open flame sources, such as lit candles, should be placed on the product.
25. The apparatus should be used in moderate climates.
SAVE THESE INSTRUCTIONS

E-3
COMPLIANCE WITH FCC REGULATIONS
FCC ID: LMZ-60315
This device complies with Part 15 of the FCC Rules. Operation is subject to the following two conditions:
(1) This device may not cause harmful interference, and
(2) This device must accept any interference received, including interference that may cause
undesired operation.
This equipment has been tested and found to comply with the limits for a Class B digital device, pursuant
to Part 15 of the FCC Rules. These limits are designed to provide reasonable protection against harmful
interference in a residential installation. This equipment generates uses and can radiate radio frequency
energy and, if not installed and used in accordance with the instructions, may cause harmful interference
to radio communications. However, there is no guarantee that interference will not occur in a particular
installation. If this equipment does cause harmful interference to radio or television reception, which can
be determined by turning the equipment off and on, the user is encouraged to try to correct the
interference by one or more of the following measures:
- Reorient or relocate the receiving antenna.
- Increase the separation between the equipment and receiver.
- Connect the equipment into an outlet on a circuit different from that to which the receiver is
connected.
- Consult the dealer or an experienced radio/TV technician for help.
CAUTION: Changes or modifications not expressly approved by the party responsible for
compliance could void the user’s authority to operate the equipment.
PROTECT YOUR FURNITURE!!
The turntable and speaker boxes of this system are equipped with non-skid rubber ‘feet’ to prevent the
them from moving when you operate the controls and while playing. These ‘feet’ are made from
non-migrating rubber material specially formulated to avoid leaving any marks or stains on your furniture.
However certain types of oil based furniture polishes, wood preservatives, or cleaning sprays may cause
the rubber ‘feet’to soften, and leave marks or a rubber residue on the furniture.
To prevent any damage to your furniture we strongly recommend that you purchase small self-adhesive
felt pads, available at hardware stores and home improvement centers everywhere, and apply these
pads to the bottom of the rubber ‘feet’ before you place the turntable and speaker boxes on fine wooden
furniture.

E-4
DEAR JENSEN CUSTOMER
Selecting fine audio equipment such as the unit you've just purchased is only the start of your musical
enjoyment. Now it's time to consider how you can maximize the fun and excitement your equipment
offers. This manufacturer and the Electronic Industries Association's Consumer Electronics Group want
you to get the most out of your equipment by playing it at a safe level. One that lets the sound come
through loud and clear without annoying blaring or distortion and, most importantly, without affecting
your sensitive hearing.
Sound can be deceiving. Over time your hearing "comfort level" adapts to higher volumes of sound. So
what sounds "normal" can actually be loud and harmful to your hearing. Guard against this by setting
your equipment at a safe level BEFORE your hearing adapts.
To establish a safe level:
•Start your volume control at a low setting.
•Slowly increase the sound until you can hear it comfortably and clearly, and without distortion.
Once you have established a comfortable sound level:
•Set the dial and leave it there.
•Taking a minute to do this now will help to prevent hearing damage or loss in the future. After all, we
want you listening for a lifetime.
We Want You Listening for a Lifetime
Used wisely, your new sound equipment will provide a lifetime of fun and
enjoyment. Since hearing damage from loud noise is often undetectable
until it is too late, this manufacturer and the Electronic Industries
Association's Consumer Electronics Group recommend you avoid
prolonged exposure to excessive noise.
Customer's Record:
The serial number of this system can be found on the back cabinet of the turntable unit. You should
note the serial number in the space provided as a permanent record of your purchase to aid in
identification in the event of theft of loss.
Model Number : JTA-315 Serial Number : ___________________________

E-5
LOCATION OF CONTROLS
MAIN UNIT
TOP PANEL
1. TURNTABLE PLATTER
2. TURNTABLE SHAFT
3. 45 RPMADAPTOR
4. TONE ARM LIFT LEVER
5. AUTO STOP ON/OFF SELECTOR
6. 33/45/78 RPM SELECTOR
7. TONE ARM
8. TONE ARM LATCH
9. STYLUS CARTRIDGE
10. POWER/FUNCTION INDICATOR
11. STEREO HEADPHONE JACK
12. POWER/VOLUME CONTROL
13. FUNCTION SELECTOR
( OUT / PHONO / AUX IN / IN)
BACK PANEL
14. AUX IN JACK
15. SPEAKER OUTPUT JACKS (R/L)
16. PITCH CONTROL
17. DC IN JACK
SPEAKER UNITS
18. BASS REFLEX PORT
19. SPEAKER CONNECTOR (RCA PLUG)

E-6
SETTING UP THE SYSTEM
The JTA-315 system is powered by an external AC adaptor with an output of DC 12V 2A .
POWER CONNECTION
1. Connect the cord of the power adaptor to the DC IN JACK (#17) located on the back panel of the
main unit.
2. Plug the AC adaptor into a household 120V~ 60Hz AC wall socket.
CONNECTING THE SPEAKERS
The wires attached to the speakers haveRCA type SPEAKER CONNECTORS(#19) on the ends
for easy connection. Plug the speaker you place on the right side of the turntable into the red color
coded SPEAKER OUTPUT JACK (R) on the back of the main unit. Plug the speaker you place on the
left side of the turntable into the white color coded SPEAKER OUTPUT JACK (L) on the backofthe
main unit.
TURNING THE MAIN UNIT OFF AND ON
When the POWER/VOLUME CONTROL (#12) is fully rotated counter-clockwise, you will hear a click
sound and the POWER/FUNCTION INDICATOR (10) will turn off confirming the power isOFF.
From the OFF position, rotate the POWER/VOLUME CONTROL (#12) clockwise and you will hear
a click sound again and the POWER/FUNCTION INDICATOR (10) will turn on confirming the power
isON. When the power isON, you can rotate the control normally toadjust the volume of the music
playing. PHONO OPERATION
CARE OF THE TONE ARM AND STYLUS
•Remove the white plastic stylus guard from the
cartridge.
•Be sure that the TONE ARM (#7) is unlocked and
free to move away from the Tone Arm Rest prior
to operating.
•Lock the TONE ARM (#7) in place with the TONE
ARM LATCH (#8) when not in use.
PLAYING A RECORD
1. Rotate the FUNCTION SELECTOR (#13) to PHONO mode.
2. Rotate the POWER/VOLUME CONTROL (#12) clockwise to turn the
unit ON. A click sound will be heard and the POWER/FUNCTION
INDICATOR (#10) will light "red".
3. Raise the Turntable Dust Cover.
4. Place a record on the TURNTABLE PLATTER (#1), use the 45 RPM
ADAPTOR (#3) if required.
5. Set the 33/45/78 RPM SELECTOR (#6) to the proper position
depending on the record to be played.
6. Raise the TONE ARM (#7) from the Tone Arm Rest by using
the TONE ARM LIFT LEVER (#4) and slowly move it over the
record. The TURNTABLE PLATTER (#1) will start to rotate.
7. Place the TONE ARM (#7) over the part of the record you
want to play, and lower the TONE ARM (#7) using TONE
ARM LIFT LEVER (#4). The TONE ARM will automatically
lower onto the record and begin playing.

E-7
8. Slowly adjust the output volume to the desired level.
9. At the end of the record, the platter will automatically stop spinning if the AUTO STOP ON/OFF
SELECTOR (#5) remains in the "ON" position. Lift the TONE ARM (#7) away from the record
surface and return it to the ToneArm Rest.
10. To stop playing manually, lift the TONE ARM (#7) from the record surface using the TONE ARM
LIFT LEVER (#4) while playing and return it to the ToneArm Rest directly.
Notes:
•The PITCH CONTROL (#16) allows you to fine tune the playing speed of the record once the
correct speed (33/45/78 RPM) is chosen. Rotate the PITCH CONTROL to slightly increase or
decrease the speed of the turntable if necessary.
•Certain types of records may have an auto-stop area outside the preset limit, so the turntable
may stop before the last track finishes. If this occurs, set the AUTO STOP ON/OFF SELECTOR
(#5) to the "OFF" position. This allows the record to play to the end, but please note that it will not
stop automatically. You must manually lift the TONE ARM (#7) and place it back on the Tone Arm
Rest and then set the AUTO STOP ON/OFF SELECTOR (#5) to the “ON” position to stop the
turntable from spinning.
•To stream your record music to external Bluetooth speakers (not included), see the BLUETOOTH
OUT OPERATION section.
BLUETOOTH OUT OPERATION
The JTA-315 system supports Bluetooth wireless connection ( OUT). It can be connected with
external Bluetooth compatible headphones (not included) or Bluetooth speakers (not included).
1. Rotate the FUNCTION SELECTOR (#13) to select the OUT mode.
2. Rotate the POWER/VOLUME CONTROL (#12) clockwise to turn the
unit ON. A click sound will be heard and the POWER/FUNCTION
INDICATOR (#10) will light "blue" and begin to flash slowly.
3. Turn ON your external Bluetooth receiving device (such as Bluetooth
headphones or Bluetooth speakers) and set to pairing mode.
4. When pairing is successful, you will hear a chime and the
POWER/FUNCTION INDICATOR (#10) will stop flashing and remain lit "blue".
5. You are now connected to your external Bluetooth device.
6. Begin playing a record, the sound will be heard from the external Bluetooth device.
Note:You can ONLY adjust the volume using the volume control on your external Bluetooth device.
Notes:
•Place the Bluetooth device within 3 feet (1m) from the JTA-315 to enable them to pair correctly.
•The JTA-315 stays in the pairing mode for only 30 seconds. If pairing is not properly completed
within 30 seconds, repeat #2 to #4 of above steps again after turning all devices OFF.
•“ OUT” only works in PHONO mode. OUT will NOT work in the AUX IN or regular Bluetooth
(IN) function modes.
BLUETOOTH IN OPERATION
An external device with Bluetooth Connectivity, like a cell phone, can be wirelessly connected to the
JTA-315 system using the Bluetooth IN function.

E-8
1. Rotate the FUNCTION SELECTOR (#13) to select the IN mode.
2. Rotate the POWER/VOLUME CONTROL (#12) clockwise to turn the
unit ON. A click sound will be heard and the POWER/FUNCTION
INDICATOR (#10) will light "blue" and begin to flash.
3. Turn on the Bluetooth feature of your Bluetooth device and enable the
search or scan function to find the “JTA-315” under the available
device list.
4. Select "JTA-315" from the device list when it appears on your device's screen. If required, enter
the pass code “0000” to pair (link) the "JTA-315" with your device.
5. Once connected, the POWER/FUNCTION INDICATOR (#10) will stop flashing and remain lit
"blue".
6. You are now connected to your external Bluetooth device.
7. Rotate the POWER/VOLUME CONTROL (#12) and/or the volume control on your Bluetooth
device to adjust the sound level.
Notes:
1. Refer to the manual of your cell phone, tablet PC, computer or other Bluetooth enabled devices
for correct Bluetooth operation since it may vary from model to model.
2. If your Bluetooth enabled device does not support A2DP profile, it will not play the music through
the speaker, even if correctly paired (linked).
3. Remember to turn OFF the JTA-315 system when you have finished listening.
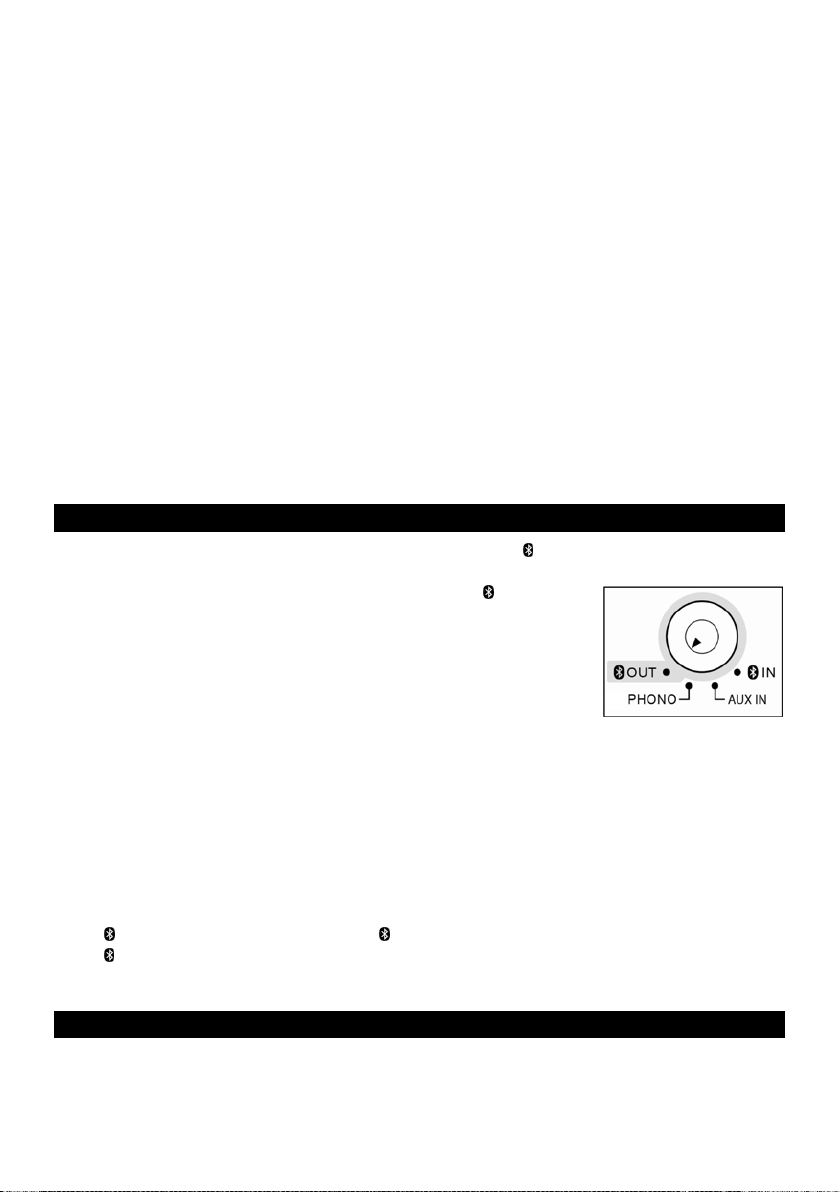
AUX IN OPERATION
The JTA-315 system provides an AUX IN JACK (#14) for connecting external audio devices like MP3
players, CD players, smart phones and iPods (except iPod shuffle 3rd
generation) to listen to your external source through the speakers of this
system.
1. You need an audio cable (not included) with one 3.5 mm stereo
plug on each end of the cable.
2. Plug one end of the cable into the AUX IN JACK (#14) located on
the rear panel of the unit and the other end of the cable into the
Line-out Jack or Headphone Jack of your external audio device.
3. Turn on the external audio device.
4. Rotate the FUNCTION SELECTOR (#13) to select the AUX IN mode.
5. Rotate the POWER/VOLUME CONTROL (#12) clockwise to turn the unit ON. A click sound will
be heard and the POWER/FUNCTION INDICATOR (#10) will light "purple".
6. Use the POWER/VOLUME CONTROL (#12) on the unit to adjust the output volume.
7. Operate all other functions on the external device as usual.
Notes:
•If you connect the Line-out Jack on your external device then you only need to adjust the volume
control of this system. If you connect the Headphone Jack of your external device then you may
need to adjust both the volume control of your external device and the volume control of this
system to find the most desirable volume setting.
•Rotate the POWER/VOLUME CONTROL (#12) counter-clockwise until you hear a “click” sound to
turn OFF the system when you have finished listening. Don't forget to switch OFF the power of
your external device as well.

E-9
USING HEADPHONES
Plug your headphones (not included) into the STEREO HEADPHONE JACK (#11) on the front panel of
the Turntable Unit for private listening. After plugging in the headphones, the speakers will
automatically be disconnected.
WARNING :ALWAYS LOWER THE VOLUME LEVEL BEFORE PUTTING ON YOUR
HEADPHONES, OTHERWISE YOUR HEARING COULD BE DAMAGED.
CARE AND MAINTENANCE
RECORD CARE AND MAINTENANCE
To ensure the best sound and the least amount of wear on your records, it’s essential that they are kept
clean. Make sure your records, especially older ones are sufficiently cleaned prior to playing them.
Thoroughly clean dust off the stylus and record regularly.
•Use a soft brush to clean the stylus. Brush from the base to the tip as shown below.
•For records with only light amounts of dust, we recommend brushing them off with a carbon
fiber brush or velvet pad before playing them. Use a good quality record cleaner and brush
set to keep your records clean. Carbon fiber brushes, velvet pads and record cleaning kits
are available online or in local record stores.
•Using a mild dish soap and warm water for washing your records will also help remove
excess dirt and dust that builds up over the years. Use a microfiber cloth when washing and
wiping off any excess water from the record once they have been cleaned.
Note: Remember, the best cleaning in the world just removes all the dust and dirt. Some records will
have scratches and groove wear. No amount of cleaning will fix this. So after cleaning, some records
may sound “perfect” and others may not.

E-10
SPECIFICATIONS
AC/DC Adaptor Input: AC 100-240V ~, 50/60Hz, 0.8A
Output: DC 12V2A
Bluetooth Version v4.2+EDR
Rated Audio Output Power 2 x 10Wrms
Speaker Impedance 4 ohms, 10W
* Design and specifications are subject to change without notice.
TROUBLESHOOTING GUIDE
For product technical support please contact Spectra Merchandising International Customer Service at
1-800-777-5331.
SYMPTOM POSSIBLE CAUSE POSSIBLE SOLUTION
Power does not come on
AC adaptor is not securely
connected to household AC outlet.
Reconnect the AC adaptor.
No sound
Power/Volume Control is fully
turned down or main unit is Off.
Rotate the Power/Volume
Control to the right for a "click"
sound to turn On the main unit
and increase the volume
output level.
Sound is distorted
Volume level is set too high.
Decrease the volume.
Sound source is distorted.
Try a different audio source
such as a good unscratched
record or MP3 music through
the AUX IN and BT sources.
At Spectra, environmental and social responsibility is a core
value of our business. We are dedicated to continuous
implementation of responsible initiatives with an aim to
conserve and maintain the environment through responsible
recycling.
Please visit us at http://www.spectraintl.com/green.htm for more information on Spectra’s green
initiatives or to find a recycler in your area.
The Bluetooth® word mark and logos are registered trademarks owned by Bluetooth SIG, Inc. and any
use of such marks by Spectra Merchandising Intl, Inc. is under license. Other trademarks and trade
names are those of their respective owners.

E-11
90 DAY LIMITED WARRANTY AND SERVICE
VALID IN THE U.S.A. ONLY
SPECTRA MERCHANDISING INTERNATIONAL, INC. warrants this unit to be free from defective
materials or factory workmanship for a period of 90 days from the date of original customer purchase
and provided the product is utilized within the U.S.A. This warranty is not assignable or transferable.
Our obligation under this warranty is the repair or replacement of the defective unit or any part thereof,
except batteries, when it is returned to the SPECTRA Service Department, accompanied by proof of the
date of original consumer purchase, such as a duplicate copy of a sales receipt.
You must pay all shipping charges required to ship the product to SPECTRA for warranty service. If the
product is repaired or replaced under warranty, the return charges will be at SPECTRA’s expense.
There are no other express warranties other than those stated herein.
This warranty is valid only in accordance with the conditions set forth below:
1. The warranty applies to the SPECTRA product only while:
a. It remains in the possession of the original purchaser and proof of purchase is demonstrated.
b. It has not been subjected to accident, misuse, abuse, improper service, usage outside the
descriptions and warnings covered within the user manual or non-SPECTRA approved
modifications.
c. Claims are made within the warranty period.
2. This warranty does not cover damage or equipment failure caused by electrical wiring not in
compliance with electrical codes or SPECTRA user manual specifications, or failure to provide
reasonable care and necessary maintenance as outlined in the user manual.
3. Warranty of all SPECTRA products applies to residential use only and is void when products are
used in a nonresidential environment or installed outside the United States.
This warranty gives you specific legal rights, and you may also have other rights which vary from state
to state. TO OBTAIN SERVICE please remove all batteries (if any) and pack the unit carefully and send
it freight prepaid to SPECTRA at the address shown below. IF THE UNIT IS RETURNED WITHIN THE
WARRANTY PERIOD shown above, please include a proof of purchase (dated cash register receipt)
so that we may establish your eligibility for warranty service and repair of the unit without cost. Also
include a note with a description explaining how the unit is defective. A customer service representative
may need to contact you regarding the status of your repair, so please include your name, address,
phone number and email address to expedite the process.
IF THE UNIT IS OUTSIDE THE WARRANTY PERIOD, please include a check for $40.00 to cover the
cost of repair, handling and return postage. All out of warranty returns must be sent prepaid.
It is recommended that you contact SPECTRA first at 1-800-777-5331 or by email at
model you have may be discontinued, and SPECTRA reserves the right to offer alternative options for
repair or replacement.
SPECTRA MERCHANDISING INTERNATIONAL, INC.
4230 North Normandy Avenue, Chicago, IL 60634, USA. 1-800-777-5331
To register your product, visit the link on the website below to enter your information.
http://www.spectraintl.com/wform.htm
1020 Printed in China
Table of contents
Other Jensen Speakers manuals

Jensen
Jensen jsbw-650 User manual

Jensen
Jensen SMPS-627 User manual

Jensen
Jensen Subwoofer PS12 User manual

Jensen
Jensen JSB-1000 User manual

Jensen
Jensen MSX60CSS User manual

Jensen
Jensen JPW410 User manual

Jensen
Jensen SMPS-627 User manual

Jensen
Jensen SMPS-621 User manual

Jensen
Jensen SMPS-610 User manual

Jensen
Jensen SFA900 User manual

Jensen
Jensen JHT525 User manual

Jensen
Jensen SMPS-1000 User manual

Jensen
Jensen SMPS-620 User manual

Jensen
Jensen SMPS-650 User manual

Jensen
Jensen MS6151DC - SCHEMA User manual

Jensen
Jensen SMPS-625 User manual

Jensen
Jensen XS525 User manual

Jensen
Jensen SMPS-627 User manual

Jensen
Jensen BUDDY User manual

Jensen
Jensen SMPS-900 User manual