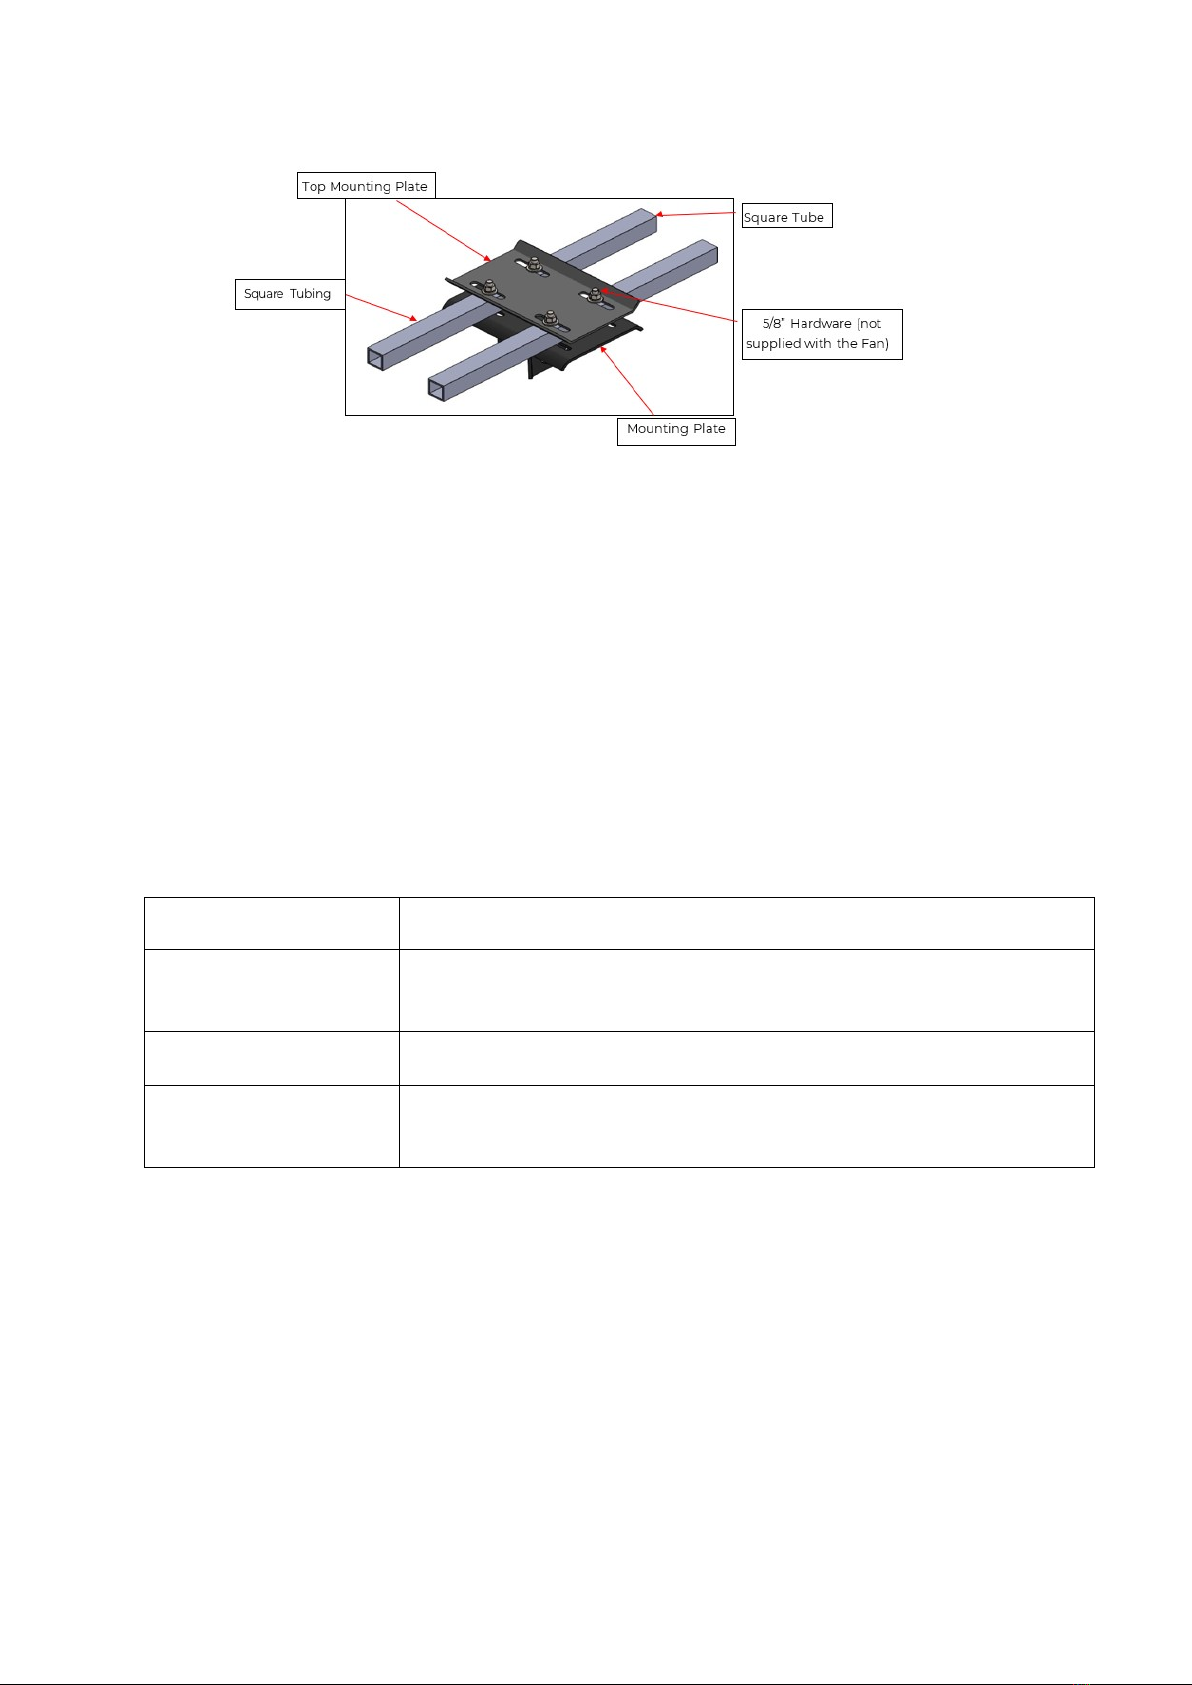
JetBlack EURUSIII HVLS User manual

EURUSIII HVLS FAN
INSTALL & USER MANUAL
NZ Distributor of
KaLe Environmental
Technology (Shanghai) Corp.

Table of Contents
HVLS Fans................................................................................................................................................................2
Safety Instructions..............................................................................................................................................2
Safety Gear ..............................................................................................................................................................3
What is in the crates .........................................................................................................................................3
Packing List ........................................................................................................................................................... 4
Equipment & Tools needed ......................................................................................................................... 4
Fan Diagram & Control Panel......................................................................................................................6
Preparing the Work Site.................................................................................................................................6
Install Appendix .................................................................................................................................................. 8
Trouble Shooting and Error Codes.......................................................................................................... 8
Fan Installation.................................................................................................................................................... 8
Electrical Information.....................................................................................................................................14
Maintenance ........................................................................................................................................................16
Limited Warranty..............................................................................................................................................17
Maintenance Record.......................................................................................................................................19
Contact Information........................................................................................................................................19

HVLS Fans
These HVLS Fans have multiple uses including cooling, ventilation and
destratification. They should be installed according to the customer
requirements and as specified by the technical team at Jet Black Fan Systems.
When in doubt our team are happy to assist –see contact information for details.
Safety Instructions
Read the instructions before operation of the equipment and store in safe place
for the future use.
a. This equipment is not intended for use by persons (including children) with
reduced physical, sensory or mental capabilities, or lack of experience and
knowledge, unless they have been given supervision or instruction
concerning use of the equipment by a person responsible for their safety.
b. Children should be supervised to ensure that they do not play with the
equipment.
PROHIBITIONS
To reduce the risk of fire, electric shock, or injury to persons, observe the
following:
a. Installation work and electrical wiring must be done by qualified person(s)
in accordance with all applicable codes.
b. When cutting or drilling into wall or ceiling, do not damage electrical
wiring and other hidden utilities.
c. The installation of the Eurus HVLS Fan must be in accordance with the
requirements specified in this installation manual and with any additional
requirements set forth by the NZECP and all applicable NZ building code
regulations. Code compliance is the responsibility of the end user.
d. The fan controllers contain high voltage capacitors which take time to
discharge after removal of mains supply. Before working on the fan
controller, ensure isolation of main supply from line inputs at the fan
controller board. Wait three minutes for capacitors to discharge to safe
voltage levels. (notes: the displayer blackness is not the mark that the
voltage has reached the safety level). Failure to do so may result in injury or
death.
e. Do not connect the fan to a damaged or hazardous power source. Only
qualified technician should attempt to resolve electrical malfunctions.
Contact Jet Black Fan Systems for questions regarding the electrical
installation of the fans.
f. Risk of fire, electric shock or injury to persons during cleaning and
maintenance. Disconnect the fan system from the power supply before
servicing.
g. Do not insert foreign objects between rotating fan blades.

CAUTIONS
a. Guy cables must be installed as per the instructions provided in this
manual, failure to do so may result in damage or injury and will void the
product warranty.
b. Do not bend the fan blades when installing or servicing the fan.
c. The installation of this fan requires the use of some power tools. Follow the
safety procedures found in the owner’s manual for each of these tools.
d. The fan system you have purchased is for covered indoor use only. Do not
expose fan to direct water contact nor direct sunlight. Improper use or
handling of the Eurus HVLS Fan may cause damage or injury and will void
the product warranty.
e. Jet Black Fan Systems product warranty will not cover equipment damage
or failure that is caused by improper handling & installation.
Safety Gear
Ensure you comply to all NZ work safety standards. We recommend:
Hard Hat
Safety Glasses
Work Gloves
Steel Tipped Work Shoes
What is in the crates
NOTE
For multiple fan orders, ensure that all components of each fan are kept together.
Components are not always interchangeable. For any missing parts required for
installation please contact Jet Black Fan Systems. Extension / Down rods are
often specified per site so quantity may differ from packing case 1.
The Eurus HVLS ceiling fan components are delivered in two packaging cases as
shown below (pictures are not to scale).

Packing List
Below is the list of items supplied with the Eurus HVLS ceiling fan. Note sizes of
bolts may vary slightly on different models.
Item
Description
QTY
1
Extension / Downrods (QTY depending on customer site
requirements)
1-3
2
Fan Blades (With Wingtips)
5
3
Threaded Rods
2
4
Fan Controller
1
5
Motor
1
6
Mounting Plate
2
7
Shims
2
8
Clamping Plates
2
9
Top Mounting Plate (for Square Beam)
1
10
Bottom Cover
1
11
Blade Retainers
5
12
Guy Wire / Safety Cable
20m
13
Black Metal Ring
1
Hardware:
Item
Description
QTY
13
M16 X 55mm: Nuts, Bolts, Flat & Lock Washers
6
14
M16: Nuts, Flat & Lock Washers
16
15
M16 X 140mm: Nuts, Bolts, Flat & Lock Washers
12
16
M16 X 25mm: Bolts, Flat & Lock Washers
4
17
M12 X 85mm: Nuts, Bolts, Flat & Lock Washers
7
18
M12 X 70mm: Nuts, Bolts, Flat & Lock Washers
7
19
M4 X 8mm Screw
3
20
Fan Controller Hardware Set
1
21
Turnbuckles with locking nuts
4
22
Shackles
8
23
Hose clamps
20
24
Loctite threadlock (used as required throughout install)
1
Equipment & Tools needed
Recommended Equipment:
Scissor Lift or other EWP with a flat base of minimum 1.2m wide and minimum
lift capacity for 1 person + additional 115KG.
NOTE:
•Use of EWP must be in accordance with the safety instructions prescribed by
the EWP manufacture, local and national safety codes that may be applicable
at the location of install.

•It is recommended that a work zone be clearly marked below the fan
installation location by use of safety cones and warning tape to alert persons
entering the zone to be vigilant and cautious of potential accidental falling
items or risk of EWP injury.
Hardware to purchase:
QTY
Description
4
1 tonne rated eyebolt –for steel structure
4
1 tonne rated eye screw –for wooden structure only
4
Metal sleeve –for wooden structure only
4.8mm 7 strand 700/800 tensile. See note below
NOTE: Check the length of cable required for the drop of the fan, should achieve
30 –45 degree angle –if need to purchase more see above grade.
General Tools for Mechanical Installation
S.No
Description
1
Standard Socket and ratchet Set
2
Standard Socket and ratchet Set
3
Standard Phillips and Flat Head Screwdriver set
4
Level Gauge
5
3/16” Steel Wire Rope cutter
Tools for Electrical Installation
S.No
Description
6
Standard Phillips and Flat Head Screwdriver set
7
Flat Head Screwdriver size: 1/8 X 4
8
Electrical wire and cable stripper
9
Multimeter
NOTE:
This list of suggested tools is not exhaustive. Additional tools may be necessary.

Fan Diagram & Control Panel
See separate manual for touch screen controller if applicable
Preparing the Work Site
IMPORTANT NOTE:
Mount the fan only to a structural element such as an I-beam, square tubing,
concrete beam, or other load bearing structure.
If large fan is being installed into a lightweight or timber structure it is
recommended to have the structure checked by a structural engineer. This is the
responsibility of the purchaser.
I –Beam Steel Structure Concrete Structure
Square Beam Structure

a. If using a square tubing arrangement it is recommended to have this
advised by a structural engineer
b. Consult a structural engineer to ensure that the structural beams,
tubes/plates are rated to uphold the respective fan weights.
c. Fan installation area must be free of obstructions such as lights, cables,
sprinklers, or other structures. The fan blades should have at least 250mm
of clearance from any obstructions, vertical and horizontal.
d. Adhere to the safety requirements in the table below when selecting the
fan location.
e. The fan should be visible from the location of the wall controller. The
mounting structure must be able to withstand the torque forces
generated by the fan.
Safety Requirement
Minimum Distances
Clearance
Minimum 250mm from all fan parts. The fan installation area
must be free of obstructions such as light, cables, sprinklers,
or other building structure.
Blade height
At least 3 meters above the finished floor level
Fan spacing
As specified by Jet Black Fans, or 4 x fan diameter, centre-to-
centre.
50 x 50 Square tube install

Install Appendix
Fan System Layout
Note it is best to connect to switchboard on a separate circuit, to ensure nothing
else interferes with the fan. It is possible however to connect to a power point if
necessary. It is installer responsibility to ensure all cable is appropriately installed
as per NZ electrical standards.
Recommended to put the fan controller in sight of the fan and within easy access
of customer. Commonly placed by the main light switches.
Fire relay can be installed by electrician and connected by fire alarm technicians.
Trouble Shooting and Error Codes
Common causes for the malfunctioning operation:
1. The external power supply of the control box is not valid.
2. Open the master switch, and then turn on the three gears control switch, if
the fan can still not work, please check whether the speed knob is of the MIN
state.
Review the VSD drive booklet for further error codes and fixes. Non-professional
staffs do not open the electrical control box!
Notes: Equipment damages due to the improper use are not covered by the
warranty. Personal injuries and equipment damages for your failure to comply
with the contents of this manual, the Company will not bear any responsibilities.
Fan Installation
NOTE: You can swap steps 1 and 2 if preferred –both methods are good.
1.5 3 core plus earth
2.5 2 core plus
earth
Dedicated circuit on
switchboard preferred

1. Preparing the Fan Motor Assembly
1.1 Insert the motor wire through the down rod and carefully pull it to leave
minimum slack.
1.2 Put the Black Metal Ring over the motor –this sits here until it is installed at
step 5
1.3 Install the Down rod on the motor with the provided M16 X 25mm hardware.
(1.1 Image) (1.2 Image)
Notes:
•Down rod is square not rounded as per images.
•Do not pull the motor wire with excessive force which may cause the wire
to disconnect from the motor terminal.
•Motors show connecting arms attached, these arms in fact get connected
at step 5.
2. Preparing the Mounting Assembly
2.1 Fix the mounting plate to the mounting structure using Clamping plates,
Shims and M16 x 55mm hardware as shown in the figure below.
NOTE:

The mounting details shown in this section is for I-Beam only. See “preparing the
worksite” for other mounting options.
3. Fan Installation -
3.1 Lift the fan motor assembly completed in step 1.2 to the ceiling.
3.2 Install the fan motor assembly to the mounting assembly to the using M16
x 140mm hardware.
NOTES:
•Use proper lifting methods to prevent fan motor damage and personal
injury. The approximate weight of the fan motor assembly is 105KG
depending on which down rods are used.
•Do not tighten the bolts completely.
•Ensure that the motor wire is routed through the gap between the down
rod and mounting plate. See Figure below.
3.3 Using a level gauge, check and ensure that the fan assembly is levelled in
the X and Y axis and completely tighten the pre-tensioned M16 x 140mm.
3.4 Add a loop of safety wire inserted through the hole in the Down rod and
either wrap it around the mounting structure or if no room above the
structure then drill a small hole through the structure to thread the safety
wire through. Tighten and attach as per steps 4 guy cable loops.

4. Installing Turnbuckles and Guy Cables
NOTE: Guy cables are intended to provide stability to the fan system during
operation and as seismic restraints. Guy cables must be installed as per the
instructions in this manual; failure to do so may result in damage or injury and will
void the product warranty.
4.1 Connect 2 x tonne rated shackles with the turnbuckles to the holes on square
block on the motor. If there is little clearance between shackles and blades, you
can swap the shackles for wire rope and wire thimbles as per 4.2
4.2 Making the Guy Cable Loop-1: Prepare Guy Wire Loop-1 at one of the guy cable
using a Wire Thimble and three Wire Rope Clips. Install the first wire rope clip
adjacent to the wire thimble followed by the second and third wire rope clips at
7.5cm - 9cm apart from each other. Dead end of the guy cable should not extend
more than 5cm out from the third wire rope clip. Be sure that all the wire rope
clips are tightened properly and installed correctly.

Wire Rope Clip
Below is a diagram showing proper clip installation, it is imperative that you
install the saddle on the live end of the wire rope.
4.3 Connect the supplied Turnbuckles and Guy Cable loop-1 to the eyes of the Slip
Rod as shown in the below figure. Secure the locking nuts as provided for
additional stability
4.4 Attach Eyebolt or Eye screw to the mounting structure, or alternatively drill a
hole through to thread the cable through the hole. The guy cable should be at 30
- 45° from the centre axis of the fan (see below illustration).
Note:
•If the structure is wooden, it is recommended to drill and insert a metal
sleeve to spread the load of the wire passing through the wooden
structure prior to fixing to bracket. This can also be done for metal
structures.

4.5 Attaching Guy Cable Loop 2: Insert wire thimble into the 5/16” eye bolt and
route the second end of the guy cable through the wire rope clips and wire
thimble to make second Loop. Refer to Step 4.1 for detailed instructions of Guy
Wire Loop. Loosely tighten the guy cable by pulling the dead end of the guy
cable.
Important: Do not use Beam-Clamp as shown in this image, instead follow
instructions
NOTES:
•Do not tighten guy cable until all the remaining guy cables have been
installed.
•After routing, cut off any excess cable on dead end.
4.6 Repeat Steps 4.1 to 4.4 to install the remaining 3 Guy Cables.
4.7 Evenly tighten guy cables by turning all the Turnbuckles. The guy cables
should be taut. Over tightening of the guy cables may result in unbalanced fan.
4.8 Check the levelling of the fan motor to ensure that it is levelled. Levelling of
the fan can be achieved by precisely adjusting the tension in all four guy cables
by turning the Turnbuckles.
4.9 Tighten locking nuts on turnbuckles to keep them from unscrewing.
5. Installing Fan Blades
5.1 Attach connecting arms with M12 75mm and M12 85mm, ensure you attach
the black metal ring as pictured below. Note it isn’t pictured in both pictures
as this is a new addition.
5.2 Carefully slide each of the fan blades (with Fan Blade tail attached) onto
the connecting arms and install the blade retainers and the fan blades with
the M12 hardware as shown in the figure.

NOTES:
•Ensure that all the M12 hardware is installed with the nuts on top of the
connecting arms as shown in the figure.
•The fan blades should be installed alternatively to balance the load on the
guy cables. It is recommended not to fully tighten the hardware until all
fan blades and blade retainers have been installed on the connecting arms.
5.3 Install all the 5 fan blades onto the connecting arms and fully tighten all
the pretensioned hardware.
6. Installing the Bottom Cover
6.1 Install the fan cover on the motor using the supplied M4 X 8mm screw.
Electrical Information
IMPORTANT NOTES
•It is the responsibility of the installer to ensure all electrical standards of the
install cable used is in accordance with all local and regional electrical
regulations.
•Refer Safety Instruction on page 3 before proceeding.
•Exercise caution and common sense when powering the fan.
•Do not connect the fan to a damaged or hazardous power source.
•Do not attempt to resolve electrical malfunctions or failures on your own.
Black (no
longer silver)
metal ring

Diameter
4.9m
5.5m
6.1m
7.3m
Weight
106KG
114KG
120KG
135KG
Input Voltage
220-240V /
1P
220-240V / 1P
220-240V / 1P
220-240V / 1P
KW input
1.8
1.8
1.8
1.8
Full Load Current
3.0A
3.6A
4.0A
5.0A
Noise Level
37.8dB
37.8dB
37.8dB
37.8dB
Max speed
75RPM
70RPM
62RPM
57RPM
Air displacement
(m3/hour)
759,000
801,000
825,000
888,000
Mounting the Fan controller
1. Mount the wall controller through the mounting holes and the hardware
set included in the Fan Controller Hardware set.
2. See install manual for touchscreen controller if applicable
Fan Controller Schematic
Sequence of Operation(s)
Start-up:
1. Ensure there is no obstruction and potential interference with any object in
the fan operation space.
2. Confirm the input power supply is correct and meets the product’s
requirement.
3. Turn the speed knob to the minimum position
4. Turn on the fan, turn the control switch from STOP position to RUN
position

5. After the fan starts, adjust speed knob to get the appropriate speed and
best effect
Shut-down:
1. Stop device by turning the power switch from RUN to position STOP.
IMPORTANT NOTE:
Power outage is prohibited during the fan normal operation.
In case of a power failure and reversion, the Eurus HVLS ceiling fan system starts
automatically as the power knob is still at RUN position. To prevent motor
damage, ensure that the power switch is turned to STOP position in the event of
a power failure.
Maintenance
NOTE
Risk of fire, electric shock, or injury to persons during cleaning, servicing and user
maintenance. Disconnect the fan system from the power supply before servicing.
Preventive Maintenance
Our product design is maintenance-free, but in order to ensure the long life of the
normal operation, the fan should also be maintained regularly, especially when
applied in harsh environments.
➢All fan hardware should be periodically checked and tightened with the
appropriate torque values.
➢Check safety cable and guy cables for fraying or damage.
➢Remove dust from fan blades and motor every six months.
➢Ensure the fan is not exposed to direct contact with water or sunlight.
Interval The maintenance content
Test run Check the operation of the fan, any abnormal sound or vibration
2500h Clean the dust on the inverter
Clean the dust on the blades
5000h Check the mechanical fasteners to ensure that there's no looseness
Check wire cable to ensure that there's no damage
NOTES
If the fan is running with a serious abnormal noise or vibration, it indicates that
some damages to the mechanical parts exist somewhere, you should
immediately shut down the fan and do a comprehensive inspection.
For any fan or inverter controller maintenance, please be sure that the fan stops
running and cut off the controller power to protect the safety of personnel.

Limited Warranty
For Jet Black Fan Systems Industrial EurusIII Series HVLS Ceiling Fans
Coverage
The Limited Warranty covers the EurusIII Series brand of HVLS ceiling fans supplied
by Jet Black Fan Systems. The warranty covers all standard fan parts and fan
accessories found to have a manufacturing or workmanship defect.
Warranty Period.
The Limited Warranty period commences from the ship date. Ship date is defined as
the date which Jet Black Fan Systems ships the fan components / accessories from
its distribution warehouse. The warranty remains active only through the first
installation; if the fan is re-mounted in any way, the warranty is void.
Standard Fan Assemblies have a 2 year warranty, limited to the following major
components: Motor, Fan Blades and Controller.
Spare and replacement parts purchased by the Customer are not covered under this
Limited Warranty.
The Limited Warranty is transferrable to a new owner for the remaining period of the
warranty. The warranty is transferrable to an end-user when the fan is purchased
through a Jet Black Fan Systems authorized reseller, distributor or directly from Jet
Black Fan Systems. It is the responsibility of the reseller to communicate the Limited
Warranty terms and conditions to the end-user. Alternatively, reseller may provide
Jet Black Fan Systems the end-user’s contact information, so that we may register
the user and product purchased.
Conditions.
The fan must be installed by either an NZ qualified electrician or an HVAC install team
approved by Jet Black Fan Systems
The fan must be installed in a non-residential facility.
The fan cannot be relocated from its original installed location.
The fan must be installed, operated and maintained as per the User Manual.
The fan cannot be modified in any way.
The fan must be paid for in full as per the terms of sale.
If any of the above conditions are not met, then the Warranty is void.
Exclusions.
- The warranty is void if the fan is exported outside of the country to which the
original sale was made, unless authorized by Jet Black Fan Systems. Customers
outside NZ and Australia must purchase the fan directly from Jet Black Fan Systems
for the warranty to be active.
- Fan noise is not covered under the Limited Warranty. Fan noise ratings stated on
Jet Black Fan Systems product data sheets, quotations or other communications are
based on controlled test conditions and are therefore approximations and for general
reference only. Actual fan noise may vary depending on installation site, fan
configuration, environment and duration of use. Fan noise is normal and is to be
expected given the use of various electrical and mechanical sub-components.
The Limited Warranty will be void in its entirety if there is damage caused by:

a) improper operation, use, handling, transportation, installation or maintenance, b)
an unstable electrical power supply
c) physical collision of an external object with fan and,
d) adverse site conditions, including, but not limited to, excessive heat, humidity,
dust, corrosive or erosive environments, etc.
e) natural disaster or fire
The Limited Warranty does not cover normal wear and tear, or minor cosmetic
defects.
Return Policy.
All sales are final. Jet Black Fan Systems does not accept returns without prior return
authorization.
Claim Process.
If you experience any problem with the fan, immediately shut down fan operation
and contact us so that we may help troubleshoot. In the event that the problem is
not resolved over the phone, customer must
a) file a claim,
b) obtain an RMA #,
c) package claimed part(s) appropriately to prevent any damage during handling and
shipping,
d) ship the claimed part(s) to Jet Black Fan Systems, with prepaid shipping and
insurance. Customer is responsible for any costs incurred to uninstall defective or re-
install replacement fan parts. Upon receipt and review of the parts being claimed
against the warranty, Jet Black Fan Systems will advise disposition for the claim. If it
is determined that the claimed part has a manufacturing or workmanship defect,
then Jet Black Fan Systems will, at its option, either repair or replace the defective
component and ship it back to the customer. If it is determined that the source of
component failure is outside of the scope of this warranty, then the Customer will be
given the option to purchase a replacement part. Jet Black Fan Systems reserves the
right to make the final determination as to whether the component is covered under
this Limited Warranty.
You can contact us via phone or email to initiate the claim process. Customer must
provide the serial number of the fan, which is located on the fan motor and the
control box.
This document is a statement of product warranty and is not an insurance certificate.
Table of contents
Other JetBlack Fan manuals
Popular Fan manuals by other brands

ANEMOI
ANEMOI AIRPRO L installation manual

Taurus Alpatec
Taurus Alpatec FRESKO 4B manual

Ridder Drive Systems
Ridder Drive Systems PolyDrive RPD 506 Series product manual

Turn of the century
Turn of the century 355-6777 installation instructions

GVA
GVA G30DFC15 instruction manual

Ebmpapst
Ebmpapst W2D250-CA06-52 operating instructions