JETWAY G03-1951WQS-F User manual

Quick Setup Guide
19”Wide TFT LCD Monitor
English / 繁體中文 / 简体中文 / 日本語
Deutsch / Français / Español / Italiano
G03-1951WQS-F

H
ow to Set up Quick-Stand of Monitor
Get ready with your Quick-Stand and hold your monitor firmly but gentle with your
hands and let the panel facing you to pedestal the monitor on the Quick-stand. When
you hear the “Click”that means you have set up your monitor in the first place
successfully.
How to Remove Quick-Stand of Monitor
Remove Quick-Stand of the monitor by unlocking the four (19”Wide) hooks as the
illustration shows below when you need to deliver the monitor for any reason.

Getting Started <English>
What’s in the Box
Check following items. If they are missing or damaged, consult your place of purchase immediately.
LCD Monitor VGA Cord Audio Cable AC Power Cord Quick-Stand CD
(User’s Manual)
Installation
This monitor is equipped with an auto-sensing power supply for voltage ranges 100~240V, 50~60Hz.
Please follow the following instruction to install LCD monitor.
1. Make sure that the system power is turned off.
2. Plug the VGA cord to the signal connector at the rear of LCD monitor.
3. Plug power cord to the jack at the rear of LCD monitor.
4. Turn on the computer and the monitor.
5. Please adjust the display mode to 1024×768 @75Hz ( 15”), 1280×1024 @75Hz ( 17”/19”), 1440×900 @75Hz
( 19”Wide ) after setting up the LCD monitor.
6. Then push the Auto-adjust button (the left most button on the front bezel) to set the best condition of your
computer.
7. For the other supported display modes, please refer to the CD.
Troubleshooting
Make sure that your monitor is properly installed by following above instruction if you have encountered any
trouble using this product. If the problems persist, check the following for possible solutions.
There is no picture on the screen.
1. Check the VGA cord connector pins. If there are bent or missing pins, consult your place of purchase
2. Check that if system entered the power saving mode. Press any key or move the mouse to deactivate the
mode.
The picture is unstable.
1. Check the VGA cord connector pins. If there are bent or missing pins, consult your place of purchase.
2. Check graphics card. See if the settings are made properly.
3. Check scanning frequency. Change the settings of your graphics card to acceptable options.
Characters look too dark or too light.
1. Adjust related settings. See the CD.

快速啟動 <繁體中文>
包裝內容
請檢查以下的項目,如果有遺漏或損壞,請儘速洽詢您購買的經銷商。
液晶顯示器 VGA 訊號線 音源線 電源線 Quick-Stand 光碟
(使用手冊)
組裝說明
本LCD 顯示器附有一個可自動偵測電壓範圍從 100~240V/50~60H z 的變壓器。 請依照下列指示連接 LCD 顯示器。
1. 請您先將 LCD 顯示器及 PC 主機電源關閉。
2. 將產品包裝箱內附的 VGA 訊號線與 LCD 顯示器背面之訊號線接孔連接,訊號線的另一頭與 PC 主機背後的 VGA
訊號連接頭連接。
3. 將電源線連接至 LCD 顯示器後方之電源插座。
4. 開啟您的 PC 主機電源及 LCD 顯示器電源。
5. 當您安裝好 LCD 顯示器時,請您將顯示模式調整至 1024×768 @75Hz ( 15”), 1280×1024 @75Hz ( 17”/19”), 1440
×900 @75Hz ( 19”Wide )。
6. 在調整好之後,請您使用自動調整功能鍵使 LCD 顯示器最佳化。
7. 本顯示器所支援的其餘顯示模式請參照光碟中的使用手冊。
問題排除
如果您遇有問題無法排除時,請先檢查您的顯示器是否安裝正確。如果問題仍然存在,請參考以下說明。
螢幕上沒有畫面。
1. 請檢查 VGA 訊號線連接頭針腳。如果針腳彎曲或遺失,請洽詢經銷商。
2. 請檢查系統是否進入省電模式。請按任何鍵或移動滑鼠,離開省電模式。
畫面捲動或不穩定。
1. 請檢查 VGA 訊號線連接頭針腳。如果針腳彎曲或遺失,請洽詢經銷商。
2. 請確定顯示卡的設定無誤。
3. 請檢查掃描頻率。將您的顯示卡的掃描頻率設定在可接受的範圍內。
文字看起來黑暗不清。
1. 請調整相關設定。請參閱光碟中的使用手冊。

快速启动 <简体中文>
包装内容
请检查以下的项目,如果有遗漏或损坏,请尽速洽询您购买的经销商 。
液晶显示器 VGA 讯号线 音源线 电源线 Quick-Stand 光盘
(使用手册)
组装说明
本LCD 显示器附有一个可自动侦测电压范围从 100~240V/50~60H z 的变压器。 请依照下列指示连接 LCD 显示器。
1. 请您先将 LCD 显示器及 PC 主机电源关闭。
2. 将产品包装箱内附的 VGA 讯号线与 LCD 显示器背面之讯号线接孔连接,讯号线的另一头与 PC 主机背后的 VGA
讯号连接头连接。
3. 将电源线与 LCD 显示器後方电源插座连接。
4. 开启您的 PC 主机电源及 LCD 显示器电源。
5. 当您安装好 LCD 显示器时,请您将显示模式调整至 1024×768 @75Hz ( 15”), 1280×1024 @75Hz ( 17”/19”), 1440
×900 @75Hz ( 19”Wide )。
6. 在调整好之后,请您使用自动调整功能键使 LCD 显示器最佳化。
7. 本显示器所支持的其余显示模式请参照光盘中的使用手册。
问题排除
如果您遇有问题无法排除时,请先检查您的显示器是否安装正确。如果问题仍然存在,请参考以下说明。
屏幕上没有画面。
1. 请检查 VGA 讯号线连接头针脚。如果针脚弯曲或遗失,请洽询经销商。
2. 请检查系统是否进入省电模式。请按任何键或移动鼠标,离开省电模式。
画面卷动或不稳定。
1. 请检查 VGA 讯号线连接头针脚。如果针脚弯曲或遗失,请洽询经销商。
2. 请确定显示卡的设定无误。
3. 请检查扫描频率。将您的显示卡的扫描频率设定在可接受的范围内。
文字看起来黑暗不清。
1. 请调整相关设定。请参阅光盘中的使用手册。

クィックスタートガイド <日本語>
セット内容の確認
下記部品をお確かめください。部品紛失の場合、お買い上げいただいた販売店にお問い合わせください。
液晶モニタ本体 VGAケーブル オーディオケーブル AC パワーコード Quick-Stand CD
(ユーザーマニュアル)
インストレーション
本体と同梱してる ACアダプタは電圧自動検出機能がついています。AC入力 100~240V、50-60Hz 自動的に切り
替えます。
下記手順を従い、液晶モニタをセットアップしてください。
1.モニタ本体のスイッチをお切りください。
2.VGA ケーブルは PCのVGA カードと液晶モニタのコネクターに接続してください。
3.先ず、電源コードの一端を LC D モニターの後部にいれて、そして、 他の一端を交流電源にいれてください。
4.開いたコンピュータおよびモニター。
5.パソコンとモニタの電源をお入りください。
6.液晶モニタをセットアップするには、解像度は 1024×768 @75Hz ( 15”), 1280×1024 @75Hz ( 17”/19”), 1440×
900 @75Hz ( 19”Wide )に設定してください。
7.液晶モニタの前面にある(左)自動調整ボタンを押してください。モニタの自動調整を行います。
8.ほかの表示モードには、本体に同梱してるマニュアル CD をご参照ください。
トラブルシューティング
モニタを設定するには上記手順でお確かめください。なお、セットアップするのに、何か問題のある場合、下記情
報をご参照ください。
モニタに何も表示されていません。
1.VGA ケーブルに折り曲げるピンのないよう、お確かめください。コネクターにピン欠け、折り曲げるピンのあ
る場合、販売店にお尋ねください。
2.パソコンは省電力モードに入っているかどうか、何かキーを押して、お確かめください。
表示された画面は不安定。
1.VGA ケーブルに折り曲げるピンのないよう、お確かめください。コネクターにピン欠け、折り曲げるピンのあ
る場合、販売店にお尋ねください。
2.ビデオカードの設定をご確認ください。詳細はビデオカードのユーザーマニュアルをご参照ください。
3.ビデオカードの更新率(周波数)をご確認ください。ビデオカードの設定をモニタの表示可能な範囲に設定し
てください。(ユーザーマニュアル CD をご参照ください。)
表示された字は暗き過ぎるか明らか過ぎるか?
1.マニュアル CD の内容を参照し、モニタ設定をお確かめください。

Installationshandbuch <Deutsch>
Verpackungsinhalt
Überprüfen Sie folgende Baueinteil. Wenn sie gecshädigt oder Verlust sind, bitte beraten Sie sich gleichzeitig.
LCD Bildschirm VGA Kabel Audio Kabel AC Netzkabel Quick-Stand CD
(Benutzmenu)
Installation
Dieser Monitor enthält ein automatiksensor Adaptor für Voltspannung 100~240V, 50~60Hz. Bitte installiert LCD
Monitor gemäß folgenden Hinweise
1. Bestätigen Sie daß Störmsysteme ausgeschaltet.
2. Das VGA Kabel ist ordnungsgemäß am Computer angeschlossen. Hierzu wurde das DB-15-Kabel verwenden.
3. Stecken Sie das Strom- Adapter-Kabel an der Rückseite des LCD Monitors an der dafür vorgesehenden Stelle
ein.
4. Stecken sie dann den Stecker (AC) in ihre Steckdose
5. Zuerst wurde der Monitor und anschließend der Computer eingeschaltet.
6. Bitte modifiziert Display Mode zu 1024×768 @75Hz ( 15”), 1280×1024 @75Hz ( 17”/19”) , 1440×900 @75Hz
( 19”Wide )nachAufbau der LCD Monitore
7. Dann drücken Modeautomatik Tastatur (Die linkesten Tastatur am vordern Bezel), um die besten Bedienungen
am Ihre Bildschirm zu Einstellen.
8. Für weiteren Unterstützungen des Displaysmodes, bitte befolgen Sie die Anweisungen auf dem der CD.
Problemlösen
Bestätigen Sie sich ihre Monitor ist ordnungsgemäß und gemäß obengenannte Hinweis installiert. Wenn das
Problem ist noch nicht ausgelöst, bitte prüfen folgende Situlation und finden möglich Lösungen.
Es gibt kein Bild am Monitor.
1. Überprüfen die Pin des Vidoekabels. Wenn es defeck Pins gibt. Beraten Ihre Verkäufer vor Ort.
2. Überprüfen das System. Wenn das system im Saving Mode ist. Drücken jenigen Tastatur oder bewegt das
Maus um das Mode zu aktivieren.
The picture is unstable.Überprüfen die Pin des Vidoekabels.
1. Überprüfen die Pin des Videokabels. Wenn es defefk Pins gibt. Beraten Ihre Verkäufer vor Ort.
2. Überprüfen Graphiekarte, ob sie ordnungsgemäß eingesetzt ist.
3. Überprüfen Scanning Frequenz. Wechseln ihre Grafiekarte zu der korrekten Einstellung.
Helligkeitbestimmungen
1. Modifiziert relavante Einstellungen. Wenden sie benutzbuch im CD.

Guía Rápida de Instalación <Español>
Introducción
Revise los siguientes componentes. Si faltan o están dañados, contacte con su proveedor inmediatamente.
Monitor LCD Cable VGA Cable Audio Cable alimentación Quick-Stand CD
(Manual de usuario)
Instalación
Este monitor incorpora una fuente de alimentación que detecta automáticamente voltajes entre 100~240V, 50~60Hz.
Para instalar su monitor LCD, por favor, siga las siguientes instrucciones
1. Compruebe que el sistema estáapagado.
2. Conecte el cable VGA al conector situado en la parte trasera de su ordenador y al conector trasero del monitor
LCD.
3. Conecte el adaptador de corriente al conector situado en la parte trasera del Monitor y el cable de corriente al
adaptador.
4. Conecte el cable de corriente a su enchufe.
5. Encienda su ordenador y el monitor.
6. Por favor, configure la pantalla a: 1024×768 @75Hz ( 15”), 1280×1024 @75Hz ( 17”/19”), 1440×900 @75Hz
( 19”Wide ), después de instalar el monitor LCD.
7. Pulse el botón de Auto-ajuste (el botón que esta a la izquierda del panel frontal) para obtener la mejor calidad
de imagen de su ordenador.
8. Otros tipos de visualización. Podráencontrarlos en el del CD.
Problemas
Asegúrese de que su monitor esta instalado correctamente. Repita los pasos anteriores si tiene algún problema al
usar el monitor LCD. Si los problemas persisten, compruebe las siguientes posibles soluciones.
No hay imagen en la pantalla.
1. Revise los pines del cable VGA. Si están doblados o rotos, consulte a su proveedor.
2. Compruebe si el sistema ha entrado en el modo ahorro de energía. Pulse cualquier tecla y mueva el ratón para
salir del ahorro de energía..
La imagen es inestable.
1. Revise los conectores del cable VGA. Si están doblados o rotos, consulte a su proveedor.
2. Revise la tarjeta gráfica. Verifique si la configuración es la adecuada..
3. Compruebe la frecuencia de barrido. Cambie la configuración de la tarjeta grafica a una opción válida.
Los carácteres aparecen demasiado oscuros o demasiado brillantes.
1. Ajuste los valores de la configuración. Vea el manual del CD.

Guide d’installation rapide <Français>
Au démarrage
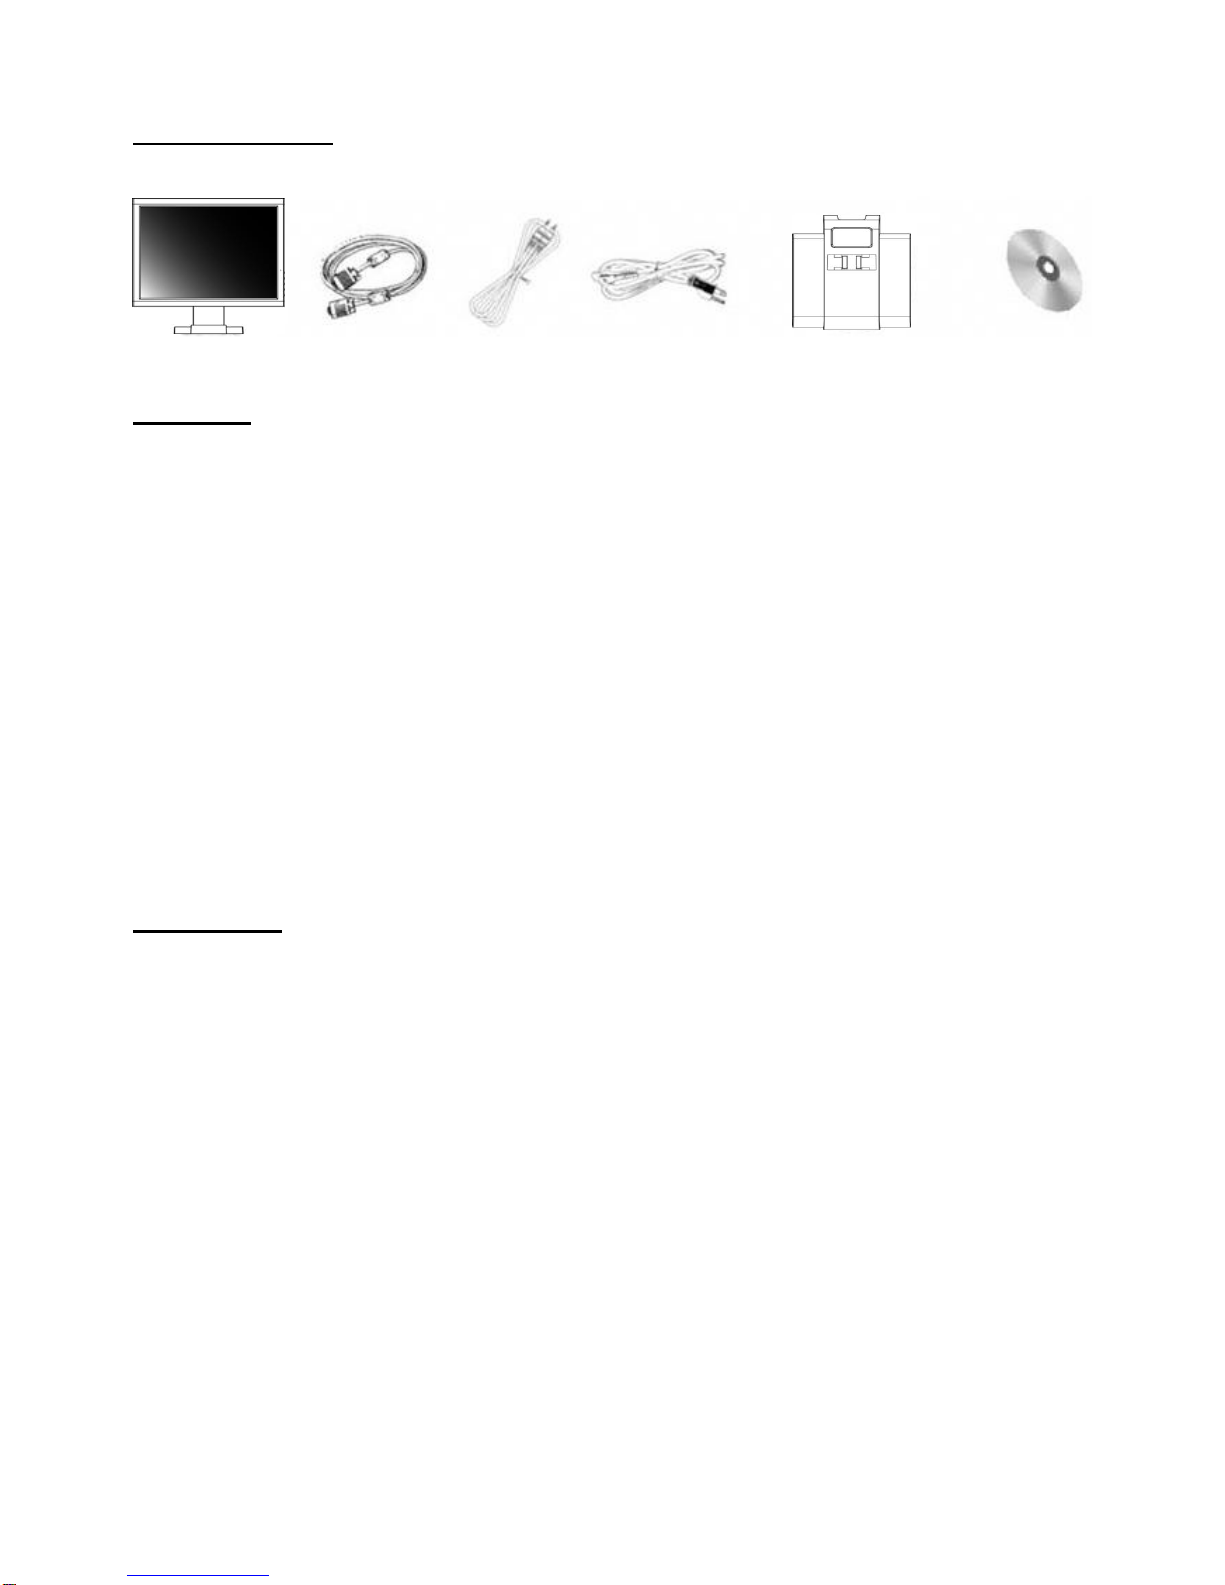
Contrôlez la présence de ces accessoires. Si ils sont manquants ou usagés, veuillez vous adresser à votre
revendeur immédiatement.
Moniteur LCD Câble VGA Câble audio Cordon d’alimentation Quick-Stand CD (Manuel)
Installation
This monitor is equipped with an auto-sensing power supply for voltage ranges 100~240V, 50~60Hz.
Please follow the following instruction to install LCD monitor.
1. Assurez-vous que le matériel est sur la position arrêt.
2. Connecter le câble Vga au connecteur idoine à l’arrière du PC et à l’arrière de l’écran LCD.
3. Brancher l'extrémitéfemelle du cordon d'alimentation sur le port POWER àl'arrière du LCD Moniteur.
4. Brancher l'extrémitémâle du cordon d'alimentation sur une prise murale.
5. Mettez en route le moniteur et l’ordinateur.
6. Veuillez ajuster la résolution de l’écran en 1024×768 @75Hz ( 15”), 1280×1024 @75Hz ( 17”/19”), 1440×900
@75Hz ( 19”Wide ),après avoir régler le moniteur.
7. Pressez ensuite le bouton “auto-adjust“ (la touche la plus à gauche sur l’avant du moniteur) pour appliqu er la
meilleur résolution.
8. Pour les autres modes d’affichages, veuillez vous référer au sur le CD.
Dysfonctionnements
Veillez à ce que votre moniteur soit proprement installé après avoir suivit les instructions ci-dessus, si vous
rencontrez des problèmes sur ce produit. Si le problème persiste, essayez les solutions suivantes.
Il n’y a pas d’image à l’écran.
1. Vérifiez les pin des connecteurs VGA. Si certains sont tordus, voir manquants, consultez votre revendeur.
2. Assurez-vous que le moniteur ne soit pas en mode veille. Pressez n’importe quelle touche du clavier ou la
souris, pour désactiver ce mode.
L’image est instable.
1. Vérifiez les pin des connecteurs VGA. Si certains sont tordus, voir manquants, consultez votre revendeur.
2. Vérifiez votre carte graphique, si les réglages sont bien effectués.
3. Vérifiez la fréquence d’affichage. Changes ces paramètres sur votre carte graphique, pour obtenir un affichage
satisfaisant.
Les graphismes sont trop foncés ou trop clairs.
1. Jouez sur les réglages préc édemment cités. Pour plus d’information, consultez le CD fourni .

Guida di avvio rapido <Italiano>
Che cosa c’è nella confezione
Controllate le voci seguenti. Se le trovate mancanti o danneggiate, consultate immediatamente il vostro distributore.
Monitor LCD Cavo VGA Cavo Audio Cavo di Corrente AC Quick-Stand CD
(Manuale d’Uso)
Installazione
Questo monitor èdotato di un gruppo alimentazione a riscontro automatico per i voltaggi nella gamma 100~240V,
50~60Hz.
Per installare il monitor LCD, seguite le istruzioni seguenti.
1. Assicuratevi che la corrente del sistema sia spenta.
2. Inserite il cavo VGA nle connettore segnali nel retro del PC e nel retro del monitor LCD.
3. Cavo di alimentazione della spina alla presa alla parte posteriore del video del LCD.
4. Accenda il computer ed il monitor.
5. Accendete il computer e il monitor.
6. Regolate la modalitàdel display su 1024×768 @75Hz ( 15”), 1280×1024 @75Hz ( 17”/19”), 1440×900 @75Hz
( 19”Wide ), dopo avere installato il monitor LCD.
7. Poi premete il pulsante Autoregolazione (il pulsante piùa sinistra sull’anello frontale) per impostare le migliori
condizioni del computer.
8. Per le altre modalitàsupportate del display, vedete del CD.
Ricerca Guasti
Se incontrate qualche problema nell'uso di questo prodotto, anzitutto assicuratevi che il monitor sia stato installato
in modo corretto seguendo le istruzioni sopra riportate. Se il problema persiste, controllate le seguenti possibili
soluzioni.
Sullo schermo non appare nessuna figura.
1. Controllate i pin del connettore del cavo VGA. Se ci sono dei pin piegati o mancanti, consultate il vostro
distributore.
2. Controllate se il sistema èpassato nella modalitàdi risparmio di corrente. Premete un tasto qualsiasi e spostate
il mouse per disattivare la modalità.
LA figura non èstabile.
1. Controllate i pin del connettore del cavo VGA. Se ci sono dei pin piegati o mancanti, consultate il vostro
distributore.
2. Controllate la scheda grafica. Vedete se le impsotazioni sono state fatte nel modo giusto.
3. Controllate la frequenza di scansione. Cambiate le impostazioni della vostra scheda grafica con delle opzioni
accettabili.
I caratteri si vedono troppo scuri o troppo chiari.
1. Regolate le impostazioni relative. Vedete il CD.
Table of contents
Languages:
Other JETWAY Monitor manuals