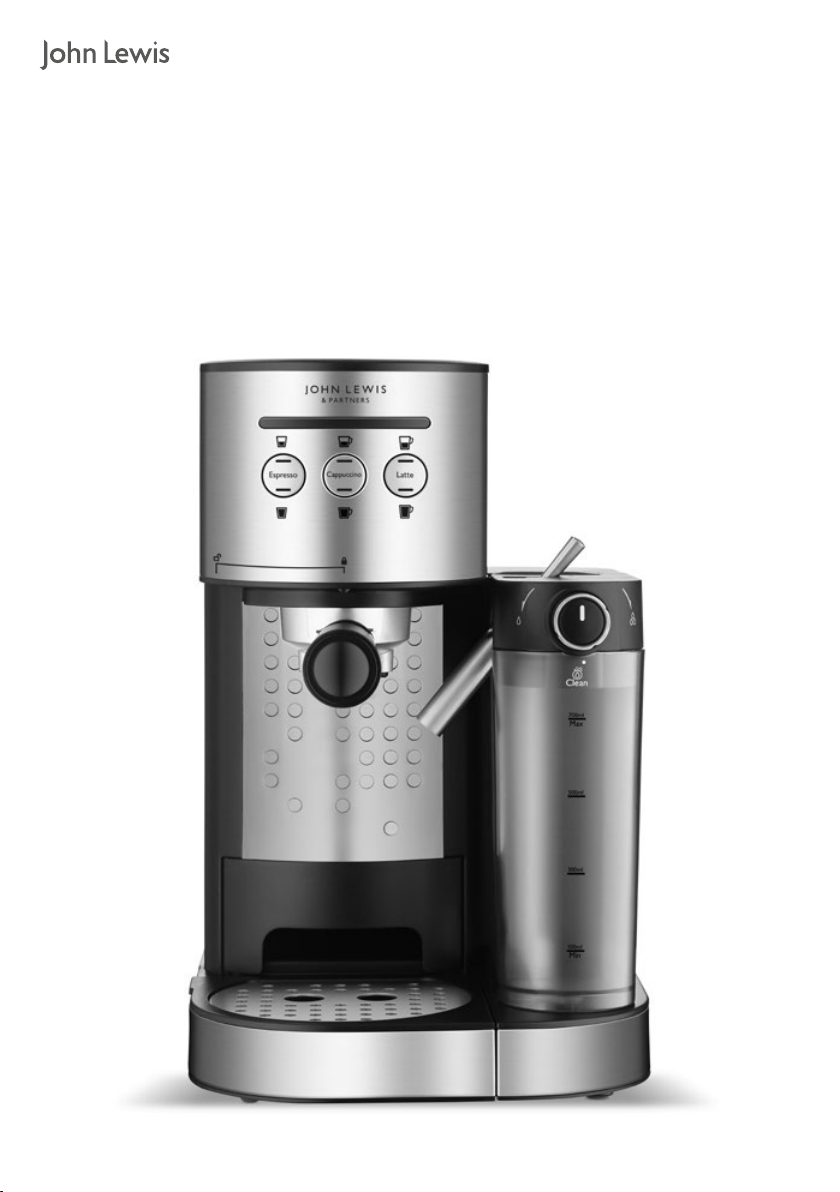
John Lewis JLPE 028 User manual

Instruction manual
Espresso machine with integrated milk system

Instruction manual
Espresso machine with integrated milk system
Instruction manual
Espresso machine with integrated milk system
2 3
Contents
3 Important safety information
4 Safety precautions
9 Your coffee machine – diagram
10 Before rst use
10 Priming the coffee machine
10 Selecting the right cup
11 Selecting the right coffee
11 Operating instructions
11 - Filling the water reservoir
11 - Filling the milk reservoir
12 - Choosing the lter
12 - Adding ground coffee
12 - Fitting the porta-lter
13 - Placing the cups
13 Coffee types
13 Selecting a function
13 - Espresso
14 - Cappuccino
13 - Latte
14 - Frothing milk
Important safety information
Thank you for purchasing this John Lewis &
Partners espresso machine.
Please read the instructions and warnings care-
fully to ensure a long life for your product and
safe usage. This instruction leaet must be re-
tained with the product for future reference.
These warnings have been provided in the in-
terest of safety. You MUST read them carefully
before using the appliance.
If you are unsure of the meaning of any of
these warnings, please contact your nearest
John Lewis & Partners shop or John Lewis &
Partners Technical Support on 03301 230106.
!
WARNING: Polythene bags over the product
or within packaging may be dangerous. To avoid
the risk of suffocation, please keep away from
pets, babies and children.
Please read ALL of the instructions, cautions,
notes and warnings included in this instruction
manual carefully before you begin to use this
14 After preparing milk
15 Troubleshooting
16 Cleaning the milk reservoir
and frothing tube
16 Cleaning the brew head,
the porta-lter and lter
17 Cleaning the water reservoir
17 Cleaning the coffee machine
17 Descaling
17 - Suggested descaling frequency
18 - Descaling the water reservoir
18 - Descaling the coffee machine
19 Technical specications
19 Servicing and disposal
20 Guarantee

Instruction manual
Espresso machine with integrated milk system
Instruction manual
Espresso machine with integrated milk system
4 5
appliance. When this unit is used, some parts
and accessories get hot and need to cool down.
Proper care and maintenance will ensure the
long life of the machine and its trouble-free
operation. Save these instructions and refer to
them often for cleaning and care tips.
!
Safety precautions
When using electrical appliances, basic safety
precautions should always be followed to
reduce the risk of re, electric shock and / or
injury to persons, including the following:
1 Read all instructions.
2 Make sure that your outlet voltage
corresponds to the voltage stated on the
rating label of the coffee maker.
3 To protect against re, electric shock and
injury to persons do not immerse cord,
plug or unit in water or other liquid.
4 Close supervision is necessary when any
appliance is used by or near children.
5 Unplug from outlet when not in use and
before cleaning. Allow to cool before
putting on or taking off parts, and before
cleaning the appliance.
6 Do not operate any appliance with a
damaged cord or plug or after the appliance
malfunctions or has been damaged in any
manner. Return appliance to an authorised
service facility for examination, repair or
adjustment.
7 The use of accessories not recommended
by the appliance manufacturer may result
in re, electric shock or injury to persons.
8 To disconnect, turn any control to the off
position then remove the plug from the
wall outlet.
9 Do not touch any hot surfaces, use handles
or knobs.
10 Do not use outdoors or for commercial
purposes.
11 Do not let cord hang over edge of table
or counter or touch a hot surface.
12 Use on a hard, at level surface only, to
avoid interruption of airow underneath
the appliance.
13 Always be sure to place the water reservoir
tightly back in the unit with its lid closed
and ll with water on or above the minimum
before turning the appliance on.
14 Do not remove the porta-lter while brewing
coffee. Please make sure the three lights are
on before you remove the porta-lter to

Instruction manual
Espresso machine with integrated milk system
Instruction manual
Espresso machine with integrated milk system
6 7
make additional coffee. Caution should also
be taken while removing the porta-lter
since the metal parts will be hot. Please
make sure to hold it by the handle and to
use the lter retention clip to dispose of
the grounds. Caution should be taken
when moving unit with hot liquids.
15 Do not remove the water reservoir until
unit is turned off.
16 This appliance is not intended to be
operated by means of an external timer
or separate remote-control system.
17 The appliance can be used by children aged
from 8 years and above and persons with
reduced physical, sensory or mental
capabilities or lack of experience and
knowledge if they have been given supervision
or instruction concerning use of the appliance
in a safe way and understand the hazards
involved. Children shall not play with the
appliance. Cleaning and user maintenance
shall not be made by children unless they
are older than 8 and supervised.
18 Keep the appliance and its cord out of
reach of children less than 8 years.
19 Before removing any of the parts and
accessories, make sure the three lights are
on, press the power button to the off
position “O” and unplug the appliance.
20 Do not remove the porta-lter at any time
during the brewing process.
21 Use caution when removing the porta-lter.
The metal parts may still be very hot. Also,
there may be hot water on the top of the
lter. Hold it only by its handle and dispose
of the brewed coffee grounds by using the
lter retention clip.
22 If coffee does not drip, the lter is blocked.
Turn off the appliance and allow it to cool
down. The blockage may be caused by the
coffee being too nely ground. See the
“Troubleshooting” section.
23 When cleaning the frothed milk dispensing
tube: Place a large cup under the tube. Fill
the milk reservoir with water and place it
back on the unit. Turn the froth control dial
clockwise to the clean position “ ” then
press the “Latte/Clean” key for 3 seconds
and release to activate the clean function.
Let the unit dispense the water through the
tube for approximately 30 seconds and
then press the “Latte/Clean” key once to
stop the process.
24 Do not place on or near a hot gas or

Instruction manual
Espresso machine with integrated milk system
Instruction manual
Espresso machine with integrated milk system
8 9
electric burner, or in a heated oven.
25 Do not use the appliance for other than its
intended use.
26 Do not leave the appliance on unattended.
27 This appliance is intended to be used in
household and similar applications such as:
– Staff kitchen areas in shops, ofces and
other working environments;
– Farm houses;
– By clients in hotels, motels and other
residential type environments;
– Bed and breakfast type environments.
28 Save these instructions.
!
CAUTION: Steam
In order to avoid possible burns to body parts and /
or other injury from hot steam and water or dam-
age to the coffee machine, never remove the water
reservoir or the porta-lter while your espresso/
cappuccino maker is brewing coffee or frothing.
Make sure the three lights are on before you re-
move the porta-lter to make more coffee. If you
need to add more water or milk to the reservoirs,
please make sure the three lights are on and turn
off the unit by switching the red key on the side of
the coffee machine to “0”, the off position.
Your coffee machine – diagram
Diagram key
Indicator
Cappuccino / Froth button
Espresso / Custom button
Prota-lter
Cup height adjustment tray
Drip tray
Latte / Clean button
Power switch
Water tank lid
Removable water tank
Frothed tube lever
Milk reservoir lid
Frothed milk dispensing tube
Removable / clear milk reservoir
Filter for double shot of espresso
Filter for single shot of espresso
Tamper
1
5
3
2
6
7
8
4
9
13
16
17
11
10
14
12
15
1
2
4
5
6
9
10
15
16
37
8
11
12
14
17
13

Instruction manual
Espresso machine with integrated milk system
Instruction manual
Espresso machine with integrated milk system
10 11
Before rst use
How to clean and prime the unit before its rst use.
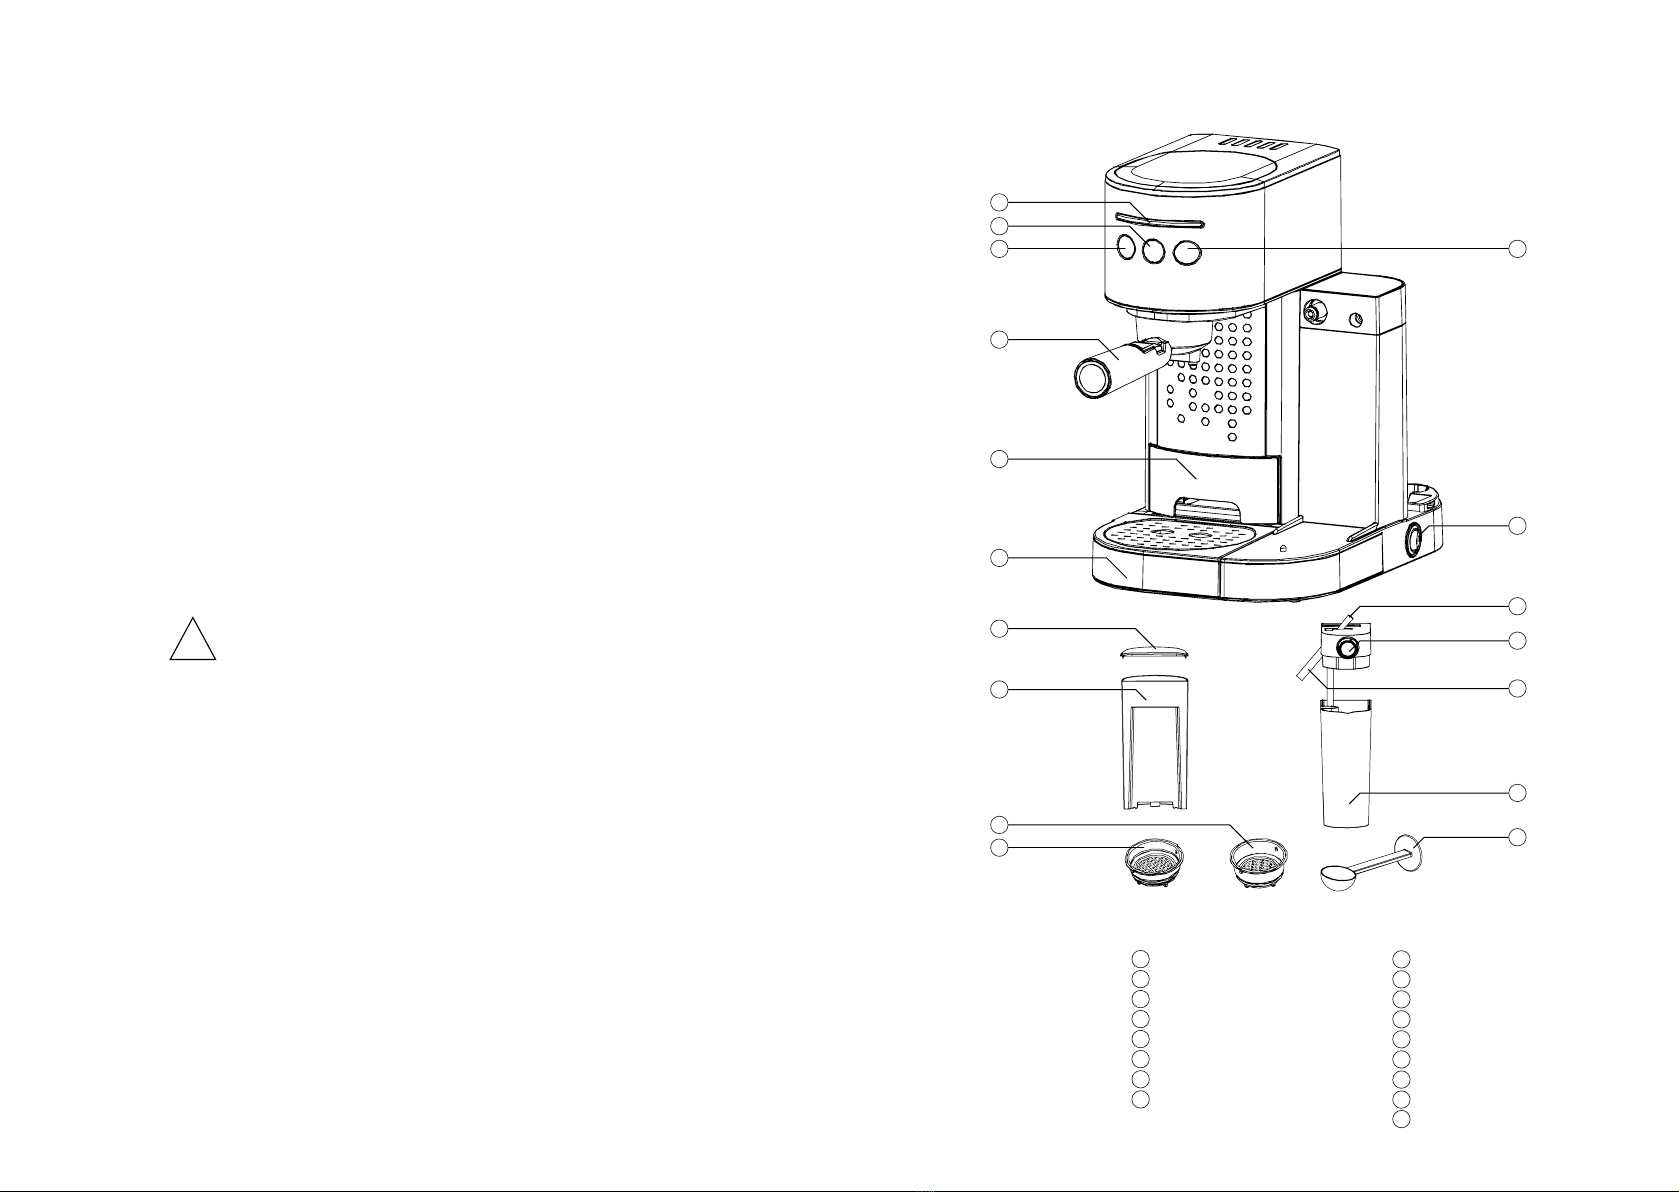
Please refer to the diagram on the previous page to familiarise yourself with
the product and identify all of its parts.
1 Please make sure the coffee machine is off by switching the red power
key on its side to the “0” setting. Ensure that it is unplugged.
2 Remove all stickers and labels from the coffee machine.
3 Remove and then wash the water reservoir, the milk reservoir, the
porta-lter, the three lters and measuring scoop in a mixture of mild
detergent and water. Rinse each part thoroughly and place it back into
the coffee machine.
4 Refer to the section “Fitting the porta-lter” before removing or
replacing the porta-lter.
5 To clean inside the appliance, follow the method to make cappuccino
but add water to both the water reservoir and the milk reservoir and
do not put coffee in the lter.
6 Never immerse the appliance in water or attempt to reach any of its
internal parts.
!
NOTE: To ensure that your coffee machine works perfectly, clean it after
each use.
Priming the coffee machine
To prime the unit, run the steam cycle for 90 seconds by following the steps
below:
1 Fill the water reservoir to a point between the “Min” and “Max” levels.
2 Fill the milk reservoir with water between the “Min” and “Max” levels.
3 Select one of the lters and put it into the porta-lter. Place the
porta-lter in the coffee machine, ensuring that it is properly locked
into place. Place a cup underneath it and place the tip of the frothed
milk dispensing tube inside the cup.
4 Plug in the coffee machine.
5 Turn the power switch to the “I” setting.
6 The three control panel lights will start ashing. Once these lights stop
ashing and shine solidly, press the “Cappuccino” key twice.
7 Once this process is completed, the three lights will again stop ashing
and shine solidly. Now your unit is primed and ready for use.
Selecting the right cup
Before preparing your beverage, please make sure to select the right cup size:
Single espresso: 60 ml (2 oz)
Double espresso: 119 ml (4 oz)
Small cappuccino: 178 ml (6 oz)
Large cappuccino: 355 ml (12 oz)
Small latte: 296 ml (10 oz)
Large latte: 474 ml (16 oz)
Selecting the right coffee
The coffee
The coffee should be freshly ground and dark-roasted. You may want to
try a French or Italian roast ground for espresso. Pre-ground coffee will only
retain its avour for 7-8 days, provided it is stored in an airtight container in
a cool, dark area. Do not store it in a refrigerator or freezer. Whole beans
should be ground immediately before use. Coffee beans stored in an airtight
container will keep their avour for up to four weeks.
The grind
If you are grinding your own coffee, this is a vital step. It will take practice.
The coffee must be nely ground. The correct grind should look like salt. If
the grind is too ne, the water will not ow through the coffee even under
pressure. These grinds look like powder and feel like our when rubbed
between the ngers. If the grind is too coarse, the water will ow through
the coffee too quickly, preventing a full-avored extraction. Use a high-quali-
ty grinder to get a uniform consistency.
What not to use
Do not use sugar-roasted ground coffee or sugar-roasted coffee beans as
these will clog the lter and damage the appliance. If sugar-roasted coffee is
accidentally used, please stop using the machine and contact your nearest
John Lewis & Partners shop or John Lewis & Partners Technical Support on
03301 230106. We recommend descaling the machine periodically to keep it
in good working condition.
Shot size and temperature range
Types Shot size range (g) Temperature range
(°C)
Single espresso 40-52 70-85
Double espresso 76-102 70-85
Manual espresso 112-145 70-85
Single cappuccino 80-105 60-83
Double cappuccino 140-190 60-83
Single latte 150-220 60-83
Double latte 240-340 60-83

Instruction manual
Espresso machine with integrated milk system
Instruction manual
Espresso machine with integrated milk system
12 13
Operating instructions
Filling the water reservoir
1 Fill the reservoir with water. You can use a jug or remove the reservoir
from the machine and ll it from a tap or water lter. Open the lid and
ll the reservoir with the desired amount of water, ensuring the ll level
is somewhere between the “MIN” and “MAX” markings on the tank.
Never use warm or hot water to ll the water reservoir.
2 Close the water reservoir lid. If you removed the reservoir to ll it,
ensure it is properly tted back into place.
Filling the milk reservoir
If you plan to prepare a cappuccino or a latte, remove the milk reservoir
from the unit and open the lid. Pour in the required quantity of cold milk,
ensuring the ll level is somewhere between the “MIN” and “MAX”
markings on the tank. Then place the milk reservoir back in the unit
ensuring it is properly tted.
!
NOTE: You can use whole milk, semi-skimmed, organic or soy milk.
Choosing the lter
Select the lter to be used:
• For a single shot, if using ground coffee, use the single shot lter.
• For a double shot or two single shots, use the double shot lter.
Adding ground coffee
For ground coffee, place the selected lter in the porta-lter as follows:
1. Put fresh, ne ground espresso coffee into the lter. Be careful not to overll.
2. Tamp down the ground coffee and compress rmly and evenly.
3. Wipe away any excess coffee from the rim to ensure a proper t under
the brew head.
Fitting the porta-lter
1. Position the porta-lter underneath the brew head. Move the retainer
clip back.
2. Position the handle so that the handle lines up with the open lock icon
“ ” on the coffee machine and ts into the groove.
3. Slowly turn it to the right until the retention clip is aligned with the
closed lock symbol “ ” on the coffee machine.
Placing the cups
- Pull out the height adjustment tray if you are using a small demitasse
cup to brew espresso.
- Keep the height adjustment tray inside its compartment if you are using
a larger cup to brew cappuccino or latte.
!
CAUTION: When brewing a cappuccino or latte, please make sure to
adjust the frothing tube lever to position the frothed milk tube inside the
cup to be used.
Switching on the coffee machine
First, plug in the coffee machine. Switch the red key on the side of the
machine to the “I” setting.
The three control panel lights will start blinking until the water reaches the
perfect temperature. Once these lights are shining solidly, the unit is ready
to use.
Coffee types
Espresso
A unique method of coffee brewing in which hot water is forced through
nely ground coffee. It is a far richer and more full-bodied brew than regular
drip coffee. Because of its richness, espresso is usually served in 44 to 59 ml
(1.5 to 2 oz.) portions, in demitasse cups.

Instruction manual
Espresso machine with integrated milk system
Instruction manual
Espresso machine with integrated milk system
14 15
Cappuccino
A cappuccino is made with one part espresso, one part steamed milk and
one part frothed milk.
Latte
A latte is made with three parts steamed milk to one part espresso.
Selecting a function
Espresso
• Press the “Espresso” key once to brew one single shot.
• Press the “Espresso” key twice to brew a double shot.
• Press and hold the “Espresso” key for 3 seconds to customise the
brewing process. When you have nished, press the “Espresso” key
once again to end the process.
The unit will start brewing the espresso according to your selection.
The unit will turn off automatically and the indicator lights will shine uninterruptedly
to show that the process is complete.
!
Note: To brew less coffee than the preset serving, press the function button
to stop the brewing process when the desired level of coffee is reached.
Cappuccino
Prior to preparing your cappuccino, adjust the quantity of frothed milk
according to your preference by turning the froth control dial to the right for
more foam and to the left for less foam.
Note: The foam intensity can be adjusted during the brewing cycle.
• Press the “Cappuccino” key once to brew a small cup of cappuccino.
• Press the “Cappuccino” key twice to brew a large cup of cappuccino.
Latte
Prior to preparing your latte, adjust the quantity of frothed milk according to
your preference by turning the froth control dial to the right for more foam
and to the left for less foam.
• Press the “Latte” key once to brew a small cup of latte.
• Press the “Latte” key twice to brew a large cup of latte.
Frothing milk
The machine also allows you to froth milk. Press and hold the “Cappuccino”
key for 3 seconds to add more foam to your coffee or to froth milk for any
other beverage such as a macchiato, hot chocolate or chai latte. When the
Troubleshooting
Problem Cause Solution
No coffee is
dispensed.
1 There is no water in reservoir.
2 The coffee grind is too ne.
3 There is too much coffee in
the lter.
4 The appliance was not turned
on or plugged in.
5 The coffee has been tamped /
compressed too much.
1 Add water.
2 Grind medium-ground coffee.
3 Remove coffee from the lter.
4 Plug the unit in and turn it on.
5 Rell the lter basket with
coffee but do not tamp down
too much.
Coffee leaks from
the edge of the
porta-lter.
1 The porta-lter has not been
rotated to the full-lock position.
2 There are coffee grounds
around the lter basket rim.
3 There is too much coffee in
the lter.
1 Rotate the lter holder to the
full-lock position.
2 Wipe the lter basket rim.
3 Remove some of the coffee.
The milk is not
foaming properly
after frothing or
it is not being
dispensed from
the frothing tube.
1 The machine has run out of
steam.
2 The milk is not cold enough.
3 The frothing tube is blocked.
1 Ensure there is enough water
in the reservoir.
2 Chill milk and frothing jug
prior to making cappuccino.
3 Follow the instructions to
clean the milk reservoirs and
frothing tube.
The coffee dis-
penses too quickly.
1 The ground coffee is too
coarse.
2 There is not enough coffee in
the lter.
1 Use a ner grind.
2 Use more coffee.
The coffee is too
weak.
1 The small lter has been used
for a double shot of espresso.
2 The ground coffee is too coarse.
1 Use a large lter for a double
shot of espresso.
2 Use a ner grind.
The three control
panel lights are
ashing alternately.
The water tank is dry. Add water to reservoir.
milk is frothed, press the “Cappuccino” key again to end the process.
After preparing milk
Once you have nished preparing your milk, you can either store the milk reservoir directly in the refrig-
erator ready for its next use or dispose of the leftover milk.

Instruction manual
Espresso machine with integrated milk system
Instruction manual
Espresso machine with integrated milk system
16 17
Cleaning the milk reservoir and frothing tube
Although you can store leftover milk in the milk reservoir in the refrigerator,
the reservoir and frothing tube must be cleaned regularly to avoid clogging
and residue build-up. To clean the milk reservoir, please follow these steps:
1 Remove the milk reservoir from the unit
2 Remove the lid of the reservoir.
3 Pour away any leftover milk and rinse and wash the milk reservoir and
its lid thoroughly with warm, soapy water. Rinse and dry the parts well.
Do not use abrasive cleaners and scouring pads, as they will scratch the
nish. The milk reservoir is dishwasher safe – it should be placed in the
top rack. The lid is not dishwasher-safe and should be hand-washed.
4 When cleaning the milk reservoir, you can open the silicon sheet – but
do not pull it out. Wash it under the tap and replace it.
5 Press and hold the “Latte/Clean” key for 3 seconds. The unit will start
releasing steam through the frothing tube. Let it run for a few seconds
until all milk residue has gone. When nished, press the “Latte/Clean”
key once to end the process.
6. Dispose of any water left in the milk reservoir and place it back in the unit.
!
Note: To remove the milk reservoir, raise it and then pull it out.
Cleaning the brew head, the porta-lter and lter
1 Switch the power key on the side of the machine to “O”, the off
position. Unplug the machine.
2 Some of the metal parts might still be hot. Do not touch them until
they have cooled.
3 Remove the porta-lter and discard the coffee grounds. Wash both the
porta-lter and lter with warm soapy water and rinse them well. Do
not wash the porta-lter or other lter in the dishwasher. These parts
of the machine are not dishwasher-safe.
4 Wipe down the lower portion of the brew head in the unit with a
damp cloth or paper towel to remove any coffee grounds that might remain.
5 Place the porta-lter (without a lter) back into the brew head.
6 Place a large, empty cup under the porta-lter.
7 Brew with water only. Press the “Espresso” key once to begin the
process. It will stop automatically.
Cleaning the water reservoir
Discard the remaining water by removing the reservoir and emptying it.
The reservoir should be emptied after each use. Wash the water reservoir
with soapy water, rinse it well and wipe it dry. The water reservoir is
dishwasher-safe.
!
Note: Drip plate and tray, Filter is dishwasher safe.
Cleaning the coffee machine
• Wipe the housing with a soft, damp wet cloth. Do not use abrasive
cleaners or scouring pads, as they will scratch the nish.
• Do not store the porta-lter in the brew head. This can adversely affect
the seal between the brew head and the porta-lter while brewing
espresso.
!
CAUTION: Do not immerse the coffee machine in water.
Descaling
Mineral deposits that build up in the espresso maker will affect its
operation. Your coffee machine must be descaled when you begin to
notice an increase in the time required to brew espresso, or when there
is excessive steaming. You may also notice a build-up of calcium deposits
on the surface of the brew head.
The frequency of cleaning depends upon the hardness of the water used.
Suggested cleaning intervals follow.
Suggested descaling frequency
• Soft or ltered water – clean every 80 brew cycles
• Hard or tap water – clean every 40 brew cycles

Instruction manual
Espresso machine with integrated milk system
Instruction manual
Espresso machine with integrated milk system
18 19
Descaling the water reservoir
1 Fill the reservoir with fresh, undiluted white household vinegar.
2 Leave the vinegar in the water reservoir overnight.
3 Discard the vinegar by removing the reservoir and emptying it.
4 Rinse the water reservoir thoroughly with tap water by half-lling the
tank with water and emptying it. Repeat this step twice.
Descaling the coffee machine
1 First, descale the inside of the water reservoir by following the descaling
steps above.
2 Switch the power button to the “O” position and unplug the machine.
Fill the reservoir with white vinegar above the minimum level ll line.
3 Insert the porta-lter (with lter and no coffee) and place a jug, carafe
or regular cup on top of the drip tray, under the porta-lter.
4 Plug the power cord into the electrical outlet.
5 Switch the power button to the “I” position. When the 3 control panel
lights turn solid blue, press the “Espresso/Custom” key twice. The
vinegar will start owing through the unit. It will stop automatically once
the process is completed.
6 Place a jug or large cup (with at least 325 ml/ 11-ounce capacity) under
the tube. Fill the milk reservoir with water and place it back on the unit.
Turn the froth control dial clockwise to the clean position “”. Next,
press the “Latte/Clean” key for 3 seconds to activate the cleaning
function. Let the unit dispense the water through the tube for
approximately 30 seconds and then press the “Latte/Clean” key once
to end the process.
7 Repeat steps 1-7 as many times as necessary, using tap water to rinse
any remaining traces of vinegar from the machine.
Technical specications
Model: JLPE 028
Rated input: 220-240V / 50/60Hz
Rated output: 1230-1470W
Milk tank capacity: 700ml
Water tank capacity: 1.2L
Servicing and disposal
This product should only be repaired or serviced by an authorised service
engineer. Only genuine, approved spare parts should be used.
This symbol indicates that this product should not be treated as normal
household waste and should be recycled. John Lewis & Partners does not
operate in-store take back, but as a member of the Distributor Take Back
scheme has funded the development and upgrade of recycling facilities
across the UK.
Please take your old appliance to your nearest collection facility. For further
details, contact your local council or visit: www.recycle-more.co.uk

Instruction manual
Espresso machine with integrated milk system
John Lewis Partnership
171 Victoria Street
London SW1E 5NN
johnlewis.com
Guarantee
This item is guaranteed for two years in respect of defects found to be due
to faulty workmanship or materials. Proof of purchase is required for the
validity of the guarantee. This guarantee is no longer valid in the case of
accidental damage, alteration, repair by any unauthorised persons or poor
maintenance. This guarantee in no way affects your statutory rights.
Please retain these instructions for further use.
Table of contents
Other John Lewis Coffee Maker manuals
Popular Coffee Maker manuals by other brands

Bunn
Bunn LCC-2 LP Installation and operating guide

Symfoni
Symfoni S1000 All in One Service book

Coffee Queen
Coffee Queen CAFE ELITE Technical manual

Siemens
Siemens TE657F09DE instruction manual

Hamilton Beach
Hamilton Beach FlexBrew TRIO manual

Maxi-matic
Maxi-matic Elite Cuisine EHC-2022 instruction manual