Jumbo Ayce 2604A User manual

CH-Import & Distribution exklusiv durch:
Jumbo-Markt AG, Industriestrasse 34, 8305 Dietlikon
Tel. +41 848 11 33 11
Exklusiv von JUMBO:
unsere starken Marken.
Alle Produkte von JUMBO, die dieses Zeichen tragen,
sind das Resultat einer besonders sorgfältigen
Auswahl unseres Expertenteams. So unterschiedlich
die Produkte auch sind – in jedem Einzelnen steckt
das Know-how, die Erfahrung und die Leidenschaft
all derer, die an der Entwicklung und Herstellung
beteiligt sind.
Unsere Marken überzeugen mit
starkem Sortiment zum besten Preis und einer
Vielfalt an Ideen und Möglichkeiten.
Un’esclusiva JUMBO:
i nostri marchi forti.
Tutti i prodotti di JUMBO contrassegnati da questo
simbolo sono il risultato di una selezione particolar-
mente accurata del nostro team di esperti. Indipen-
dentemente dalla diversità dei prodotti, in ognuno di
essi c’è tutto il know-how, l’esperienza e la passione
di tutti coloro che hanno contribuito al loro sviluppo
e alla loro produzione.
I nostri marchi convincono per la vastità
dell’assortimento al miglior prezzo e una gran
varietà di idee e di possibilità.
Exclusivité JUMBO:
nos marques fortes.
Tous les produits JUMBO portant ce signe sont le
résultat d’une sélection particulièrement rigoureuse
effectuée par notre équipe d’experts. Ces produits
d’une grande diversité sont le résultat du savoir-faire,
de l’expérience et de la passion de toutes les
personnes ayant pris part à leur développement
et à leur production.
Nos marques séduisent grâce à leur vaste
assortiment et à la variété des idées et des
possibilités qu’elles offrent.
DE FR IT
GEBRAUCHSANWEISUNG I MANUEL D’UTILISATION I
MANUALE D’ISTRUZIONI I OPERATOR’S MANUAL
LAMPE AVEC TREILLIS
LAMPADA CON RETE
HUMIDITY-PROOF LIGHT
GITTERLEUCHTE

Lesen Sie das vorliegende Handbuch sorgfältig durch, bevor Sie dieses Produkt in Betrieb
nehmen, und prüfen Sie alle Teile auf Beschädigung. Sollten Schäden vorliegen, darf das
Produkt nicht montiert werden. Bewahren Sie diese Anleitung auf, um Informationen später
darin nachlesen zu können.
D
01 I02
SICHERHEITSHINWEISE:
a)
Die Montage muss von einem qualifizierten Elektriker durchgef
ührt werden.
b) Prüfern Sie vor der Montage, ob der Anschluss des Stromkabels sicher und zuverlässig ist.
c) Berühr
d) Sicherheitsklasse II.
e) Für den Aussenbereich
Wenn das Schutzglas beschädigt ist, muss es umgehend ersetzt werden. Die Leuchte darf
ERLÄUTERUNG DER SYMBOLE:
Entspricht den für das Produkt massgeblichen, europäischen Bestimmungen.
Das Symbol mit der durchgestrichenen Abfalltonne bedeutet, dass das Produkt getrennt
vom Haushaltsabfall entsorgt werden muss. Das Produkt muss gem. der örtlichen
Entsorgungsvorschriften der Wiederverwertung zugeführt werden. Durch separate
Entsorgung des Produkts tragen Sie zur Minderung des Verbrennungs- oder
Deponieabfalls bei und reduzieren eventuelle, negative Einwirkungen auf die menschliche
Gesundheit und die Umwelt.
TECHNISCHE DATEN:
Typ 2604A
Nennspannung 220-240 V ~ 50 Hz
Nennleistung Max. 60 W
IP-Stufe IP44
Schutzklasse
Gitterleuchte
Gewicht 0.5 kg
REINIGUNG:
Zur Reinigung der Leuchte die Stromversorgung ausschalten und die Leuchte abkühlen
lassen. Die Leuchte mit einem weichen Stoff reinigen (falls notwendig leicht angefeuchtet).
Nie Alkohol, Lösungsmittel oder ähnliche Produkte verwenden; diese könnten die Leuchte
beschädigen.
Grösse Lampensockel
E27
MONTAGE:
en Sie das Leuchtmittel nicht, wenn es leuchtet oder noch nicht vollständig abgekühlt
ist.
nicht ohne Schutzglas benutzt werden.
II
Schalten Sie vor der Montage den Strom ab.
Bei dem externen Stromkabel muss es sich um eine wasserfeste, VDE-zertifizierte Schlauch-
leitung vom Typ H05RN-F 2x mit einem Querschnitt von 1,0 mm2 handeln. Bitte bringen Sie
an der Verbindung des Kabels den Schrumpfschlauch an.
1.Nehmen Sie die Metallbügel und die Glasabdeckung ab. Nehmen Sie die Gummiabdec-
kungen ab und durchbohren Sie sie, um das Kabel durchführen zu können. (Abb.1-5)
2. Führen Sie das Kabel durch die Kappen und befestigen Sie die Kappe am Gehäuse der
Leuchte. Schliessen Sie das braune Kabel an den L-Anschluss (mit “L” markiert) und das
blaue Kabel an den anderen Anschluss der Leuchtenhalterung an. (Abb. 6-7)
3. Schrauben Sie die Glüh
lampe in den Sockel. Die Leistung der Glühlampe darf Höchstleis
tung der Leuchte nicht überschreiten. (Abb. 8-9)
4. Bringen Sie die obere Abdeckung an und befestigen Sie sie mit den Metallbügeln.
Vergewissern Sie sich, dass die Gummidichtung ordnungsgemäss angebracht ist. (Abb. 10-12)
5. Wählen Sie den Ort für die Montage der Leuchte aus. Befestigen Sie dort dann die Basis der
Leuchte mit Schrauben und ziehen Sie die Schrauben fest, damit die Leuchte sicher befestigt
ist.
WECHSELN DER GLÜHLAMPE:
1. Schalten Sie den Hauptschalter ab und lassen Sie die Glühlampe abkühlen.
2. Öffnen Sie die Abdeckung der Leuchte.
3. Schrauben Sie die abgekühlte Glühlampe vorsichtig heraus.
4. Schrauben Sie die neue Glühlampe in den Sockel.
5. Schliessen Sie die Abdeckung der Leuchte, bevor Sie sie wieder einschalten.
D
f)
8mm
4cm

F
03 I04
Lisez ce manuel d’instructions avant ant d’utiliser le produit et vérifiez qu’aucun élément n’est
endommagé. Le produit ne doit pas être installé s’il est endommagé. Conservez ce manuel pour
référence ultérieure.
INSTRUCTION DE SÉCURITÉ:
EXPLICATION DES SYMBOLES:
Conforme aux réglementations européennes s'appliquant au produit.
Le pictogramme de la poubelle barrée indique que le produit doit faire l’objet d’un tri.
Il doit être recyclé conformément à la réglementation environnementale locale en
matière de déchets. En triant les produits portant ce pictogramme, vous contribuez à
sur la santé humaine et l’environnement.
CARACTÉRISTIQUES TECHNIQUES:
2604A
220-240 V ~ 50 Hz
Max. 60 W
IP44
II
0.5 kg
E27
Lampe avec treillis
Type
Tension nominale
Puissance nominale
Niveau IP
Poids
NETTOYAGE:
Pour nettoyer la lampe, couper l’alimentation électrique et attendez qu’elle ait reforidi.
Nettoyer avec un tissue doux (légèrement humidifié si besoin). Ne jamais utiliser d’alcool,
de solvants ou de produits similaires: ceux-ci pourraient endommager les lampes.
INSTALLATION:
réduire le volume des déchets incinérés ou enfouis, et à diminuer tout impact négatif
a) L’installation doit être réalisée par un électricien qualifié.
b) Vérifiez que le câble d’alimentation est int
ègre et s
ûr avant de commencer l’installation.
c) Ne touchez pas l’ampoule lorsqu’elle est allumée ou non encore compl
ètement refroidie.
d) Produit de classe II.
e) Pour l’extérieur IPX4: protégé contre les éclaboussures.
f) Lo rsque le verre de protection est endommagé, il doit être remplacé immédiatement.
Le luminaire ne doit pas être utilise sans son verre de protection.
Protection d’isolation
Douille de l’ampoule
Eteindre l’alimentation avant l’installation.
Le câble d’alimentation doit
être certifié VDE-H05RN-F 2x1,0mm² étanche. Faire venir la
1. Retirez les crochets métalliques et le verre de protection. Retirez le bouchon de caoutchouc
2. Passez le câble dans le bouchon puis fixez le bouchon au corps du luminaire. Connectez le
(marquée avec “L”) et le fil bleu à l’autre terminal. (Fig.6-7).
3. Vissez une ampoule dans la douille. La puissance de l’ampoule ne doit être sup
érieure à la
(Fig. 8-9).
4. Mettez le verre de protection en place et fixez-le avec les crochets en métal. Vérifiez que le
(Fig. 10-12).
5. Fixez le luminaire à l’aide de vis et assurez-vous que celles-ci sont bien serrées afin de bien
goulotte de protection du câble jusqu’à l’entrée du luminaire.
et faites un trou pour le passage du câble (Fig. 1-5).
fil brun au terminal de phase
puissance indiquée sue le luminaire.
joint caoutchouc est bien en place
maintenir le luminaire.
1. Eteignez l’alimentation et laissez refroidir l’ampoule.
2. Ouvre le couvercle du luminaire.
3. Dévissez la lampe précautionneusement une fois qu’elle est refroidie.
4. Vissez une nouvelle lampe dans la douille.
5. Remettez le couvercle en place avant d’allumer l’alimentation.
CHANGEMENT DE L’AMPOULE:
8mm
4cm

I
05 I06
Leggere attentamente il presente manuale prima di utilizzare il prodotto e controllare che non
componenti danneggiati. In caso di danni, il prodotto non può essere installato.vi siano
Conservare questo manuale per consultazioni future.
AVVERTENZA DI SICUREZZA:
SPIEGAZIONE DEI SIMBOLI:
Conforme ai regolamenti europei applicablili ai prototti.
Il simbolo del cassonetto barrato indica che il prodotto non può essere eliminato con i
Il prodotto dev’essere riciclato nel rispetto delle norme
ambientali locali per lo smaltimento dei rifiuti. Separandoun prodotto contrassegnato
ci, aiuterai a ridurre il volume dei rifiuti destinati
agli inceneritori o alle discariche, minimizzando così qualsiasi possibile impatto
negativo sulla salute umana e sull’ambiente.
comuni rifiuti domestici.
da questo simbolo dai rifiuti domesti
DATI TECNICI:
2604A
220-240 V ~ 50 Hz
Max. 60 W
IP44
II
0.5 kg
E27
Tipo
Tensione nominale
Potenza nominale
Livello IP
Vetro di protezione contro
le scosse elettriche
Peso
Lampada con rete
INSTALLAZIONE:
MANUTENZIONE:
Pulire regolarmente lampada. Prima di pulire la lampada, disattivare l’alimentazione e
raffreddata.Pulire con un panno morbido (può essere
danneggiare la lampada.
aspettare che la lampadina si sia
leggermente inumidito). Non usare mai alcol, solvent o prodotti simili: essi potrebbero
a) L’installazione deve essere effettuata da un elettricista qualificato.
b) Prima dell’installazione, veriticare l’affidabilità e la sicurezza del collegamento del cavo di
c) Non toccare la lampadina quando
è accesa o finch
é non si
è completamente raffreddata.
d) Classe di sicurezza II.
e) Per esterni IPX4: Splash-proof.
f) Se il vetro di protezione
è danneggiato, deve essere sostituito immediatamente. La lampada
non deve essere utilizzata se priva del vetro di protezione.
alimentazione.
Dimensioni zoccolo
della lampada
Prima di procedere all’installazione, staccare l’alimentazione.
Il cavo di alimentazione esterno deve essere un cavo impermeabile certificato VDE H05RN-F
restringibile sul cavo nel punto di giunzione.
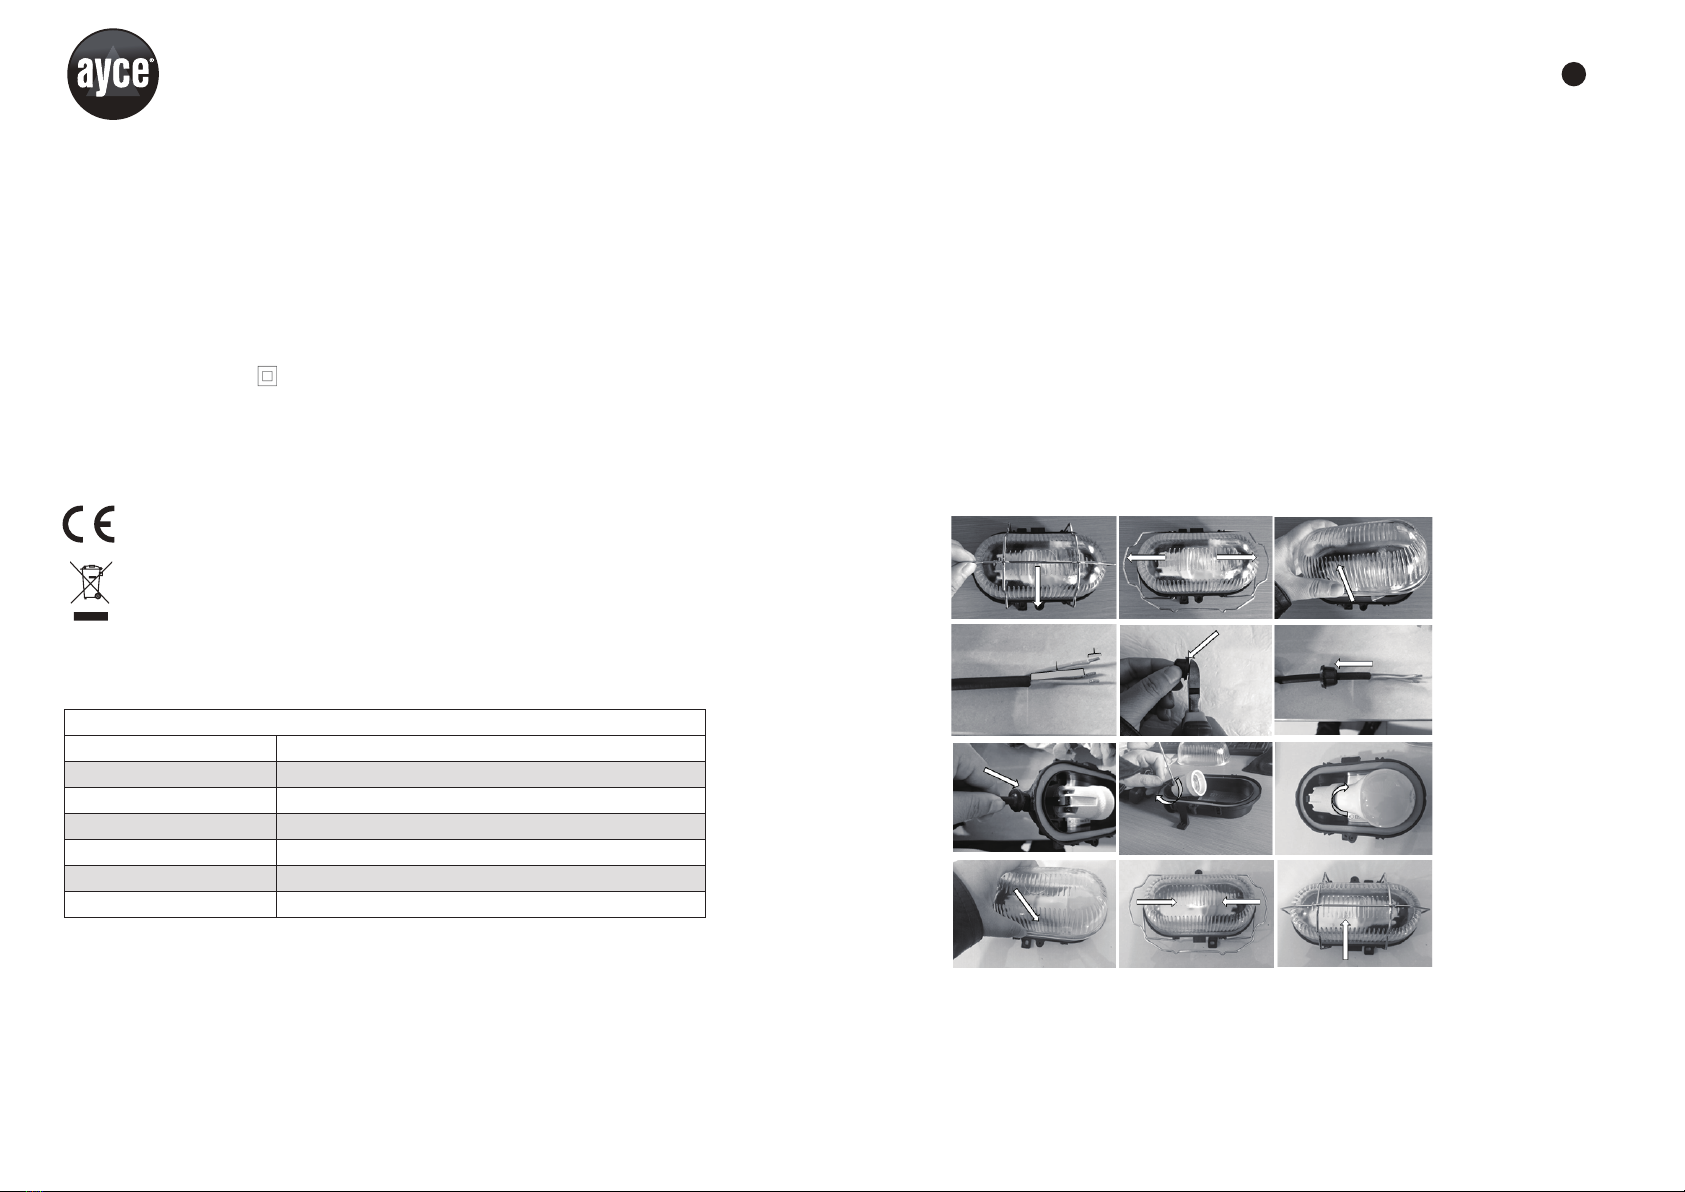
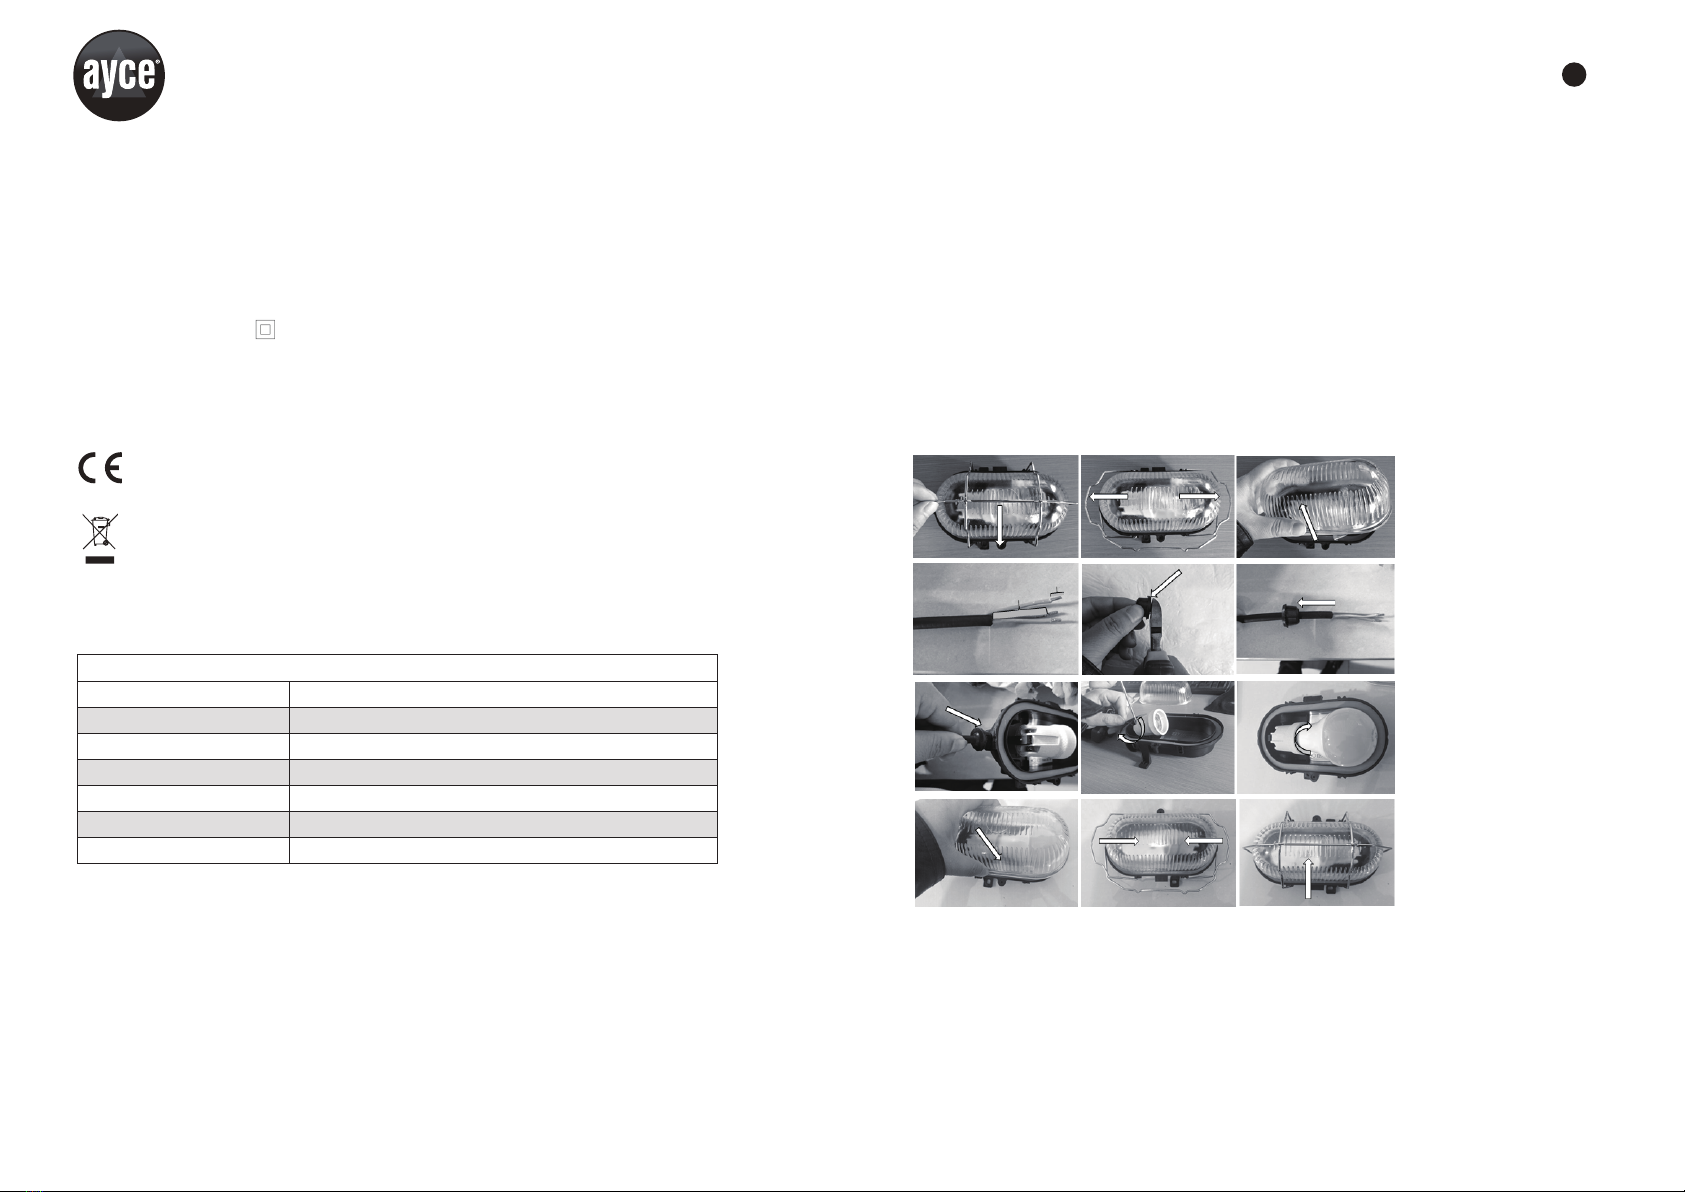
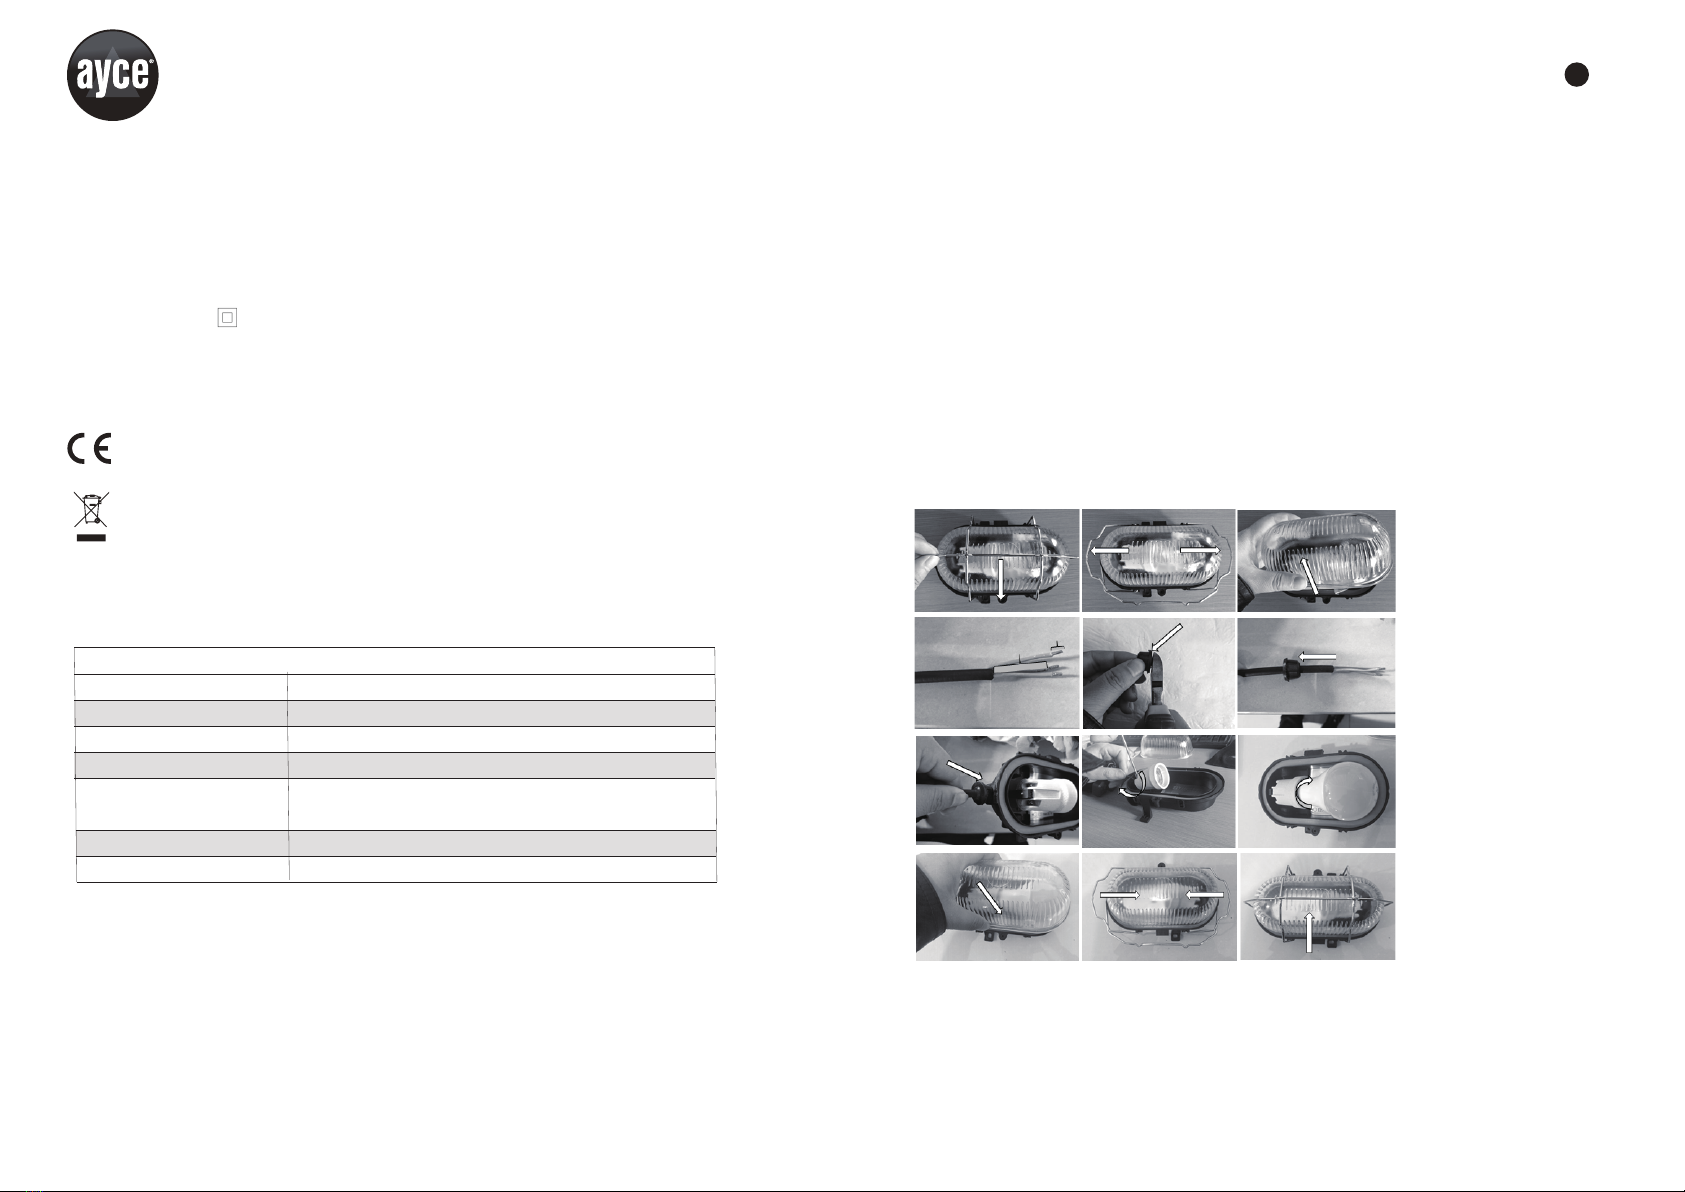
1. Togliere le reggette di metallo e la copertura del vetro. Togliere i tappi di gomma e realizzare
ei fili (Fig. 1-5).
2. Bloccare il cavo attraverso i cappucci e quindi fissare il tappo sul corpo lampada. Collegare
(contrassegnato con “L”) e il filo blu con l’altro terminale
del portalampada (Fig. 6-7).
3. Inserire la lampadina nello zoccolo. La potenza della lampadina non deve essere superiore
Fig. 8-9).
4. Montare la copertura superiore e fissarla con le reggette di metallo. Verificare che la
(Fig. 10-12).
5. Scegliere l’ubicazione designata per installare la lampada, quindi fissare la base con le viti,
2x da 1,0 mm2. Inserire il flessibile
i fori per il collegamento d
il filo marrone con il terminale L
alla potenza massima della lampada (
guarnizione di gomma sia posizionata correttamente
avvitandole bene.
OSTITUZIONE DELLA LAMPADINA:
1. Disattivare l’interruttore principale e lasciar raffreddare la lampadina.
2. Aprire la copertura della lampada.
3. Svitare la lampadina ormai fredda, prestando attenzione.
4. Avvitare la nuova lampadina nello zoccolo.
5. Chiudere la copertura della lampada prima di effettuare l’accensione.
8mm
4cm

Read this manual carefully before using this product and check whether there are any damaged
parts. The product cannot be installed in case of damages. Keep this manual for further reference.
SAFETY WARNINGS:
GB
07 I08
EXPLANATION OF SYMBOLS:
Conforms to relevant European requirements for the product.
The crossed-out wheeled bin symbol indicates that the item should be disposed of
separately from household waste. The item should be handed in for recycling in
accordance with local environmental regulations for waste disposal. By separating a
marked item from household waste, you will help reduce the volume of waste sent to
incinerators or land-fills and minimize any potential negative impact on human health
and the environment.
TECHINICAL DATA:
2604A
220-240 V ~ 50 Hz
Max. 60 W
IP44
II
0.5 kg
E27
Type
Rated voltage
Rated power
IP Level
Lamp socket size
Weight
Humidity-proof light
INSTALLATION:
CLEANING:
Turn off the power to clean the lamp and let the lamp cool down. Clean the lamp with soft
cloth (if necessary slightly moistened). Never use alcohol or a similar solvent, this could
damage the lamp.
a)
The installation must be carried out by a qualified electrician.
b) Please check whether the connection of the power cord is safe and reliable before installation.
When the light bulb is burning or not completely cooled down, please do not touch it.
A class II product.
IPX4: Splash-proof.
When the protection glass is damaged, it should be replaced immediately. The lamp must not be used
without the protectionn glass.
Electric shock
protection class
Switch the power off before the installation.
The external power cord must be a VDE-certified H05RN-F 2x1,0mm2 waterproof cable.
Please put the shrinkage hose on the cable at the joint.
1. Take the metal hoops and glass cover off. The the rubber caps off and make holes for the
2. Fix the cable through the caps and then fix the cap on the lamp body. Connect the brown
(marked with “L”) and blue wire with the other terminal of the
lamp hodler (Fig. 6-7).
3. Screw the light bulb into the socket. The power of the light bulb should not exceed the
4. Mount the upper cover and fix it with metal hoops. Make sure the rubber gasket is in the
5. Choose the designed place of the lamp installation, the fix t
tighted the screws to fix the lamp well.
he lamp base with screws and
wire connection (Fig. 1-5).
wire with the L terminal
maximum power of the lamp (Fig. 8-9).
right place (Fig. 10-12).
CHANGING THE LIGHT BULB:
1. Switch the main switch off and cool down the bulb.
2. Open the lamp cover.
3. Unscrew the cooled down light buulb cautiously.
4. Screw the new light bulb into the socket.
5. Close the lamp cover before switching on the lamp.
8mm
4cm
c)
d)
e)
f)
This manual suits for next models
1
Table of contents
Languages:
Popular Outdoor Light manuals by other brands

North Light
North Light Vera CS-MT021-UK quick start guide

West Elm
West Elm Sculptural Glass Floor Lamp Assembly instructions

Allpro
Allpro FE13PC instruction manual

North Light
North Light XYIP-24ELED-160R-RGB instruction manual

Heath Zenith
Heath Zenith SL-6136 installation guide

HOMEDEPOT
HOMEDEPOT 8419-3511-10 Instructions for Assembling and Installing

solarcentre
solarcentre Edinburgh instructions

LIVARNO LUX
LIVARNO LUX Z31170A Operation and safety notes

Herman Miller
Herman Miller Ode How to assemble

LIVARNO LUX
LIVARNO LUX 315252 Assembly, operating and safety instructions

HAMPTON BAY
HAMPTON BAY COLLIER KZH1601AX-01/GW Use and care guide

HAMPTON BAY
HAMPTON BAY KIF2301LS-01 Use and care guide