JUNGLE HOBBIES LL-4800N Instruction manual

Quick Start Manual
Advanced LED
Lighting System
LL-4800N
www.JungleHobbies.com
ADVANCED LED LIGHTING SYSTEM

Safety Guidelines
For your safety, please read these operating instructions carefully before
using your Advanced LED Lighting System
NEVER LOOK DIRECTLY AT THE LEDS. Light emitted from LEDs may
cause eye and/or skin damage. UV and Invisible Radiation (IR) emitted
from this product can cause permanent damage. Always minimize
exposure to eyes and skin.
A drip loop must be used with all electrical aquarium devices. A drip loop is
a self- made part of the cord hanging below the receptacle. (See Fig. 1)
Jungle Hobbies is not liable for any personal safety or equipment damage
caused by improper use of your Advanced LED Lighting system.
Check the power cord, plug and socket for damage before using.
Before wiring, please read the state and local laws, make sure to use a
compliant power adapter.
Hang or attach the light fixture securely.
Do not place anything on the product.
Avoid putting any objects on the system and keep the slot and ventilation
openings clean. They should never be blocked or covered.
Do not splash or submerge in water.
If the power supply is damaged, discontinue use and replace.
Get Started
Thank You For Choosing JUNGLE HOBBIES
Advanced LED Lighting System
Package content
1
2
3
45
6
Parts diagram
Please Verify That The Contents Of This Package Are Complete
1
02
01
1.LEDfixture x 1pc
2. Power wire x 2sets
3.AC/DC adapter x 2sets
4. Two types of flexible brackets x 1set
5. Pendant & accessories x 1set
6.Infrared remote controller x 1pc
Parts list

Mounting For Advanced LED Lighting System
2
Step1
Step1
Step2
Step2
Step3
Step3
Step4
Step5
2.1 Mounting flexible brackets
①Assemble via one of brackets
② Assemble via the other brackets
04
03

③ Assemble via the combination of two types of brackets
Step1
Step4
Step3
Step2
Step6
Step7
Step5
06
05

Step1 Step2
Step3 Step4
Step5
Step6
ZETLIGHT
ZETLIGHT R
OPENOPEN I N OFF START
RESETSAVE
COLOR
24/12
°C/° F
DEMO
-
+
NOTE: Always unplug the battery protection part before you use the remote controller.
2.2 Mounting the pendant
08
07

Daytime mode
Sunrise or Sunset mode
Dawn or Nighttime mode
Light Off mode
08:33
Ⅰ) In the Current Time or Time Duration settings: The first two digits
represents “Hour(s)”, and the last two digital represent “Minute(s)”.
Ⅱ) In Lighting Effects settings: The first digit represents which time period
you are setting. “1” indicates Dawn period, “2” indicates Sunrise period,
“3” indicates Daytime period, “4” indicates Sunset period, and “5” indicates
Nighttime period.
The second digit represents which LED colors you are setting. “A” is for
white LEDs, “B” is for blue LEDs, and “C” is for color mixed LEDs.
The last two digits indicates brightness levels from “00” to “32”.
Ⅲ) In the Lightning mode: Frequency levels will range from “1” to “8”.
Ⅳ) In the Cloudy mode: Frequency levels will range from “Co 01” to “Co 12”.
Ⅴ) The last two digits represent the lighting unit as a slave or receiver in the
network mode. “ “ represents slave.In
Ⅵ) “OFF” represents light off.
In 12-hour clock: indicates morning, indicates afternoon. AM PM
3
①
②
③
O F F
④
⑤
⑥
Index Of Display Screen
Display screen
O F F
AM
PM
①
②
③
④ ⑤
⑥
0
8 3 3
Press to toggle between white, blue, or color mixing, and adjust the
brightness of each one by / . This allows you to combine a variety of
different settings to simulate the dawn effect.
Press to toggle between white, blue, or color mixing, and adjust the
brightness of each one by / . This allows you to combine a variety of
different settings to simulate the sunrise effect.
Press to turn off light
OFF
Press to return to previously set automatic running mode.
START
1
Press to set slaves / receivers and to be ready to receive signals from the
master / sender.
IN
2
-
+
-
+
-
+
Press to set the time duration of Dawn Mode. Press once for setting
hour(s), twice for setting minute(s). Use / to adjust the time.
3
Press to set the time duration of Sunrise Mode. Press once for setting
hour(s), twice for setting minute(s). Use / to adjust the time.
4
Remote controller
10
6
7
8
9
1
2
3
4
5
11
12
Index Of Infrared Ray Remote Controller
4
Press to set the time of day. Press once for setting hour(s), twice for
setting minute(s). Use / to adjust the time.
OPEN
-
+
10
09
-
+

5.1 Current Time Setting
Step 1) Press the hour digit of display screen will be flashing.
Use " " or " " keys to adjust hour(s).
Step 2) After setting current hour(s), press again and the minute digit of
display screen will be flashing. Use " " or " " keys to adjust current
minute(s). Your current time setting will be automatically saved and
displayed on the screen after 10 seconds without operating. Or you can
press to go back to the Automatic Running Mode with your updated
current time.
-
+
-
+
-
+
-
+
-
+
-
+
-
+
-
+
-
+
-
+
-
+
-
+
-
+
Coordinate with other function keys to adjust your settings.
12
Press to set the time duration of Daytime Mode. Press once for setting
hour(s), twice for setting minute(s). Use / to adjust the time.
5
Press to recover the default only when the temperature is displayed.
8RESET
Press to save your settings whenever you want.
SAVE
9
10 COL OR
Press to choose 24-hour clock or 12-hour clock key. Factory setting is 24-
hour clock.
11 24/12
Press to choose Celsius or Fahrenheit display of the light fixture.
C/F
Press to demonstrate one-day lighting effects in a few minutes. Press any
key to quit this mode.
DEMO
Press to set the current time. Press once for setting hour(s), twice for
setting minute(s). Use / to adjust the time as you want.
Press to set the time duration of Nighttime Mode. Press once for
setting hour(s), twice for setting minute(s). Use / to adjust the time.
7
Press to set the time duration of Sunset Mode. Press once for setting
hour(s), twice for setting minute(s). Use / to adjust the time.
6
Press to toggle between white, blue, or color mixing, and adjust the
brightness of each one by / . This allows you to combine a variety of
different settings to simulate the daytime effect.
Press to toggle between white, blue, color mixing and adjust the
brightness of each one by / . This allows you to combine a variety of
different settings to simulate the nighttime effect.
Press to toggle between white, blue, or color mixing, and adjust the
brightness of each one by / . This allows you to combine a variety of
different settings to simulate the sunset effect.
Press to simulate the lightning effect and use / to adjust its frequency.
Press to simulate the cloudy effect and use / to adjust its frequency.
Operating Instructions
(Note: You can set the time duration for each mode as you like. If the total is less than
24 hours, the light will be OFF after the Nighttime mode until the next cycle. If the
total is more than 24 hours, the time period over 24 hours will be ignored)
Turning off
Light on time
The time duration of dawn mode Dawn lighting effects
The time duration of sunrise mode Sunrise lighting effects
The time duration of daytime mode Daytime lighting effects
The time duration of sunset mode Sunset lighting effects
The time duration of nighttime mode Nighttime lighting effects
Timer settings Lighting effects settings
5
(Tip: Press to choose 24-hour clock or 12-hour clock.)
5.1 Current Time Setting
Step 1) Press the hour digit of display screen will be flashing.
Use " " or " " keys to adjust hour(s).
Step 2) After setting current hour(s), press again and the minute digit of
display screen will be flashing. Use " " or " " keys to adjust current
minute(s). Your current time setting will be automatically saved and
displayed on the screen after 10 seconds without operating. Or you can
press to go back to the Automatic Running Mode with your updated
current time.
Before using the timer, the current time must be set.
-
+
-
+
12
11

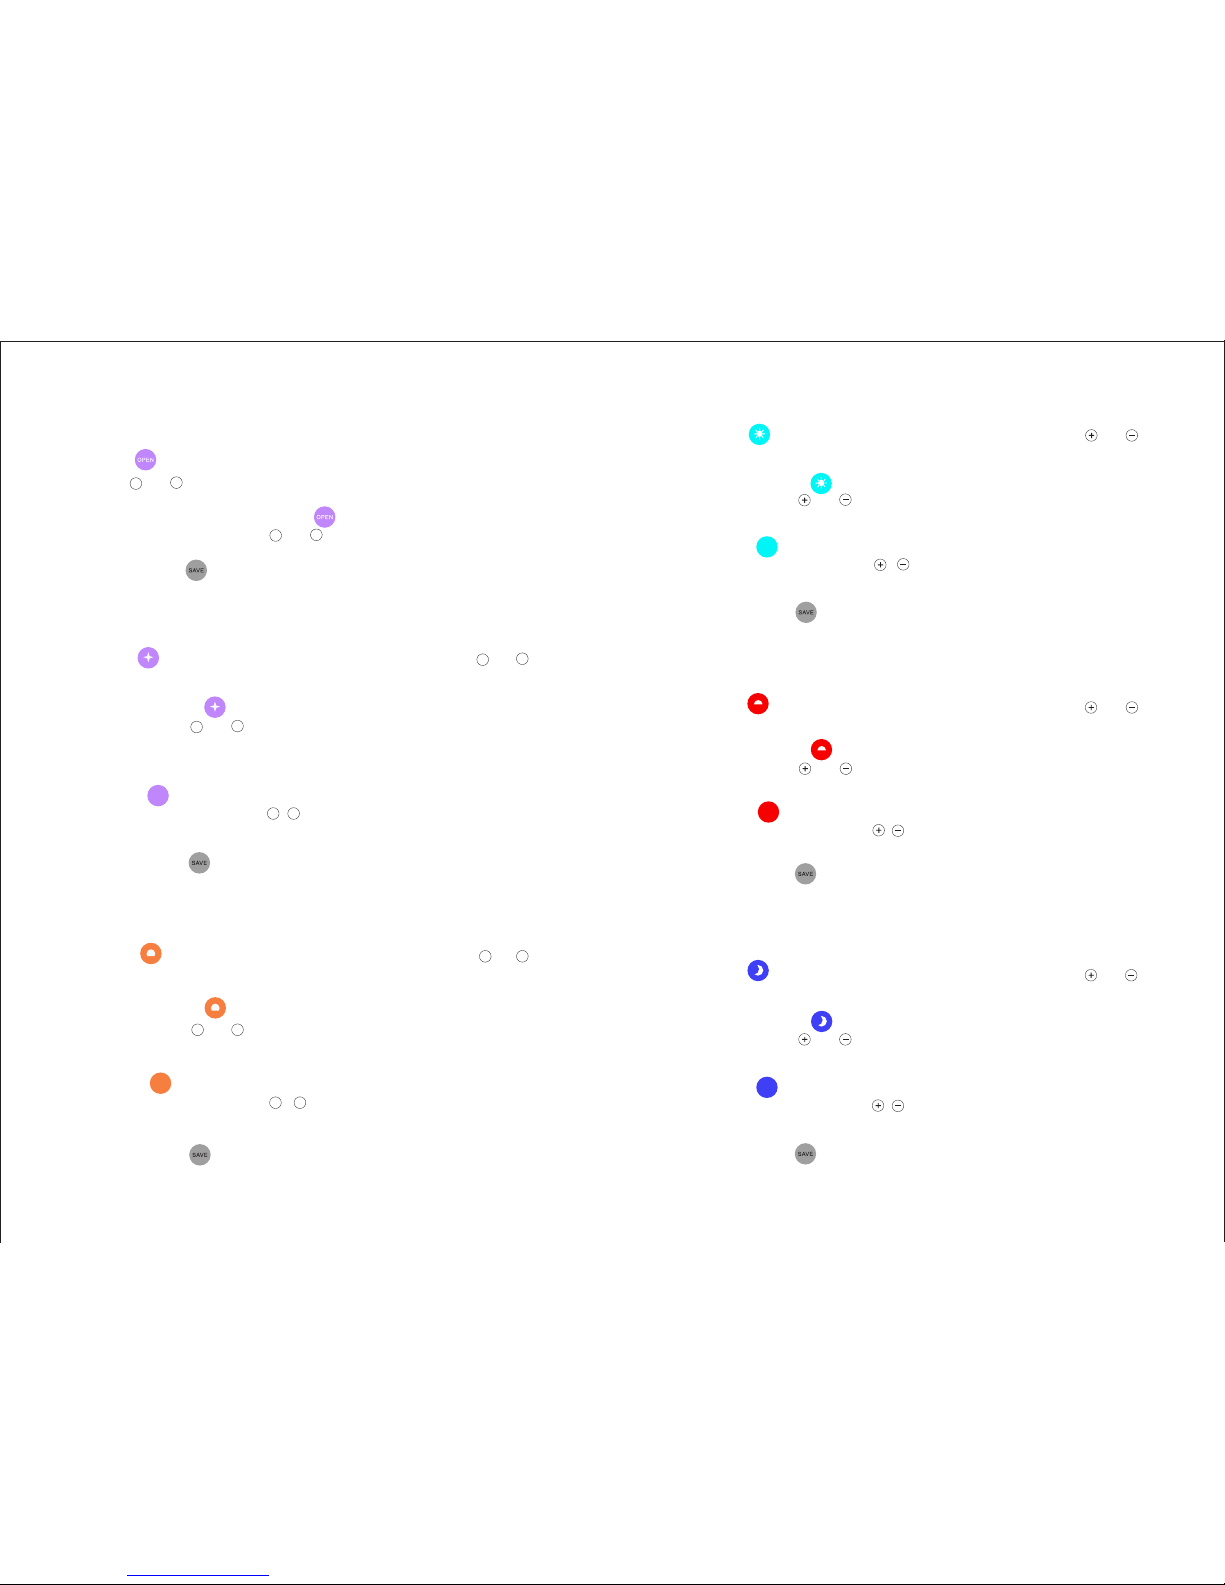
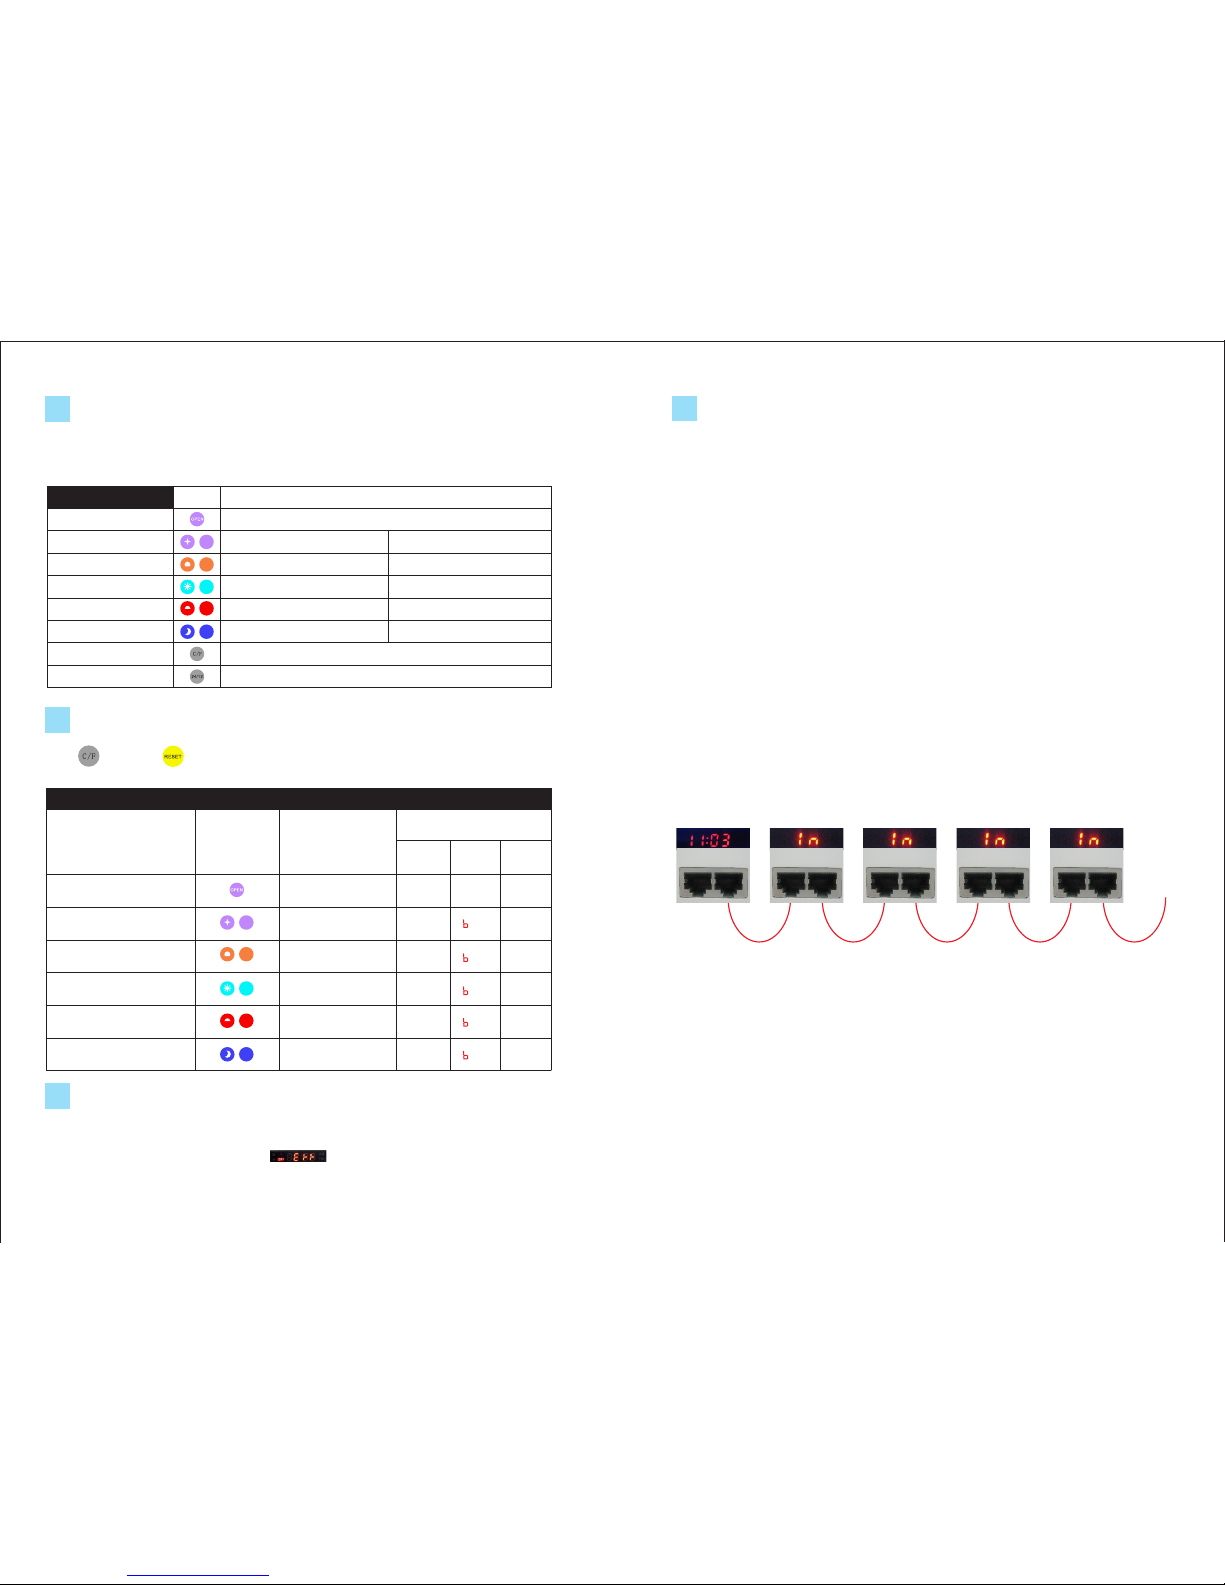
5.2 Timer And Lighting Mode Settings
Step 1) Light on setting
I. Press , the hour digit of display screen will be flashing.
Use " " or " " keys to adjust light on hour(s).
II. After setting Light On hour(s), press again and the minute digit of display
screen will be flashing. Use " " or " " keys to adjust light on minute(s).
III. Lastly, press to save your setting or press other function keys to
continue your next settings.
Step 2) Dawn mode settings
I. Press , the hour digit of display screen will be flashing. Use " " or " "
keys to adjust how many hour(s) you want for the dawn mode.
II. After that, press again and the minute digit of display screen will be
flashing. Use " " or " " keys to adjust how many minute(s) you want for
the dawn mode. (e.g. If you set 01:30 that means the dawn mode will be
running for 1 hour and 30 minutes)
III. Press to toggle between white, blue, color mixing and adjust the
brightness of each one by / . This allows you to combine a variety of
different settings to simulate the dawn effect.
IV. Lastly, press to save your settings or press other function keys to
continue your next settings.
Step 3) Sunrise mode settings
I. Press , the hour digit of display screen will be flashing. Use " " or " "
keys to adjust how many hour(s) you want for the sunrise mode.
II. After that, press again and the minute digit of display screen will be
flashing. Use " " or " " keys to adjust how many minute(s) you want for
the sunrise mode.
III. Press to toggle between white, blue, color mixing and adjust the
brightness of each one by / . This allows you to combine a variety of
different settings to simulate the sunrise effect.
IV. Lastly, press to save your settings or press other function keys to
continue your next settings.
-
-
+
-
+
-
+
+
-
+
-
+
-
+
-
+
Step 4) Daytime mode settings
I. Press , the hour digit of display screen will be flashing. Use " " or " "
keys to adjust how many hour(s) you want for the daytime mode.
II. After that, press again and the minute digit of display screen will be
flashing. Use " " or " " keys to adjust how many minute(s) you want for
the daytime mode.
III. Press to toggle between white, blue, color mixing and adjust the
brightness of each one by / . This allows you to combine a variety of
different settings to simulate the daytime effect.
IV. Lastly, press to save your settings or press other function keys to
continue your next settings.
Step 5) Sunset mode settings
I. Press , the hour digit of display screen will be flashing. Use " " or " "
keys to adjust how many hour(s)you want for the sunset mode.
II. After that, press again and the minute digit of display screen will be
flashing. Use " " or " " keys to adjust how many minute(s) you want for
the sunset mode.
III. Press to toggle between white, blue, color mixing and adjust the
brightness of each one by / . This allows you to combine a variety of
different settings to simulate the sunset effect.
IV. Lastly, press to save your settings or press other function keys to
continue your next settings.
Step 6) Nighttime mode settings
I. Press , the hour digit of display screen will be flashing. Use " " or " "
keys to adjust how many hour(s) you want for the nighttime mode.
II. After that, press again and the minute digit of display screen will be
flashing. Use " " or " " keys to adjust how many minute(s) you want for
the nighttime mode.
III. Press to toggle between white, blue, color mixing and adjust the
brightness of each one by / . This allows you to combine a variety of
different settings to simulate the nighttime effect.
IV. Lastly, press to save your settings or press other function keys to
continue your other settings.
14
13

Saving function
The below functions can be saved whenever you want. Updated settings will
be automatically saved after 10 seconds of no operation.
Reset to factory settings
Press , then press to recover the default as below:
Smart Fan Cooling
The smart fan will automatically turn on when the temperature of the light reaches
approximately 38°C and turns off at approximately 34°C. The light will automatically
shut off and will display a warning of “ ” on the screen when its Temperature
reaches approximately 60°C.
6
7
8
Keys Settings can be saved
Light on time
Dawn mode settings
Dawn mode settings
Sunrise mode settings
Daytime mode settings
Sunset mode settings
Nighttime mode settings
Temperature display
12/24-hour clock
The time duration of the dawn
The time duration of the nighttime
The time duration of the sunset
The time duration of the daytime
The time duration of the sunrise
The beginning time in a day
Lighting effects for the dawn
Lighting effects for the nighttime
Lighting effects for the sunset
Lighting effects for the daytime
Lighting effects for the sunrise
Celsius or Fahrenheit display
12-hour clock or 24-hour clock
Functions
05:00
02:00
01:00
10:00
02:00
03:00
Functions Keys Time duration
Beginning time/ Brightness grade
Light on time Null
Color
Mix
Null
White
(beginning time)
Factory settings
Null
Blue
Network connection
The network function only applies when using two or more lighting LL-4800N
fixtures. Using standard RJ45 network cables, all of lighting fixtures can LL-4800N
be connected and synchronized to operate efficiently and conveniently.
Figure I
LL-4800N LL-4800N LL-4800N LL-4800N LL-4800N
A (Master) D (Slave)C (Slave)B (Slave)
9
IN OUT IN OUT IN OUT IN OUT IN OUT
Case 1 -Step1) If “A” fixture is as a master and others are slaves, “OUT”
ethernet port of “A” fixture should be connected to “IN” ethernet
port of “B” fixture by the network cable. Then, “OUT” ethernet
port of “B” fixture should be connected to “IN” ethernet port of “C”
fixture.(Refer to figure l below.)
Step2) Lastly, press “IN” for all of slaves with the remote controller
and they will be ready to receive signals from the master.
Step3) Now, you can adjust time, lighting mode, or other settings from
the master and all of slaves will be synchronized to operate as one.
16
15
1C 0 11A0 1
2A1 0
3A2 8
4A1 5
5A0 2
2C 2 8
3C 2 8
4C 3 0
5C 0 2
1 0 1
2 0 5
3 2 8
4 1 0
5 1 0
E (Slave)

Figure II
LL-4800N LL-4800N LL-4800N LL-4800N LL-4800N
A (Master) E (Slave)D (Slave)C (Master)B (Slave)
IN OUT IN OUT
IN OUT IN OUT
IN OUT
Case 2 - Step1) If “A” fixture and “C” are as masters and others are slaves,”OUT” ethernet
port of A fixture should be connected to IN ethernet port of B fixture by the
network cable. Then,”OUT” ethernet port of B fixture should be connected to
“IN” ethernet port of “C” fixture. (Refer to figure II below.)
Step2) Lastly, press IN for all of slaves with the remote controller and they
will be ready to receive signals from the masters.
Step3) Now, you can adjust time, lighting mode, or other settings from masters In this
situation, “B” fixture will be controlled by “A” fixture only. “D” and “E” fixtures
will be also controlled by “C” fixture only.
The PAR measurements for LL-4800N measured in micromoles (ìmol) per meter sq per second.
PAR measurement
10
Photosynthesis is driven by PAR
0- 2 00
20 1 -40 0
40 1 -60 0
60 1 -80 0
80 1 +
CM/
INCH
CM/
INCH
20CM/7.9INCH
CM/
INCH
40CM/15.7INCH
60CM/23.6INCH
0
60 40 2020 40 60
88 1616 2424
0
5/1.9
5/1.9
15/5.9
15/5.9
25/9.8
25/9.8
0
60 40 2020 40 60
88 1616 2424
0
5/1.9
5/1.9
15/5.9
15/5.9
25/9.8
25/9.8
0
60 40 2020 40 60
88 1616 2424
0
5/1.9
5/1.9
15/5.9
15/5.9
25/9.8
25/9.8
18
17

Jungle Hobbies Advanced LED Lighting System is specially designed for terrariums
and fresh water planted aquaria. It offers the most realistic lighting for animals and the
necessary wavelengths for plants to
photosynthesize properly. LL-4800N utilizes the
optimum spectrum-6500K as a main lighting for a
terrarium or aquarium. This closely resembles the
spectrum of natural sunlight.
Color spectrum
12
Product Specification
13
COLOR TEMP
FOR WHITE LED
LUMENS
6500K
14000LM
MODEL
ITEM SIZE(CM)
INPUT VOLTAGE
TOTAL LED POWER 192W
LL-4800N
100V-240V
LED QTY GREEN 2W x 6PCS
RED 2W x 6PCS
WHITE 40W x 4PCS
BLUE 0.06W x 12PCS
YELLOW 2W x 4PCS
Photosynthesis
Photosynthesis is a process by which most plants and organisms capture light energy
from the sunlight to drive the chemical process necessary to power the organisms'
metabolism. Photosynthesis plays an essential role for all living organisms and their
ecosystems. The diagram to the right
illustrates that Chlorophyll A and Chlorophyll B
are the two most dominant forms needed for
healthy ecosystems in terrariums and
vivariums.
11
4 0 0 5 0 0 6 0 0 7 0 0
100
75
50
25
0
Wavelength
Absorption(%)
chlorophyll a
carotenoids
chlorophyll b
Troubleshooting
The light
does not work
Problem
Make sure the lighting unit is
connected to power Connect it to the power
Use press to set the current
time appropriately
No response
with remote
controller
The screen
displays
Check if the light is the Network
mode or OFF mode.
Press to return to automatic
running mode
Check if the IR remote
battery is drained.
Replace the remote battery with
CR2025
Point the remote to the receiver
side of the light. The Side with
the digital display.
Check if the remote is being
pointed to the correct side of
the light.
Repair/replace the smart fan
by a professionals or return it to
the dealer if within warranty.
Check if the smart fan does not
work normally
Avoid objects into the light.
Keep the slot and ventilation
opening clean, they should not
be blacked and covered
Check if the slot and ventilation
are blocked and covered
Use time setting keys to adjust
the time appropriately. Or use
to reset to factory settings
Check if the light is in the
Network mode or OFF mode.
Check if the lights is currently
in the OFF part of the program
Check if the brightness level
is set to “0” (zero)
Use time setting keys to adjust
the time appropriately
The light is
always ON
Check if the total time period is
over 24 hours
Check if the current time is
same as the real time
Verify Solution
Press to return to automatic
running mode
Press , , , or to
adjust the brightness level
14
86.5 X 16 X 6.5H CM / 34 X 6.3 X 2.6H INCH
20
19

Please read and follow all instructions carefully.
LL-4800N Limited Warranty:
This Limited Warranty applies to new LL-4800N product purchased directly from
Jungle Hobbies Ltd or an authorized dealer by the original purchaser for normal
use and not for resale. Jungle Hobbies Ltd warrants that a covered product is free
from defects in materials and workmanship, with the exceptions stated below.
What does this limited warranty not cover?
The limited warranty does not cover damage resulting from commercial use,
misuse, accident, modification or alteration to hardware, tampering, unsuitable
physical or operating environment beyond product specifications, improper
maintenance, or failure caused by a product for which Jungle Hobbies Ltd is not
responsible. There is no warranty of uninterrupted or error-free operation. There
is no warranty for loss due to failure. There is no warranty for product with
removed labels. JUNGLE HOBBIES LTD. DOES NOT PROVIDE ANY OTHER
WARRANTIES OF ANY KIND, INCLUDING, BUT NOT LIMITED TO, THE IMPLIED
WARRANTIES OR CONDITIONS OF MERCHANTABILITY AND FITNESS FOR A
PARTICULAR PURPOSE. Jungle Hobbies Ltd. is not responsible for the cost of
return shipping of defective product, only shipping cost of the replacement if
within warranty period.
What must you do?
If you are having trouble with this product, before seeking limited warranty
service, first follow the troubleshooting procedures contained in this guide.
Warranty Information
22
21
Table of contents