Jupiter 700 Series User manual

CLARINET
Owner's Manual
Gebrauchsanweisung
Manual D'instructions
Manual de Instrucciones
保養手冊
Specifications subject to change without notice
www.jupitermusic.com

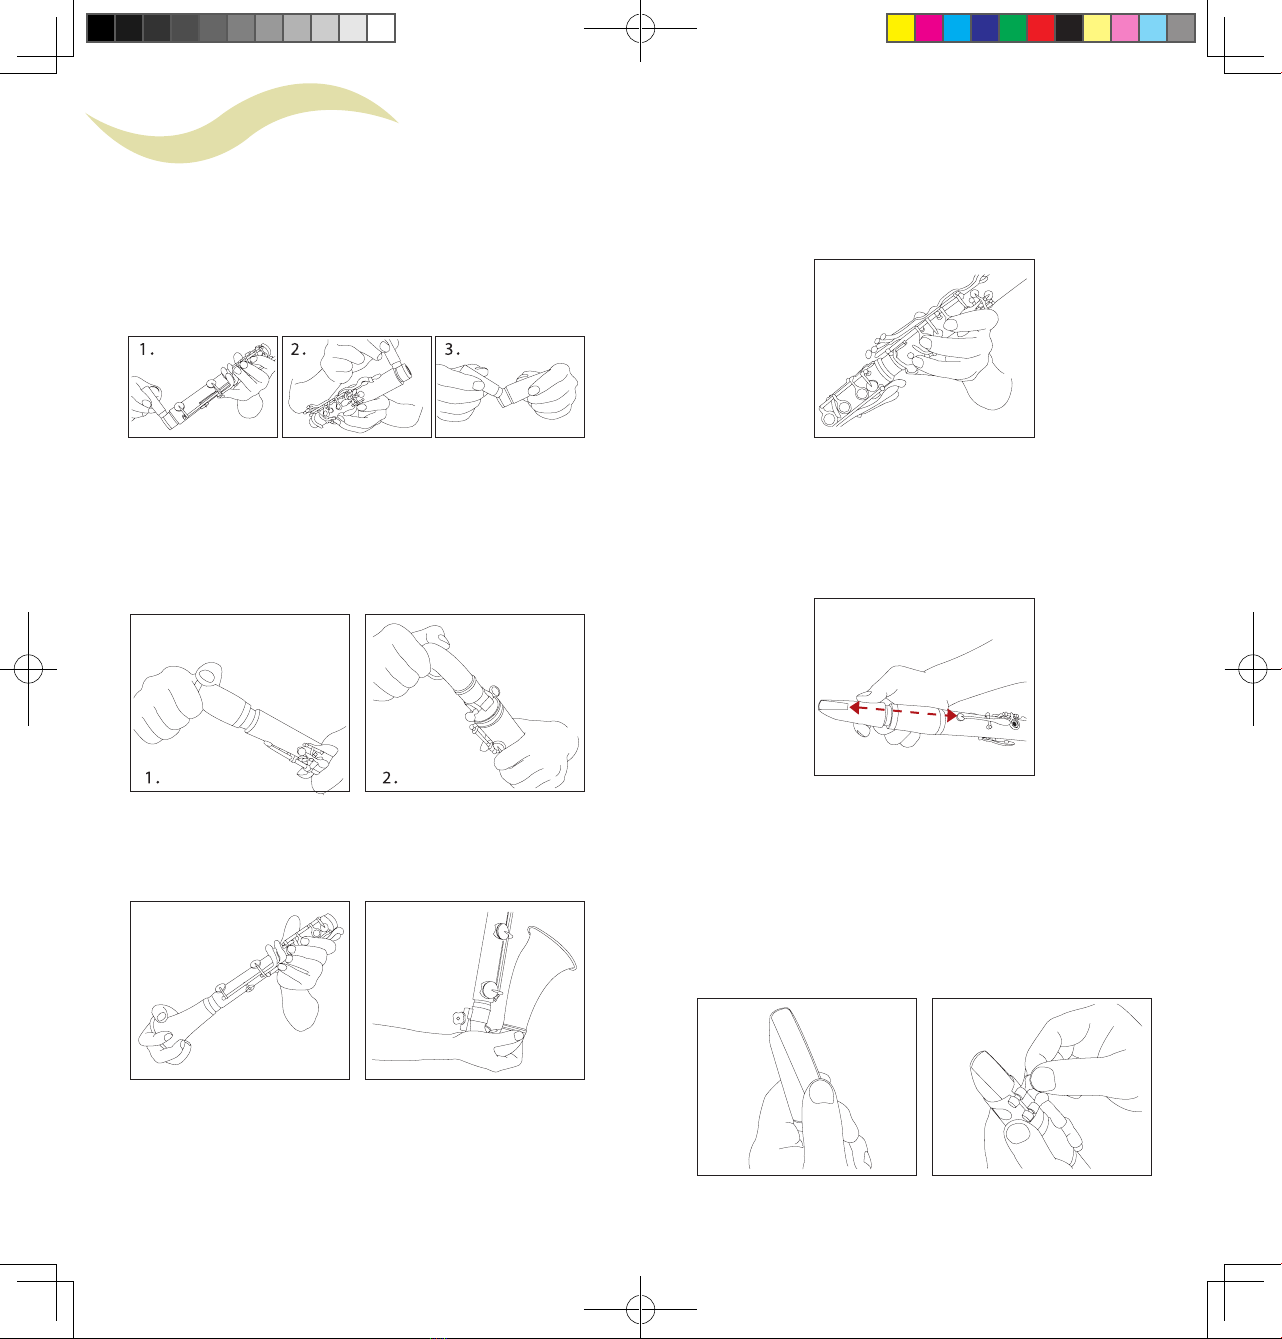
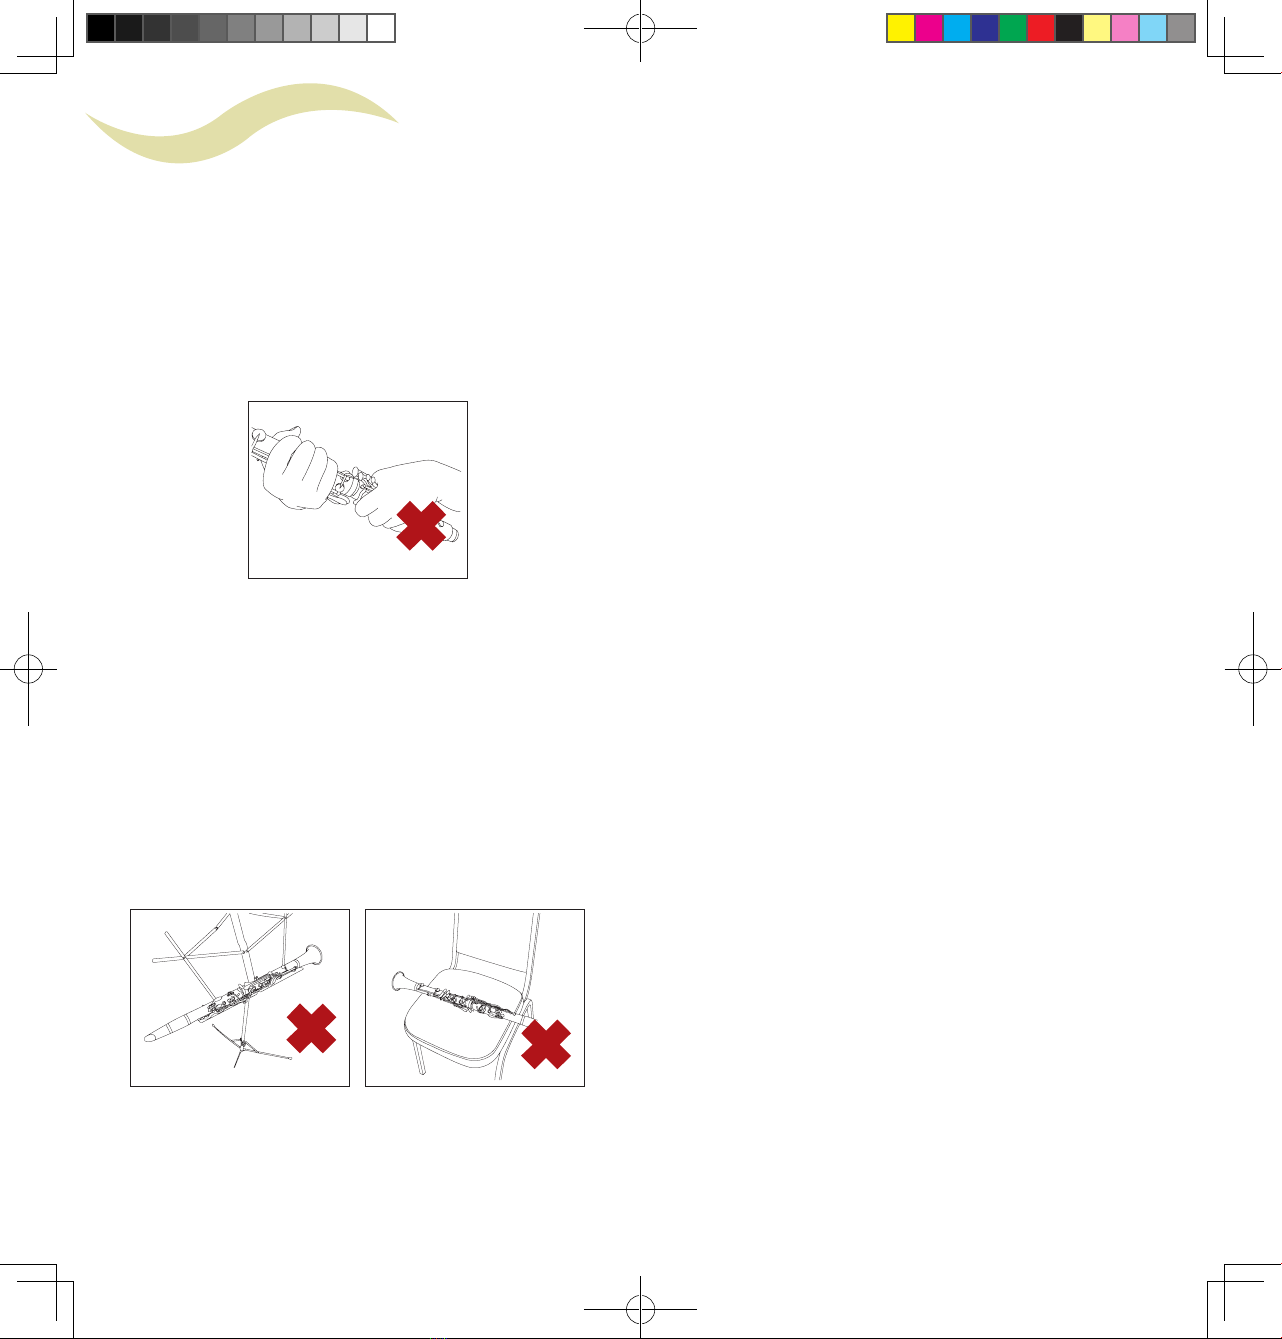
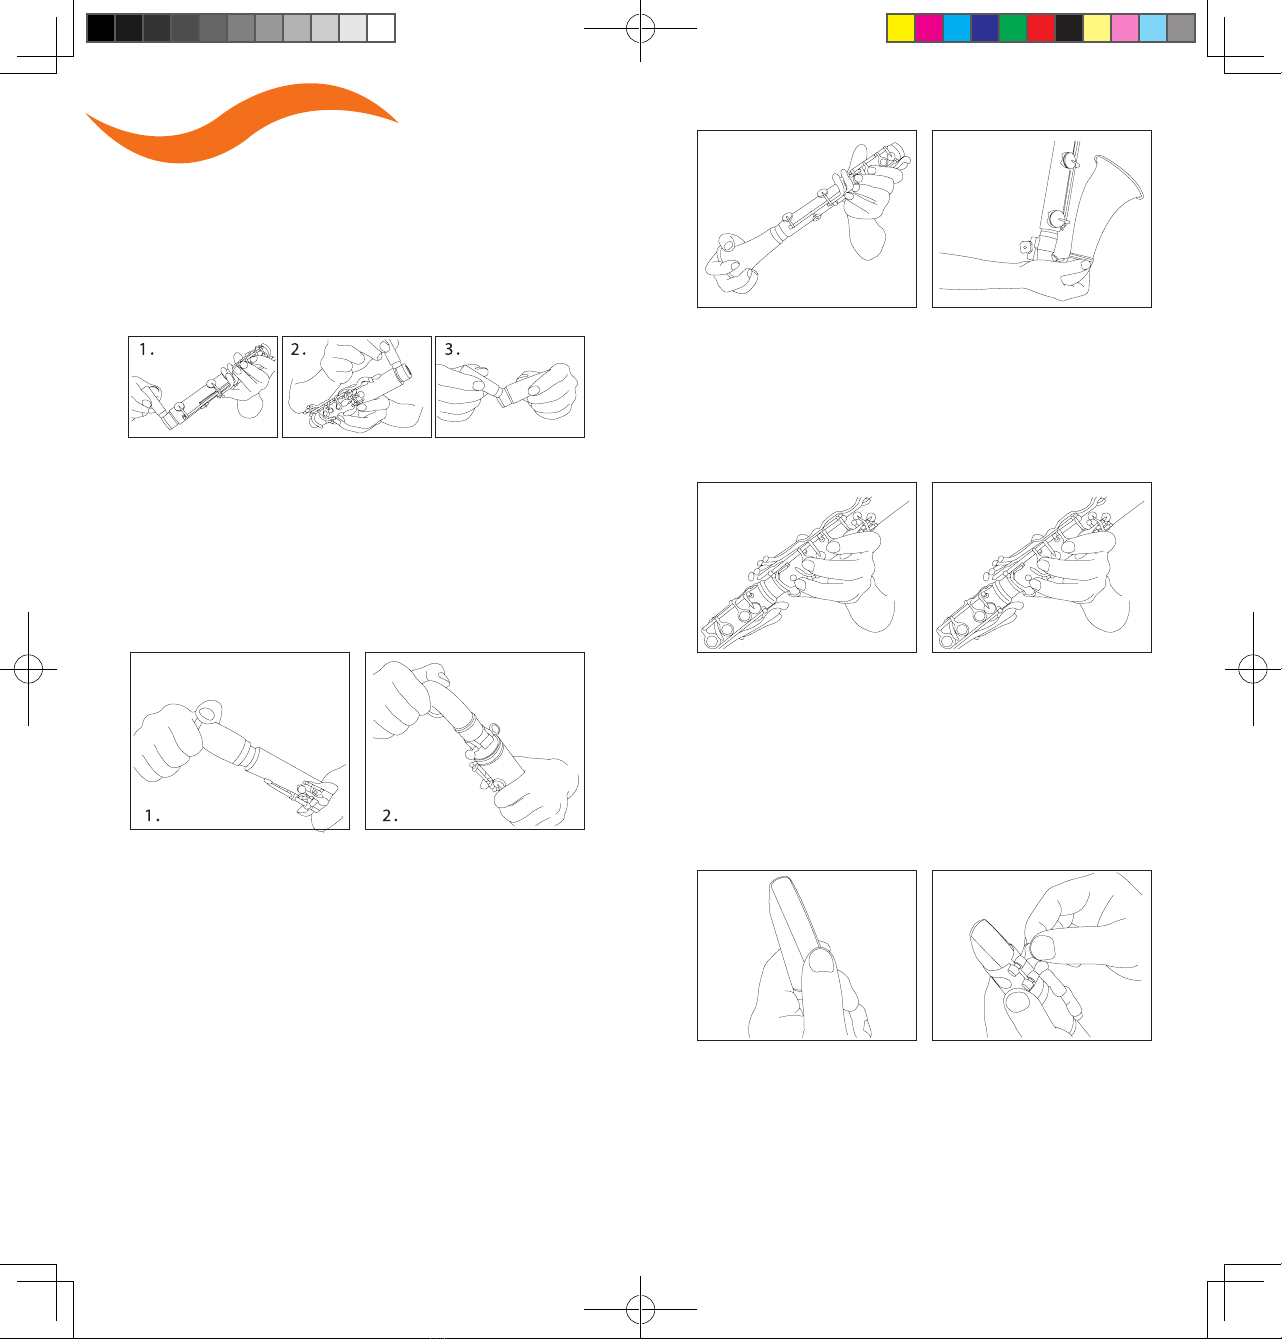
Thank you for purchasing a Jupiter series
clarinet. This manual provides you with basic
care and maintenance instructions so you can
get the most out of your instrument. We hope
you will read this carefully to help alleviate
any problems with your instrument and to get
more enjoyment from your music.
Vielen Dank, dass Sie sich für den Kauf einer
JUPITER Klarinette entschieden haben. Diese
Gebrauchsanweisung dient dazu, Ihnen das
Basiswissen über die Bedienung und Pflege
der Klarinette zu vermitteln, damit Sie Ihr
Instrument optimal nutzen können. Bitte lesen
sie die folgenden Kapitel sehr aufmerksam,
damit Sie eventuell auftretende Probleme mit
Ihrem Instrument leichter lösen und Ihre Musik
richtig genießen können.
Nous vous remercions d’avoir porté votre
choix sur une clarinette Jupiter. Ce manuel
vous donnera une série d’instructions
concernant son usage et son entretien. Nous
espérons qu’il vous sera utile pour répondre
à vos questions et qu’il vous permettra de
bénéficier au maximum du plaisir que vous
procurera cet instrument.
Muchas gracias por comprar un clarinete
Jupiter. Este manual le muestra el uso básico
e instrucciones de mantenimiento para que
pueda obtener lo mejor de su instrumento.
Por favor, léalo cuidadosamente y le ayudará
a resolver problemas con su instrumento y
disfrutar mejor de su música.
感謝您購買 JUPITER 的單簧管系列樂器,本手冊
將協助您了解基本的組裝與保養方法,請仔細地閱
讀本手冊,因為我們衷心地希望這本手冊能幫助您
解決您對樂器的疑惑,讓您學習的過程更愉快。

Clarinet Owner’s Manual>>>FE<<<Clarinet Owner's Manual
Contents
Clarinet’s Nomenclature 1
English
1. Assembly 3
2. Disassembly 5
3. Inspection & Maintenance 6
4. Caution 7
German
1. Zusammenbau
des Instrumentes 9
2. Auseinanderbau
des Instrumententes 11
3. Wartung und Pflege 12
4. Gebrauchsanweisung 13
French
1. Assemblage de I'instrument 15
2. Démontage de l'instrument 17
3. Entretien de l'instrument 18
4. Caution 19
Spanish
1. Montaje 21
2. Desmontaje 23
3. Inspección y Mantenimiento 24
4. Cuidado 25
Chinese
1. 吹奏前的組合 27
2. 吹奏後的拆卸 29
3. 吹奏後的檢查與保養 30
4. 注意事項 31

Clarinet Owner’s Manual>>>21<<<Clarinet Owner's Manual
Clarinet’s Nomenclature
Mouthpiece
Mundstück
Bec
Boquilla
吹嘴
Neck
S-Bogen
Bocal
Tudel
吹口管
Barrel
Birne
Baril
Barrilete
調音管
Ring key
Ringklappe
Clé à anneau
Anillo
環鍵 Lowerjoint
Unterteil
Corps du bas
Cuerpo inferior
下管
Bell
Schallbecher
Pavillon
Campana
喇叭口
Floor peg
Stachel
Pique
Pica
支撐架
Upper joint
Oberteil
Corps du haut
Cuerpo superior
上管
Neck screw
S-Bogenschraube
Vis de bocal
Tornillo del tudel
吹口管螺絲

Clarinet Owner’s Manual>>>43<<<Clarinet Owner's Manual
Step 1.
Liberally apply cork grease to the tenon corks
on all joints.
Step 2.
(1.) Bb Clarinet – Connect the barrel and the
upper joint.
(2.) Bb Bass Clarinet - Connect the neck and
the upper joint.
Step 3.
Connect the lower joint and bell.
Assembly
1Step 4.
Connect the upper joint from Step 2 to the
lower joint from Step 3 while depressing the
ring keys of the upper joint. This prevents
damage to the bridge key mechanism.
Step 5.
Attach the mouthpiece to the barrel. Align
the ramp surface of the mouthpiece with the
thumb register key.
Step 6.
Properly position the reed on the mouthpiece.
Slide the ligature over the reed being careful
not to damage the reed tip. After the ligature
is properly positioned, hand tighten the
ligature screws.

Clarinet Owner’s Manual>>>65<<<Clarinet Owner's Manual
Step 1.
Remove the reed, ligature, and mouthpiece
from the barrel.
Step 2.
Press the ring keys on the upper joint while
separating the upper and lower joints.
Step 3.
Detach the upper joint from the barrel.
Step 4.
Detach the lower joint from the bell.
Step 1.
After playing and before returning to the case,
draw the cleaning swab through the body
sections to remove any moisture.
Step 2.
Wipe the body and the keys gently with
the supplied cleaning cloth. Take care not
to scratch or damage the body or keys by
improper handling.
Step 3.
Clean and dry the mouthpiece and reed. To
lengthen the life of the reed, store the reed in
a reed protector.
Inspection & Maintenance
3
Disassembly
2

Clarinet Owner’s Manual>>>87<<<Clarinet Owner's Manual
1. Use key oil sparingly to all pivot points to
keep the keys operating smoothly.
2. To avoid damaging the key mechanism,
do not exert excess pressure on the keys
during assembly and disassembly.
3. Remove any excess moisture from the body
and keys to prolong the instrument’s
finish.
4. Do not expose any instrument to excessive
temperature or humidity.
5. To avoid possible damage after playing,
put the clarinet in a safe place such as an
instrument case or a suitable instrument
stand. Do not put it on a chair, desk, or
anywhere else where it could easily fall.
Caution
4
6. For adjustment or repair, take your
instrument to a qualified technician or
dealer. Don’t attempt to adjust the clarinet
yourself.

Clarinet Owner’s Manual>>>109<<<Clarinet Owner's Manual
Zusammenbau
des Instrumentes
1
Schritt 1:
Den Kork an den Verbindungszapfen mit
Korkfett oder Vaseline einfetten.
Schritt 2:
(1.)Die Bb klarinette--Die Birne auf das
Oberstück mit einer leichten Drehbewegung
aufstecken.
(2.)Bass Klarinette--Schrauben Sie den
S-Bogen von der Bass Klarinette mit leichten
Drehbewegungen auf den Korpus.
Schritt 3:
Der Schallbecher und das Unterstück
ebenfalls mit einer leichten Drehbewegung
verbinden.
Schritt 4.
Verbinden Sie das Oberstück mit dem
Unterstück während die Ringklappen des
Oberstücks gedrückt werden. So werden
Schäden an dem Verbindungsmechanismus
der Klappen vermieden.
Schritt 5.
Drehen Sie mit leichten Bewegungen das
Mundstück auf die Birne. Achten Sie darauf,
dass das Mundstück und die Klappen in einer
Linie stehen.
Schritt 6.
Das Blatt mit der flachen Seite auf die flache
Seite des Mundstücks anbringen und mit der
Blattschraube sichern. Achten Sie darauf,
dass das Klarinettenblatt mit dem Mundstück
bündig abschließt.

Clarinet Owner’s Manual>>>1211<<<Clarinet Owner's Manual
Wartung und Pflege
3
Schritt 1.
Entfernen Sie mit leichten Drehbewegungen
das Mundstück von der Birne und lösen
Sie die Blattschraube, damit Sie das
Klarienttenblatt entnehmen können.
Schritt 2.
Die Ringklappen des Oberstücks drücken
und gleichzeitig das Oberstück und das
Unterstück trennen.
Schritt 3.
1.Die Birne von dem Oberstück entfernen.
2.Den Schallbecher von dem Unterstück
entfernen.
Schritt 1.
Reinigen Sie nach dem Spielen mit dem
Reiningungstuch alle Teile der Klarinette, um
eventuelle Feuchtigkeit zu entfernen.
Schritt 2.
Alle Klappen vorsichtig mit einem Poliertuch
abwischen. Achten Sie darauf, dass Sie die
Klappen nicht verkratzen oder beschädigen.
Schritt 3.
Das Mundstück und das Blatt reinigen und
trocknen lassen. Bewahren Sie das Blatt in
einem sog. Blatthalter auf, damit es nicht
einreißen kann.
Auseinanderbau
des Instrumententes
2

Clarinet Owner’s Manual>>>1413<<<Clarinet Owner's Manual
1. Mit gelegentlichem Ölen der Schrauben
gewährleisten Sie eine reibungslose
Mechanik.
2. Die Klappen während der Montage oder
Demontage nicht drücken, damit der
Klappenmechanismus nicht beschädigt
wird.
3. Um den Korpus aus Holz gegen Risse zu
schützen, die Klarinette nicht extremer
Trockenheit oder Hitze aussetzen.
4. Die Klarinette sicher aufbewahren, um sie
vor Schäden zu schützen. Nicht auf einen
Notenständer, Stuhl oder sonst irgendwo
platzieren, wo sie leicht herunterfallen
kann. Bewahren Sie das Instrument nach
dem Spielen in dem dafür vorgesehenen
Koffer auf. Setzen Sie das Instrument keiner
großen Hitze sowie Feuchtigkeit aus.
Gebrauchsanweisung
4
5. Während die Feuchtigkeit mit Papier
entfernt wird ist darauf zu achten, dass kein
Druck auf die Polster ausgeübt werden darf,
da dies die Polster beschädigen kann.
6. Das Instrument nur durch einen
qualifizierten Instrumentenbauer oder
Fachhändler einstellen oder reparieren
lassen. Bitte keine Einstellungen selbst
vornehmen.

Clarinet Owner’s Manual>>>1615<<<Clarinet Owner's Manual
Assemblage de
I'instrument
1
1. Appliquer la graisse sur le liege des tenons
du corps du haut et corps du bas.
2. (1.) La clarinette Bb-
Emboîter les deux corps sans appuyer
fortement sur les clés ce qui pourrait
dérègler le
mécanisme.
(2.) La clarinette basse-
Attachez enfin la partie inférieure du bocal
au
corps supérieur.
3. Emboîter le baril sur le corps du haut.
4. Emboîter le pavillon sur le corps du bas.
5. Aligner la table du bec avec la clé de pouce.
6. Positionner correctement l'anche sur le
bec. Glisser la ligature en veillant à ne pas
endommager le bout de l'anche. Quand la
ligature est bien positionnée, resserrer les
vis de la ligature.

Clarinet Owner’s Manual>>>1817<<<Clarinet Owner's Manual
Entretien de l'instrument
3
1. Après avoir joué et avant de ranger
l'intrument dans son etui, retirer toute
trace d'humidité à l'intérieur des différentes
parties de l'instrument avec l'écouvillon.
2. Essuyer le corps et les clés avec un chiffon
doux. Prendre garde de ne pas rayer
l'instrument par une mauvaise manipulation.
3. Nettoyer et sécher le bec et l'anche. Ranger
l'anche dans son étui protecteur pour éviter
de la détériorer.
1. Retirer l'anche, la ligature et le bec du baril.
2. Appuyer légèrement sur les cles du haut
lorsque vous séparez le corps du haut et le
corps du bas.
3. Retirer le baril; Retirer le pavillon.
Démontage de
l'instrument
2

Clarinet Owner’s Manual>>>2019<<<Clarinet Owner's Manual
1. N'utiliser que peu d'huile pour clés sur
toutes les parties à pivot.
2. Pour éviter d'endommager le mécanisme
ne pas exercer une pression trop forte au
montage et démontage.
3. Pour éviter les fentes du bois ne pas
exposer la clarinette a des changements
brusques de température.
4. Ne pas exposer l'instrument à des
temperatures excessives ou à l'humidité.
5. Mettre toujours votre clarinette en sécurité
comme la ranger dans son etui ou la poser
sur un stand. Ne pas la placer sur une
chaise ou tout endroit d'où elle porrait
rouler ou tomber.
Caution
4
6. Ne pas tenter d'ajuster ou réparer vous-
mêmes votre clarinette. Adressez-vous à
votre revendeur ou à un technicien qualifié.

Clarinet Owner’s Manual>>>2221<<<Clarinet Owner's Manual
Montaje
1
Paso 1.
Aplique grasa de corchos a los corchos de las
uniones.
Paso 2.
(1.) Clarinete en SIb-- Coloque el barrilete en
el cuerpo superior.
(2.) Clarinete Bajo-- Una el extremo inferior
del tudel al cuerpo superior.
Paso 3.
Coloque la campana en el cuerpo inferior.
Paso 4.
Una el cuerpo superior del paso 2 al cuerpo
inferior del paso 3 presionando los anillos
de las llaves del cuerpo superior, para evitar
dañar el mecanismo.
Paso 5.
Una la boquilla al barrilete. Alinee la boquilla
con las llaves de octava superiores.
Paso 6.
Coloque apropiadamente la caña en la
boquilla y asegúrela con la abrazadera.

Clarinet Owner’s Manual>>>2423<<<Clarinet Owner's Manual
Inspección y
Mantenimiento
3
Paso 1.
Separe la caña de la boquilla y la boquilla del
barrilete.
Paso 2.
Presione los anillos de las llaves del cuerpo
superior mientras separa ambos cuerpos.
Paso 3.
Separe el barrilete del cuerpo superior.
Separe la campana del cuerpo inferior.
Paso 1.
Después de tocar, limpie con un paño todas
las uniones de los cuerpos para quitar
cualquier suciedad.
Paso 2.
Limpie suavemente todas las llaves con un
paño, teniendo cuidado para no arañarlas
o dañarlas. Limpie el agua depositada en el
interior del cuerpo. Limpie el agua depositada
en el interior del cuerpo. Limpie el agua
depositada en el interior del cuerpo.
Paso 3.
Limpie y seque la boquilla y caña. Guarde la
caña en un estuche protector.
Desmontaje
2

Clarinet Owner’s Manual>>>2625<<<Clarinet Owner's Manual
1. Aplicar lubricante regularmente en las
conexiones entre la llaves y los pilares para
un suave funcionamiento de las mismas.
2. No presione las llaves mientras monta o
desmonta el instrumento para evitar daños
en el mecanismo.
3. Mantenga las llaves limpias y evite la
acumulación de suciedad en el cuerpo para
proteger las llaves contra la oxidación, y
para que no se deformen las uniones de los
cuerpos.
4. Para proteger el cuerpo de las rajas, no
exponga el instrumento a ambientes
excesivamente secos o calientes. Seque
el agua de su interior inmediatamente
después de terminar de tocar.
5. Coloque el clarinete en un lugar seguro
para evitar daños. No lo ponga en un atril,
ni en una silla o cualquier sitio donde pueda
rodar fácilmente y caerse.
Cuidado
4
6. No presione las zapatillas cuando use el
papel absorvente para quitar la suciedad.
Puede dañarlas.
7. Para ajustes y reparaciones, lleve su
instrumento a un técnico o distribuidor
cualificado. No intente hacerlo Vd. mismo.

Clarinet Owner’s Manual>>>2827<<<Clarinet Owner's Manual
吹奏前的組合
1
步驟一:
組合吹嘴時請先在軟木上凡士林或軟木膏。
步驟二:
(1.) Bb 單簧管 - 組裝調音管和上管。
(2.) Bb 低音單簧管 - 連接吹口管和上管。
步驟三:
組裝喇叭管和下管。
步驟四:
組合已經組裝好的上管及下管。組合時,為避免鍵
聯動結構的碰撞,請先按壓住上管的環鍵 (即左手
食指與中指按壓之環鍵 ),再將上、下管接合。
步驟五:
裝上吹口,使吹口的斜面與由左手按壓的高音鍵成
一直線。
步驟六:
將竹片適當的放置於吹口的斜面上,將吹口束滑過
竹片的上方,並小心勿傷害竹片的頂端。用束圈螺
絲將吹口束旋緊在適當位置。

Clarinet Owner’s Manual>>>3029<<<Clarinet Owner's Manual
吹奏後的檢查與保養
3
步驟一:
吹奏完畢後,鬆開束頭的螺絲,再將吹口管從身管
移開。
步驟二:
請按住上管的環鍵將上下管分開。
步驟三:
請分別將上管與調音管分開。
將下管與喇叭管分開。
步驟一:
於吹奏完畢放置樂盒前,以通條布貫穿管體將各節
管體內的水分擦拭乾淨。
步驟二:
用我們提供的擦拭布小心的將鍵組擦拭乾淨 , 在擦
拭時 ,請勿壓迫按鍵所在的部位 , 以免按鍵容易變
形。並請小心擦拭勿刮傷管體和鍵。
步驟三:
洗淨吹嘴及竹片,將竹片上水分擦乾後,再存放回
竹片匣內以延長竹片的壽命。
吹奏後的拆卸
2

Clarinet Owner’s Manual>>>3231<<<Clarinet Owner's Manual
1. 請定期於螺栓銜接處上少量的油,保持按鍵靈活
順暢。
2. 組裝樂器時勿過度施壓於按鍵上,以防按鍵變形。
3. 保持按鍵與管體清潔,避免殘留水漬、汗漬,以
防止樂器表面產生變化。
4. 請勿將樂器置於過度乾燥或溼氣過重的環境內,
以免管體易因環境變化導致龜裂。
5. 練習結束後請把樂器放置入樂盒或是樂器架上 ,
請不要將單簧管置放在樂架、椅子、床上或任何
可能會掉落及有人可能會碰撞或可供人坐在上面
的表面上,以免因為不小心而摔壞或壓壞。
6. 請不要嘗試自己來調整樂器,任何調校的動作應
該交由合格及有經驗的調整師或維修店處理。
注意事項
4
This manual suits for next models
2
Table of contents
Languages:
Other Jupiter Musical Instrument manuals