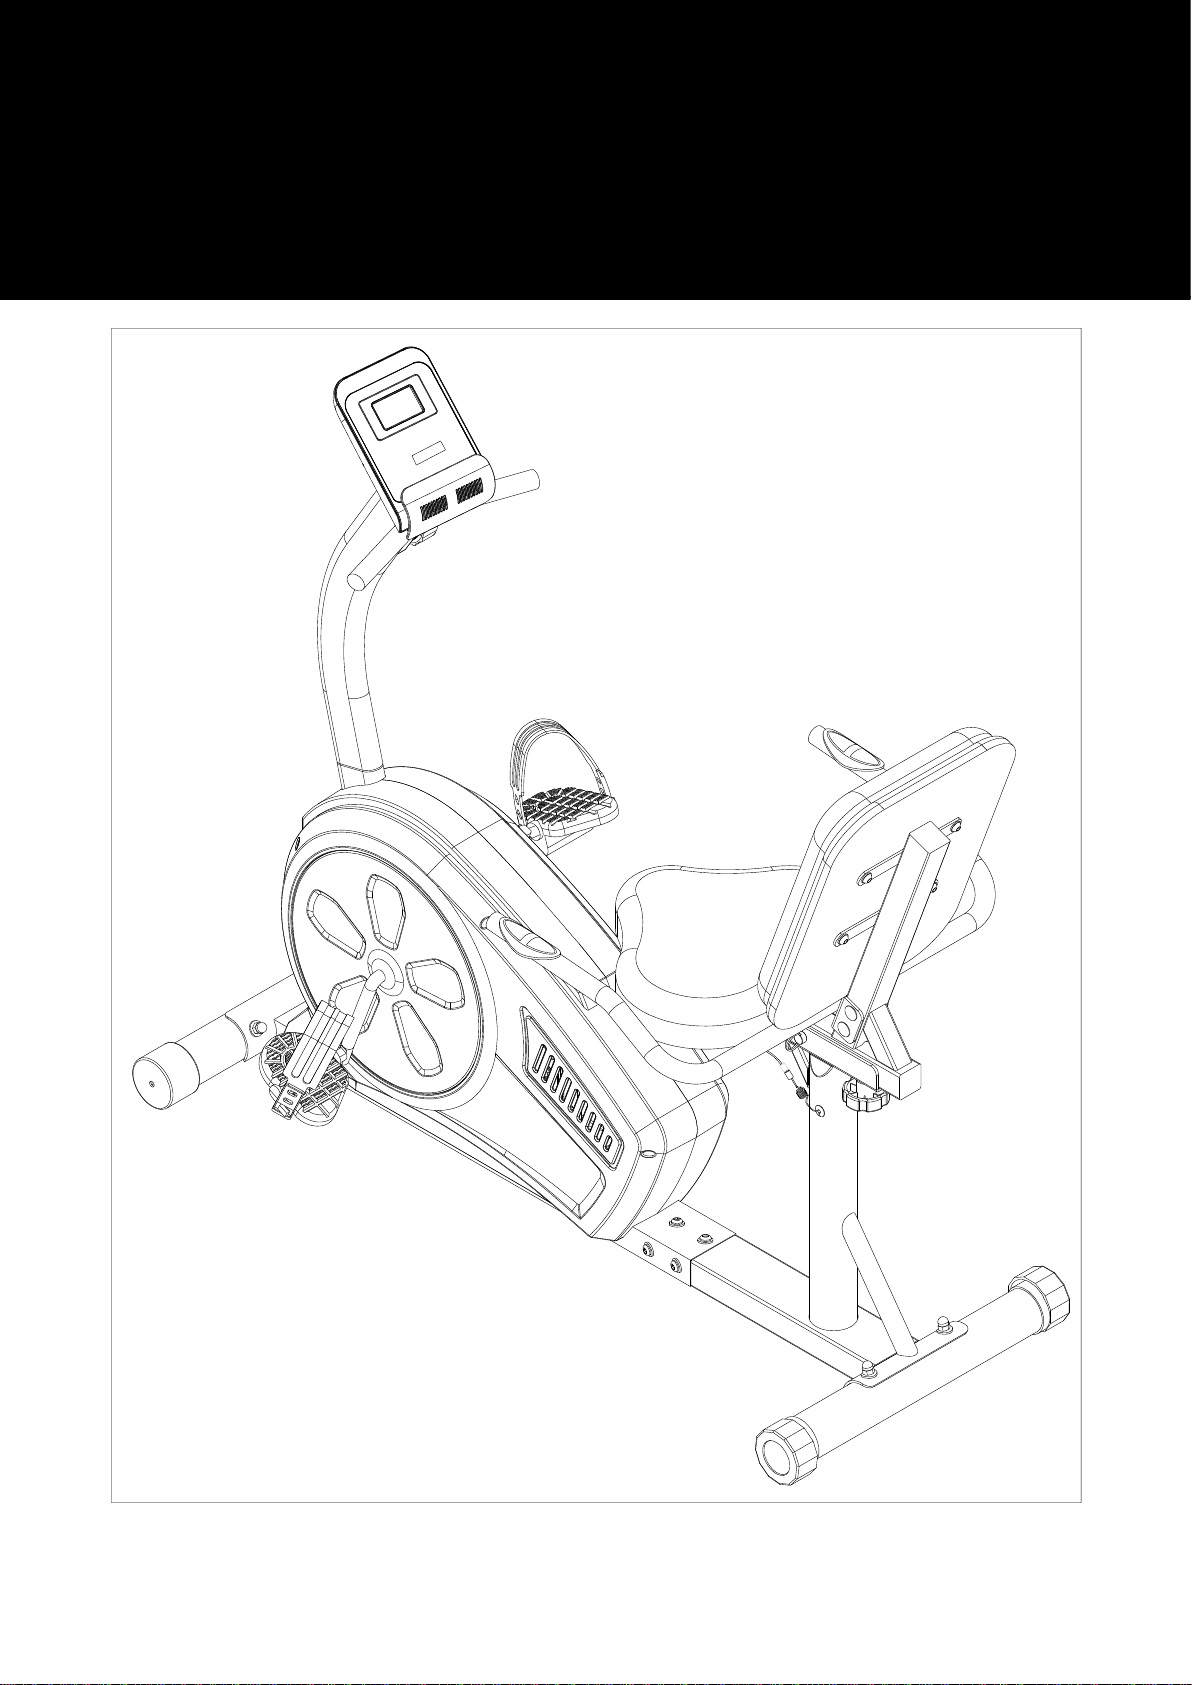
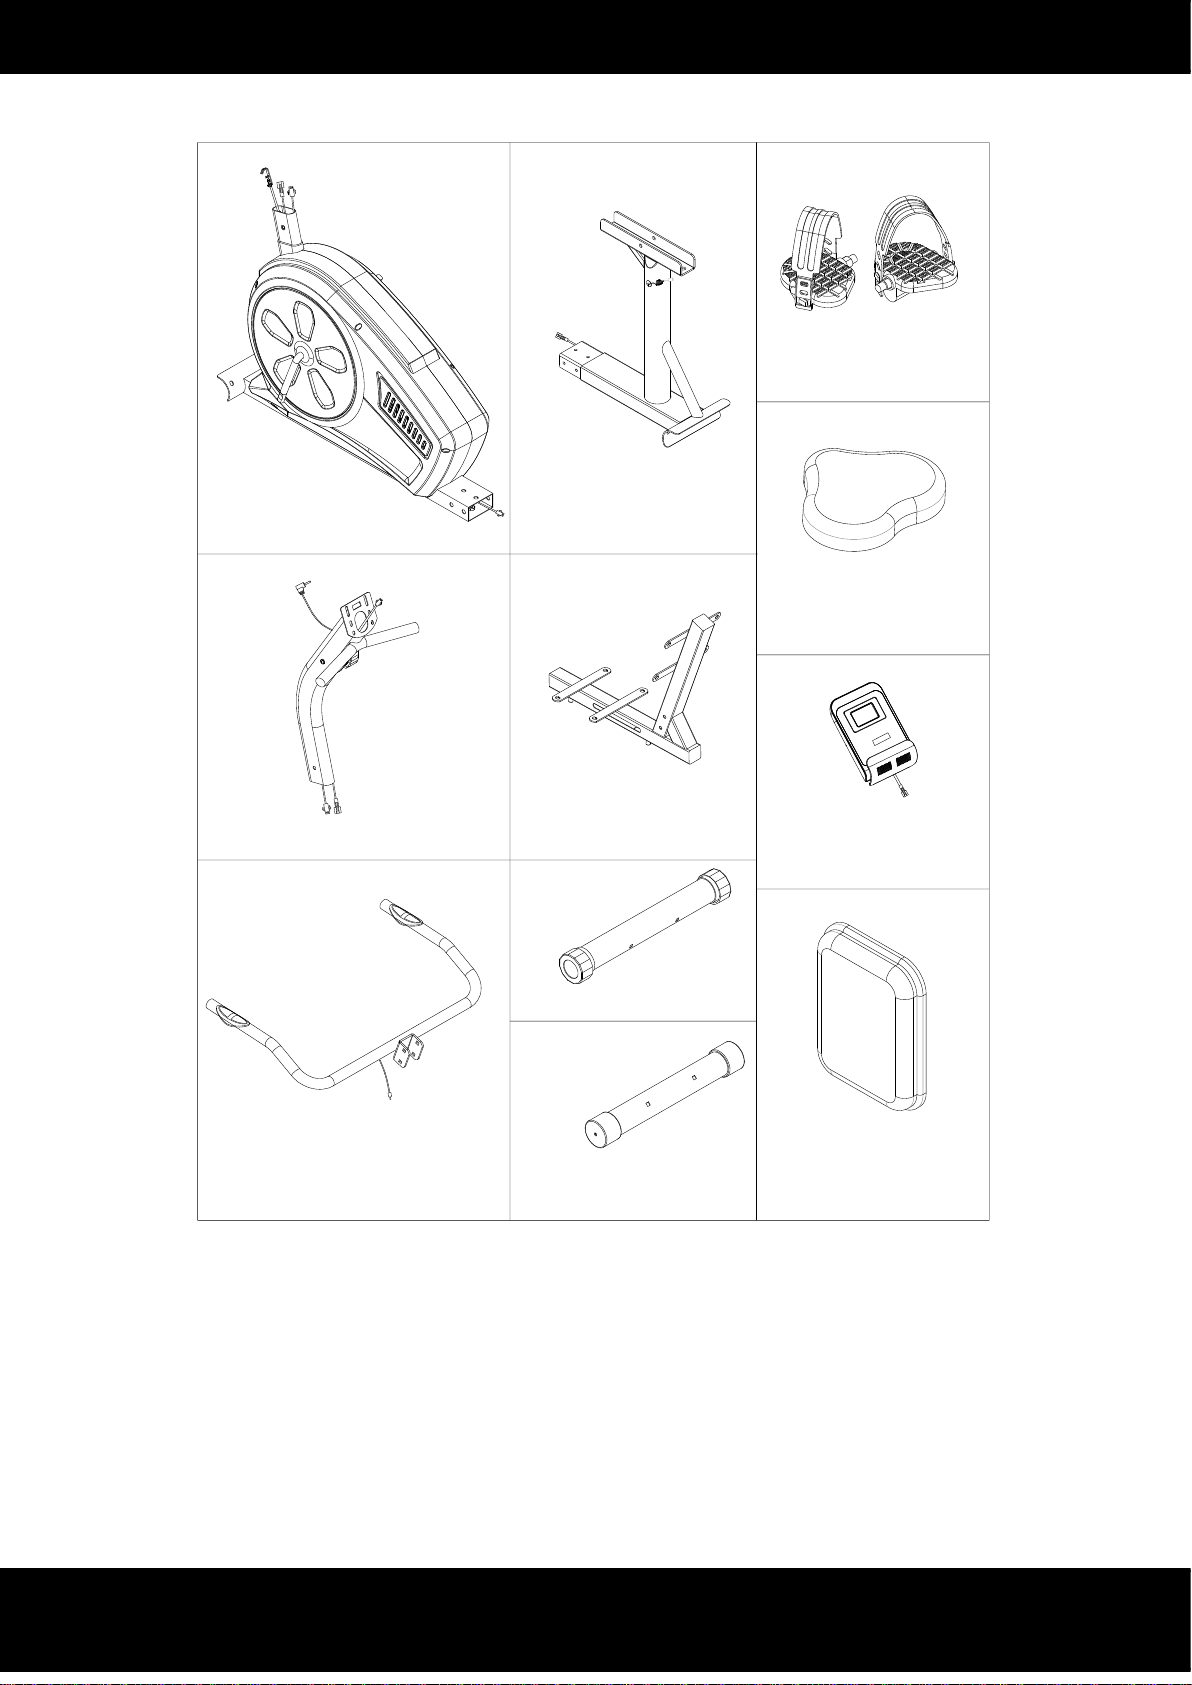
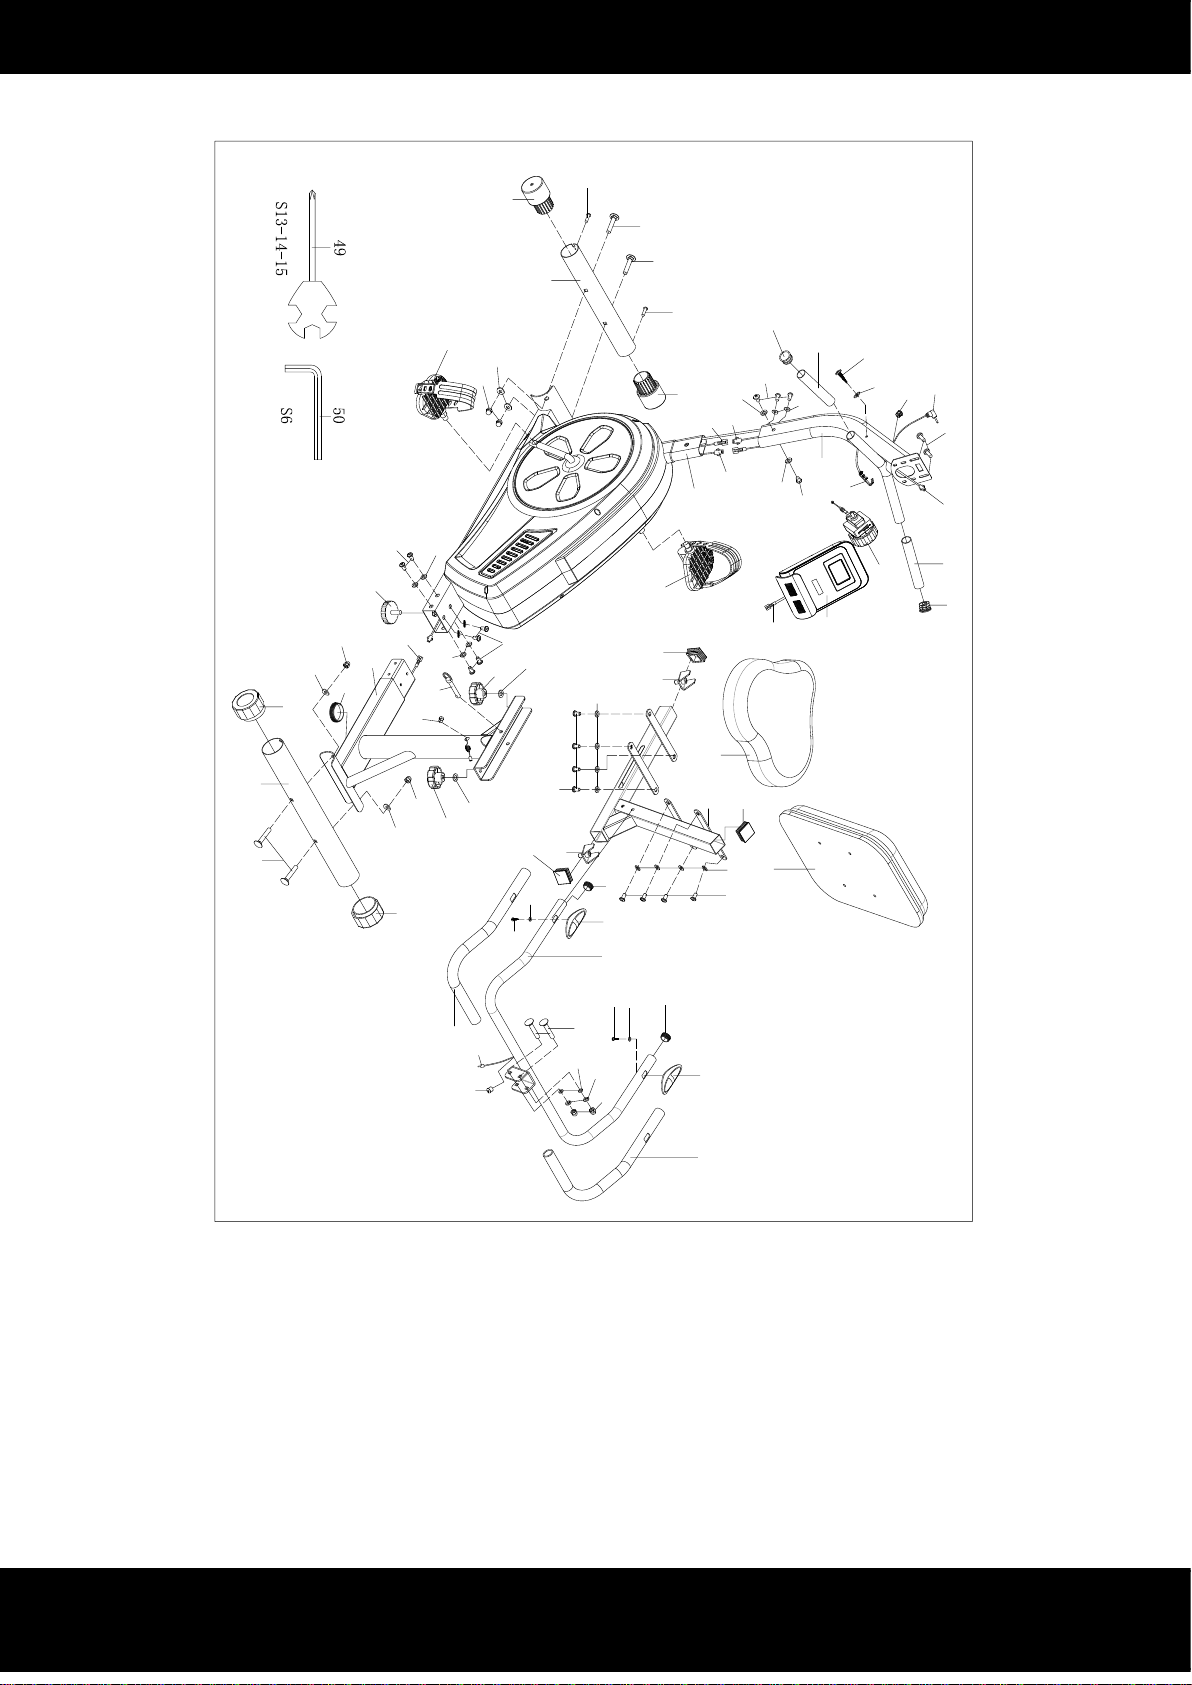
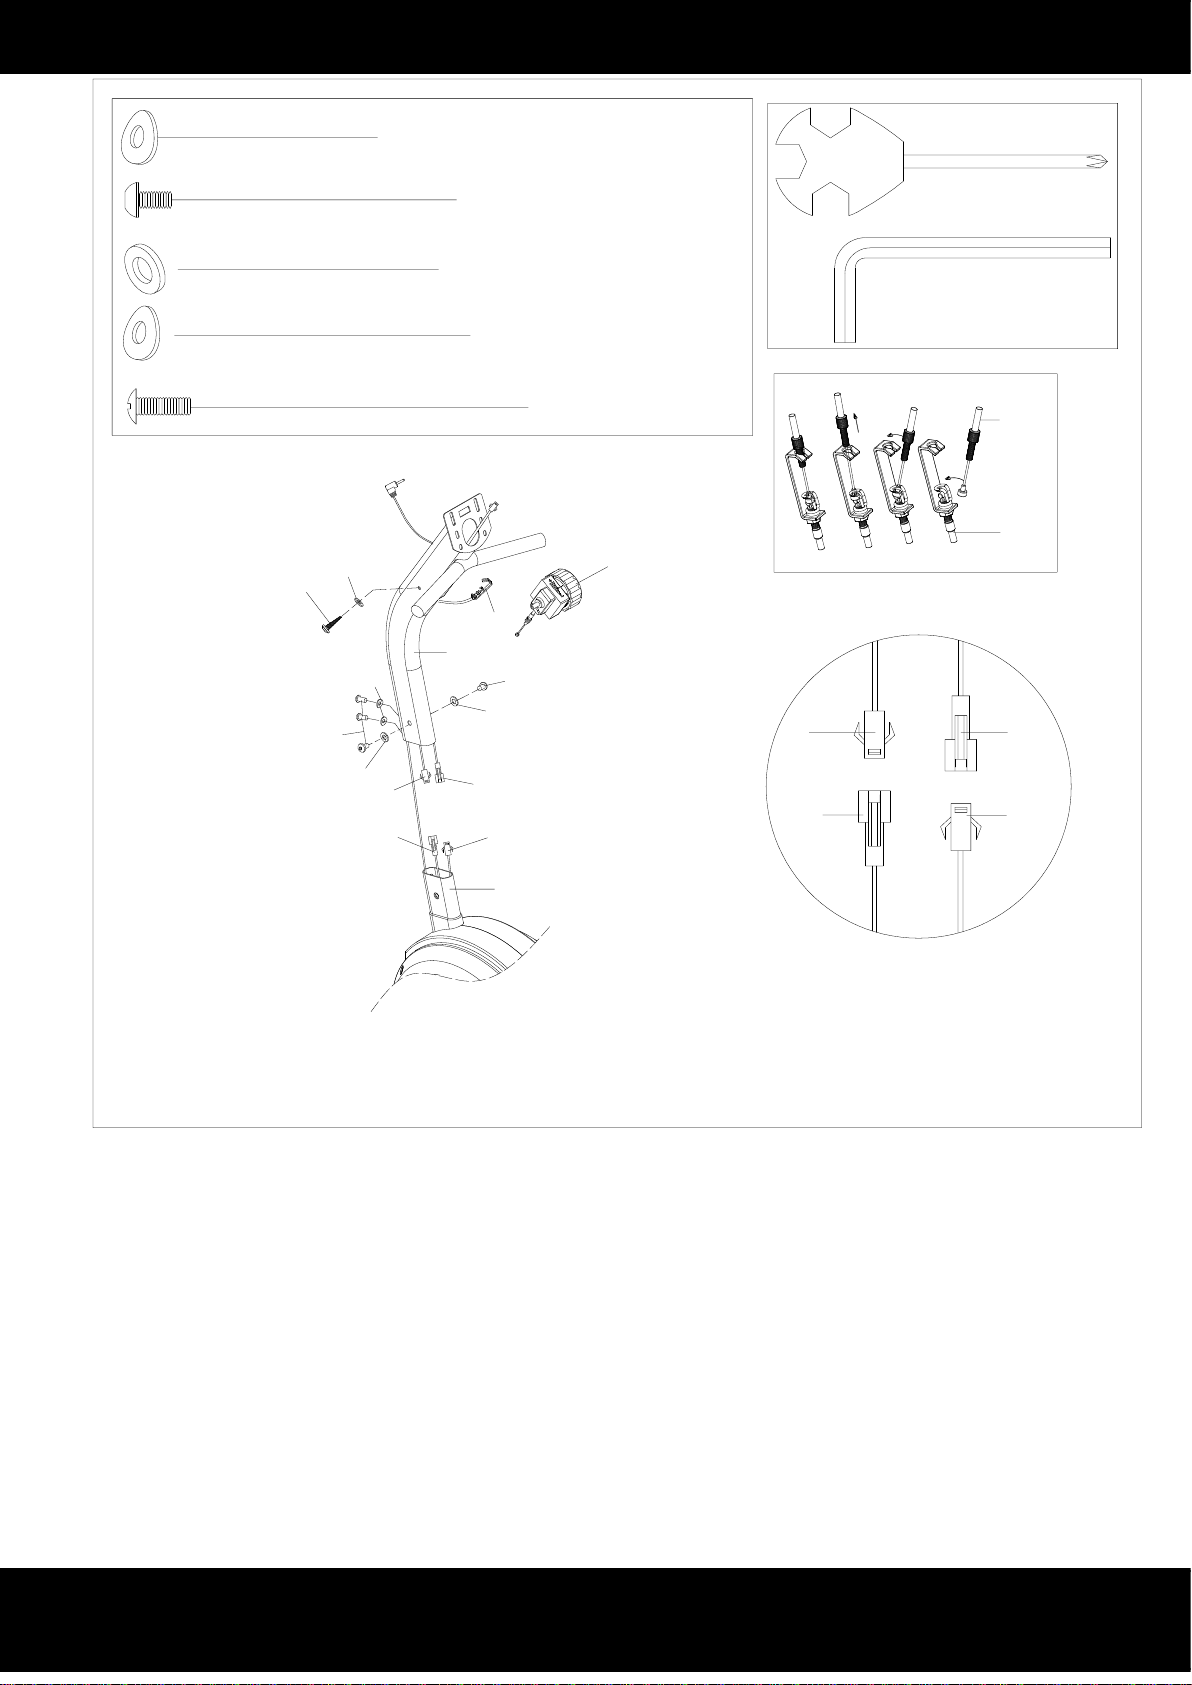
Justfit R450 User manual

INSTRUCTION MANUAL
Please read this manual carefully before using!

Instruction Manual
1
Content
Important Safety Information
Package List
Part list
Explosive drawing
Assembly
Instruction for use
2
3
5
6
8
13

Instruction Manual
2
Important Safety Information
Warnings
To reduce the risk of serious injury, read the following important warnings before using the Recumbent.
1. Before starting any exercise program you should consult your doctor to determine if you have any physical or
health conditions that could create a risk to your health and safety, or prevent you from using the
Recumbentproperly. Your doctor’s advice is essential if you are taking medication that affects your heart rate,
blood pressure or cholesterol level.
2. Be aware of your body’s signals. Incorrect or excessive exercise can damage your health. Stop exercising if
you experience any of the following symptoms: Pain, tightness in your chest, irregular heartbeat, extreme
shortness of breath, feeling light-headed, dizzy or nauseous. If you do experience any of these conditions
you should consult your doctor before continuing with your exercise program.
General Safety Precautions
1. Use the Recumbent only in the way described in this instruction book.
2. Before using the Recumbent, check the nuts and bolts are securely tightened.
3. Use the Recumbent on a solid, flat level surface with a protective cover for your floor or carpet.
4. Before beginning training, remove all objects within a radius of 2 meters from the machine.
5. Once the machine is correctly assembled please consult our Warm up guide towards the end of this booklet
before you start your exercise regime.
6. Only use this machine when it is in correct working order. Use only original spare parts for any necessary
repairs.
7. Keep the Recumbent away from excessive moisture and dust.
8. This machine can be used for only one person’s training at a time.
9. Wear suitable clothing whilst using the Recumbent.Avoid wearing loose clothing which may get caught in the
Recumbent or clothing that may restrict or prevent movement.
10. The Recumbent is not suitable for therapeutic use.
11. Keep children and pets away from the machine. Designed for adult use only.
12. The maximum user’s weight is 100kgs.
13. All moveable accessories require weekly maintenance. Check them before use every time. If anything is
broken or loose, please fix it immediately. You may continue using the Recumbent after any damaged parts
have been fixed.
14. This training equipment is in compliance with EN957 part 5 for domestic use.
15. To mount the exercise machine please take hold of the handrail and step onto the foot plates.
16. To dismount the exercise machine take hold of the handrail and step off the foot plates. Please retain this
information for future reference.

Instruction Manual
3
Package List
19# 1PC
29# 1PC
2# 1PC
36# 1PC
44# 1PC
32# 1PC
21# 1PC
20L/R# 2PCS
1# 1PC
39# 1PC
40# 1PC

Instruction Manual
4
#15 d8*Φ20*2*R16 2PCS
#14 d8*Φ20*2 2PCS
#30 d8*52*59 1PC
#35 d10*Φ20*2 2PCS
#46 M8*60*20*H5 2PCS
#47 d8 2PCS
#50 S6 1PC
#49 S13-14-15 1PC
#34 M10*Φ58*32 2PCS

Instruction Manual
5
Part list
NO.
Description
QTY
NO.
Description
QTY
1
Display
1
50
Inner hex wrench
1
2
Handlebar post
1
51
Rotation plate
2
3
Foam
2
52
Housing
2
4
End cap
4
53
Cross pan head self-tapping screw
8
5
Resistance control
1
54
Cross pan head self-drilling tapered screw
4
6
Washer
1
55
Big thin nut
1
7
Cross pan head screw
1
56
Snap spring
1
8
Wire holder
3
57
Big nut
1
9
Trunk wire
1
58
Ball rack
2
10
Cross pan head screw
2
59
Ball seat
2
11
Trunk wire 2
1
60
Big nut 1
1
12
Resistance wire
1
61
Washer
1
13
Inner hex bolt
18
62
Round magnet
1
14
Washer
2
63
Belt wheel
1
15
Arc washer
2
64
Crank
1
16
Handle pulse wire
1
65
Ribbed belt
1
17
Trunk wire 3
1
66
Cross pan head self-tapping screw
1
18
Sensor
1
67
Hex bolt
1
19
Mainframe
1
68
Washer
3
20
Pedal
2
69
Bearing
2
21
Front stabilizer
1
70
Free wheel
1
22
Front stabilizer end cap
2
71
Curved washer
2
23
Square neck bolt
4
72
Free wheel frame
1
24
Cross pan head self-tapping screw
2
73
Bolt
1
25
Arc washer
4
74
Washer
1
26
Cap nut
6
75
Pulling spring
1
27
Foot pad
1
76
Nylon nut
1
28
Trunk wire 4
1
77
Hex bolt
1
29
Rear mainframe
1
78
Spring washer
1
30
Spring pin
1
79
Washer
2
31
End cap
1
80
Snap spring
2
32
Rear stabilizer
1
81
Magnet board shaft
2
33
Rear stabilize end cap
2
82
Magnet board
2
34
Plum knob
2
83
Pulling spring 2
1
35
Washer
2
84
Cross pan head self-tapping screw
1
36
Saddle frame
1
85
Magnet holder
1
37
U sheet metal
2
86
Square magnet
3
38
Square end cap
3
87
Hex bolt
1
39
Saddle
1
88
Cross pan head screw
1
40
Backrest
1
89
Cross pan head screw
2
41
Handle pulse
2
90
Fixed plate
1
42
Washer
2
91
Bearing
5
43
Cross pan head self-tapping screw
2
92
Bearing seat
2
44
Handlebar
1
93
Flywheel shaft
2
45
Foam
2
94
Flywheel
2
46
Square neck bolt
2
95
Crank cover
1
47
Spring washer
2
96
Hex bolt
1
48
Washer
16
97
Hex nut
1
49
Cross solid wrench
1
98
Sensor seat
1

Instruction Manual
6
Explosive drawing
2
1a
3
3
4
4
5
6
7
8
9
10 11
12
13
14
15 13
14
1
16
17
18
19
20R
20L
21
22
22
23 23
24
24
25 26
13
48
13
48
27
28
29
30
8
25
26 31
26
25
32
33
33
23
34
35
34
35 13
13
48
48
36
37
37
38
38
38
39
40
4
4
41
41
42
43
42
43
44
45
45
46 48
47 26
16 8

Instruction Manual
7
54
54
19
18
17
12

Instruction Manual
8
Assembly
25 26
23
23 21
25
26
26
25
19
29
17
13
48
13
48 28
#23 M8*73*20*H5 4PCS
#25 d8*Φ20*2*R30 4PCS
#26 M8*H16*S13 4PCS
#48 d8*Φ16*1.5 6PCS
#13 M8*16*S6 6PCS
S13
S15
20L
20R
23
23
32
S6
Step1
1. Connect the trunk wire 3(17) and 4(28) first and the fix the mainframe (19) and rear mainframe (29) firmly by
inner hex bolt (13) and washer (48).
2. Attach the front and rear stabilizer (21) and (32) to the mainframe with square neck bolt (23), arc washer (25)
and cap nut (26).
3. Fix the pedal (20L/R) to the mainframe.
Note: please rotate the left pedal in anti-clockwise and right in clockwise.

Instruction Manual
9
19
13
14
15 13
14
5
12
#15 d8*Φ20*2*R16 2PCS
#14 d8*Φ20*2 2PCS
#13 M8*16*S6 4PCS
#6 d5*Φ20*1 1PC
#7 M5*10 1PC
6
7
S6
18
11
12
5
18
17
911
17
9
2
Step2
1. Remove the cross pan head screw (7), washer (6) and resistance control (5) first. And then pull the resistance wire (12)
through the handlebar post (2). At last connect the trunk wire 1 (9), 2 (11) and 3 (17).
2. Connect the resistance wire (12) and resistance control (5) and the fix it by cross pan head screw (7) and washer (6).
3. Fix the handlebar post (2) to the mainframe (19) with inner hex pan head bolt (13), arc washer (15) and washer (14).

Instruction Manual
10
29
13
48
13
48
30
34
35
34
35
39
40
#13 M8*16*S6 8PCS
#48 d8*Φ16*1.5 8PCS
#30 d8*52*59 1PC
#35 d10*Φ20*2 2PCS
S6
36
36
29
37
37
37
37
#34 M10*Φ58*32 2PCS
Step3
1. Connect the saddle frame (36) to the rear mainframe (29) with plum knob (34), washer (35) and then insert
the spring pin (30);
2. Fix the saddle (39) and backrest (40) to the saddle frame (36) by inner hex pan head bolt (13) and washer (48).
Note: insert the U sheet metal (37) into the hole of the rear mainframe (29) when fix the saddle frame.

Instruction Manual
11
48
47 26
46
16
28
44
36
#46 M8*60*20*H5 2PCS
#47 d8 2PCS
#48 d10*Φ20*2 2PCS
#26 M8*H16*S13 2PCS
16
28
S13
Step4
1. Fix the handlebar (44) to the saddle frame (36) with square neck bolt (46), washer (48), spring washer (47) and cap nut
(26).
2. Connect the handle pulse wire (16)and trunk wire 4(28)well.

Instruction Manual
12
1a
1
10
11
1a
11
9
#10 M5*12 2PCS
2
Step5
1. Connect the wire of the display (1a)and trunk wire 2(11)first.
2. And then fix the display (1) to the handlebar post (2).
Congratulations you have finished assembling the machine. Before
use we suggest check each part is securely fastened.

Instruction Manual
13
Instruction for Use
Conditioning Guidelines
The following guidelines will help you to plan your exercise program. Remember that correct nutrition and
adequate rest are essential for successful results. If you’re beginning an exercise program, you should check with
your doctor if:
You have been diagnosed with heart problems, high blood pressure or any other medical condition.
You have not exercised for over a year.
You are over 35 and do not currently exercise.
You are pregnant.
You have diabetes.
You have chest pains, or experience dizziness or fainting spells.
You are recovering from an injury or illness.
Target Heart Rate (THR)
TRAINING ZONE
AGE
MIN-MAX (BPM)
20
133 - 167
25
132 - 166
30
130 - 164
35
129 - 162
40
127 - 161
45
125 - 159
50
124 - 156
55
122 - 155
60
121 - 153
65
119 - 151
70
118 - 150
75
117 - 147
80
115 - 146
85
114 - 144
Note:This is a guide only and performance will depend on the fitness and condition (health) of the person
using the Recumbent.
Work-Out Tips
Always perform stretching exercises both before and after your work-out. See page 9.

Instruction Manual
14
Start slowly; doing too much too soon can lead to injuries.
If you are sore or tired, give yourself a few extra days to recover.
Start with two or three 15 minute sessions per week with a rest day between work-outs.
Warm-up for 5 or 10 minutes with gentle movements like walking or swinging your arms in a circle and then
stretch the muscles you’ll use during your work-out. The Recumbent will mainly exercise the thigh and calf
muscles.
Increase the pace and resistance to slightly harder than comfortable and exercise for as long as you can. You
may only be able to exercise for a few minutes at a time, but that will change quickly if you exercise regularly.
End each work-out with a 5 minute cool down with the resistance set to a low level. You should then stretch
the muscles you’ve just worked to prevent injury and cramp.
Increase your work-out time by a few minutes each week until you can work continuously for 30 minutes per
session.
Don’t worry about distance or pace. For the first few weeks, focus on endurance and conditioning.
How hard should you work?
1. When exercising, you should try to stay within your Target Heart Rate (THR) zone.
2. The THR table will tell you the THR for your age. This is only a guide and will depend on the fitness and
condition (health) of the person using the recumbent.
3. Always be aware of how you feel when you exercise. If you feel dizzy or light- headed, stop immediately and
rest. If you’re not breaking into a sweat, speed it up!
Stretching Guide
Tips For Stretching
Begin with gradual mobility exercises of all the joints, i.e. simply rotate the wrists, bend the arm and roll your
shoulders. This will allow the body’s natural lubrication (synovial fluid) to protect the surface of the bones at
these joints.
Always warm up the body before stretching, as this increases blood flow around the body, which in turn
makes the muscles more supple.
Start with your legs, and work up the body.
Each stretch should be held for at least 10 seconds (working up to 20 to 30 seconds) and usually repeated
about 2 or 3 times.
Do not stretch until it hurts. If there’s any pain, ease off.
Don’t bounce. Stretching should be gradual and relaxed.
Don’t hold your breath during a stretch.
Stretch after exercising to prevent muscles tightening up. Stretch at least three times a week to maintain
flexibility.

Instruction Manual
15
Inner Thigh Stretch
Sit with the soles of your
feet together and your
knees outward. Pull your
feet toward your groin
area as far as possible.
Hold for about 10
seconds.
Calf Stretch
Stand with the back foot
flat on the floor and
transfer weight to the
front foot.
Hold for about 10
seconds.
Repeat for other leg.
Note: Keep your back and rear
leg straight when performing
this exercise.
Hamstring Stretch
Keep front leg straight,
hands on bent leg (thigh).
Push down and out until
you begin to feel the
stretch in back of knee (or
straight leg).
Keep knees unlocked and
back straight.
Hold for about 10
seconds.
Repeat for other leg.
Thigh Stretch
Stand on right leg and
take hold of the left ankle
with the left hand,
drawing the foot up close
behind to the hips.
Keep back straight and
knees together. Use a
wall for balance if
required.
Hold for about 10
seconds.
Repeat for the other leg.
Table of contents