K-JAPAN KJRH300 User manual

Operators manual•Manuel du Propriétaire•Manual del propietario
Manual do Proprietário•Manuale del proprietario•Instrukcja obsługi dla właściciela
Hand-Held Blower•Soufeur Á Main•Soplador Portátil
Soprador Portátil•Sofatore Portatile•Dmuchawa Ręczna
KJRH300

— 1 —
FOREWORD
This Owner’s/Operator’s Manual is designed to familiarize the operator with the various features
and component parts of the equipment and to assist you with the operation and maintenance of
your new Hand-held Blower.
It is essential that any operator of this Hand-held Blower product reads and understands
the contents of this manual before using the Hand-held Blower.
Important safety instructions will be identified by the following safety symbol:
Failure to comply with the instructions in this manual may result in serious injury or death. For
additional assistance, contact any local authorized Maruyama dealer or Maruyama Mfg. Co., Inc.
TABLE OF CONTENTS
SPECIFICATIONS
AIR INTAKE SCREEN
HANDLE
FAN COVER
THROTTLE TRIGGER
PIPE B
PIPE A
THROTTLE SETTING LEVER
FUEL TANK RECOIL STARTER
ENGINE
AIR CLEANER
STOP SWITCH
Foreword …………………………………… 1Starting and stopping procedure ……… 7
Specifications……………………………… 1Carburetor adjustment …………………… 8
Product description ……………………… 1
Operating the Hand-held Blower
………… 9
Marking …………………………………… 2Regular maintenance …………………… 9
Symbol Explanation ……………………… 2Storage …………………………………… 11
Safety instructions ……………………… 3Troubleshooting …………………………… 12
Assembly …………………………………… 5Maintenance period ……………………… 12
Before operation ………………………… 5
Models KJRH300
Max. Air volume m3/min (CFM) 12,5 (450)
Max. Air speed m/s (MPH) 56 (125)
Length×Width×Height mm (in.) 340 x 245 x 360 (13.4 x 9.7 x 14.2)
Welght kg (ibs) 4.4 (9.7)
Englne Type Forced air cooled 2-stroke,
horizontal shaft, gasoline engine, TJ027E
Displacement ml (cu. in) 26.3 (1.61)
Rotational speed 7400 min-1
Carburetor Diaphragm type
lgnition Solid state lgnition
Spark plug NGK BPMR7A
Starler Recoil starter
Fuel Maxing ratio 50 parts of regular unleaded gasoline to 1 part of
2-stroke engine oil by volume
Tank capacity L 0.5
PRODUCT DESCRIPTION
MODEL:KJRH300
English

— 2 —
SYMBOL EXPLANATION
Read and understand this Owner’s/Operator’s Manual before using this product.
Fire Danger: Gasoline is highly flammable. Never add fuel to the Hand-held
Blower with a running or hot engine. Do not smoke or place any sources of heat in
the vicinity of the fuel.
Breathing exhaust fumes can cause death. Never start or run the engine inside a
close room or building.
Hot Surface Warning: Contact may cause burns. During use and for some time
after stopping the engine, the engine is very hot. Do not touch engine components
such a cylinder, muffler and engine covers until the engine has cooled to ambient
temperature.
Always use:
• A protective helmet.
• Ear protection.
• Protective glasses or visor.
Moving parts Warning: Contact with rotation fan or other moving parts could cause
serious personal injury or death. Keep hands, feet and clothing away from fan and
other moving parts.
MARKING
①MODEL NAME
②
See SYMBOL EXPLANATION
③
Approved EC emission
④ SERIAL No.
③
④
②
MaruyamaMfg.Co.,Inc
4-15Uchikanda3-ChomeChiyoda-ku
Tokyo101-0047Japan
EuropeanAuthorizedRepresentative
boulevardGeneralWahis,53,
B-1030Brussels,BELGIUM
Obeliss.a.
105
WA
dB
L
XXXX
KJRH300
ProductDate
Model
FuelTankCapacity0.5L
①
English

SAFETY INSTRUCTIONS
OPERATOR SAFETY
1. Read and understand this Owner’s/Operator’s Manual before using this
product. Be thoroughly familiar with the proper use of this product.
2. Never allow children to operate the Handheld Blower. It is not a toy. Never
allow adults to operate the unit without first reading the Operator’s Manual.
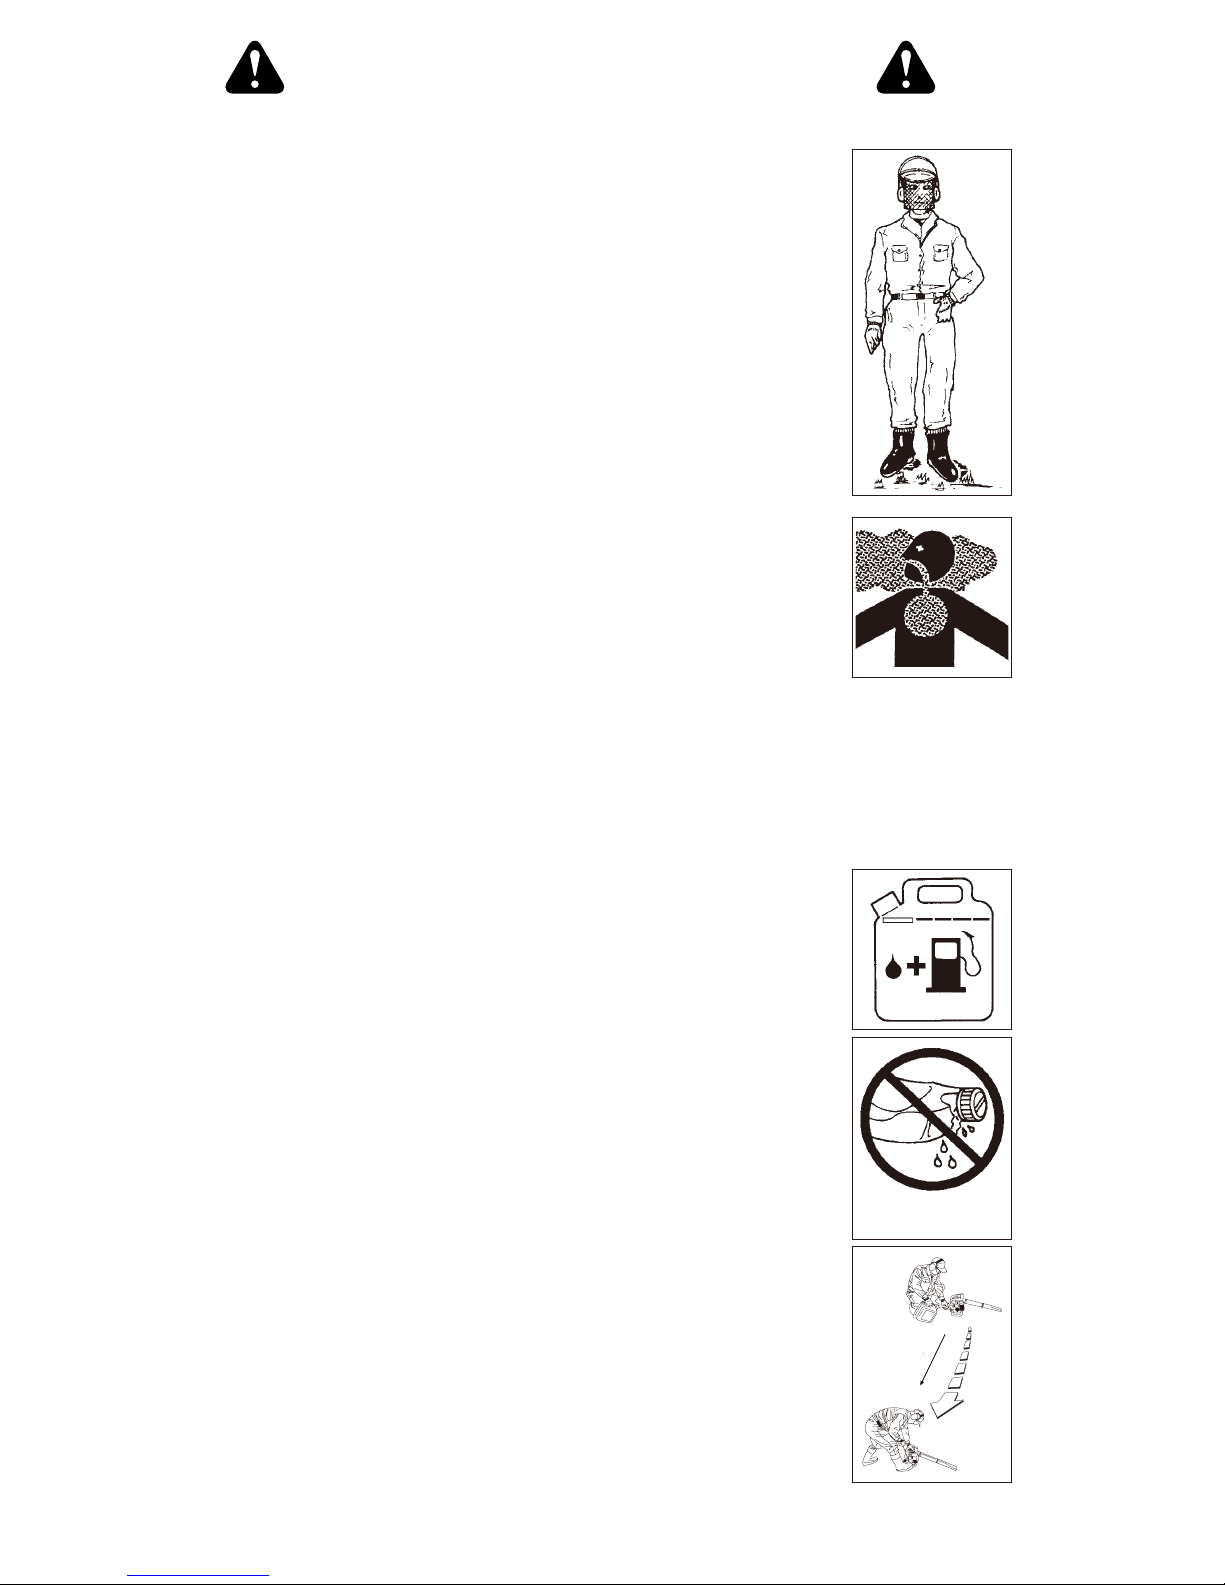
3. Always wear eye protection.
4. Wear hearing protection.
5. Always wear sturdy boots with nonslip soles.
6. Always wear heavy long pants, boots and gloves. Do not wear loose
clothing, jewelry, short pants, sandals or go barefoot. Secure hair so it is
above shoulder length.
7. Always wear a face filter mask.
8. Never operate this Handheld Blower when you are tired, ill, under
the influence of alcohol, drugs or medication.
9. Never start or run the engine inside a closed room or building.
Breathing exhaust fumes can cause death.
10. Keep handles clean of oil, fuel and dirt.
HANDHELD BLOWER SAFETY
1. Make sure the Handheld Blower is correctly assembled as instructed in
the Assembly section of this manual.
2. Before each use, inspect the Handheld Blower, replace damaged parts,
and check for fuel leaks. Make sure all fasteners are in place and
tightened securely.
3. Maintain the Handheld Blower in accordance with the recommended
maintenance intervals and procedures detailed in the “Maintenance”
section, beginning on page 9.
4. Use the correct accessories. Never use replacement parts that are not approved by
Maruyama.
5. Shut off the engine before performing maintenance or working on the machine.
6. If running problems or excessive vibration occur, stop immediately and inspect the unit for the
cause. If the cause cannot be determined, or is beyond your ability to correct, return the
Handheld Blower to your servicing dealer for repair.
FUEL SAFETY
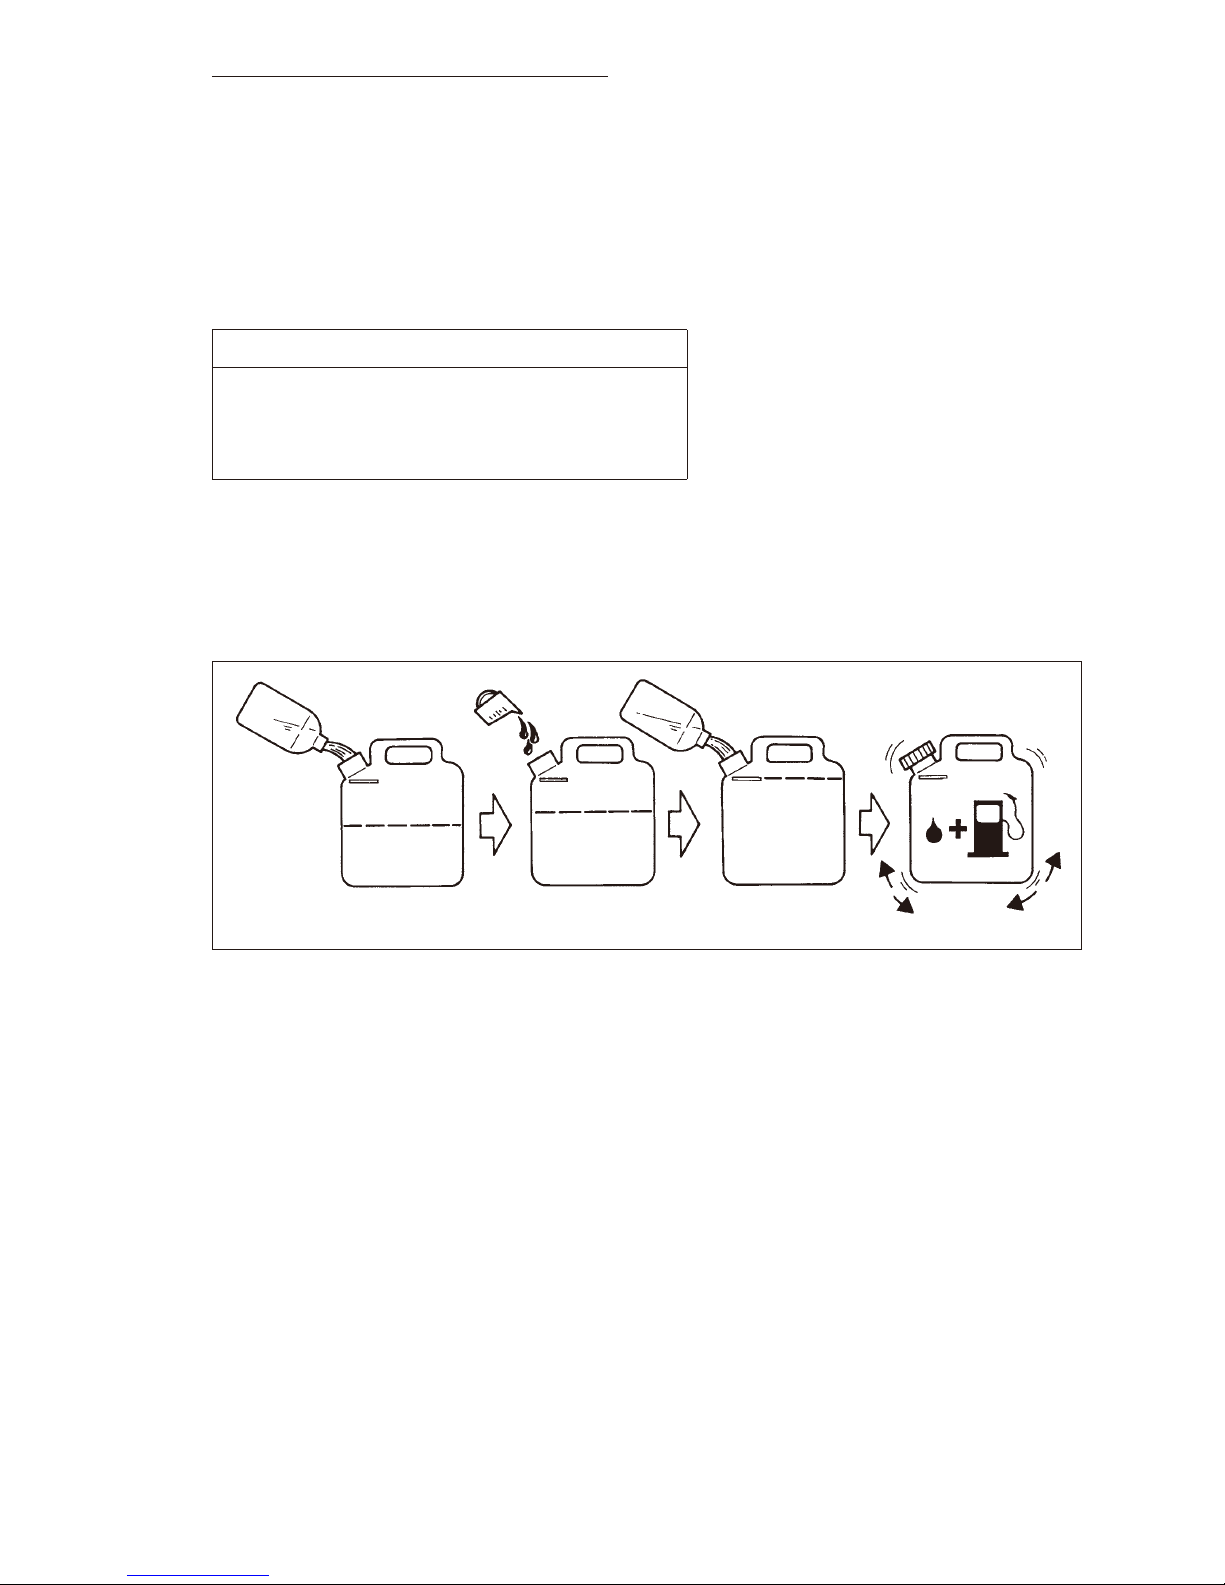
1. Gasoline is highly flammable and must be handled and stored carefully.
Use a container approved for storing gasoline and/or fuel/oil mixture.
2. Mix and pour fuel outdoors and where there are no sparks or flames.
3. Do not smoke near fuel storage containers or the Handheld Blower. Do
not smoke while operating the Handheld Blower.
4. Do not overfill the fuel tank. Stop filling 10 ~ 20 mm from the top of the
tank.
5. Wipe up any spilled fuel before starting the engine.
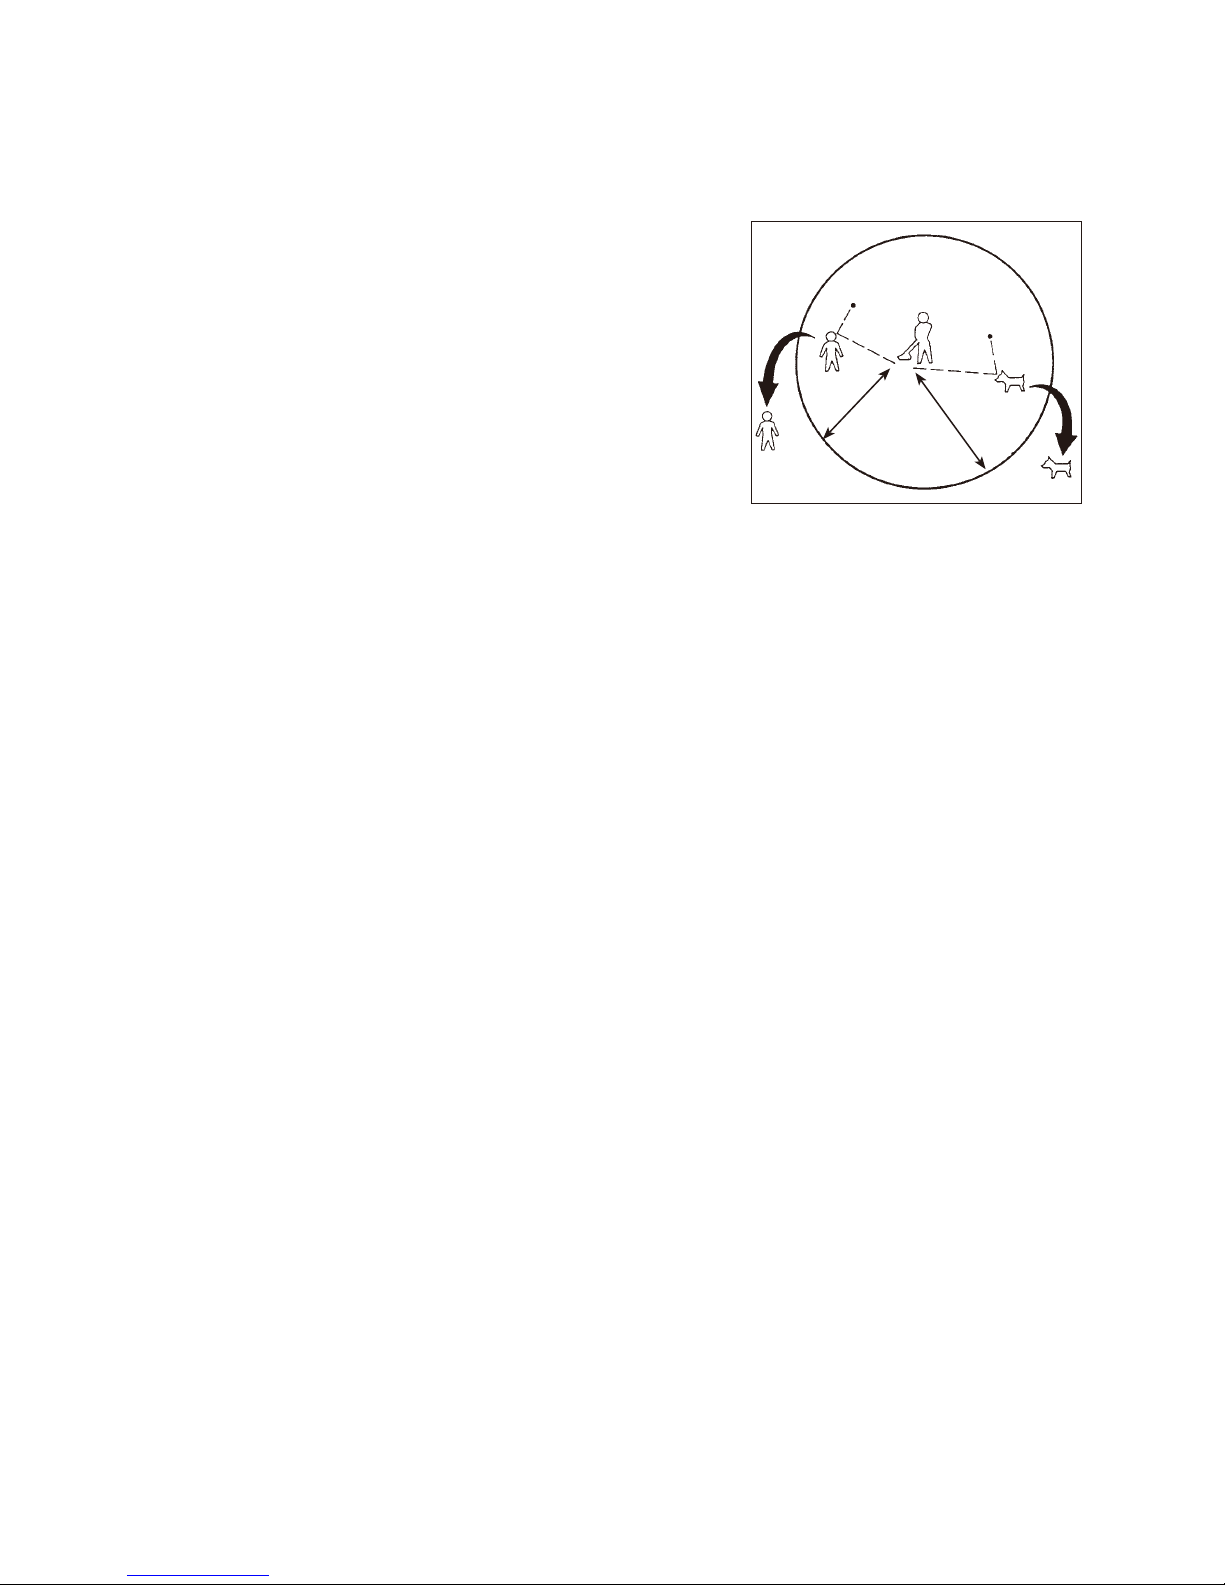
6. Move the Handheld Blower at least 3 m away from the fueling location
before starting the engine.
7. Do not remove the fuel tank cap while the engine is running or
immediately after stopping the engine.
8. Allow the engine to cool before refueling.
9. Empty the fuel tank before storing the Handheld Blower. Fuel should be
emptied after each use as fuel remaining in the tank may leak during
storage.
10. Store both fuel and the Handheld Blower away from open flame, sparks
and excessive heat. Make sure fuel vapors cannot reach sparks or open
flames from heaters, furnaces, electric motors, etc.
— 3 —
WIPE UP ANY
FUEL SPILLAGE
Min. 3 m
English

— 4 —
OPERATING SAFETY
1. THIS HANDHELD BLOWER CAN CAUSE SERIOUS INJURIES. Read the instructions
carefully. Be familiar with all controls and the proper use of the Handheld Blower.
2. Avoid using the Handheld Blower near rocks, gravel, stones and similar materials which can
become dangerous projectiles.
3. Keep children, bystanders and animals outside a 15m
radius surrounding the area of operation.
4. If you are approached while operating the Handheld
Blower, stop the engine.
5. Never allow children to operate the Handheld Blower.
6. Use the Handheld Blower only in daylight or adequate
artificial lighting.
7. Never operate the Handheld Blower without proper
guards or other protective safety devices in place.
8. Do not put hands or feet near any moving parts. Keep clear of hot surfaces such as the
muffler.
9. Maintain a firm footing while operating the Handheld Blower.
10. Use the right tool for the job. Do not use the Handheld Blower for any job that is not
recommended.
11. Know how to stop the machine quickly in an emergency. For information on how to stop the
engine refer to the Starting and Stopping Procedures on page 7.
12. Do not point the Handheld Blower nozzle in the direction of people or pets.
OPERATING TECHNIQUES
1. Operate power equipment only at reasonable hours — not early in the morning or late at night
when people may be disturbed. Comply with the times listed in local ordinances. Usual
recommendations for hours of operation are 9:00 a.m. to 5:00 p.m., Monday through
Saturday.
2. To reduce noise levels, limit the number of pieces of equipment used at any one time and
operate power blowers at the lowest possible throttle speed to do the job.
3. Check your equipment before operation, especially the muffler, air intakes and air filters.
4. Use rakes or brooms to loosen debris before blowing.
5. In dusty conditions, slightly dampen surfaces or use a mister attachment when water is
available.
6. Conserve water by using power blowers instead of hoses for many lawn and garden
applications, including areas such as gutters, screens, patios, grills, porches and gardens.
7. Use the full blower nozzle extension so the air stream can work close to the ground.
8. Watch out for children, pets, open windows, or freshly washed cars and blow debris safely
away.
9. After using blowers and other equipment, CLEAN UP! Dispose of debris in trash receptacles.
15 m Minimum
English

— 5 —
ASSEMBLY
BLOWER PIPES INSTALLATION
WARNING! Stop the engine before installing or removing blower pipes.
1. Align groove in pipe A with pegs on
blower housing and slide pipe A on to
housing.
2. Rotate pipes A clock wise to lock it into
place.
3. Align groove in pipe B with pegs on pipe
A and slide pipe B until proper position.
4. Align groove in pipe B with pegs on pipe
A and slide pipe B until proper position.
1
Peg
2
1
3
2
4
BEFORE OPERATION
FUELING
WARNING! The following precautions will lessen the risk of fire.
1. Do not smoke near fuel.
2. Mix and pour fuel outdoors and where there are no sparks or flames.
3. Always shut off the engine before refueling. Never remove the fuel tank cap while the engine
is running or immediately after stopping the engine.
4. Always open the fuel tank cap slowly to release any possible pressure inside the tank.
5. Do not overfill the fuel tank. Stop filling 10 ~ 20 mm from the top of the
tank.
6. Tighten the tank fuel cap carefully but firmly after refilling.
7. Wipe up any spilled fuel before starting the engine.
8. Move the Handheld Blower at least 3 m away from the fueling location
and fuel storage container before starting the engine.
Min. 3 m
English

— 6 —
FUEL; MIXING GASOLINE AND OIL
WARNING! LThe engine used on this Handheld Blower is of a 2-cycle design. The internal
moving parts of the engine, i.e., crankshaft bearings, piston pin bearings and piston to cylinder
wall contact surfaces, require oil mixed with the gasoline for lubrication. Failure to add oil to the
gasoline or failure to mix oil with the gasoline at the appropriate ratio will cause major engine
damage which will void your warranty. For your fuel premix, only use a quality oil designed for
2-cycle air-cooled engine.
FUEL MIXTURE: Always use a good quality 2-cycle, air-cooled engine oil mixed at a ratio of 50:1.
FUEL MIXTURE CHART:
MIXING INSTRUCTIONS : Always mix fuel and oil in a clean container approved for gasoline.
Mark the container to identify it as fuel mix for the Handheld Blower. Use regular unleaded
gasoline and fill the container with half the required amount of gasoline. Pour the correct amount
of oil into the container then add the remaining amount of gasoline. Close the container tightly and
shake it momentarily to evenly mix the oil and the gasoline before filling the fuel tank on the
Handheld Blower.
When refilling the Handheld Blower fuel tank, clean around the fuel tank cap to prevent dirt and
debris for entering the tank during cap removal. Always shake the premix fuel container
momentarily before filling the fuel tank.
Always use a spout or funnel when fueling to reduce fuel spillage. Only fill the tank to within 10 ~
20 mm from the top of the tank. Avoid filling to the top of the tank filler neck.
NOTE :
1. Never mix gasoline and oil directly in the Handheld Blower fuel tank.
2. Do not use National Marine Manufacturer’s Association (NMMA) or BIA certified oils. This type
of 2-cycle engine oil does not have the proper additives for air-cooled, 2-cycle engines and
can cause engine damages.
3. Do not use automotive motor oil. This type of oil does not have the proper additives for
aircooled, 2-cycle engines and can cause engine damage.
GAS GAS
FILL
HALF
GASOLINE ADD OIL ADD REMAINING
GASOLINE SHAKE
(MIX OIL AND GASOLINE)
OIL
2-Cycle Oil (50:1)
With
1 liter gasoline mix 120 m
ℓoil
2 liter 140 m
ℓ
5 liter 100 m
ℓ
English

— 7 —
STARTING AND STOPPING PROCEDURE
Before Starting The Engine : Fill the fuel tank as instructed in the BEFORE OPERATION section
of this manual (page 5). Rest the Handheld Blower on the ground. Make sure that the area is clear
of any broken glass, nails, wire, rocks or other debris. Keep all bystanders, children and animals
away from the working area.
COLD STARTING PROCEDURE
This Blower is equipped with a fuel primer and a choke system. To
start a “cold” engine properly, perform the following procedure:
1. Pump the primer bulb at the bottom of the carburetor until fuel
can be seen flowing through the fuel return line to the fuel
tank. (Flowing fuel should be almost clear, not foamy or full of
bubbles.)
2. Move the choke lever to the closed ( ) position.
3. Move the stop switch to the “ON” position.
4. (1) Press the throttle trigger
(2) Move the throttle setting lever to half position.
(3) Release the throttle trigger.
(4) Release the throttle setting lever.
(Throttle is kept in half position.)
5. Hold the Handheld Blower with your left hand and press it
down firmly.
IMPORTANT: Be careful not make damages to fuel tank or the
blower by your foot.
6. Pull the starter grip. Grasping the starter grip, slowly pull the
starter cord out until you feel resistance, then pull the cord
quickly and powerfully. Pull the starter grip until the engine
starts.
7. After the engine starts, move the throttle setting lever to the
idle position, then move the choke lever to the open ( )
position.
If the engine stops running before you move the choke lever
to the open ( ) position:
A. Go ahead and open the choke.
B. Make sure the throttle setting lever is set to the idle
position.
C. Pull the starter grip until the engine starts.
Primer Bulb
Fuel Return Line
Starter Grip
Choke
Lever
STOP SWITCH
START (ON) STOP
Throttle Trigger
Idle
Position
Throttle Setting Lever
Full Throttle
Position
(1)
(2)
Fuel TANK
English

— 8 —
HOT RESTART
To start the engine that is already warmed up (hot restart), or if the ambient temperature exceeds
20°C:
1. Pump the primer bulb at the bottom of the carburetor until fuel can be seen flowing through
the fuel return line to the fuel tank.
2. Move the choke lever to the ( ) position and move the stop switch to the “ON” position.
3. More the throttle setting lever to the idle position and pull the starter grip.
4. If the engine fails to start after three to four pulls, follow the instruction in the Cold Starting
Procedure section (page 7).
If the engine fails to start after you follow the above procedures, contact an authorized
Maruyama dealer.
Note : 1. Don't pull the starter cord out completely.
2. Do not rerease the starter cord from the fully extended position.
Indication of the sound power levels :
The values in the owner's/operator's manual indicate measured sound power level. The
values in the EC declaration of conformity indicate guaranteed sound power level.
TO STOP THE ENGINE
1. Move the throttle setting lever to the idle position. Release the throttle trigger.
2. Slide the stop switch to the “STOP” position.
CARBURETOR ADJUSTMENT
This Handheld Blower is equipped with non-adjustable fuel mixture carburetor. The engine idle
speed is the only adjustment for the operator.
WARNING ! Idle speed adjustment should be checked each time the unit is operated.
WARNING ! Engine must be running to make carburetor adjustments. When engine is running,
fan is rotating and other parts are moving. Contact with rotating fan or other moving parts could
cause serious personal injury or death. Keep hands, feet and clothing away from fan and other
moving parts. Keep all bystanders and pets away from unit while making carburetor adjustments.
Wear the recommended personal protective equipment and observe all safety instructions.
Engine Idle Speed :
When the throttle trigger and the throttle setting lever is idle position the engine should return to an
idle speed between 2700 and 3300 RPM. The engine should not stall (stop running) at engine idle
speed.
To adjust the engine idle speed, rotate the
idle speed adjustment screw on the
carburetor.
• Turn the idle speed screw in (clockwise)
to increase the engine idle speed.
• Turn the screw out (counterclockwise) to
decrease the engine idle speed.
If idle speed adjustment is necessary,
and after adjustment the engine stalls,
stop using the Handheld Blower
immediately!
Contact your local authorized Maruyama Dealer for assistance and servicing.
Idle Speed
Adjuster Screw
English

— 9 —
OPERATION THE HANDHELD BLOWER
CAUTION: Always wear eye protection, hearing protection, gloves, face filter mask and
sturdy boots with nonslip soles when operating the Handheld Blower.
1. Allow the engine to warm up for a few minutes.
2. Control engine speed by the throttle trigger, or set the engine speed by the throttle setting
lever.
*To adjust the throttle setting lever.
Press the throttle trigger, then adjust the throttle setting lever as you wish operation.
3. Operate lower speed to blow leaves or debris ground.
4. If the blow is not enough to blow, open the throttle gradually.
Note : Operate Handheld Blower at the lowest throttle setting to do the job.
REGULAR MAINTENANCE
Maintenance, replacement or repair of emission control devices and systems may be
performed by any repair establishment or individual; however, warranty repairs must be
performed by a dealer or service center authorized by Maruyama Manufacturing Company,
Inc. The use of parts that are not equivalent in performance and durability to authorized
parts may impair the effectiveness of the emission control system and may have a bearing
on the outcome of a warranty claim.
CAUTION: Stop the engine before performing maintenance.
AIR FILTER
Clean the element every 20 hours.
• Twist off the air cleaner cap, and remove the element.
• Clean the element in a bath of kerosene or high flash-point solvent.
• Soak the element in new 2-stroke engine oil, and squeeze it to
remove excess oil.
• Fit the element in the air cleaner case, then reinstall the air cleaner
cap firmly.
kCAUTION
Improper air cleaner cleaning can result in engine damage.
Do not use compressed air to clean or dry the air cleaner. Do not operate the engine with
the air cleaner removed.
Always clean the air cleaner with an approved high flash point solvent only. Never use
gasoline.
NOTE
Operating in dusty condition may require more frequent maintenance.
A. Air cleaner cap
B. Element
C. Air cleaner case
A. Air cleaner cap
A
A
B
C
English

— 10 —
FUEL FILTER
Maintenance Interval
• The fuel filter should be cleaned and inspected for damage after each 20 hours of operation.
• The fuel filter should be replaced after every 100 hours of operation.
Fuel Filter Replacement
The fuel filter is attached to the end of the
fuel pick-up hose inside the fuel tank.
To replace the fuel filter :
1. Make sure the fuel tank is empty.
2. Remove the fuel cap.
3. Using a wire hook, gently pull the fuel
filter out through the fuel filler opening.
4. Grasp the fuel hose next to the fuel filter fitting and remove the filter, but do not release the
hose.
5. While still holding on to the fuel hose, attach the new fuel filter.
6. Drop the new fuel filter back into the fuel tank.
7. Make sure that the fuel filter is not stuck in a corner of the tank, and that the fuel hose is not
doubled over (kinked) before refueling.
SPARK PLUG
Maintenance Interval
• The spark plug should be removed from the engine and checked after each 25 hours of
operation.
• Replace the spark plug after every 100 hours of operation.
Spark Plug Maintenance
1. With the engine at ambient (room) temperature, twist the high tension lead boot on the spark
plug back and forth a couple of times to loosen the boot, then pull the boot off of the spark
plug.
2. Remove the spark plug.
3. Clean the electrodes with a stiff brush.
4. Adjust the electrode air gap to 0.6- 0.7 mm
(024-.028 in).
5. Replace the spark plug if it is oil-fouled,
damaged, or if the electrodes are worn down.
6. Do not overtighten the spark plug when
installing. The tightening torque is 10.7-16.6
N·m (95-148 in. lbs).
Wire Fuel Pick-up Hose
Fuel Filter
0.6 - 0.7 mm (0.024 - 0.02 inches)
TIPS
English

ENGINE SCREEN
Maintenance Interval
The screen should be cleaned and inspected each
time the Handheld Blower is used.
Screen Cleaning
Clean all dirt and debris from the screen.
AIR INTAKE SCREEN
Maintenance Interval
The air intake screen should be cleaned and inspected
each time Handheld Blower is used and when air flow
dropped down during operation.
Air Intake Screen Cleaning
Clean all dirt and debris from the air intake screen.
WARNING ! Never use the Hand-held Blower without the
air intake screen. Before starting the engine, check the
screw is securety tightend and no damage.
GENERAL CLEANING AND TIGHTENING
CAUTION: When engine is running, fan is rotating and other parts are moving. Contact
with rotating fan or other moving parts could cause serious personal injury or death.
Always turn off your Handheld Blower before you clean or perform any maintenance on
it.
The Maruyama Handheld Blower will provide maximum performance for many, many hours if it is
maintained properly. Good maintenance includes regular checking of all fasteners for correct
tightness, and cleaning the entire machine.
STORAGE
For long term storage of the Handheld Blower :
1. Empty the fuel tank into a suitable fuel storage container
approved for gasoline.
2. Pump the primer bulb on the carburetor until all fuel is
discharged through the clear fuel return hose.
3. Run the engine to remove any fuel that may remain in
the carburetor.
4. Perform all regular maintenance procedures and any
needed repairs.
5. Remove the spark plug and squirt a very small amount
of oil into the cylinder.
6. Pull the starter grip once.
7. Slowly pull the starter grip to bring the piston to the top of the cylinder (TDC).
8. Reinstall the spark plug.
9. Store the Handheld Blower in a dry place away from excessive heat, sparks or open flame.
CAUTION: Oil may squirt out of the spark plug opening when you pull the starter grip. Oil
can cause eye injuries. Protect your eyes and keep your face away from the spark plug
opening.
— 11 —
Air Intake Screen
Screen
Screw
3mm
Allen Wrench
English

— 12 —
Symptom Probable couse Remedy
Engine won't start
or output is low
Insufcient
compression
Faulty Piston, Cylinder and Piston ring M
Loose spark plug Tighten properly.
Loose cylinder bolts
No fuel to
combustion
chamber
No fuel in fuel tank Fill fuel tank.
Blocked fuel filter or tube Clean.
Blocked air vent in tank cap
Faulty carburetor M
Spark plug fouled
by fuel
Over-rich fuel/air mixture Rotate engine with spark plug
removed to discharge excess fuel.
Clean spark plug.
Clogged air cleaner Clean.
Faulty carburetor M
Incorrect grade/type of fuel Change gasoline.
Water in fuel Replace spark plug.
No spark or
weak spark
Faulty spark plug Replace spark plug.
Faulty ignition coil M
Engine switch left in " ○" (Stop)
position Turn engine switch to " I " (Start)
position.
Low output Engine overheats
Clogged air cleaner
Clean.
Recoil starter or cooling air path
clogged with dlft.
Carbon built-up in combusition chamber
M
Poor ventilation around engine Select a better location.
TROUBLESHOOTING
Maintenence
Interval
Daily First
20 hours Every
20 hours Every
50 hours Every
100 hours
Check and replenish fuel ●
Check for fuel leakage ●
Check bolts, nuts and screws for looseness and loss ●
Check throttle lever operation ●
Check start/stop switch operation ●
Clean fuel lter ●
*Clean air cleaner element ●
Tighten boits, nuts and screws ● ●
Clean spark plug and adjust electrode gap ●
Remove dust and dirt from cylinder ns ●
M
Remove carbon deposits on piston head and inside cylinder
●
Remove carbon deposits in the exhaust pipe of muffier ●
Clean spark arrester screen ●
M Check the sliding portion of crankshaft, connecting rod etc. ●
Fuel tube Replace every 3 years
NOTE
◦The service intervals indicated are to be used as a guide.
◦Servise with an Asterisk (*) should be performed more frequently depending on the severity of operating condi-
tion.
◦M : Service should be performed by an authorized Maruyama dealer.
M : Service should be performed by an authorized Maruyama dealer.
If the engine malfunctions, carefully examine the symptoms and the operating conditions, and use the table below as
a guide to troubleshooting.
MAINTENANCE PERIOD
kWARNING
Accidental engine starting can cause injury. Always remove the spark plug cap before
servicing the engine to prevent accidental starting.
English

— 1 —
AVANT PROPOS
Ce manuel du propriétaire/usager est conçu pour familiariser l’opérateur avec les différents
accessoires et pièces qui composent l’appareil et pour l’aider à utiliser et entretenir son nouveau
souffleurs à main.
Avant d’utiliser la souffleurs à main, il est impératif de lire ce manuel et de bien en
assimilent le contenu.
Les consignes de sécurité les plus importantes sont indiquées par le symbole de sécurité :
Le manquement aux consignes de sécurité de ce manuel risque de se traduire par des blessures
graves ou mortelles. Pour plus de renseignements, contacter votre distributeur Maruyama agréé
ou la société Maruyama Mfg.Co.,Inc
TABLE DES MATIÈRES
CARACTÉRISTIQUES TECHNIQUES
GRILLE D’ENTRÉE D’AIR
POIGNÉE
CACHE VENTILATEUR
COMMANDE D’ACCÉLÉRATEUR
TUBULURE B
TUBULURE A
LEVIER DE RÉGLAGE DES GAZ
RESERVOIR DE CARBURANT
LANCEUR
MOTEUR
FILTRE À AIR
INTERRUPTEUR MARCHE/ARRÊT
Avant-propos ……………………………… 1 Démarrage et arrêt ………………………… 7
Caractéristiques techniques ……………… 1 Réglage du carburateur ………………… 8
Description du produit …………………… 1
Fonctionnement de la soufflante à main
… 9
Marquage ………………………………… 2 Entretien régulier ………………………… 9
Explication des symboles ………………… 2 Entreposage ……………………………… 11
Consignes de sécurité …………………… 3 Dépistage des pannes …………………… 12
Assemblage ……………………………… 5 Intervalles d’entretien …………………… 12
Avant mise en marche …………………… 5
Modèls KJRH300
Volume air max. m3/min (CFM) 12,5 (450)
Vitesse de l'air max. m/s (MPH) 56 (125)
Dimensions (L × l × H) mm (pouces) 340 x 245 x 360 (13,4 x 9,7 x 14,2)
Poids kg (ibs) 4,4 (9,7)
Moteur Type
Moteur 2 temps à essence, à arbre horizontal et refroidissement par air TJ027E
Cylindrée en ml (pouces cubes)
26,3 (1,61)
Régime moteur 7400 min-1
Carburateur à membrane
Allumage Allumage transistorisé
Bougie NGK BPMR7A
Démarreur Lanceur à rappel automatique
Carburant Rapport de mélange 50 parts d'essence ordinaire sans plomb
pour 1 part d'huile 2 temps par volume
Capacité du réservoir en l. 0,5
DESCRIPTION DU PRODUIT
MODÈLE:KJRH300
French

— 2 —
EXPLICATION DES SYMBOLES
Lire et assimiler le manuel du propriétaire/usager avec d’utiliser le produit.
Risque d’incendie : L’essence est un produit hautement inflammable. Ne jamais
faire le plein de carburant lorsque le moteur est en marche. Ne pas fumer ou
approcher de source de chaleur dans le voisinage du carburant.
L’inhalation des fumées peut être mortelle. Ne jamais faire démarrer ou tourner le
moteur dans une pièce ou un immeuble fermés.
Attention haute température : Risque de brûlure. Le moteur est très chaud
pendant la marche et tout de suite après son arrêt. Ne pas toucher le cylindre, le
silencieux et les carters du moteurs tant que le moteur n’a pas refroidi à la
température ambiante.
Toujours porter:
• Un casque de protection.
• Des protecteurs d’oreilles.
• Des lunettes ou visières de protection.
Attention pièces mobiles : Le contact avec le ventilateur ou autres pièces mobiles
peut entraîner des blessures graves ou mortelles. Ne pas approcher les mains,
les pieds ou les vêtements de ces éléments.
MARQUAGE
①RÉFÉRENCE MODÈLE
②
Voir la section EXPLICATION
DES SYMBOLES
③
Approvazione CE per le emissioni
④ Nº DE SÉRIE (GRAVÉ)
③
④
②
MaruyamaMfg.Co.,Inc
4-15Uchikanda3-ChomeChiyoda-ku
Tokyo101-0047Japan
EuropeanAuthorizedRepresentative
boulevardGeneralWahis,53,
B-1030Brussels,BELGIUM
Obeliss.a.
105
WA
dB
L
XXXX
KJRH300
ProductDate
Model
FuelTankCapacity0.5L
French
①

CONSIGNES DE SÉCURITÉ
SÉCURITÉ DE L’OPERATEUR
1. Lire et assimiler ce manuel du propriétaire/usager avant d’utiliser la
soufflante à main afin de bien vous familiariser avec son fonctionnement.
2. Ne pas laisser la souffleurs entre les mains des enfants. Ce n’est pas un
jouet. Ne laisser personne utiliser la soufflante sans lui avoir d’abord fait
lire le manuel de l’usager.
3. Toujours porter des lunettes de protection.
4. Porter des vêtements de protection.
5. Toujours porter des bottes robustes avec des semelles anti-dérapantes.
6. Toujours porter des pantalons longs, des bottes et des gants. Ne pas
garder de vêtements lâches, de bijoux, de shorts, de sandales ; ne pas
travailler pieds nus. Attacher les cheveux.
7. Toujours porter un masque facial.
8. Ne jamais utiliser la souffleurs lorsque vous êtes fatigué, sous
l’influence d’alcool, de drogue ou de médicaments.
9.
Ne jamais faire démarrer ou tourner le moteur dans une pièce ou un
immeuble fermé. L'inhalation des émanations peut provoquer la mort.
10. Nettoyer les traces d’huile, de carburant ou de saletés sur les
poignées.
SÉCURITÉ DE LA TAILLEUSE DE HAIE
1. Vérifier que la souffleurs manuelle est correctement assemblée selon les
instructions de la section ‘’Assemblage’’ de ce manuel.
2. Avant chaque mise en service, vérifier la souffleurs, remplacer les pièces
endommagées et vérifier les fuites de carburant. S’assurer que toutes les
attaches sont en place et bien serrées.
3. Assurer l’entretien de la souffleurs conformément aux procédures et intervalles d’entretien
recommandés à la section '’Entretien’’, à partir de la page 9.
4. Utiliser les accessoires conformes. Ne jamais utiliser des pièces de rechange non agréées
par Maruyama.
5. Couper le moteur avant chaque intervention d’entretien ou toute autre intervention sur la
soufflante.
6. En cas de problèmes de fonctionnement ou de trop fortes vibrations, arrêter tout de suite le
moteur et en rechercher la cause. Si vous n’arrivez pas à la déterminer,
ou si le dépannage est hors de vos capacités, renvoyer la souffleurs à
votre distributeur pour réparation.
SÉCURITÉ DE CARBURANT
1. L’essence est un produit hautement inflammable. La manipuler et la
stocker avec précautions. Utiliser un jerrican prévu pour l’essence et/ou
le mélange de carburant/huile.
2. Mélanger et verser le carburant en extérieur et loin de toute étincelles
ou flammes vives.
3. Ne pas fumer près des jerricans de carburant ou près de la souffleurs à
main. Ne pas fumer pendant l’utilisation de la souffleurs.
4. Ne pas trop remplir le réservoir de carburant. Arrêter à 10 ~ 20 mm du
haut du réservoir.
5.
Essuyer les éclaboussures de carburant avant de faire démarrer le moteur.
6. Eloigner la souffleurs d’au moins 3 m de l’endroit de remplissage du
réservoir pour faire démarrer le moteur.
7. Ne jamais retirer le bouchon du réservoir de carburant quand le moteur
est en marche ou tout de suite après l’avoir arrêté.
8. Avant de faire le plein, laisser refroidir le moteur.
9. Avant de ranger la souffleurs à main, vider le réservoir de carburant. Il
est recommandé de vider le réservoir après chaque utilisation afin
d'éviter les risques de fuite de carburant.
10. Ranger le carburant et la souffleurs à l’abri des flammes vives, des
sources d’étincelles ou de trop fortes chaleurs. S’assurer que les
vapeurs de carburant ne risquent pas d’atteindre les flammes d’un
chauffage, d’un four, d'un moteur électrique, etc.d’atteindre les flammes
d’un chauffage, d’un four, d'un moteur électrique, etc.
— 3 —
ESSUYER LES ECLABOUSSURES
DE CARBURANT
Minimum
3m
French

— 4 —
SÉCURITÉ DE FONCTIONNEMENT
1.
CETTE SOUFFLEURS A MAIN PEUT PROVOQUER DES ACCIDENTS GRAVES. Lire attentivement
les instructions, se familiariser avec les commandes et l’utilisation correcte de la soufflante.
2. Eviter d’utiliser la souffleurs à main lorsqu’il y a des pierres, des graviers ou des matériaux de
ce genre pouvant se transformer en projectiles dangereux.
3. Eloigner les enfants, les tiers et les animaux dans un
rayon d’au moins 15 m de la surface de travail.
4. Si quelqu’un s’approche alors que vous travaillez avec
la souffleurs, couper tout de suite le moteur.
5. Ne jamais laisser les enfants utiliser la souffleurs à
main.
6. Utiliser uniquement la souffleurs à main lorsqu’il fait
jour ou si l’endroit est bien éclairé.
7. Ne jamais utiliser la souffleurs à mains sans les capots
et autres dispositifs de protection.
8. Ne pas approcher les mains ou les pieds des pièces mobiles. Ne pas toucher les surfaces
chaudes tels que le silencieux.
9. Rester bien en équilibre lorsque vous manipulez la souffleurs à main.
10. Utiliser l’outil qui correspond au travail à effectuer. Ne pas utiliser la souffleurs manuelle pour
toute autre tâche que celle pour laquelle elle est conçue.
11. Apprendre à arrêter très vite la machine en cas d’urgence. Consulter la section ‘’Démarrage
et arrêt’’ à la page 7.
12. Ne pas diriger le bec de la souffleurs vers les personnes ou les animaux.
TECHNIQUES DE FONCTIONNEMENT
1.
Les engins à moteur doivent être utilisés à des heures raisonnables – ni trop tôt le matin ni trop tard le
soir – c’est-à-dire à des heures qui ne risquent pas de déranger le voisinage. Respecter les prescriptions
locales. Normalement les heures recommandées sont de 9 H 00 à 17 H 00, du lundi au samedi.
2. Limiter le nombre d’accessoires utilisés afin de réduire le bruit, et utiliser la souffleurs à la
vitesse minimale requise pour le travail à accomplir.
3. Avant de mettre l’appareil en marche vérifier notamment le silencieux, les arrivées d’air et les
filtres à air.
4. Ratisser ou balayer les débris avant d’utiliser la souffleurs.
5. Dans un environnement poussiéreux, humidifier la surface ou utiliser le nébuliseur s’il y a de
l’eau.
6. L’utilisation des souffleurs à moteur à la place des tuyaux d'arrosage permet d’économiser
l’eau dans la plupart des opérations sur le gazon ou dans les jardins, y compris dans les
gouttières, les rideaux, les patios, les grilles, les porches et les jardins.
7. Utiliser la rallonge du bec de souffleurs de manière à ce que le jet d’air soit près du sol.
8. Faire attention aux enfants, aux animaux, aux fenêtres ouverts ou aux véhicules fraîchement
lavés. Souffler les débris en toute sécurité.
9. Après avoir utilisé les soufflantes et autres équipements, NETTOYER ! Jeter les débris dans
le poubelles.
15 m minimum
French

— 5 —
ASSEMBLAGE
INSTALLATION DES TUBULURES DE SOUFFLANTE
ATTENTION! Arrêter le moteur avant de poser ou déposer les tubulures de souffleurs.
1. Aligner la rainure de la tubulure A sur les
taquets du boîtier de souffleurs et faire
glisser la tubulure A dans le boîtier.
2. Faire tourner la tubulure A dans le sens
horaire pour bien la bloquer.
3. Aligner la rainure de la tubulure B sur
les taquets de la tubulure A et rentrer la
tubulure B à sa place.
4. Faire tourner la tubulure B dans le sens
horaire pour bien la bloquer.
1
Taquet
2
1
3
2
4
AVANT MISE EN MARCHE
PLEIN DE CARBURANT
ATTENTION! Les précautions qui suivent réduiront les risques d’incendie.
1. Ne pas fumer dans le voisinage du carburant.
2. Mélanger et verser le carburant en extérieur, loin de toute source d’étincelles ou de flammes.
3. Toujours couper le moteur avant de faire le plein. Ne jamais retirer le bouchon du réservoir
quand le moteur est en marche ou tout de suite après l’avoir arrêté.
4.
Toujours ouvrir le bouchon de carburant lentement afin de relâcher la pression à l’intérieur du réservoir.
5. Ne pas trop remplir le réservoir de carburant. Arrêter à 10 ~ 20 mm du
haut du réservoir.
6. Après un plein, serrer le bouchon de carburant doucement mais
fermement.
7.
Avant de mettre le moteur en marche, essuyer les éclaboussures de carburant.
8. Avant de mettre le moteur en marche, éloigner la souffleurs à main de 3
m de l’endroit de remplissage du réservoir et de l’endroit d’entreposage
des jerricans de carburant.
Minimum
3 m
French

— 6 —
CARBURANT ; MÉLANGE ESSENCE ET HUILE
ATTENTION! Le moteur de cette souffleurs à main est un moteur à deux temps. Les organes
mobiles internes du moteur, c'est-à-dire les paliers du vilebrequin et de l’axe de piston ou les
surfaces de contact de la paroi de cylindre doivent être graissés avec un mélange d’huile et
d’essence. Les pannes de moteur provoquées du fait que l'essence n'a pas été additionnée
d'huile ou du fait que la proportion d'essence et d'huile n'est pas respectée ne seront pas
couvertes par la garantie. Le pré mélange de carburant sera fait avec une huile de qualité
appropriée aux moteurs 2 temps refroidis par air.
MÉLANGE DE CARBURANT : Toujours utiliser une huile de bonne qualité pour moteur 2 temps
refroidis par air mélangée au taux de 50:1.
TABLEAU DU MÉLANGE DE CARBURANT :
INSTRUCTIONS DE MÉLANGE : Toujours mélanger le carburant et l’huile dans un récipient
propre homologué pour l’essence. Marquer le récipient qui contient le mélange de carburant pour
la souffleurs. Verser la moitié de l’essence ordinaire non plombée dans le récipient, verser la
quantité d’huile requise puis ajouter le reste de l’essence. Fermer le récipient et remuer pour
égaliser le mélange. Remplir ensuite le réservoir de carburant de la souffleurs à main.
Avant de remplir le réservoir de carburant de la souffleurs, bien nettoyer autour du bouchon de
remplissage afin d’éviter la pénétration de débris et de poussière dans le réservoir. Toujours agiter
le mélange de carburant avec de remplir le réservoir de carburant.
Toujours utiliser un entonnoir pour faire le plein afin de réduire les éclaboussures. Ne pas remplir
à plus de 10 ~ 20 mm du bord du réservoir. Eviter de remplir jusqu’au col du bouchon de
remplissage.
REMARQUE :
1. Ne jamais faire le mélange d’essence et huile directement dans le réservoir de la souffleurs.
2. Ne pas utiliser les huiles certifiées par les associations maritimes National Marine
Manufacturer’s Association (NMMA) ou BIA. Ce type d’huile pour moteurs à deux temps ne
contiennent pas les additifs qui conviennent aux moteurs à refroidissement par air et risquent
d’endommager le moteur de la souffleurs.
3. Ne pas utiliser d’huile pour moteur automobile. Cette catégorie d’huile ne contient pas les
additifs qui conviennent aux moteurs à deux temps refroidis par air et risquent d’endommager
le moteur.
ESSENCE ESSENCE
REPÈRE DE
REMPLISSAGE
LA MOITIE DE
L’ESSENCE AJOUTER
L'HUILE AJOUTER
L’ESSENCE
QUI RESTE
AGITER
(POUR MELANGER L’HUILE ET L’ESSENCE)
HUILE
Huile 2 temps (50:1)
Pour
1 litre d’essence 20 m
Rd’huile
2 litres 40 m
R
5 litres 100 m
R
French

— 7 —
DÉMARRAGE ET ARRÊT
Avant de faire démarrer le moteur : Remplir le réservoir de carburant comme indiqué à la
section AVANT MISE EN MARCHE de ce manuel (page 5). Poser la souffleurs à main sur le sol.
S’assurer que l’endroit est propre et n’est pas encombré de verre cassé, de clous, de fils de fer,
de pierres et autres débris. Eloigner les tiers, les enfants et les animaux de la surface de travail.
DÉMARRAGE À FROID
La souffleurs est équipée d’un amorçage de carburant et d’un
étrangleur. Pour un bon démarrage “à froid”, procéder comme
suit:
1. Pomper la poire d’amorçage qui se trouve au bas du
carburateur pour faire couler le carburant dans la canalisation
de retour de carburant jusqu’au réservoir de carburant. (Le
fuel doit être clair, sans mousse et sans bulles).
2. Déplacer le levier d’étrangleur sur la position fermée ( ).
3. Déplacer l’interrupteur de marche/arrêt sur la position “ON”.
4. (1) Appuyer sur la commande d’accélérateur
(2) Amener le levier de réglage des gaz à mi-course.
(3) Relâcher la commande d’accélérateur.
(4) Relâcher le levier de réglage des gaz. (La commande des
gaz reste sur la position mi-course.)
5. Tenir la souffleurs à main avec la main gauche et appuyer
fermement vers le bas. Tenir la manette auxiliaire avec le pied
gauche sans appuyer.
IMPORTANT: Faire attention de ne pas endommager le
réservoir à carburant ou la souffleurs avec le pied.
6. Tirer sur la poignée du démarreur. Empoigner la et tirer
doucement sur lacorde jusqu’à sentir une résistance.
Tirer alors vivement et très vite sur la corde. Tirer jusqu’à ce
que le moteur démarre.
7. Une fois que le moteur est parti, déplacer le levier de réglage
des gaz sur la position de ralenti, et le levier d'étrangleur sur
la position ouverte ( ).
Si le moteur s’arrête avant que le levier d’étrangleur n’arrive
sur la position ouverte ( ):
A. Continuer et ouvrir l’étrangleur.
B. Vérifier que le levier de réglage des gaz est sur la position
de ralenti.
C. Tirer sur la poignée du démarreur jusqu’à ce que le moteur
parte.
Poire d’amorçage
Canalisation de retour de carburant
Poignée du démarreur
Levier
d’étrangleur
Interrupteur de marche/arrêt
Démarrage
(marche) Arrêt
Commande d’accélérateur
Position de
ralenti
Levier de réglage des gaz
Position plein
gaz
(1)
(2)
Réservoir de carburant
Manette auxiliaire
French
Table of contents
Languages: