König Electronic CMP-WNPCI40 User manual

1
CMP-WNPCI40
MANUAL (p. 2)
Wireless LAN PCI 300Mbps 11N
MODE D’EMPLOI (p. 9)
LAN PCI 300Mbps 11N sans l
MANUALE (p. 16)
PCI LAN Wireless da 300Mbps 11N
BRUKSANVISNING (s. 31)
Trådlöst LAN (WLAN) PCI-kort 300Mbps
11N
MANUAL DE UTILIZARE (p. 38)
Placă PCI de reţea wireless 300Mbps 11N
HASZNÁLATI ÚTMUTATÓ (o. 23.)
Vezeték nélküli LAN 11N PCI kártya,
300 Mbit/s
KÄYTTÖOHJE (s. 27)
Langaton LAN PCI 300Mbps 11N
ANLEITUNG (s. 5)
WLAN PCI 300Mbps 11N
GEBRUIKSAANWIJZING (p. 12)
Draadloze LAN PCI 300Mbps 11N
MANUAL DE USO (p. 20)
PCI LAN Inalámbrica 300Mbps 11N
NÁVOD K POUŽITÍ (s. 34)
Bezdrátová LAN PCI karta 300 Mb/s
11N
ΕΓΧΕΙΡΙΔΙΟ XPHΣHΣ (σελ. 41)
Ασύρματο LAN PCI 300Mbps 11N

2
ENGLISH
Installation
Please follow the instructions below to install your new wireless network card:
1. Install the PCI wireless network card into your computer when the computer is switched off.
2. Insert the device driver CD-ROM into the CD/DVD ROM drive of your computer, and execute ‘Autorun’.
3. Select the Wireless 11N PCI card from the menu
4. Please read the end user license agreement and click ‘I accept the terms of the license agreement’ then click the ‘Next’
button, to accept the license agreement. It is recommend to install the driver and utility if the network card is used for
the first time.
5. You can choose the configuration tool used to configure the wireless network card here. It’s recommended to select
‘Driver and Ralink Utility’, which provides full access to all functions of this wireless network card. If you prefer to use
the wireless configuration tool provided by Windows®XP or Vista, please select ‘Driver only’ and click ‘Next’.
6. Now you’ll see the following message: please click ‘Install’ to start utility installation. If you see the ‘Found New
Hardware’ message again, please ignore it and wait.
7. Please wait while the install procedure is in progress. When you see the message: “please click ‘Finish’ to complete
the driver installation process” please click finish.
8. After the installation is completed, the wireless configuration utility will be shown on the desktop of your computer
automatically. You will also see an icon at the lower-right corner in you windows system tray. When you want to
configure your wireless connection, please right click on this icon, and a pop-up menu will appear. Click ‘Launch
Config Utility’ to start the configuration program.
Connect to Wireless Access Point
After the driver has been correctly installed, it will try to connect to any unencrypted wireless access point automatically.
If you want to connect to a specic wireless access point, or the access point of your choice uses encryption, you have to
congure the wireless network card.
NOTE: In Vista, the network card will not connect to any unencrypted wireless access point automatically.
The current status of the wireless connection will be displayed by the Ralink conguration utility in icons:
Wireless connection is established, good signal reception.
Wireless connection is established, normal signal reception.
Wireless connection is established, weak signal reception.
Connection is not established yet.
Wireless network card is not detected.
There are two ways you can congure your wireless network card to connect to a wireless access point:
1. Using the Ralink configuration utility
2. Using the built-in windows zero configuration utility

3
Using Ralink Utility
Please follow the instructions below to use the Ralink conguration utility to connect to a wireless access point.
1. Right-click the Ralink configuration utility icon located in the lower-right corner of your computer desktop and then click
‘Launch Config Utility’.
Ralink setup utility (RaUI) will launch, and begin to scan for all wireless access points automatically.
Menu
Setup Area
More / Less
button
Information explanation
Scan result includes 5 types of information, which are:
A B C D E
AThe SSID (Service Set Identifier) of wireless device.
If nothing is displayed here, it means the SSID of this wireless device is hidden. If a symbol appears in front of the
name of the wireless device, it means you’ve established a connection with that wireless device
BThe type of this wireless device and the channel number of this wireless device
Means this wireless device is an access point
Means this wireless device is a computer (Ad-Hoc mode, point-to-point connection)
CThe wireless standard supported by this access point is displayed here. for 802.11n, ‘g; for 802.11g , and ‘b’ for
802.11b .
The WPS icon will appear when the access point supports WPS. If the access point uses encryption, a key icon
will appear
Note: When the access point supports WPS and the WPS icon is shown, you will not see the key icon here even
though the access point uses encryption.
DShows the signal strength of the access point by percentage
EShows a bar graph of the signal strength

4
Connecting to an Access Point
If the wireless access point you wish to connect to is found, you can establish a connection with it by clicking the ‘Connect’
button.
1. Click the wireless access point or network device you wish to connect to, it will be highlighted, then click ‘Connect’.
If the access point you selected does not use encryption, you’ll be connected to this wireless access point within one
minute. If the access point you selected uses encryption, please proceed to step 3.
2. If the wireless access point does not have SSID, you’ll be prompted to input it now. Please ask the owner of the
wireless access point for the exact SSID and input it here. Then click ‘OK’. If the SSID you provided here is wrong,
you’ll not be able to connect to this access point, and you’ll be prompted to enter it again.
3. If the wireless access point uses encryption, you will be prompted to input its WEP key or WPA pre-shared key.
4. Please ask the owner of the wireless access point for the correct key. Input the key and click ‘OK’. By checking the
‘Show Password’ box, the encryption key you enter here will be displayed enabling you to check it.
If the key you enter is wrong, you will not be able to connect to this wireless access point.
Authentication type will be selected by the authentication type of the access point automatically, please don’t
change it.
5. If you successfully connect to the wireless access point, you’ll see a symbol in front of the wireless device.
If you move your cursor over the Raling conguration utility icon, a balloon pops up with information about the
connections status.

5
Safety precautions:
Do not expose the product to water or moisture.
Maintenance:
Clean only with a dry cloth. Do not use cleaning solvents or abrasives.
Warranty:
No guarantee or liability can be accepted for any changes and modications of the product or damage caused due to
incorrect use of this product.
General:
Designs and specications are subject to change without notice.
All logos brands and product names are trademarks or registered trademarks of their respective holders and are hereby
recognized as such.
Keep this manual and packaging for future reference.
Attention:
This product is marked with this symbol. It means that used electrical and electronic products should not be
mixed with general household waste. There is a separate collections system for these products.
DEUTSCH
Installation
Bitte folgen Sie den nachstehenden Anleitungen zur Installation Ihrer kabellosen Netzwerkkarte:
1. Installieren Sie die PCI kabellose Netzwerkkarte im Computer, während er ausgeschaltet ist.
2. Legen Sie die Treiber-CD-ROM in das CD/DVD ROM-Laufwerk Ihres Computers ein und führen Sie „Autorun“ aus.
3. Wählen Sie im Menü Wireless 11N PCI Card.
4. Lesen Sie die Lizenzvereinbarung und klicken Sie ‘I accept the terms of the license agreement’ („Ich akzeptiere
die Bedingungen der Lizenzvereinbarung“), dann klicken Sie ‘Next’ („Weiter“) zum Akzeptieren. Wir empfehlen die
Installation von Treiber und Dienstprogramm, wenn die Netzwerkkarte das erste Mal benutzt wird.
5. Hier wählen Sie das Konfigurationstool zur Konfiguration der WLAN-Karte. Wir empfehlen Auswahl von ‘Driver
and Ralink Utility’ („Treiber und Ralink Utility“), womit Sie Zugriff zu allen Funktionen dieser WLAN-Karte haben.
Bevorzugen Sie die Verwendung des kabellosen Konfigurationstools von Windows®XP oder Vista, so wählen Sie bitte
‘Driver only’ („Nur Treiber“) und klicken Sie ‘Next’ („Weiter“).
6. Nun wird folgende Mitteilung angezeigt: Bitte klicken Sie „Installieren“, um das Dienstprogramm zu starten. Wird die
Mitteilung ‘Found New Hardware’ („Neue Hardware gefunden“) erneut angezeigt, so ignorieren Sie diese und
warten Sie einen Moment.
7. Bitte warten Sie die Installation ab. Klicken Sie auf ‘Finish’ („Fertig“), wenn die Mitteilung “please click ‘Finish’ to
complete the driver installation process” („Bitte klicken Sie ‚Fertig’, um die Treiberinstallation zu beenden“) angezeigt
wird.
8. Nach Beendigung der Installation wird das WLAN-Dienstprogramm automatisch auf dem Desktop angezeigt. Unten
rechts in der Symbolleiste wird ein Symbol angezeigt. Wollen Sie Ihren kabellosen Anschluss konfigurieren, machen
Sie einen Rechtsklick auf dieses Symbol zur Anzeige eines Popupmenüs. Klicken Sie ‘Launch Config Utility’ („Konfig
Dienstprogramm starten“).

6
Verbindung mit einem Wireless Access Point
Nach korrekter Treiberinstallation versucht das Programm automatisch, mit einem nicht verschlüsselten WLAN Access
Point zu verbinden. Möchten Sie eine Verbindung zu einem bestimmten WLAN Access Point oder Ihr bevorzugter WLAN
Access Point benutzt eine Verschlüsselung, so müssen Sie die WLAN-Karte kongurieren.
HINWEIS: In Vista verbindet sich die Netzwerkkarte nicht automatisch mit einem unverschlüsselten WLAN Access
Point.
Der aktuelle Status der kabellosen Verbindung wird durch das Ralink Kongurationsdienstprogramm mit Symbolen
angezeigt:
Kabellose Verbindung aufgebaut, guter Signalempfang.
Kabellose Verbindung aufgebaut, normaler Signalempfang.
Kabellose Verbindung aufgebaut, schwacher Signalempfang.
Verbindung wurde noch nicht aufgebaut.
WLAN-Karte nicht erkannt.
Sie können die WLAN-Karte auf zweierlei Weise zum Anschluss an einen WLAN Access Point konfigurieren:
1. Mit dem Ralink Konfigurationsdienstprogramm;
2. Mit dem integrierten Windows Zero Konfigurationsdienstprogramm.
Ralink Dienstprogramm
Bitte folgen Sie den nachstehenden Anleitungen zur Benutzung des Ralink Kongurationsdienstprogramms zum
Anschluss an einen WLAN Access Point.
1. Klicken Sie rechts auf das Symbol des Ralink Konfigurationsdienstprogramms unten rechts auf dem Desktop und
klicken Sie dann ‘Launch Config Utility’ („Konfig Dienstprogramm starten“).
Ralink Setup Utility (RaUI) startet und beginnt, automatisch nach allen WLAN Access Points zu suchen.
Menü
Setup- Bereich
Mehr/weniger
Schaltächen

7
Erklärungen
Das Suchergebnis umfasst 5 Arten von Informationen:
A B C D E
ASSID (Service Set Identifier) des kabellosen Geräts.
Falls hier nichts angezeigt wird, so ist der SSID des kabellosen Geräts verborgen. Wird vor der Bezeichnung des
kabellosen Geräts angezeigt, so haben Sie eine Verbindung zu diesem kabellosen Gerät hergestellt.
BArt des kabellosen Geräts und seine Kanalnummer.
Das kabellose Gerät ist ein Access Point.
Das kabellose Gerät ist ein Computer (Ad-Hoc Modus, point-to-point-Verbindung).
CHier wird der kabellose Standard angezeigt, welcher von diesem Access Point unterstützt wird. steht für 802.11n,
steht für 802.11g, und steht für 802.11b.
Das WPS-Symbol wird angezeigt, wenn der Access Point WPS unterstützt. Benutzt der Access Point
Verschlüsselung, so wird das Schlüsselsymbol angezeigt.
Hinweis: Unterstützt der Access Point WPS und das WPS-Symbol wird angezeigt, so wird das Schlüsselsymbol
hier nicht angezeigt, selbst wenn der Zugangspunkt Verschlüsselung benutzt.
DAnzeige der Signalstärke des Zugangspunktes in Prozent.
EBalkenanzeige für die Signalstärke.
Verbindung mit einem Access Point
Wird der kabellose Access Point, mit welchem Sie sich verbinden möchten, gefunden, so klicken Sie ‘Connect’
(„Verbinden“).
1. Klicken Sie den kabellosen Access Point oder das Netzwerkgerät, mit welchem Sie sich verbinden möchten an, es
wird markiert, dann klicken Sie ‘Connect’ („Verbinden“).
Benutzt der von Ihnen gewählte Access Point keine Verschlüsselung, so werden Sie mit diesem kabellosen Access
Point innerhalb einer Minute verbunden. Benutzt der von Ihnen gewählte Access Point Verschlüsselung, so gehen Sie
bitte zu Schritt 3.
2. Hat der kabellose Access Point keine SSID, so werden Sie aufgefordert, sie nun einzugeben. Bitte fragen Sie den
Inhaber des kabellosen Access Points nach der genauen SSID und geben Sie sie hier ein. Dann klicken Sie „OK“.
Ist die eingegebene SSID falsch, so können Sie sich nicht mit diesem Access Point verbinden und Sie werden
aufgefordert, sie erneut einzugeben.
3. Benutzt der kabellose Zugangspunkt Verschlüsselung, so werden Sie aufgefordert, den WEP- oder WPA-Schlüssel
einzugeben.

8
4. Bitte fragen Sie den Inhaber des kabellosen Access Points nach dem korrekten Schlüssel. Geben Sie den Schlüssel
ein und klicken Sie „OK“. Durch Auswahl des Kästchens ‘Show Password’ („Passwort anzeigen“), wird der
eingegebene Schlüssel hier angezeigt und Sie können ihn überprüfen.
Ist der eingegebene Schlüssel falsch, so haben Sie keinen Zugriff auf diesen kabellosen Access Point.
Der Authentizierungstyp wird nach dem Authentizierungstyp des Access Points automatisch gewählt, bitte
nicht ändern.
5. Nach erfolgreicher Verbindung mit dem kabellosen Access Point wird vor dem kabellosen Gerät angezeigt.
Gehen Sie mit dem Cursor über das Symbol des Ralink Kongurationsdienstprogramms, erhalten Sie Informationen
zum Anschlussstatus als Popup.
Sicherheitsvorkehrungen:
Sorgen Sie dafür, dass das Gerät nicht mit Wasser oder Feuchtigkeit in Berührung kommt.
Wartung:
Nur mit einem trockenen Tuch säubern. Keine Reinigungs- oder Scheuermittel verwenden.
Garantie:
Es kann keine Garantie oder Haftung für irgendwelche Änderungen oder Modikationen des Produkts oder für Schäden
übernommen werden, die aufgrund einer nicht ordnungsgemäßen Anwendung des Produkts entstanden sind.
Allgemeines:
Design und technische Daten können ohne vorherige Ankündigung geändert werden.
Alle Logos, Marken und Produktnamen sind Marken oder eingetragene Marken ihrer jeweiligen Eigentümer und werden
hiermit als solche anerkannt.
Bitte bewahren Sie Bedienungsanleitung und Verpackung für spätere Verwendung auf.
Achtung:
Dieses Produkt ist mit diesem Symbol gekennzeichnet. Es bedeutet, dass die ausgedienten elektrischen und
elektronischen Produkte nicht mit dem allgemeinen Haushaltsmüll entsorgt werden dürfen. Für diese Produkte
stehen gesonderte Sammelsysteme zur Verfügung.

9
FRANÇAIS
Installation
Lire attentivement les instructions suivantes pour installer votre nouvelle carte réseau WiFi :
1. Introduire la carte réseau WiFi PCI dans votre ordinateur lorsqu’il est éteint.
2. Insérer le CD-ROM du pilote du périphérique dans le lecteur CD/DVD ROM de votre ordinateur et exécuter ‘Autorun’.
3. Sélectionner la carte 11N PCI WiFi dans le menu
4. Veuillez lire le Contrat de Licence Utilisateur Final et cliquer sur ‘J’accepte les termes du contrat de licence’, puis
cliquez sur le bouton ‘Suivant’ pour accepter le contrat de licence. Il est recommandé d’installer le pilote et l’utilitaire si
la carte réseau est utilisée pour la première fois.
5. Vous pouvez choisir l’outil de configuration nécessaire pour paramétrer la carte réseau WiFi ici. Il est recommandé
de sélectionner ‘Pilote et utilitaire Ralink’ qui offre un accès complet à toutes les fonctionnalités de cette carte réseau
WiFi. Si vous préférez utiliser l’outil de configuration WiFi fourni par Windows XP ou Vista, veuillez sélectionner ‘Pilote
uniquement’ et cliquer sur ‘Suivant’.
6. Maintenant, vous voyez le message suivant : cliquer sur ‘Installer’ pour démarrer l’installation de l’utilitaire. Si vous
voyez encore le message ‘Nouveau matériel détecté’, veuillez l’ignorer et attendre.
7. Patienter pendant la procédure d’installation. Cliquer sur ‘Terminer’ quand vous voyez le message : “Veuillez cliquer
sur ‘Terminer’ pour compléter le processus d’installation du pilote”.
8. Une fois l’installation terminée, l’utilitaire de configuration WiFi s’affichera automatiquement sur le bureau de votre
ordinateur. Vous voyez également un icône dans le coin inférieur droit dans la zone de notification windows. Si vous
voulez configurer votre connexion WiFi, cliquer sur cet icone et un menu contextuel apparaît. Cliquer sur ‘Lancer
l’utilitaire de configuration’ pour démarrer le programme de configuration.
Connexion au point d’accès WiFi
Une fois que le pilote a été correctement installé, il essaiera de se connecter automatiquement à n’importe quel point
d’accès WiFi non-codé. Si vous voulez vous connecter à un point d’accès WiFi spécique ou un point d’accès de votre
choix qui utilise l’encodage, vous devez congurer la carte réseau WiFi.
NOTE: Sous Vista, la carte réseau ne se connecte pas automatiquement à n’importe quel point d’accès WiFi non-
encodé.
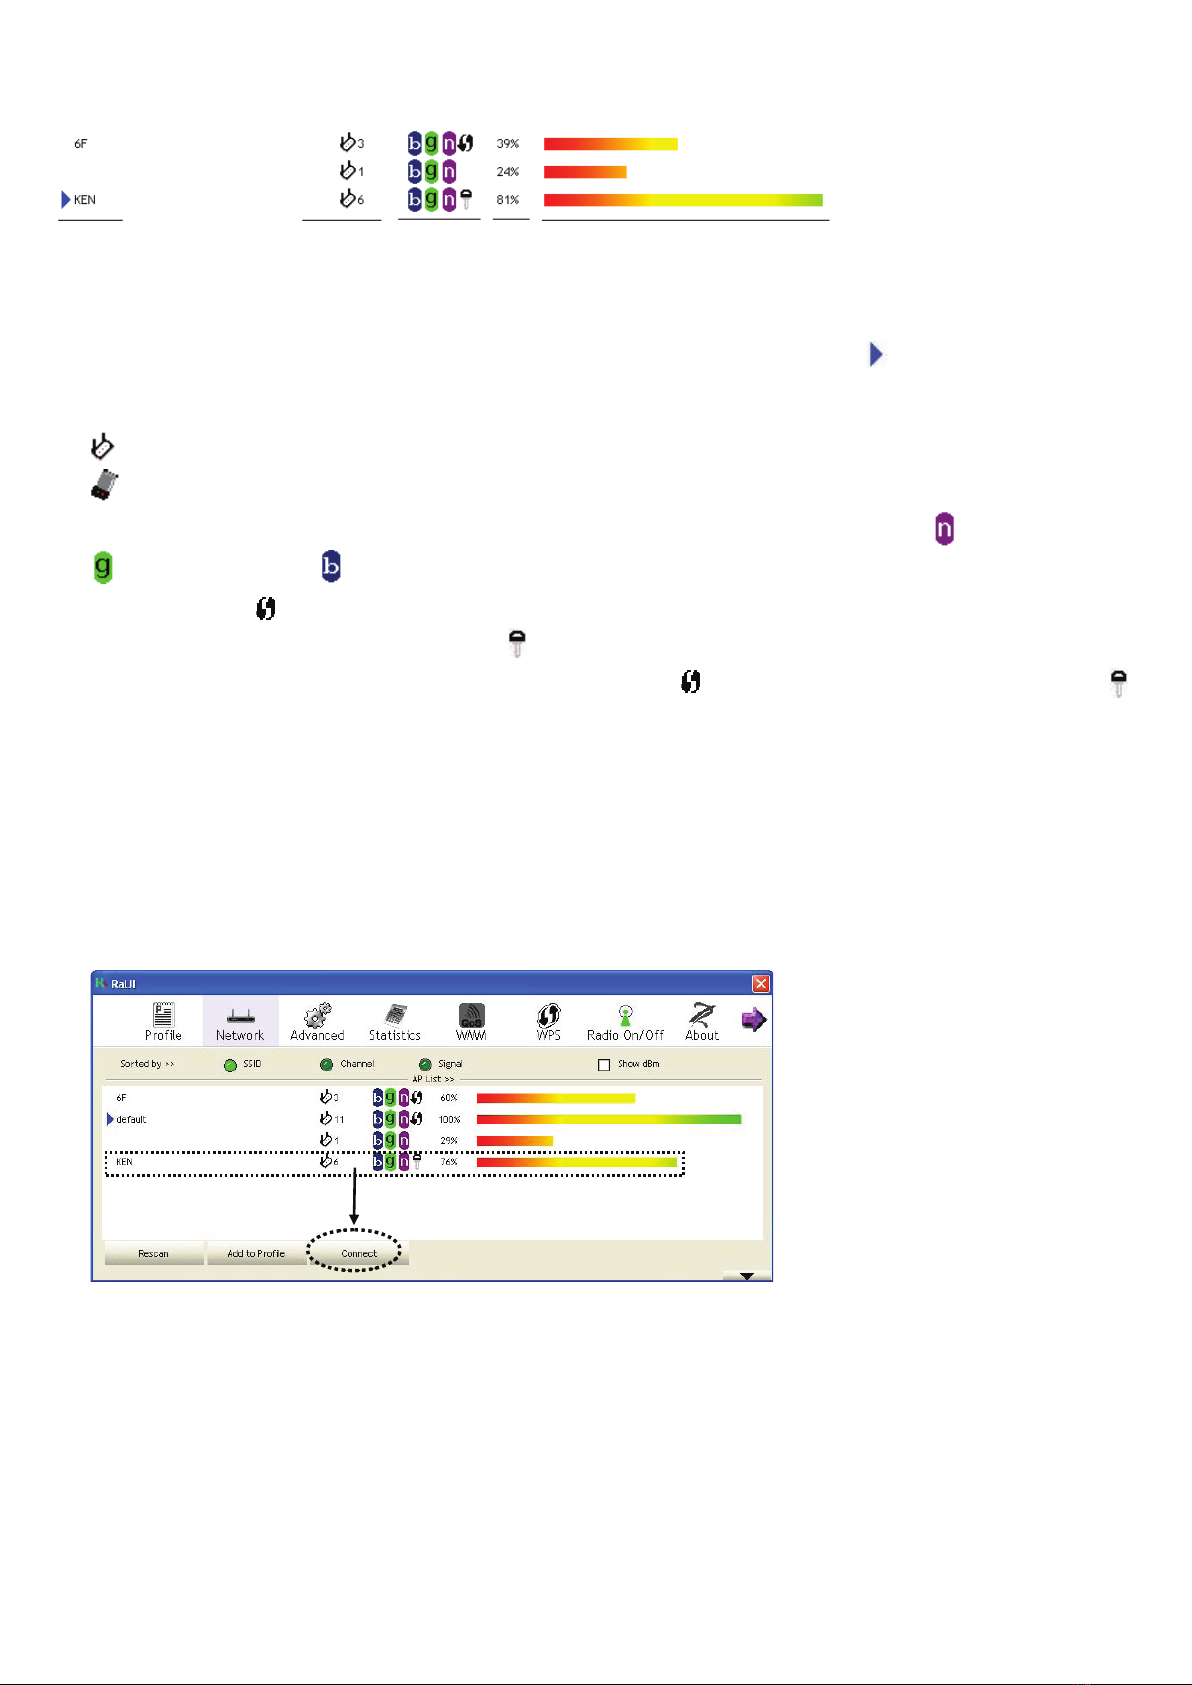
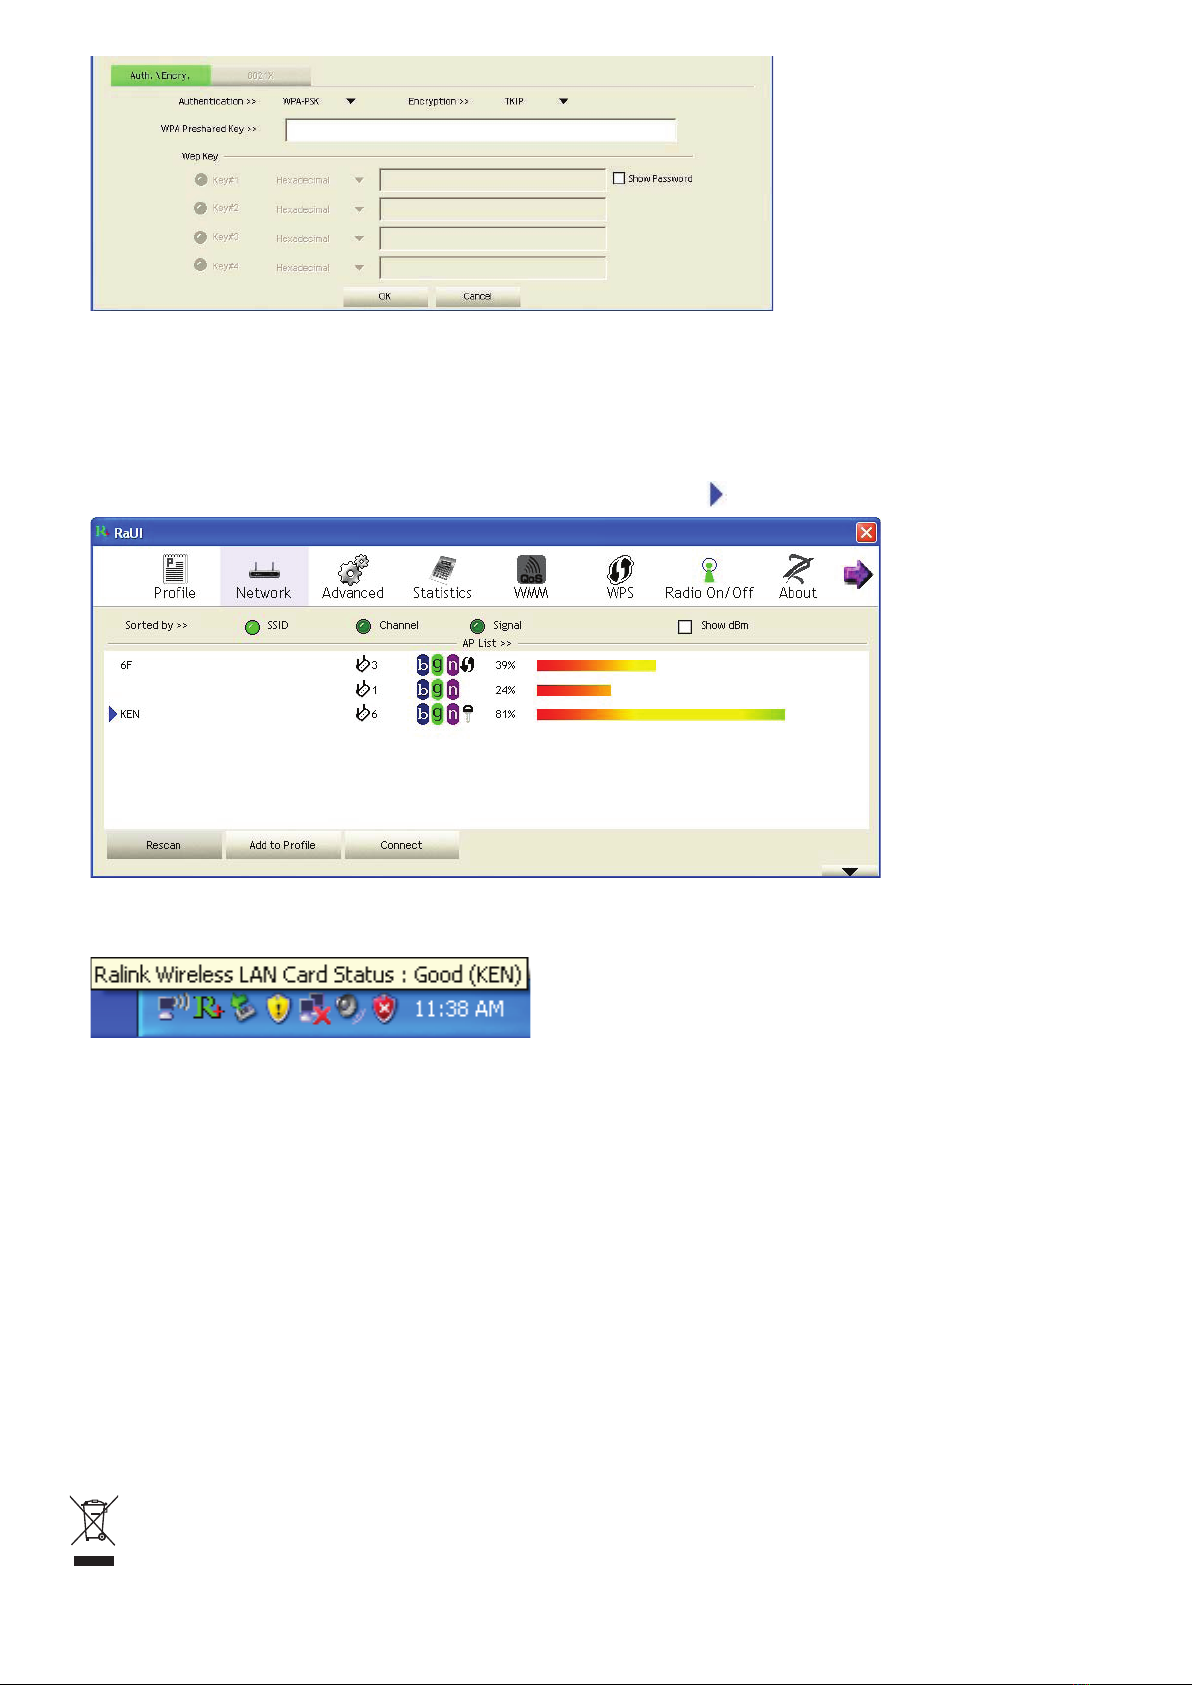
Le statut en cours de la connexion WiFi s’afche par l’utilitaire de conguration Ralink suivant les icênes suivants :
Connexion WiFi établie, bonne réception du signal.
Connexion WiFi établie, réception normale du signal.
Connexion WiFi établie, faible réception du signal.
Connexion pas encore établie.
Carte réseau WiFi non détectée.
Il existe deux façons de congurer votre carte réseau WiFi pour la connecter à un point d’accès WiFi :
1. Utiliser l’utilitaire de configuration Ralink ;
2. Utiliser l’utilitaire de windows zero configuration intégré.

10
Utilisation de l’utilitaire Ralink
Suivre les instructions ci-dessous pour utiliser l’utilitaire de conguration Ralink pour connecter un point d’accès WiFi.
1. Cliquer avec le bouton droit de la souris sur l’icône de l’utilitaire de configuration Ralink situé dans le coin inférieur
droit du bureau de votre ordinateur et cliquer ensuite sur ‘Lancer l’utilitaire de configuration’.
L’utilitaire de conguration Ralink (RaUI) démarre et lance automatiquement le balayage de tous les points d’accès
WiFi.
Menu
Zone de
congura-tion
Touche Plus /
Moins
Informations explicatives
Le résultat du balayage propose 5 types d’information qui sont :
A B C D E
ALe SSID (Service Set Identifier) du périphérique sans fil.
Si rien n’apparaît ici, cela signie que le SSID de ce périphérique sans l est caché. Si un symbole apparaît devant
le nom du périphérique sans l, cela signie que vous avez établi une connexion avec ce périphérique sans l.
BLe type de ce périphérique sans fil et le numéro du canal du périphérique sans fil.
Signie que ce périphérique sans l est un point d’accès.
Signie que ce périphérique sans l est un ordinateur (mode Ad-Hoc, connexion point-à-point).
CLa norme sans fil supportée par ce point d’accès s’affiche ici. pour 802,11n, ‘ pour 802,11g, et pour 802,11b.
L’icône WPS apparaît si le point d’accès supporte WPS. Si le point d’accès utilise l’encodage, un icône clé
apparaît.
Note: Lorsque le point d’accès supporte WPS et que l’icône WPS s’afche, vous ne verrez pas l’icône clé ici
même si le point d’accès utilise l’encodage.
DAffiche la force du signal du point d’accès par pourcentage.
EAffiche un histogramme de la force du signal.

11
Connexion au point d’accès
Si le point d’accès WiFi auquel vous voulez vous connecter est détecté, vous pouvez établir une connexion en cliquant
sur la touche ‘Connecter’.
1. Cliquer sur le point d’accès WiFi ou sur le périphérique réseau WiFi pour le surligner puis cliquer sur ‘Connecter’.
Si le point d’accès que vous avez sélectionné n’utilise pas l’encodage, vous serez connecté à ce point d’accès WiFi
dans un délai d’une minute. Si le point d’accès que vous avez utilisé utilise l’encodage, passer à l’étape 3.
2. Si le point d’accès WiFi n’a pas de SSID, vous serez invité à le saisir maintenant. Demander au titulaire du point
d’accès WiFi le SSID exact et le saisir ici. Puis cliquer sur ‘OK’. Si le SSID que vous avez saisi ici est incorrect, vous
ne pourrez pas vous connecter à ce point d’accès et vous serez invité à le saisir une nouvelle fois.
3. Si le point d’accès WiFi utilise l’encodage, vous serez invité à saisir sa clé WEP ou la clé prépartagée WPA.
4. Demander au titulaire du point d’accès WiFi de vous donner la bonne clé. Saisir la clé et cliquer sur ‘OK’. En cochant
la case ‘Afficher le mot de passe’, la clé d’encodage que vous saisissez ici s’affichera vous permettant de la cocher.
Si la clé que vous saisissez est incorrecte, vous ne pourrez pas vous connecter à ce point d’accès WiFi.
Le type d’authentication sera automatiquement sélectionné selon le point d’accès, veuillez ne pas le
modier.
5. Si vous vous connectez avec succès au point d’accès WiFi, vous verrez un symbole devant le périphérique sans
fil.
Si vous déplacez votre curseur au-dessus de l’icône de l’utilitaire de conguration Raling, un ballon apparaît contenant
des informations sur le statut des connexions.

12
Consignes de sécurité :
N’exposez jamais l’appareil à l’eau ou à l’humidité.
Entretien :
Ne nettoyez l’appareil qu’avec un chiffon sec. N’utilisez pas de solvants ou de produits abrasifs.
Garantie :
Aucune garantie ou responsabilité ne sera acceptée en cas de modication et/ou de transformation du produit ou en cas
de dommages provoqués par une utilisation incorrecte de l’appareil.
Généralités :
Le design et les caractéristiques techniques sont sujets à modication sans notication préalable.
Tous les logos de marques et noms de produits sont des marques déposées ou immatriculées dont leurs détenteurs sont
les propriétaires et sont donc reconnues comme telles dans ce documents.
Conservez ce manuel et l’emballage pour toute référence ultérieure.
Attention :
Ce symbole gure sur l’appareil. Il signie que les produits électriques et électroniques ne doivent pas être
jetés avec les déchets domestiques. Le système de collecte est différent pour ce genre de produits.
NEDERLANDS
Installatie
Volg de onderstaande instructies a.u.b. om uw nieuwe, draadloze netwerkkaart te installeren:
1. Installeer de PCI draadloze netwerkkaart op uw computer wanneer de computer is uitgeschakeld.
2. Steek de driver CD-ROM in de CD/DVD ROM drive van uw computer en start ‘Autorun’ (Autostart).
3. Selecteer de Draadloze 11N PCI kaart in het menu.
4. Lees a.u.b. de eindgebruiker licentieovereenkomst en klik op ‘I accept the terms of the license agreement’
(Ik accepteer de voorwaarden van de licentieovereenkomst) en klik vervolgens op de ‘Next’ toets om de
licentieovereenkomst te accepteren. Het is raadzaam de driver en het programma te installeren wanneer de
netwerkkaart voor het eerst wordt gebruikt.
5. U kunt hier de configuratiesoftware kiezen, gebruikt om de draadloze netwerkkaart te configureren. Wij raden aan
‘Driver and Ralink Utility’ (Driver en Ralink Programma) te selecteren, waarmee u volledig toegang heeft tot alle
functies van deze draadloze netwerkkaart. Indien u liever de draadloze configuratiesoftware van Windows®XP of
Vista gebruikt, selecteer dan a.u.b. ‘Driver only’ (Aleen driver) en klik op ‘Next’ (Volgende).
6. Nu zal de volgende melding verschijnen: please click ‘Install’ to start utility installation (Klik a.u.b. op “Installeren” om
het programma te installeren). Mocht de melding ‘Found New Hardware’ (Nieuwe Hardware Gevonden) nogmaals
verschijnen, negeer het a.u.b. en wacht eventjes.
7. Wacht a.u.b. totdat de installatieprocedure is voltooid en klik op “finish” (beëindigen) zodra de melding “Please click
‘Finish’ to complete the driver installation process” (Klik a.u.b. op “Beëindigen om het driver installatieproces te
voltooien) verschijnt.
8. Nadat de installatie is voltooid, zal het draadloze configuratieprogramma automatisch op het bureaublad van uw
computer worden weergegeven. Er zal tevens een icoontje rechtsonder in de hoek op de Windows systeembalk
verschijnen. Als u uw draadloze verbinding wilt configureren, dan kunt u op dit icoontje rechtsklikken, een menu zal
verschijnen. Klik vervolgens op ‘Launch Config Utility’ (Start Configuratiesoftware) om het configuratieprogramma te
starten.

13
Verbinding maken met het Draadloze Toegangspunt
Nadat de driver correct is geïnstalleerd, zal het automatisch verbinding proberen te maken met elk willekeurig draadloos
toegangspunt zonder encryptie. Als u een verbinding wilt maken met een speciek draadloos toegangspunt, of als het
gewenste toegangspunt een encryptie gebruikt, dan dient u de draadloze netwerkkaart te congureren.
OPMERKING: In Vista zal de netwerkkaart niet automatische verbinding proberen te maken met elk draadloos
toegangspunt zonder encryptie.
De huidige status van de draadloze verbinding zal d.m.v. icoontjes door het Ralink conguratieprogramma worden
weergegeven:
Draadloze verbinding is tot stand gebracht, goede signaalontvangst.
Draadloze verbinding is tot stand gebracht, normale signaalontvangst.
Draadloze verbinding is tot stand gebracht, zwakke signaalontvangst.
Verbinding nog niet tot stand gebracht.
Draadloze netwerkkaart is niet geïdenticeerd.
U kunt uw draadloze netwerkkaart op twee manieren congureren om verbinding te maken met een draadloos
toegangspunt:
1. Met gebruik van het Ralink configuratieprogramma;
2. Met gebruik van het ingebouwde Windows®Zero configuratieprogramma.
Het Ralink programma gebruiken
Volg a.u.b. de onderstaande instructies om het Ralink conguratieprogramma te gebruiken voor verbinding met een
draadloos toegangspunt.
1. Rechtsklik op het icoontje van het Ralink configuratieprogramma rechtsonder in de hoek van uw computer en klik
vervolgens op ‘Launch Config Utility’ (Start Configuratiesoftware).

14
Het Ralink instellingsprogramma (RaUI) zal starten en automatisch naar alle draadloze toegangspunten scannen.
Menu
Instelzone
Meer / Minder
toets
Uitleg over de informatie
Scanresultaten bevatten 5 informatietypes, waaronder:
A B C D E
ADe SSID (Service Set Identificatie) van het draadloze apparaat.
Als hier niets wordt weergegeven, betekent dit dat de SSID van dit draadloze apparaat verborgen is. Als een
symbool voor de naam van het draadloze apparaat verschijnt, betekent dit dat u een verbinding tot stand heeft
gebracht met dat draadloze apparaat.
BHet type en het kanaalnummer van dit draadloze apparaat.
Betekent dat dit draadloze apparaat een toegangspunt is.
Betekent dat dit draadloze apparaat een computer is (Ad-Hoc modus, punt-naar-punt verbinding).
CHier wordt het draadloos standaard weergegeven dat door dit toegangspunt wordt ondersteund. voor 802.11n,
voor 802.11g, en voor 802.11b.
Het WPS-icoontje zal verschijnen wanneer het toegangspunt WPS ondersteunt. Als het toegangspunt een
encryptie gebruikt, zal een sleutelicoontje verschijnen.
Opmerking: Wanneer het toegangspunt WPS ondersteunt en het WPS-icoontje verschijnt, zult u geen
sleutelicoontje zien, zelfs wanneer het toegangspunt wel een encryptie gebruikt.
DToont de signaalsterkte van het toegangspunt, uitgedrukt in percentage.
EToont een balkgrafiek van de signaalsterkte.
Verbinding maken met een Toegangspunt
Zodra het draadloze toegangspunt waarmee u een verbinding wilt maken is gevonden, kunt u de verbinding tot stand
brengen door op de ‘Connect’ (Verbinden) toets te drukken.
1. Klik op het draadloze toegangspunt of netwerkapparaat waarmee u een verbinding wilt maken en uw keuze wordt
gemarkeerd. Klik vervolgens op ‘Connect’ (Verbinden).

15
Als het door u geselecteerde toegangspunt geen encryptie gebruikt, dan zal er met dit draadloze toegangspunt binnen
één minuut een verbinding worden gemaakt. Ga a.u.b. verder naar stap 3 als het door u geselecteerde toegangspunt
wel encryptie gebruikt.
2. Als het draadloze toegangspunt geen SSID heeft, zult u gevraagd worden dit nu in te voeren. Vraag de eigenaar
van het draadloze toegangspunt a.u.b. om de exacte SSID, voer het hier in en klik vervolgens op ‘OK’. Indien de
ingevoerd SSID incorrect is, zult u geen verbinding kunnen maken met dit toegangspunt en wordt u gevraagd de
SSID opnieuw in te voeren.
3. In het geval dat het draadloze toegangspunt encryptie gebruikt, zult u gevraagd worden de WEP sleutel of de vooraf
gezamenlijk gebruikte WPA sleutel in te voeren.
4. Vraag de eigenaar van het draadloze toegangspunt a.u.b. om de correcte sleutel, voer deze in en klik op ‘OK’. Door
de ‘Show Password’ box aan te vinken, wordt de door u ingevoerde encryptiesleutel weergegeven zodat u deze kunt
controleren.
Als u een verkeerde sleutel invoert, kan er geen verbinding worden gemaakt met dit draadloze toegangspunt.
Het vericatietype zal automatisch door het vericatietype van het toegangspunt worden geselecteerd, wijzig
dit a.u.b. niet.
5. Zodra de verbinding met het draadloze toegangspunt is geslaagd, zult u een symbooltje voor het draadloze
apparaat zien.
Als u de cursor op het icoontje van het Ralink conguratieprogramma houdt, zal een ballonnetje verschijnen met
informatie over de verbindingstatus.

16
Veiligheidsvoorzorgsmaatregelen:
Stel het product niet bloot aan water of vocht.
Onderhoud:
Uitsluitend reinigen met een droge doek. Gebruik geen reinigingsmiddelen of schuurmiddelen.
Garantie:
Voor wijzigingen en veranderingen aan het product of schade veroorzaakt door een verkeerd gebruik van dit product, kan
geen aansprakelijkheid worden geaccepteerd. Tevens vervalt daardoor de garantie.
Algemeen:
Wijziging van ontwerp en specicaties zonder voorafgaande mededeling onder voorbehoud.
Alle logo’s, merken en productnamen zijn handelsmerken of geregistreerde handelsmerken van de respectievelijke
eigenaren en worden hierbij als zodanig erkend.
Bewaar deze gebruiksaanwijzing voor latere raadpleging.
Let op:
Dit product is voorzien van dit symbool. Dit symbool geeft aan dat afgedankte elektrische en elektronische
producten niet met het gewone huisafval verwijderd mogen worden. Voor dit soort producten zijn er speciale
inzamelingspunten.
ITALIANO
Installazione
Si prega di seguire le istruzioni sotto riportate per istallare la nuova scheda di rete senza li:
1. Istallare la scheda di rete wireless PCI nel proprio computer quando il computer è spento.
2. Inserire il CD-ROM del driver del dispositivo nel lettore CD/DVD ROM del proprio computer ed eseguire ‘Autorun’.
3. Selezionare scheda PCI Wireless 11N dal menù.
4. Si prega di leggere il contratto di licenza all’utente finale e cliccare su “Accetto i termini del contratto di licenza”, poi
cliccare su ‘Avanti’ per accettare il contratto di licenza. Si raccomanda di istallare il driver e le utility se la scheda di
rete viene usata per la prima volta.
5. Qui si può scegliere lo strumento di configurazione usato per configurare la scheda di rete wireless. Si raccomanda di
selezionare “Driver e Utilità Ralink”, che forniscono un accesso completo a tutte le funzioni di questa scheda di rete
wireless. Se si preferisce usare lo strumento di configurazione wireless di Windows XP o Vista, si prega di selezionare
‘Solo driver’ e cliccare ‘Avanti’.
6. Ora si vedrà il seguente messaggio: si prega di cliccare ‘Istalla’ per avviare l’istallazione dell’utility. Se si vede il
messaggio ‘Trovato Nuovo Hardware’ di nuovo, si prega di ignorarlo e attendere.
7. Si prega di attendere durante la procedura d’istallazione. Si prega di cliccare su “Fine” quando si vede il messaggio:
“Prego cliccare su ‘Fine’ per completare il processo d’istallazione del rider”.
8. Dopo che l’istallazione è completata, l’utility di configurazione wireless verrà mostrata automaticamente sul desktop
del computer. Si vedrà anche l’icona nell’angolo basso a destra nel system tray di Windows. Se si vuole configurare
il collegamento wireless, si prega di cliccare su questa icona e un menù popup apparirà. Cliccare su ‘Lancia Utilità
Config’ per avviare il programma di configurazione.

17
Collegamento al Punto di Accesso Wireless
Dopo che il driver è stato istallato correttamente, proverà automaticamente a collegarsi a qualsiasi punto di accesso
wireless non criptato. Se ci si vuole collegare ad uno specico punto di accesso wireless, o il proprio punto di accesso
scelto è criptato, si deve congurare la scheda di rete wireless.
NOTA: In Vista, la scheda di rete non si collegherà automaticamente a qualsiasi punto di accesso wireless non criptato.
L’attuale stato della connessione wireless sarà mostrato dall’utilità di congurazione Ralink nelle icone:
Il collegamento wireless è stabilito, buona ricezione del segnale.
Il collegamento wireless è stabilito, normale ricezione del segnale.
Il collegamento wireless è stabilito, debole ricezione del segnale.
Connessione non ancora stabilita.
Scheda di rete wireless non rilevata.
Ci sono due modi di congurare la propria scheda di rete wireless per collegarla ad un punto di accesso wireless:
1. Usare l’utility di configurazione Ralink;
2. Usare l’utility di configurazione zero integrata in Windows.
Usare l’Utility Ralink
Si prega di seguire le istruzioni sotto riportate per usare l’utility di congurazione Ralink per collegarsi ad un punto di
accesso wireless.
1. Cliccare col tasto destro del mouse l’icona dell’utility di configurazione Ralink situata nell’angolo basso a destra del
desktop del computer e poi cliccare su ‘Lancia Utility Config’.
L’utilità di setup Ralink (RaUI) verrà lanciata ed inizierà automaticamente la scansione di tutti i punti di accesso
wireless.
Menù
Area Setup
Bottone Meno /
Più

18
Spiegazione sulle informazioni
I risultati della scansione includono 5 tipi di informazioni, che sono:
A B C D E
AIl SSID (Identificatore Set di Servizio) del dispositivo senza fili.
Se qui non appare nulla, signica che il SSID di questo dispositivo senza li è nascosto. Se compare un simbolo di
fronte al nome del dispositivo senza li, signica che si è stabilita una connessione con un dispositivo senza li.
BIl tipo di questo dispositivo senza fili e il numero del canale di questo dispositivo senza fili.
Signica che questo dispositivo senza li è un punto di accesso.
Signica che questo dispositivo senza li è un computer (modo Ad-Hoc, collegamento punto-a-punto).
CLo standard wireless supportato da questo punto di accesso viene mostrato qui. per 802.11n, per 802.11g, e
per 802.11b .
L’icona WPS apparirà quando il punto di accesso supporta WPS. Se il punto di accesso usa la crittazione, apparirà
l’icona chiave .
Nota: quando il punto di accesso supporta WPS e l’icona WPS viene mostrata, non si vedrà l’icona chiave
anche se il punto di accesso usa la crittazione.
DMostra la forza del segnale del punto di accesso in percentuale.
EMostra un grafico a barre della forza del segnale.
Collegamento ad un Punto di Accesso
Se il punto di accesso wireless dove ci si vuole collegare viene trovato, si può stabilire una connessione cliccando sul
bottone ‘Connetti’.
1. Cliccare sul punto di accesso wireless o il dispositivo di rete cui ci si vuole connettere, questo verrà evidenziato, poi
cliccare su ‘Connetti’.
Se il punto di accesso selezionato non usa crittazione, si verrà collegati al punto di accesso wireless entro un minuto.
Se il punto di accesso selezionato usa la crittazione, si prega di andare al passo 3.
2. Se il punto di accesso wireless non ha SSID, verrà chiesto in inserirlo adesso. Si prega di chiedere al proprietario del
punto di accesso wireless l’esatto SSID e di inserirlo qui. Poi cliccare ‘OK’. Se il SSID fornito è sbagliato, non ci si
potrà collegare a questo punto di accesso, e verrà chiesto di inserirlo di nuovo.

19
3. Se il punto di accesso wireless usa la crittazione, verrà richiesto di inserire la sua chiave WEP o chiave pre-condivisa
WPA.
4. Si prega di chiedere al proprietario del punto di accesso wireless la chiave corretta. Inserire la chiave e premere ‘OK’.
Mettendo il segno nella casella ‘Mostra Password’, la chiave di crittazione che si inserisce verrà mostrata permettendo
di controllarla.
Se la chiave inserita è sbagliata, non si sarà in grado di collegarsi a questo punto di accesso wireless.
Il tipo di autenticazione verrà selezionato automaticamente dal tipo di autenticazione del punto di accesso, si
prega di non cambiarlo.
5. Se ci si è collegati con successo al punto di accesso wireless, si vedrà il simbolo davanti al dispositivo senza fili.
Se si sposta il cursore sopra l’icona dell’utility di congurazione Ralink, appare un pallone con le informazioni sullo
stato della connessione.
Precauzioni di sicurezza:
Non esporre il prodotto ad acqua o umidità.
Manutenzione:
Pulire solo con un panno asciutto. Non utilizzare solventi detergenti o abrasivi.
Garanzia:
Non sarà accettata alcuna garanzia o responsabilità in relazione a cambiamenti e modiche del prodotto o a danni
determinati dall’uso non corretto del prodotto stesso.
Generalità:
Il design e le caratteristiche tecniche sono soggetti a modica senza necessità di preavviso.
Tutti i marchi a logo e i nomi di prodotto sono marchi commerciali o registrati dei rispettivi titolari e sono riconosciuti come
tali in questo documento.
Tenere questo manuale e la confezione per riferimento futuro.
Attenzione:
Il prodotto è contrassegnato con questo simbolo, con il quale si indica che i prodotti elettrici ed elettronici non
devono essere gettati insieme ai riuti domestici. Per questi prodotti esiste un sistema di raccolta differenziata.

20
ESPAÑOL
Instalación
Por favor, siga las instrucciones para instalar su nueva tarjeta de red inalámbrica:
1. Instala la tarjeta de red inalámbrica en su PC cuando lo tenga desconectado.
2. Coloque el CD-ROM del controlador del dispositivo en el lector de CD/DVD de su PC, y ejecute el ‘Autorun’.
3. Seleccione la tarjeta inalámbrica 11N PCI del menú
4. Por favor lea el contrato de licencia de usuario y haga ‘clic’ en “Acepto los términos del acuerdo de licencia”, luego
pulse en “Siguiente” para aceptar el acuerdo de licencia. Se recomienda instalar el controlador y la utilidad si es la
primera vez que usa la tarjeta de red inalámbrica.
5. Usted puede elegir la herramienta de configuración para configurar aquí la tarjeta de red inalámbrica. Se recomienda
seleccionar la herramienta “Driver and Ralink Utility”, que proporciona un acceso completo a todas las funciones de la
tarjeta de red inalámbrica. Si desea usar la herramienta de configuración inalámbrica proporcionada por WindowsXP
o Vista, por favor seleccione “Driver only” y haga ‘clic’ en Siguiente.
6. Ahora verá el mensaje siguiente: Por favor haga ‘clic’ en “Install” para iniciar el asistente de instalación. Si ve le
mensaje “Nuevo Hardware encontrado” otra vez, por favor ignórelo y espere.
7. Por favor, espere mientras continua el procedimiento de instalación. Por favor, haga ‘clic’ en “Terminar” cuando vea el
siguiente mensaje. “Por favor, haga ‘clic’ en Terminar para completar el proceso de instalación del controlador”.
8. Tras finalizar la instalación, la utilidad de configuración inalámbrica aparecerá automáticamente en el escritorio de
su PC. Usted también verá un icono en la esquina inferior derecha en la bandeja de sistema de Windows. Si usted
desea configurar su conexión inalámbrica, por favor haga ‘clic’ con el botón derecho sobre este icono y aparecerá un
menú emergente. Haga ‘clic’ sobre “Lanzar Utilidad de Configuración” para iniciar el programa de configuración.
Conectar con un Punto de Acceso Inalámbrico
Después de haber instalado correctamente el controlador, intentará conectarse automáticamente a cualquier punto de
acceso inalámbrico sin codicación. Si usted desea conectarse a un punto de acceso inalámbrico especíco, o si el punto
de acceso que desea usa codicación, usted tendrá que congurar la tarjeta de red inalámbrica.
NOTA: En Vista, la tarjeta de red no se conectará automáticamente a ningún punto de acceso inalámbrico sin
codicación.
El estado actual de la conexión inalámbrica aparecerá en pantalla a través de la utilidad de conguración ‘Ralink’ en los
siguientes iconos:
Conexión inalámbrica establecida, señal de recepción buena.
Conexión inalámbrica establecida, señal de recepción normal.
Conexión inalámbrica establecida, señal de recepción débil.
La conexión no se ha establecido todavía.
No se detecta la tarjeta de red inalámbrica.
Hay dos modos de congurar su tarjeta de red inalámbrica para conectarla a un punto de acceso inalámbrico:
1. Usando la utilidad de configuración ‘Ralink’;
2. Usando la utilidad de configuración incorporada en Windows.
Table of contents
Languages:
Other König Electronic PCI Card manuals
Popular PCI Card manuals by other brands

AmbiCom
AmbiCom WL54-PCIe Specifications

Commell
Commell MP-60102 user manual

Beckhoff
Beckhoff FC7501 Documentation

ICP DAS USA
ICP DAS USA PCI-1800HU quick start guide

United Electronic Industries
United Electronic Industries DNA-CAR-550 user manual

Keysight Technologies
Keysight Technologies M9048A installation guide