Kaiser Baas Smart User manual

Smart | MediaPlayer+
Make your existing TV smart
USER GUIDE


Languages
English 4

4
English
Community
Tech support:
e: helpdesk@kaiserbaas.com
w: www.kaiserbaas.com/support
p: Australia 1300 302 306
p: New Zealand 0800 302 306
(business hours, AEST)
/kaiserbaas
Register this product for 12 month warranty:
www.kaiserbaas.com/register
Get product updates:
www.kaiserbaas.com/updates

5
English
Contents
Safety Precautions 6
What’s in the Box 7
Product Diagram 8
Smart MediaPlayer+Remote 9
Setting up the Smart MediaPlayer+10
Language Setup 12
WiFi Setup 13
Screen Resize Setup 14
Time Zone Setup 15
Home Screen 16
Videos 19
Finding Hidden Hard Drive 21
Adding Video Sources and Setup Movie Scraper 23
Music 34
Pictures 39
File Browser 43
Settings 44
Other features 47
Frequently Asked Questions 51
Contact Us 53

6
English
Safety Precautions
Before using the Smart MediaPlayer+, please ensure you read
and understand all the safety precautions below:
• Donotattempttoopentheunitormodifyitinany
way, as this will void your warranty. Maintenance and
repairs should only be performed by Kaiser Baas.
• KeeptheSmartMediaPlayer+away from water and
other liquids. Do not use wet hands when using the
Smart MediaPlayer+as this may cause the unit to
malfunction.
• KeeptheSmartMediaPlayer+away from direct sunlight
and heat sources.
• SmartMediaPlayer+may become slightly warm during
use, this does not indicate malfunction.
• DonotplaceheavyobjectsontheSmartMediaPlayer+,
as this may cause it to malfunction.
• Donotdisposeoftheunitviaconventionaldomestic
waste.
• Usethesuppliedpoweradapter;donotsubstitutefor
another adapter.

7
English
What’s in the Box
Please ensure the product package has all the following
contents:
B
A
B
E
C
F
D
G
H
DE
FGH
C
Smart MediaPlayer+
Power adapter
Remote control
Warranty Card
User Guide
Quick Start Guide
2 x AAA batteries
HDMI cable
A

8
English
Product Diagram
HDMI AV
Optical
SD/MMC
Warning: Before you connect unit to a power outlet, read the safety
information in this User Manual
1Power Status
Power status light turns blue
when unit is on
2SD/MMC reader
Reads secured digital cards
3Hard Reset
Restore factory defaults
42 x USB
Standard USB 2.0 HOST port
(Supports FAT32/NTFS/
EXT3/HFS Storage file
systems)
5S/PDIF
Connect to AV reciever
6HDMI out
Connects to the HDMI input
on TV (cable provided)
7Ethernet Port
Connect the network cable
8AV Out
Connects to analog Video
& Audio input onTV (cable
not provided)
9Power socket
Connects to the AC pack
1
2 3
4 6 7 8 95
Front
Side
Back

9
English
1 2 3
4 5 6
7 8 9
0
SETTINGSMEDIAACTIVEAPPS
PREV NEXT VOL- VOL+
MOUSE MENU
HOME BACK
OK
/
1Power button
2Mute button
3Applications
4Active Applications
5Media
6Settings
7Previous
8Next
9Volume Down
10 Volume Up
11 Mouse Mode
12 Menu
13 Arrow Keys/Navigation
14 OK/Enter
15 Home
16 Back
17 Number buttons
18 Backspace
19 Return
Smart MediaPlayer+Remote
1 2
7
3
11 12
13 14
15 16
17
17
17 17 17
18 17 19
17 17
17 17
8
4
9
5
10
6
10
English
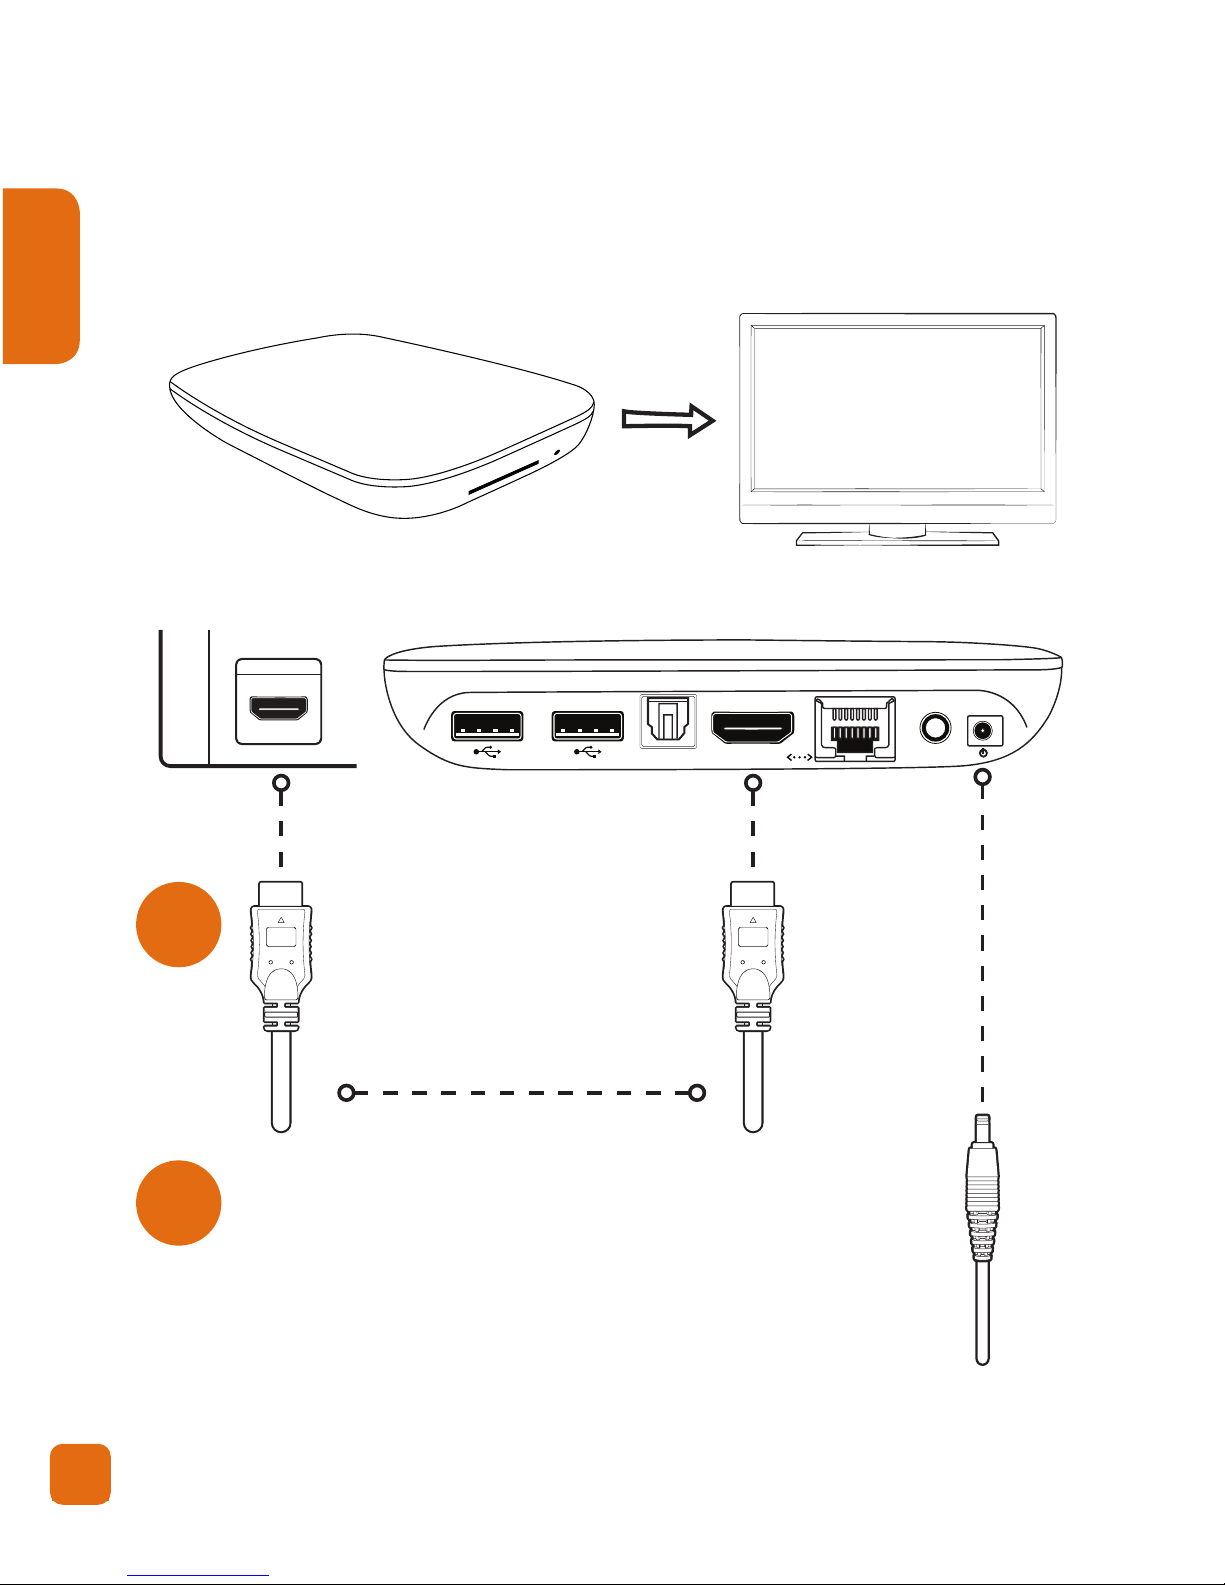
Setting up the Smart MediaPlayer+
Connect HDMI cable
• Connect one end of
cable to the back of TV
• Connect the other end
to the ‘HDMI’ port in
Smart MediaPlayer+
Back of TV
TIP: Use the HDMI cable to get the 1080P HD video quality. Video qual-
ity for component connection is 1080i and composite is 480i/576i.
Connect Power
• Connect AC pack to ‘Power input’ of Smart
MediaPlayer+
• Connect the wall plug to a power outlet
Warning: The ‘Power socket’ is next to the AV out jack. DO NOT
insert power cord into AV jack (Yellow) by accident.
1
2
Steps to Connect:
HDMI AV
Optical
HDMI IN
Table of contents
Other Kaiser Baas Media Player manuals


