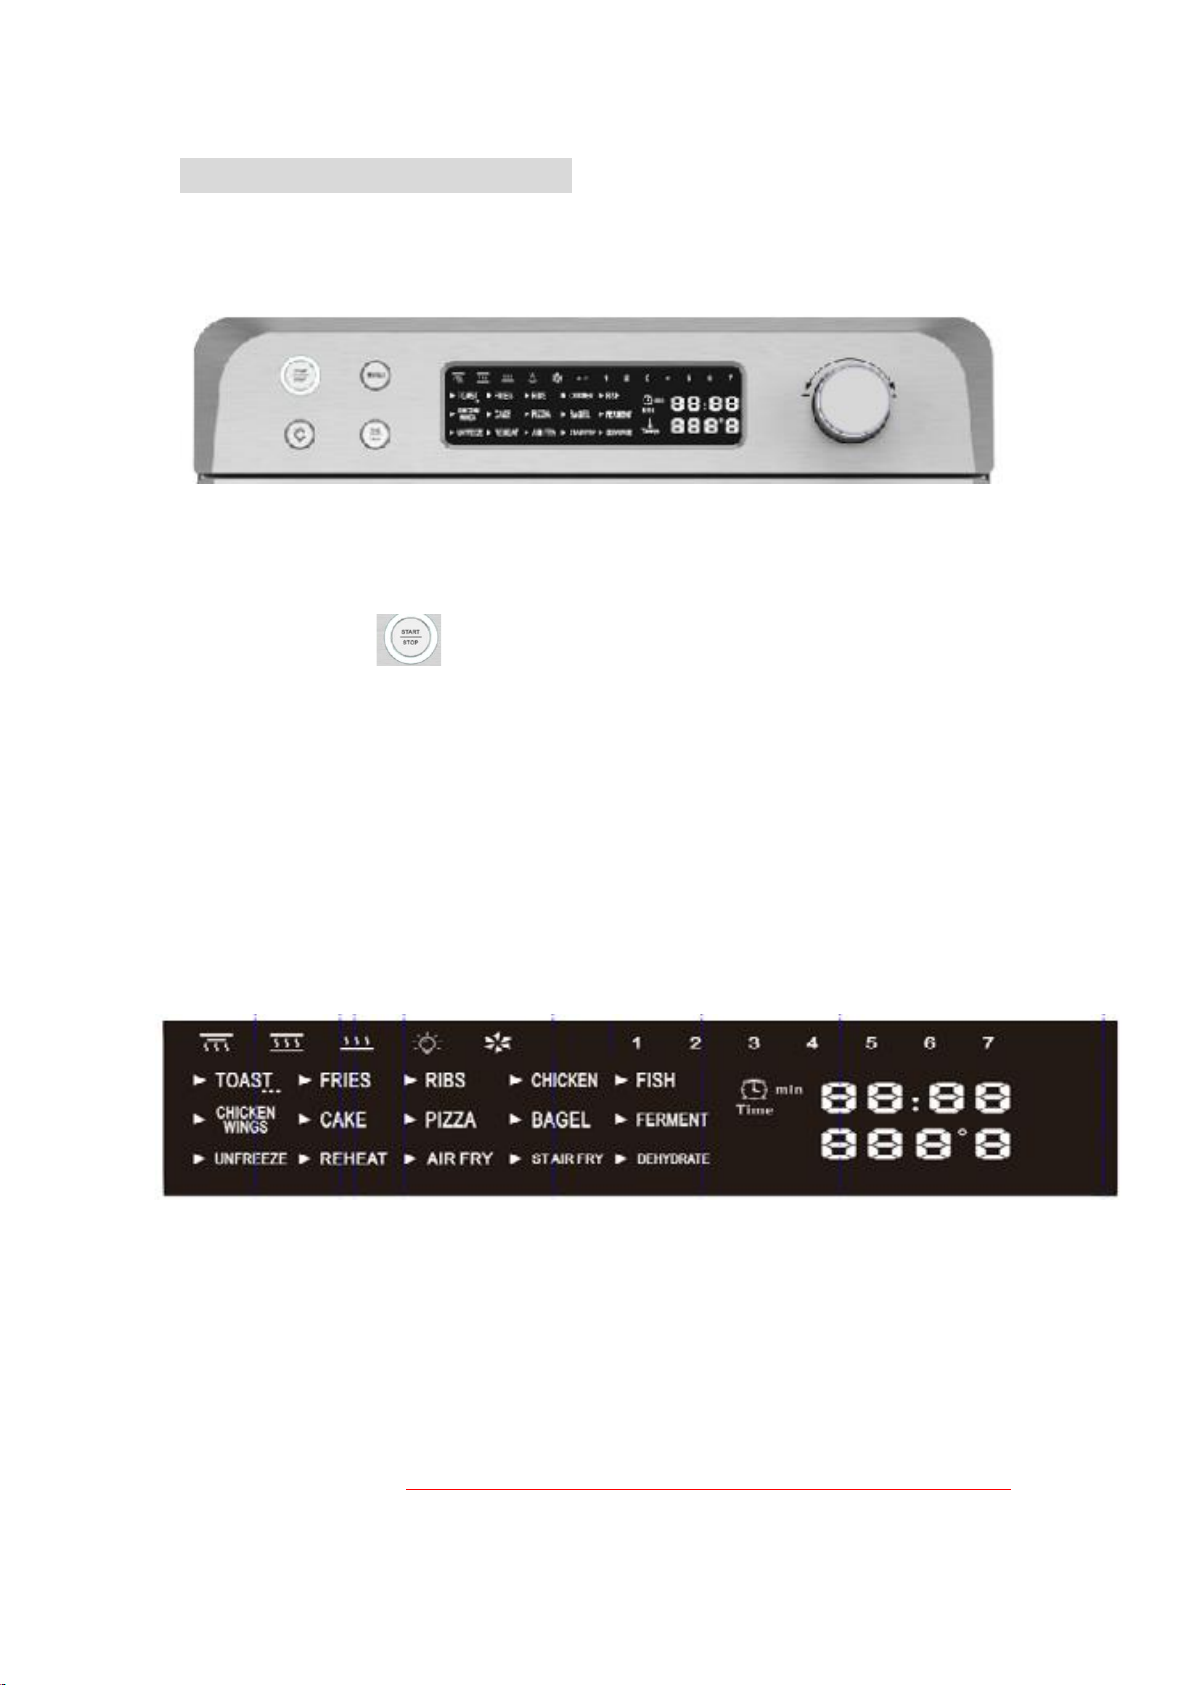
manuals.online logo
Brands
  1. Home
  2. •
  3. Brands
  4. •
  5. Kalamera
  6. •
  7. Oven
  8. •
  9. Kalamera KAF-HD23DL User manual

Kalamera KAF-HD23DL User manual

INSTRUCTION MANUAL
Air fryer oven
Model No.: KAF-HD23DL
For Indoor Household Use Only
Specification: 120V/60Hz/1700W
Kalamera Inc
Add: 18523 Gale Ave, Industry, CA, 91748, US
Getting To Know Your Air Fryer Air Fryer Oven
SAVE THIS INSTRUCTIONS
Illustration
A: Crisper tray I: Temp./ Time adjust button
B: Tray handle J: Furnace feet
C: Wire rack K: Door handle
D: Bake tray L: Door
E: Crumb tray M: Display window
F: Power N: Function selected button
G: Menu selection button O: Lamp ON/OFF button
H: Main enclosure
Technical Specifications
Voltage: 120/V.A.C., 60Hz.
Power: 1700 Watts.
*Illustrations may differ from actual product.
Top of outer heating element: 900Watts, Top of inner heating element: 800 Watts,Bottom
heating element: 800 Watts.
How to use your air fryer oven
1.Control panel:
2. The operation of Air fryer oven:
2-1. The display will not turn on when plug in the power. Press the
power key “ ” to turn on the oven. On the screen, timer/clock
icon, hour/minute character and temperature digits/temperature icon,
℉ character are displaying. At the same time, 3 temperature digits
and 4 timer digits are flashing.
2-2. The 15 smart menu buttons are shown as below. Only ONE
function can be chosen at a time.
It can only be used for single selection, and no repeat selection is al-
lowed. Turn FUNCTION knob, corresponding menu will more for-
ward and be highlighted on the screen, preset temperature and time
will show up. Change the selection, the system automatically can-
cels the previous selection, the newly selected menu corresponding
to the font flashing display, temperature and time follow the change
of the preset value. When button is pressed, the buzzer will beep
once. If pressed and held, buzzer will beep continuously.
Preset menus--showing time, temperature and mode setting will
work as below function combination:
Function
Time
Temp
1=Bottom
2=Top of inner
3=Top of outer Heating
element
Broiling
Air
Default Timing
(Min.)
Adjustable
(Min.)
Default ℉
Adjustable ℉
1
TOAST
6
1-15
400
180-450
1+3
Slow
2
FRIES
18
1-60
400
180-450
1+3
Strong
3
RIBS
18
1-60
400
180-450
2+3
Strong
4
CHICKEN
40
1-60
350
180-450
2+3
Strong
5
FISH
22
1-60
400
180-450
1+3
Strong
6
CHICKEN
WINGS
16
1-60
400
180-450
2+3
Strong
7
CAKE
40
1-60
350
180-450
1+3
Slow
8
PIZZA
20
1-60
400
180-450
1+3
Slow
9
BAGEL
20
1-60
400
180-450
1+3
Slow
10
FERMENT
120
1-12H
100
N/A
1
/
11
UN-
FREEZE
15
1-90
130
130-180
1
Strong
12
REHEAT
20
1-60
200
130-210
1
Slow
13
AIRFRY
20
1-60
450
180-450
1+3
Slow
14
STAIRFRY
15
1-60
450
180-450
2+3
Strong
15
DEHY-
DRATE
120
1-24H
130
120-180
2
Strong
Note: During the working process, both time and temperature could be
adjusted by the relative buttons. After the adjustment, display will flash
for 3 seconds, and the oven will automatically confirm and resume work-
ing. The error of each temperature point is ± 18 ℉, and the reset temper-
ature is 40 ~ 80 ℉. At the beginning of power on, the screen is displaying,
the position selected by the menu, triangle symbol, heating element sym-
bol, rotisserie and light are flashing. After the menu is selected, the corre-
sponding menu is on for a long time, triangle symbol is flashing, and oth-
er irrelevant menus are not on. Time and temperature symbols are always
on.
2-3. The internal cooling fan outputs 12V voltage to control the fan
(1.8W) to rotate. When the program is finished, the fan will continue
to rotate for 3 minutes before the end of operation. When the cooling
fan does not work, the display board and program control stop work-
ing.
3) The working mode button is shown in the figure below。
3-1. Press this menu button,Use this selected knob,
twist it which can choose menu, and display in the corresponding
menu flashing. Move one table for each grid of menu
3-2. After selecting the menu, press the stop/start button to
start the work menu. Then press the button to stop the work. Every
time the button is pressed, the buzzer will ring, Press and sound.
3-3. Press the button to start lighting work, then press the
button, the inside lamp is off, the icon is displayed, and so on. And
the lighting button is always valid after the product is turned on.
3-4. Press the temperature key to adjust the operating tempera-

Other Kalamera Oven manuals

Kalamera K-Kitchen Series User manual

Kalamera

Kalamera K-Kitchen Series User manual

Popular Oven manuals by other brands

Brandt FC 222 user manual

Brandt

Brandt FC 222 user manual

aumate TOA20M04N-1E instruction manual

aumate

aumate TOA20M04N-1E instruction manual

Maytag CWE4100AC - 24" Single Electric Wall Oven Dimension Guide

Maytag

Maytag CWE4100AC - 24" Single Electric Wall Oven Dimension Guide

Kernau KBO 1076 S PT B instruction manual

Kernau

Kernau KBO 1076 S PT B instruction manual

Bosch HB 37 N Series User manual and installation instructions

Bosch

Bosch HB 37 N Series User manual and installation instructions

Electrolux EOD5420AA user manual

Electrolux

Electrolux EOD5420AA user manual

Mx Onda MX-HC2183 instruction manual

Mx Onda

Mx Onda MX-HC2183 instruction manual

Daewoo F6EV19SM2 Service manual

Daewoo

Daewoo F6EV19SM2 Service manual

Blodgett MT3870 Specifications

Blodgett

Blodgett MT3870 Specifications

GE ZET2F owner's manual

GE

GE ZET2F owner's manual

GE JK3000DF3WW owner's manual

GE

GE JK3000DF3WW owner's manual

eka EKF 523 NT Operating and instruction manual

eka

eka EKF 523 NT Operating and instruction manual

AEG Electrolux E3191-5 user manual

AEG Electrolux

AEG Electrolux E3191-5 user manual

Pratica Rocket Express quick start guide

Pratica

Pratica Rocket Express quick start guide

Viking Professional VGSO260T user guide

Viking

Viking Professional VGSO260T user guide

FM RX203 instruction manual

FM

FM RX203 instruction manual

Bosch HBN331 9B Series instruction manual

Bosch

Bosch HBN331 9B Series instruction manual

NEFF B95M42N0MK Instructions for use

NEFF

NEFF B95M42N0MK Instructions for use

manuals.online logo
manuals.online logoBrands
  • About & Mission
  • Contact us
  • Privacy Policy
  • Terms and Conditions

Copyright 2025 Manuals.Online. All Rights Reserved.