Kalia MR1947-570-001 Installation guide

MIROIRS À
ÉCLAIRAGE DEL LED-ILLUMINATED
MIRRORS
Instructions d’installation
& Garantie
Installation murale
Installation Instructions
& Warranty
Wall installation
Conservez ce guide après l’installation car il contient des renseignements
utiles pour le service et la garantie.
Keep these instructions after you have finished the installation,
it contains useful information regarding service and warranty.
103568_RevK
06/23 Numéro de série/Serial number

2—
INSTRUCTIONS D'INSTALLATION & GARANTIE/INSTALLATION INSTRUCTIONS & WARRANTY
Merci d’avoir choisi Kalia - Thank you for choosing Kalia
Miroirs Kalia : source d’inspiration et de beauté
Merci d’avoir choisi un produit Kalia et de faire confiance à notre
entreprise.
Kalia a une philosophie d’affaires basée sur des valeurs fonda-
mentales, dont l’innovation et l’excellence, ainsi qu’un service
personnalisé adapté aux exigences d’aujourd’hui et de demain.
Nous sommes convaincus que ce produit saura vous plaire et
surpassera vos exigences en termes de fiabilité et durabilité.
Nous sommes là pour vous !
Dans ce guide, vous trouverez toute l’information nécessaire à
l’installation et au bon fonctionnement de votre produit Kalia.
Dans le but d’assurer une installation et une utilisation optimales,
veuillez prendre quelques minutes pour étudier ce guide. En cas
de problème d’installation ou de performance, veuillez commu-
niquer avec nous au numéro sans frais : 1 877 465-2542 ou par
courriel au : service@kaliastyle.com
Nous vous remercions encore une fois
d’avoir choisi un produit Kalia.
Kalia mirros: inspiration and beauty
Thank you for choosing a Kalia product and for placing your
trust in our company.
Kalia has a business philosophy based on solid core values that
are focused on providing innovation and excellence as well as
a personalized service designed to meet the changing needs
of today and tomorrow. We are convinced that you will be fully
satisfied with your new Kalia product and that it will exceed
your expectations in terms of reliability and durability. At Kalia,
we put our expertise to work for you!
This guide contains all the information necessary for the
installation and proper use of your Kalia product. To ensure
the smooth installation and optimal use of your product, we
recommend to take a few moments to study the information
provided in this guide.
In the event that you should encounter a problem related to
the installation or the performance of this product, please
contact us at our toll-free line: 1-877-465-2542 or by email at:
service@kaliastyle.com.
Thank you once again for choosing Kalia.

— 3
INSTRUCTIONS D'INSTALLATION & GARANTIE/INSTALLATION INSTRUCTIONS & WARRANTY
Renseignements importants - Important Information
Important
• Lire attentivement le présent guide avant l’installation.
• Respecter tous les codes de l’électricité et de bâtiment locaux.
• Assurez-vous d’avoir tous les outils et matériaux nécessaires
à l’installation.
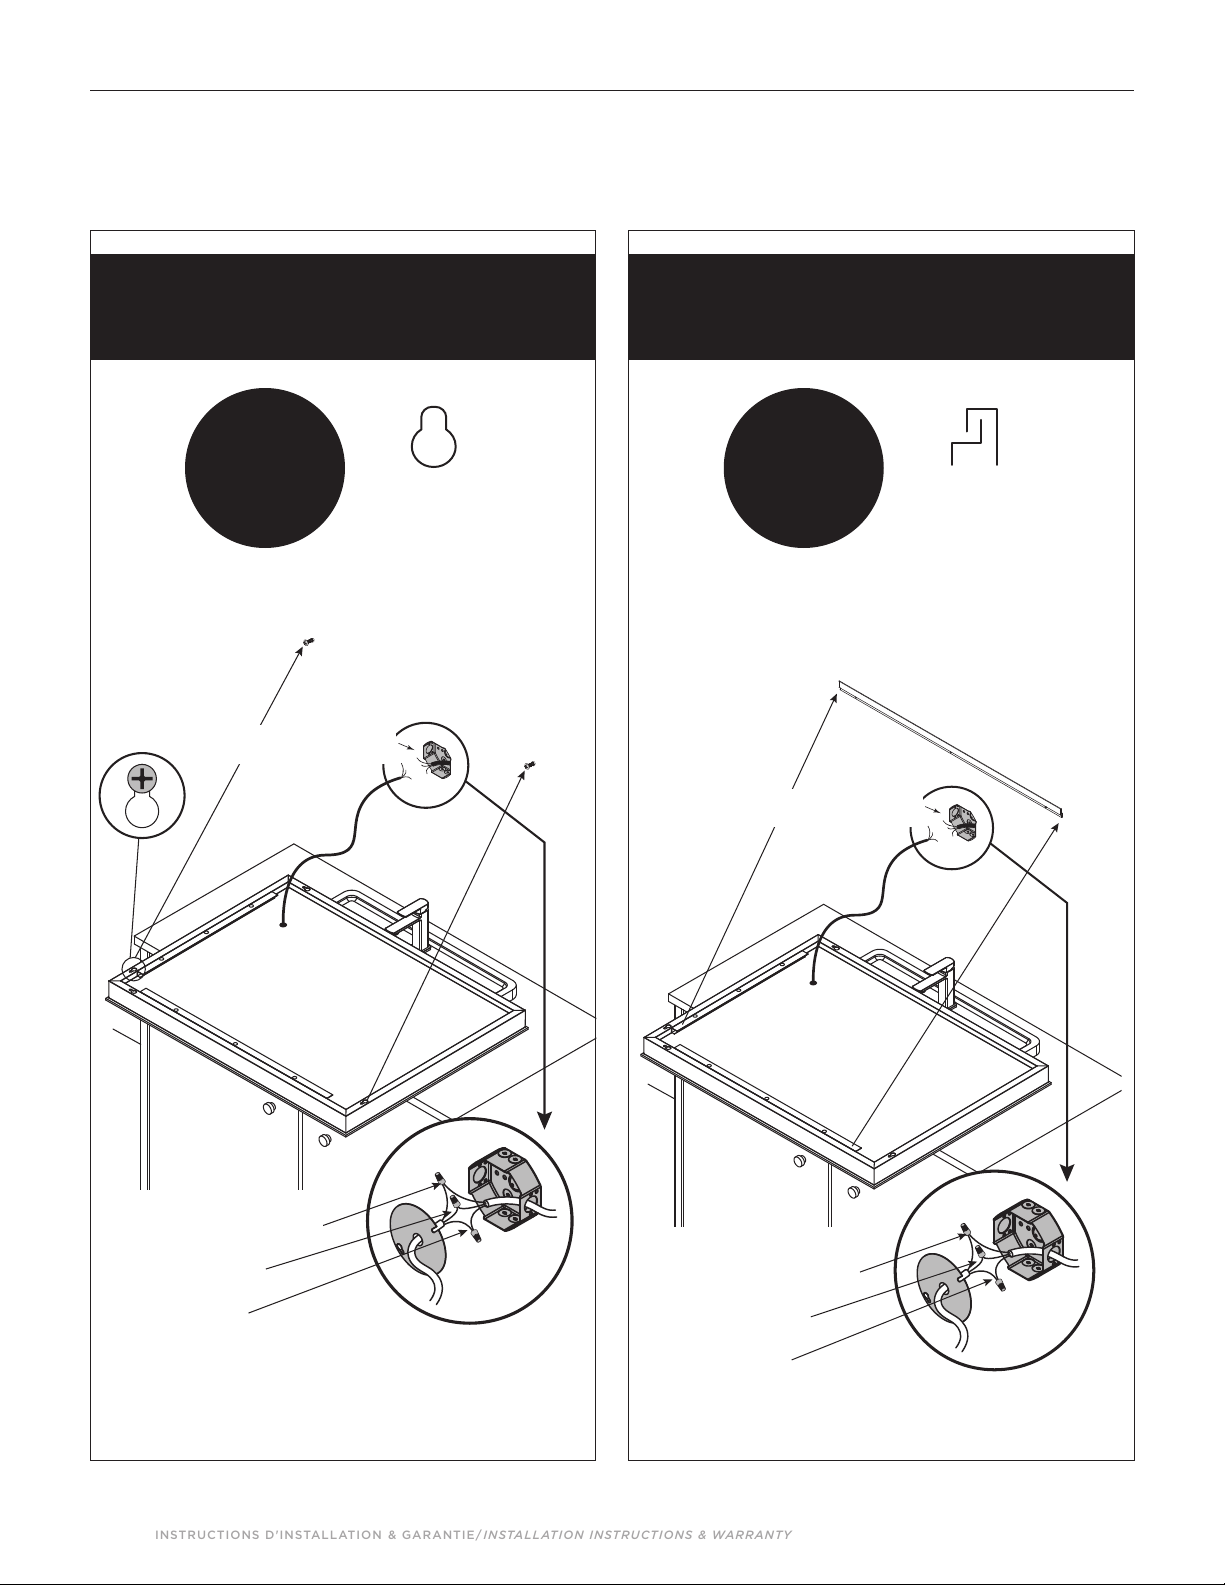
• Avant toute opération d’installation ou d'entretien sur le miroir
assurez-vous de déconnecter le réseau électrique.
• Raccordez les câbles du miroir avec ceux de l’installation élec-
trique à l’aide d’une boite de raccordement. Il est obligatoire
de brancher la mise à la terre.
• Ne pas rétablir le courant avant d’avoir complété l’installation.
• Vérifier que toutes les pièces illustrées à la section « Schéma
des pièces » sont incluses et qu’aucune pièce n’est endommagée.
• Manipuler les pièces avec soin.
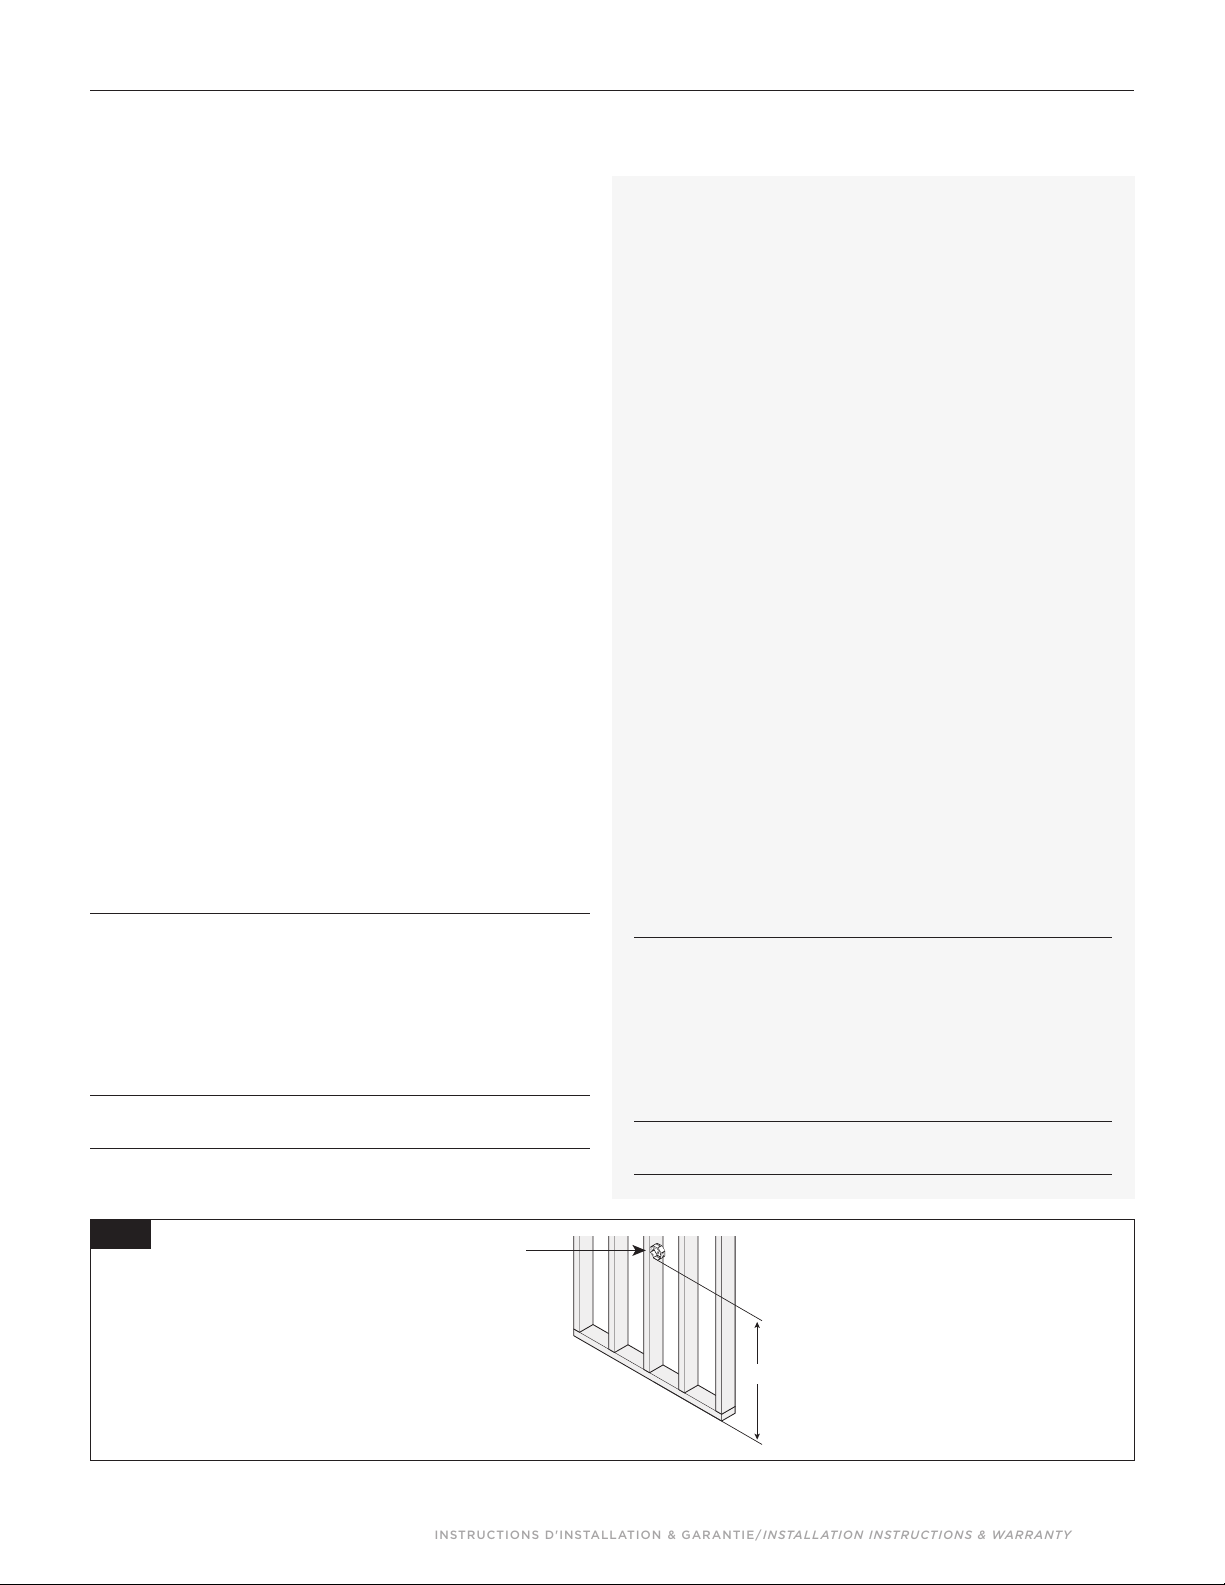
• Votre boîte électrique doit être à une distance de 50’’
(1270 mm) à 60’’ (1524 mm) du sol et derrière l'emplacement
futur du miroir (fig. 1).
• Ne pas installer le miroir dans la douche ou au-dessus d’un bain.
Remarques
• Couvrir le drain du lavabo afin d’éviter de perdre des pièces.
• Avant l’installation, déballer le miroir et vérifier que toutes les
pièces sont incluses et qu’elles sont en bon état. Si un problème
survient, le signaler immédiatement au vendeur.
• Ce miroir convient aux endroits humides.
Kalia se réserve le droit d’apporter toute modification au design
du produit et ceci sans préavis. Utilisez le manuel d’installation
fourni dans l’emballage.
Kalia n’est pas responsable des problèmes causés par une installa-
tion non conforme aux directives énoncées dans le présent guide.
Bonne Installation !
Important
• Read this guide carefully before proceeding with the
installation.
• Respect all local electric and building codes.
• Make sure you have all the tools and materials needed for
installation.
• Before any installation or maintenance operation on the
mirror make sure to turn off the electrical supply at the mains.
• Connect the mirror’s output wire to the power supply by
using a connection box. It is obligatory to connect the ground.
• Do not switch on the electrical supply at the mains before
the end of the installation.
• Make sure all the parts shown in the “Parts Diagram” section
are included and in good condition.
• Manipulate parts with care.
• Your connection box must be at a distance of 50’’ (1270mm)
to 60’’ (1524 mm) from the floor and behind the expected
location of the mirror (fig. 1).
• Do not install the mirror in a shower or above a bathtub.
Notice
• Cover the drain of the sink to prevent the loss of parts.
• Before installation, take the mirror out of its packaging
and make sure all parts are included and that they are in
good condition. If there is a problem, report it immedia-
tely to the seller.
• This mirror is suitable for damp locations.
Kalia reserves the right to make any changes to the design
of the product, without notice. Use the installation manual
supplied with the product.
Kalia is not responsible for problems caused by an installation
not executed in accordance with the directions given in this guide.
Good installation!
BOITE DE JONCTION
JUNCTION BOX
50’’ À/TO 60’’
Fig. 1

4—
INSTRUCTIONS D'INSTALLATION & GARANTIE/INSTALLATION INSTRUCTIONS & WARRANTY
Schéma des pièces - Parts diagram
3
2
3
4
4
2
3
2
1
5
7 à/to 26
6
Outils et matériaux nécessaires - Necessary Tools and Materials
Perceuse électrique
Electric drill
Tournevis
Screwdriver
Crayon
Pencil
Ruban à mesurer
Measuring tape
Mèche 7/32
7/32 drill bit
Niveau
Level
Ce modèle est utilisé dans ce guide pour illustrer l’installation. /
In this guide, this model is used to demonstrate this installation.

— 5
INSTRUCTIONS D'INSTALLATION & GARANTIE/INSTALLATION INSTRUCTIONS & WARRANTY
Liste des pièces - Parts list
Quincaillerie détaillée - Detailed Hardware
14 mm 5.5 mm 4 mm
24.5 mm 28 mm 45 mm
1
14 mm 5.5 mm 4 mm
24.5 mm 28 mm 45 mm
2
14 mm 5.5 mm 4 mm
24.5 mm 28 mm 45 mm
3
4 mm
45 mm
4
Numéro
depièce/
Partnumber
103565
102749
103566
104182
103567
103569
107077
103550
106231
103552
103564
105276
106230
103562
106232
105648
103551
103555
106233
104434
103560
103563
103554
103556
103553
103557
103558
Description
Marette/Wirenut
Cheville/Wallanchor
VisM4x45mmpourbarenZ/
ScrewM4x45mmforZ‐bar
VisM4x45mmpourtrouducadrage/
ScrewM4x45mmforkeyhole
Rondellepourfilélectrique/
Electriccordbushing
Plaquepourboiteélectrique/Electricbox
cover
Plaquepourboiteélectrique
encastrée/Electricboxcover(recessed)
Support/Bracket 260mm
Support/Bracket300mm
Support/Bracket320mm
Support/Bracket330mm
Support/Bracket350mm
Support/Bracket360mm
Support/Bracket 380mm
Support/Bracket390mm
Support/Bracket400mm
Support/Bracket 420mm
Support/Bracket 450mm
Support/Bracket 480mm
Support/Bracket500mm
Support/Bracket 550mm
Support/Bracket 600mm
Support/Bracke t630mm
Support/Bracket 640mm
Support/Bracket 760mm
Support/Bracket 830mm
Support/Bracket 1030mm
1 Accent18"x26" MR1460‐500‐001 3 3 3 2 1 1 1 1
2 Accent24"x32" MR1461‐500‐001 3 3 3 2 1 1 1 1
3 Brilia24"X32"MR1464‐500‐001 3 3 3 2 1 1 1 1
4 Emblem32"X24"MR1465‐500‐001 3 3 3 2 1 1 1
5 Effect30"X38"MR1468‐500‐001 3 3 3 2 1 1
11
6 Effect24"X56"MR1534‐500‐001 3 3 3 2 1 1 1 1
7 EffectØ24" MR1660‐500‐001 3 3 3 1 1 1
8 EffectØ30" MR1661‐500‐001 3 3 3 1 1 1
9 Effect24"x24" MR1662‐500‐001 3 3 3 2 1 1 1
10 Effect30"x30" MR1663‐500‐001 3 3 3 2 1 1 1
11 Effectoval24"x32" MR1664‐500‐001 3 3 3 1 1 1 1
12 Profila18"x26" MR1665‐500‐001 3 3 3 2 1 1 1 1
13 Accent18"x26" MR1460‐500‐0012 3 3 3 2 1 1 1 1
14 Profila30"x38" MR1667‐500‐001 3 3 3 2 1 1
11
15 Profila24"x56" MR1668‐500‐001 3 3 3 2 1 1 1 1
16 Brilia18"x26" MR1671‐500‐001 3 3 3 2 1 1 1 1
17 Emblem24"x32" MR1672‐500‐001 3 3 3 2 1 1 1
18 Emblem38"x30" MR1673‐500‐001 3 3 3 2 1 1 1
19 Effectoval30"x38"MR1674‐500‐001 3 3 3 1 1 1 1
20 Effect18"x26" MR1675‐500‐001 3 3 3 2 1 1 1 1
21 Effect24"x32" MR1676‐500‐001 3 3 3 2 1 1 1 1
22 EffectØ24" MR1781‐570‐XXX 3 3 3 1 1 1
23 EffectØ30" MR1782‐570‐XXX 3 3 3 1 1 1
24 Effect24"x32" MR1783‐570‐XXX 3 3 3 2* 1 1 1 1
25 Effect30"x38" MR1784‐570‐XXX 3 3 3 2* 1 1 2
26 Effect24"x32" MR1785‐570‐001 3 3 3 2 1 1 1 1
27 Effect30"x38" MR1786‐570‐001 3 4 4 2 1 1
11
28 Celestia24"x32" MR1787‐570‐001 3 3 3 2 1 1 1 1
29 Celestia30"x38" MR1788‐570‐001 3 4 4 2 1 1 1 1
30 Effect20"x32" MR1946‐570‐XXX 3 3 3 1 1 1 1
31 Effect22"x38" MR1947‐570‐XXX 3 4 4 1 1 1 1
32 Eclipse20"x32" MR1948‐570‐001 3 3 3 1 1 2
33 Eclipse22"x38" MR1949‐570‐001 3 4 4 1 1 1 1
Qtétotale/Totalqty
*Nondisponibleaveclefiniorbrossé/Notavailablewithbrushedgoldfinis
h
This manual suits for next models
8
Table of contents
Popular Indoor Furnishing manuals by other brands

Regency
Regency LWMS3015 Assembly instructions

Furniture of America
Furniture of America CM7751C Assembly instructions

Safavieh Furniture
Safavieh Furniture Estella CNS5731 manual

PLACES OF STYLE
PLACES OF STYLE Ovalfuss Assembly instruction

Trasman
Trasman 1138 Bo1 Assembly manual

Costway
Costway JV10856 manual