KAMA AD 105S User manual

Elderfield & Hall, Inc.,
www.kooltools.com
10901 McBride Lane
Knoxville, Tn 37932
T: 865.671.7682 Fax: 865.671.7686
Kama Bandsaw AD 105S
110 Volt, Single Phase
2 ¼ HP Portable Benchtop Bandsaw
For Accurate Cuts Up to 4”.
Instruction Manual:
Introduction to the Manual
General Precautions
Equipment
Machine
Start-Up
Caution
Maintenance

1. Introduction to the Manual 2. General Precautions
The purpose of this manual is to provide the
necessary information for competent, safe use of
the equipment.
This information is the result of continuous,
systematic data processing and technical tests
recorded and validated by the manufacturer, in
accordance with the internal procedures to
ensure the safety and quality of information: EN
89/392, EN 60204-1, CEI 110-8, IEC 801, EN
202-2, EN 418, prEN 1050, prEN 614-1.
The information below is intended
EXCLUSIVELY for specialized users, capable
of interacting with the product with the utmost
safety for people, the machine and the
environment, interpreting basic diagnostics of
problems and malfunctions and performing
simple checks and maintenance, in full
compliance with the instructions given in the
pages that follow and with current health and
safety regulations.
The document does not examine in depth the
topics of disassembly and extraordinary
maintenance, as these operations must always be
carried out solely by our authorized Technical
Service.
For a proper relationship with the product, it is
essential to ensure that the manual remains
legible and well-preserved, for future reference.
Should it deteriorate or, more simply, for further
technical and operating information, contact the
nearest Authorized Retailer directly.
Before using the machine or opening its
packaging, read the instructions in the following
manual very carefully.
If the machine is used by more than one
operator , each one must adhere to the following
manual very carefully.
The Manufacturer declines any responsibility
for damage to persons, things or to the machine
itself arising from its incorrect use, negligence
and superficial interpretations of safety concepts
contained in this manual.
This instructions manual should serve the
duration of the machines operating “life” and be
available for at least 10 (ten) years: it is
advisable to keep it in a known and accessible
place (possibly together with the other manuals
relating to the machine).
Always make sure in advance that the minimum
safety, placement and operating standards are
respected, taking note of the environmental
conditions, temperature, humidity, lighting,
vibrations, suspended dust and the appropriateness
of the area to be occupied.
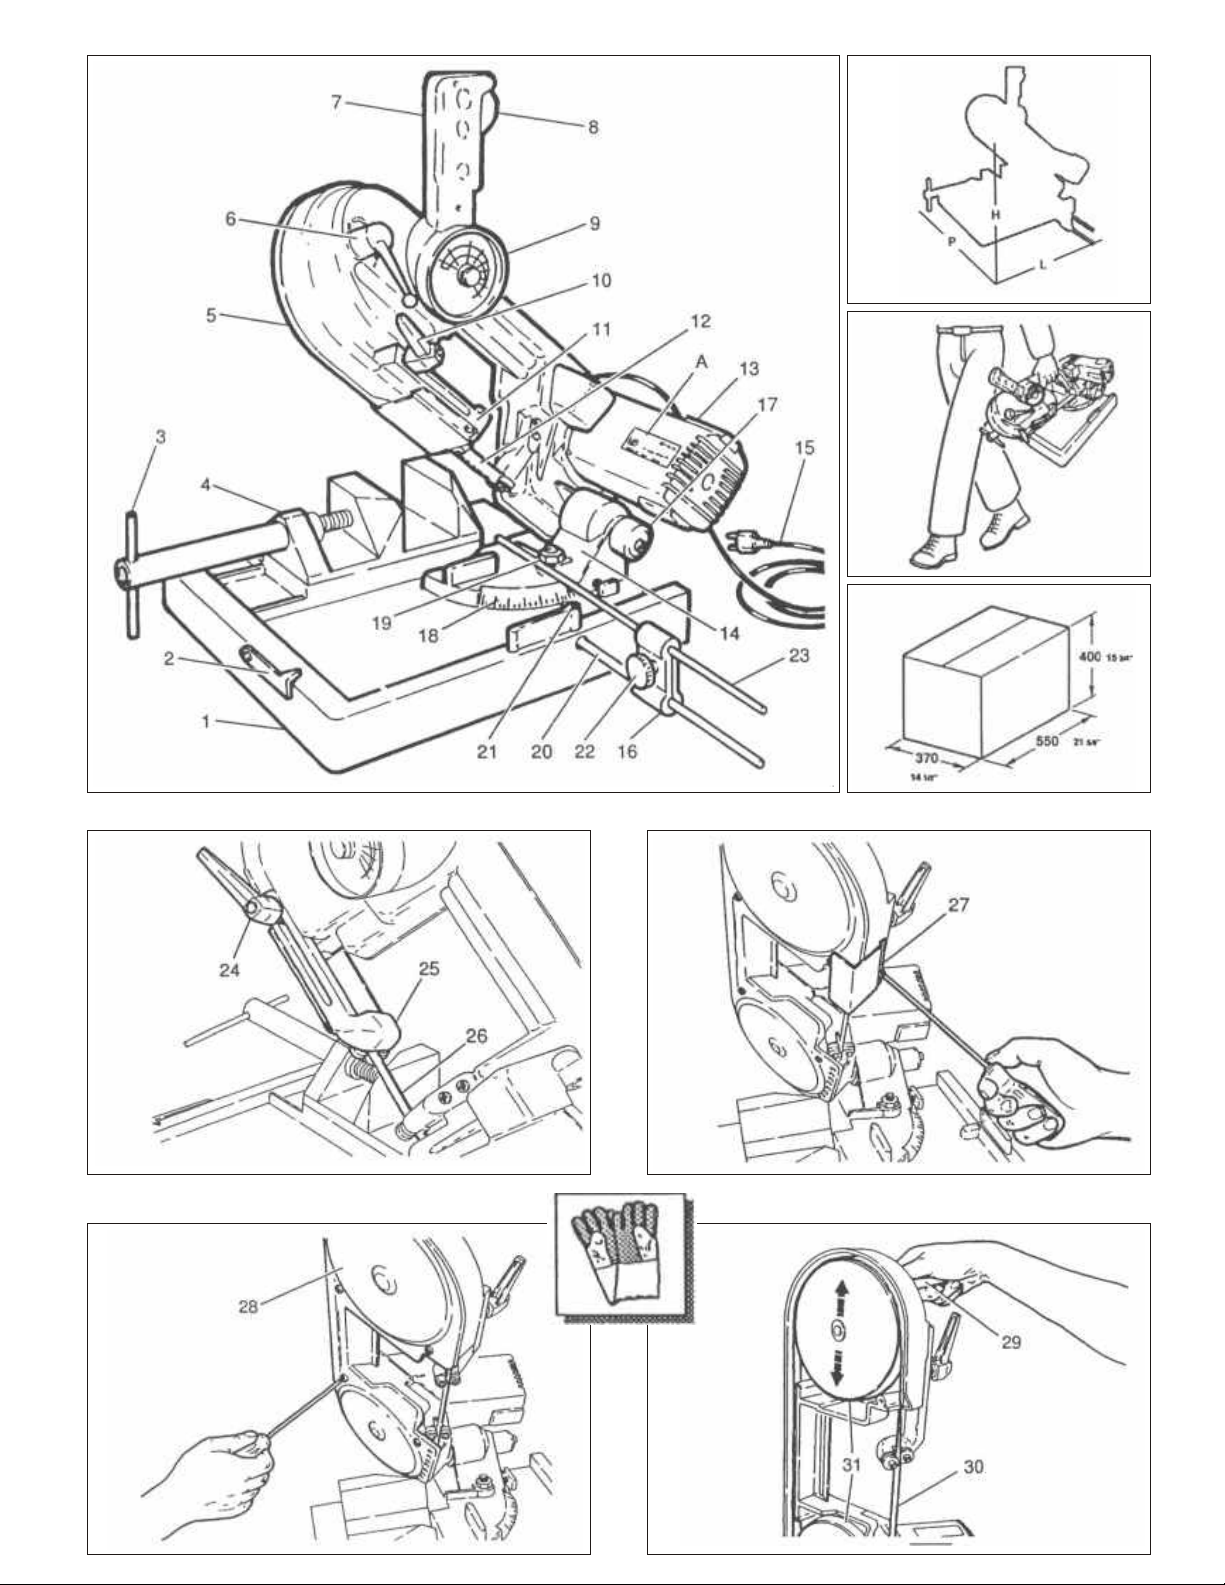
The saw may operate outdoors (work sites, open
spaces in general, etc.) or indoors (workshops,
laboratories, etc.) where there is no risk of
explosion or fire.
Before using the equipment, make sure that the
surface where the machine will be placed is flat,
sufficiently sturdy and ergonomical: we recommend
using a workbench for this reason.
Always make sure in advance that the workpiece is
tightly clamped; in any case, make sure that the
start of the production cycle does not create
hazardous situations for people and/or property.
Do not remove or damage the information plates on
the machine; you must recognize their meaning and
keep the message legible. Should they deteriorate,
replace immediately, contacting only an authorized
Technical Service directly.
The use of spares that do not respond to the
specifications listed below, changes or tampering -
however slight- shall exempt the manufacturer from
any responsibility regarding the proper use,
functioning and safety of people and/or property.
It is strictly forbidden to tamper with safety
equipment and/or devices.
Dispose of processing waste in compliance with
current regulations.
Any maintenance operation except for
those specifically described in the pages
of this manual, must be carried out by
skilled personnel co-ordinated directly
by the authorized Technical Service.

3. Equipment 4. Machine
The benchtop band saw is supplied ready to use,
packed in a cardboard box and protected by a sheet
of cardboard.
The packing material must be disposed
of according to current environmental
protection regulations.
The machine is supplied initially with:
a band saw blade measuring 44 - 7/8” x .025 x
1/2” M2 (dual metal), 8-12 TPI.
part holder.
instruction manual.
3.1 Warranty
The machine is guaranteed for 12 months following
the date of purchase: the warranty is valid only if all
of the instructions listed on the warranty certificate
and in this manual are fully complied with.
When unpacking the machine make sure
the machine is in perfect condition and
that the package contains the parts
described; the Manufacturer shall not be
responsible for errors or missing parts following
five days after shipment.
3.2 Note
The band saw has been designed, manufactured
and protected for bench use, where it is
necessary to cut all types of metal parts having a
maximum diameter or thickness of 4 1/8”.
Any other use is excluded by the Manufacturer,
who shall be exempt from any liability for
damage to people, animals, property or the
machine itself caused by improper use.
Do not run the machine without a piece to be cut
for long periods.
Do not cut “hardened” or “cemented” steel parts.
4.1 Identification
The essential information for identifying the
machine is found on the plates located outside the
product. This essentially includes:
A) Manufacturer
B) Serial number
C) Model
D) Year of Manufacture
E) Voltage (V)
F) Power (kW)
G) Hertz (Hz)
H) Amperes (A)
I) Weight (kg)
The EC approval plate is located as shown in fig 2
ref. A.
It is strictly forbidden to remove or
damage the plates; should this occur,
always contact an authorized Technical
Service only.
For any information and/or technical explanations
regarding the machine, always indicate:
model
serial number
edition and preparation date of the instruction
manual
4.2 Description
Portable bad saw consisting of a fixed bench
pivoting head with screw lock for angle sawing,
speed regulator, work clamp and operator tool.
The machine may be used for dry cutting (from 0°
to 45° right) of materials compatible with the
specifications listed below, in full respect of the
environmental conditions and limitations
recommended by the manufacture and current
health and safety regulations.
The description includes the use for
which the product has been designed
built and protected; any other use or
failure to comply with the technical
parameters listed below may constitute a hazard
to people and/or property.

4.6 Lifting and Moving
The saw may be lifted, carried and moved by hand
in compliance with the instructions below:
fasten the blade arm in its end position using the
mechanical lock provided (fig. 2 ref. 2);
make sure it is properly fastened and grasp the
center of the arm (fig. 2B), lifting carefully.
The machine must be lifted and carried
only when free of materials, always
disconnected from all power sources. In
any case, always comply with current health and
safety regulations.
5. Start-Up
4.3 Components (Refer to fig. 2)
1 Base
2 Safety / Shipment
3 Vise Crank
4Vise
5 Machine Body
6 Blade Tension Lever
7 Grip
8 On / Off Switch
9 Cutting Speed Regulator
10 Blade Guide Lock Lever
11 Blade Guide
12 Band Saw Blade
13 Electric Motor
14 90° Rotation Unit
15 Power Cord
16 Cutting Depth Clamp
4.4 Technical Figures
DESCRIPTION
Dimensions (L x W x H) 22” x 15” x 15”
Belt Saw 44 - 7/8” x .025 x 1/2”
Single phase Electric
Motor 1800 W - 110 V - 5 A - 60 Hz
Insulating Class 2
Cutting Depth 4 1/8”
Speed (continuous) 60 / 330 ft/min
Weight 42 Lbs
Cutting Capacity:
90° •4” ¿4” x 4 1/4”
45° •2 1/4” ¿2 1/4” x 2 1/2”
4.5 Technical Specifications
Blade drive pulleys: on bearings.
Transmission: treated, tempered steel gears.
Switch with safety device.
Steel clamp.
Automatic blade stretcher.
Cutting capacity: profiled material.
5.1 Preliminary Steps
It is essential to determine size
measurements and placement in advance
in order to ensure safe placement,
running, emergency actions within the
surrounding environment. These conditions
should be respected beginning with the
preliminary stages, before cutting.
Rest the machine on a bench of adequate size
and sturdiness (four threaded holes are provided
under the base so that the machine may be
fastened securely in place).
Move the safety lever down (2).
Pivot the machine using the grip; it should stay
in the raised position. If this is not the case,
slightly tighten the screw (17) that works directly
on the clutch inside the swivel and lifting unit.
Make sure the machine is aligned with the
graded scale (18) according to the chosen cutting
angle.
Make sure that the nut (19) is tight.
Before plugging the machine in, make
sure that the line voltage corresponds to
the voltage indicated on the machine.
Mount the depth stop (20), tightening by means
of the set screw (21).
Loosen the knob (22).
Slide the rod (23) to determine the desired
cutting length.
Tighten the knob (22) securely.
Set the cutting speed using the regulator (9); set
the blade speed based on the material to be cut.

The first time it is started, the machine will be fairly
noisy, due to the normal breaking-in stage of the
transmission gears. This noise will disappear after
approximately 8 machine hours; in any case, the
measurable noise level is equal to and not greater
than 78 dbA.
IT IS ABSOLUTELY FORBIDDEN:
to lubricate the blade (saw)
before/during/after cutting;
work without the blade guide installed and
positioned properly;
work without the rear guard;
hold the piece to be cut by hand.
THE MANUFACTURER SHALL NOT BE HELD
LIABLE:
For damage of any type or entity caused by
irrational use of the machine, failure to observe the
safety rules indicated in this manual or tampering
with the machine, however slight. These actions
will also invalidate all warranty coverage.
5.2 Cutting Speed (FPM)
(Dial Speed is measured in Meter per Minute)
FPM MPM
Stainless Steel: 65-163 20-50
Copper, Aluminum
and its Alloys: 163-260 50-79
Steel, etc.: 260-357 79-109
Clamp the piece to be cut in the vise securely.
5.3 Adjusting the Blade Guide (fig.3)
Loosen the lever (24).
Slide the blade guide (25) which also acts as a
protection until the saw (26) is as covered as
possible, based on the size of the part to be cut.
5.4 Operator Position
The placement of the machine in relation to the
operator position must make it possible to
observe the results of the operation and maintain
safety conditions.
During this stage, make sure the start button (8)
and speed regulator (9) are easily accessible, and
that there is sufficient visibility and lighting on
the tool, the surrounding area and base.
It is strictly forbidden to place and/or
use the saw when environmental
conditions constitute a hazard of explosion or
fire. It is forbidden to use the machine for any
purpose other than that intended by the
manufacturer. Make sure that operation of the
saw does not create hazardous situations for
people and/or property. Should you encounter a
malfunction, stop the machine immediately and
check the reason for and/or extent of the
breakdown. Contact the authorized Technical
Service if necessary to exceed the cutting
capacity stated by the manufacturer.
5.5 Starting
Release the safety switch by turning the lock
(orange) down (8) then press and begin cutting
using even pressure.
6. Caution

7. Maintenance
7.1 Replacing the saw
It is essential to wear protective gloves
when changing the blade.
Remove the corner plate (27) from the sliding
blade guide. (fig. 4)
Remove the protective guard (28). (fig. 5)
Turn the lever (29) towards the position “-”.
Remove the blade (30). (fig. 6)
Insert the new blade, taking care to observe the
cutting direction and placing it between the blade
guide rollers, then between the rubber pulleys
(31).
Turn the lever (29) towards the position “+”.
When the lever (29) reaches the end of its stroke,
the blade will automatically position itself for
cutting when the motor begins to turn.
Replace the guard (28) and the plate (27) of the
sliding blade guide.
During the first 4-6 cuts (after replacing
the blade) use light pressure, to increase
the duration and effectiveness of the
blade thereafter.
7.2 After Each Working Shift
Carefully clean all parts of the machine, to remove
shavings and cutting residue.
7.3 Periodically
Check the length of the electric motor brushes
and make sure they are efficient: if they are less
than 6 mm long, they must be replaced with
other identical ones.
The gear transmission requires no maintenance
since it runs on LONG LIFE lubricants.
8. Wiring Diagram

fig. 2
fig. 3 fig. 4
fig. 5 fig. 6
fig. 2A
fig. 2B
fig. 2C

Elderfield & Hall, Inc.,
www.kooltools.com
10901 McBride Lane
Knoxville, TN 37932
T: 865.671.7682 Fax: 865.671.7686 Email:
KAMA AD 105S BANDSAW
PURCHASED ON: _____________________________________
PURCHASED FROM: __________________________________
NOTES:
__________________________________________________________________________
__________________________________________________________________________
__________________________________________________________________________
__________________________________________________________________________
__________________________________________________________________________
Distributed By:
Table of contents
Other KAMA Saw manuals
Popular Saw manuals by other brands

Panasonic
Panasonic EY3551 - 18V WOOD SAW operating instructions

Laguna Tools
Laguna Tools 14BX Series operating instructions

Scheppach
Scheppach ts 310 instruction manual

DeWalt
DeWalt DWC410 Original instructions

Parkside
Parkside PTK 2000 D3 Translation of the original instructions

Makita
Makita LS1017L technical information