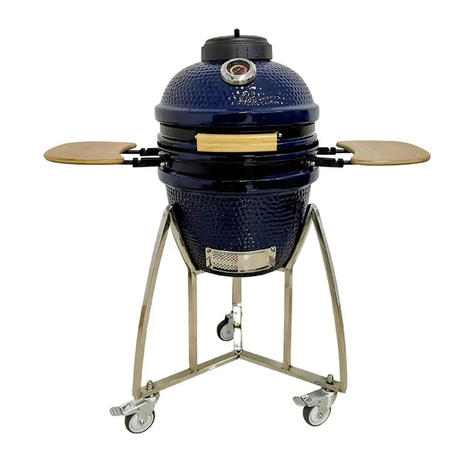
Kamado KGUB19-CGCP User manual


Table of
Contents:
Recommended Accessories..................................................................
Introduction
- Grill
Contents
...........
.
....
.
..............
.
....
.
................
.
....
.
....
.
Grill Components..................................................................................
GrillAssembly
........................................................................................
.
Starting Your
Saffire..................
.
..........................................................
..
Temperature and Control
Settings
......................................................
.
Roasting &
Smoking-
Using the Heat Deflector
..............................
.
Adding Smoke Flavor & Maintenance................................................
Pizza & Safe Practice
s
.....
.
.......................................
.
...................
.
....
.
......
.
Useful Accessories & Notes
....................................................................
Warranty
...................................................................................................
Page
1
Page2
Page3
Page4-6
Page
7
Page8
Page
9
Page
10
Page
11
Page
12&13
Back
Page
WARNING:
As with all wood and charcoal burning appliances;
If the grill is placed on, or near, combustible surfaces, such as a
wood deck, it is the owner or operators responsibility to ensure
that hot embers do not escape the grill and ignite those surfaces.
On these combustible surfaces, a non-combustible, protective
pad is required underneath, and just in front of, the grill.


Kamado Gourmet
Congratulations
on your
purchase
of the Kamado Gourmet,
Ceramic Grill and
Smoker!
You now have one of the finest tools available to help
you create the most amazing barbecued food possible
!
Visit the KamadoGourmet.com and SaffireGrills.com websites for
more ideas, recipes and tips to enhance
your
barbecue
experience.
At KamadoGourmet.com
you may fill out the
warranty/registration
form
and include your email address,
if desired
, for occasional
updates, tips, and recipes for your Kamado Gourmet barbecue.
Models:
KGUB19-CGBP Black Pepper Glaze
KGUB19-CGCP Cayenne Pepper Glaze
Grill Includes:
Ceramic Dome and Base
Cart Assembly with Caster Wheels
Bands, Hinge, Shelf Mounting Brackets
Chimney Top Air Control
Bamboo Side Shelves
Thermometer
Ash Tool
Interior Components:
Cooking Grid Rack
Stainless Steel Cooking Grid
Refractory Brick Firebox
Cast Iron Grate or Stainless Charcoal Basket (optional*)
2 piece Ceramic Heat Deflector (optional*)
Second Level Cooking Grids (optional*)
Ash Pan (optional*)
*Optional items may be included with certain packages.
Assembly Tools
Included: Wrench & Hex Wrench
Needed: Phillips Screw Driver (std.- large)
2


ASSEMBLY
Cart Assembly
1. Open the box and remove the cart parts, including: 4 Cart Legs,
4 Caster Wheels, 2 Cross-connectors, 16 screws and 8 felt pads.
2.Slide the two cross connectors into the crossbars on one of the legs.
(Fig. 1). The flat side of the Connector should be facing toward the
bottom
of
the cart, next to the screw holes
.
Start screws into holes with
a Philips screw driver. Takecare that the screws are going into the
connector straight. Be
gentle
so the threads are not ruined. They
should turn with very little
pressure.
Do not fully tighten any of the
screws
until
they have all been started.
3.
With cart inverted, slide the remaining legs onto the two
Cross
Connectors.
(Fig. 1)
Start all 16 screws. Then tighten them with screw
driver
.
Remove backing from felt stickers and apply as seen in Fig 4.
4. Now place the washer on the caster wheel bolts. Insert the caster
bolts
into the holes on the bottom of the cart legs. Besure to place the two
casters with brakes next to each other on the same side of the
cart.
Fasten
them with the large Acorn
Nuts.
(Fig 3)
Fig.1
Fig. 2
Unpack the
Grill
5. Remove the items from the inside of the
grill including the basket/grate
and Ash Pan out of the bottom.
(See page 3)
6. Remove firebox assembly (Fig 5). You will need to hold it from just
below the firebrick on the inside of the firebox. Be careful of metal edges
on the sheet metal shell and under the firebrick.
7. Remove any remaining packaging materials from inside the
grill.
8. Attach the round bar-shaped handle to the two screws on the metal band
on the front of the grill dome. Use the two acorn screws.
Discard any lock-washers. No washers should be used attaching the handle.
4
< Fig. 3
Fig. 4
Fig. 5

ASSEMBLY
Assemble
Grill
9. Mount the 4 Side Shelf Brackets to the two pair of screws on each side of the grill with the
attached
Acorn Nuts. (Fig. 6 & 7) Remove any lock washers. They should not be used mounting the brackets
.
The ShelfStop-Tabs
(short
metal rod with cap) on the bracket should be near the top of the bracket
and
facing in toward the other bracket. The left and right brackets are different.
10. Use a 10mm socket wrench (preferably), or the included
wrench, to snugly tighten all acorn nuts on the grill including
the hinge. If an acorn
nut
spins without tightening, using a
rapid jerking action with the wrench usually causes them to
catch and tighten. Lifting up on the bracket may
also
help as it
causes friction on the screw
allowing
the nut to
tighten.
11.It is also good to double check the tightness of
the
Band Tension Bolts that are mounted horizontally
toward
the back, near the hinge. (Fig.
7
)
They should be very snug
and
tight. A few turns past anything resembling loose.
Use the included hex key (Allen wrench) to hold the bolt.
Use the 10mm wrench to turn the nuts.
Do not turn the bolt as it may ruin the threads.
12.To lift the grill into the cart, have one person hold
the
metal hinge on the back of the grill and the other
person
hold the ash/draft opening at the bottom on the
front.
Place
the grill into the cart so the front of the grill is between the
two locking caster wheels. (Page 3) The ceramic grill body
does not need to be fastened to the cart. The weight of the grill
is sufficient to hold it in place.
13. Place the ceramic Firebox into the grill so that the cut-out
notch/hole on the bottom aligns with the Bottom Air Control
Door on the front of the grill. (Fig. 8)
Installing the Grill in an Enclosure / Island:
To lift the grill, one person should grip the steel hinge at the rear
of the
grill
.
The second person
should o
pen the lid and grip the
Bottom Air Control Port from
the
inside of the grill. Keep the
other hand on the
Main
Handle to steady it. Lower the grill into
position on the optional ceramic feet and heat-shield or a
noncombustible surface.
WARNING:A noncombustible surface less than 1” thick, which is
on top of wood/combustible material, is not sufficient protection
without the Built-in Kit which includes a heat shield under the grill.
When any wood or combustibles are located immediately beneath
the surface that the grill will be resting on, the Basket Grate and
Ash Pan should also be used in place of the Cast Iron Grate. The
Ash Pan is suspended above the bottom of the grill creating an
insulating air gap to reduce radiant heat off the bottom of the grill.
See Website for more Built-in Instructions
5
Fig.6 Shelf Bracket (inside view)
Fig.7
Shelf Bracket (outside) & Tension Bolt
Fig. 8 Placing Firebox in Grill

ASSEMBLY
Final Grill
Assembly
17. Ashpan (Optional) - Place it
in the bottom of the
firebox with its large opening facing the air inlet hole on
the front of the grill. (Page 3)
Cast Iron Grate or Charcoal Basket is placed over the
pan in the bottom of the Firebox. (Fig 10 + p3)
18. Cooking Grid Rack is placed on top of
the
Refractory Firebox. (Fig.
11
)
Then place the cooking grid onto the rack at the
top or bottom position (Figs
.
12 & 13)
19. Chimney Top Control - Slide it onto the top of the
grill. Do not press down very hard. The hinge for the slide
damper should be at the 2 o’clock Position (Fig. 14 + p3)
20. Side Shelves - Drop them into position on the side shelf
brackets. The pins on the shelf drop right into the slot on
the
bracket. (Fig.13) The tool hooks should be facing toward the
front. To use the side shelf,
lift outside edge up 30° above
rim, slide it in toward the grill, lower shelf to level so the
hooks
engage with the pin on the bracket.
(Figs 13 & 14)
Grill Assembly
Complete!
Get Ready to Barbecue!
6
Fig. 12 Chimney Top Control
Fig. 10 Cooking Grid Rack on
Firebox
Fig. 11 Cooking Grids at top or bottom levels
Fig. 13 Shelf in
Fig. 9 Refractory Brick
Firebox
Fig. 14 Shelf up/engaged

ASSEMBLY
USING YOUR
Kamado Gourmet
Starting
the
Fire
1. Remove the Cooking Grid and Rack and place them on the ground or hang them from the tool hooks on shelf.
2. If you have charcoal left in the grill from the previous fire, shake the charcoal basket or stir the
charcoal
around enough to knock the ash down through the grate into the bottom/ash pan. This willallow better air
flowfor easier
starting.
The remaining charcoal is good to use
again.
3.
Pour lump charcoal into the firebox about 4” deep. (See
Fig.l4} For smoking longer times
add more.
Do not fill higher than 2” from the top of the firebox to allow room for the Rack and Ceramic Heat Deflector
.
CAUTION: DO NOT USE LIGHTER FLUID INSIDE THE GRILL!
IT WILL VOID YOUR WARRANTY!
Not only does lighter fluid create a bad smell in the
neighbor-
hood and on your
food,
but it is not good for the ceramics
on
your
grill.
4. If using a fire-starter square/cube/unit, nestle one down into
the
charcoal. You may place fire-starters in more than one
spot,
in
the charcoal, if you want to get the whole area burning
quicker
for high temperature grilling and
searing.
You may stack some charcoal around the starter to speed
up
the process. Be sure to leave enough air space around the stacked
charcoal for the air and flame or it will not burn
as well.
Now light the starter (Fig. 15)
5.
Ifyou are using an electric fire-starter nestle it down
into
the charcoal so it is resting on charcoal just above the
grate.
The charcoal should envelope the lower half of the
starter
element. Plug in the starter and let it operate no more than
8
minutes. (Fig.16)
6. Unplug and remove the starter within 8 minutes to avoid
damaging the starter. You do not have to leave the starter
in
longer as the fire willcontinue to increase after removing it.
7. Replace the Rack and Cooking Grid and close the grill.
Swing
the
chimney top damper fully open until the grill is
up to
your
desired
temperature
.
8. When the grill has reached your desired
cooking
temperature,
adjust the bottom and top damper to hold
at your
desired
temperature.
See settings on page
10
.
9. When you are finished cooking, close the Top
and Bottom Air Controls to snuff the fire out. This
will preserve any remaining coals for the next use.
7
Fig. 15 Fire Lighter
Square
Fig.16 Electric Fire
Starter


ASSEMBLY
Roasting &
Smoking
For Roasting and Smoking you willwant to cook with indirect heat to avoid burning the surface of
your
meat. This can be accomplished by putting your food on a rack which is placed inside a pan. Watershould
be added to the pan for a more effective buffer from the heat. Fig.
25
An easier wayto accomplish this is provided for your
Kamado Gourmet
by wayof the Ceramic Heat
Deflector. The Heat Deflector is placed on the circular wire rack,
underneath
the food, in order to create
indirect, convective heat. This turns
your
Kamado Gourmet
into a smoker. The Heat Deflector is handy any
time you are cooking thicker pieces of meat that
may
become overly done on the outside before the inside
has finished cooking. It keeps your food out of
the direct
flame and intense radiant heat from the coals.
The beauty of the Heat Deflector is that you willhave convective heat, along with some radiant heat from
the
dome,
to provide even heat all around your masterpiece. This eliminates the need for rotisseries, water
pans, meat
racks and all of the preparation and cleaning that goes along with it.
Using the Heat
Deflector
After starting the fire, one or both of the ceramic heat deflector halves are placed on the bottom of the wire
rack.
Use just one deflector if you want indirect heat on one side and direct heat for grilling on the other
side.
A space is left between the deflector and the firebox wall for the heat to flow
.
It is recommended to place a
disposable aluminum pan, or foil with the edges bent up, on top of the ceramic heat deflector.This
will
catch the
drippings
and keep them from
running
into the fire.
The cooking grid may now be placed in the desired position on the wire rack. Also see page
10.
9
For further information, online manuals and videos
visit: KamadoGourmet.com or SaffireGrills.com

Setup and Cooking
Smoke Flavor
To add smoked flavor to your food you may use wood chips
or chunks. Follow the suggestions below:
1. When grilling at higher temperatures you can add the
wood chips or chunks through the door in the cooking grid.
Close the bottom air control down to a low setting while
adding the chips. Also keep it low after adding chips for a
couple minutes, to allow the smoke to penetrate the meat.
2. IMPORTANT – Meat will take on more smoke during the
early part of cooking when the meat is cooler on the
surface. Using a rub on your meats will also help absorb
more smoke. Dry and hotter meat surfaces, later in the
cook, do not absorb much more smoke. Spritzing with
water helps.
Secondary Cooking
Grids
(
See Photos
>)
The two Secondary Grids may be added on top of the Primary
Cooking Grid
for more cooking area.
It is elevated 5 inches
above the cooking surface below, allowing
enough
room to
access and turn food on the
l
owe
r
level.
If the main cooking grid is placed at the lower level, the two
Secondary Cooking Grids may be stacked on top of one another.
Cleaning Cooking
Grids
It is not necessary to use soap to clean the Cooking Grids
after every use. The easiest wayto keep your
grids
clean is
by using a brass or stainless steel bristled brush just before
cooking. When grilling at higher temperatures put
the
Cooking Grid into position and allow it to heat up at a
high temperature setting for 5 to 10
minutes and then
brush them. When smoking, avoid the high heat, just
brush the grids before cooking.
After brushing the grids, close the lid and slow the grill
down to cooking temperature with the air
control.
A good way to finish cleaning the grid, just before the food,
is to wipe it with a cloth or paper towel soaked with
vegetable oil. Use the grill brush to move the cloth over the
grids. It usually holds it well.
Ash
Cleaning
Ash is traditionally removed from a ceramic grill by using the ash tool to rake
the
ash down through the grate. Once the ash area is full it is raked out through
the
air control at the bottom of the grill and into a bucket. You may do this with
the Kamado Gourmet. If you have the optional Charcoal Basket and Ash Pan
cleaning is much easier. Lift the basket by the handles and shake the ash down to the
pan below. Lift the basket, with remaining charcoal, out and set it aside. Now lift the
Ash Pan out of the grill
and
discard the ash into a
noncombustible container.
WARNING: Do not allow ash to fill all the way up to the grate.This prevents air
from
flowing around the grate, causing it to get extra hot and reduces its life expectancy.
10

Setup and Cooking
Pizza
The
Kamado Gourmet
makes a fantastic pizza oven
!
You mayset it up in one of two ways:
1. Invert the wire cooking grid rack and set the pizza stone on
top.
2
.
Placea pizza stone on top of the cooking grids at the top level.
(this may incur extra wear and stress on the cooking grids over time.
)
Pizza Cooking:
Bring the grill up to 500°-600° & maintiain at
that
temperature with air controls at the medium to
high
setting (see page
10).
Once the grill has reached 500°-600°,do not wait
much more than a couple of minutes to put
the
pizza on. Spread a layer of corn meal on top of
the
pizza stone just before placing the pizza.
Vigilance is required to ensure the pizza
crust
does not
burn.
To help prevent the crust from burning you have a
cou-
ple of options. These are especially helpful when baking
a
thicker or stuffed pizza, calzone, etc.:
1. Place the pizza on a cold pizza stone and then place
the
stone into the preheated
grill.
2. Place the Ceramic Heat Deflector in first. Then place the
Pizza Stone on top of the deflector for
a
double thickness
of
ceramic.
Rotating pizza stones also keeps the stone
temperatures down.
When making pizza from scratch it can be easierto build
your
pizza right on the
stone.
Operational Tip:
Asair comes in to the fire it is superheated and expands greatly.
With this in mind, it is better to slow the
fire
down byclosing the
bottom damper and then reducing the top damper opening to fine tune
the
temperature.
This is recommended, but is not a safety issue.
WARNING: If it has only been a couple minutes since you have closed down the air setting on a very
hot
fire, do not abruptly open the lid. As with most grills, this can cause the additional smoke in the top of
the
grill
to ignite into a poof of flame when it is
opened.
SOLUTION:
When opening the grill it is always a good practice to first open the Chimney Top
com
pletely.
Then lift the lid open one or two inches and hold it there for the count of
5.
Then open the
lid fully.
This allows the excess smoke to exit the grill safely
11


LIMITED LIFETIME WARRANTY
The parts listed below are warranted as follows, for the period of time specified*;
Original owner is entitled to free replacement (excluding possible shipping charges) of any part listed
below that fails to operate properly under normal usage due to manufacturing defects. This does not
cover damage due to forces of nature, natural disasters, theft, operator error, abusive over-firing or
accidental damage. Some of this is covered in the “Half-Price Warranty” below.
The “Reimbursement Procedure” (below) must be followed for a warranty claim and reimbursement.
EXCEPTION: The use of lighter fluid inside the Saffire Grill is detrimental to the ceramics
and good food flavor. If used, it will void the warranty.
Covered Product: Kamado Gourmet (models KGUB19-CGBP & KGUB19-CGCP):
Lifetime: Ceramic dome, ceramic base, firebox brick and metal firebox shell.
5 years: Cart and metal parts unless otherwise specified below.
1 year: Cast iron fire-grate, basket-grate, ash pan, thermometer,
gasket, metal and ceramic accessory parts..
……………………………………………………………………………
Lifetime ½ Price Warranty for All Grills – All Circumstances
Original owner is entitled to replacement parts at one half (50% off) the current Suggested Retail
Price for any lifetime warranted part, listed above, that fails to perform properly. This includes parts
damaged by operator error, accidental damage, forces of nature and natural disasters. Original owner
must still be in possession of the grill and follow the reimbursement procedure listed below to
receive the benefits of this warranty. The provision of this warranty may be withdrawn by the
dealer or Saffire Grill Co. due to abusive use of grill, mishandling, over firing or inordinate number of
recurrent claims.
……………………………………………………………………………
Reimbursement Procedure
To receive reimbursement of warranty parts Contact Saffire Grill Co.
the following information must be provided:
a. Serial number (located on the box or grill hinge)
b. Sales receipt (if warranty registration was not filed)
c. Photos with explicit detail of the grill and failed part are acceptable if
approved by the dealer and/or Saffire Grill Company.
In lieu of photos, the actual grill or failed part must be presented.
(Transportation may be the customer’s responsibility as determined by Saffire Grill Co.)
Saffire warranty does not cover shipping, labor, or installation expenses for the grill or parts.
Saffire Grill Co. reserves the right to determine the validity of any claim
.
Jan
2022
815-967-4100
Contact@KamadoGourmet.com
Saffire Grill Co.
1102 10th St.
Rockford, IL 61104
This manual suits for next models
1
Other Kamado Grill manuals
Popular Grill manuals by other brands

Brinkmann
Brinkmann 810-6340-S owner's guide

Even Embers
Even Embers GAS2660AS owner's manual

Simogas
Simogas ESTIVALE PRIMA Series quick start guide

Mayer Barbecue
Mayer Barbecue 1000020145 Assembly instructions

Suwanee Grill
Suwanee Grill The Sports Grille UGG-1 owner's manual

Weber
Weber Spirit 89527 owner's guide

Koenig
Koenig MONARCH 390 Assembly manual

Brinkmann
Brinkmann 2-Gallon Pan & Basket Set owner's manual

Weber
Weber 54636 owner's guide

Weber
Weber Genesis E-330 Specifications

Kenmore
Kenmore 415.16113 Assembly instructions/use and care manual

Dyna-Glo
Dyna-Glo DGP480CSP-D User's manual and operating instructions