Kamasa-TOOLS K 12170 User manual

Portable
Inspection
Camera
K 12170

2

The K 12170 is a high performance industrial endoscope with a high resolution
five-inch colour LCD display. This is a fully-featured instrument, ergonomically
designed so that the main function buttons can be controlled with one hand. The
extremely flexible, semi-rigid camera probe is 1 metre long an d just 3.9mm in
diameter. The inspection camera has numerous applications from inspecting
engines and engine components, inspecting cables or pipes in or behind walls,
to locating lost keys, etc, in drains. For example, the very narrow diameter of the
camera probe makes it ideal for inspecting combustion chambers in diesel-
engined vehicles using the glow plug aperture for access. Read the part number of
a component buried in the engine-bay without dismantling.
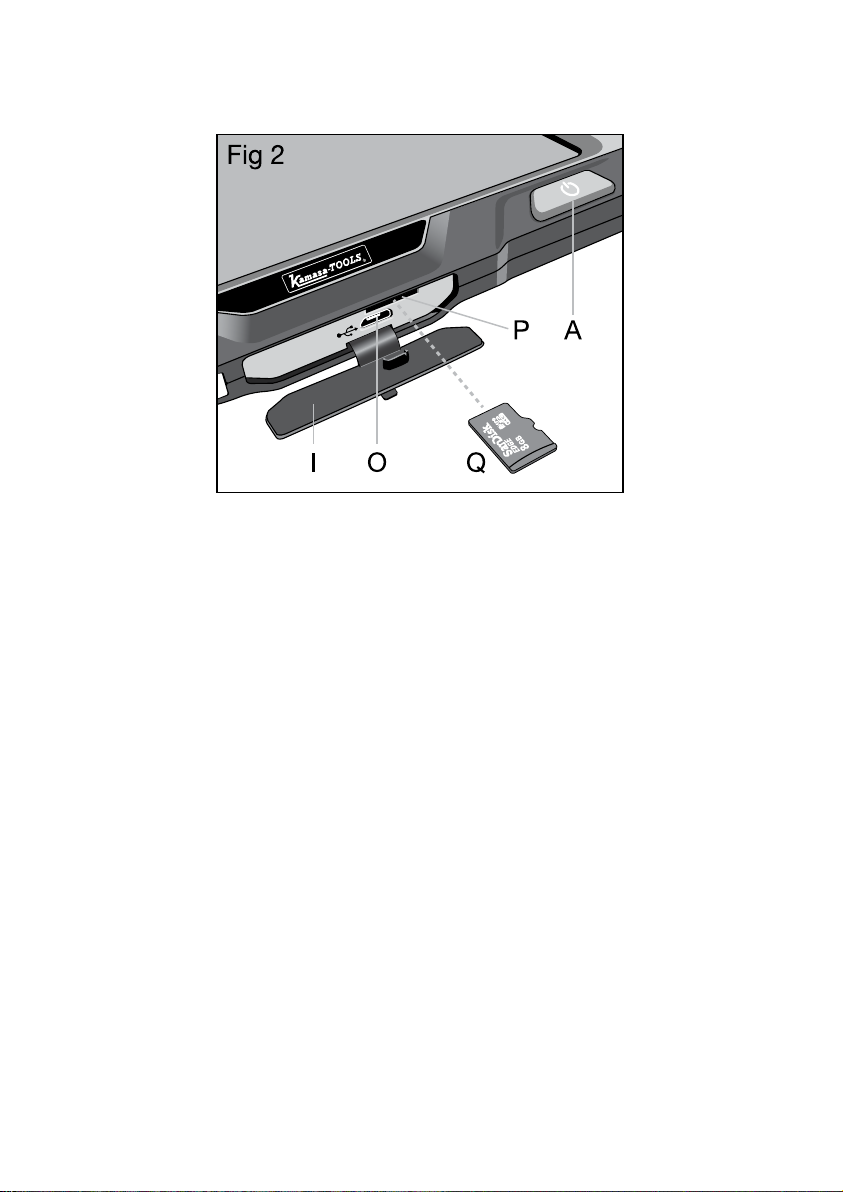
The instrument is fitted with a 32 GB Micro SD card which enables still images
and video recordings to be saved. Sound is also recorded. The still image or video
files can be transferred to a PC or laptop via the supplied USB lead or by removing
the Micro SD card from the inspection camera and connecting to the PC via a
card reader.
The instrument features a four-LED torch and the button controls are back-lit. The
tip of the camera probe features six LEDs with three brightness settings for use in
dark environments.
The internal battery is charged via the USB lead (supplied); plug the lead into a
suitable USB port on a PC or 5V USB mains adaptor (not supplied).
INTRODUCTION
3

4
Ref. Description
APower button
(ON / OFF)
BCamera probe
socket
CCamera probe
LED control
D
Record (take
photo or start/
stop video)
E
OK Enter
button (confirm
selection)
FUP and DOWN
selection
G
Settings (enter
or exit settings
menu)
H
Mode button
(switch between
photo / video /
playback)
ICharging port
cover
JLED torch switch
(ON / OFF)
KLED torch
LSpeaker
MMicrophone
NReset button
OMicro-USB
socket
PMicro SD card
socket
QMicro SD card
(supplied)
CONTROLS
M
K 12170
M
K 12170

INSTRUCTIONS
5
Set-up:
• Refer to Figure 2: pull back the charging port cover (I) and carefully insert
the Micro SD card in socket (P). (32 GB Micro SD card is provided with
instrument). Do not remove or refit the Micro SD card if the instrument is
switched ON. Power OFF the instrument before removing or refitting the Micro
SD card. Failure to carry out this advice will damage the instrument.
• Connect camera probe to the socket (B) on the top of the instrument. Refer to
Figure 3: carefully align channel on the probe connector with the red marker
dot on the instrument socket and push fully home. Screw locking ring until tight.

6
Charging:
The internal battery is charged via the USB lead (supplied). Refer to Figure 2: pull
back the charging port cover (I) and plug the micro-USB connector of the lead
into the micro-USB socket (O). Now connect the USB connector of the lead into
a suitable USB port on a PC or 5V USB mains adaptor (not supplied). The ON/
OFF symbol on the power button (A) flashes RED while the internal battery is being
charged. When the battery is fully charged, the ON/OFF symbol on the power
button is not lit. When the instrument is switched on, the state of battery charge
symbol is displayed on the top right of the screen (refer to Figure 4: symbol 5).
INSTRUCTIONS

Switch On:
Press and hold (for approximately 2 seconds) the ON / OFF power button (A).
The current time and date is displayed, refer to Figure 4: symbol (3); if the Micro
SD card is present, symbol (4A) is displayed. If the Micro SD card is not present,
symbol (4B) is displayed.
The instrument has three separate modes of operation: photo,video and
playback. These are selected by pressing the Mode button (H). Refer to Figure 4:
The mode symbol (1) on the top left of the screen displays the selected mode.
7
M
2019-05-24 23:52:16
00:16 K 12170
INSTRUCTIONS

8
INSTRUCTIONS
Recording a still photo image:
When the instrument is in photo mode, press the Record button (D) to take a still
photo of the camera probe image currently being displayed on the screen. The
image will be stored on the Micro SD card.
Video recording:
When the instrument is in video mode, press the Record button (D) to start video
recording. Refer to Figure 4: The recording symbol (2) will flash and the current
length of the recording will be displayed. Press the Record button (D) again to stop
the recording. The video recording will be stored on the Micro SD card.
Playback:
When the instrument is in playback mode, the previously recorded still images or
videos are displayed on the screen, starting with the most recent image or video.
Use the UP and DOWN selection keys (F) to scroll between images and/or videos.
Press the OK enter button (E) to play the selected video.
Brightness settings for Camera Probe LEDs:
The tip of the camera probe features six LEDs with three brightness settings for
use in dark environments. Press the Camera probe LED control button (C) to cycle
between brightness settings.

Settings:
As well as the main Settings Menu, there are also separate setting menus for
the three modes (photo / video / playback). For example, to access the photo
settings menu, the instrument must be in photo mode; to access the video
settings menu, the instrument must be in video mode, etc. Then refer to Figure 5
and follow the instructions below to access the specific mode settings menu.
INSTRUCTIONS
9
M
2019-05-24 23:52:16
M
2019-05-24 23:52:16
M
2019-05-24 23:52:16 H
G
F
E
K 12170
K 12170
K 12170

10
INSTRUCTIONS
Refer to Figure 5:
1 Press Setting Button (G) to enter the Setting Menu pages. The specific mode
settings menu is displayed: (photo / video / playback).
2 Use UP and DOWN selection buttons (F) to navigate through the menus.
3 Confirm the selection by pressing the OK enter button (E).
4 Press the mode button (H) to move to the Main Setting Menu, then navigate
through the menus and confirm selections as detailed above.
5 When your main setting preferences have been confirmed, move out of the
setting menu by pressing the mode button (H) again.
Available Settings:
Photo Mode:
• Resolution: (1920 x 1080p)
• Date Stamp: switch the date stamp watermark on saved photos (OFF / ON).
Refer to Figure 4 — symbol 6.
• Shutter sound: (OFF / ON)
Video Mode:
• Resolution: (1280 x 720p)
• Recording: switch the microphone (OFF / ON)
• Date Stamp: switch the date stamp watermark on saved videos (OFF / ON).
Refer to Figure 4 — symbol 6.
Playback Mode:
• Delete: Delete current file (image or video), or delete all files. Press mode
button (H) to exit without deleting any files.
• Protection: Lock or unlock files
• Slideshow: Select interval between slides (2 sec, 5 sec or 8 sec). Press OK to
start or stop slideshow.

Main Settings Menu:
• Auto Power Off: Off / 3 minutes / 5 minutes / 10 minutes.
• Language: Default is English, but seven other languages can be selected:
Chinese, German, Japanese, Spanish, French, Italian and Russian.
• Date / Time: Set the default date and time for the instrument.
• Format: Formats the Micro SD card. Caution — all data will be deleted.
• Default Setting: Sets the instrument to factory default settings.
• Version: Displays current firmware version.
INSTRUCTIONS
11
M
2019-05-24 23:52:16
Auto Power O
Language
Date / Time
Format
Default Setting
Version
K 12170

12
INSTRUCTIONS
Copying image and video files to the PC or Laptop:
There are two methods of transferring files from the instrument to your PC or
laptop:
1 Remove the Micro SD card (instrument switched OFF), and using a suitable
card reader, transfer the files to the PC or laptop.
2 With the instrument switched ON, connect the USB lead (supplied) to the
instrument and the PC; a window will open on the PC screen displaying the files
on the Micro SD card fitted to the instrument.
Reset Button:
Refer to Figure 1: If the system software freezes or the instrument fails to
respond to button input, including the power button (A), then the system can be
reset and powered OFF by pressing the Reset Button (N).
Accessories included:
7 Mirror attachment (90°)
8 Hook attachment
9 Magnet attachment
Refer to Figure 7: the three attachments supplied are simply clipped over the end
of the camera probe.

SPECIFICATIONS
Screen 5-inch colour LCD
Screen resolution 1280 x 720
Probe resolution 1280 x 720
Saved image resolution 1920 x 1080
Video recording resolution 1280 x 720
Ports Micro USB (charging port) + Micro SD card port
LED torch 4 LED torch
Battery 3500mAh rechargeable Lithium battery
Operating temperature 0° - 45°C (32° - 113°F )
Charging duration Approximately 3 - 4 hours
Operating duration Approximately 2 - 4 hours
Certificates CE, FCC, RoHS
Languages English, Chinese, German, French, Spanish, Italian,
Russian, Japanese
Included
Instrument, camera probe, Micro USB charging
cable, storage case, instruction manual. Mirror,
hook & magnet attachments.
13

PRECAUTIONS
• Always refer to instructions before use.
• Do not remove or refit the Micro SD card if the instrument is switched ON.
Power OFF the instrument before removing or refitting the Micro SD card.
Failure to carry out this advice will damage the instrument.
• Main Settings Menu — Format: CAUTION: this will erase all data on the Micro
SD card! Any previously saved images or video recordings will be erased.
• Do not use excessive force when connecting probe to instrument — carefully
align the channel on the probe connector with the red spot on the instrument
socket and push fully home before tightening the locking ring (refer to Figure 3).
• Observe standard workshop safety procedures when using the instrument. Do
not let children or other unqualified personnel use the instrument.
• If operating the inspection camera on a vehicle, make sure the engine is
not running. If working under a vehicle, make sure that it is fully and safely
supported.
• When checking a vehicle’s engine internals, the engine or parts to be inspected
must be cold — the camera probe is not heat-resistant.
• Do not put the camera probe into anything or near anywhere that may contain
a live electrical charge.
• Keep the instrument dry, clean, free from oil, water and grease. Use a mild
detergent on a clean cloth to clean the outside of the instrument when
necessary. Keep in the supplied storage case when not in use.
• If the instrument is not to be used for a period of time, ensure that it is charged
at least once every three months to prevent damage to the Lithium battery
(excessive discharge).
• Do not carry the instrument by the probe.
• The instrument is not shock-resistant. Do not use it as a hammer or drop it.
• Protect the camera lens (on end of probe) from dirt and corrosive substances.
• Do not let the camera get wet or use in damp or wet conditions.
• The instrument is an industrial endoscope and is not intended for medical use.
14

15

Kamasa Tools is a registered trademark of KG Knutsson AB, 191 81 Sollentuna, Sweden
K 12170
www.kamasatools.com
Table of contents